Thirukarthigai, also known as Karthigai Deepam, is one of the oldest and most sacred Tamil festivals, celebrated in the Tamil month of Karthigai on the auspicious Pournami (Full Moon) day. It is a festival of light, devotion, and divine protection, where homes are adorned with rows of glowing oil lamps symbolizing prosperity and spiritual awakening.
Throughout the entire month of Karthigai, families light lamps at the entrance of their homes. On the day of Thirukarthigai/Karthigai Deepam, the whole house is beautifully illuminated, creating a divine and uplifting atmosphere.
One of the most iconic places associated with this festival is Thiruvannamalai, world-renowned for its spectacular Karthigai Deepam celebrations.
Rows of glowing oil lamps lit for the auspicious Thirukarthigai / Karthigai Deepam festival.
The Legend Behind Thirukarthigai / Karthigai Deepam
According to Hindu scriptures, Lord Brahma and Lord Vishnu once fell into an ego-driven argument, each claiming superiority. To humble them and restore harmony, Lord Shiva appeared as an infinite pillar of fire (Jyothi Sthambam) and challenged them:
“Whoever finds the beginning or end of this fire is the greatest.”
Brahma transformed into a swan (Annam) and flew upward.
Vishnu took the form of Varaha (boar) and dug deep into the earth.
Despite their divine powers, neither could find the beginning nor end of Shiva’s fiery form. Realizing their mistake, they surrendered their ego and prayed with devotion. Lord Shiva then revealed himself to them.
This divine appearance as a pillar of endless fire is commemorated as Thirukarthigai / Karthigai Deepam.
Thiruvannamalai Deepam – The Holy Fire Hill
Thiruvannamalai in Tamil Nadu is the spiritual epicenter of Karthigai Deepam. Lord Shiva is believed to have manifested as Arunachala Hill, a form of Agni (fire).
Tiruvannamalai and Arunachala both mean “holy fire hill.”
The Shiva Linga here is the Agni Linga, representing the fire element.
Devotees light tiny oil lamps at home which symbolize miniature Jyothi Lingas.
Every year, lakhs of devotees gather to witness the Mahadeepam, lit atop the sacred hill—a mesmerizing sight symbolizing divine brilliance and protection.
Spiritual Significance of Thirukarthigai
Karthigai Deepam represents
The victory of light over darkness
Removal of ignorance and ego
Infinite nature of God (Ananta Jyothi)
Protection, prosperity & spiritual growth
Homes are decorated with rows of lamps to invoke Lord Shiva’s Jyothi Swarupam—the form of divine light.
Festival Days
Day 1:Appa Karthigai
Day 2:Vadai Karthigai
Devotees prepare and offer traditional neivedhyam such as Pori, Adhirasam, Vella Seedai, Vetrilai-Pakku, and fruits.
In South Tamil Nadu and Kerala, sisters light the sacred Gajalakshmi Vilakku (Elephant Lamp) to pray for the well-being and longevity of their brothers.
Why Do We Light the Elephant Lamp (Gajalakshmi Vilakku) on Karthigai?
A touching traditional story explains this practice:
A king once had a single daughter who grew up with a beloved elephant. She treated the elephant as her own brother. After marriage, she deeply missed him. Every Karthigai Deepam, she lit an elephant-shaped lamp, prayed for her brother, and offered:
Tender coconut
Milagu Adai (elephant-leg sized)
Pori
Adhirasam
Vella Seedai
This devotional practice later became part of the traditional Karthigai rituals. Today, lighting the Gajalakshmi Vilakku symbolizes:
We’re continuing our look at how PowerShell can be used in offensive operations, but this time with survival in mind. When you’re operating in hostile territory, creativity and flexibility keep you alive. PowerShell is a powerful tool and how well it serves you depends on how cleverly you use it. The more tricks you know, the better you’ll be at adapting when things get tense. In today’s chapter we’re focusing on a core part of offensive work, which is surviving while you’re inside the target environment. These approaches have proven themselves in real operations. The longer you blend in and avoid attention, the more you can accomplish.
We’ll split this series into several parts. This first piece is about reconnaissance and learning the environment you’ve entered. If you map the perimeter and understand the scope of your target up front, you’ll be far better placed to move into exploitation without triggering traps defenders have set up. It takes patience. As OTW says, true compromises usually require time and persistence. Defenders often rely on predictable detection patterns, and that predictability is where many attackers get caught. Neglecting the basics is a common and costly mistake.
When the stakes are high, careless mistakes can ruin everything. You can lose access to a target full of valuable information and damage your reputation among other hackers. That’s why we made this guide to help you use PowerShell in ways that emphasize staying undetected and keeping access. Every move should be calculated. Risk is part of the job, but it should never be reckless. That’s also why getting comfortable with PowerShell matters, as it gives you the control and flexibility you need to act professionally.
If you read our earlier article PowerShell for Hackers: Basics, then some of the commands in Part 1 will look familiar. In this article we build on those fundamentals and show how to apply them with survival and stealth as the priority.
Basic Reconnaissance
Hostname
Once you have access to a host, perhaps after a compromise or phishing attack, the first step is to find out exactly which system you have landed on. That knowledge is the starting point for planning lateral movement and possible domain compromise:
PS > hostname
Sometimes the hostname is not very revealing, especially in networks that are poorly organized or where the domain setup is weak. On the other hand, when you break into a large company’s network, you’ll often see machines labeled with codes instead of plain names. That’s because IT staff need a way to keep track of thousands of systems without getting lost. Those codes aren’t random, they follow a logic. If you spend some time figuring out the pattern, you might uncover hints about how the company structures its network.
System Information
To go further, you can get detailed information about the machine itself. This includes whether it is domain-joined, its hardware resources, installed hotfixes, and other key attributes.
PS > systeminfo
This command is especially useful for discovering the domain name, identifying whether the machine is virtual, and assessing how powerful it is. A heavily provisioned machine is often important. Just as valuable is the operating system type. For instance, compromising a Windows server is a significant opportunity. Servers typically permit multiple RDP connections and are less likely to be personal workstations. This makes them more attractive for techniques such as LSASS and SAM harvesting. Servers also commonly host information that is valuable for reconnaissance, as well as shares that can be poisoned with malicious LNK files pointing back to your Responder.
Once poisoned, any user accessing those shares automatically leaks their NTLMv2 hashes to you, which you can capture and later crack using tools like Hashcat.
OS Version
If your shell is unstable or noninteractive and you cannot risk breaking it with systeminfo. Here is your alternative:
Different versions of Windows expose different opportunities for abuse, so knowing the precise version is always beneficial.
Patches and Hotfixes
Determining patch levels is important. It tells you which vulnerabilities might still be available for exploitation. End-user systems tend to be updated more regularly, but servers and domain controllers often lag behind. Frequently they lack antivirus protection, still run legacy operating systems like Windows Server 2012 R2, and hold valuable data. This makes them highly attractive targets.
Many administrators mistakenly believe isolating domain controllers from the internet is sufficient security. The consequence is often unpatched systems. We once compromised an organization in under 15 minutes with the NoPac exploit, starting from a low-privileged account, purely because their DC was outdated.
To review installed hotfixes:
PS > wmic qfe get Caption,Description,HotFixID,InstalledOn
Remember, even if a system is unpatched, modern antivirus tools may still detect exploitation attempts. Most maintain current signature databases.
Defenses
Before proceeding with exploitation or lateral movement, always understand the defensive posture of the host.
Firewall Rules
Firewall configurations can reveal why certain connections succeed or fail and may contain clues about the broader network. You can find this out through passive reconnaissance:
PS > netsh advfirewall show allprofiles
The output may seem overwhelming, but the more time you spend analyzing rules, the more valuable the information becomes. As you can see above, firewalls can generate logs that are later collected by SIEM tools, so be careful before you initiate any connection.
Antivirus
Antivirus software is common on most systems. Since our objective here is to survive using PowerShell only, we won’t discuss techniques for abusing AV products or bypassing AMSI, which are routinely detected by those defenses. That said, if you have sufficient privileges you can query installed security products directly to learn what’s present and how they’re configured. You might be lucky to find a server with no antivirus at all, but you should treat that as the exception rather than the rule
This method reliably identifies the product in use, not just Microsoft Defender. For more details, such as signature freshness and scan history run this:
PS > Get-MpComputerStatus
To maximize survivability, avoid using malware on these machines. Even if logging is not actively collected, you must treat survival mode as if every move is observed. The lack of endpoint protection does not let you do everything. We saw people install Gsocket on Linux boxes thinking it would secure access, but in reality network monitoring quickly spotted those sockets and defenders shut them down. Same applies to Windows.
Script Logging
Perhaps the most important check is determining whether script logging is enabled. This feature records every executed PowerShell command.
If EnableScriptBlockLogging is set to 1, all your activity is being stored in the PowerShell Operational log. Later we will show you strategies for operating under such conditions.
Users
Identifying who else is present on the system is another critical step.
The quser command is user-focused, showing logged-in users, idle times, and session details:
PS > quser
Meanwhile, qwinsta is session-focused, showing both active and inactive sessions. This is particularly useful when preparing to dump LSASS, as credentials from past sessions often remain in memory. It also shows the connection type whether console or RDP.
PS > qwinsta
Network Enumeration
Finding your way through a hostile network can be challenging. Sometimes you stay low and watch, sometimes you poke around to test the ground. Here are the essential commands to keep you alive.
ARP Cache
The ARP table records known hosts with which the machine has communicated. It is both a reconnaissance resource and an attack surface:
PS > arp -a
ARP entries can reveal subnets and active hosts. If you just landed on a host, this could be valuable.
Note: a common informal convention is that smaller organizations use the 192.168.x.x address space, mid-sized organizations use 172.16.x.x–172.31.x.x, and larger enterprises operate within 10.0.0.0/8. This is not a rule, but it is often true in practice.
Known Hosts
SSH is natively supported on modern Windows but less frequently used, since tools like PuTTY are more common. Still, it is worth checking for known hosts, as they might give you insights about the network segmentation and subnets:
PS > cat %USERPROFILE%\.ssh\known_hosts
Routes
The route table exposes which networks the host is aware of, including VLANs, VPNs, and static routes. This is invaluable for mapping internal topology and planning pivots:
PS > route print
Learning how to read the output can take some time, but it’s definitely worth it. We know many professional hackers that use this command as part of their recon toolbox.
Interfaces
Knowing the network interfaces installed on compromised machines helps you understand connectivity and plan next steps. Always record each host and its interfaces in your notes:
PS > ipconfig /all
Maintaining a record of interfaces across compromised hosts prevents redundant authentication attempts and gives a clearer mindmap of the environment.
Net Commands
The net family of commands remains highly useful, though they are often monitored. Later we will discuss bypass methods. For now, let’s review their reconnaissance value.
Password Policy
Knowing the password policy helps you see if brute force or spraying is possible. But keep in mind, these techniques are too noisy for survival mode:
PS > net accounts /domain
Groups and Memberships
Local groups, while rarely customized in domain environments, can still be useful:
PS > net localgroup
Domain groups are far more significant:
PS > net group /domain
Checking local Administrators can show privilege escalation opportunities:
PS > net localgroup Administrators
Investigating domain group memberships often reveals misconfigured privileges:
PS > net group <group_name> /domain
With sufficient rights, groups can be manipulated:
PS > net localgroup Administrators hacker /add
PS > net group "Marketing" user /add /domain
However, directly adding accounts to highly privileged groups like Domain Admins is reckless. These groups are closely monitored. Experienced hackers instead look for overlooked accounts, such as users with the “password not required” attribute or exposed credentials in LDAP fields.
Domain Computers and Controllers
Domain computer lists reveal scope, while controllers are critical to identify and study:
PS > net group "Domain Computers" /domain
PS > net group "Domain Controllers" /domain
Controllers in particular hold the keys to Active Directory. LDAP queries against them can return huge amounts of intelligence.
Domain Users
Enumerating users can give you useful account names. Administrators might include purpose-based prefixes such as “adm” or “svc” for service accounts, and descriptive fields sometimes contain role notes or credential hints.
PS > net user /domain
Shares
Shares are often overlooked by beginners, and that’s a common mistake. A share is basically a place where valuable items can be stored. At first glance it may look like a pile of junk full of unnecessary files and details. And that might be true, since these shares are usually filled with paperwork and bureaucratic documents. But among that clutter we often find useful IT data like passwords, VPN configurations, network maps and other items. Finding documents owned by assistants is just as important. Assistants usually manage things for their directors, so you’ll often find a lot of directors’ private information, passwords, emails, and similar items. Here is how you find local shares hosted on your computer:
PS > net share
Remote shares can also be listed:
PS > net view \\computer /ALL
Enumerating all domain shares creates a lot of noise, but it can be done if you don’t have a clear understanding of the hosts. We do not recommend doing this. If the host names already give you enough information about their purpose, for example, “DB” or “BACKUP”, then further enumeration isn’t necessary. Going deeper can get you caught, even on a small or poorly managed network. If you decide to do it, here is how you can enumerate all shares in the domain:
PS > net view /all /domain[:domainname]
Interesting shares can be mounted for detailed searching:
PS > net use x: \\computer\share
You can search through documents in a share using specific keywords:
That’s it for Part 1 of the Survival Series. We’re excited to keep this going, showing you different ways to work with systems even when you’re limited in what you can do. Sure, the commands you have are restricted, but survival sometimes means taking risks. If you play it too safe, you might get stuck and have no way forward. Time can work against you, and making bold moves at the right moment can pay off.
The goal of this series is to help you get comfortable with the Windows tools you have at your disposal for recon and pentesting. There will be times when you don’t have much, and you’ll need to make the most of what’s available.
In Part 2, we’ll go deeper looking at host inspections, DC queries, and the Active Directory modules that can give you even more insight. Having these native tools makes it easier to stay under the radar, even when things are going smoothly. As you get more experience, you’ll find that relying on built-in tools is often the simplest, most reliable way to get the job done.
Cipher Brief exclusive: Retired CW5 Joey Gagnard details how Ukrainian commanders are rewriting the rulebook on tech, tactics, and survival.
EXPERT Q&A —This week, after the Russian drone incursions into Poland, Ukrainian President Volodymyr Zelensky said Ukraine will train Polish representatives on the counter drone tactics that it has developed in the war.
Retired Chief Warrant Officer (CW5) Joey Gagnard, was on the ground in Ukraine this week and talks with Cipher Brief CEO and Publisher Suzanne Kelly about Ukraine’s ability to continue to innovate under fire. Our conversation has been lightly edited for length and clarity.
The Cipher Brief: You’ve been different parts of Ukraine this week and have spent some time along the front lines, talking with Ukrainian military leaders. What are they telling you about how this battle is progressing, how are things on the ground?
Gagnard: I'll tell you that the battle is progressing exactly in the way that it has previously. As the Ukrainians make advances in technology, the Russians are adapting. They're adapting their techniques and tactics for trying to impose costs against Ukrainians and vice versa. It still remains something of a rat race of technological development here in Ukraine. A lot of the commanders are super frustrated with the resource constraints that they have, but they're doing the best they can. And I can tell you that the main thing that many Ukrainians have told us is that their biggest benefit - their biggest strength - is that morale remains high, and based on our own observations during our travels, I'll tell you that that's exactly the case.
The Cipher Brief brings expert-level context to national and global security stories. It’s never been more important to understand what’s happening in the world. Upgrade your access to exclusive content by becoming a subscriber.
The Cipher Brief: The Cipher Brief was with you in Ukraine this past May, and there was a lot of focus on innovation and technology and getting information as quickly as possible from the battle space to the commanders and integrating that into the intelligence stream quickly. Have you seen anything during this visit that marks a significant change or a progression in that since May?
Gagnard: There are some significant advances that have been made here. Since we were here before, the Ukrainians have sped up the information flow from the front lines all the way back to the command centers where they're making decisions on use of some of their weapon systems.
Unfortunately, some of the constraints that they have logistically, some of the weapon systems that they're receiving - continue to run short. They're still very dependent on Western support for some of the weapons systems that they don't have, that they need in order to impose more costs against the Russians. But they're making tremendous advances in terms of how they use information and the speed at which information is going from the point of capture back to the command centers.
The commanders are very aware that the way they were trained to do business is not going to be sufficient, and they've made adaptations to align more with NATO standards that they've obviously become aware of through their relationships with the different people here in country. I'm super impressed with the adaptations that the Ukrainian commanders continue to make, breaking away from the training and the doctrine that they were steeped in whenever they were coming up as young officers and young soldiers. Those commanders that do have military experience, you can see that paying dividends for them.
The most effective units seem to be adopting some different tactics, looking critically at the battle spaces that they're operating in and at some of the technologies that they have at their disposal and they’re making maximum use of them. It's extraordinarily impressive to watch what they're doing with the resources they have.
The Cipher Brief Threat Conference is happening October 19-22 in Sea Island, GA. The world's leading minds on national security from both the public and private sectors will be there. Will you? Apply for a seat at the table today.
The Cipher Brief: We hear a lot about the challenges they're facing. What opportunities do you see for the military in the next several months?
Gagnard: The Ukrainians are doing a phenomenal amount with the limited technology that they have. For the Ukrainian theater, the technology that they've developed during this conflict is absolutely the best thing out there, the best thing anywhere in the world right now, for this theater.
A lot of American companies are making great technology that is focused on different priorities. I think there are some real opportunities to invest in some of the tactics and some of the things that the Ukrainians are doing to better understand that in the West, especially with some of the policies that are coming out of the Pentagon, we are trying to make our defense industry more agile and more nimble.
I think there's some real opportunities to foster those relationships with the Ukrainians and see how they're doing business, see how they've tied industry into their defense ecosystem. I think that's a major opportunity for us.
Similarly, some of the things that they've done with open source information presents real opportunities for our defense enterprise to take lessons from, frankly.
Aside from that, I'm still a huge advocate for having closer military integration, shoulder-to-shoulder with the Ukrainian Armed forces here in Ukraine. I think that that would make an outsized impact if we could somehow get combat soldiers involved with Ukrainian Armed Forces in any capacity. I think it would be welcomed and I think it would have an outsized impact on all of our strategic interests.
Are you Subscribed to The Cipher Brief’s Digital Channel on YouTube? There is no better place to get clear perspectives from deeply experienced national security experts.
Read more expert-driven national security insights, perspective and analysis in The Cipher Brief because National Security is Everyone’s Business.
Persistence on Windows systems has always been a cat-and-mouse game between attackers looking for reliable footholds and defenders trying to close down avenues of abuse. Windows itself provides a wide range of mechanisms that are legitimate parts of system functionality, yet each of them can be turned into a way of ensuring malicious code runs again and again after reboot or logon. Registry values, system processes, and initialization routines are all potential targets for persistence, and while most of them were never designed with security in mind, they remain available today. What makes them attractive is durability: once configured, they survive restarts and provide repeated execution opportunities without requiring the attacker to manually re-enter the environment.
The techniques described here are all examples of registry-based persistence, each with its own advantages, drawbacks, and detection footprints. Understanding them is crucial for both attackers– who rely on stability– and defenders– who need to spot tampering before it causes damage.
AppInit
AppInit is a legacy Windows feature that tells the OS loader to map one or more DLLs into any process that links user32.dll. That means when many GUI apps start, Windows will automatically load the DLLs listed in that registry value, giving whatever code is inside those DLLs a chance to run inside those processes. It’s a registry-based, machine-wide mechanism that survives reboot and affects both 32-bit and 64-bit GUI applications when configured.
The first command turns the AppInit behavior on for the 64-bit registry view. The second command writes the path to the DLL(s) that Windows should try to load into GUI processes (this value is a string of one or more DLL paths). The next two commands do the same thing for the 32-bit registry view on a 64-bit system. First it will enable the mechanism for 32-bit processes, and then set the 32-bit DLL path.
In plain terms: enable AppInit, tell Windows which DLLs to load, and do it for both 64-bit and 32-bit processes so GUI apps of both architectures will load the specified libraries.
Pros: survives reboots and causes the DLL to be loaded into many GUI processes automatically, giving broad coverage without per-user startup entries.
Cons: requires administrative rights to change HKLM, is noisy because the DLL will appear loaded in many processes (creating strong telemetry), and relies on an older, well-known mechanism that defenders often check.
If you’re a defender, focus on auditing the HKLM Windows keys (including the Wow6432Node path) and monitoring unusual DLL loads into system or common GUI processes.
LSASS
Modifying LSASS’s configuration to load an extra DLL is a way to get code executed inside a highly privileged, long-lived system process. LSASS is responsible for enforcing security policy and handling credentials. Because it loads configured authentication/notification packages at startup, adding an entry here causes the chosen module to be loaded into that process and remain active across reboots. That makes it powerful, but dangerous.
The registry command updates Notification Packages multi-string under the LSA key. In simple terms, this line tells Windows “when LSASS starts, also load the packages named rassfm, scecli, meter and force the write if the value already exists.”
Pros: survives reboots and places code inside a long-running, high-privilege process, making the persistence both durable and powerful.
Cons: requires administrative privileges to change the LSA registry, produces extremely high-risk telemetry and stability impact (misconfiguration or a buggy module can crash LSASS and destabilize or render the system unusable), and it is highly suspicious to defenders.
Putting code into LSASS buys durability and access to sensitive material, but it is one of the loudest and riskiest persistence techniques: it demands admin rights, creates strong signals for detection, and can crash the machine if done incorrectly.
Winlogon
Winlogon is the component that handles interactive user logons, and it calls the program(s) listed in the UserInit registry value after authentication completes. By appending an additional executable to that UserInit string you ensure your program is launched automatically every time someone signs in interactively.
This keeps the normal userinit.exe first and appends c:\meter.exe, so when Winlogon runs it will launch userinit.exe and then meter.exe as part of the logon sequence. Be aware that UserInit must include the legitimate userinit.exe path first. Removing or misordering it can break interactive logons and lock users out.
Pros: survives reboots and reliably executes at every interactive user logon, giving consistent persistence across sessions.
Cons: requires administrative privileges to change HKLM, offers no scheduling control (it only runs at logon), and is risky, since misconfiguring the UserInit value can prevent users from logging in and produces obvious forensic signals.
Microsoft Office
Many Office components read configuration from the current user’s registry hive, and attackers can abuse that by inserting a path or DLL name that Office will load or reference when the user runs the suite. This approach is per-user and survives reboots because the configuration is stored in HKCU, but it only triggers when the victim actually launches the Office component that reads that key. It’s useful when the target regularly uses Office and you want a simple, low-privilege persistence mechanism that doesn’t require installing a service or touching machine-wide autoruns.
Pros: survives reboots and works from a normal user account because it lives in HKCU, so no administrative rights are required.
Cons: there’s no scheduling control, it only triggers when the user launches the relevant Office component, so you cannot control an execution interval.
Summary
Windows persistence through registry modifications offers multiple paths, from legacy AppInit DLL injection to LSASS notification packages, Winlogon UserInit hijacking, and Office registry keys under HKCU. Each of these methods survives reboots, ensuring repeated code execution, but they vary in scope and stealth. AppInit and Office rely on application startup, while LSASS and Winlogon provide broader and more privileged coverage. All require different levels of access, with the most powerful options also being the loudest in telemetry and the riskiest to system stability. For defenders, the key takeaway is clear: monitoring critical registry keys under HKLM and HKCU, watching for unusual DLL or executable loads, and ensuring proper auditing are essential.
Anchovies marinated with spices and deep fried in oil to perfection. Crispy, crunchy and flavorful nethili meen fry recipe. It serves as a perfect appetizer and good for side dish too.
Nethili aka Anchovy fry is a very popular dish in South India, be it at home or at restaurant menu. It’s the favourite dish of many. It is prepared by marinating the fish with spices like chilli powder, turmeric powder, pepper powder, coriander powder, ginger garlic paste, rice flour, cornstarch and then deep fried until brown and crispy.
Nethili fish fry is a simple and super easy recipe prepared with handful ingredients which are easily available in our pantry. So now you can make this restaurant style anchovies fry at home and serve it as a starter, snack or side dish with meal.
Anchovies fish fry is an amazing fish fry which is loved by all age groups. It is ridiculously delicious and so crispy which will make you ask for more.
This restaurant style nethili fish fry is one of my personal favourite among the many fishes and sea food I love. Even my husband and my kiddo love this as much as I do so we can say its a family favourite dish.
Anchovy is also called nethili or chooda or netholi in different parts of India. Anchovies is a small fish variant. It has tiny bones which are soft. The center bone is not hard as in other big fishes. We need not remove the bones while eating because when fried the bones become crispy and can be eaten as such.
Nethili meen fry aka nethili varuval is a quick fish fry using anchovies. You can also called this nethili meen fry as nethili 65, it is just like the Tamil Nadu’s famous chicken 65 and prawn 65recipe. The fish tastes heavenly and spicy which a fish lover should definitely try. This fish fry is so addictive that you can’t stop with few. I am sure you going to love this one!
WHY YOU’LL LOVE THIS RECIPE ● Quick and easy ● Needs handful of pantry staples ● Crispy and crunchy ● Can be served as a starter, party appetizer, snacks or side dish with meal. ● Perfectly golden fried under 10 minutes. ● Flavorful ● Ideal for all age groups including kids.
Coming to the recipe, I have used fresh large size anchovies aka nethili fish. I have cleaned the fish well and removed the head and tail too. You can keep the head and tail intact if you wish. Fresh fish taste much better than frozen one. Along with spice masala powders I have used ginger garlic paste and combination of rice flour and cornstarch/cornflour for adding crispness and crunch to the fish. The fish is marinated with the spice mix and kept marinated for a minimum of 30 minutes. Then the fish is deep-fried. You can shallow fry as well.
You can use other small fish for this recipe. The dish tastes best when served with a side combo of steamed rice or as a starter with onion rings, lemon wedges, green chillies and fried curry leaves.
PRO TIPS ● Marinate the fish for longer duration. This will allow the spices to penetrate nicely into the fish and make it more flavorful. ● You can fry the fish ahead of time to avoid rushing at the end moment for any party or gatherings. Just fry the fish for few minutes. You dont need to make them brown and crisp. Just before serving heat oil and drop the previously fried fishes and fry them for a minute. You will get a crisp and crunchy fish. ● Fry the fish on medium flame, just increase the flame to high just few seconds before taking off. Be sure to stir constantly. This will brown evenly and make it crisp.
I made a simple recipe video of this amazing anchovies fry recipe for my readers which I have shared below. Please do watch and SUBSCRIBE to my channel if you haven’t yet. It will mean a lot to me and motivate me to come up with more videos for my readers. As always looking forward to your feedbacks!
NETHILI MEEN FRY VIDEO TUTORIAL
I hope you’ll try this authentic South Indian nethili meen fry recipe and do share your thoughts about the recipe with me here.
500 gms anchovies fish/nethili meen 1 tbsp ginger garlic paste 2 tsp coriander powder 2 tbsp kashmiri red chilly powder 1 tsp turmeric powder 1 tsp pepper powder 2 tbsp rice flour 2 tbsp corn flour Juice of half lemon Salt as per taste Oil for frying
For Garnishing Few curry leaves Green chillies Onion rings Lemon slices
Step by step pictorial instructions to make anchovies fry:
In a mixing bowl add in the ginger garlic paste, coriander powder, chilly powder, turmeric powder, pepper powder, rice flour, corn flour, lemon juice and salt. Mix well and make a thick paste. Please do not add water.
Marination Masala
Now add in the cleaned anchovies. Mix well together the masala paste and the fish. Marinated for atleast 30 minutes.
Fish Marination
Heat oil in a frying pan. When the oil is heated, reduce the flame to low and frist fry some curry leaves until crisp. Remove and keep aside.
Fried Curry Leaves
Now carefully drop the fish one by one onto the hot oil. Do not over crowd it.
Fry the fish on medium flame for about 3-4 minutes. Then flip over and fry for 2-3 minutes or until golden and crisp. It will take totally approximately 6-7 minutes. Flip over in between for evening cooking.
Remove them and continue the same process with the remaining fish.
Serve hot with fried curry leaves, green chillies, onion rings and squeeze of lemon juice.
NOTES: ● This recipe can be used in other small fish varieties also. ● You can also use egg white of one egg. ● Adjust the chilly powder according to your heat preference. ● You can skip the cornstarch and increase the rice flour a bit if it is not available. ● If you don’t have much time for marination, you can keep marinated for few minutes and fry it. But the longer marination the better in taste.
Well, if you make this nethili meen fry, please do leave a feedback in the comments box below or snap a photo and tag Akum Raj Jamir on Facebook and akumrajjamir on Instagram with hashtag #atmykitchen. I would love to see your creations.
Thank you so much for stopping by my blog. I hope you liked the recipe. Your valuable feedbacks are always welcome, I love hearing from you guys and always do my best to respond to each and every one of you.
Happy Cooking! Love Akum
Disclosure: At My Kitchen is an Amazon Affiliate, which simply means that if you make a purchase through these links, I will earn a very small commission at no additional cost to you!
Please click on the link if you wish to purchase these products from Amazon.
Easy egg roast recipe is hard-boiled eggs fried and then cooked in an onion tomato based masala. This egg roast is also called muttai varuval in Tamil and nadan muttai roast in Kerala. It goes so well with flatbreads like roti, chapati, parota, dosa, appams, string hoppers and as a side to regular rice dal or lentils.
Recipe for easy egg roast, egg thokku recipe, muttai thokku recipe, muttai varuval. Curried eggs in an onion tomato masala. Recipe with step by step pictures.
This easy egg roast is a close cousin of the Kerala nadan muttai roast. It’s best described as boiled eggs in roasted onion and tomato masala. It’s an easy recipe that can be put together in under thirty minutes.
The base sauce or “masala” as called in India is made with simple ingredients and indian spices, found in most indian pantry.This masala can be used as a base masala for other non vegetarian and vegetarian options.
Muttai Varuval is my easy everyday recipe. It is nothing but boiled eggs golden fried and cooked in a thick and spicy onion tomato masala. Perfect side dish for the busy weekdays. I believe every household has their own version of egg roast or muttai varuval. Just like for the Kerala style egg roast we use coconut oil for making the nadan muttai roast. The heat for the egg roast is either from red chilli powder, green chillies or black pepper powder or a combination of these.
For making egg roast or egg curry we like to fry the boiled eggs and then add it to the curry or the masala. But some directly add the boiled eggs and it’s totally up to your preference. Frying the eggs makes the skin slightly blistered and golden in colour which makes the dish looks so beautiful and appealing.
WHY THIS RECIPE WORKS
* Ready in under 30 minutes. * Required only pantry Ingredients. This is a perfect recipe for days when you have only basics available. * Easy and straight forward recipe. Requires no roasting and grinding. Turns out so delicious and tasty with spice masala powders. * An easy way to add more protein to the Indian diet. * The same masala base can be used with vegetables and non-vegetarian food too. * It goes with almost everything – roti, rice , chapati, parota, dosas, appams etc.
INGREDIENTS TO MAKE EASY EGG ROAST
Hard boiled eggs Oil Onion Tomato Garlic Ginger Green chillies Curry leaves Coriander leaves Red chilli powder Coriander powder Garam masala powder Cumin powder Black pepper powder Turmeric powder Salt as per taste Water as required
HOW TO MAKE EASY EGG ROAST
This section shows how to make easy egg roast with step-by-step photos and details about the technique with video tutorial. For full ingredients measurements, see the recipe card below.
I made a simple video of this easy egg roast recipe for my readers which I have shared below. Please do watch to know how I made this delicious recipe. If you liked the video please do SUBSCRIBE to my channel if you haven’t yet. Also like, share and comment on it! It will mean a lot to me and really motivate me to come up and shoot more videos for my readers. As always I’m looking forward to your feedback!
EASY EGG ROAST VIDEO TUTORIAL
STEP BY STEP PICTORIAL RECIPE TO MAKE EASY EGG ROAST
In a pot add some water and salt and boil 3 to 4 eggs. Once the eggs are hard boiled allow them to cool down. Peel the eggs and cut them into halves. Keep aside.
In a pan heat the oil. Once the oil is heated, simmer the flame and add in the eggs.
Fry the eggs on both the sides until golden brown. Remove and keep aside.
In the same oil add in the ginger and garlic. Saute them for a minute.
Add in the curry leaves, onion and green chillies. Saute until the onions are cooked and soft
Add in the tomatoes and cook until it turns soft and mushy.
Add in the salt along with the masala – red chilli powder, garam masala powder, coriander powder, cumin powder, black pepper powder, turmeric powder.
Mix well and cook for a minute. Now add in about ¼ cup of water and cook the masalas for about 2 minutes or until the water is dried up and the oil separates. ( Cook over low to medium flame).
Add in the fried eggs in single layers. Take some masalas and cover up the top layer of the eggs. Put on the lid and let it cook for about 2 minutes in low flame.
Flip over the eggs and again cook for about 2 minutes in low flame.
Flip over again and turn off the flame. Sprinkle the coriander leaves and your easy egg roast is ready to be served. Enjoy!
RECIPE NOTES
* Here the eggs are cut halves and made. You can keep the eggs whole. Suggest to put some cuts so that the masala penetrates inside. * We used refined sunflower oil. You can use mustard oil or coconut oil for making the egg roast. * You can always adjust the chilli and red chilli powder as per your heat preference. * The masalas can be adjusted as per your taste and availability.
Easy egg roast recipe is hard-boiled eggs fried and then cook in an onion tomato based masala. This egg roast is also called muttai varuval in Tamil and nadan muttai roast in Kerala. It goes so well with flatbreads like roti, chapati, parota, dosa, appams, string hoppers and as a side to regular rice dal or lentils.
½ Teaspoon Black pepper powder (kali mirch powder)
½Teaspoon Turmeric powder (haldi powder)
1-2Teaspoon Saltor as per your taste
¼CupWater
Instructions
In a pot add some water and salt and boil 3 to 4 eggs. Once the eggs are hard boiled allow to cool down. Peel the eggs and cut them into halves. Keep aside.
In a pan heat the oil. Once the oil is heated, simmer the flame and add in the eggs.
Fry the eggs on both the sides until golden brown. Remove and keep aside.
In the same oil add in the ginger and garlic. Saute them for a minute.
Add in the curry leaves, onion and green chillies. Saute until the onions are cooked and soft
Add in the tomatoes and cook until it turns soft and mushy.
Add in the salt along with the masala - red chilli powder, garam masala powder, coriander powder, cumin powder, black pepper powder, turmeric powder.
Mix well and cook for a minute. Now add in about ¼ cup of water and cook the masalas for about 2 minutes or until the water is dried up and the oil separate. ( Cook over low to medium flame).
Add in the fried eggs in single layers. Take some masalas and cover up the top layer of the eggs. Put on the lid and let it cook about 2 minutes in low flame.
Flip over the eggs and again cook for about 2 minutes in low flame.
Flip over again and turn off the flame. Sprinkle the coriander leaves and your easy egg roast is ready to be served. Enjoy!
Video
Notes
Here the eggs are cut halves and made. You can keep the eggs whole. Suggest to put some cuts so that the masala penetrates inside.
We used refined sunflower oil. You can use mustard oil or coconut oil for making the egg roast.
You can always adjust the chilli and red chilli powder as per your heat preference.
The masalas can be adjusted as per your taste and availability.
SERVING SUGGESTION
SERVING SUGGESTIONS
An egg roast is a perfect side dish with simple dal and rice. This simple egg dish instantly lifts the humble meal to a feast!
We also love pairing it with roti, chapati, parota, butter naan, appams, idiyappam (string hopper), or dosas! It’s one of those dishes that fits breakfast, lunch and dinner perfectly!
It’s also a perfect appetizer or side for your favourite drinks.
Well, if you make this easy egg roast recipe I’ll be glad if you take out some time and rate the recipe and leave a feedback in the comments box below. You can also snap a photo and tag Akum Raj Jamir on Facebook and akumrajjamir on Instagram with hashtag #atmykitchen. I would love to see your creations.
Thank you so much for stopping by my blog. I hope you liked the recipe. Your valuable feedbacks are always welcome, I love hearing from you guys and always do my best to respond to each and every one of you.
Badam Halwa Recipe with Step by Step Pictures. Delicious and melt in mouth badam | almond halwa which taste absolutely mouthwatering. Badam halwa also known as almond halwa is made healthier with jaggery and lots of ghee to achieve the melt in mouth texture. Badam Halwa Its monday, I am gonna start this week by...
Easy egg roast recipe is hard-boiled eggs fried and then cooked in an onion tomato based masala. This egg roast is also called muttai varuval in Tamil and nadan muttai roast in Kerala. It goes so well with flatbreads like roti, chapati, parota, dosa, appams, string hoppers and as a side to regular rice dal or lentils.
Recipe for easy egg roast, egg thokku recipe, muttai thokku recipe, muttai varuval. Curried eggs in an onion tomato masala. Recipe with step by step pictures.
This easy egg roast is a close cousin of the Kerala nadan muttai roast. It’s best described as boiled eggs in roasted onion and tomato masala. It’s an easy recipe that can be put together in under thirty minutes.
The base sauce or “masala” as called in India is made with simple ingredients and indian spices, found in most indian pantry.This masala can be used as a base masala for other non vegetarian and vegetarian options.
Muttai Varuval is my easy everyday recipe. It is nothing but boiled eggs golden fried and cooked in a thick and spicy onion tomato masala. Perfect side dish for the busy weekdays. I believe every household has their own version of egg roast or muttai varuval. Just like for the Kerala style egg roast we use coconut oil for making the nadan muttai roast. The heat for the egg roast is either from red chilli powder, green chillies or black pepper powder or a combination of these.
For making egg roast or egg curry we like to fry the boiled eggs and then add it to the curry or the masala. But some directly add the boiled eggs and it’s totally up to your preference. Frying the eggs makes the skin slightly blistered and golden in colour which makes the dish looks so beautiful and appealing.
WHY THIS RECIPE WORKS
* Ready in under 30 minutes. * Required only pantry Ingredients. This is a perfect recipe for days when you have only basics available. * Easy and straight forward recipe. Requires no roasting and grinding. Turns out so delicious and tasty with spice masala powders. * An easy way to add more protein to the Indian diet. * The same masala base can be used with vegetables and non-vegetarian food too. * It goes with almost everything – roti, rice , chapati, parota, dosas, appams etc.
INGREDIENTS TO MAKE EASY EGG ROAST
Hard boiled eggs Oil Onion Tomato Garlic Ginger Green chillies Curry leaves Coriander leaves Red chilli powder Coriander powder Garam masala powder Cumin powder Black pepper powder Turmeric powder Salt as per taste Water as required
HOW TO MAKE EASY EGG ROAST
This section shows how to make easy egg roast with step-by-step photos and details about the technique with video tutorial. For full ingredients measurements, see the recipe card below.
I made a simple video of this easy egg roast recipe for my readers which I have shared below. Please do watch to know how I made this delicious recipe. If you liked the video please do SUBSCRIBE to my channel if you haven’t yet. Also like, share and comment on it! It will mean a lot to me and really motivate me to come up and shoot more videos for my readers. As always I’m looking forward to your feedback!
EASY EGG ROAST VIDEO TUTORIAL
STEP BY STEP PICTORIAL RECIPE TO MAKE EASY EGG ROAST
In a pot add some water and salt and boil 3 to 4 eggs. Once the eggs are hard boiled allow them to cool down. Peel the eggs and cut them into halves. Keep aside.
In a pan heat the oil. Once the oil is heated, simmer the flame and add in the eggs.
Fry the eggs on both the sides until golden brown. Remove and keep aside.
In the same oil add in the ginger and garlic. Saute them for a minute.
Add in the curry leaves, onion and green chillies. Saute until the onions are cooked and soft
Add in the tomatoes and cook until it turns soft and mushy.
Add in the salt along with the masala – red chilli powder, garam masala powder, coriander powder, cumin powder, black pepper powder, turmeric powder.
Mix well and cook for a minute. Now add in about ¼ cup of water and cook the masalas for about 2 minutes or until the water is dried up and the oil separates. ( Cook over low to medium flame).
Add in the fried eggs in single layers. Take some masalas and cover up the top layer of the eggs. Put on the lid and let it cook for about 2 minutes in low flame.
Flip over the eggs and again cook for about 2 minutes in low flame.
Flip over again and turn off the flame. Sprinkle the coriander leaves and your easy egg roast is ready to be served. Enjoy!
RECIPE NOTES
* Here the eggs are cut halves and made. You can keep the eggs whole. Suggest to put some cuts so that the masala penetrates inside. * We used refined sunflower oil. You can use mustard oil or coconut oil for making the egg roast. * You can always adjust the chilli and red chilli powder as per your heat preference. * The masalas can be adjusted as per your taste and availability.
Easy egg roast recipe is hard-boiled eggs fried and then cook in an onion tomato based masala. This egg roast is also called muttai varuval in Tamil and nadan muttai roast in Kerala. It goes so well with flatbreads like roti, chapati, parota, dosa, appams, string hoppers and as a side to regular rice dal or lentils.
½ Teaspoon Black pepper powder (kali mirch powder)
½Teaspoon Turmeric powder (haldi powder)
1-2Teaspoon Saltor as per your taste
¼CupWater
Instructions
In a pot add some water and salt and boil 3 to 4 eggs. Once the eggs are hard boiled allow to cool down. Peel the eggs and cut them into halves. Keep aside.
In a pan heat the oil. Once the oil is heated, simmer the flame and add in the eggs.
Fry the eggs on both the sides until golden brown. Remove and keep aside.
In the same oil add in the ginger and garlic. Saute them for a minute.
Add in the curry leaves, onion and green chillies. Saute until the onions are cooked and soft
Add in the tomatoes and cook until it turns soft and mushy.
Add in the salt along with the masala - red chilli powder, garam masala powder, coriander powder, cumin powder, black pepper powder, turmeric powder.
Mix well and cook for a minute. Now add in about ¼ cup of water and cook the masalas for about 2 minutes or until the water is dried up and the oil separate. ( Cook over low to medium flame).
Add in the fried eggs in single layers. Take some masalas and cover up the top layer of the eggs. Put on the lid and let it cook about 2 minutes in low flame.
Flip over the eggs and again cook for about 2 minutes in low flame.
Flip over again and turn off the flame. Sprinkle the coriander leaves and your easy egg roast is ready to be served. Enjoy!
Video
Notes
Here the eggs are cut halves and made. You can keep the eggs whole. Suggest to put some cuts so that the masala penetrates inside.
We used refined sunflower oil. You can use mustard oil or coconut oil for making the egg roast.
You can always adjust the chilli and red chilli powder as per your heat preference.
The masalas can be adjusted as per your taste and availability.
SERVING SUGGESTION
SERVING SUGGESTIONS
An egg roast is a perfect side dish with simple dal and rice. This simple egg dish instantly lifts the humble meal to a feast!
We also love pairing it with roti, chapati, parota, butter naan, appams, idiyappam (string hopper), or dosas! It’s one of those dishes that fits breakfast, lunch and dinner perfectly!
It’s also a perfect appetizer or side for your favourite drinks.
Well, if you make this easy egg roast recipe I’ll be glad if you take out some time and rate the recipe and leave a feedback in the comments box below. You can also snap a photo and tag Akum Raj Jamir on Facebook and akumrajjamir on Instagram with hashtag #atmykitchen. I would love to see your creations.
Thank you so much for stopping by my blog. I hope you liked the recipe. Your valuable feedbacks are always welcome, I love hearing from you guys and always do my best to respond to each and every one of you.
Coconut ladoos are a delightful and easy-to-make Indian sweet that is perfect for festive occasions or as a quick treat to satisfy your sweet tooth. The recipe requires minimal ingredients, primarily desiccated coconut and sweetened condensed milk, making it accessible and simple to prepare even for novice cooks. The addition of cardamom powder infuses a warm, aromatic flavour that beautifully complements the sweetness of the condensed milk and the nutty taste of the coconut.
The process of making coconut ladoos is straightforward, involving a few basic steps. Initially, the coconut is lightly roasted in ghee to enhance its flavour and aroma. Then, it is mixed with condensed milk and flavoured with cardamom powder. This mixture is cooked until it thickens and begins to leave the sides of the pan. After a short cooling period, the mixture is shaped into small balls and rolled in additional desiccated coconut, giving them a beautiful finish and a pleasant texture.
These coconut ladoos are delicious and visually appealing, making them a great addition to any dessert table. They are perfect for sharing with family and friends during celebrations or as a homemade gift. The ease of preparation and the delightful taste make them a favourite among both kids and adults. With the provided tips, you can easily perfect the recipe and enjoy these scrumptious coconut ladoos anytime.
Enjoy the video of coconut ladoo. Subscribe for more videos.
Now, let us see how to prepare this recipe.
Coconut Ladoo Recipe with Condensed Milk and Desiccated Coconut
In a heavy-bottomed pan, heat the ghee on medium heat.
Add the desiccated coconut and roast it lightly for about 2-3 minutes. Stir continuously to ensure it doesn't burn. The coconut should just start to turn golden and release its aroma.
Lower the heat and add the sweetened condensed milk to the roasted coconut. Mix well until the coconut and condensed milk are thoroughly combined.
Add the cardamom powder to the mixture. Continue to cook the mixture on low heat, stirring constantly, until it thickens and starts to leave the sides of the pan. This should take about 5-7 minutes.
Remove the mixture from heat and let it cool slightly. It should be warm but cool enough to handle with your hands.
Grease your palms with a little ghee to prevent sticking.
Take small portions of the mixture and roll them into smooth, round balls.
Roll the shaped ladoos in the extra desiccated coconut to coat them evenly.
Allow the coconut ladoos to cool completely. They will firm up as they cool. Store them in an airtight container. They can be kept at room temperature for a couple of days or refrigerated for longer shelf life.
Recipe Notes
Ensure you stir the mixture continuously while cooking to prevent it from sticking to the pan and burning.
If the mixture feels too dry, add a little more condensed milk. If it’s too sticky, incorporate some extra desiccated coconut.
Grease your hands with ghee while shaping the ladoos to make the process smoother and prevent sticking.
Let the mixture cool enough to handle but not completely, as it might harden and become difficult to shape.
For a longer shelf life, store the ladoos in the refrigerator, especially in warm climates.
Delicious Coconut ladoo using Condensed Milk is ready to serve.
If you found this post useful, I would love it if you pin it or share it with your Facebook fans, Twitter followers, or Google+ circles today. All it takes is a simple click on the “pin it”, “like,” “share,” “Tweet,” or Google+ buttons below the post. It will keep me motivated. Thank you!
Karthigai Deepam is a highly celebrated festival in Southern India, particularly in Tamil Nadu. It is a time for people to honour Lord Shiva as a divine flame during the Tamil month of Karthigai (November-December). This festival is also known as the Festival of Lights and is a grand affair.
As part of the celebration, people illuminate their homes with lamps to symbolize the triumph of light over darkness and ignorance. It is a beautiful sight that fills everyone’s hearts with hope and inspiration. The day is marked with prayers, rituals, and the lighting of a massive lamp on the hill of Arunachala in Thiruvannamalai, an awe-inspiring sight.
Sweet Karthigai Adai is a delectable treat that adds to the joy of the festival. It is prepared with great care and devotion, using rice, lentils, jaggery, coconut, and cardamom. These adais are a cherished offering during Karthigai Deepam, bringing sweetness and symbolism to the celebration. It is a testament to the love and unity among families and communities.
Enjoy the video of Karthiga Vella Adai. Subscribe for more videos.
Now, let us see how to prepare this recipe.
Karthigai Vella Adai Recipe - Karthigai Deepam Special
Add rice, toor dal, and chana dal in a bowl. Add enough water and wash it thoroughly 2 to 3 times. Add fresh water and soak rice and dal for 2 to 3 hours.
Once soaked, transfer rice and dal to a mixer jar. Add little water and grind it to a smooth paste.
To the batter, add salt, jaggery, cardamom powder and grind to a smooth batter.
Transfer the batter to a bowl. Add coconut bits and mix all thoroughly. Adjust the batter consistency if required.
Adai is usually made thick. If you want thinner adai, add the water and make it like crispy dosa.
Heat a pan, pour a ladle of batter, and spread it in a circular motion, as shown. Drizzle a spoon of ghee. Let it cook.
Now flip to the other side and drizzle another spoon of ghee. Once cooked again, flip to the first side and cook for a few more minutes till it gets crispier. Now transfer to a plate. Vella adai is ready.
Recipe Notes
Soak lentils and rice for at least 2-3 hours.
Grind the batter to a smooth paste, and keep it slightly thicker than the dosa batter consistency.
Adai can be made immediately after grinding. You need not ferment the batter.
If you want to use the remaining batter, refrigerate it for later use. (approx two days)
Delicious Karthigai Vella Adai is ready to serve God as Prashad.
If you found this post useful, I would really love it if you pin it or share it with your Facebook fans, Twitter followers, or Google+ circles today. All it takes is a simple click on the “pin it”, “like,” “share,” “Tweet,” or Google+ buttons below the post. It will keep me motivated. Thank you!
Preparing and sharing traditional sweets and savouries is an integral part of Diwali preparations. Families make an array of delicious treats, such as ladoos, jalebis, and murukku, to offer to guests and exchange with loved ones.
With Diwali fast approaching, many of you have likely begun preparing sweets and snacks. This is the perfect time to share my healthy version of the garlic murukku recipe using Kodo millet flour with you all, which can be prepared in 15 minutes.
Garlic Murukku is a popular South Indian snack, particularly during festivals like Diwali. Murukku is a crunchy, deep-fried snack made from rice flour and various seasonings. Garlic Murukku gets its distinctive flavour from the addition of garlic.
To make the perfect murukku, the following steps should be followed.
Use any good brand of Kodo millet flour.
Grind enough garlic by adding a little water into a smooth paste. Use only one or one and a half tsp of garlic paste into the mixture.
Always cook murukku on the medium-low flame to cook evenly.
Instead of sesame seeds, you can use carom seeds or cumin seeds.
Gently drop the murukku into the oil, or else the oil may spill. Use enough oil to deep fry.
If you feel the dough is getting dry and not able to press, sprinkle a little water and mix it thoroughly.
Always keep the dough closed with a cloth or lid to prevent it from getting dry.
If making in large quantities, always make it in batches.
Enjoy the video of Kodo millet murukku. Subscribe for more videos.
Grind enough garlic (10 pods) by adding a little water into a smooth paste. Use only one or one and a half tsp of garlic paste into the mixture.
On a wide bowl, place a sieve, add kodo millet flour, and Bengal gram flour. Sieve both thoroughly and discard the residue.
Now to the bowl, add sesame seeds, required salt, hing, chili powder, garlic paste, a tbsp of hot oil, mix with a spatula, and crumble the mixture thoroughly.
Then add water little by little. Bring it to a chapati dough consistency. It should neither be too stiff nor too soft. Murukku press (3 dots) shown here in the video is used for making murukku.
Take a small portion of dough and make it into the ball. Now grease the murukku press with oil and fill 3/4 of the press with dough. Keep 2-3 butter paper ready by applying oil on it.
Now press the murukku batter on butter paper in a circular motion as shown. 3 to 4 circles are enough. Heat oil in a heavy bottom Kadai. First, check by dropping a little dough in oil. If the oil is hot enough the dough would rise immediately or else it will go down. Now gently drop the murukku into the oil. Deep fry 2 to 3 murukkus at a time. Do not overcrowd.
Let it cook on low flame till it turns crispy. Then gently turn to the other side and let it cook till bubbling stops.
Now remove and place it on a kitchen towel to remove excess oil. Repeat the process with the remaining murukku batter. Let it cool and store it in an airtight container.
Recipe Notes
Use any good brand of Kodo millet flour.
Grind enough garlic by adding a little water into a smooth paste. Use only one or one and a half tsp of garlic paste into the mixture.
Always cook murukku on the medium-low flame to cook evenly.
Instead of sesame seeds, you can use carom seeds or cumin seeds.
Gently drop the murukku into the oil, or else the oil may spill. Use enough oil to deep fry.
If you feel the dough is getting dry and unable to press, sprinkle a little water and mix it thoroughly.
Always keep the dough closed with a cloth or lid to prevent it from getting dry.
If making in large quantities, always make it in batches.
Crispy and crunchy garlic Kodo millet murukku is ready to relish.
If you found this post useful, I would really love it if you pin it or share it with your Facebook fans, Twitter followers, or Google+ circles today. All it takes is a simple click on the “pin it”, “like,” “share,” “Tweet,” or Google+ buttons below the post. It will keep me motivated. Thank you!
Karupatti Mysore Pak is a delicious and unique variation of the traditional Indian sweet Mysore Pak. What sets it apart is the use of karupatti, which is a type of palm jaggery made from the sap of palm trees. This rich, dark jaggery imparts a distinct flavour and aroma to the Mysore Pak, making it a favourite among those who appreciate traditional South Indian sweets.
There are so many varieties of Mysore Pak nowadays available in shops, and Karupatti Mysore Pak is one of them. So this time, I wanted to try this recipe for the upcoming Diwali. I am glad that I gave it a try, and this turned out to be super yummy. I have already posted regular soft Mysore Pak. Using the same recipe, I have tweaked this recipe, and it turned out like we get in the Sri Krishna Sweets shop.
Follow the below steps to get the perfect soft carrot Mysore Pak:
Keep flame to medium-low for the entire process.
Do not leave it unattended.
Always use fresh Bengal gram powder.
Fry Bengal gram until you get a nice aroma, do not burn. If not fried properly, then you will get the raw smell in the final product.
Make sure you get one string consistency while making jaggery syrup.
The last stage is also important. When the mixture starts leaving the Kadai, immediately switch off the flame and transfer it to a greased plate; otherwise, it will become hard.
If you use the given ingredients with a specified quantity and follow the steps as such, you will get an awesome mouth-melting dessert. Now let us see how to prepare this recipe.
Enjoy the video of Karupatti mysore pak. Subscribe for more vidoes.
Karupatti Mysore Pak Recipe | Palm Jaggery Mysore Pak - Diwali Sweet
Grease a plate with ghee and set aside. To get a proper square I have used a cake ring.
Now heat a heavy bottom non-stick Kadai, add Bengal gram, and dry roast it on low flame for about 5-6 minutes until a nice aroma comes. Don't let the color change.
Now transfer the Bengal gram to another bowl and allow it to cool. If you leave it in Kadai, it will turn brown due to residual heat in it. In a bowl add roasted Bengal gram, 1/2 cup ghee, mix it without any lumps, and set aside.
In a sauce pan, add water and palm jaggery. Cook until the palm jaggery is melted completely. Remove it from the stove.
Now heat a pan and filter and add the prepared jaggery water. Boil the jaggery until you get the one string consistency. If you take the jaggery syrup between the thumb and the index finger a single string will form, that's the correct consistency.
Now add the Bengal gram oil mixture to the jaggery syrup and mix well.
Now add the remaining 1/2 cup ghee in intervals (2 tbsp at a time) to avoid drying and mix well. Keep stirring continuously until all the ghee is used.
At this last stage, you can see foam forming, and now if you scoop, it will not stick to Kadai. The mixture will not be sticky anymore. Switch off the flame and pour the mixture into the greased plate.
Just allow it to cool for a while and once it starts to get set, cut it into the desired shape.
Recipe Notes
Keep flame to medium-low for the entire process.
Please do not leave it unattended.
Always use fresh Bengal gram powder.
Fry Bengal gram until you get a nice aroma; do not burn. If not fried properly, then you will get the raw smell in the final product.
Make sure you get one string consistency while making jaggery syrup.
The last stage is also important. When the mixture starts leaving the Kadai, immediately switch off the flame and transfer it to a greased plate; otherwise, it will become hard.
Soft, melt-in-the-mouth carrot Mysore Pak is ready to relish.
If you found this post useful, I would really love it if you pin it or share it with your Facebook fans, Twitter followers, or Google+ circles today. All it takes is a simple click on the “pin it”, “like,” “share,” “Tweet,” or Google+ buttons below the post. It will keep me motivated. Thank you!
In the Chettinad region of Tamil Nadu, a traditional sweet dish called kummayam is made during the month of Aadi. This dish resembles halwa and is made by roasting urad dal, moong dal, and raw rice. To add sweetness, jaggery or palm jaggery is used, and it is typically flavoured with ghee.
In the Tamil solar calendar, Aadi is the fifth month, which holds immense significance in Tamil culture. This is because it marks the onset of the monsoon season and the annual freshes of the rivers. The 18th day of the month is celebrated as the Aadi festival, a time to honour the importance of water, the source of all life.
During the month of Aadi, people make kummayam for various reasons:
It’s a way to celebrate the abundance of the monsoon season.
Kummayam is known to have health benefits, especially for women. The ingredients used in kummayam are said to strengthen the bones and uterus and are also a good source of protein and iron.
Kummayam is a traditional sweet often served during special occasions like weddings and festivals.
Here are some additional facts about kummayam:
The name kummayam comes from the Tamil word “Kumm,” which means “to grind.”
Kummayam is traditionally made in a clay pot over a wood fire.
The texture of kummayam should be smooth and soft and have a slight chewiness.
Kummayam can be stored in an airtight container for up to one week.
If you are looking for a delicious and nutritious sweet, I encourage you to try kummayam. It is a traditional Chettinad dish that is sure to please your tastebuds. Now let us see how to prepare this recipe.
Enjoy the video Kummayam. Subscribe for more videos.
Aadi Kummayam Recipe | Chettinadu Special Aadi Kummayam
Kummayam - a delicious and nutritious sweet from the region of Chettinad.
Dry roast whole urad dal, moong dal, and rice separately until it turns aromatic and golden brown. Place it on a plate and let it cool completely.
Transfer the dals and rice to a blender or food processor and grind into a fine powder. Sieve the powder to remove any large pieces.
In a small saucepan, heat the jaggery and 3/4 cup of water over medium heat. (Water ratio is 1:3). Stir until the jaggery melts and the mixture comes to a boil. Remove from the heat and let cool slightly.
Heat a tbsp of the ghee in a large skillet or wok over medium heat. Add the kummayam powder and cook, stirring constantly, for about 5 minutes, or until fragrant.
Add the jaggery mixture and cook, stirring constantly, until the kummayam thickens, about 10 minutes more.
Finally add the remaining tbsp of ghee and stir for another minute. Remove from the heat and let cool completely. Kummayam is ready.
Recipe Notes
Use good quality whole urad dal, moong dal, and rice.
Dry roast whole urad dal, moong dal, and rice separately until it turns aromatic and golden brown.
Use either jaggery or palm jaggery.
You can enjoy this nutritious treat, either warm or cold.
Delicious and healthy Aadi Kummayam is ready to serve God as Prashad.
If you found this post helpful, please consider sharing it with your friends and followers on Facebook, Twitter, or Google+. You can do so by clicking the buttons below the post. Your support would be greatly appreciated and will keep me motivated. Thank you!
Call it by any name it has a lot of nutritional value and is a powerhouse of nutrients. Snake gourd belongs to the summer squash family, mostly a summer produce ,it is available all round the year in India.
Rich in dietary fiber , vitamins A and C ,snake gourds help in digestion ,prevent bloating and constipation . Helps in detoxification of the body because of its diuretic properties. Due to water content present in the snake gourd it helps maintain body's hydration.
Podalangai Thayir pachadi is a new addition to my kitchen and hence it is making it to the blog .
Amma would make it frequently during summer, but over the years I had totally forgotten about this recipe . As a flash,this recipe occurred to me this morning when I was contemplating what to make with fresh and tender snake gourd that I had just bought. The snake gourds have to be tender. Overly ripe ones taste bitter and become hard and chewy . So while buying, make sure the snake gourd vine is easy to twist and tender to feel. If you find it hard or it easily cracks ,then don't buy that .
Podalangai thayir pachadi is very easy to make and gets done in no time . A tasty paste is made using fresh coconut, ginger,green chillies and curry leaves which is added to thick whipped yogurt and boiled snake gourd is mixed along with this followed by a tempering of mustard, dry red chillies and asafoetida.
Podalangai thayir pachadi is also made during Amavasya, pithrupaksha and Shraadh cooking in a typical Tamil Brahmin household . Vishu and Onam Sadhyas also feature padavalanga kichadi as one of the Sadhya menu items.
Officially, though it is still winter/spring in India , we are already feeling the warmth in my part of the city. There is hardly any chillness felt and the afternoon sun is at its peak .
As always, with summer setting in; buttermilk,lassi,raita and yogurt based curries make a lot of appearance in my kitchen . Yogurt based curries are light on stomach and easy to digest as well .Most importantly it keeps the body cool during harsh summer and it maintains hydration.
My son is a very picky eater, and he likes very few vegetables. So in today’s school lunch box, I used beet-cooked water to make the chapati dough since chapati is his favorite. The rest of the dishes are detailed below. Today’s School Lunch Box Menu has How to make Soft Beets Chapati I usually...
Once in a while, I pack a South Indian lunch box for school and office. In today’s lunch box, I’ve included typical South Indian dishes, including tangy and spicy Kara Kuzhambu or Puli Kuzhambu made with dried bitter gourd. For the kids, I’ve added a dollop of ghee over cooked rice to mellow the spice....
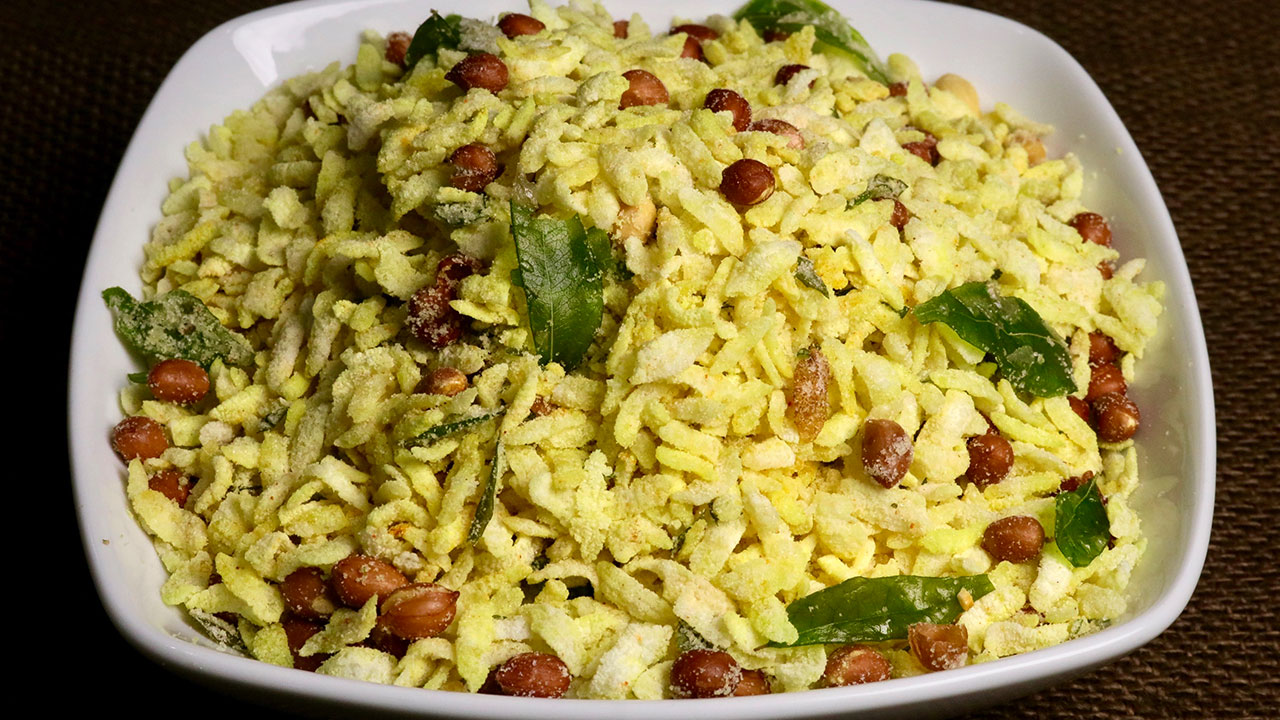
Khatta Meetha chivda is a popular tea time snack. This delicious sweet and salty snack can be enjoyed by all ages. Chivda is a flat rice, also known as poha.
Course Snack
Cuisine Indian
Prep Time 5minutes
Cook Time 20minutes
Total Time 40minutes
Servings 8people
Ingredients
2cupchivdaor poha available in different thickness, thick, medium, thin or nylon poha, I am using medium
Grind sugar, salt, citric acid and red chili powder together making sugar in to powder. And all the ingredients will be mixed evenly. Set aside.
Wash and pet dry curry leaves and let it air dry for at least 10 minutes or more.
In a frying pan take about 1” of oil and heat on medium heat. Oil should be moderately hot. Put about 1/4 cup of chivda in an oil, chivda should come up right away, (otherwise oil is not hot enough) as soon chivda comes up over oil, lower the heat to low and stir fry chivda till it doubles in size but remains white in color. Take out fried chivda in a strainer to drain out excess oil. Repeat the process and fry the remaining chivda.
In the same oil fry peanuts over low heat till they are light brown.
Fry the curry leaves until they are crisp.
Take another frying pan large enough to hold all the ingredients, put I teaspoon of oil in the pan over low heat. put turmeric stir and put chivda, keep mixing till it is mixed well and chivda will be light yellow turn off the heat and let the chivda come to room temperature.
Add peanuts, sugar mix, and crush the curry leaves over. Mix it gently until all the ingredients are incorporated well.
Notes
You can store the Khatta Meetha Chivda, in a air tight container for a month. Store it in an air-tight container and enjoy this scrumptious snack for up to 2 months...!!
Carving Pumpkins for Halloween Now is the time to consider about the great pumpkin you’ll be carving this Halloween. As you know, Linus would wait all night for the Great Pumpkin, but I wouldn’t take a cue from Linus. I’d head directly to the patch with the kids in tow. Once there, after your children have moved, rolled and lifted […]
Lemon chicken fry is my most awaited to try recipe, ever since I had Lemon chicken from the Hotel – The Plantain Leaf. The whole family likes this chicken, which is mildy spiced, juicy and tender. Lemon chicken is prepared by cooking the chicken with spices and lemon juice. Also this consumes very little time […]


/Potlakaaya (Telugu) /Padavalanga (Malayalam) / Padavalkkai (Kannada) , Snake gourd /padwal(Marathi)/Potlakaaya (Telugu) /Padavalanga (Malayalam) / Padavalkkai (Kannada) pachadi, perugu pachadi, pachadi, kichadi, padavalnga kichadi, podalanga pachadi, podalanga thayir pachadi, potlakaya perugu,potlakaya, padwal raita, padval raita, dahi padwal")
/Potlakaaya (Telugu) /Padavalanga (Malayalam) / Padavalkkai (Kannada) , Snake gourd /padwal(Marathi)/Potlakaaya (Telugu) /Padavalanga (Malayalam) / Padavalkkai (Kannada) pachadi, perugu pachadi, pachadi, kichadi, padavalnga kichadi, podalanga pachadi, podalanga thayir pachadi, potlakaya perugu,potlakaya, padwal raita, padval raita, dahi padwal")
/Potlakaaya (Telugu) /Padavalanga (Malayalam) / Padavalkkai (Kannada) , Snake gourd /padwal(Marathi)/Potlakaaya (Telugu) /Padavalanga (Malayalam) / Padavalkkai (Kannada) pachadi, perugu pachadi, pachadi, kichadi, padavalnga kichadi, podalanga pachadi, podalanga thayir pachadi, potlakaya perugu,potlakaya, padwal raita, padval raita, dahi padwal")
/Potlakaaya (Telugu) /Padavalanga (Malayalam) / Padavalkkai (Kannada) , Snake gourd /padwal(Marathi)/Potlakaaya (Telugu) /Padavalanga (Malayalam) / Padavalkkai (Kannada) pachadi, perugu pachadi, pachadi, kichadi, padavalnga kichadi, podalanga pachadi, podalanga thayir pachadi, potlakaya perugu,potlakaya, padwal raita, padval raita, dahi padwal")