Breakfast taquitos filled with a quick scramble along with veggies, cheese, and your favorite toppings is such a quick, easy, and satisfying meal! Make the super versatile scramble seasoning ahead, so you can whip up all kinds of eggy breakfasts in a flash. (gluten-free, nut-free, with easy soy-free option)
These breakfast taquitos are super easy and super quick, if you have my scramble seasoning on hand. Even if you don’t, making the scramble seasoning is also easy. You just get all the spices, mix them in a jar, and it’s ready. You can use that scramble seasoning on scrambles, omelettes, frittatas, or to make a quick tofu egg salad in many different ways. It works well wherever you want any kind of eggy breakfast flavor.
Definitely make some and use that in this recipe, because then it’s super quick. You just crumble the tofu, add some chopped veggies, the scramble seasoning, and vegan cream cheese. Mix it all up in a bowl, and your scramble is ready to stuff into your breakfast taquitos.
Then, you roll that scramble up in warm tortillas and bake or pan fry. Serve with your favorite toppings, like pico de gallo, salsa, vegan sour cream, etc., and they are just fabulous!
Why You’ll Love Breakfast Taquitos
quick and easy breakfast that’s super satisfying
cheesy, veggie-packed tofu scramble stuffed into soft tortillas, baked or pan fried until crisp
versatile! Customize mix-ins and flavors to taste.
easy to make gluten-free, nut-free, and even soy-free
Learn how to make quick & delicious Masala Idli recipe using leftover idlis with a video tutorial and detailed step by step pictures. Use the leftover idlis to make a quick snack or meal with stir fried masala idli recipe. Masala Idli is a quick, flavorful snack made from leftover idlis tossed in a tempering...
Poha is a light and popular Maharashtrian breakfast made with flattened rice, onions, herbs, spices, and sometimes peanuts or potatoes. It has many regional versions like Kanda Poha, Dadpe Pohe, and Indori Poha. This Kanda Poha recipe is made with onions, potatoes, peanuts, and basic spices. It is easy to cook, filling, and naturally vegan...
Bun Maska is a classic Indian snack, popular in Irani cafés in Mumbai. Soft buns are warmed and spread with sweetened whipped butter. The Bun Maska Recipe is simple, yet the result is rich and satisfying, perfect for breakfast or an afternoon snack. You can easily make this café-style dish at home. Paired with a...
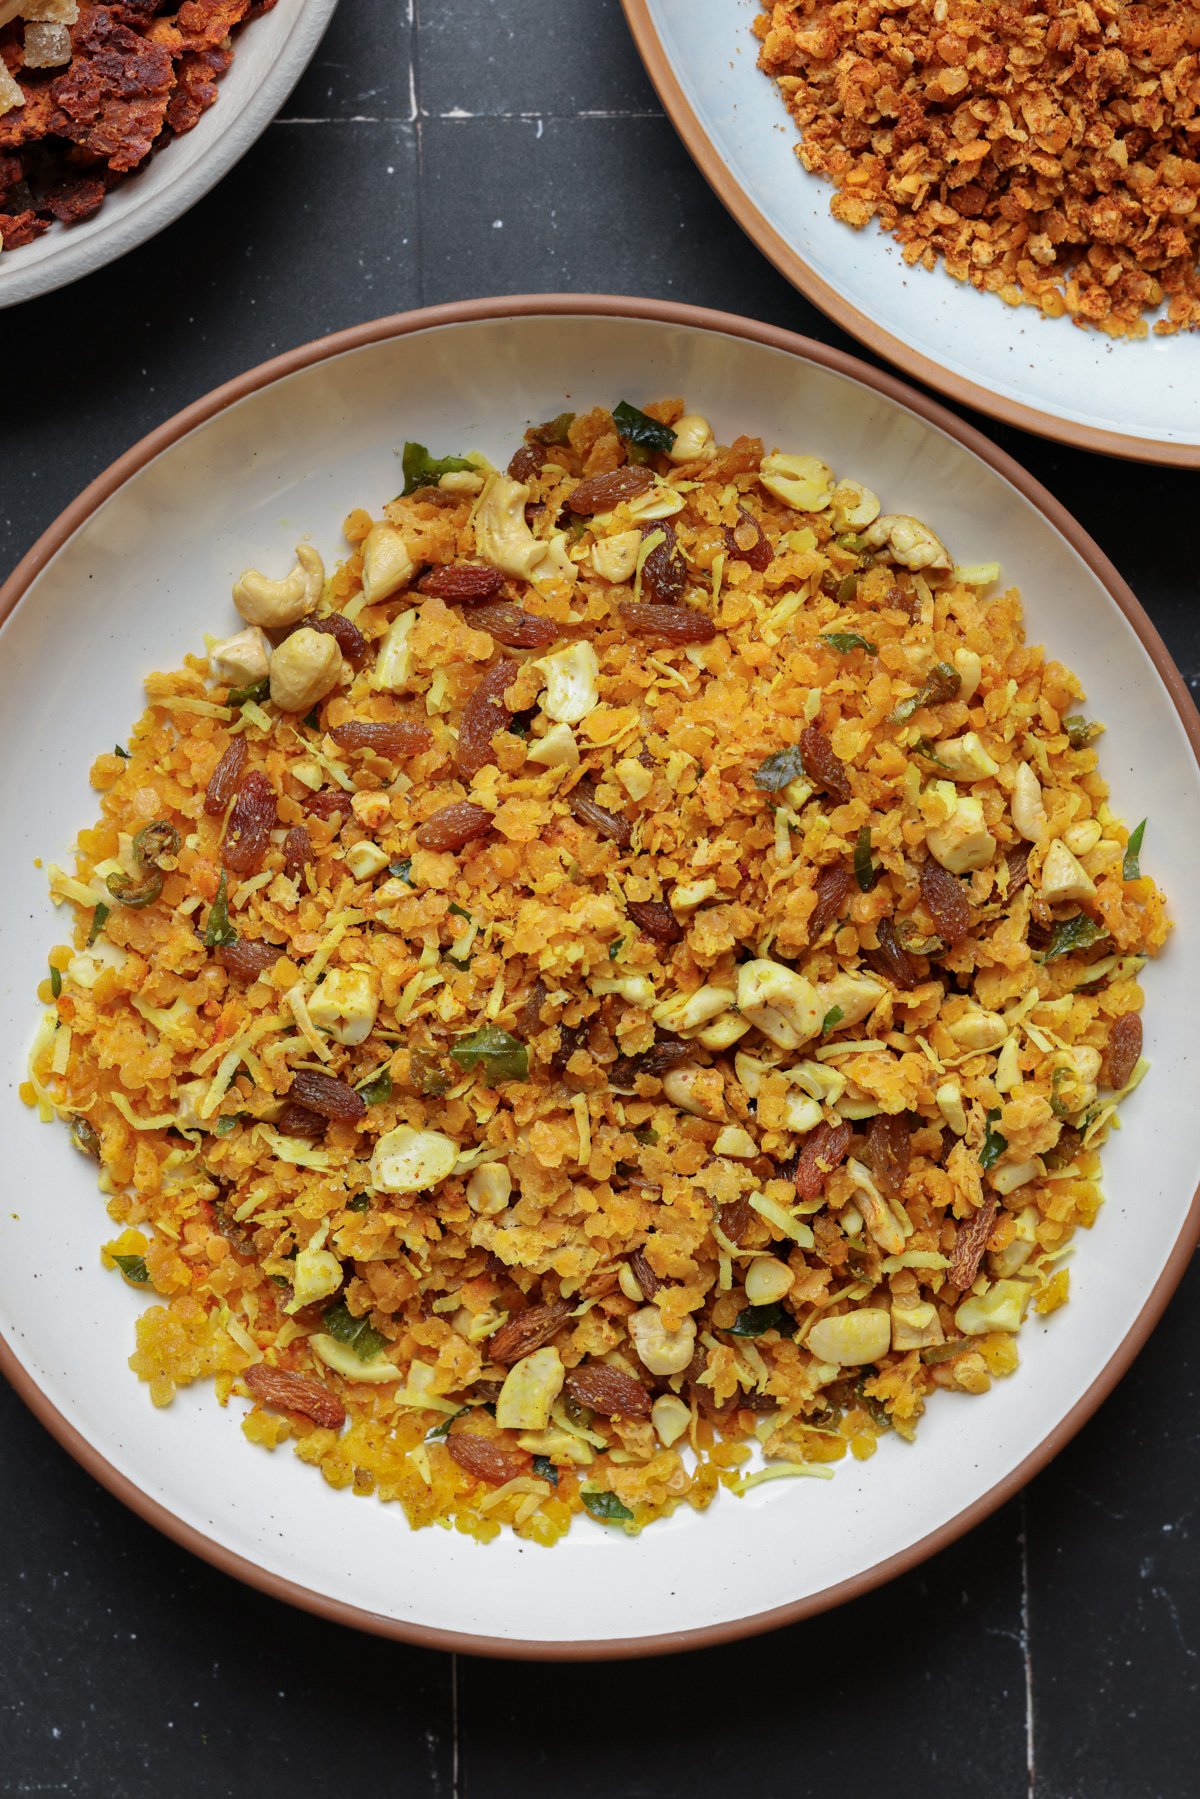
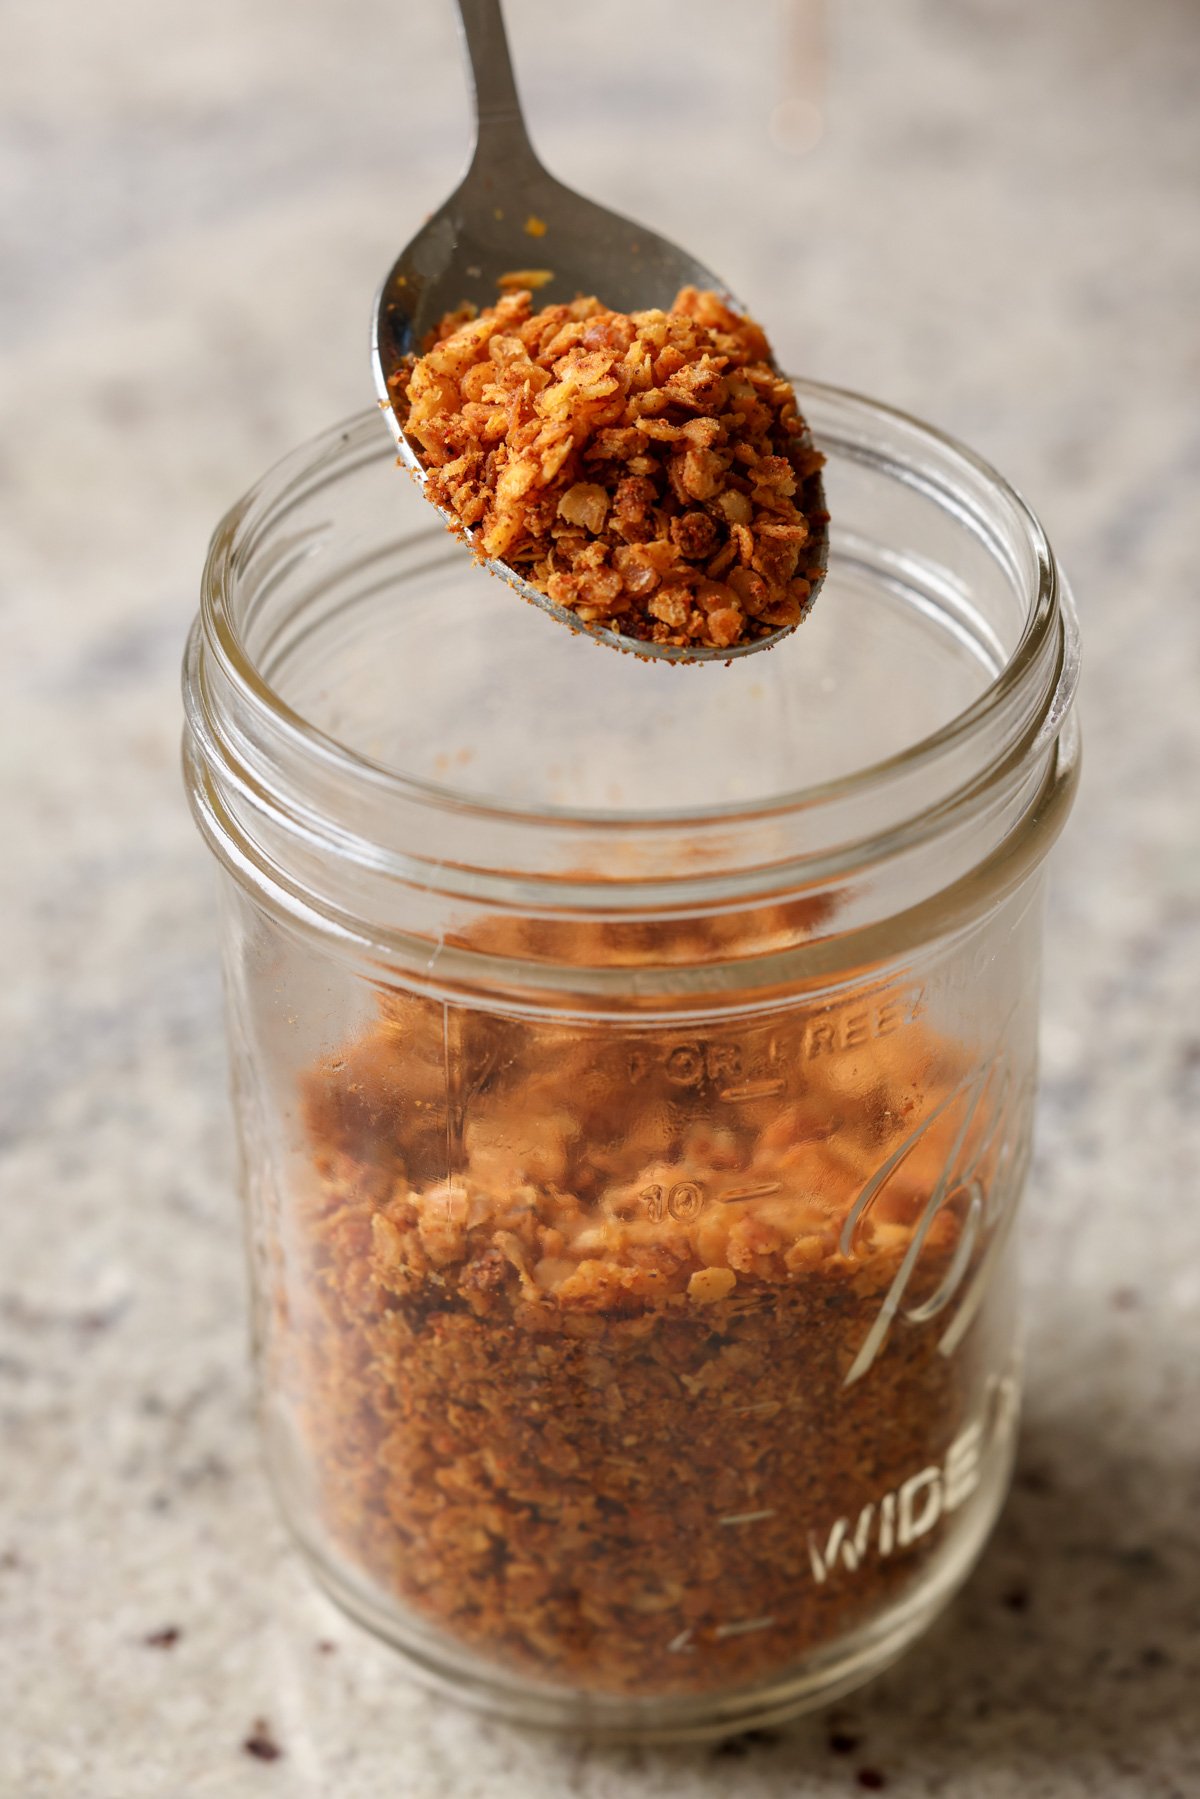
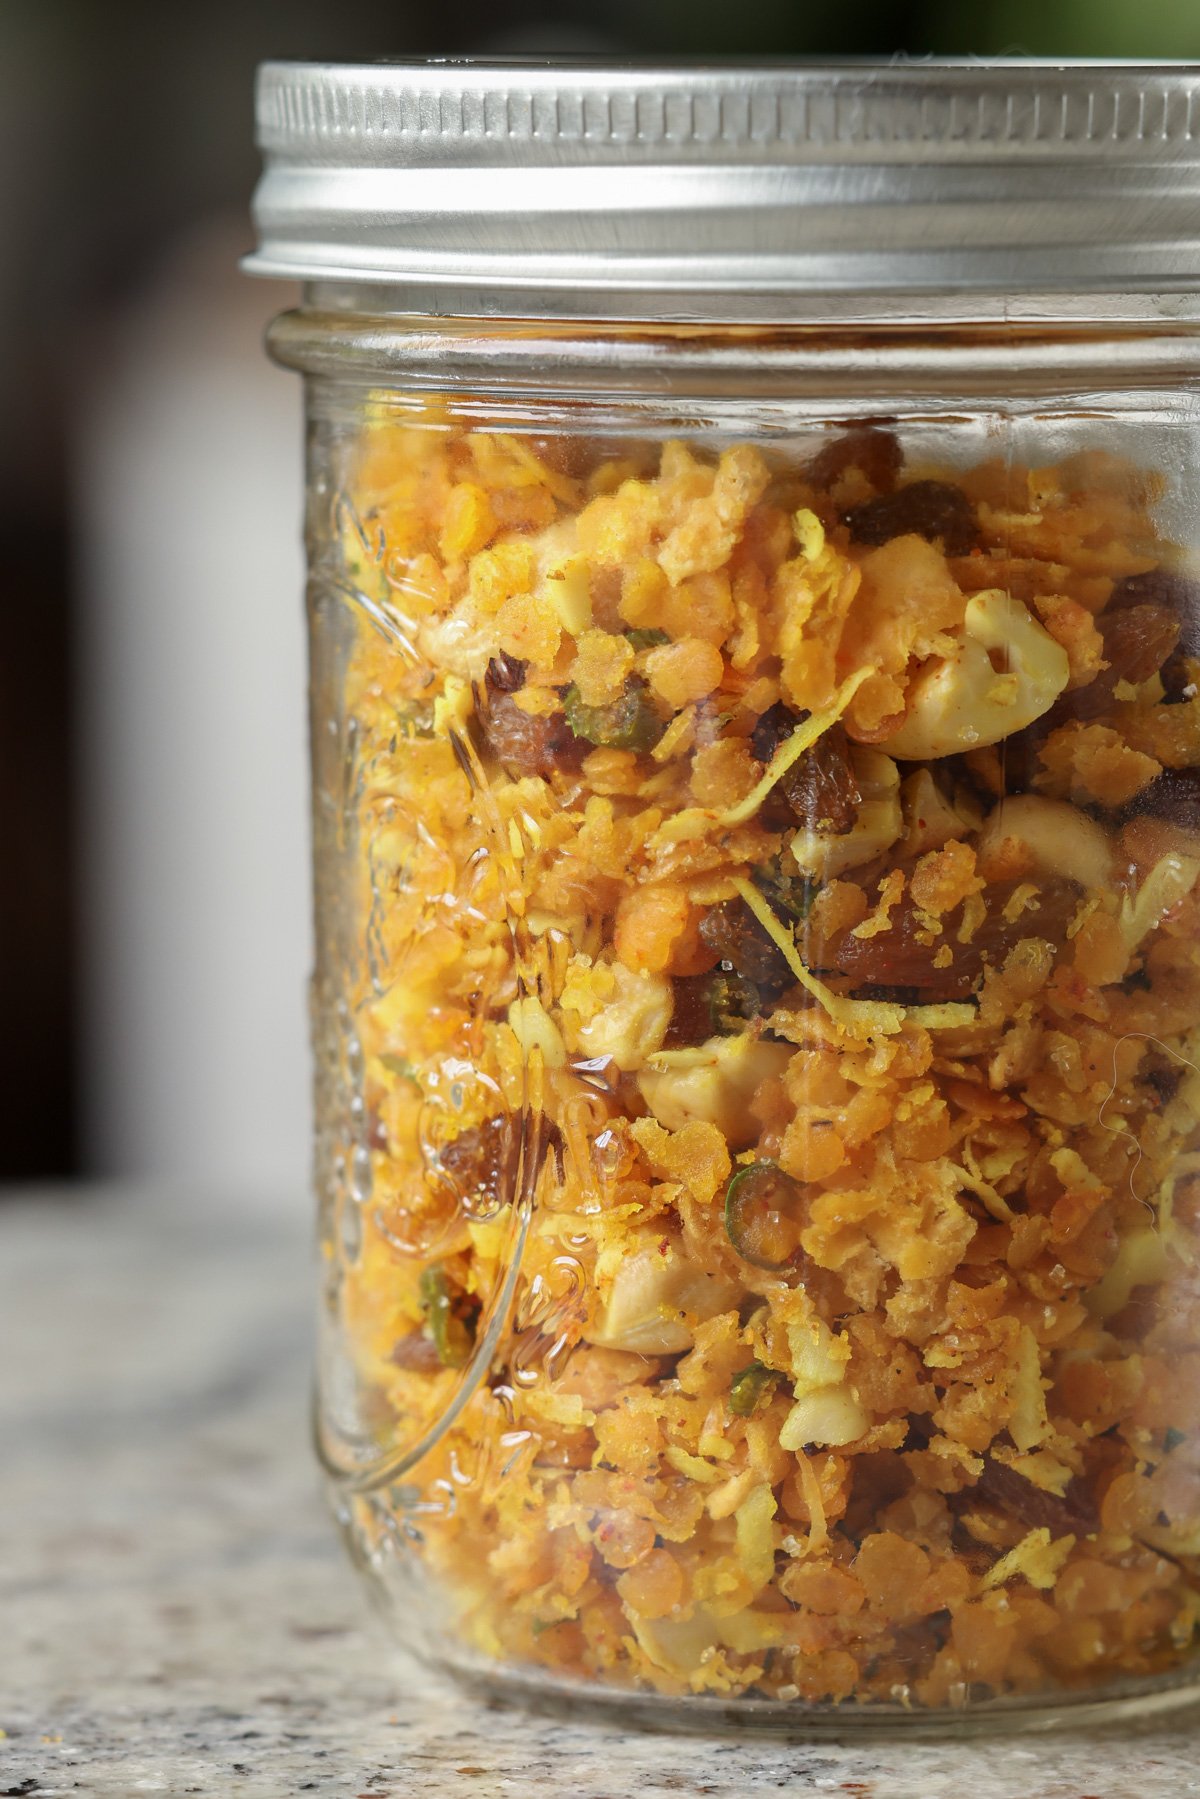
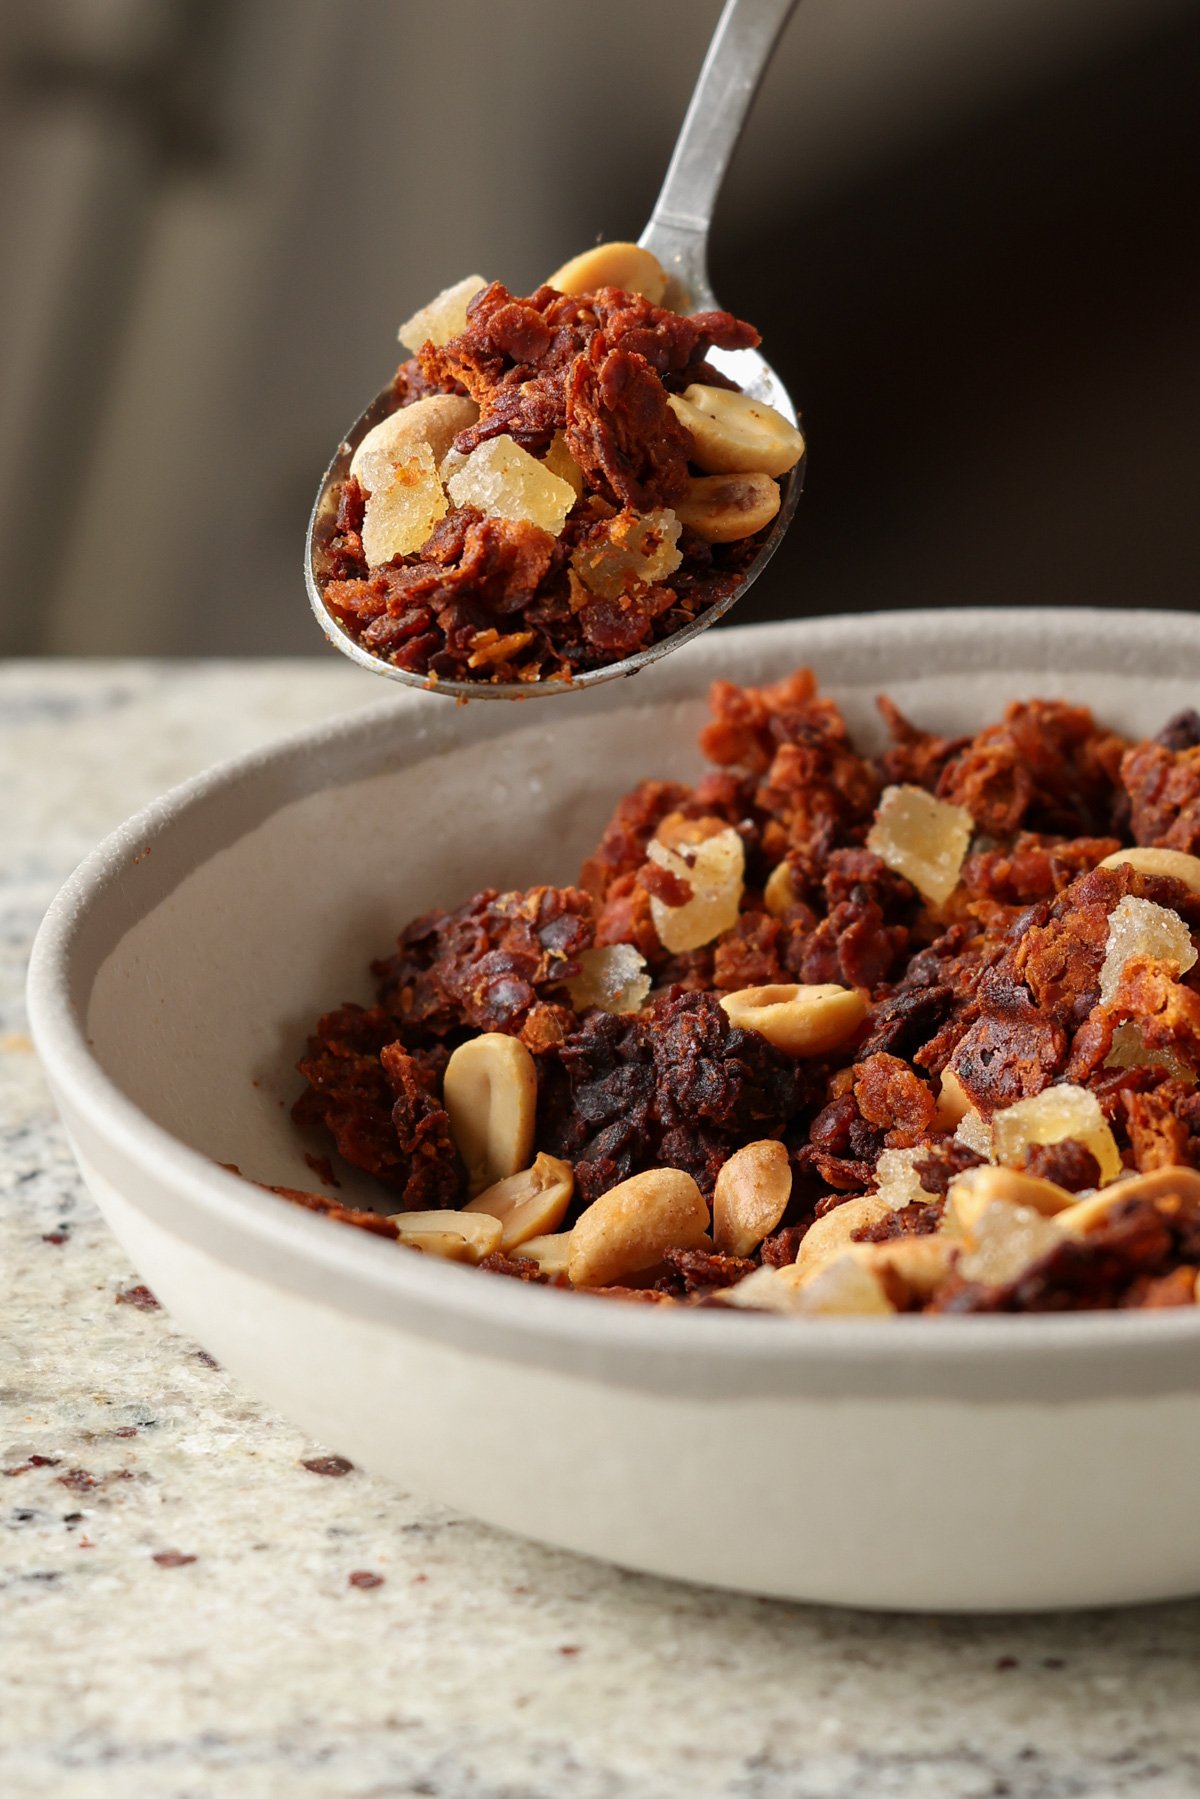
Lentil trail mix is a super delicious snack, and here I will show you three ways to make it! Peanut gochujang, Indian Chivda, Doritos Nacho flavor! This high protein, savory granola is easy and fun to make and a perfect breakfast or snack. (16 grams of protein and fiber per serving!)
When I shared my red lentil granola recipe, quite a few of you asked for a savory version, and today I’m sharing three different ways to make savory lentil granola/trail mix! Make all three flavors of this delicious lentil trail mix, or triple your favorite flavoring and make one big batch.
Why three ways? Because I just couldn’t decide between these amazing flavors: Indian-spiced, peanut gochujang, and nacho spice. So, I decided to let you choose for yourself!
This trail mix/savory granola recipe uses split red lentils (aka masoor dal) as the base. You cook the red lentils on the stovetop until they are just al dente, and they roast up to be light and crisp in the oven with your seasonings of choice.
The result is a protein-packed snack that is absolutely full of flavor, no matter which seasoning mix you choose! A serving of this trail mix has around 16 grams of protein and 16 grams of fiber. You can amp up the protein even more by folding in hemp seeds into the granola once it has finished roasting.
The Indian-spiced lentils are inspired by Indian chivda, which usually uses rice flakes or other flaked or puffed grains. It is spicy savory with some balancing sweet from raisins or dates and is fantastically delicious!
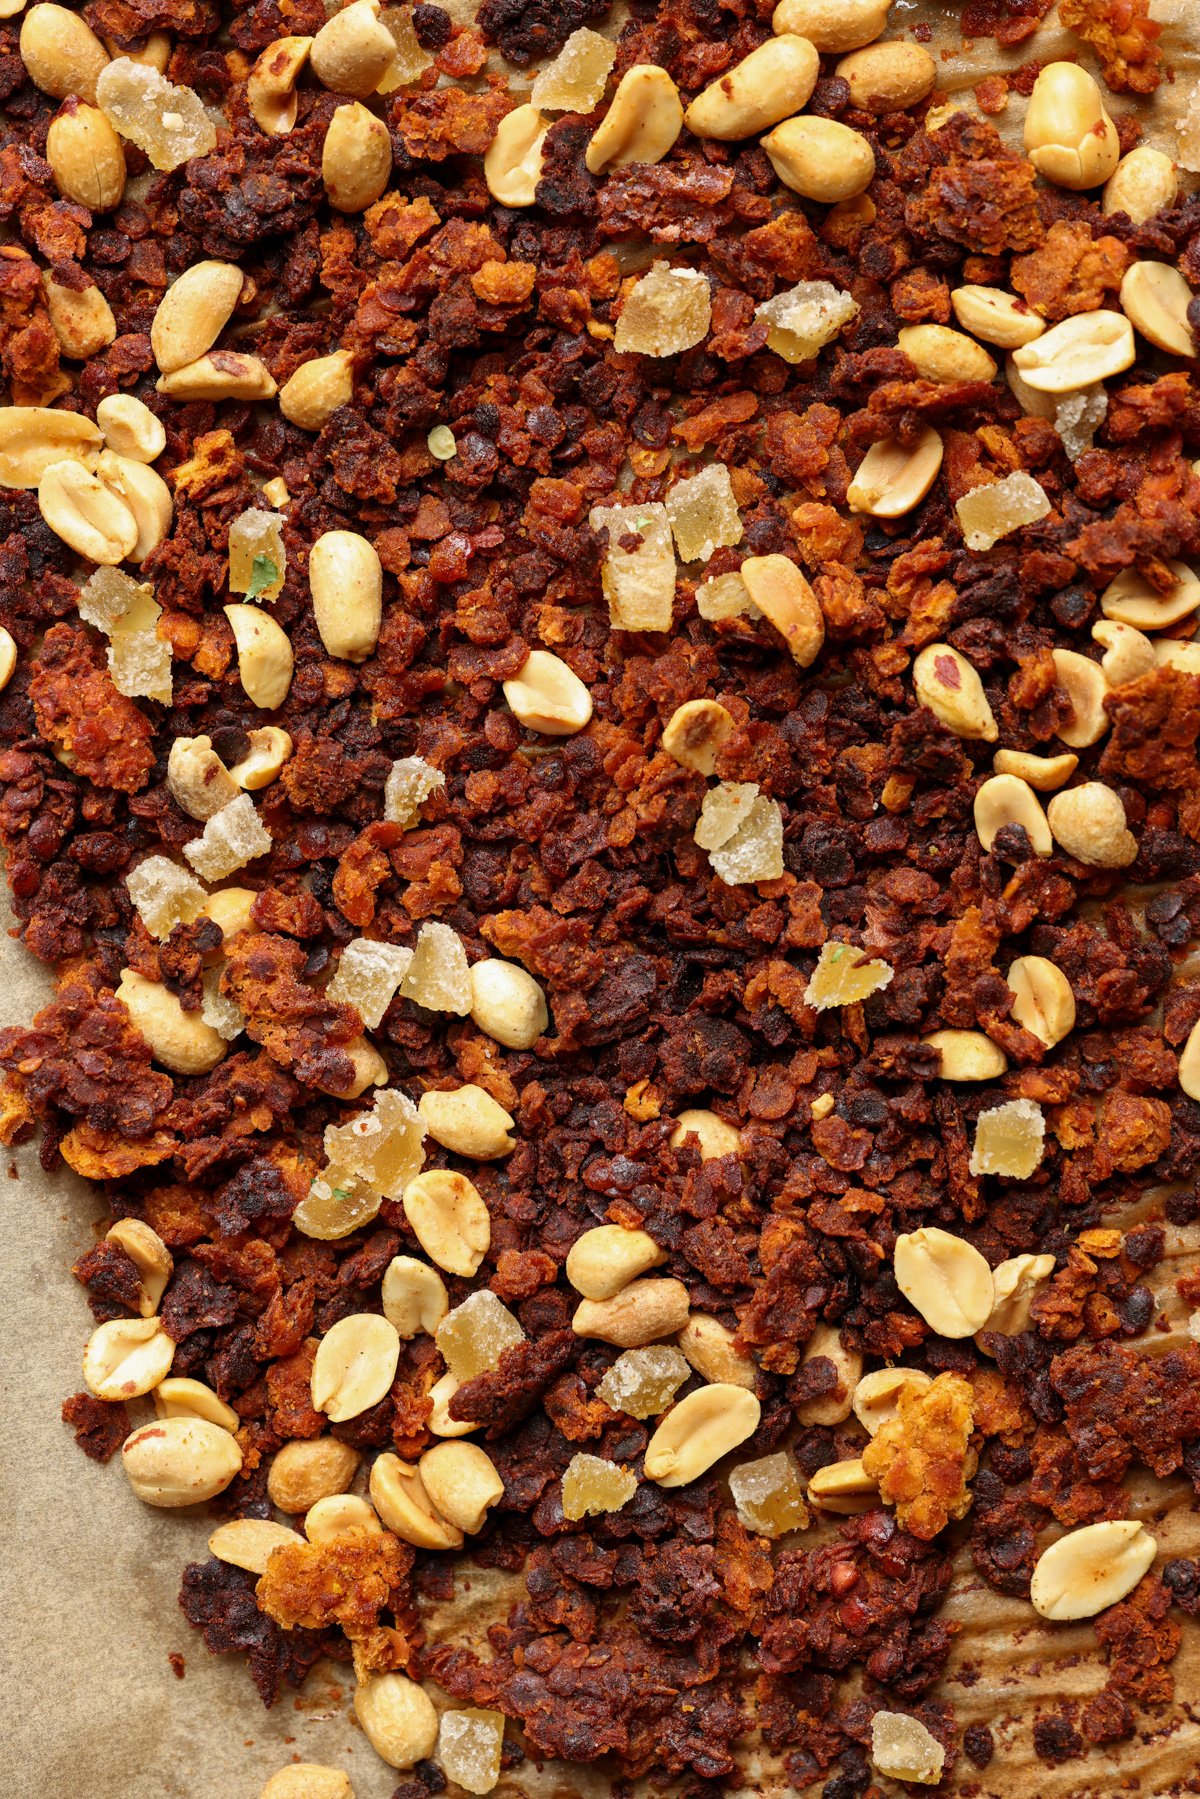
For the nacho spiced savory lentil trail mix, a took inspiration from my nacho cheese granola bars. It’s your favorite snacking chip in crisp trail mix form! you can adjust it to your flavor preference. Add more cayenne for more heat or more nutritional yeast for more cheesiness.
If you love gochujang, definitely try the peanut gochujang lentil trail mix which has an amazing savory-spicy flavor with a hint of sweetness. It pairs so well with the crunchy peanuts! Comment below on which one will you try first!
Why You’ll Love Lentil Trail Mix
protein- and fiber-packed breakfast or snack with 16 grams each of protein and fiber per serving!
make all three flavors or choose from 3 amazing flavors: Indian-spiced, peanut gochujang, or nacho cheese
deep flavors and incredible textures
naturally gluten-free with soy-free and nut-free options included
Milk Dalia, also known as Sweet Dalia, is a comforting and nutritious Indian Wheat Porridge made with broken wheat or cracked wheat (dalia), milk and sugar. This wholesome dish is lightly flavored with cardamom and often enriched with nuts and dried fruits, making it a delicious and energizing breakfast or dessert. Cooked until creamy, this...
Here’s how you can use your everyday oats and make a savory breakfast dish with it that is also something different than the usual. Oats Upma is an easy and delicious breakfast recipe perfect for your quick mornings. Made with quick-cooking oats and the goodness of mixed vegetables, this upma variation gets ready in just...
If you know of oats, as the undefeated champ of Oats Porridge with milk and fruits (maybe), then think twice! Because here’s a recipe that’s going to change that perspective of yours. This is an easy and Oats Idli recipe that results in light, fluffy and delicious idli for your comforting breakfasts or a hearty...
Learn how to make Instant Ragi Rava Dosa recipe with detailed step by step pictures. Crispy, delicious, and healthy ragi dosa recipe made with ragi flour. Ragi Dosa or Ragi Rava Dosa is a popular breakfast recipe from South India, especially Karnataka and it can easily be found in many darshini-style hotels around Bangalore too....
Soya keema sandwich recipe – A simple and healthy protein-rich sandwich recipe with soya chunks and paneer filling.
Soya chunks are a rich source of protein, but many friends do not prefer to eat them. I have posted a few recipes using soya chunks in Jeyashri’s kitchen. This recipe is a perfect one for non-soya chunks lovers. I am not a great fan of soya chunks, but I mask them with Indian masalas and eat them. The same filling can be used as a filling for paratha, too.
Everyone at home loves sandwiches. So I always try to make different fillings. This one is a super hit one at home and everyone loved it. You can use the soya granules we get in the shops or cook the big chunks and pulse them to get the minced texture. I have added some paneer to this filling to get a nice taste. You can add scrambled tofu also instead of paneer. The addition of some veggies to this makes it healthier. You can pack this for lunch box or can make this for breakfast or after school snack too.
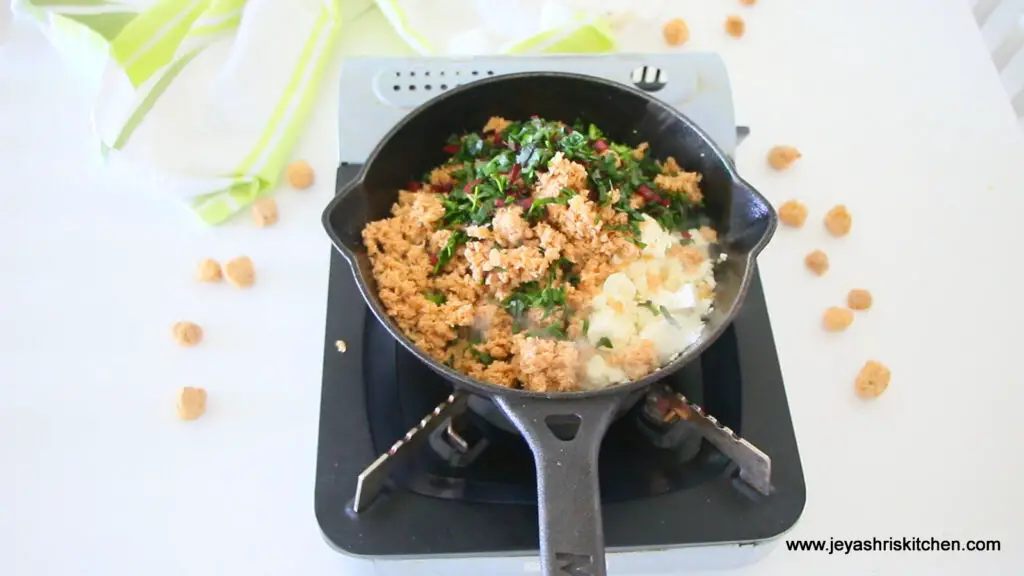
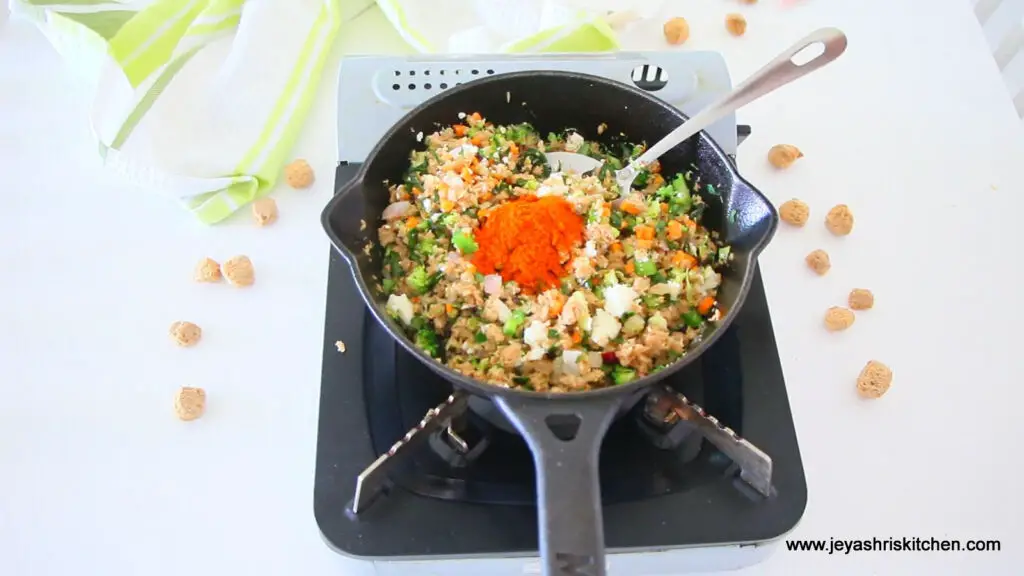
Add the carrot, broccoli, capsicum, scrambled paneer and scrambled soya chunks.
Cook for 2 minutes
Add the red chili powder, chaat masala, turmeric powder and salt.
Mix well and cook for 1-2 minutes
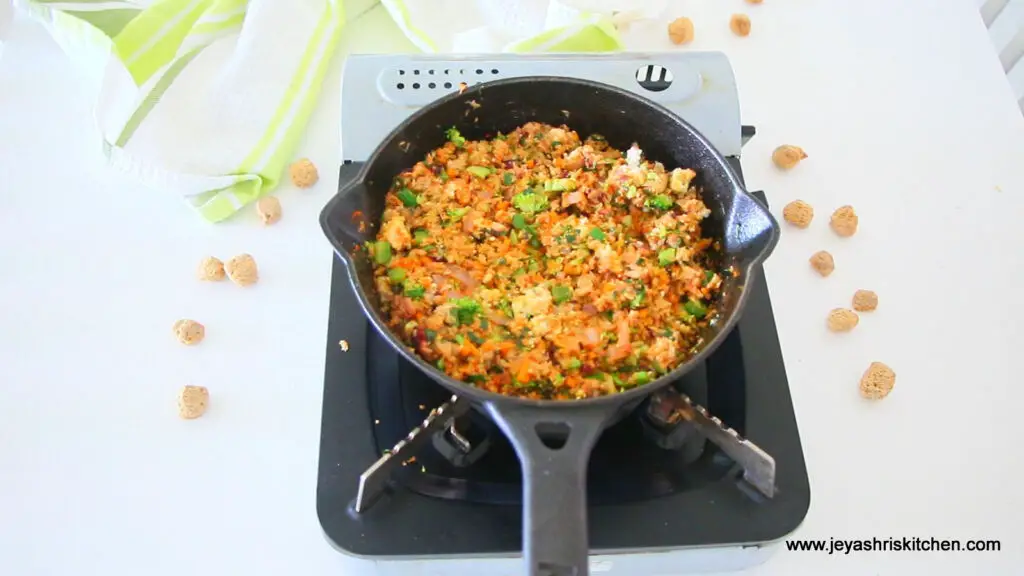
Add 2 tbsp coriander leaves and switch off the flame
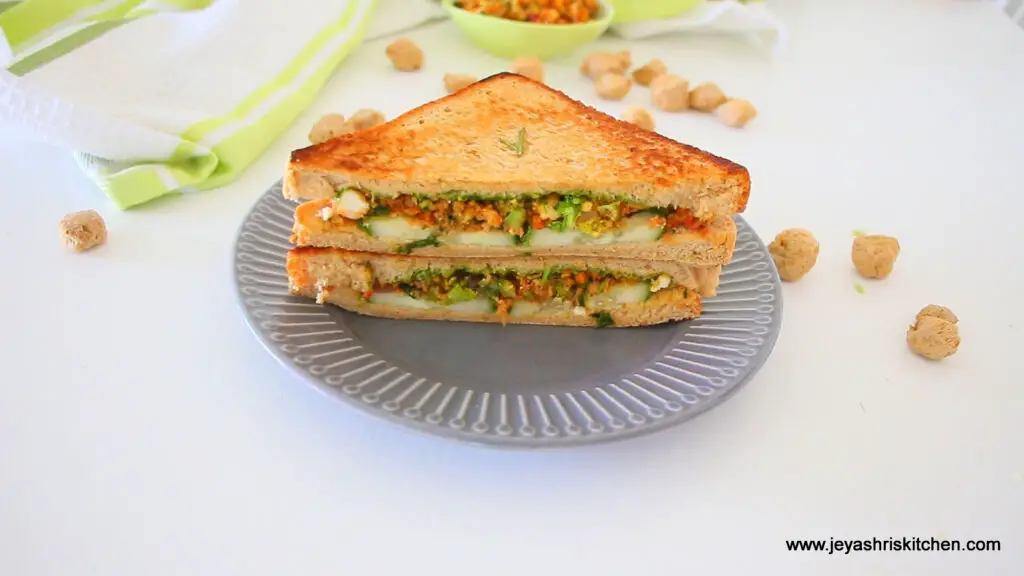
Add little butter in a pan
Place a slice of wheat bread
Spread green chutney on one side of the bread.
Place 2 tbsp of soya veg keema and 2 cucumber slices
Place another bread
Cook on both sides
Take out from the pan
Cut and serve
Soya chunks veg keema sandwich is ready.
You can pack this for school lunch box too
Video
Notes
1. You can add cabbage, grated beetroot, sweet corn, peas, spring onion greens to the soya keema veg sandwich
2. Use wheat sandwich or you can serve this as an open toast on Sour dough bread.
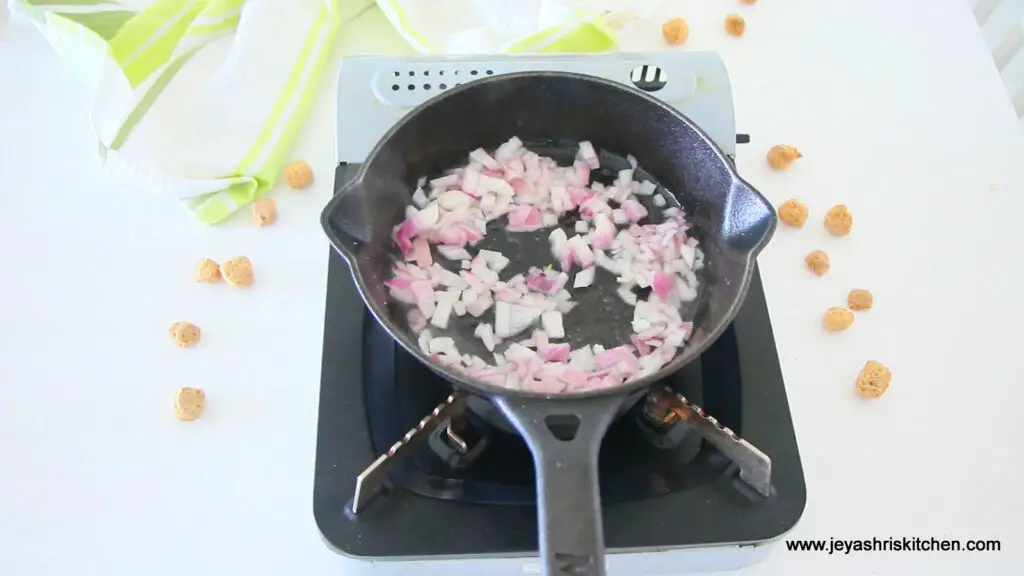
In a pan add oil and add the onions
Cook till translucent.
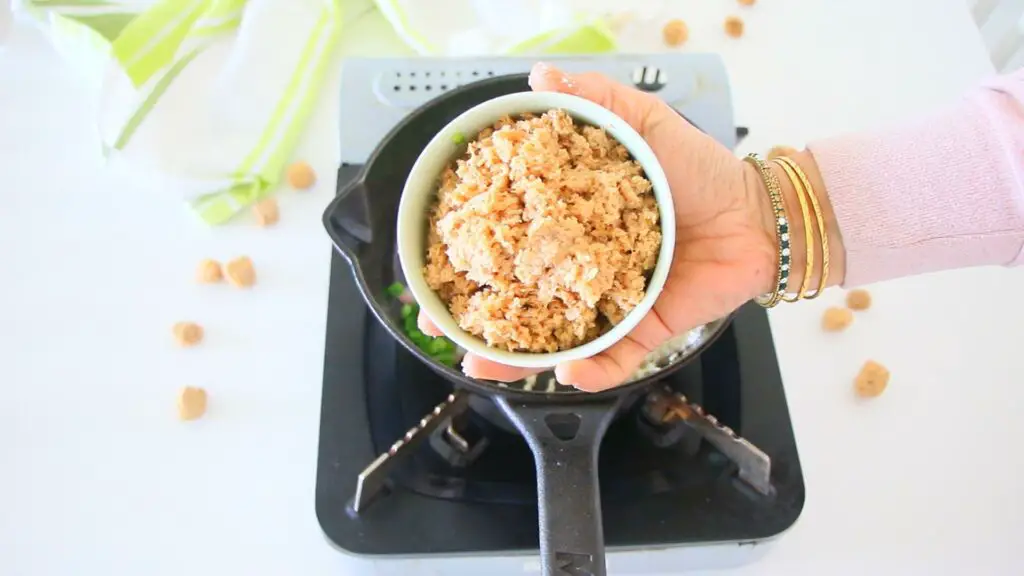
Boil the soya chunks in water for 2 minutes
Drain the water and squeeze the extra water
Pulse in the mixie jar.
1 cup scrambled soya chunks is ready.
Add the carrot, broccoli, capsicum, scrambled paneer and scrambled soya chunks.
Cook for 2 minutes.
Add the red chili powder, chaat masala, turmeric powder, and salt.
Mix well and cook for 1-2 minutes.
Add 2 tbsp coriander leaves and switch off the flame.
Add a little butter to a pan
Place a slice of wheat bread.
Spread green chutney on one side of the bread.
Place 2 tbsp of soya veg keema and 2 cucumber slices.
Place another bread
Cook on both sides
Take out from the pan.
Cut and serve
Soya chunks veg keema sandwich is ready.
You can pack this for the school lunch box too.
Notes:
You can add cabbage, grated beetroot, sweet corn, peas, and spring onion greens to the soya keema veg sandwich
Use wheat sandwich or you can serve this as an open toast on Sourdough bread.
Today, I am going to share a South Indian breakfast menu Idea or Pongal breakfast Menu idea. After a break of 1 and 1/4 years from blogging, I am sharing a Pongal-relevant post that is close to my heart. Pongal Festival In South India, on Pongal day, which falls in mid-January, i.e., on the first...
Flaky, crispy, and filled with delicious flavor, Chinese Scallion Pancakes are a restaurant favorite that you can easily make at home! This simple, budget-friendly Green Onion Pancake or Chinese Pancakes recipe requires just 7 ingredients (one of which is water) and 40 minutes to make. Plus, it’s naturally vegan to boot! What Are Scallion Pancakes…
Ragi malt recipe also known as ragi java or ragi porridge is a healthy dish made with finger millet flour, water and jaggery. Ragi also known as finger millet are tiny red seeds packed with nutrition. Ragi is a superfood. Ragi seeds and its flour are used to make various recipes. Soaked and ground ragi…
Flattened rice, commonly known as poha, is rice which is flattened into flat, light, dry flakes originating from the Indian subcontinent. These flakes of rice swell when added to liquid, whether hot or cold. The thickness of the flakes varies between almost translucently thin to thick Poha and used in varieties of Indian dishes. It is called by different names in different regions, such as Avalakki (ಅವಲಕ್ಕಿ) in Kannada, Atukulu in Telugu, Aval in Tamil & Malayalam, Poha in Hindi.
Avalakki Rasayana/Sihi Avalakki/Sweet Poha is a famous dish from Karnataka, usually prepared during festivals to offer as a Prashad to Lord during Tulasi festival or Krishna Janmashtami. Poha/Aval is Lord Krishna’s favorite food, so avalakki kayi bella is prepared for his offerings. Avalakki Rasayana is a very simple dish, involves no cooking, so could be a great energy dish for ones who are fasting for festivals.
Red Poha vs White Poha! How to use RED POHA?
“Red Poha”
Most Indians kickstart their day with Poha for breakfast. So why not try your breakfast with healthy Poha. A healthier variation to the everyday pohais the red poha, which is made from red rice. Moreover, unlike white rice, red rice doesn’t undergo excessive processing, and as such the other bran layer remains intact. Red poha is slightly coarser in texture as compared to white poha. Red poha can be used pretty much the same way as white poha. You need to rinse the poha 2-3 times and soak it in water first, for at least 10 minutes, so that it softens and then use in many dishes such as salads or stir fry with other vegetables and spices or use in cutlets. This rasayana recipe calls for Red Poha, but you could still use white Poha. It is really about making a healthier choice.
I Usually prepare rasayana as a side dish whenever I make avalakki oggarane (which is the spicy version of poha) for breakfast. Great to pack it in a lunch box too. This Rasayana is a mixture of Red Poha, Jaggery, Coconut, Banana, and Cardamom powder. I call this recipe as 5-ingredient Rasayana that could be prepared within 5-mins.
We had a lot of jackfruits this summer and was finding ways to use in recipes. So thought why not dump into sweet Poha dish and trust me, it tasted so good and made an awesome combination with banana and Poha. Make sure to use only ripe Banana and Jackfruit for this recipe. Jackfruit is purely optional, skip if unavailable. Make this simple no-cook yummy rasayana for breakfast or pack it for lunch box.
Red Poha Rasayana | ಬಾಳೆಹಣ್ಣು-ಹಲಸಿನಹಣ್ಣು ಅವಲಕ್ಕಿ ರಸಾಯನ | Festival Recipe | Avalakki Kayi Bella | Sweet Poha/Aval with banana-jackfruit
Avalakki Rasayana is a very simple, tasty no-cook dish, prepared as a prashad for festivals or even everyday breakfast. 5-ingredient Rasayana!! in 5-mins!!
Course Breakfast, Side Dish
Cuisine Indian
Keyword Red Poha, Sweet Poha
Prep Time 5minutes
Cook Time 0minutes
Poha soak time 10minutes
Servings 4
Author KaviRuchi
Ingredients
1cupRed Pohaflattened rice
1Bananafinely chopped
¼cupFresh Coconutgrated
4-5Jackfruitthin strips-Optional
1TbspJaggery Powderadd more/less as per taste
⅛tspCardamom Powderelaichi powder
Instructions
PREPARATION:
Rinse 1 cup thick Red Poha/Flattened Rice 2-3 times and soak in water for 10 mins. Skip Soaking if using thin Poha flakes.
Tear or cup Jackfruit into thin strips and set aside.
Finely chop 1 ripe banana into small pieces and set aside.
METHOD:
Strain the soaked Poha and add in a mixing bowl.
Add 1 Tbsp Jaggery(or more as per taste), chopped Banana, Chopped Jackfruit and grated coconut.
Add a dash of Cardamom Powder and give a good mix.
After a few mins, jaggery melts and blends well with the poha. Add ¼ cup milk if you feel it still dry.
5-ingredient Rasayana is ready in 5-mins! Serve this Rasayana as a side-dish with spicy poha(Avalakki Oggaranfor breakfast.
Healthy & Tasty Sweet Poha is Ready to Relish!!
Video
Notes
Many variations can be made to this dish,
Red Poha can be replaced with white Poha too.
Add more or less of jaggery as per taste. You could also replace with sugar or add half Jaggery and half sugar. You could also add a spoonful of honey.
Jackfruit is optional. Add only if available for the season. Traditional Rasayana is done just with banana.
Roast few finely chopped cashews and almonds in ghee, along with dry grapes and add to Rasayana.
No need Soaking if using thin flakes of Poha. The juice from the sugar/Jaggery and banana is sufficient enough to make it soft.
Rice is a staple food of more than half of the world’s population and is an inexpensive, nutritious source of energy. There are many varieties of rice that differ in color, flavor and nutritional value, such as brown rice, white rice, red rice, blackrice, etc.,
Red rice a.k.a cargo rice is a type of non-glutinous, russet-colored long grain rice, that is similar to brown rice, in that it is unpolished and is healthier than plain old white rice. It is nutty flavor and soft texture, that goes well with most of the dishes using in place of white rice.
As you all know white rice contains fewer nutrients than brown, black or red varieties, as itshusk, bran layer and the germ is removed. So, consuming whole grains over refined grains an excellent choice for health by making nutritious additions to your diet.
If you are looking for an alternative to your usual white/brown rice, consider trying red rice because it is a whole grain with a good source of fiber and iron and also fat-free. Red rice definitely makes a healthy addition to your diet.
Dosa is a very common, tasty and filling breakfast from south India. It’s more like a crepe, a thin pancake. The procedure of preparing dosa batter involves soaking rice, urad dal, and fenugreek seeds for 4-6 hours and grinding to a smooth paste and fermenting overnight. The fermented dosa batter is then spread on a hot tawa to yield a delicious dosa that can be enjoyed with any chutney or sambar. Making dosas is a tedious process but the end result is worth, a day-long wait to enjoy the irresistible scrumptious dosas. So why not make this dosa dish for the whole family to enjoy a healthy version. Here is a dosa recipe with the nutritious red rice along with watermelon rind making it, even more, healthier dish. Yes, you read it right! its watermelon rind in this dosa recipe.
Like its cousin-cucumber, the entire watermelon can be eaten, although people tend to only eat the inner pink flesh and throw away the watermelon rind. The black seeds and rind is entirely edible and has many health benefits. After using the flesh part, store the watermelon rind in the refrigerator in an airtight box and use it later to make many dishes from chutneys to pickles. Finding ways to use watermelon rind for food, such as pickles, relishes or jam, extends the functionality of this fruit.
But I tried adding the rind to dosa while making the batter, happy I found another best way to use the healthy rind in our daily food without wasting it, also dosas were as crispy and tasty as the normal dosas with added on health benefits. The dosas with rind do have a slight watermelon flavor that is so good and who would not love to try watermelon flavored dosa. Yummier than ever!!
I always use cast iron to make dosas. You could use a Non-Stick Tawa or Cast-Iron Tawa. Though Non-Stick Tawas make the job easier, I personally recommend using Cast iron and works best all the time I have made these dosas.
Cast iron cookware is inexpensive, hold a high heat capacity, free of chemicals, add trace amounts of iron to your food, and last—well—forever.
Remember to keep the cast-iron tawa/skillet well seasoned always and exclusive for making dosa. Using the same Tawa for making Roti/Chapathi, would make it harder for making dosas the next time.
The right temperature of tawa need to be maintained for making this dosa, also the consistency of the batter should be not too thick and not too watery. Don’t worry if dosa sticks anytime and you find hard to scrape out. Just get the tawa off the stove and scrape and once clean, rub oil using half cut onion/potato. The Tawa is all set to make dosas again.
Enjoy this dosa for breakfast or even an evening snack or pack it for lunch box. Serve Dosa with chutney of your choice and sambar.
Today I served dosa with yummy PEANUT CHUTNEYand Chutney Powder topped with ghee.
You might want to try chutney with Watermelon Rind
HOW TO MAKE RED RICE DOSA(with Watermelon Rind) STEP BY STEP:
1.Rinse 1 cup red rice, ¼ cup urad dal, ½ tsp methi, and ¼ cup red poha thoroughly and soak together in enough water for 5-6 hours.
2. Peel the green skin from watermelon rind(white part, some amount of red fruit is fine too). Roughly chop about a cup of rind and set aside. You could store remaining rind in the refrigerator for later use.
3. Drain the water from soaked rice and dal mixture. Grind the soaked rice and dal to a smooth batter, along with watermelon rind(i did not use any water while grinding)
4. Transfer the ground batter to a deep bowl(which has enough space for the batter to rise. Set in a warm place to ferment for about 8-10 hours or overnight.
5. Once the batter has well risen (doubles the volume), add salt as per taste and mix well. The batter should be thick and pouring consistency. Add water if required to attain pouring consistency, but I did not use water here, as the water from the rind was sufficient to attain the right consistency.
6. Heat a pre-seasoned Cast Iron Dosa Tawa on a med-low flame. When hot, sprinkle water and wipe with a clean towel. Drizzle a few drops of oil and wipe using a paper towel. Pour a ladle of dosa batter and spread in a circular motion. Drizzle oil/ghee on top and edges.
7. Once the dosa is firm and light brown, fold and serve hot with any curry or chutney or sambar.
Healthy & Tasty Dosa is Ready to Relish!!
If you want to know HOW TO SELECT & STORE WATERMELON, also 3 delicious WATERMELON COOLERS recipe, check out…
Red Rice Dosa with Watermelon Rind | ಕೆಂಪಕ್ಕಿ-ಕಲ್ಲಂಗಡಿ ತೊಗಟೆ/ಸಿಪ್ಪೆ ದೋಸೆ | Healthy Breakfast | Red Rice Crepes
Dosa is a very common, tasty and filling breakfast from south India. Here is a healthy dosa recipe with the nutritious red rice along with watermelon rind. Enjoy this dosa for breakfast or even an evening snack or pack it for lunch box. Serve Dosa with chutney of your choice and sambar.
Course Breakfast
Cuisine Indian
Keyword dosa
Prep Time 10minutes
Cook Time 5minutes
soaking and fermenting 10hours
Servings 10dosas
Author KaviRuchi
Ingredients
1cupRed Rice
¼cupUrad Dal
¼cupRed Pohaflattened rice
½tspMethi Seedsfenugreek seeds
1cupWatermelon Rindchopped
Saltto taste
Oil / Gheeto roast dosas
Instructions
Preparation(Soaking and Fermenting):
Rinse red rice, urad dal, methi and red poha thoroughly and soak together in enough water for 5-6 hours.
Peel the green skin from watermelon rind(white part, some amount of red fruit is fine too). Roughly chop the rind and set aside.
Drain the water from soaked rice and dal mixture. Grind the soaked rice and dal to a smooth batter, along with watermelon rind(i did not use any water while grinding).
Transfer the ground batter to a deep bowl(which has enough space for the batter to rise). Set in a warm place to ferment for about 8-10 hours or overnight.
Method (Making Dosa):
Once the batter has well risen (doubles the volume), add salt and mix well. The batter should be thick and pouring consistency. Add water if required to attain pouring consistency.
Heat a pre-seasoned Cast Iron Dosa Tawa on med-low. When hot, sprinkle water and wipe with a clean towel.
Drizzle a few drops of oil and wipe using a paper towel.
Pour a ladle of dosa batter and spread in a circular motion. Drizzle oil/ghee on top and edges.
Once the dosa is firm and light brown, fold and serve hot with any curry or chutney or sambar.
Healthy & Tasty Dosa is Ready to Relish!!
Video
Notes
Red rice is easily available in many Asian and health food stores and even online.
If Red rice is not available, add any normal idly rice/basmati rice/sona masuri rice in place.
Rice: Rind proportion I make is usually 1:1 (this recipe makes around 10 dosas for 1 cup rice)i.e., if you soak 2 cups rice add 2 cups watermelon Rind. Adjust rind(add more or less) to attain the consistency of batter required, without adding any water while grinding the batter.
This dosa can be made without watermelon rind, just replace rind with water while grinding. This dosa works well with or without watermelon rind.
After ferment add water only if required. I did not use any water while grinding or before making dosas.
The fermenting time might vary depending on the temperature condition in the place you live in. It normally takes 8-10 hours in warm weather. But in cold places, keep the batter inside the oven overnight, with the oven light on. This heat is sufficient enough for batter to rise well. You could even use the YOGURT mode in INSTANT POT for fermenting. Both ways have worked well for me. Try your convenient method and enjoy making dosas irrespective of weather conditions.
This Instant Quinoa oats dosa is one of my favorite and go-to recipes when I am in a hurry to make something healthy and delicious. Being a South Indian and a Dosa fanatic, I get these cravings of Dosa frequently and this recipe is a perfect option.
This tried and tested recipe uses quinoa instead of rice making it a great high protein option. Plus there is no need to ferment the batter, making it a great meal for busy lifestyles. But as we are adding few fenugreek seeds, it not only helps in digestion but also helps in fermentation if you like. Just let the batter sit on the kitchen counter at a warm place and voila, I promise you to get a lovely fermentation there.
Ingredients needed for this QUINOA OATS DOSA
Organic Quinoa – Any color, black, white, or red, or a mix of both. And it makes a great substitute for rice that is high in protein and fiber.
Rolled Oats – Quick or rolled oats. This adds fiber to the dish.
Rice – Gives the dosa a crispy texture
Urad Dal – Adds the traditional earthy dosa taste with creamy texture and proteins
Chana Dal – Helps make the dosa crispy
Fenugreek seeds – Helps in digestion and fermentation if you like it to be.
Salt
Is this DOSA vegan-friendly?
As we are using only plant-based and vegan ingredients it makes a great dish to add to your vegan diet. And it’s gluten-free too.
Look at that even golden crisp texture !! Shall we get into the detailed recipe now. But before that check out more delicious recipes from my blog.
In a mixing bowl add quinoa, chana dal, urad dal, rice, and wash them thoroughly until the water runs clear.
Now add in 5 cups of water in that bowl and add fenugreek seeds, rolled oats and keep aside.
Let everything soak for 5 hours or you can leave it overnight.
Let's make the batter now
Reserve the water from the soaked lentils, quinoa and oats.
In a blender jar add in soaked lentils, quinoa, rice and oats. And blend everything to a fine paste.
Add salt and water gradually just a tbsp at a time and grind to make a smooth batter.
Transfer the Batter into a container and it is ready. You can start making dosa's now. Note : You can refrigerate the batter and use it when needed, or if you like it to ferment just cover the container and let it ferment for 5-6 hours or overnight.
It's DOSA time
Heat a cast iron griddle / tawa / Dosa pan on medium flame, take a ladleful of batter at a time, pour it on tawa and spread it using the back of ladle. Starting from the center of the batter spread it even and thin in circular motion going outwards.
Once you start observing the Dosa turning golden brown, spread a tsp of oil evenly.
Allow the dosa to crisp up further for another couple of minutes and gently slide the spatula underneath the dosa and fold it into half.Note : If you like softer dosa lower the heat and take the dosa out when you see it cooked thoroughly.
Gently oil the griddle / tawa / Dosa pan using an onion or a paper towel before making another dosa. This step helps in achieving a perfect crisp dosa.
Serve hot Quinoa oats dosa with chutney and condiments of your choice.
Notes
You can refrigerate the batter and use upto 4 days.
While making the batter you can also add in some spices like green chilies, cumin seeds and fresh ginger to make it more flavorful. Throw in some greens like spinach or steamed veggies like beets or carrots to make it more nutritious.
Always make sure the griddle isn't too hot, else the batter might stick to the pan and will leave your dosas taste burnt. Keep the flame between low and medium.
If you’ve tried this recipe, please share your valuable feedback in the comments below. Also you can Tag your photo and share it with #mycurryveda on Instagram @mycurryveda or on Facebook .
Palli chutney, an utterly creamy and nutty peanut condiment served alongside Dosa, Idli, Wada and other South Indian tiffins. The green chilies and garlic lends a bit of heat and spice to the creamy peanuts. Then we add a crackling tempering of mustard seeds, curry leaves, and dry red chilies that elevates the flavor and aroma. This Palli chutney / peanut chutney is equally loved by adults and kids, because of it’s nutty and creamy taste.
Chutneys are a quintessential accompaniment to every Indian meal, we always have some kind of chutneys in everyday meals. And this Palli chutney is a regular thing at home in every Telugu household for tiffins like Dosa, Idli, Wada and Upma. It’s super simple, healthy, delicious and comes together quickly under 15 mins.
Like every other recipe, each household or region has their own variation and in Telangana we use only peanuts, chilies, garlic cloves and a basic tempering. You can find peanut chutney with urad dal or some add roasted gram dal or chana dal to make it more nutritious. Below recipe of palli chutney is something I’ve grown up eating and found across Telangana.
Is this recipe Vegan ?
As all the ingredients we are using here are completely plant based, vegan and gluten-free.
Note : Please do not try this recipe if you have peanut allergy.
Ingredients needed for Palli chutney
Peanuts
Green chilies
Garlic cloves
Salt
Tempering – oil, mustard seeds, cumin seeds, garlic cloves, dry red chilies, urad dal and curry leaves
How to make Palli chutney
Firstly we need to roast the peanuts, peeled garlic cloves, green chilies, cumin seeds in a tbsp of oil until peanuts are well roasted.
Let this roasted peanuts to completely cool down, then grind everything to a smooth paste by adding some water.
Add salt, blend it again, taste and adjust the seasoning to your taste preference.
Let’s make a tempering now. Heat a small tadka pan, add oil, once it’s hot enough add in mustard seeds, cumin seeds and urad dal. Let them splutter.
Now add in chopped garlic cloves, curry leaves, dry red chilies and fry until garlic turns golden brown.
Transfer this tempering to the Palli chutney. Voila, that’s it!!
Let’s get into the detailed recipe now, before that check more delicious recipes from my blog.
A delicious condiment or dip made of peanuts, garlic, green chilies and topped with a crackling tempering.
Course Chutneys, condiments
Cuisine Andhra, Telangana
Keyword Chutney, plant based, vegan
Prep Time 5 minutesminutes
Cook Time 10 minutesminutes
Total Time 15 minutesminutes
Servings 4Servings
Author Shravani Abhishek
Equipment
Blender
Skillet
Ingredients
Palli chutney base
½cupPeanuts
1Green chilies
2clovesGarlic
½tspCumin seeds
Tempering
1tbspCooking oil
1tspMustard seeds
1tspCumin seeds
1tspUrad dal
2clovesGarlic
1sprigcurry leaves
2Dry red chilies
1pinchTurmeric powder
Instructions
Let's make the Palli chutney/peanut chutney base
Heat a skillet, add in 2 tbsp of oil, once it's hot add in cumin seeds, peeled garlic cloves, slit green chili, peanuts and roast until peanuts release a nutty aroma and turn golden brown.
Let this mixture cool down to room temperature. Then transfer these to blender, add salt, little water and blend to make a smooth paste.
Taste and adjust the seasoning, add more water to adjust the consistency of chutney to your liking. Blend it again, transfer this chutney to a bowl and keep aside.
Tempering time!!!
Heat the skillet, add oil and once it's hot add in mustard seeds, cumin seeds and urad dal. Let them splutter.
Now add in torn dry red chilies, torn curry leaves, thinly chopped garlic cloves and fry until garlic turns golden brown. Add in pinch of turmeric powder and turn off the heat.
Transfer this sizzling tadka to the Palli chutney, and serve it with Idli, Dosa or any tiffin of your choice.
If you’ve tried this recipe, please share your valuable feedback in the comments below. Also you can Tag your photo and share it with #mycurryveda on Instagram @mycurryveda or on Facebook .


 I’d love to hear from you! Please share your food photo with hashtag #kaviruchi on


