❌

Reading view

There are new articles available, click to refresh the page.

Digital Forensics: Investigating Conti Ransomware with Splunk

Welcome back, aspiring digital forensic investigators!

The world of cybercrime continues to grow every year, and attackers constantly discover new opportunities and techniques to break into systems. One of the most dangerous and well-organized ransomware groups in recent years was Conti. Conti operated almost like a real company, with dedicated teams for developing malware, gaining network access, negotiating with victims, and even providing β€œcustomer support” for payments. The group targeted governments, hospitals, corporations, and many other high-value organizations. Their attacks included encrypting systems, stealing data, and demanding extremely high ransom payments.

For investigators, Conti became an important case study because their operations left behind a wide range of forensic evidence from custom malware samples to fast lateral movement and large-scale data theft. Even though the group officially shut down after their internal chats were leaked, many of their operators, tools, and techniques continued to appear in later attacks. This means Conti’s methods still influence modern ransomware operations which makes it a valid topic for forensic investigators.

Today, we are going to look at a ransomware incident involving Conti malware and analyze it with Splunk to understand how an Exchange server was compromised and what actions the attackers performed once inside.

Splunk

Splunk is a platform that collects and analyzes large amounts of machine data, such as logs from servers, applications, and security tools. It turns this raw information into searchable events, graphs, and alerts that help teams understand what is happening across their systems in real time. Companies mainly use Splunk for monitoring, security operations, and troubleshooting issues. Digital forensics teams also use Splunk because it can quickly pull together evidence from many sources and show patterns that would take much longer to find manually.

Time Filter

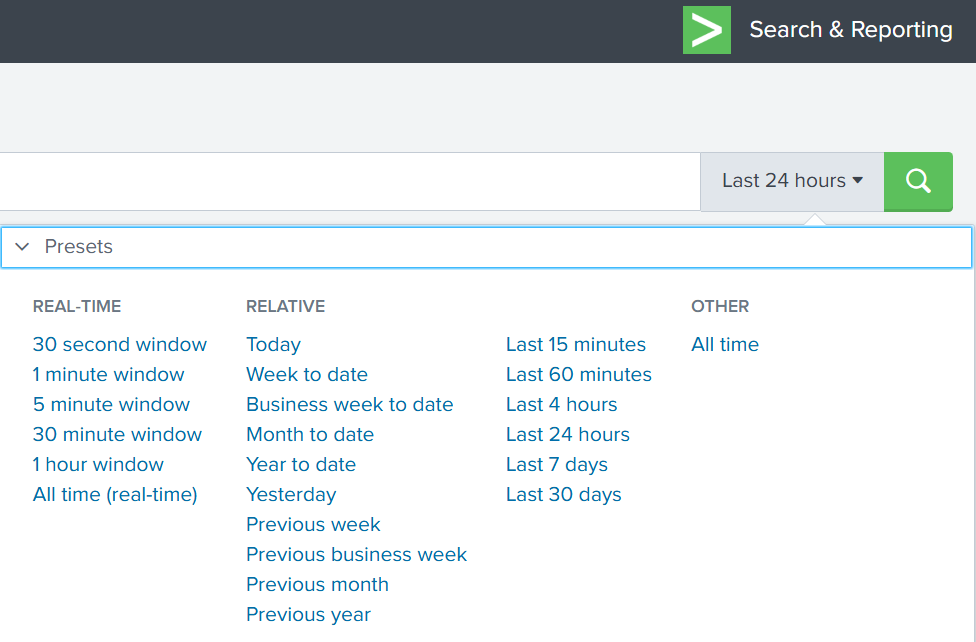
Splunk’s default time range is the last 24 hours. However, when investigating incidents, especially ransomware, you often need a much wider view. Changing the filter to β€œAll time” helps reveal older activity that may be connected to the attack. Many ransomware operations begin weeks or even months before the final encryption stage. Keep in mind that searching all logs can be heavy on large environments, but in our case this wider view is necessary.

time filter on splunk

Index

An index in Splunk is like a storage folder where logs of a particular type are placed. For example, Windows Event Logs may go into one index, firewall logs into another, and antivirus logs into a third. When you specify an index in your search, you tell Splunk exactly where to look. But since we are investigating a ransomware incident, we want to search through every available index:

index=*

analyzing available fields on splunk

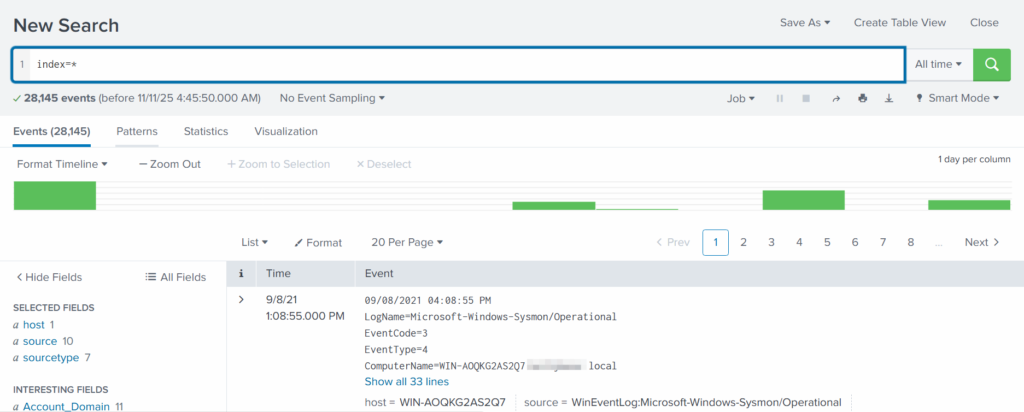
This ensures that nothing is missed and all logs across the environment are visible to us.

Fields

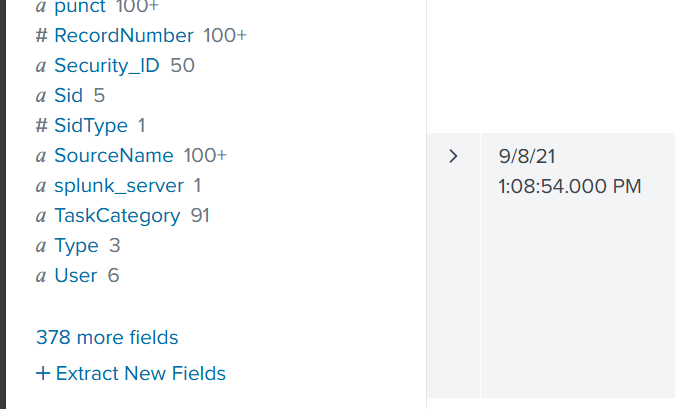
Fields are pieces of information extracted from each log entry, such as usernames, IP addresses, timestamps, file paths, and event IDs. They make your searches much more precise, allowing you to filter events with expressions like src_ip=10.0.0.5 or user=Administrator. In our case, we want to focus on executable files and that is the β€œImage”. If you don’t see it in the left pane, click β€œMore fields” and add it.

adding more fields to splunk search

Once you’ve added it, click Image in the left pane to see the top 10 results.Β 

top 10 executed images

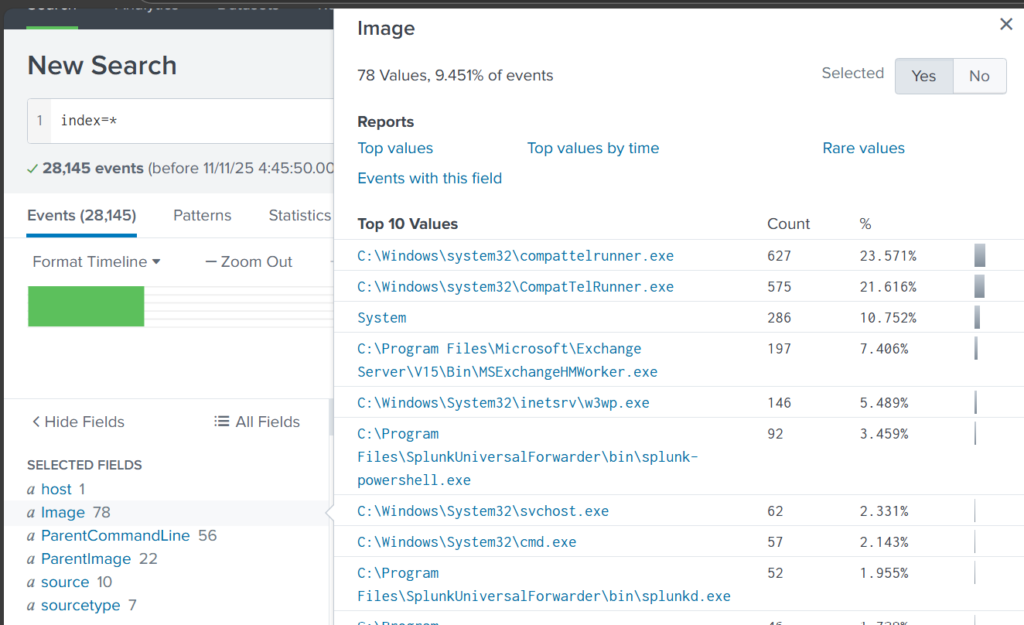
These results are definitely not enough to begin our analysis. We can expand the list using top:Β 

index=* | top limit=100 Image

top 100 results on images executed
suspicious binary found in splunk

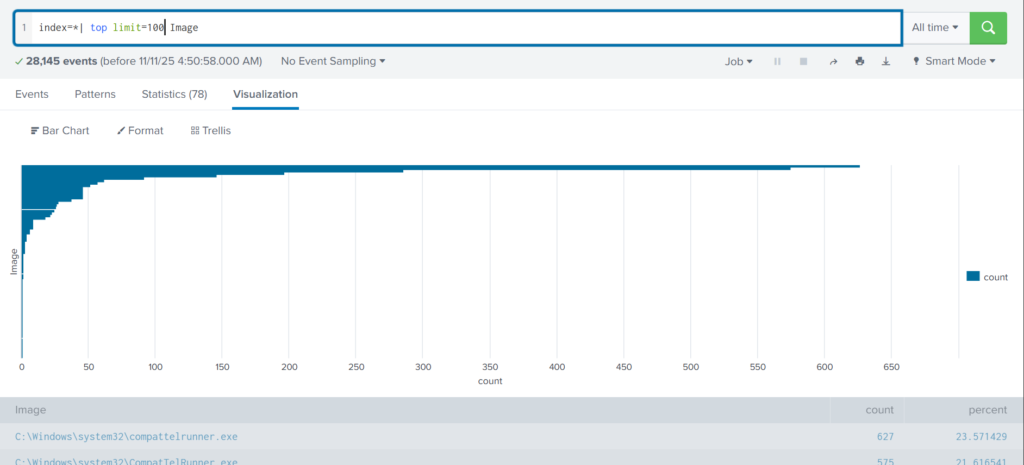
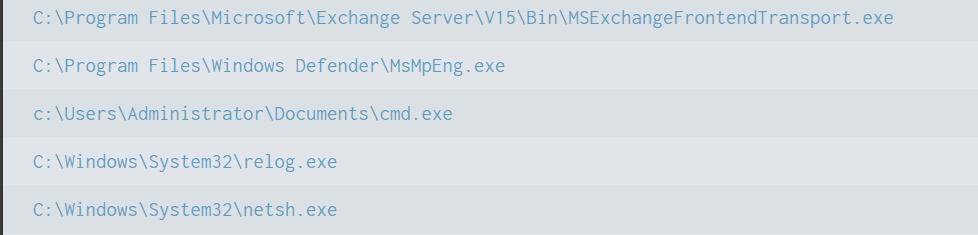
Here the cmd.exe process running in the Administrator’s user folder looks very suspicious. This is unusual, so we should check it closely. We also see commands like net1, net, whoami, and rundll32.

recon commands found

In one of our articles, we learned that net1 works like net and can be used to avoid detection in PowerShell if the security rules only look for net.exe. The rundll32 command is often used to run DLL files and is commonly misused by attackers. It seems the attacker is using normal system tools to explore the system. It also might be that the hackers used rundll32 to stay in the system longer.

At this point, we can already say the attacker performed reconnaissance and could have used rundll32 for persistence or further execution.

Hashes

Next, let’s investigate the suspicious cmd.exe more closely. Its location alone is a red flag, but checking its hashes will confirm whether it is malicious.

index=* Image="C:\\Users\\Administrator\\Documents\\cmd.exe" | table Image, Hashes

getting image hashes in splunk

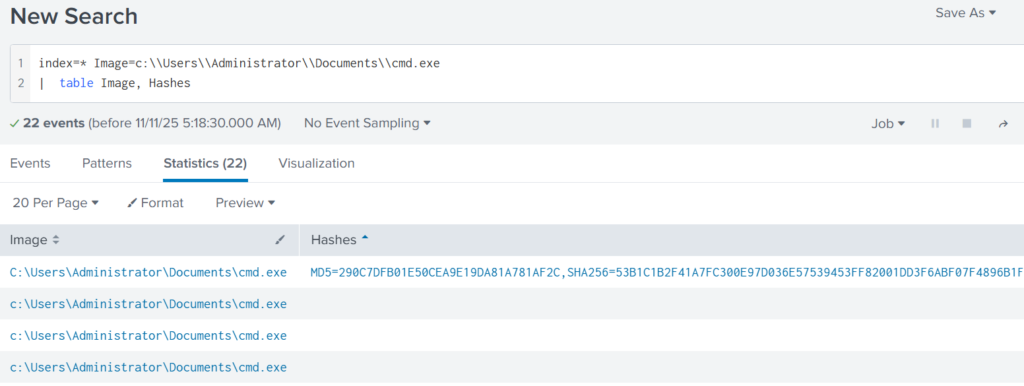
Copy one of the hashes and search for it on VirusTotal.

virus total results of the conti ransomware

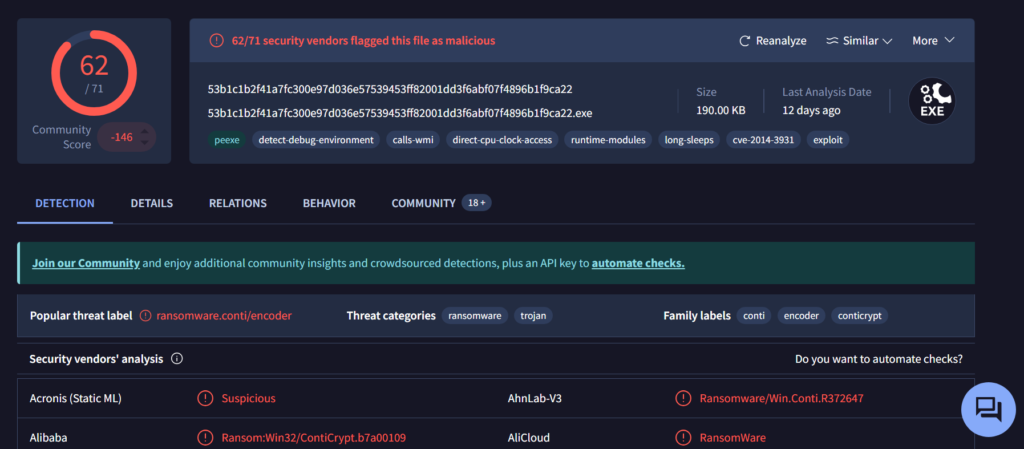
The results confirm that this file belongs to a Conti ransomware sample. VirusTotal provides helpful behavior analysis and detection labels that support our findings. When investigating, give it a closer look to understand exactly what happened to your system.

Net1

Now let’s see what the attacker did using the net1 command:

index=* Image=*net1.exe

net1 found adding a new user to the remore destop users group

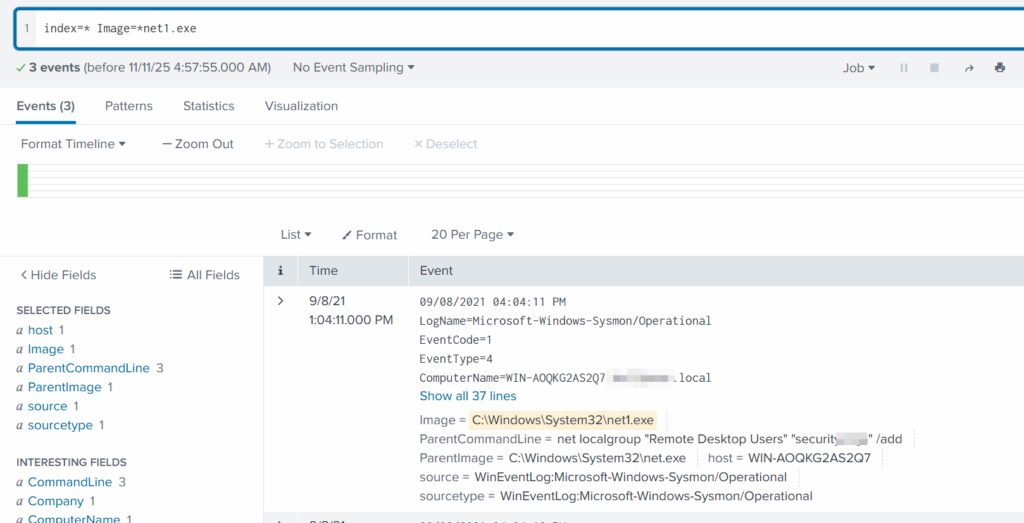
The logs show that a new user was added to the Remote Desktop Users local group. This allows the attacker to log in through RDP on that specific machine. Since this is a local group modification, it affects only that workstation.

In MITRE ATT&CK, this action falls under Persistence. The hackers made sure they could connect to the host even if other credentials were lost. Also, they may have wanted to log in via GUI to explore the system more comfortably.

TargetFilename

This field usually appears in file-related logs, especially Windows Security Logs, Sysmon events, or EDR data. It tells you the exact file path and file name that a process interacted with. This can include files being created, modified, deleted, or accessed. That means we can find files that malware interacted with. If you can’t find the TargetFilename field in the left pane, just add it.

Run:

index=* Image="C:\\Users\\Administrator\\Documents\\cmd.exe"

Then select TargetFilename

ransom notes found

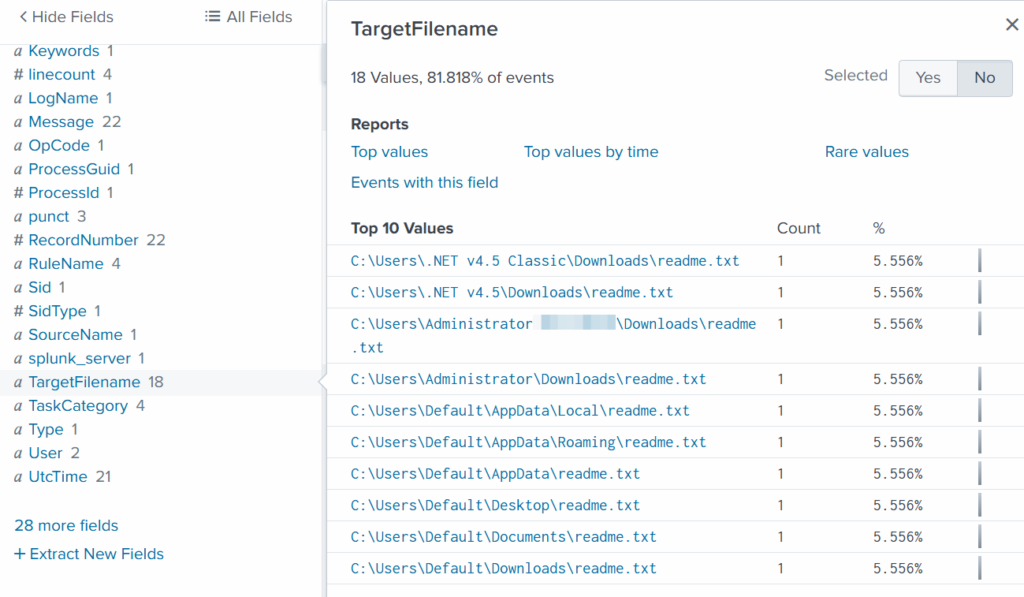
We see that the ransomware created many β€œreadme” files with a ransom note. This is common behavior for ransomware to spread notes everywhere. Encrypting data is the last step in attacks like this. We need to figure out how the attacker got into the system and gained high privileges.

Before we do that, let’s see how the ransomware was propagated across the domain:

index=* TargetFileName=*cmd.exe

wmi subscription propagated the ransomware

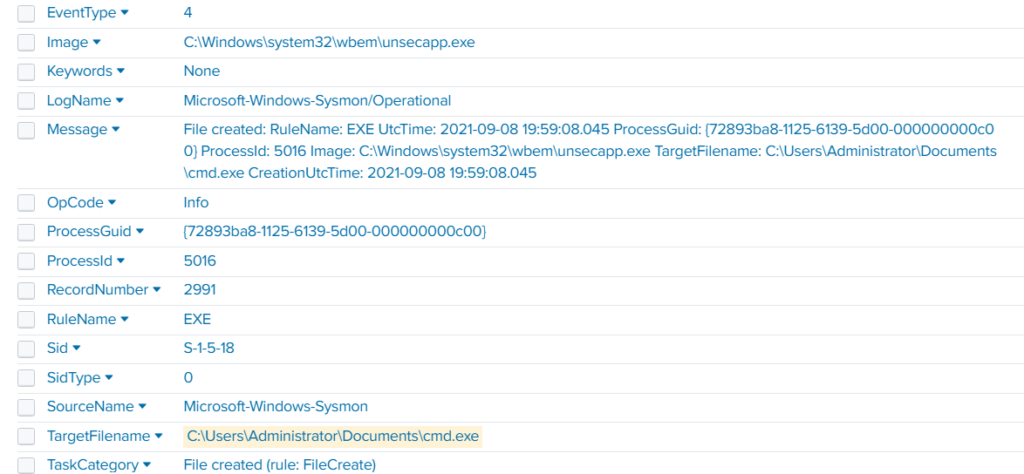
While unsecapp.exe is a legitimate Microsoft binary. When it appears, it usually means something triggered WMI activity, because Windows launches unsecapp.exe only when a program needs to receive asynchronous WMI callbacks. In our case the ransomware was spread using WMI and infected other hosts where the port was open. This is a very common approach.Β 

Sysmon Events

Sysmon Event ID 8 indicates a CreateRemoteThread event, meaning one process created a thread inside another. This is a strong sign of malicious activity because attackers use it for process injection, privilege escalation, or credential theft.

List these events:

index=* EventCode=8

event code 8 found

Expanding the log reveals another executable interacting with lsass.exe. This is extremely suspicious because lsass.exe stores credentials. Attacking LSASS is a common step for harvesting passwords or hashes.

found wmi subscription accessing lsass.exe to dump creds

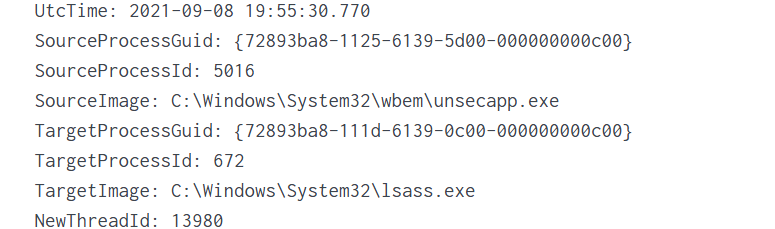
Another instance of unsecapp.exe being used. It’s not normal to see it accessing lsass.exe. Our best guess here would be that something used WMI, and that WMI activity triggered code running inside unsecapp.exe that ended up touching LSASS. The goal behind it could be to dump LSASS every now and then until the domain admin credentials are found. If the domain admins are not in the Protected Users group, their credentials are stored in the memory of the machine they access. If that machine is compromised, the whole domain is compromised as well.

Exchange Server Compromise

Exchange servers are a popular target for attackers. Over the years, they have suffered from multiple critical vulnerabilities. They also hold high privileges in the domain, making them valuable entry points. In this case, the hackers used the ProxyShell vulnerability chain. The exploit abused the mailbox export function to write a malicious .aspx file (a web shell) to any folder that Exchange can access. Instead of a harmless mailbox export, Exchange unknowingly writes a web shell directly into the FrontEnd web directory. From there, the attacker can execute system commands, upload tools, and create accounts with high privileges.

To find the malicious .aspx file in our logs we should query this:

index=* source=*sysmon* *aspx

finding an aspx shell used for exchange compromise with proxyshell

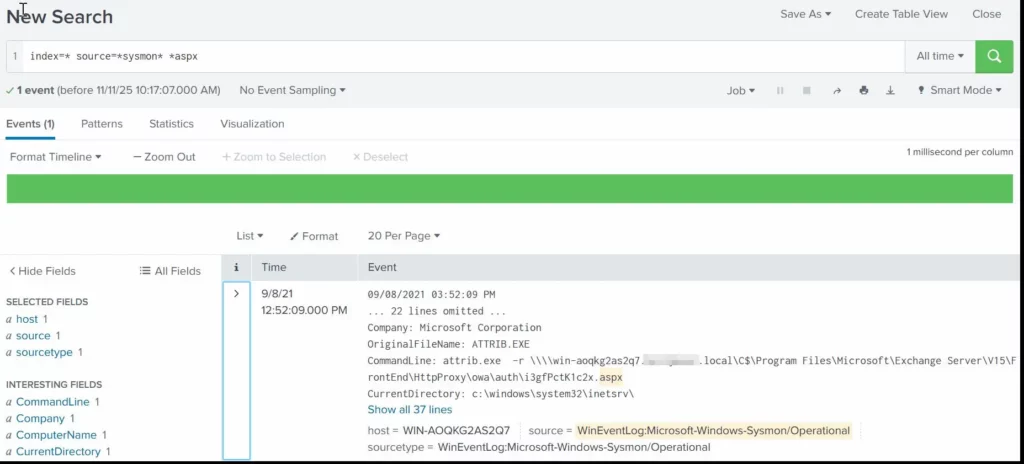
We can clearly see that the web shell was placed where Exchange has web-accessible permissions. This webshell was the access point.

Timeline

The attack began when the intruder exploited the ProxyShell vulnerabilities on the Exchange server. By abusing the mailbox export feature, they forced Exchange to write a malicious .aspx web shell into a web-accessible directory. This web shell became their entry point and allowed them to run commands directly on the server with high privileges. After gaining access, the attacker carried out quiet reconnaissance using built-in tools such as cmd.exe, net1, whoami and rundll32. Using net1, the attacker added a new user to the Remote Desktop Users group to maintain persistence and guarantee a backup login method. The attacker then spread the ransomware across the network using WMI. The appearance of unsecapp.exe showed that WMI activity was being used to launch the malware on other hosts. Sysmon Event ID 8 logged remote thread creation where the system binary attempts to access lsass.exe. This suggests the attacker tried to dump credentials from memory. This activity points to a mix of WMI abuse and process injection aimed at obtaining higher privileges, especially domain-level credentials.Β 

Finally, once the attacker had moved laterally and prepared the environment, the ransomware (cmd.exe) encrypted systems and began creating ransom note files throughout these systems. This marked the last stage of the operation.

Summary

Ransomware is more than just a virus, it’s a carefully planned attack where attackers move through a network quietly before causing damage. In digital forensics we often face these attacks and investigating them means piecing together how it entered the system, what tools it used, which accounts it compromised, and how it spread. Logs, processes, file changes tell part of the story. By following these traces, we understand the attacker’s methods, see where defenses failed, and learn how to prevent future attacks. It’s like reconstructing a crime scene. Sometimes, we might be lucky enough to shut down their entire infrastructure before they can cause more damage.

If you need forensic assistance, you can hire our team to investigate and mitigate incidents. Additionally, we provide classes on digital forensics for those looking to expand their skills and understanding in this field.Β 

Network Forensics: Analyzing a Server Compromise (CVE-2022-25237)

Welcome back, aspiring forensic and incident response investigators.

Today we are going to learn more about a branch of digital forensics that focuses on networks, which is Network Forensics. This field often contains a wealth of valuable evidence. Even though skilled attackers may evade endpoint controls, active network captures are harder to hide. Many of the attacker’s actions generate traffic that is recorded. Intrusion detection and prevention systems (IDS/IPS) can also surface malicious activity quickly, although not every organization deploys them. In this exercise you will see what can be extracted from IDS/IPS logs and a packet capture during a network forensic analysis.

The incident we will investigate today involved a credential-stuffing attempt followed by exploitation of CVE-2022-25237. The attacker abused an API to run commands and establish persistence. Below are the details and later a timeline of the attack.

Intro

Our subject is a fast-growing startup that uses a business management platform. Documentation for that platform is limited, and the startup administrators have not followed strong security practices. For this exercise we act as the security team. Our objective is to confirm the compromise using network packet captures (PCAP) and exported security logs.

We obtained an archive containing the artifacts needed for the investigation. It includes a .pcap network traffic file and a .json file with security events. Wireshark will be our primary analysis tool.

network artifacts for the analysis

Analysis

Defining Key IP Addresses

The company suspects its management platform was breached. To identify which platform and which hosts are involved, we start with the pcap file. In Wireshark, view the TCP endpoints from the Statistics menu and sort by packet count to see which IP addresses dominate the capture.

endpoints in wireshark with higher reception

This quickly highlights the IP address 172.31.6.44 as a major recipient of traffic. The traffic to that host uses ports 37022, 8080, 61254, 61255, and 22. Common service associations for these ports are: 8080 for HTTP, 22 for SSH, and 37022 as an arbitrary TCP data port that the environment is using.

When you identify heavy talkers in a capture, export their connection lists and timestamps immediately. That gives you a focused subset to work from and preserves the context of later findings.

Analyzing HTTP Traffic

The port usage suggests the management platform is web-based. Filter HTTP traffic in Wireshark with http.request to inspect client requests. The first notable entry is a GET request whose URL and headers match Bonitasoft’s platform, showing the company uses Bonitasoft for business management.

http traffic that look like brute force

Below that GET request you can see a series of authentication attempts (POST requests) originating from 156.146.62.213. The login attempts include usernames that reveal the attacker has done corporate OSINT and enumerated staff names.

The credentials used for the attack are not generic wordlist guesses, instead the attacker tries a focused set of credentials. That behavior is consistent with credential stuffing: the attacker uses previously leaked username/password pairs (often from other breaches) and tries them against this service, typically automated and sometimes distributed via a botnet to blend with normal traffic.

credentil stuffing spotted

A credential-stuffing event alone does not prove a successful compromise. The next step is to check whether any of the login attempts produced a successful authentication. Before doing that, we review the IDS/IPS alerts.

Finding the CVE

To inspect the JSON alert file in a shell environment, format it with jq and then see what’s inside. Here is how you can make the json output easier to read:

bash$ > cat alerts.json | jq .

reading alert log file

Obviously, the file will be too big, so we will narrow it down to indicators such as CVE:

bash$ > cat alerts.json | jq .

grepping cves in the alert log file

Security tools often map detected signatures to known CVE identifiers. In our case, alert data and correlation with the observed HTTP requests point to repeated attempts to exploit CVE-2022-25237, a vulnerability affecting Bonita Web 2021.2. The exploit abuses insufficient validation in the RestAPIAuthorizationFilter (or related i18n translation logic). By appending crafted data to a URL, an attacker can reach privileged API endpoints, potentially enabling remote code execution or privilege escalation.

cve 2022-25237 information

Now we verify whether exploitation actually succeeded.

Exploitation

To find successful authentications, filter responses with:

http.response.code >= 200 and http.response.code < 300 and ip.addr == 172.31.6.44

filtering http responses with successful authentication

Among the successful responses, HTTP 204 entries stand out because they are less common than HTTP 200. If we follow the HTTP stream for a 204 response, the request stream shows valid credentials followed immediately by a 204 response and cookie assignment. That means he successfully logged in. This is the point where the attacker moves from probing to interacting with privileged endpoints.

finding a successful authentication

After authenticating, the attacker targets the API to exploit the vulnerability. In the traffic we can see an upload of rce_api_extension.zip, which enables remote code execution. Later this zip file will be deleted to remove unnecessary traces.

finding the api abuse after the authentication
attacker uploaded a zip file to abuse the api

Following the upload, we can observe commands executed on the server. The attacker reads /etc/passwd and runs whoami. In the output we see access to sensitive system information.

reading the passwd file
the attacker assessing his privileges

During a forensic investigation you should extract the uploaded files from the capture or request the original file from the source system (if available). Analyzing the uploaded code is essential to understand the artifact of compromise and to find indicators of lateral movement or backdoors

Persistence

After initial control, attackers typically establish persistence. In this incident, all attacker activity is over HTTP, so we follow subsequent HTTP requests to find persistence mechanisms.

the attacker establishes persistence with pastes.io

The attacker downloads a script hosted on a paste service (pastes.io), named bx6gcr0et8, which then retrieves another snippet hffgra4unv, appending its output to /home/ubuntu/.ssh/authorized_keys when executed. The attacker restarts SSH to apply the new key.

reading the bash script used to establish persistence

A few lines below we can see that the first script was executed via bash, completing the persistence setup.

the persistence script is executed

Appending keys to authorized_keys allows SSH access for the attacker’s key pair and doesn’t require a password. It’s a stealthy persistence technique that avoids adding new files that antivirus might flag. In this case the attacker relied on built-in Linux mechanisms rather than installing malware.

When you find modifications to authorized_keys, pull the exact key material from the capture and compare it with known attacker keys or with subsequent SSH connection fingerprints. That helps attribute later logins to this initial persistence action.

Mittre SSH Authorized Keys information

Post-Exploitation

Further examination of the pcap shows the server reaching out to Ubuntu repositories to download a .deb package that contains Nmap.Β 

attacker downloads a deb file with nmap

Shortly after SSH access is obtained, we see traffic from a second IP address, 95.181.232.30, connecting over port 22. Correlating timestamps shows the command to download the .deb package was issued from that SSH session. Once Nmap is present, the attacker performs a port scan of 34.207.150.13.

attacker performs nmap scan

This sequence, adding an SSH key, then using SSH to install reconnaissance tools and scan other hosts fits a common post-exploitation pattern. Hackers establish persistent access, stage tools, and then enumerate the network for lateral movement opportunities.

During forensic investigations, save the sequence of timestamps that link file downloads, package installation, and scanning activity. Those correlations are important for incident timelines and for identifying which sessions performed which actions.

Timeline

At the start, the attacker attempted credential stuffing against the management server. Successful login occurred with the credentials seb.broom / g0vernm3nt. After authentication, the attacker exploited CVE-2022-25237 in Bonita Web 2021.2 to reach privileged API endpoints and uploaded rce_api_extension.zip. They then executed commands such as whoami and cat /etc/passwd to confirm privileges and enumerate users.

The attacker removed rce_api_extension.zip from the web server to reduce obvious traces. Using pastes.io from IP 138.199.59.221, the attacker executed a bash script that appended data to /home/ubuntu/.ssh/authorized_keys, enabling SSH persistence (MITRE ATT&CK: SSH Authorized Keys, T1098.004). Shortly after persistence was established, an SSH connection from 95.181.232.30 issued commands to download a .deb package containing Nmap. The attacker used Nmap to scan 34.207.150.13 and then terminated the SSH session.

Conclusion

During our network forensics exercise we saw how packet captures and IDS/IPS logs can reveal the flow of a compromise, from credential stuffing, through exploitation of a web-application vulnerability, to command execution and persistence via SSH keys. We practiced using Wireshark to trace HTTP streams, observed credential stuffing in action, and followed the attacker’s persistence mechanism.

Although our class focused on analysis, in real incidents you should always preserve originals and record every artifact with exact timestamps. Create cryptographic hashes of artifacts, maintain a chain of custody, and work only on copies. These steps protect the integrity of evidence and are essential if the incident leads to legal action.

For those of you interested in deepening your digital forensics skills, we will be running a practical SCADA forensics course soon in November. This intensive, hands-on course teaches forensic techniques specific to Industrial Control Systems and SCADA environments showing you how to collect and preserve evidence from PLCs, RTUs, HMIs and engineering workstations, reconstruct attack chains, and identify indicators of compromise in OT networks. Its focus on real-world labs and breach simulations will make your CV stand out. Practical OT/SCADA skills are rare and highly valued, so completing a course like this is definitely going to make your CV stand out.Β 

We also offer digital forensics services for organizations and individuals. Contact us to discuss your case and which services suit your needs.

Learn more: https://hackersarise.thinkific.com/courses/scada-forensics

The post Network Forensics: Analyzing a Server Compromise (CVE-2022-25237) first appeared on Hackers Arise.

Digital Forensics: Getting Started Becoming a Forensics Investigator

Welcome, aspiring forensic investigators!

Welcome to the new Digital Forensics module. In this guide we introduce digital forensics, outline the main phases of a forensic investigation, and survey a large set of tools you’ll commonly meet. Think of this as a practical map: the article briefly covers the process and analysis stages and points to tools you can use depending on your objectives. Later in the course we’ll dig deeper into Windows and Linux artifacts and show how to apply the most common tools to real cases.

Digital forensics is growing fast because cyber incidents are happening every day. Budget limits, legacy systems, and weak segmentation leave many organizations exposed. AI and automation make attacks easier and fasterю. Human mistakes, especially successful phishing, remain a top cause of breaches. When prevention fails, digital forensics helps answer what happened, how it happened, and what to do next. It’s a mix of technical skills, careful procedure, and clear reporting.

What is Digital Forensics?

Digital forensics (also called computer forensics or cyber forensics) is the discipline of collecting, preserving, analyzing, and presenting digital evidence from computers, servers, mobile devices, networks, and storage media. It grew from early law-enforcement needs in the 1980s into a mature field in the 1990s and beyond, as cybercrime increased and investigators developed repeatable methods.

Digital forensics supports incident response, fraud investigations, data recovery, and threat hunting. The goals are to reconstruct timelines, identify malicious activity, measure impact, and produce evidence suitable for legal, regulatory, or incident-response use.

digital forensics specialists analyzing the hardware

Main Fields Inside Digital Forensics

Digital forensics branches into several focused areas. Each requires different tools and approaches.

Computer forensics

Focuses on artifacts from a single machine: RAM, disk images, the Windows registry, system logs, file metadata, deleted files, and local application data. The aim is to recreate what a user or a piece of malware did on that host.

Network forensics

Covers packet captures, flow records, and logs from routers, firewalls and proxies. Analysts use network data to trace communications, find command-and-control channels, spot data exfiltration, and follow attacker movement across infrastructure.

Forensic data analysis

Deals with parsing and interpreting files, database contents, and binary data left after an intrusion. It includes reverse engineering malware fragments, reconstructing corrupted files, and extracting meaningful information from raw or partially damaged data.

Mobile device forensics

Targets smartphones and tablets. Android and iOS store data differently from desktops, so investigators use specialized methods to extract messages, app data, calling records, and geolocation artifacts.

Hardware forensics

The most specialized area: low-level analysis of firmware, microcontrollers, and embedded devices. This work may involve extracting firmware from chips, analyzing device internals, or studying custom hardware behavior (for example, the firmware of an IoT transmitter or a skimmer installed on an ATM).

hardware forensics

Methods and approaches

Digital forensics work generally falls into two modes: static (offline) analysis and live (in-place) analysis. Both are valid. The choice depends on goals and constraints.

Static analysis

The traditional workflow. Investigators take the device offline, build a bit-for-bit forensic image, and analyze copies in a lab. Static analysis is ideal for deep disk work: carving deleted files, examining file system metadata, and creating a defensible chain of custody for evidence.

Live analysis

Used when volatile data matters or when the system cannot be taken offline. Live techniques capture RAM contents, running processes, open network connections, and credentials kept in memory. Live collection gives access to transient artifacts that vanish on reboot, but it requires careful documentation to avoid altering evidence.

Live vs Static

Static work preserves the exact state of disk data and is easier to reproduce. Live work captures volatile evidence that static imaging cannot. Modern incidents often need both. They start with live capture to preserve RAM and active state, then create static images for deeper analysis.

The forensic process

1. Create a forensic image

Make a bit-for-bit copy of storage or memory. Work on the copy. Never change the original.

2. Document the system’s state

Record running processes, network connections, logged-in users, system time, and any other volatile details before power-down.

3. Identify and preserve evidence

Locate files, logs, configurations, memory dumps, and external devices. Preserve them with hashes and a clear chain of custody.

4. Analyze the evidence

Use appropriate tools to inspect logs, binaries, file systems, and memory. Look for malware artifacts, unauthorized accounts, and modified system components.

5. Timeline analysis

Correlate timestamps across artifacts to reconstruct the sequence of events and show how an incident unfolded.

6. Identify indicators of compromise (IOCs)

Extract file hashes, IP addresses, domains, registry keys, and behavioral signatures that indicate malicious activity.

7. Report and document

Produce a clear, well-documented report describing methods, findings, conclusions, and recommended next steps.

mobile forensics

Toolset Overview

Below is a compact reference to common tools grouped by purpose. Later modules will show hands-on use for Windows and Linux artifacts.

Imaging and acquisition

FTK Imager β€” Windows tool for creating forensic copies and basic preview.

dc3dd / dcfldd β€” Forensic versions of dd with improved logging and hashing.

Guymager β€” Fast, reliable imaging with a GUI.

DumpIt / Magnet RAM Capture β€” Simple, effective RAM capture utilities.

Live RAM Capturer β€” For memory collection from live systems.

Image mounting and processing

Imagemounter β€” Mount images for read-only analysis.

Libewf β€” Support for EnCase Evidence File format.

Xmount β€” Convert and remap image formats for flexible analysis.

File and binary analysis

HxD / wxHexEditor / Synalyze It! β€” Hex editors for direct file and binary inspection.

Bstrings β€” Search binary images with regex for hidden strings.

Bulk_extractor β€” Extract emails, credit card numbers, and artifacts from disk images.

PhotoRec β€” File carving and deleted file recovery.

Memory and process analysis

Volatility / Rekall β€” Industry standard frameworks for memory analysis and artifact extraction.

Memoryze β€” RAM analysis, including swap and process memory.

KeeFarce β€” Extracts KeePass data from memory snapshots.

Network and browser forensics

Wireshark β€” Packet capture and deep protocol analysis.

SiLK β€” Scalable flow collection and analysis for large networks.

NetworkMiner β€” Passive network forensics that rebuilds sessions and files.

Hindsight / chrome-url-dumper β€” Recover browser history and user activity from Chrome artifacts.

Mail and messaging analysis

PST/OST/EDB Viewers β€” Tools to inspect Exchange and Outlook data files offline.

Mail Viewer β€” Supports multiple mailstore formats for quick inspection.

Disk and filesystem utilities

The Sleuth Kit / Autopsy β€” Open-source forensic platform for disk analysis and timeline creation.

Digital Forensics Framework β€” Modular platform for file and system analysis.

Specialized extraction and searching

FastIR Collector β€” Collects live forensic artifacts from Windows hosts quickly.

FRED β€” Registry analysis and parsing.

NTFS USN Journal Parser / RecuperaBit β€” Recover change history and reconstruct deleted/changed files.

Evidence processing and reporting

EnCase β€” Commercial suite for imaging, analysis, and court-ready reporting.

Oxygen Forensic Detective β€” Strong platform for mobile device extraction and cloud artifact analysis.

Practical notes and best practices

a) Preserve original evidence. Always work with verified copies and record cryptographic hashes.

b) Capture volatile data early. RAM and live state can vanish on reboot. Prioritize their collection when necessary.

c) Keep clear records. Document every action, including tools and versions, timestamps, and the chain of custody.

d) Match tools to goals. Use lightweight tools for quick triage and more powerful suites for deep dives.

e) Plan for scalability. Network forensics can generate huge data sets. Prepare storage and filtering strategies ahead of time.

Summary

We introduced digital forensics and laid out the main concepts you’ll need to start practical work: the different forensic disciplines, the distinction between live and static analysis, a concise process checklist, and a broad toolset organized by purpose. Digital forensics sits at the intersection of incident response, threat intelligence, and legal evidence collection. The methods and tools presented here form a foundation. In later lessons we’ll work through hands-on examples for Windows and Linux artifacts, demonstrate key tools in action, and show how to build timelines and extract actionable IOCs.Β 

Keep in mind that good forensic work is disciplined, repeatable, and well documented. That’s what makes the evidence useful and the investigation reliable.

If you need forensic assistance, we offer professional services to help investigate and mitigate incidents. Additionally, we provide classes on digital forensics for those looking to expand their skills and understanding in this field.

The post Digital Forensics: Getting Started Becoming a Forensics Investigator first appeared on Hackers Arise.

❌