TLDR: We successfully migrated our core RabbitMQ messaging infrastructure from a self-hosted cluster on EKS to managed Amazon MQ to eliminate the significant operational burden of being accidental RabbitMQ experts. The complexity stemmed from over 50 interconnected services and a zero-downtime, zero-loss requirement. Our strategy involved meticulous auditing, mirroring the setup, and a “downstream-first” live cutover using Shovel plugins as a critical failsafe. The result is a much more stable, predictable platform, freeing up engineering cycles to focus 100% on building security features for our customers instead of debugging infrastructure failures.
Picture this: it’s 3 AM, and your message broker is acting up. Queue depths are climbing, consumers are dropping off, and your on-call engineer is frantically restarting pods in a Kubernetes cluster they barely understand. Sound familiar?
For years, we lived this reality with our self-hosted RabbitMQ running on EKS. Sure, we had “complete control” over our messaging infrastructure, but that control came with a hidden cost: becoming accidental RabbitMQ experts, a costly operational distraction from our core mission: accelerating the release of features that directly benefit our customers and help them keep their assets secure.
The breaking point came when we realized our message broker had become a single point of failure—not just technically, but organizationally. Only a handful of people could troubleshoot it, and with a mandatory Kubernetes upgrade looming, we knew it was time for a change.
Enter Amazon MQ: AWS’s managed RabbitMQ service that promised to abstract away the operational headaches.
But here’s the challenge: we couldn’t just flip a switch. We had over 50 services pumping business-critical messages through our queues 24/7. Payment processing, user notifications, data sync—the works. Losing a single message was unacceptable. One wrong move and we’d risk impacting our security platform’s reliability.
This is the story of how we carefully migrated our entire messaging infrastructure while maintaining zero downtime and absolute data integrity. It wasn’t simple, but the process yielded significant lessons in operational maturity.
Background: The Old vs. The New
The Old Setup (RabbitMQ on EKS)
Running your own RabbitMQ cluster feels empowering at first. You have complete control, can tweak every setting, and it’s “just another container” in your Kubernetes cluster. But that control comes with a price. When RabbitMQ starts acting up, someone on your team needs to know enough about clustering, memory management, and disk usage patterns to fix it. We found ourselves becoming accidental RabbitMQ experts when we really just wanted to send messages between services.
The bus factor was real. Only a handful of people felt comfortable diving into RabbitMQ issues. When those people were on vacation or busy with other projects, incidents would sit longer than they should. Every security patch meant carefully planning downtime windows. Every Kubernetes upgrade meant worrying about how it would affect our message broker. It was technical debt disguised as infrastructure.
The warning signs were there. Staging would occasionally have weird behavior—messages getting stuck, consumers dropping off, memory spikes that didn’t make sense. We’d restart the services and things would go back to normal, but you can only kick the can down the road for so long. When similar issues started appearing in production, even briefly, we knew we were on borrowed time.
Kubernetes doesn’t stand still, and neither should your clusters. But major version upgrades can be nerve-wracking when you have critical infrastructure running on top. The thought of our message broker potentially breaking during a Kubernetes upgrade—taking down half our platform in the process—was the final push we needed to look for alternatives.
The New Setup (Amazon MQ)
With Amazon MQ, someone else worries about keeping RabbitMQ running. AWS handles the clustering, the backups, the failover scenarios you hope never happen but probably will. It’s still RabbitMQ under the hood, but wrapped in the kind of operational expertise that comes from running thousands of message brokers across the globe.
AWS takes care of many of the routine operational tasks, though you still need to plan maintenance windows for major upgrades. The difference is that these are less frequent and more predictable than the constant patching and troubleshooting we dealt with before. The monitoring becomes simpler too—you may still use Grafana panels, but now they pull from CloudWatch instead of requiring Prometheus exporters and custom metrics collection.
Amazon MQ isn’t serverless though, so you still need to choose the right instance size and monitor both CPU, RAM, and disk usage carefully. Since disk space is tied to your instance type, running out of space is still a real concern that requires monitoring and planning. The key difference is that you’re monitoring well-defined resources rather than debugging mysterious cluster behavior.
Security by default is always better than security by choice. Amazon MQ doesn’t give you the option to run insecure connections, which means you can’t accidentally deploy something with plaintext message traffic. It’s one less thing to worry about during security audits and one less way for sensitive data to leak.
When your message broker just works, developers can focus on the business logic that actually matters. You still get Slack alerts when things go wrong and queue configuration is still something you need to think about, but you’re no longer troubleshooting clustering issues or debugging why nodes can’t talk to each other at 2 AM. The platform shifts from something that breaks unexpectedly to something that fails predictably with proper monitoring.
The Migration Challenge
Complex Service Dependencies
Over 50 services depended on RabbitMQ:
- Some only consumed messages.
- Some only produced messages.
- Some did both.
Like many companies that have grown organically, our RabbitMQ usage had evolved into a complex web of dependencies. Fifty-plus services might not sound like a massive number in some contexts, but when each service potentially talks to multiple queues and many services interact with each other through messaging, the dependency graph becomes surprisingly intricate. Services that started simple had grown tentacles reaching into multiple queues. New features had been built on top of existing message flows. What looked like a straightforward “change the connection string” problem on paper turned into a careful choreography of moving pieces.
Zero Downtime Requirement
Messages were business-critical – downtime was not an option.
These weren’t just debug logs or nice-to-have notifications flowing through our queues. Payment processing, user notifications, data synchronization between systems—the kind of stuff that immediately breaks the user experience if it stops working. The pressure was real: migrate everything successfully or risk significant business impact.
Migration Risks
Risks included:
- Dropped or duplicated messages.
- Consumers/producers falling out of sync.
- Unexpected latency or queue build-up.
Message systems have this nasty property where small problems can cascade quickly. A consumer that falls behind can cause queues to back up. A producer that starts sending to the wrong place can create ghost traffic that’s hard to trace. During a migration, you’re essentially rewiring the nervous system of your platform while it’s still running—there’s no room for “oops, let me try that again.”
We needed a plan to untangle dependencies and migrate traffic safely.
Our Migration Approach
1. Audit and Preparation
Service Mapping and Analysis
Before touching anything, we needed to understand what we were working with. This meant going through every service, every queue, every exchange, and drawing out the connections. Some were obvious—the email service clearly produces to the email queue. Others were surprising—why was the user service consuming from the analytics queue? Documentation helped, but sometimes the only way to be sure was reading code and checking configurations.
The RabbitMQ management API proved invaluable during this phase. We used it to query all the queues, exchanges, bindings, and connection details—basically everything we needed to get a complete picture of our messaging topology. This automated approach was much more reliable than trying to piece together information from scattered documentation and service configs.

Interactive topology chart showing service dependencies and message flows
With all this data, we created visual representations using go-echarts to generate interactive charts showing message flows and dependencies. We even fed the information to Figma AI to create clean visual maps of all the connections and queue relationships. Having these visual representations made it much easier to spot unexpected dependencies and plan our migration order.
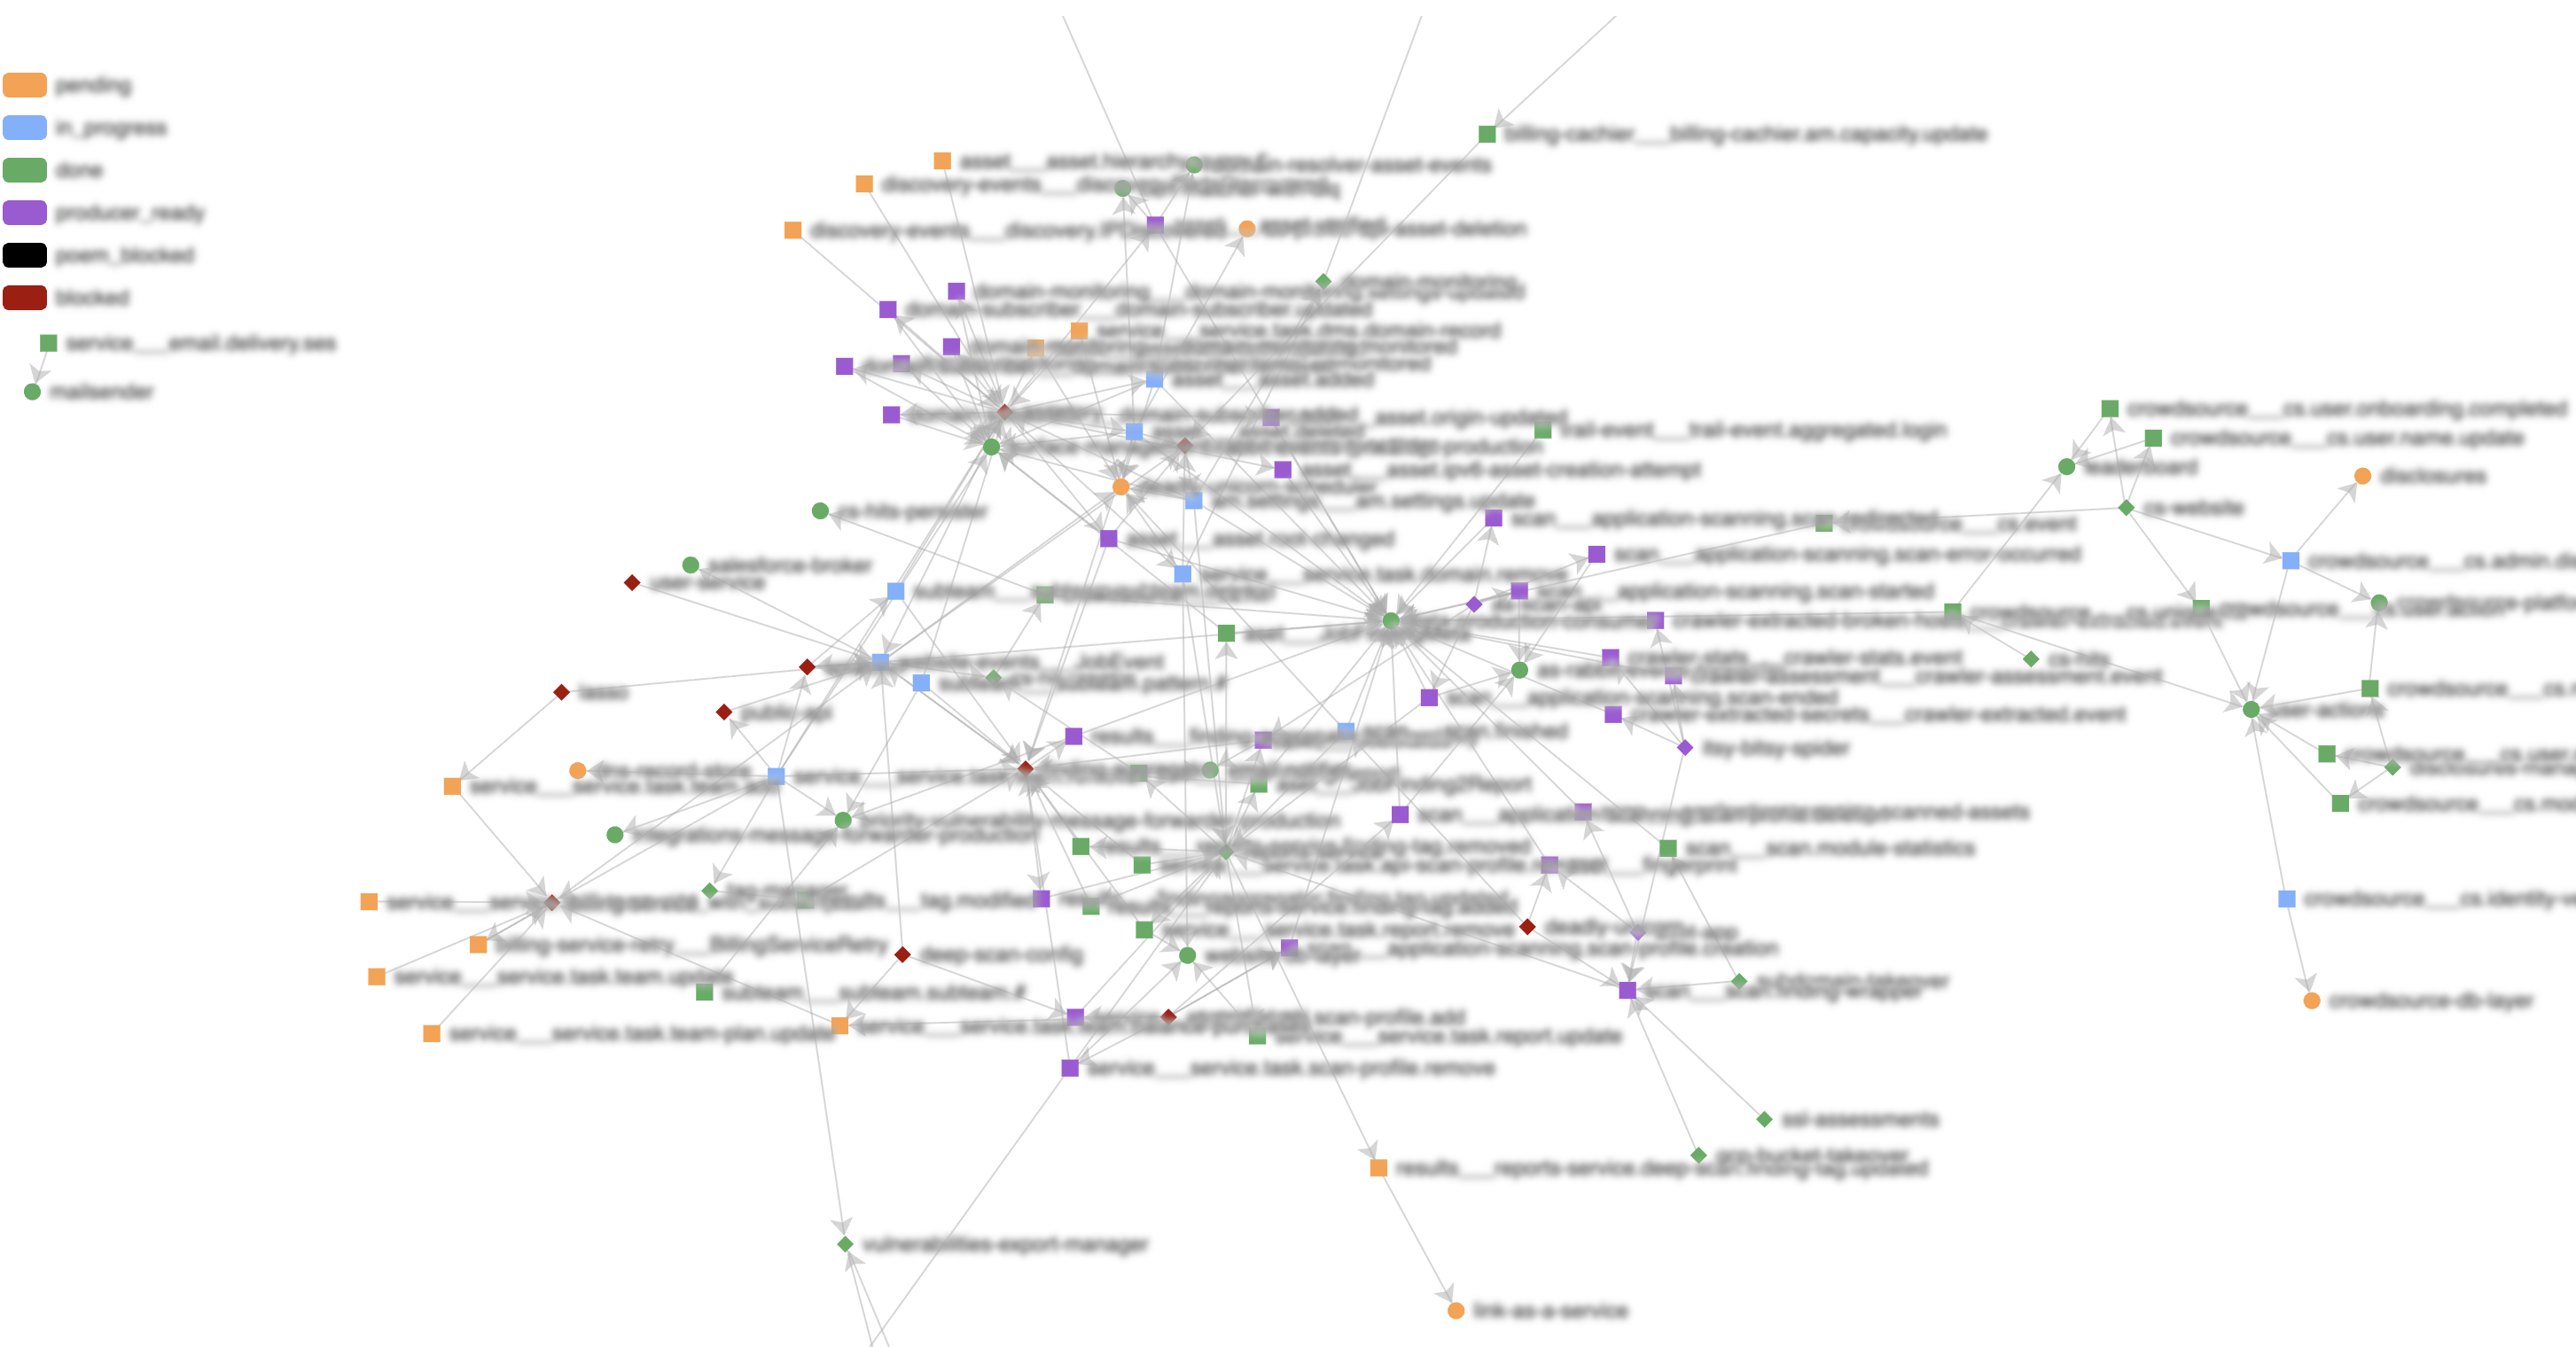
Visual map of RabbitMQ connections and dependencies
The visualizations helped us identify both hotspots where many services converged, and “low hanging fruits”—services that weren’t dependent on many other components. By targeting these first, we could remove nodes from the dependency graph, which gradually un-nested the complexity and unlocked safer migration paths for upstream services. Each successful migration simplified the overall picture and reduced the risk for subsequent moves.
Service Categorization
- Consumer-only
- Producer-only
- Consumer + Producer
This categorization became our migration strategy. Consumer-only services were the easiest—we could point them at the new broker without affecting upstream systems. Producer-only services were next—as long as consumers were already moved, producers could follow safely. The Consumer+Producer services were the trickiest and needed special handling.
Migration Roadmap
Having a plan beats winging it every time. We could see which services to migrate first, which ones to save for last, and where the potential problem areas were. It also helped with communication—instead of “we’re migrating RabbitMQ sometime soon,” we could say “we’re starting with the logging services this week, then the notification system the week after.”
Safety Net Strategy
Shovels became a critical part of our strategy from day one. These plugins can copy messages from one queue to another, even across different brokers, which meant we could ensure message continuity during the migration. Instead of trying to coordinate perfect timing between when producers stop sending to the old broker and consumers start reading from the new one, shovels would bridge that gap and guarantee no messages were lost in transit.
2. Build a Mirror Setup
Export Configuration
We exported the complete configuration from our old RabbitMQ cluster, including:
- Queues
- Exchanges
- Users & permissions
RabbitMQ’s export feature became our best friend. Instead of manually recreating dozens of queues and exchanges, we could dump the entire configuration from the old cluster. This wasn’t just about saving time—it was about avoiding the subtle differences that could cause weird bugs later. Queue durability settings, exchange types, binding patterns—all the little details that are easy to get wrong when doing things by hand.
Mirror the Setup
We then imported everything into Amazon MQ to create an identical setup:
- Same queue names and exchanges.
- Same credentials.
The goal was to make the new broker as close to a drop-in replacement as possible. Services shouldn’t need to know they’re talking to a different broker—same queue names, same exchange routing, same user accounts. This consistency was crucial for a smooth migration and made it easier to roll back if something went wrong.
Queue Type Optimization
We made one strategic change: most queues were upgraded to quorum queues for better durability, except for one high-traffic queue where quorum caused performance issues.
Quorum queues are RabbitMQ’s answer to the classic “what happens if the broker crashes mid-message” problem. They’re more durable but use more resources. For most of our queues, the trade-off made sense. But we had one queue that handled hundreds of messages per second, and the overhead of quorum consensus was too much. Sometimes the best technical solution isn’t the right solution for your specific constraints.
3. Live Cutover
Once the new broker was ready, we began moving services live. But we didn’t start with production—we had the same setup mirrored in staging, which became our testing ground. For every service migration, we’d first execute the switch in staging to validate the process, then repeat the same steps in production once we were confident everything worked smoothly.
Consumer-Only Services
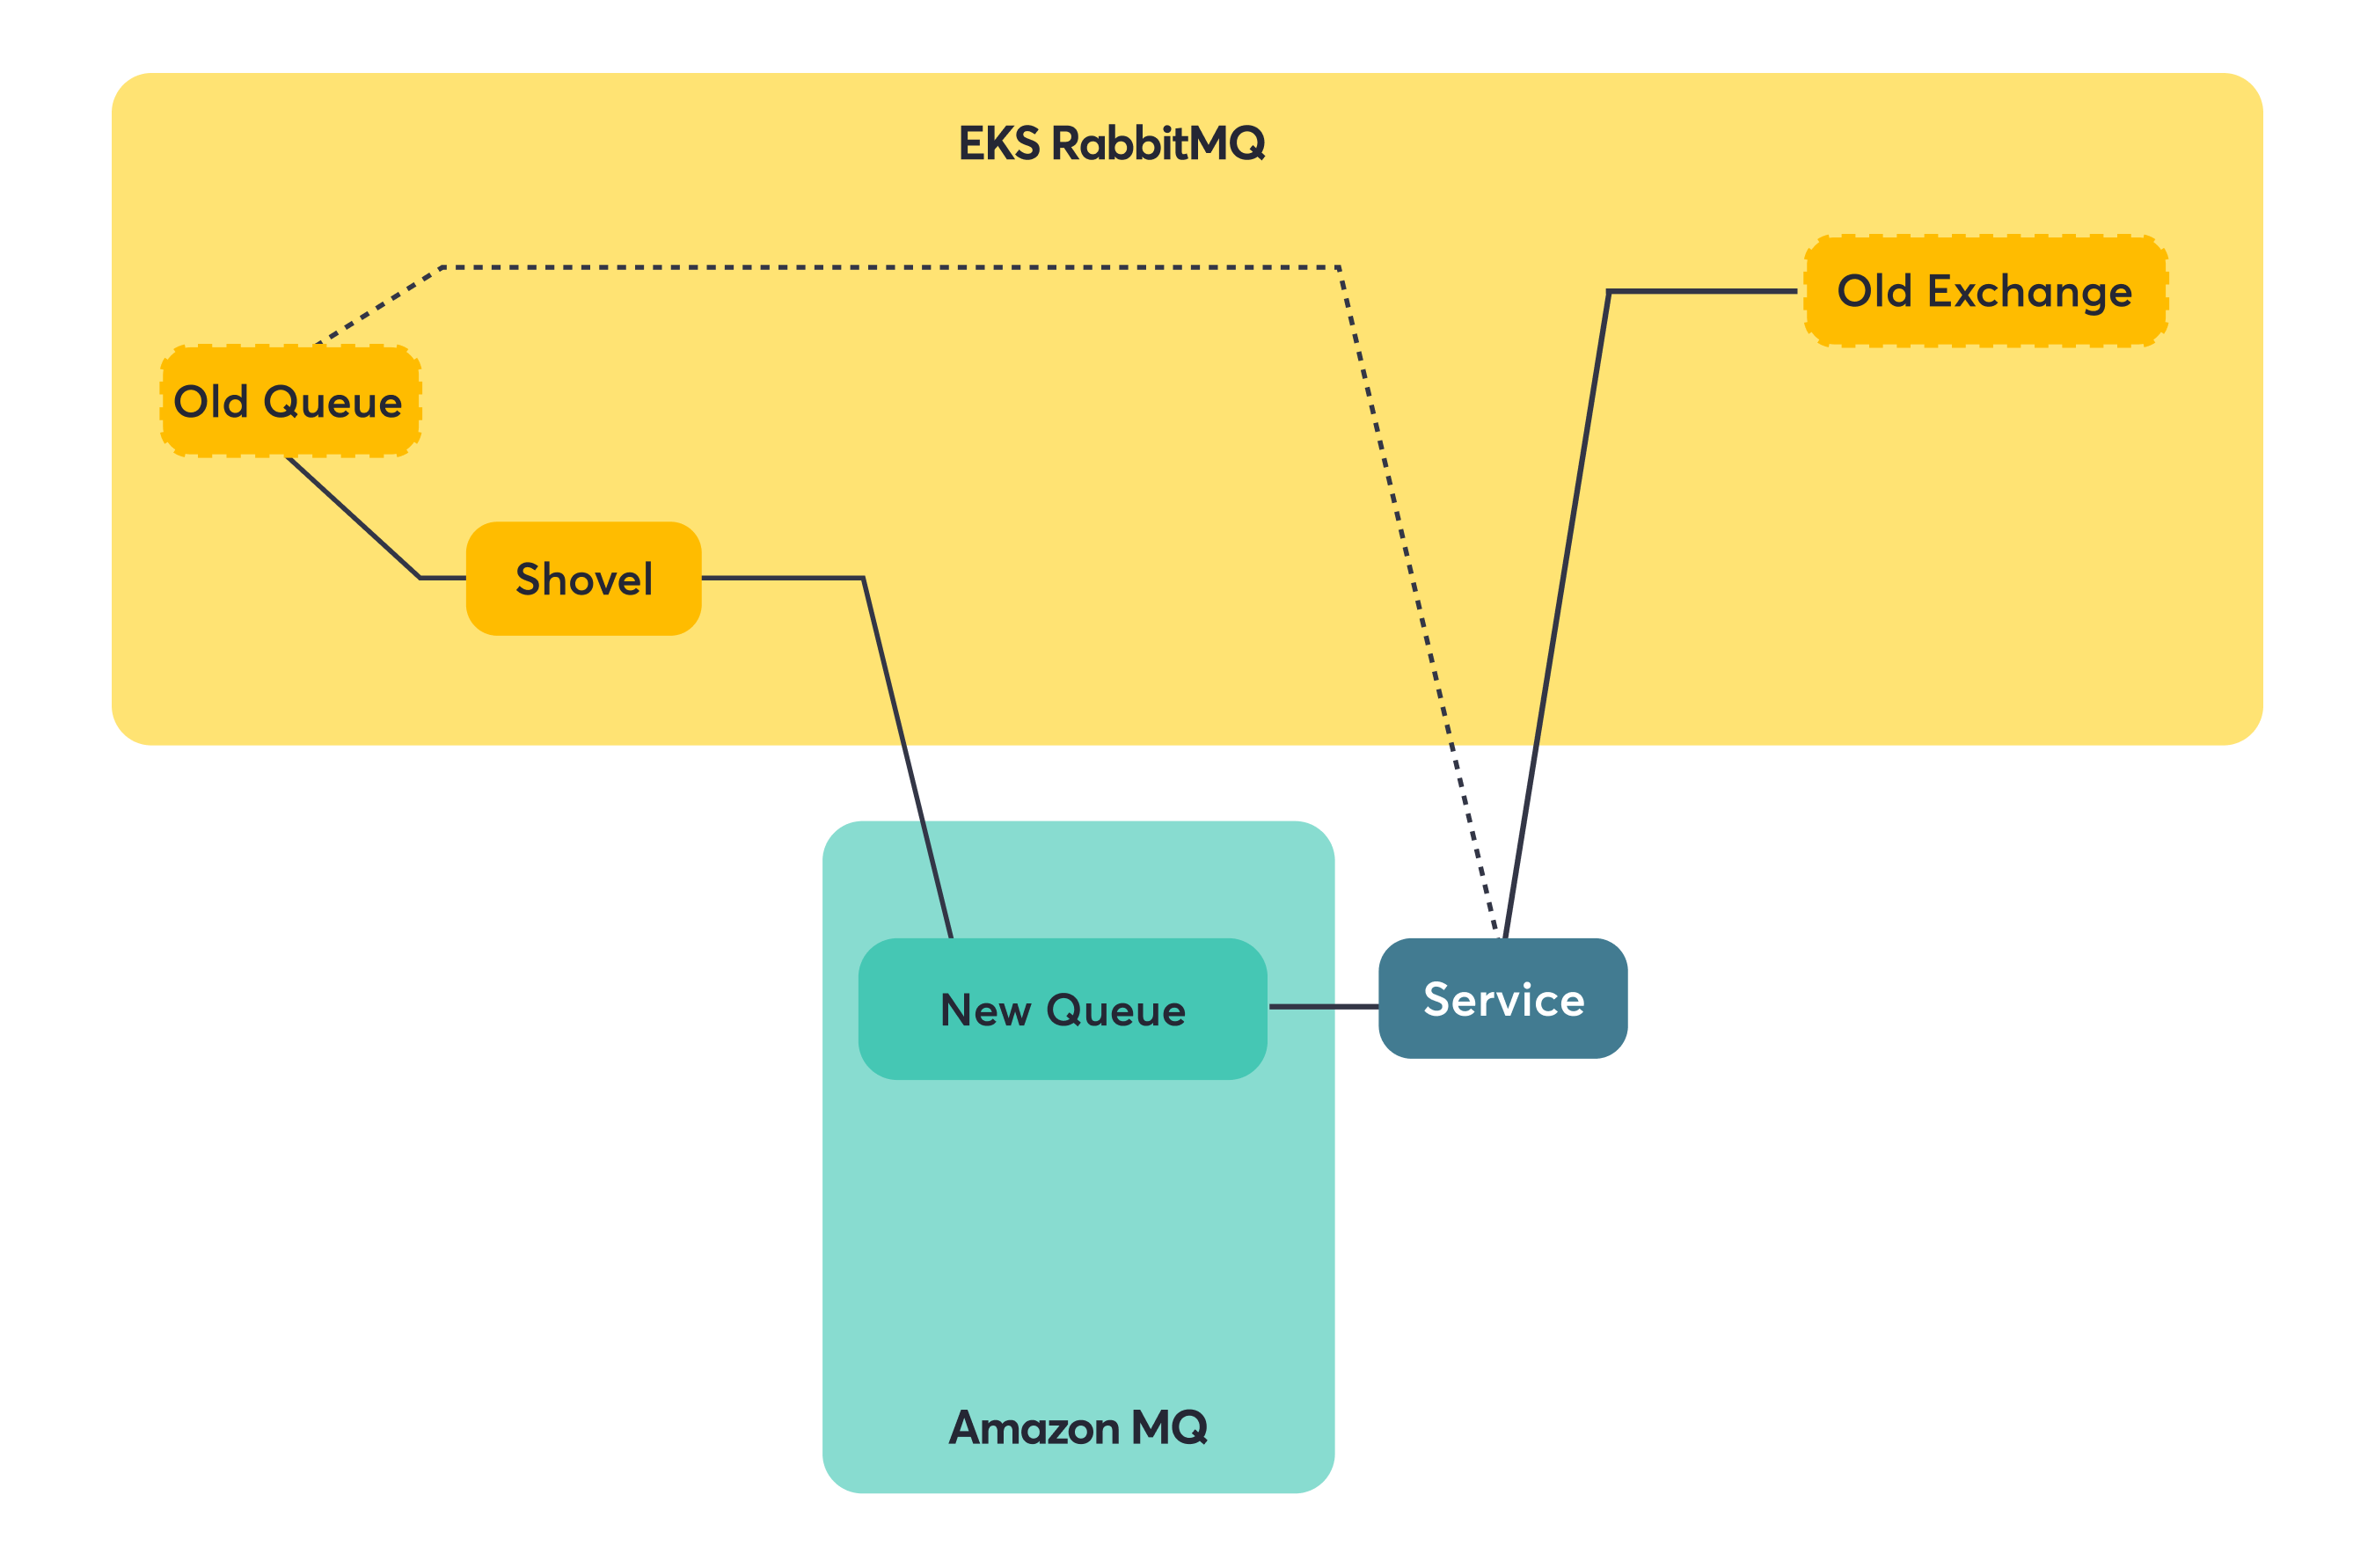
Consumer-only services were our practice round. We could move them over and if something went wrong, the blast radius was limited. The shovel plugin became our safety net—it copies messages from one queue to another, even across different brokers. This meant messages sent to the old queue while we were migrating would still reach consumers on the new broker. No lost messages, no service interruption.
Step 1: Switch consumer to Amazon MQ.
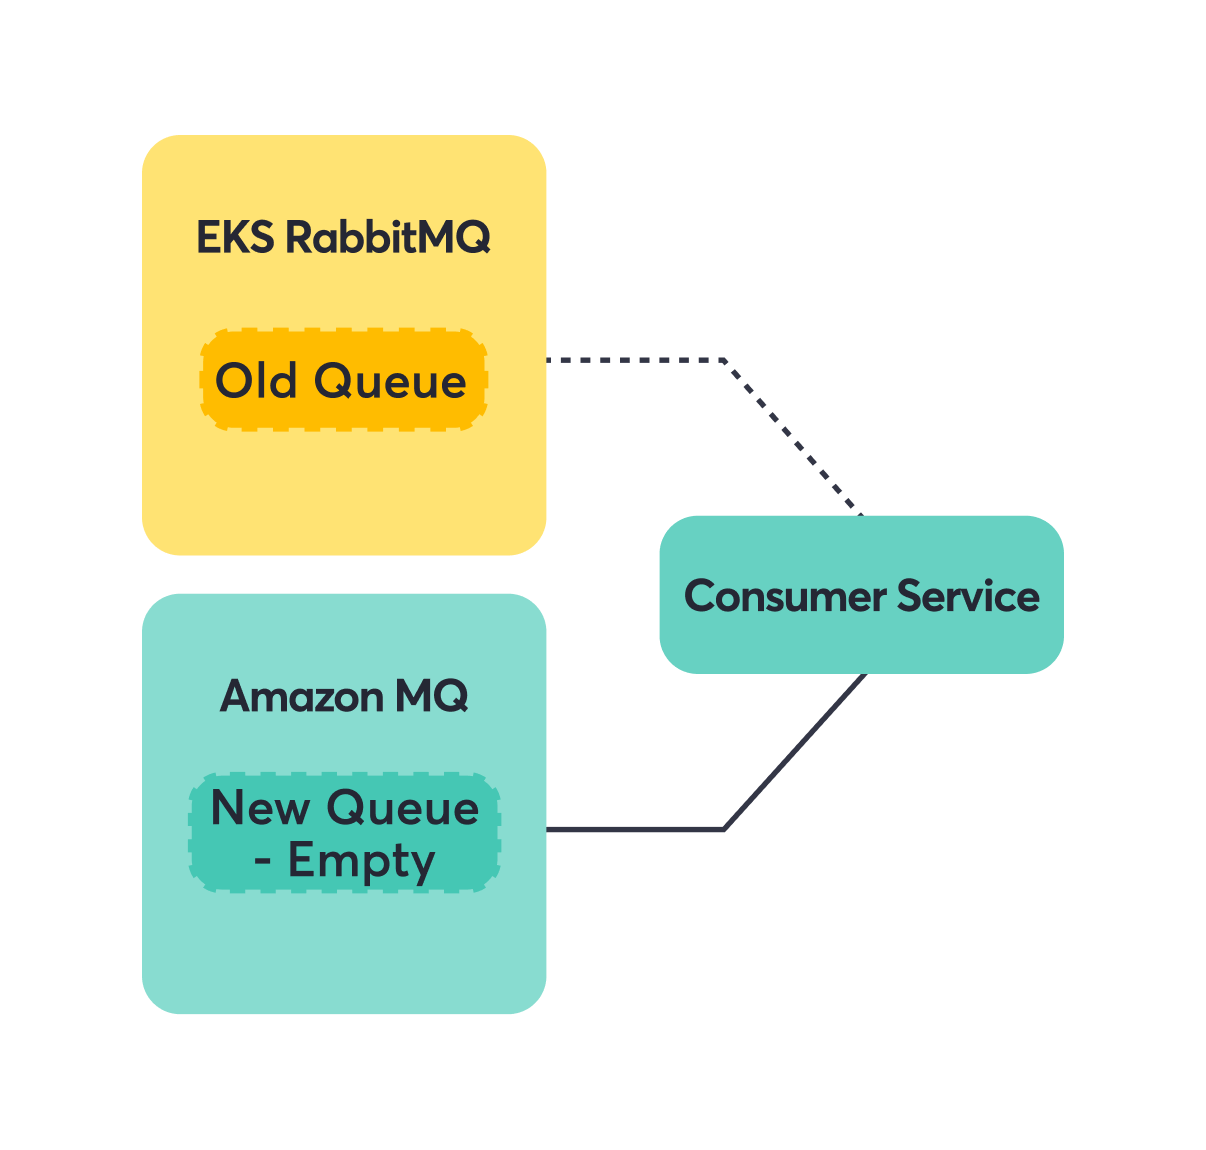
Step 2: Add shovel to forward messages from the EKS RabbitMQ Old Queue to the Amazon MQ New Queue.

Step 3: Consumers seamlessly read from Amazon MQ.

Producer-Only Services
Once consumers were happily reading from Amazon MQ, we could focus on the producers. Since the queue and exchange names were identical, producers just needed a new connection string. Messages would flow into the same logical destinations, just hosted on different infrastructure.
Note: For a producer to be eligible for migration, you want all the downstream consumers to be migrated first.
Step 1: Switch producer to Amazon MQ.
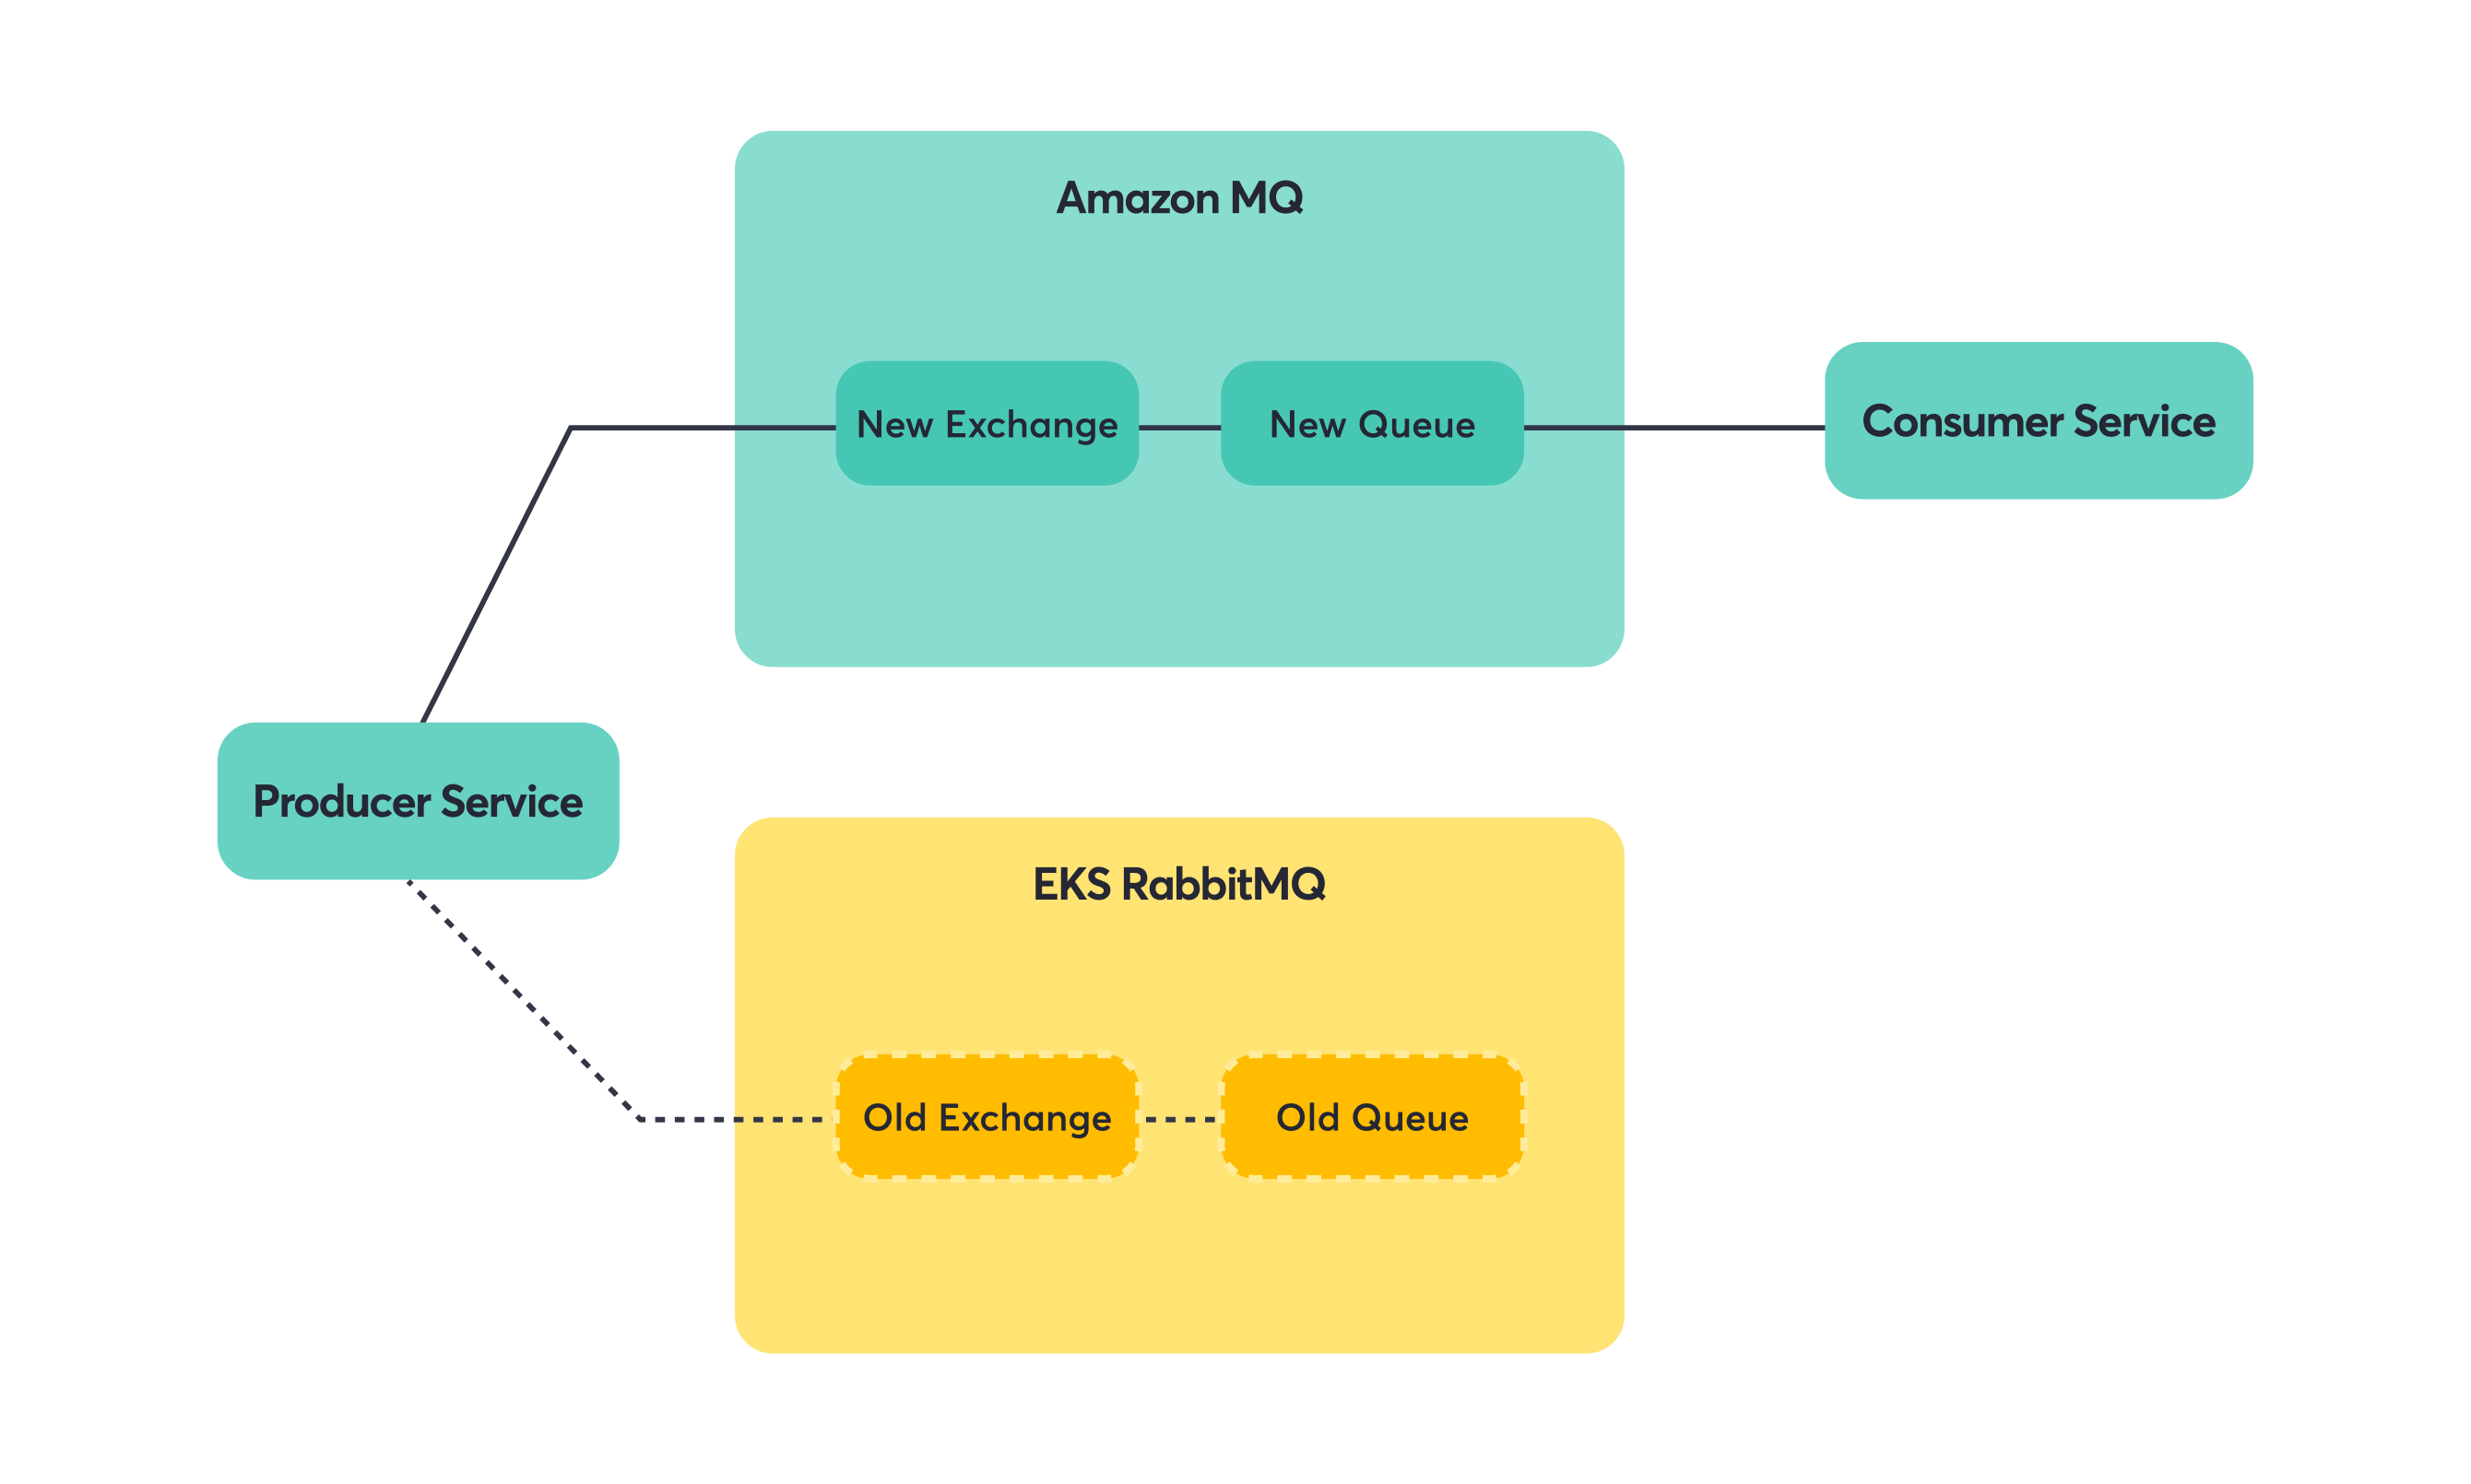
Step 2: Messages flow to the same queues via the new exchange/broker.

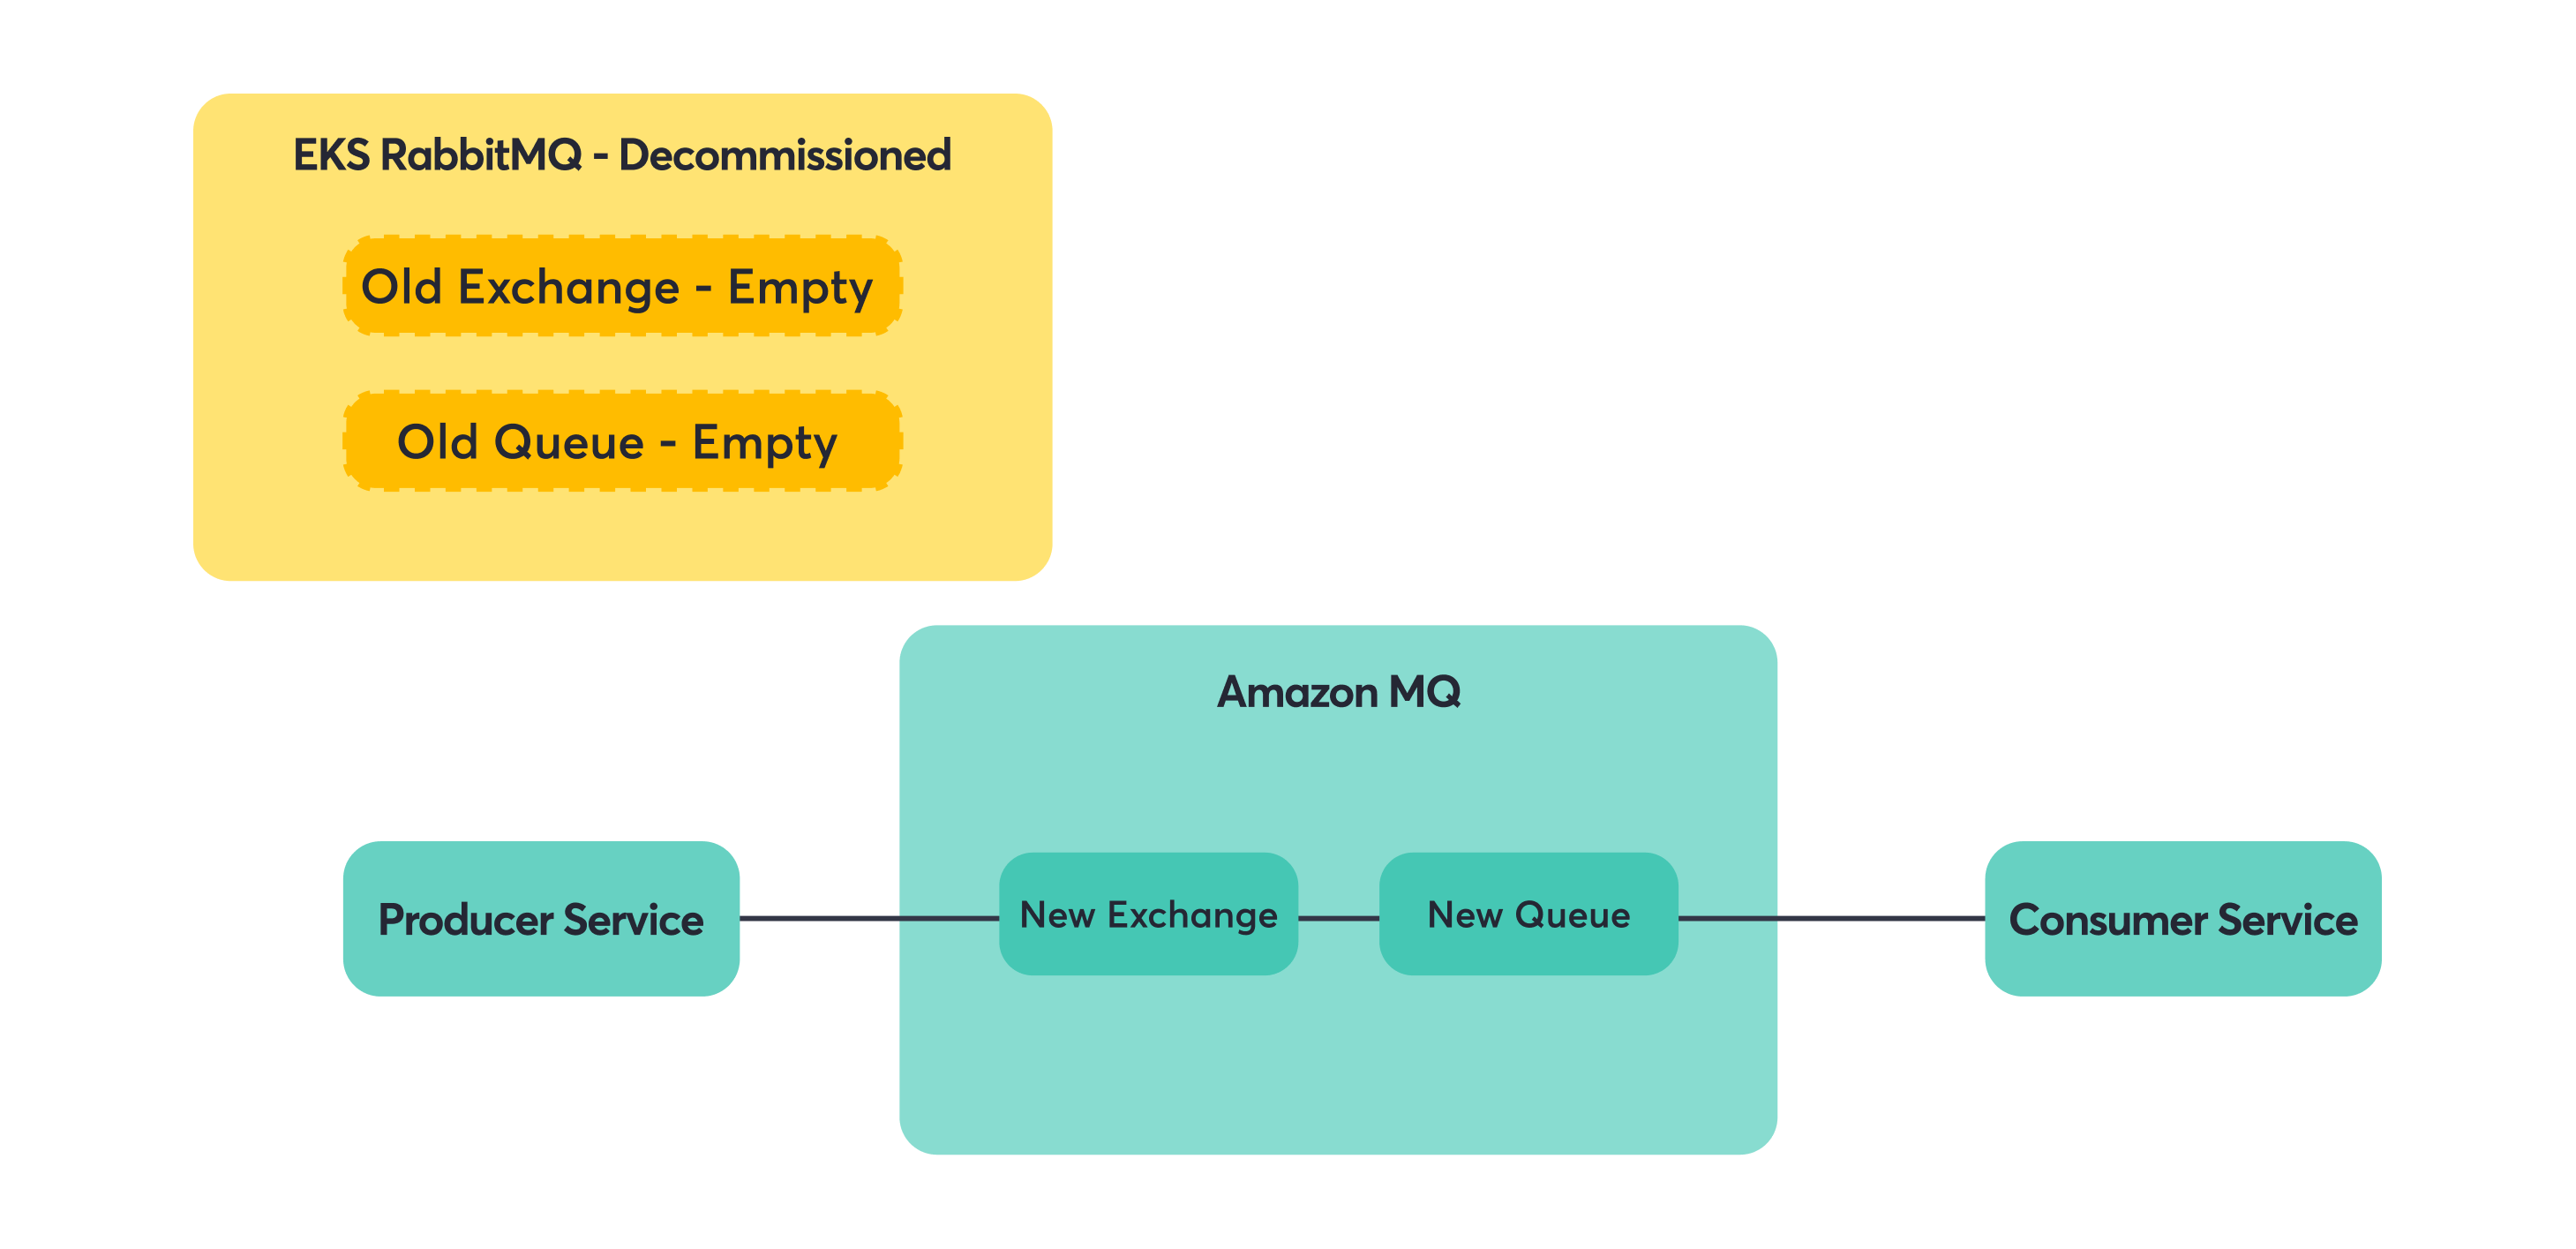
Step 3: Remove shovel (cleanup).
Key principle: migrate downstream consumers first, then producers to avoid lost messages.
This principle saved us from a lot of potential headaches. If you move producers first, you risk having messages sent to a new broker that doesn’t have consumers yet. Move consumers first, and you can always use shovels or other mechanisms to ensure messages reach them, regardless of where producers are sending.
Consumer + Producer Services
These services were the final boss of our migration. They couldn’t be treated as simple consumer-only or producer-only cases because they did both. Switching them all at once meant they’d start consuming from Amazon MQ before all the upstream producers had migrated, potentially missing messages. They’d also start producing to Amazon MQ before all the downstream consumers were ready.
The solution required a bit of code surgery. Instead of one RabbitMQ connection doing everything, these services needed separate connections for consuming and producing. This let us migrate the consumer and producer sides independently.
Step 1: Migrate consumer side to Amazon MQ (producer stays on old broker). The service now consumes from the new queue (via the shovel) but still produces to the old exchange.
Step 2: Switch producer side to Amazon MQ (full migration complete). Now both consuming and producing happen on Amazon MQ.

This gave us full control to migrate complex services step by step without downtime.
Post-Migration Monitoring
Old habits die hard, and one of those habits is checking dashboards when something feels off. We rebuilt our monitoring setup for Amazon MQ using Grafana panels that pull from CloudWatch instead of Prometheus. This simplified our metrics collection—no more custom exporters or scraping configurations. The metrics come directly from AWS, and we still get the same visual dashboards we’re used to, just with a cleaner data pipeline.
Essential Metrics
We focused on four key metrics that give us complete visibility into our message broker:
- Queue Depth – Shows if consumers are keeping up with producers. A steadily increasing queue depth indicates a backlog building up.
- Connection Counts – Helps spot services having trouble connecting to the broker. Sudden drops often indicate network or authentication issues.
- Broker Health – Gives the big picture view of whether the infrastructure itself is working correctly. AWS provides comprehensive health checks.
- CPU and Memory Usage – Critical since Amazon MQ runs on specific instance types, not serverless infrastructure. You need to size instances correctly and watch for resource exhaustion.
Alerting Strategy
We set up a layered alerting approach focusing on the infrastructure level and service-specific monitoring:
- Resource Usage Alerts – CPU and memory alerts are crucial since you’re still responsible for choosing the right instance size. We set up both Slack notifications for warnings and PagerDuty alerts for critical thresholds.
- Service-Level Monitoring – Each service has its own alerts on queue length and consumer counts. This gives teams ownership of their specific queues and helps them spot issues with their particular message flows before they become broker-wide problems.
Lessons Learned
Migration is Doable, But Plan Carefully
Live migration is possible, but it’s not trivial and definitely requires careful planning.
We managed to avoid downtime during our migration, but it took some preparation and a lot of small, careful steps. The temptation is always to move fast and get it over with, but with message systems, you really can’t afford to break things. We had a few close calls where our planning saved us from potential issues.
Patterns That Worked for Us
Some approaches that made our migration smoother:
- Downstream-first approach: move consumers before producers.
- Mirror everything: identical exchanges, queues, credentials.
- Dual broker strategy: run old and new in parallel with shovels.
- Flexible service design: separate configs for consumers and producers.
These aren’t revolutionary ideas, but they worked well in practice. The downstream-first approach felt scary at first but ended up reducing risk significantly. Having identical setups meant fewer surprises. Running both brokers in parallel gave us confidence and fallback options.
What We Got Out of It
The migration went better than we expected:
- No outages during the process.
- Didn’t lose any messages (that we know of).
- Day-to-day operations are definitely easier now.
The new system has been more stable, though we still get alerts and have to monitor things carefully. The main difference is that when something goes wrong, it’s usually clearer what the problem is and how to fix it. Less time spent digging through Kubernetes logs trying to figure out why rabbit are unhappy.
Conclusion
Moving from RabbitMQ on EKS to Amazon MQ turned out to be worth the effort, though it wasn’t a simple flip-the-switch operation.
The main win was reducing the operational burden on our team. We still have to monitor and maintain things, but the day-to-day firefighting around clustering issues and mysterious failures has mostly gone away.
If you’re thinking about a similar migration:
- Take time to really understand your current setup first.
- Test everything in staging multiple times.
- Plan for it to take longer than you think.
The migration itself was stressful, but the end result has been more time to focus on building features instead of babysitting infrastructure.
Looking back, the hardest part wasn’t the technical complexity—it was building confidence that we wouldn’t break anything important. But with good planning, visual dependency mapping, and a healthy respect for Murphy’s Law, it’s definitely doable.
Now when someone mentions “migrating critical infrastructure with zero downtime,” we don’t immediately think “impossible.” We think “challenging, but we’ve done it before.”
The post Migrating Critical Messaging from Self-Hosted RabbitMQ to Amazon MQ appeared first on Blog Detectify.


