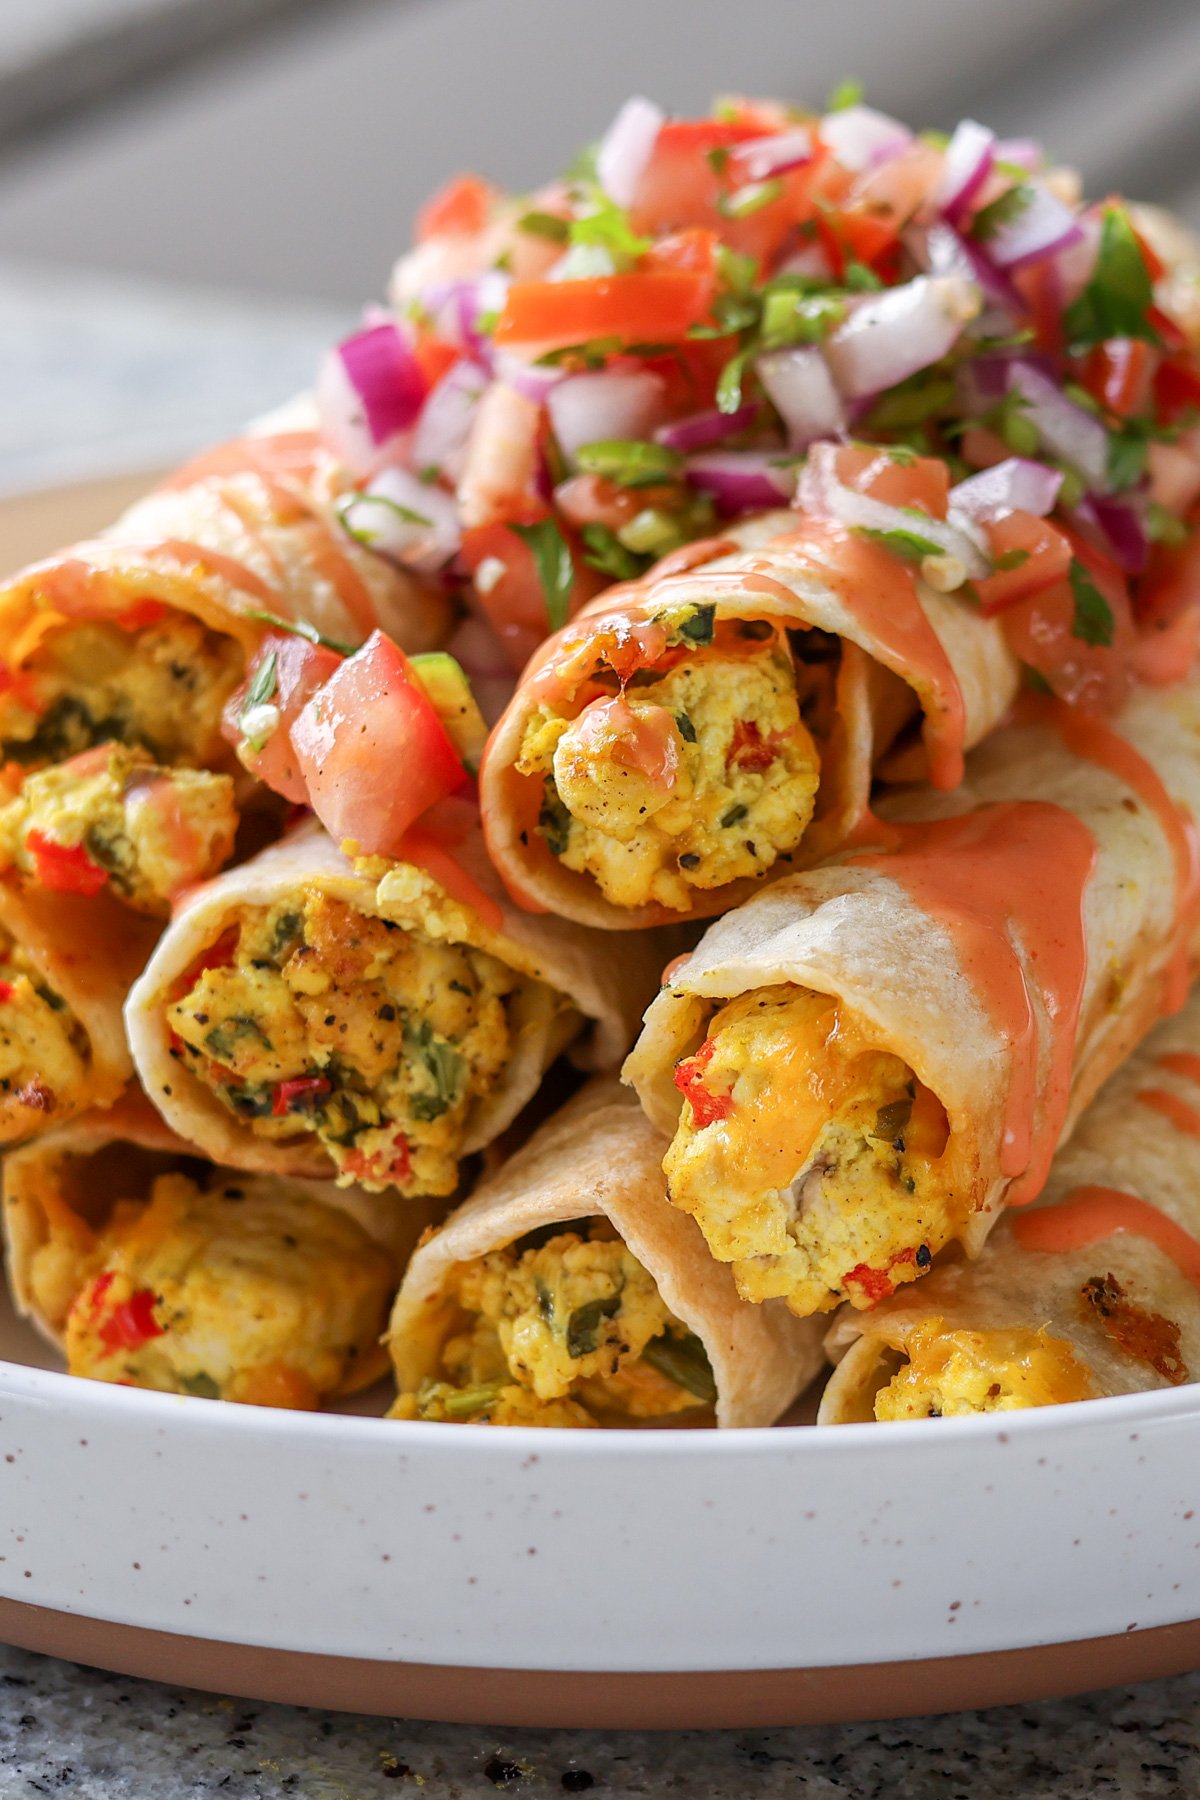
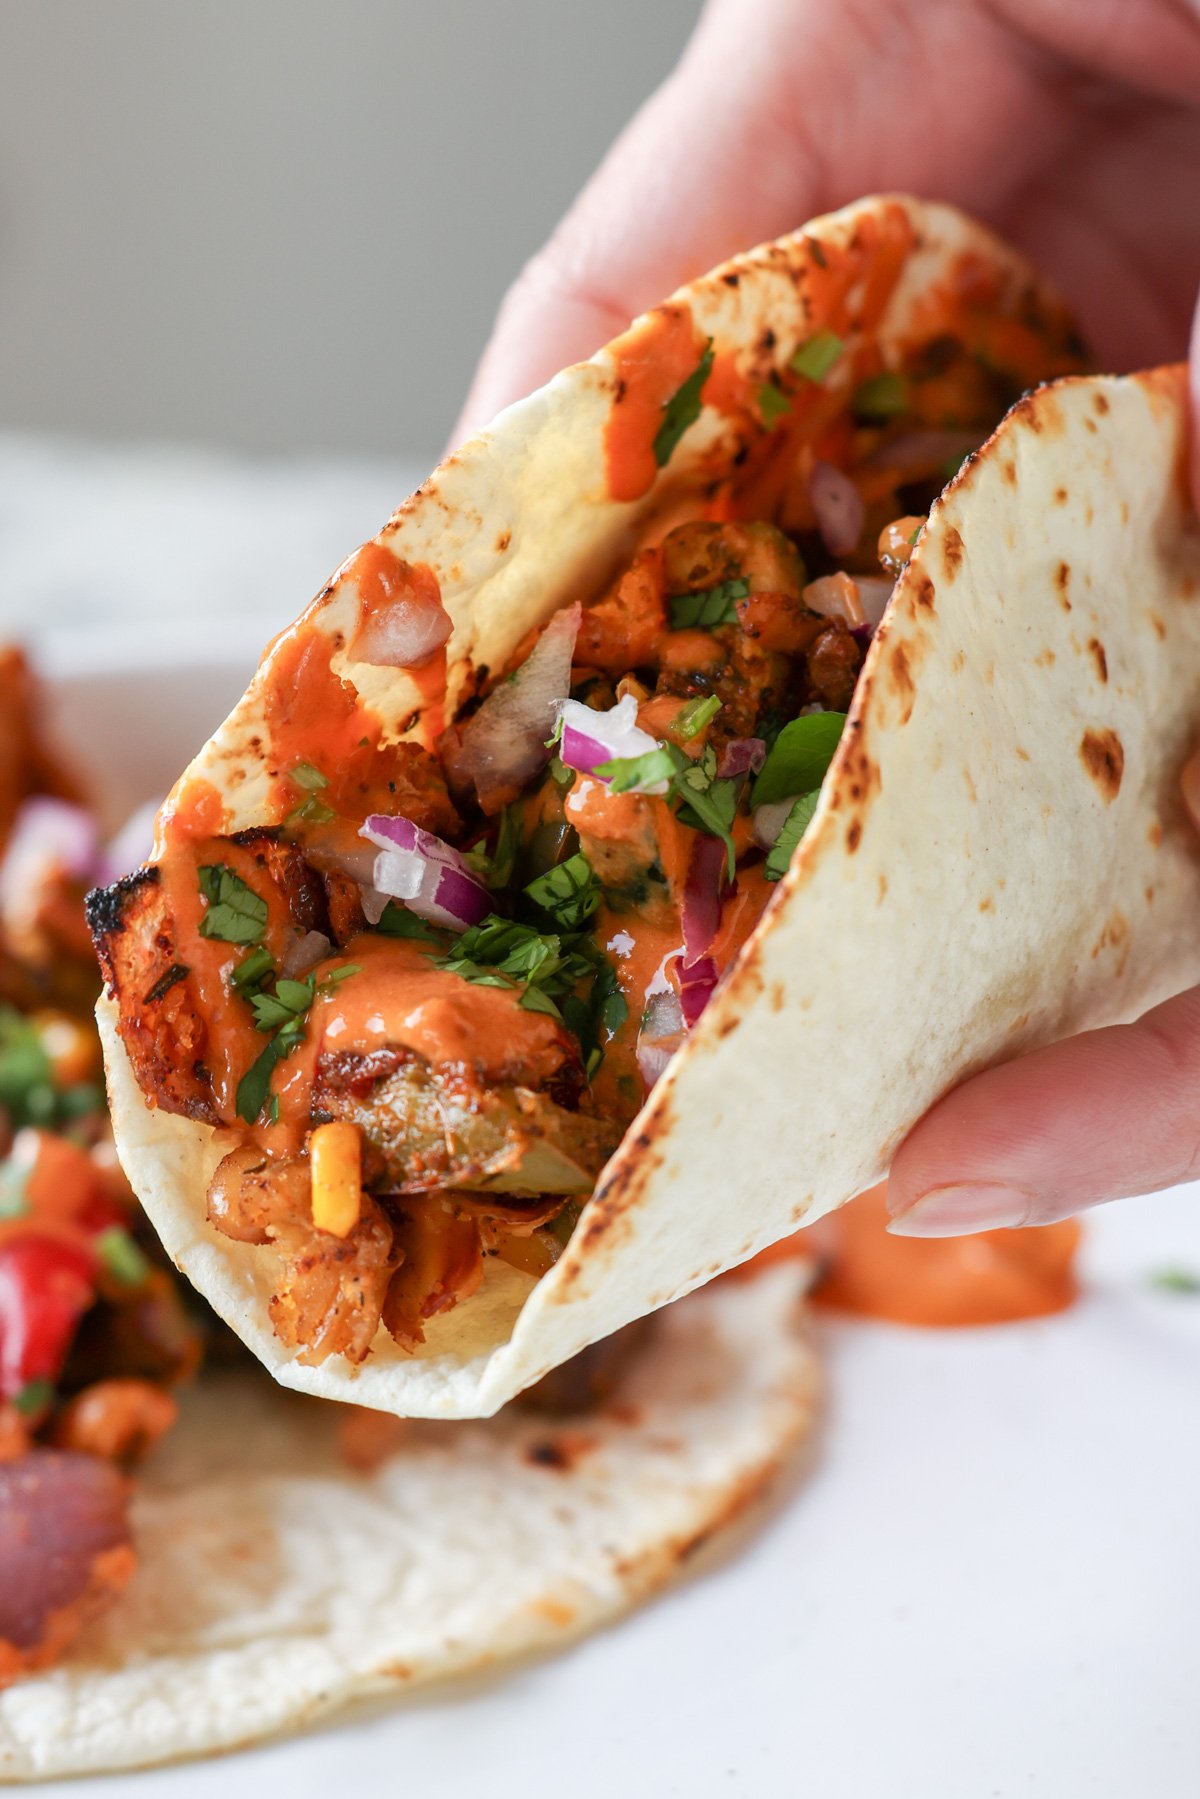
Breakfast taquitos filled with a quick scramble along with veggies, cheese, and your favorite toppings is such a quick, easy, and satisfying meal! Make the super versatile scramble seasoning ahead, so you can whip up all kinds of eggy breakfasts in a flash. (gluten-free, nut-free, with easy soy-free option)
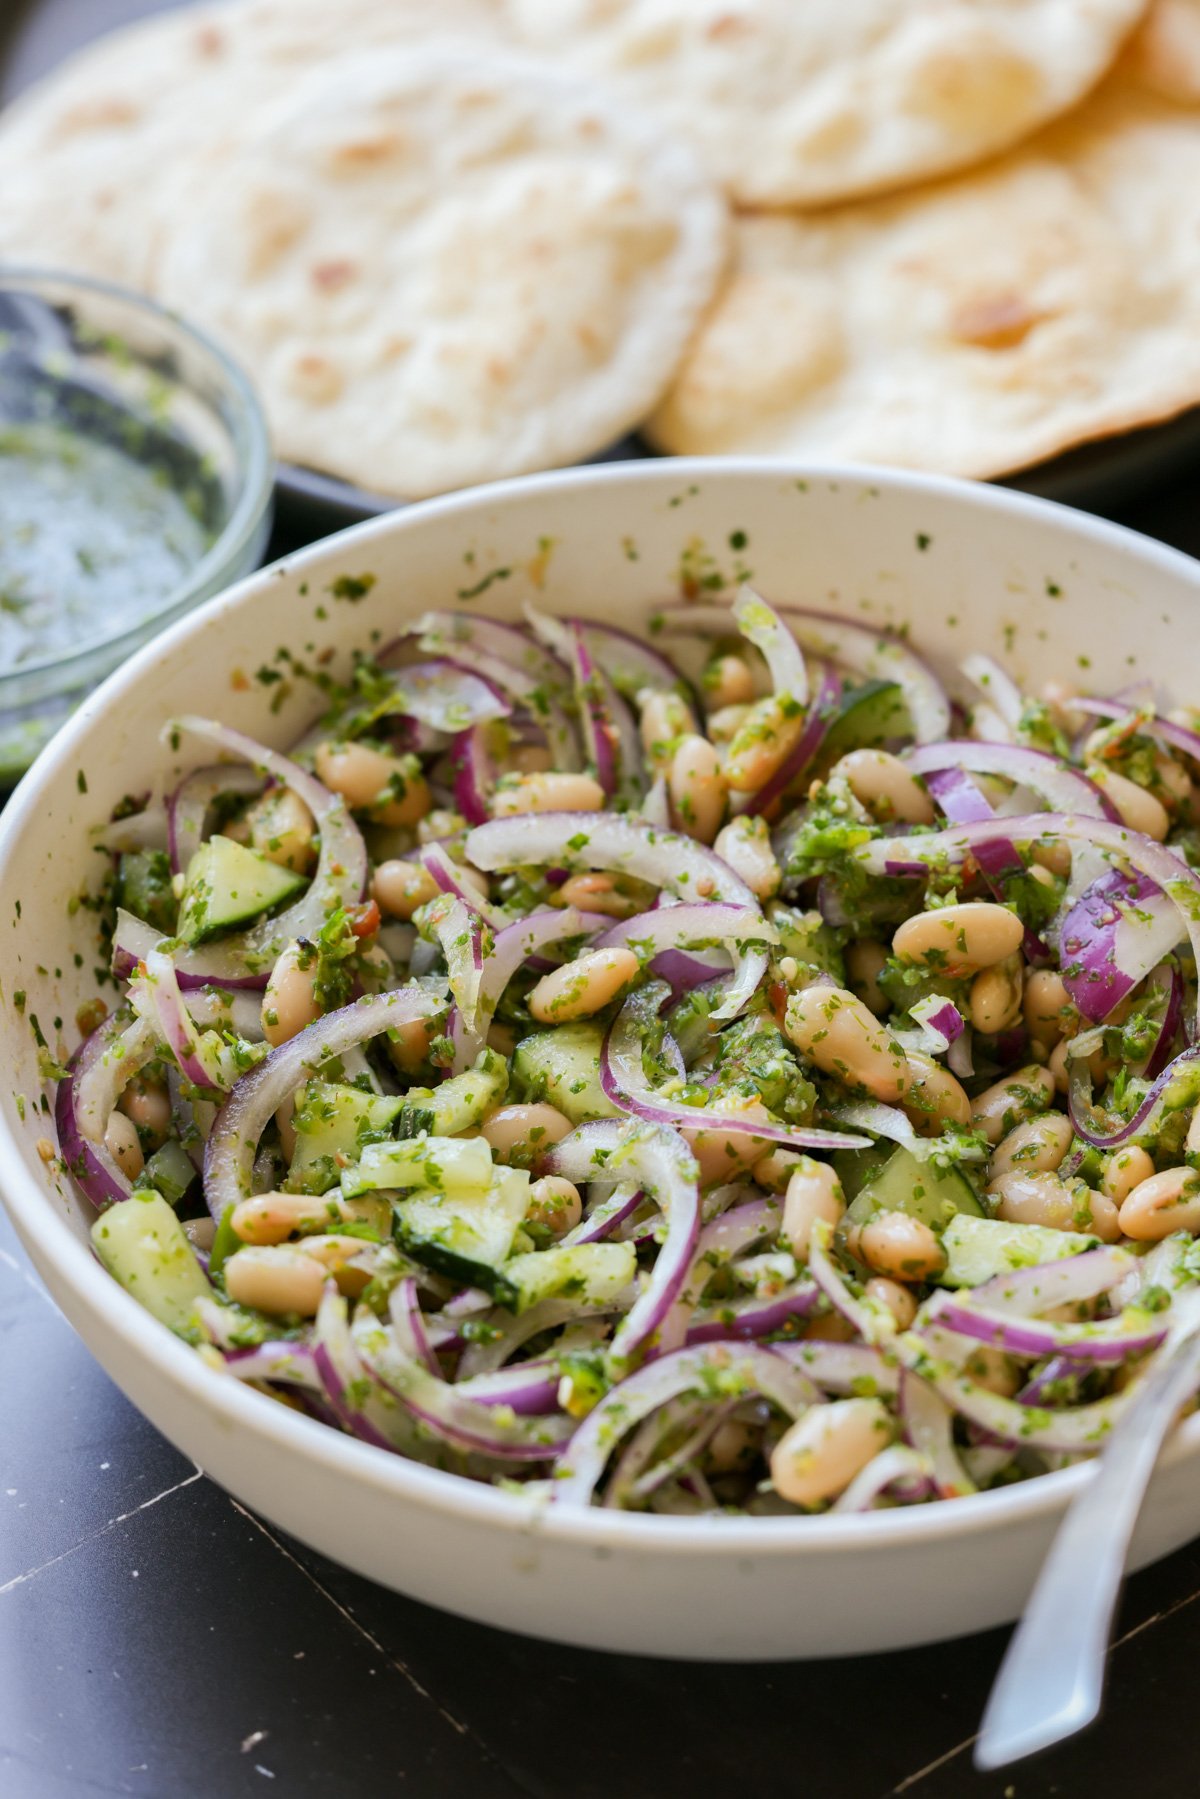
These breakfast taquitos are super easy and super quick, if you have my scramble seasoning on hand. Even if you don’t, making the scramble seasoning is also easy. You just get all the spices, mix them in a jar, and it’s ready. You can use that scramble seasoning on scrambles, omelettes, frittatas, or to make a quick tofu egg salad in many different ways. It works well wherever you want any kind of eggy breakfast flavor.
Definitely make some and use that in this recipe, because then it’s super quick. You just crumble the tofu, add some chopped veggies, the scramble seasoning, and vegan cream cheese. Mix it all up in a bowl, and your scramble is ready to stuff into your breakfast taquitos.
Then, you roll that scramble up in warm tortillas and bake or pan fry. Serve with your favorite toppings, like pico de gallo, salsa, vegan sour cream, etc., and they are just fabulous!
Why You’ll Love Breakfast Taquitos
quick and easy breakfast that’s super satisfying
cheesy, veggie-packed tofu scramble stuffed into soft tortillas, baked or pan fried until crisp
versatile! Customize mix-ins and flavors to taste.
easy to make gluten-free, nut-free, and even soy-free
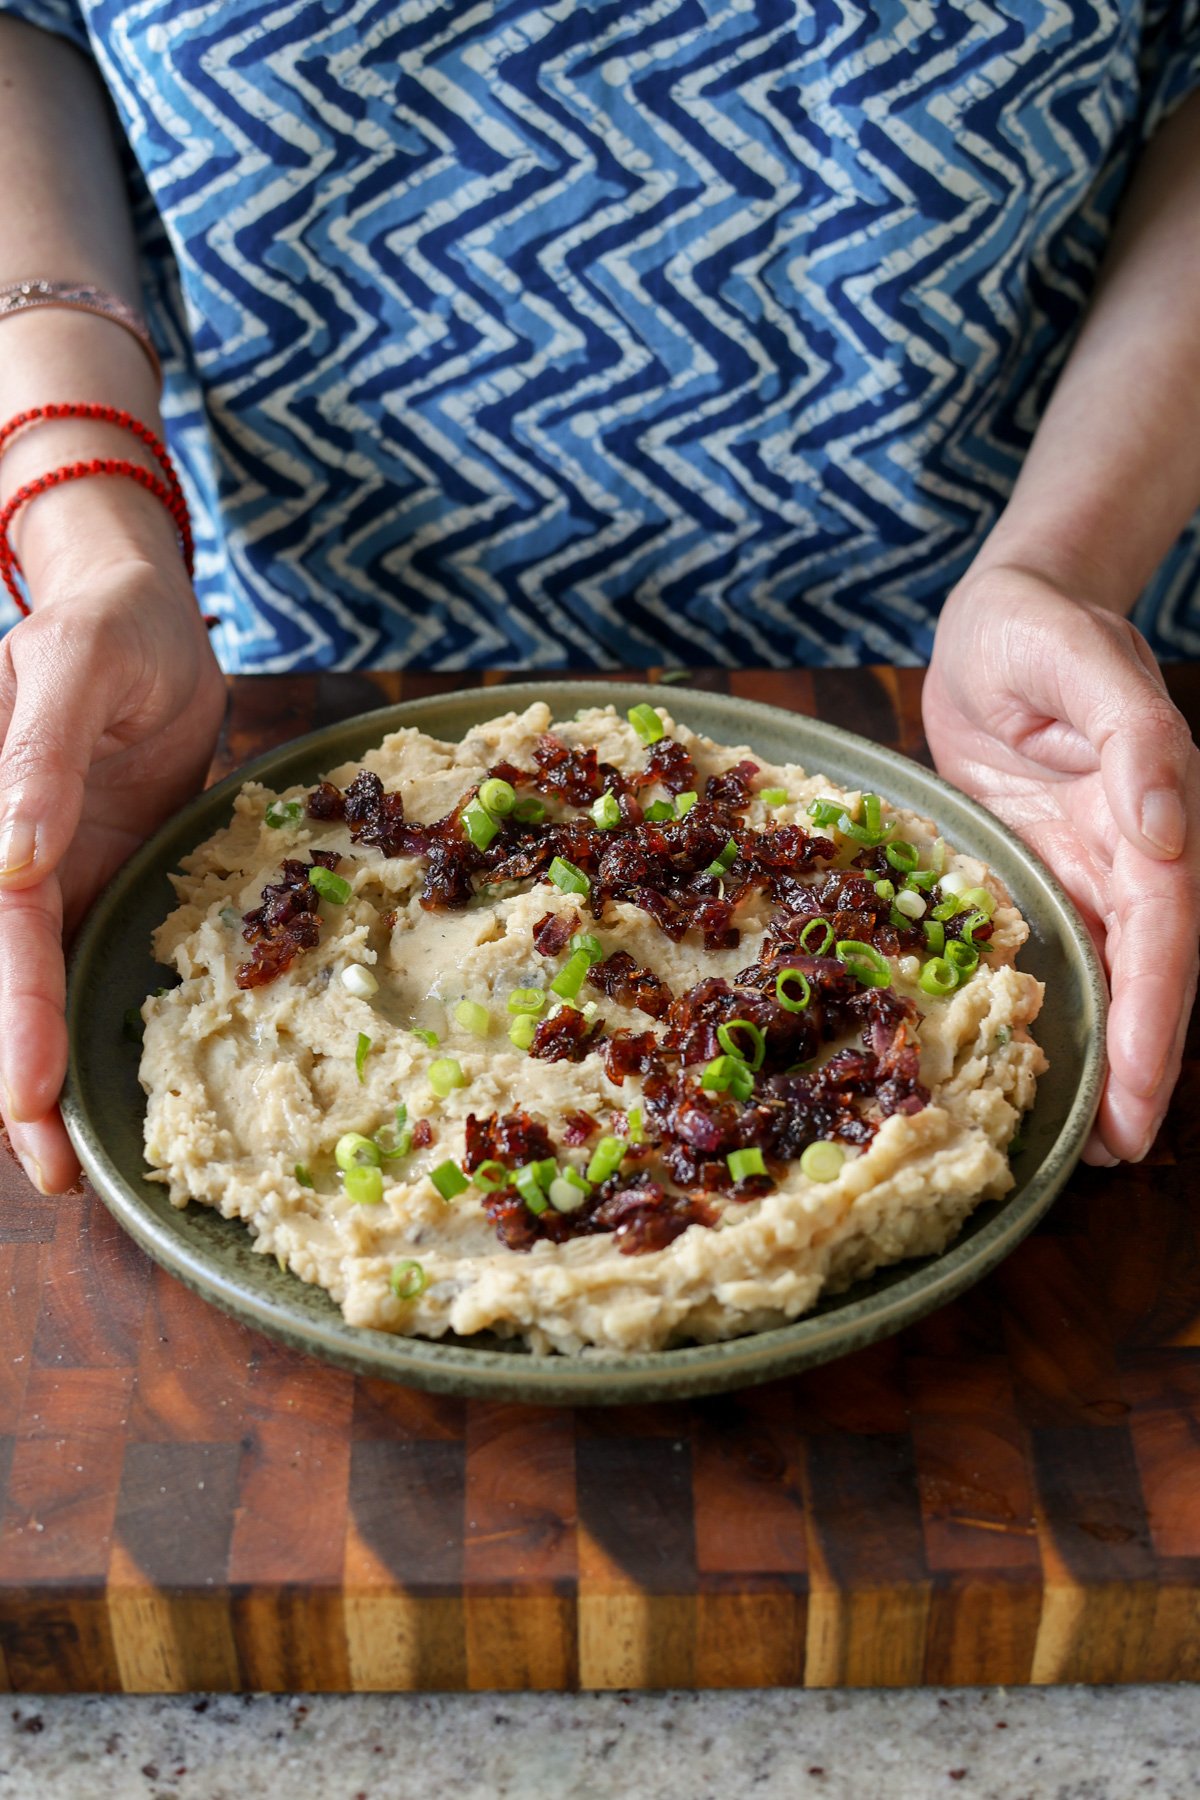
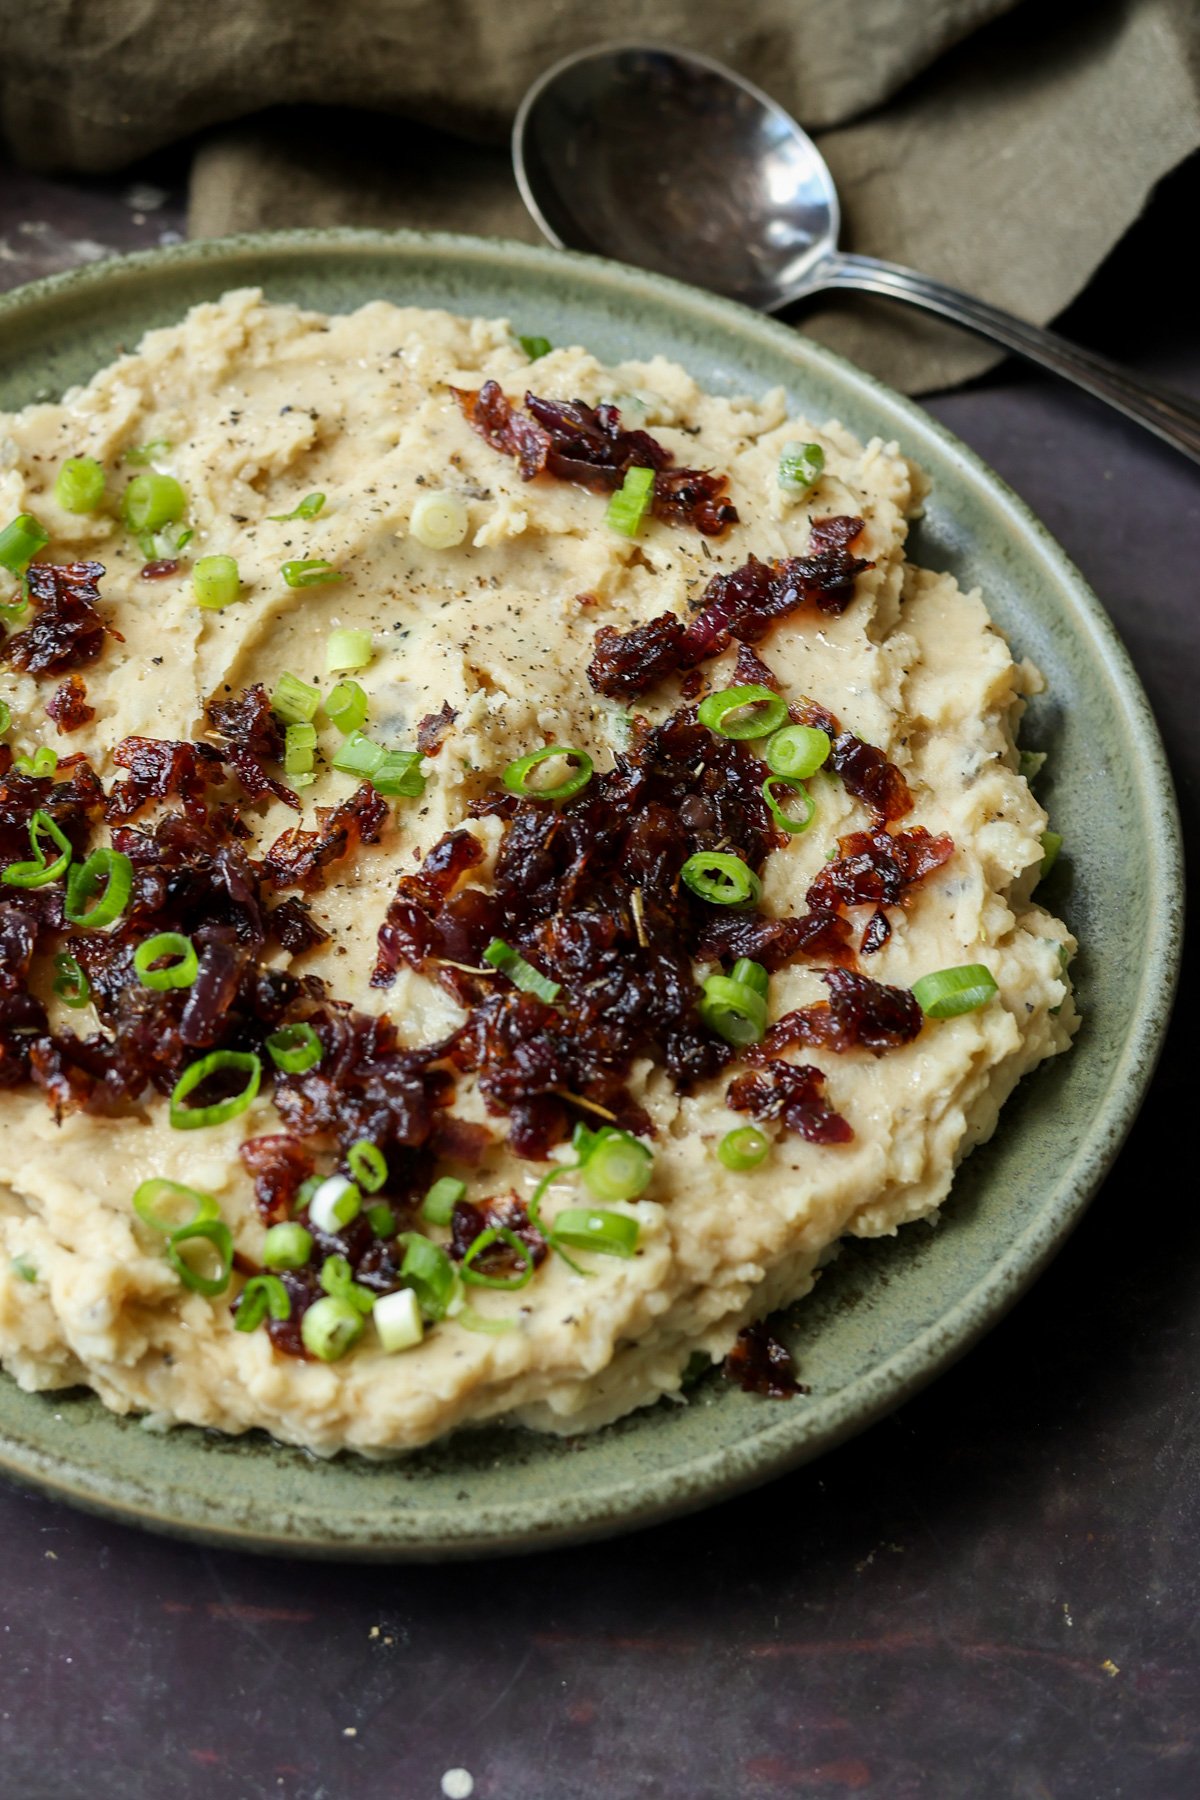
Creamy, rich, and deeply savory, these mashed potatoes get a flavor upgrade with caramelized onions and a secret boost of plant-based protein from pureed white beans. The result is velvety, buttery comfort in every bite. A side that’s perfect for holidays or weeknights alike. (Gluten-free, nut-free, with a soy-free option.)
Everyone loves potatoes in every form, especially mashed potatoes around the holiday season. They’re a fixture at every meal, and we’re going to level them up times two.
This recipe levels up the flavor with caramelized onions, garlic, and herbs that add an amazing flavor to these mashed potatoes. And we’re going to add some pureed white beans for extra protein and heartiness.
You’ll get protein from the beans, nutritional yeast, and non-dairy milk. You can add even more protein by serving it with crispy lentils or tofu bacon bits.
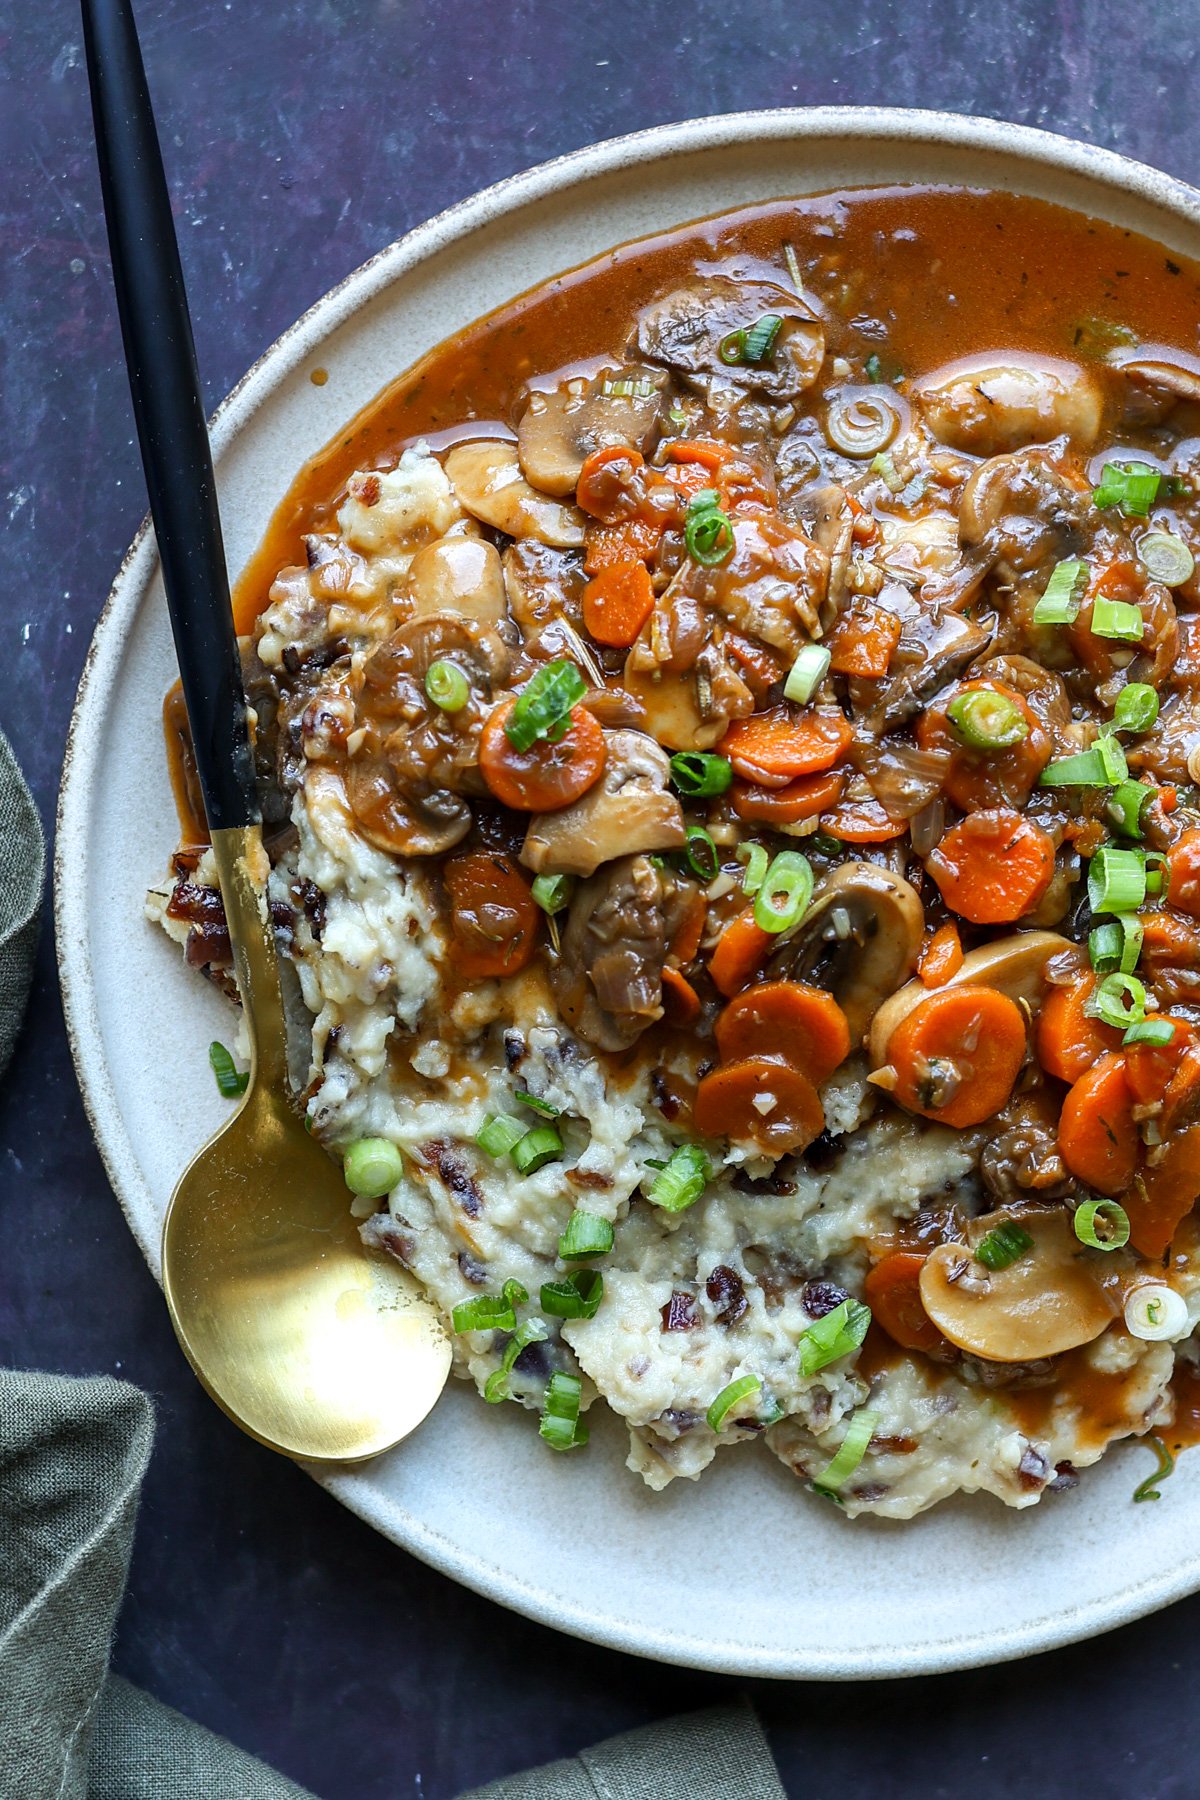
No matter how you serve caramelized onion mashed potatoes they’re rich, hearty, and perfect for any holiday table or cozy dinner. Served here with my mushroom bourguignon.
Why You’ll Love Caramelized Onion Mashed Potatoes
creamy mashed potatoes
savory caramelized onion topping
sneaky protein
delicious holiday side dish
naturally gluten-free and nut-free with easy soy-free option
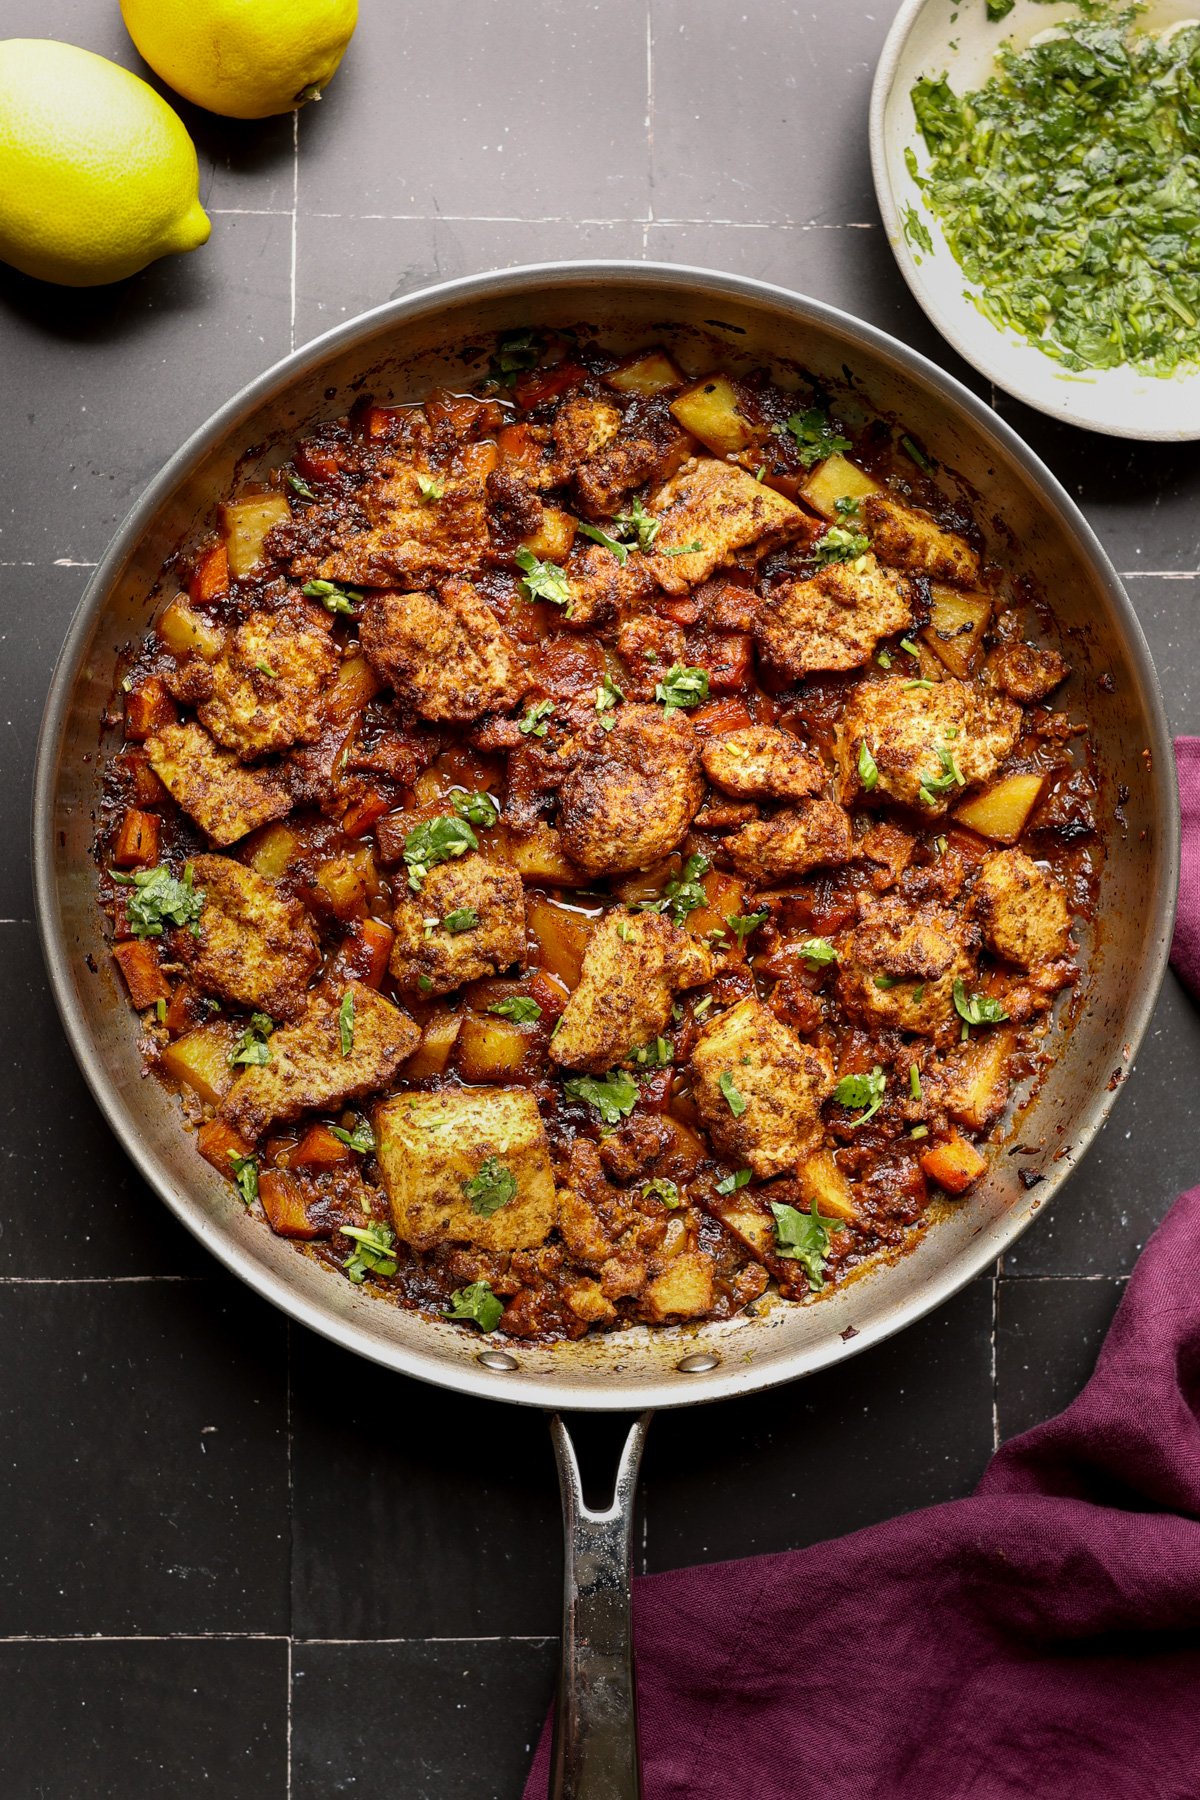
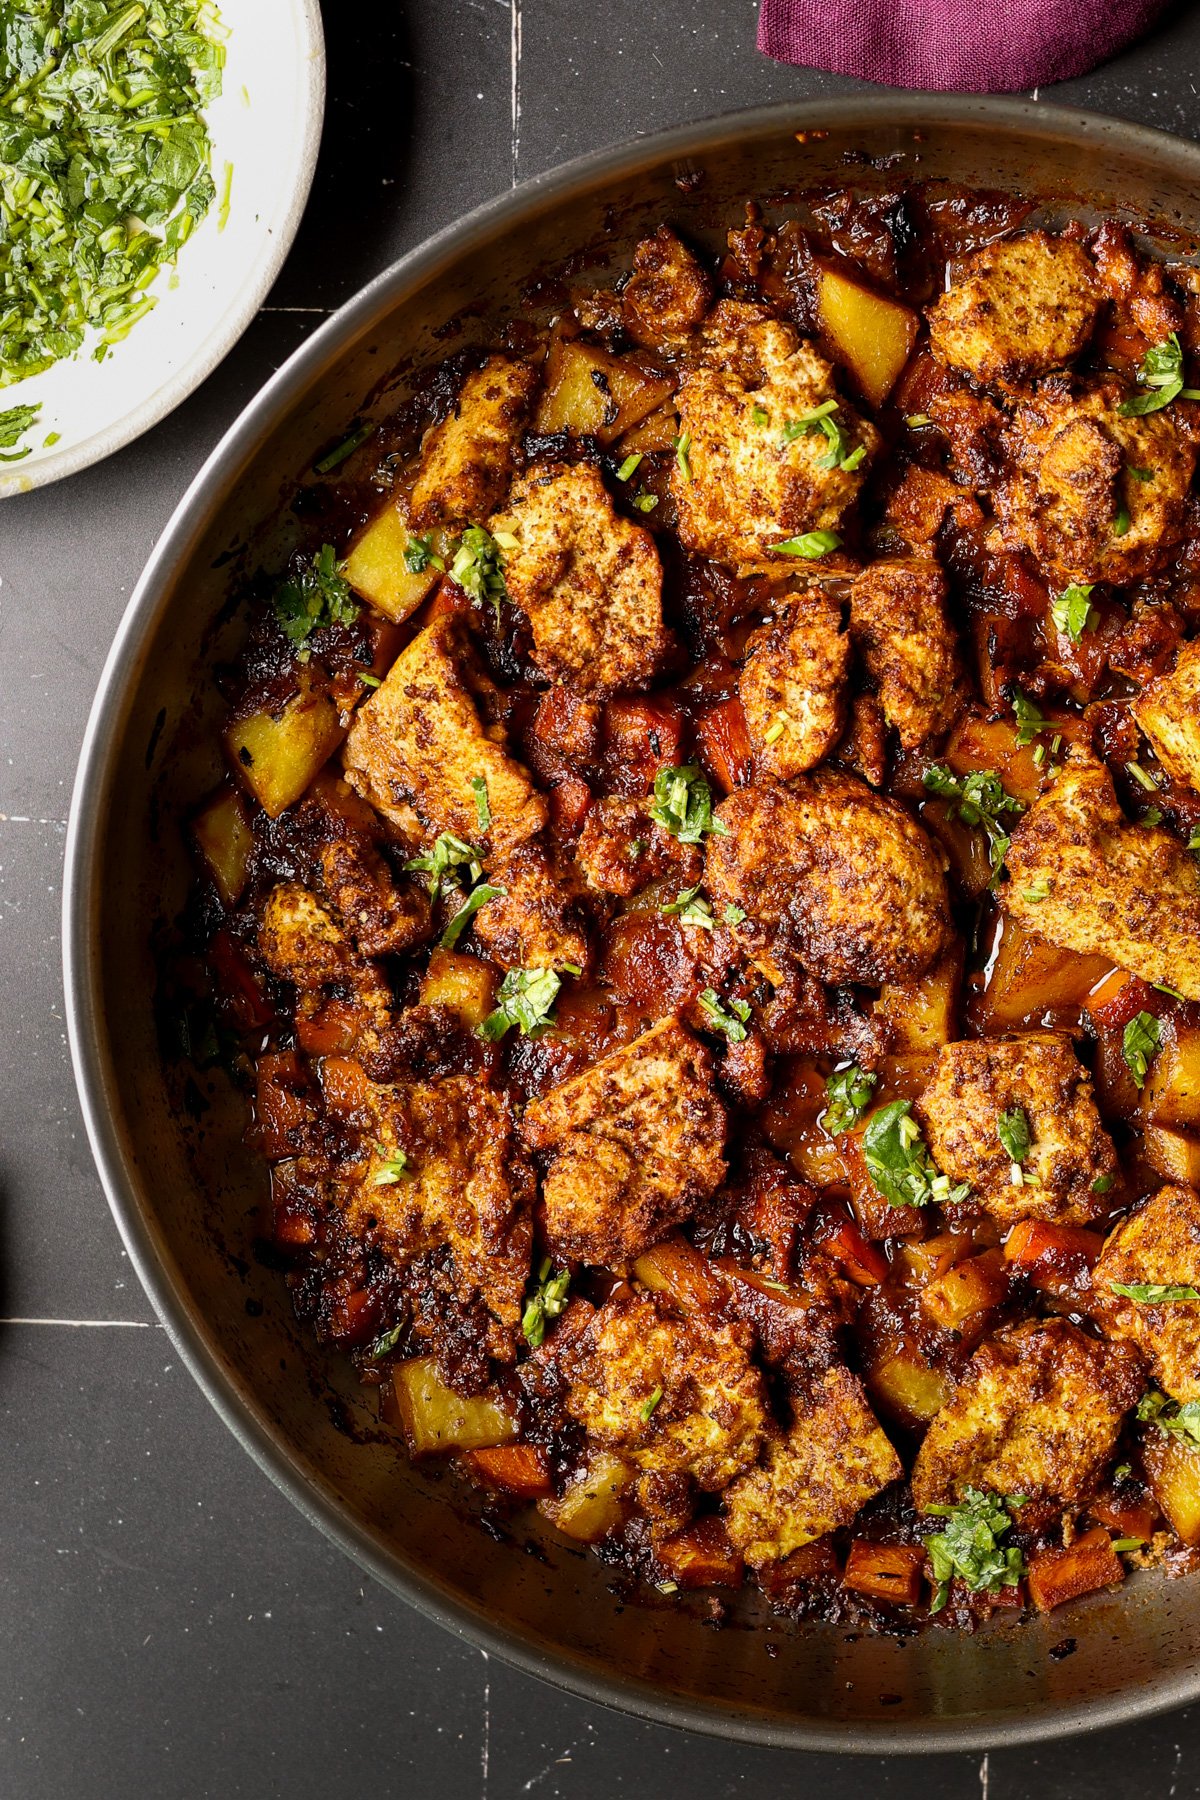
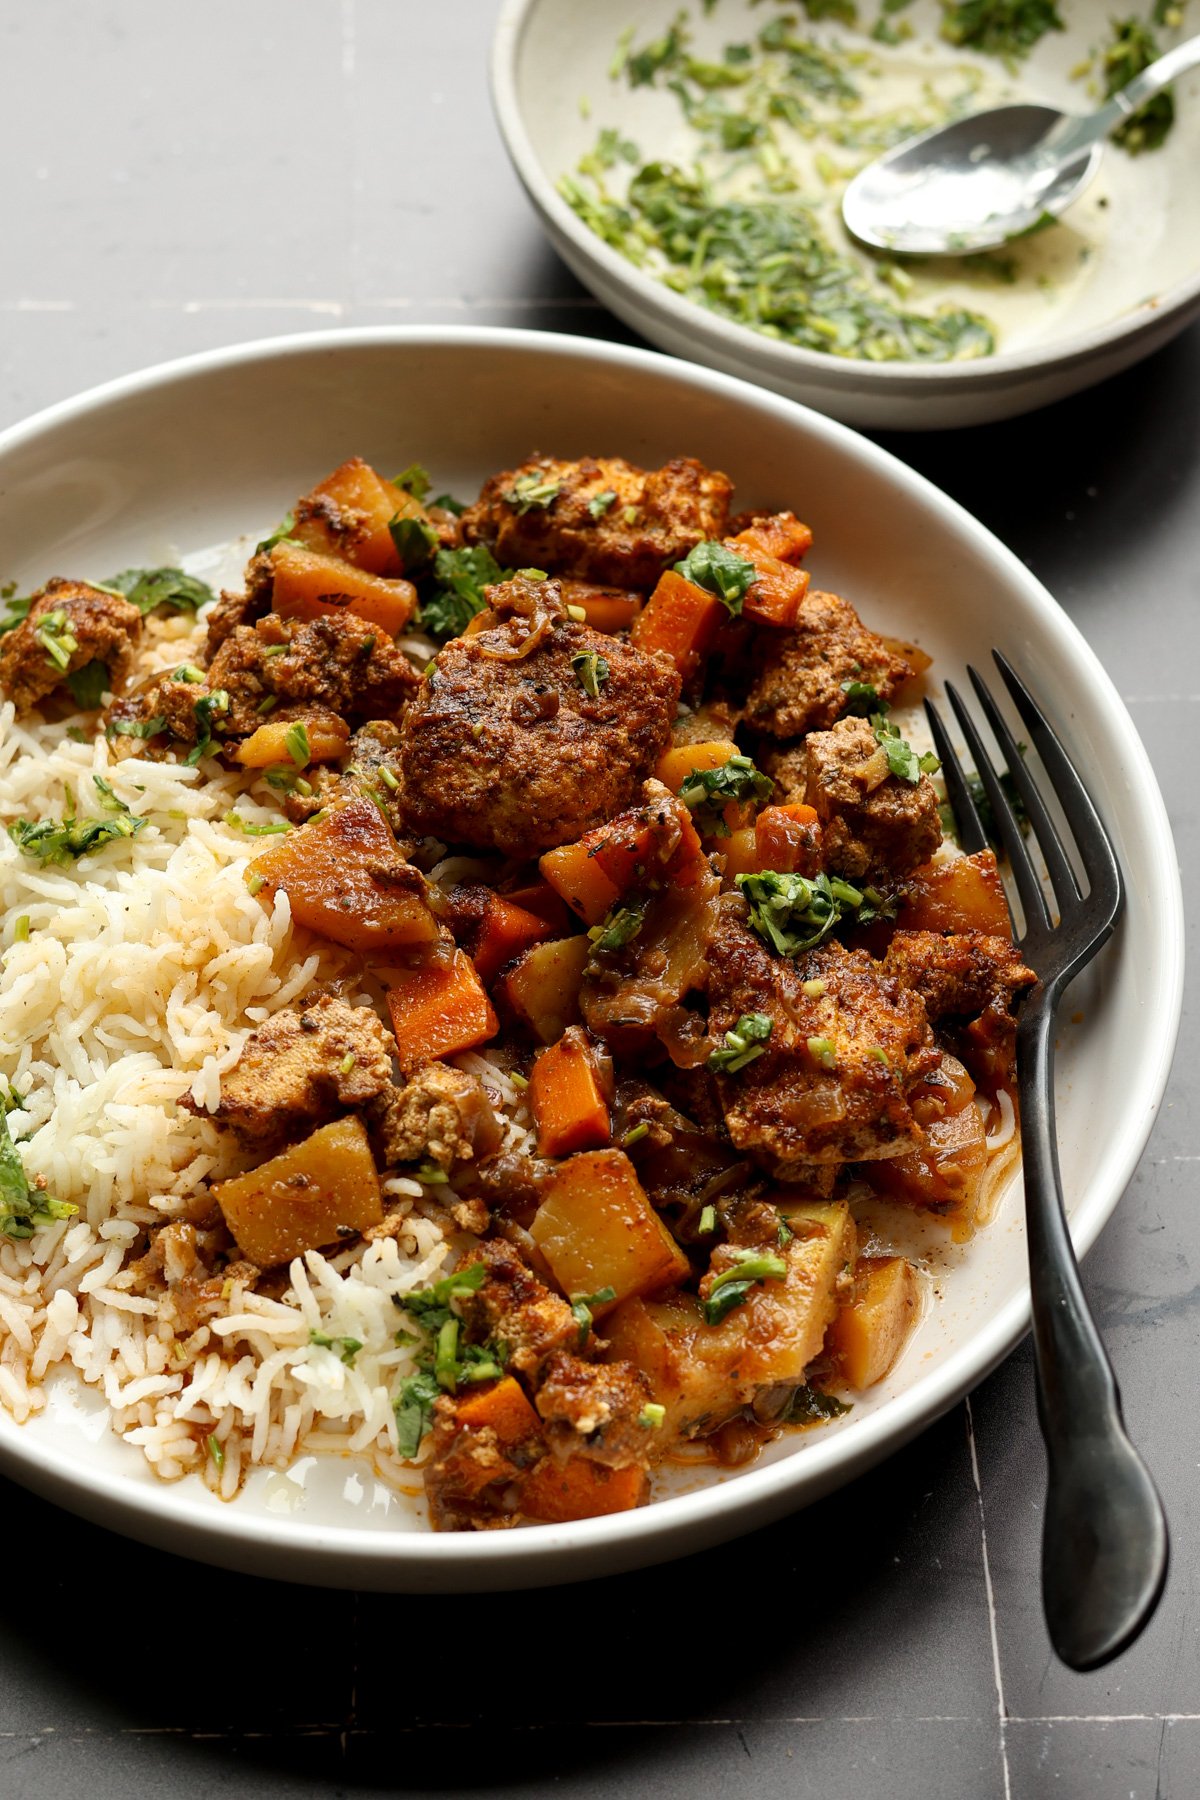
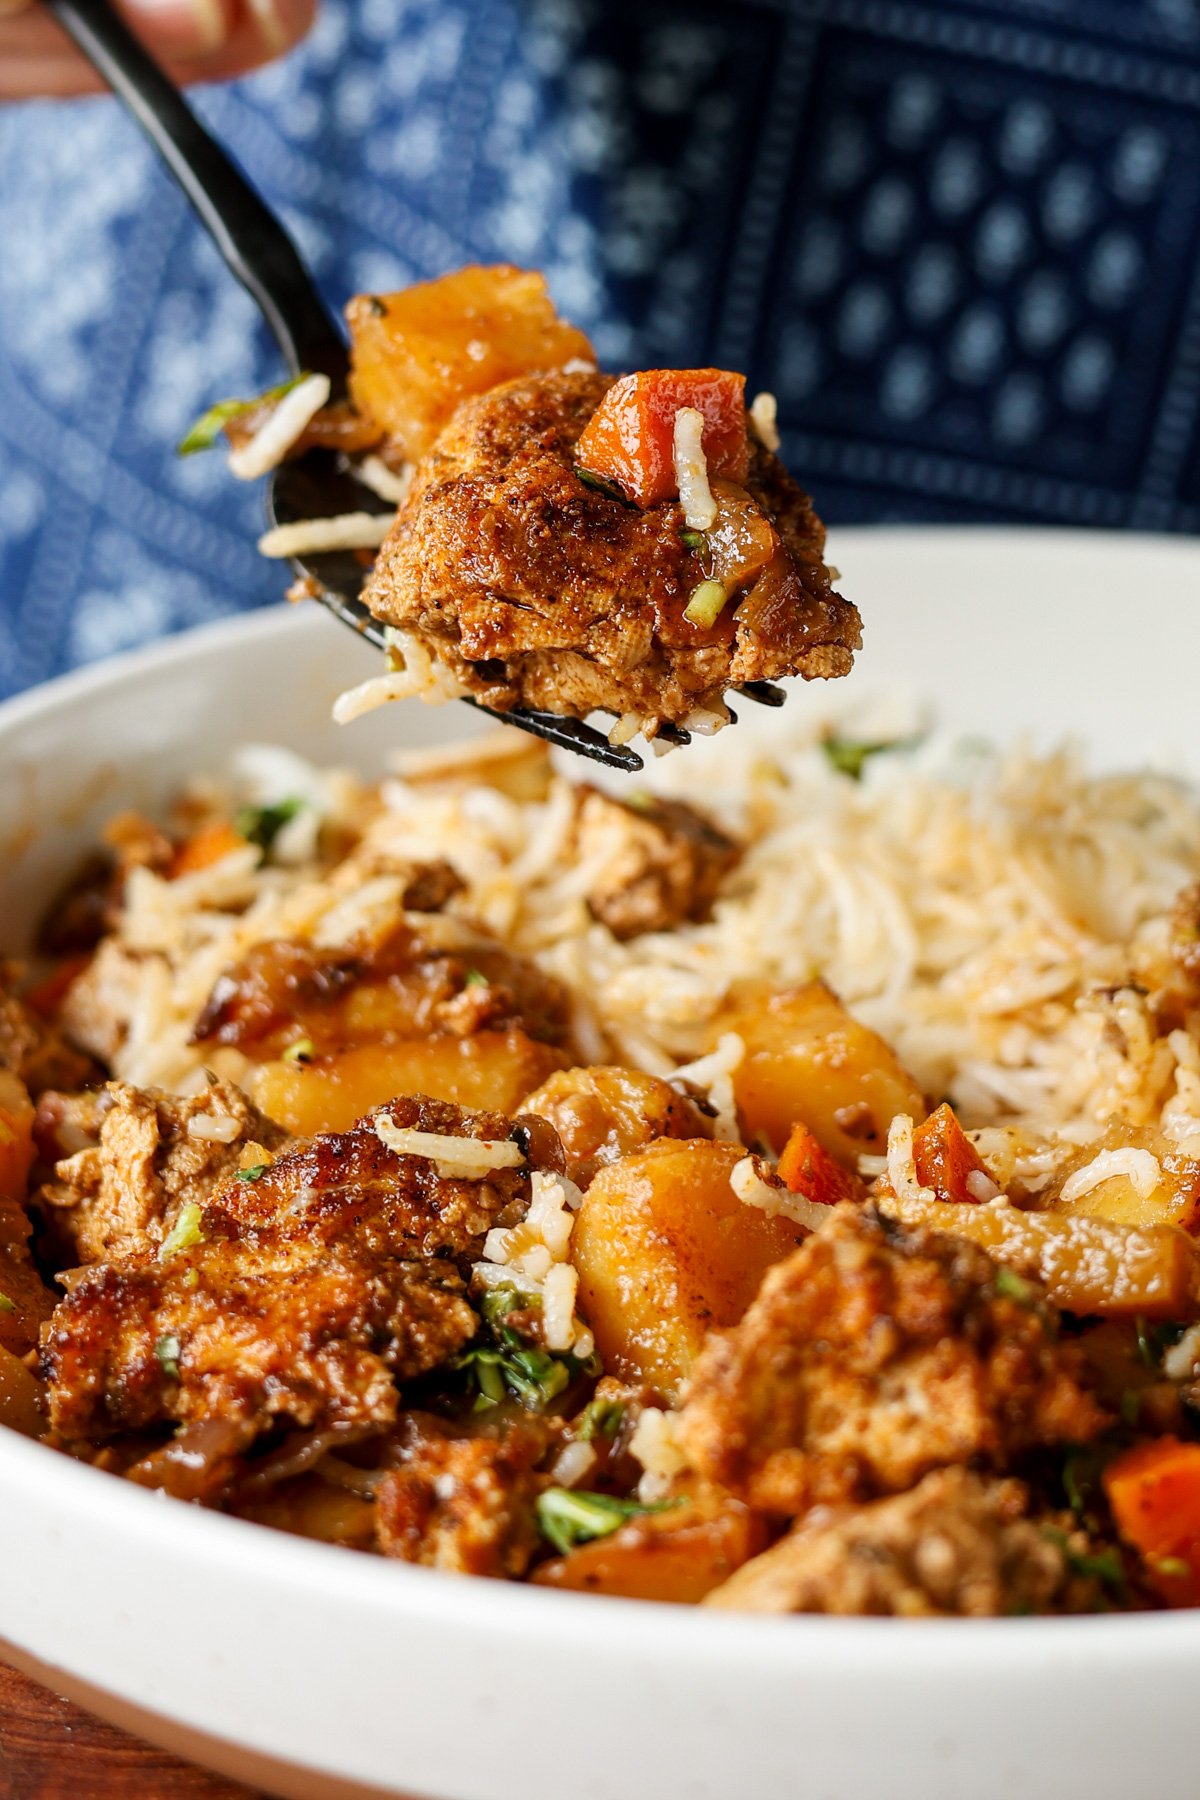
Spice-Rubbed Braised Tofu with Vegetables in a Savory Umami Sauce. A unique delicious holiday entree that all cooks in one pan! (gluten-free and nut-free with soy-free options)
I wanted to make a vegan braised meat-style dish for the holidays, so I came up with this one-skillet meal that’s rich, hearty, and incredibly flavorful. It features an amazing, aromatic spice rub that smells so meaty you’ll be surprised it’s entirely plant-based. The spice rub coats tofu that’s been frozen, thawed, and pressed, giving it a dense, chewy texture perfect for braising.
The base for the braise starts with crisped-up potatoes and carrots. After searing the vegetables, we make a deeply flavorful sauce with caramelized onions, lots of aromatics, and fresh herbs, and flavor boosters.
The tofu and vegetables braise together in this sauce, allowing the tofu to absorb all that flavor while developing a slightly crispy top and a tender, chicken-like interior.
We use an oven-safe pan to start the dish on the stovetop and finish it in the oven, where the vegetables become perfectly tender and the tofu gets a gorgeous golden top.
It’s fantastic served with rice, couscous, mashed potatoes or other mashed vegetables, bean purée, some crusty bakery bread, or a side salad.
A simple herb sauce adds a bright, fresh contrast, but you can enjoy it on its own, too. It’s full of amazing flavors with or without. The herb sauce just bumps up the flavor even more.
Why You’ll Love Braised Tofu and Vegetables
1-pan entree that’s perfect for the holiday table
flavorful braised vegetables in caramelized onion sauce
big pieces of crisp, herb-rubbed tofu
naturally gluten-free and nut-free with easy soy-free option
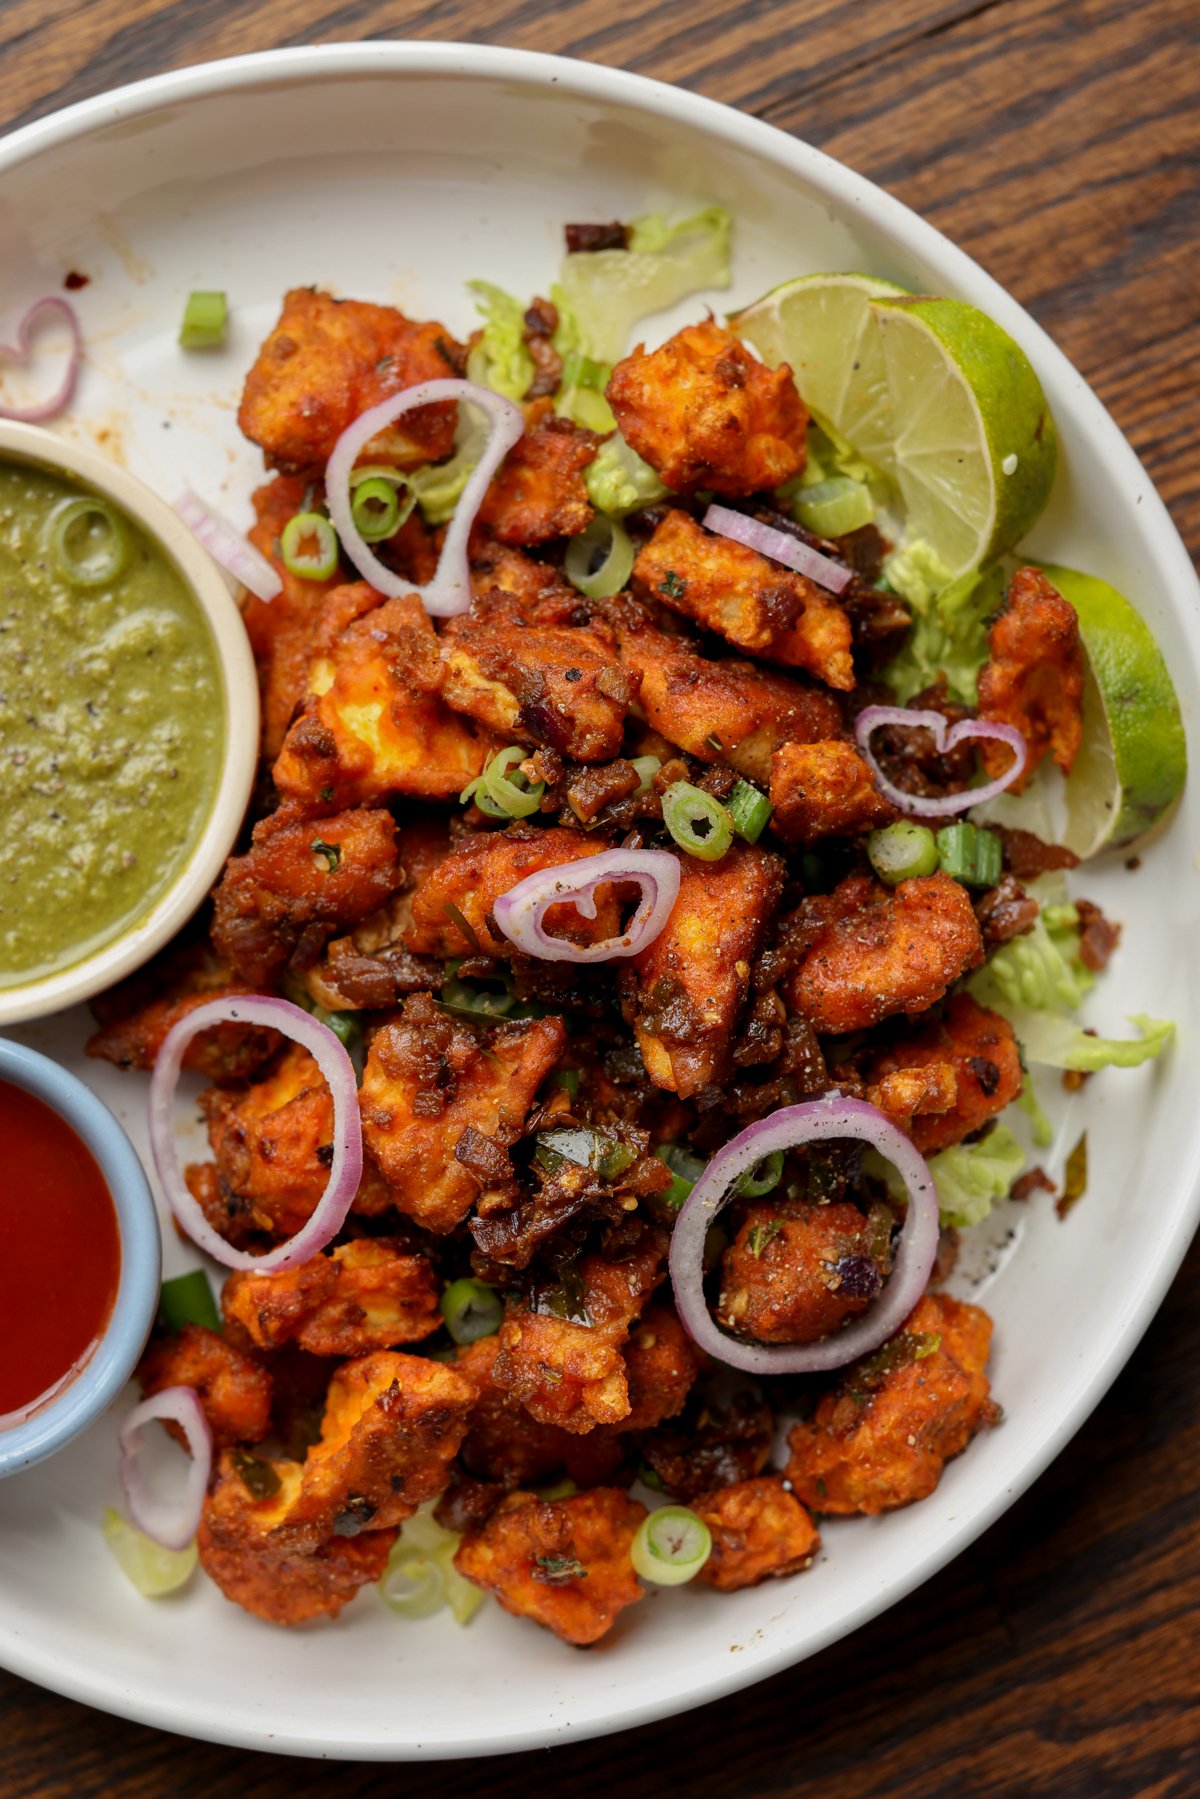
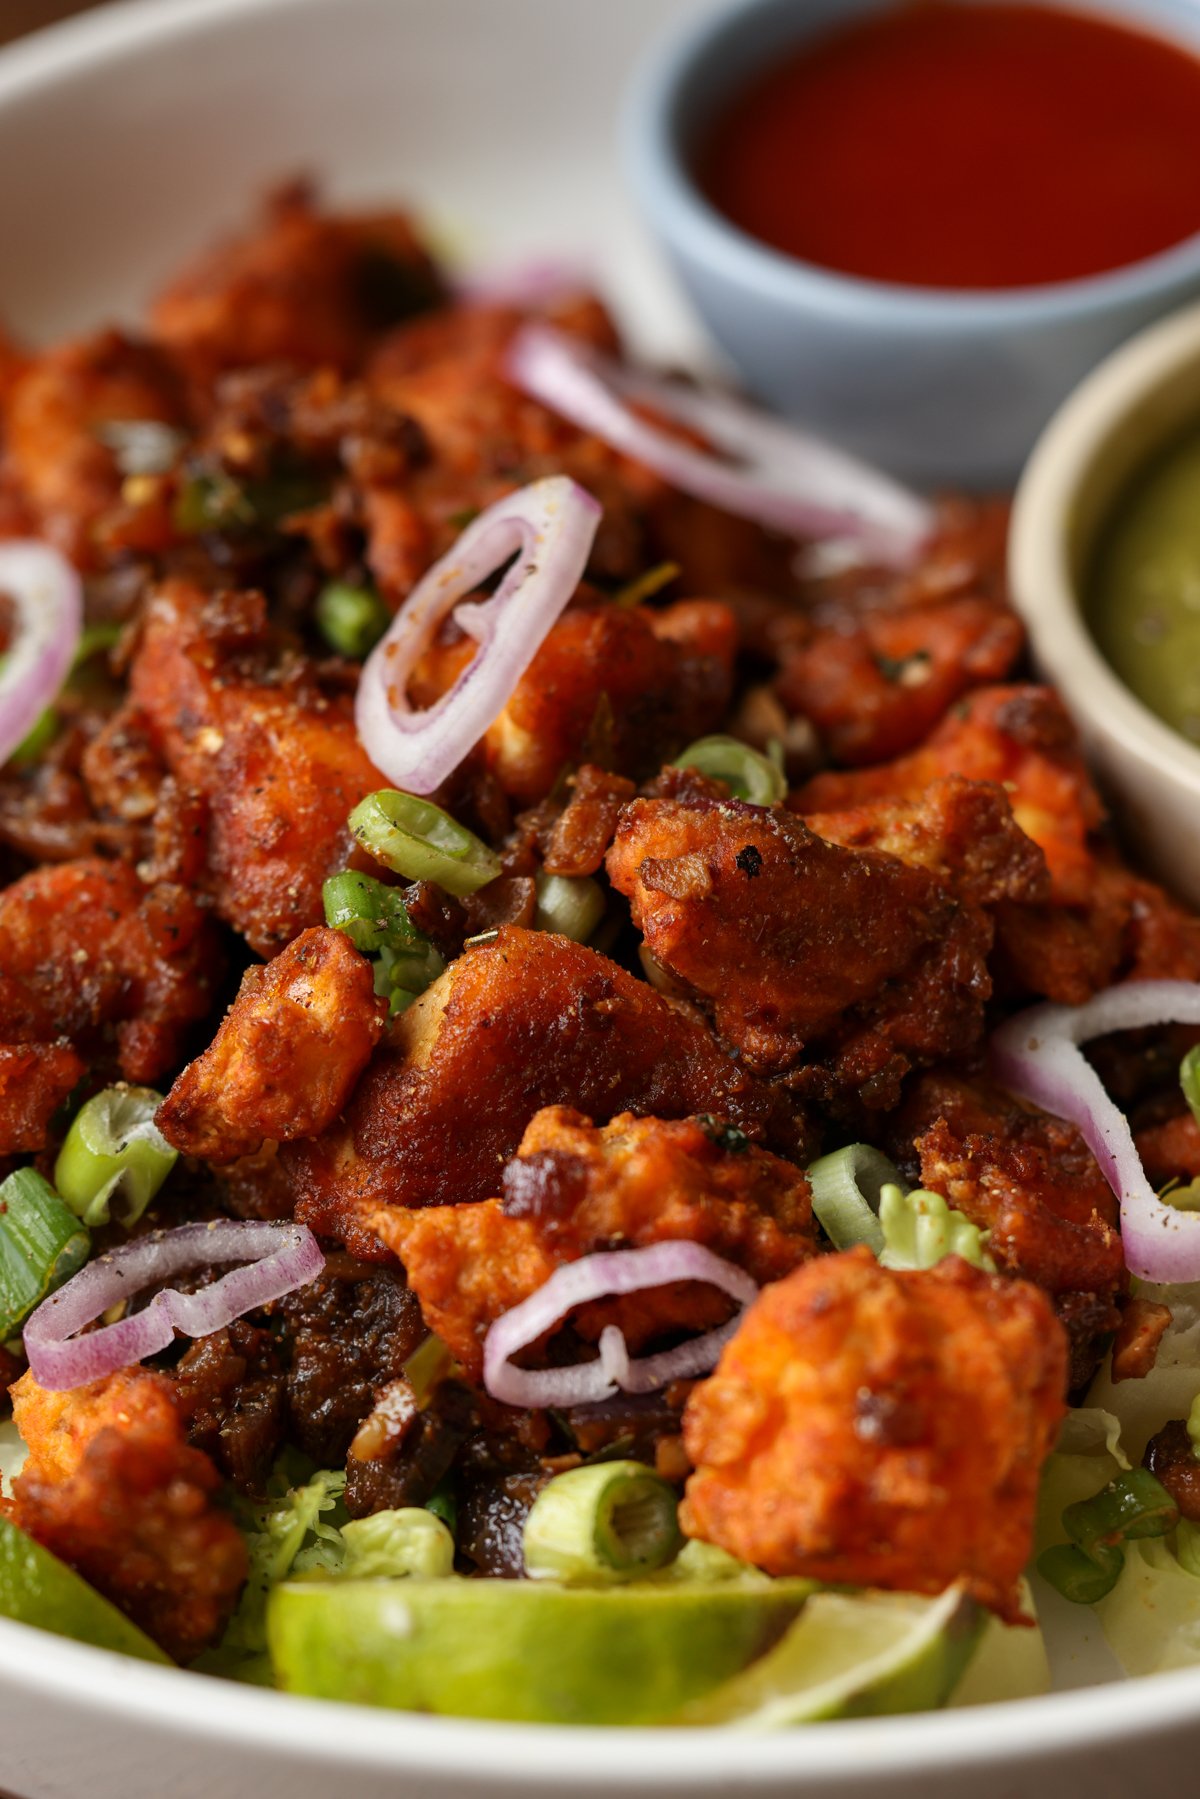
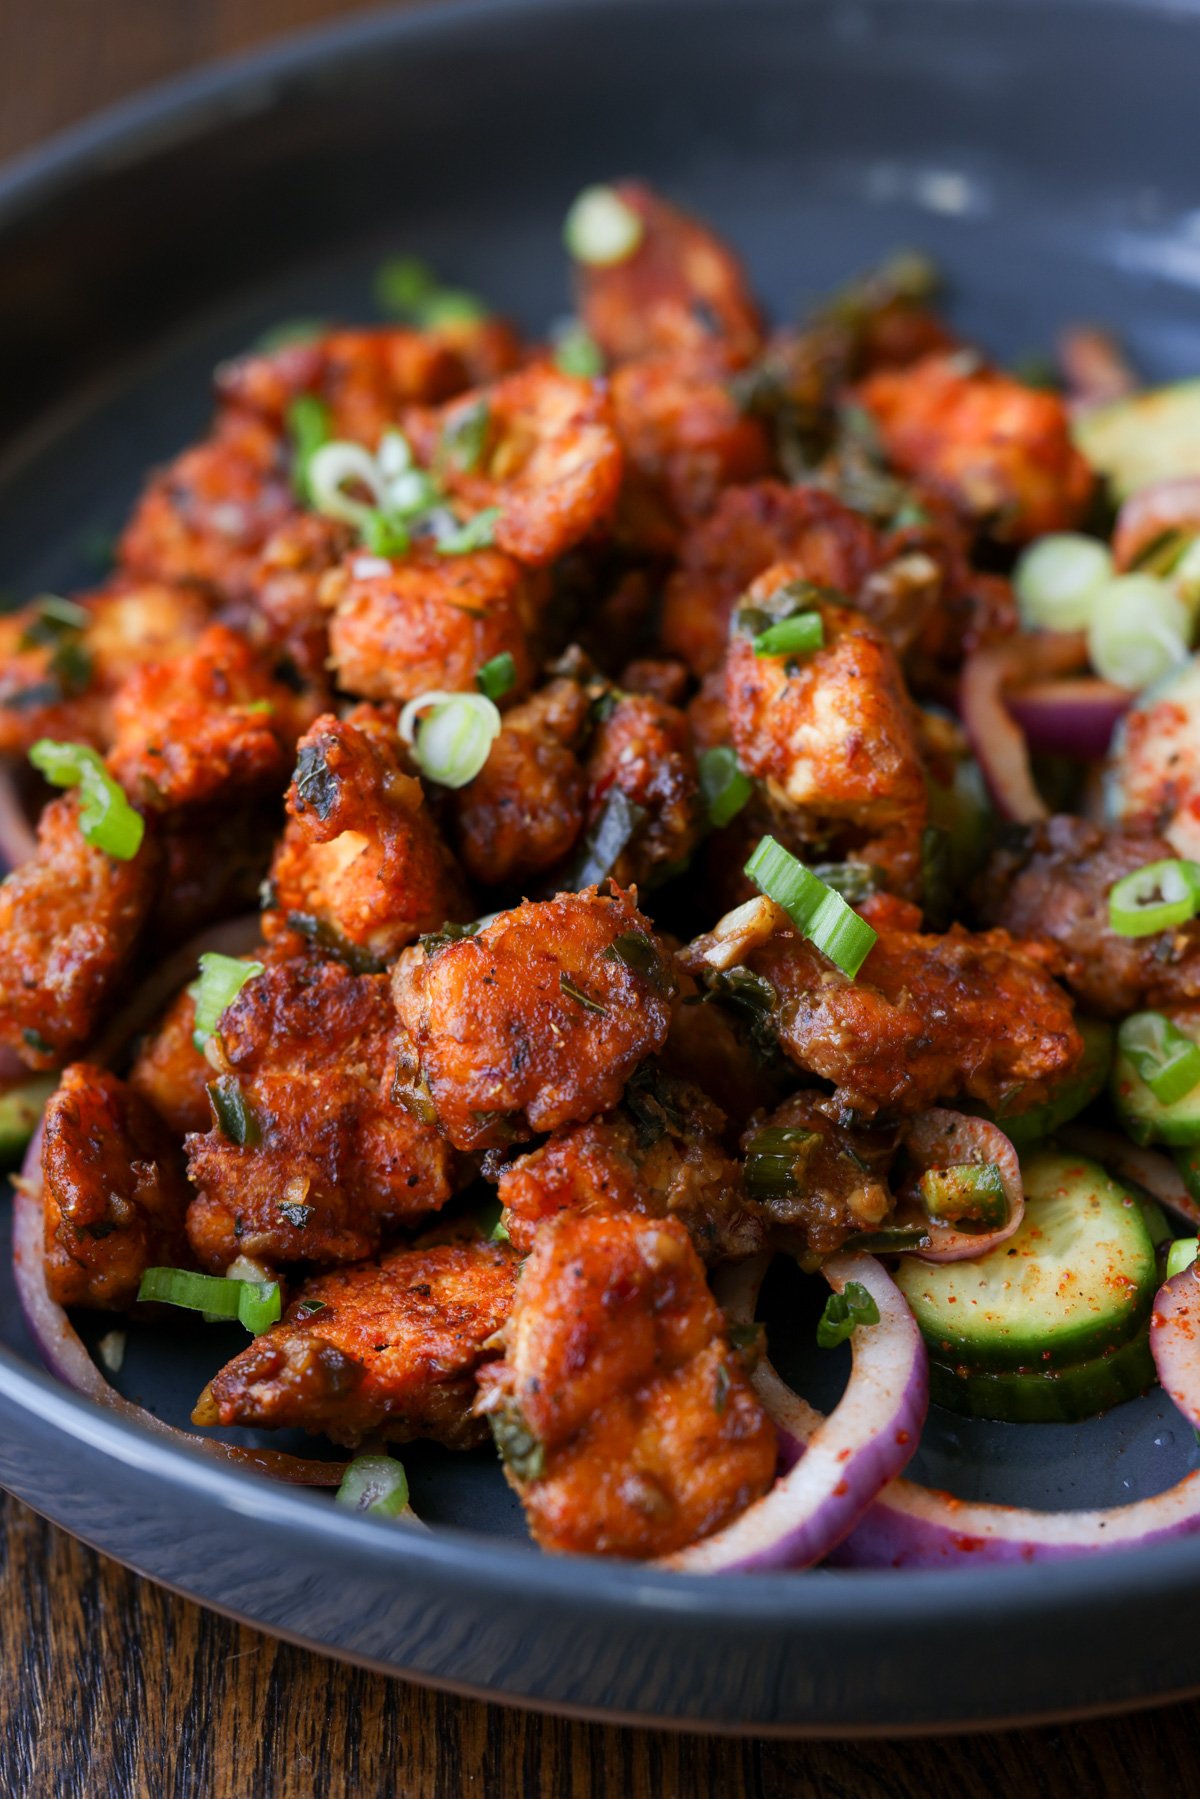
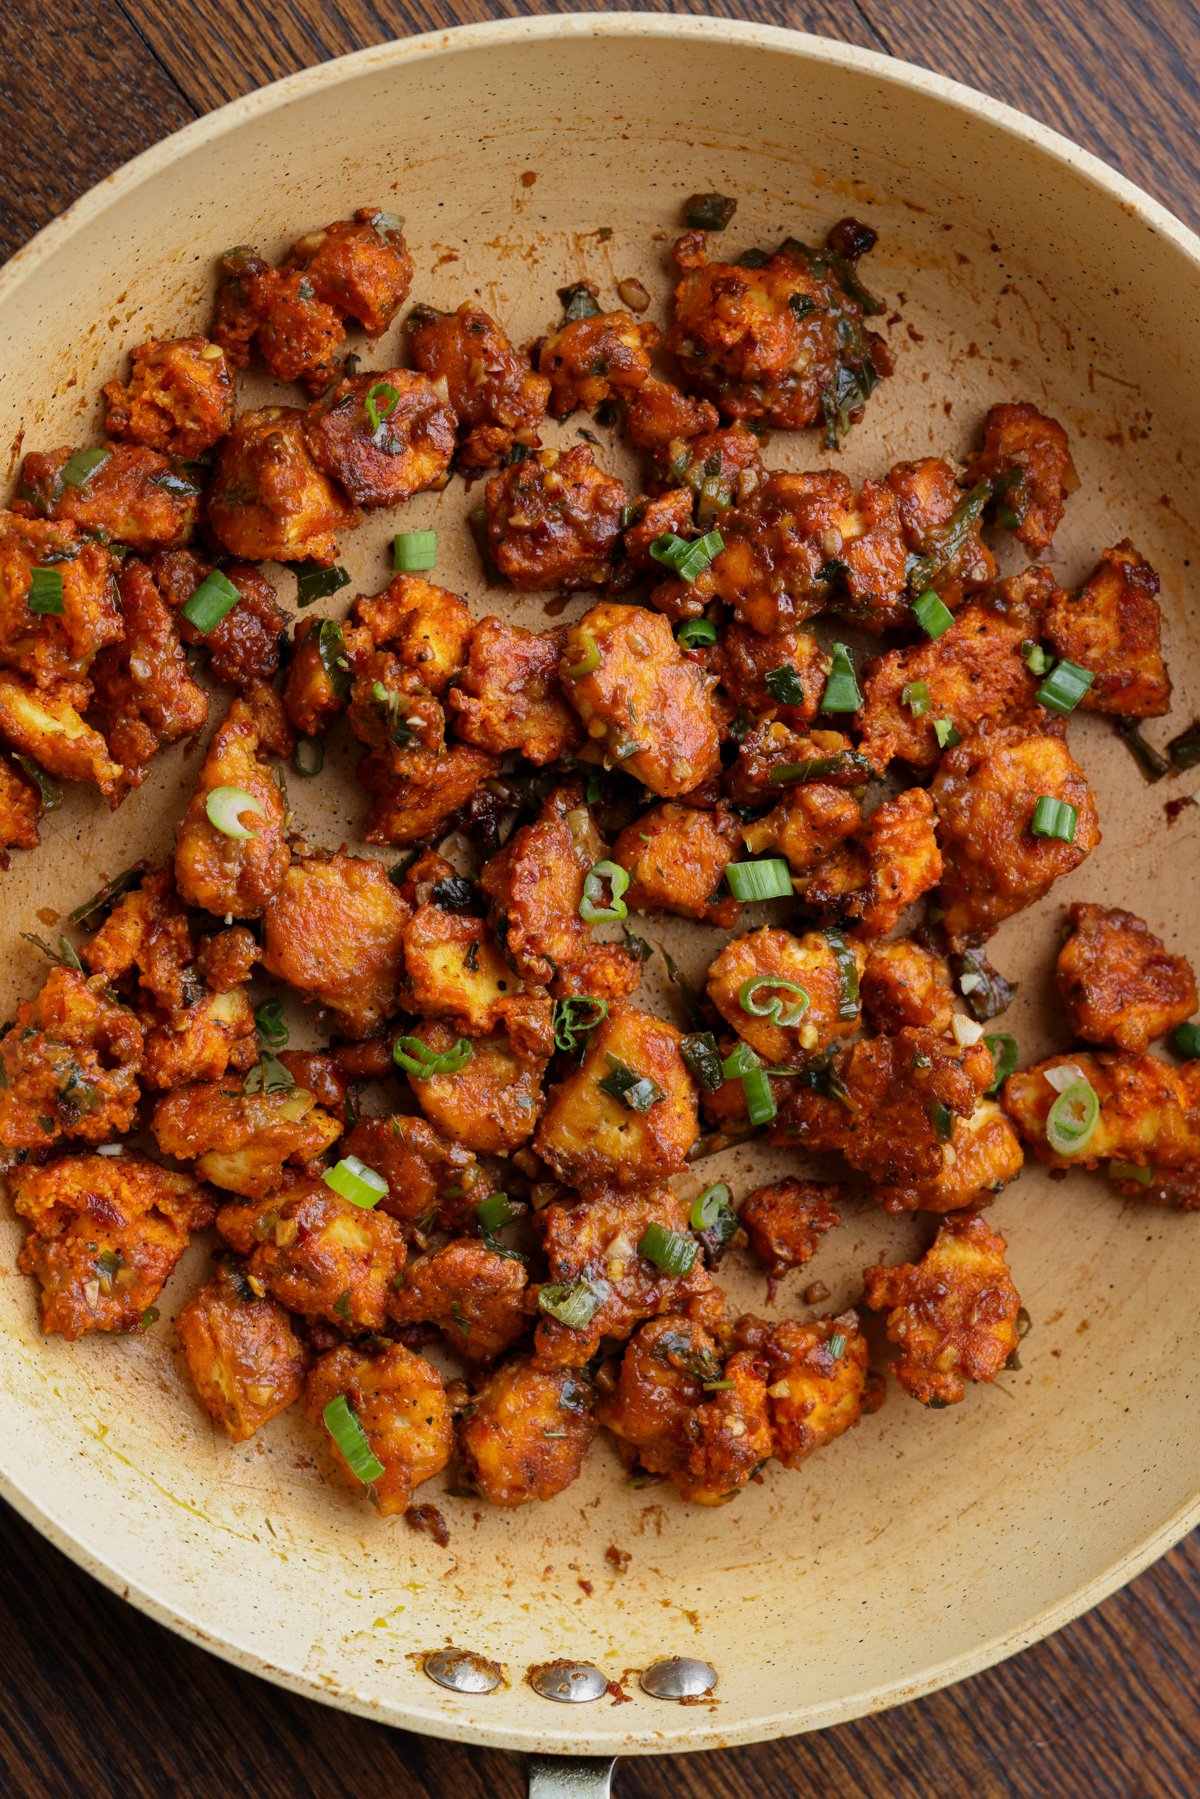
Vegan Chicken 555 reimagines a beloved South Indian street-style appetizer. Crisp golden tofu is coated in a richly spiced sauce infused with fennel, ginger, garlic, coriander, and peppers, and enough heat to make you reach for seconds (and maybe a cold drink). gluten free, nut free. soy free option.
This is another one in my series creating vegan versions of these amazing, meat-heavy, regional Indian appetizers. There’s just so much variety in all of these super delicious snacks and appetizers, and sometimes you don’t find those flavors and that spice in the vegetarian appetizers.
You can use this recipe with tofu, soy curls, chickpea tofu, chickpeas, or vegetables, like cauliflower. Basically, you coat your protein or vegetables of choice with this amazing, flavorful batter, and either pan fry or bake it.
Then, we make this easy, spicy, and delicious sauce mixture. It’s kind of a dry sauce, and you toss the crisped tofu “chicken” in it. Oh my god, it’s so incredibly delicious and also pretty spicy!
You can adjust the spice level to your preference. There are four kinds of chilies in this tofu 555: Kashmiri chili powder in the batter, and green chilies, cayenne, and red pepper flakes in the sauce. To get the flavor with less heat, reduce any or all of those. The combination of peppers adds a ton of flavor, so you definitely want to use some of each, even if you don’t use the full amounts. You can use a milder green chili to manage the heat, too, if you prefer.
Basically, adjust the heat based on your preference, but definitely try this vegan chicken 555. It’s just so fabulously delicious!
Tofu 555 is great on its own or in crunchy salads with juicy fruits like apples, pears, or mangoes, or with roasted or fresh vegetables. A cucumber salad with a simple lime, salt, and pepper dressing also pairs wonderfully with this Indian appetizer. Or, you can make wraps with lettuce, creamy dressing, and fresh green chilis or pickled jalapeños.
No matter how you serve it, you have got to try vegan chicken 555!
Why You’ll Love Chicken 555
crispy tofu in thick, spicy sauce with flavors of fennel, ginger, garlic, coriander, and 4 kinds of peppers
easily adjust the heat to your preference
use your plant based protein or use veggies of choice.
naturally gluten-free and nut-free with easy soy-free option
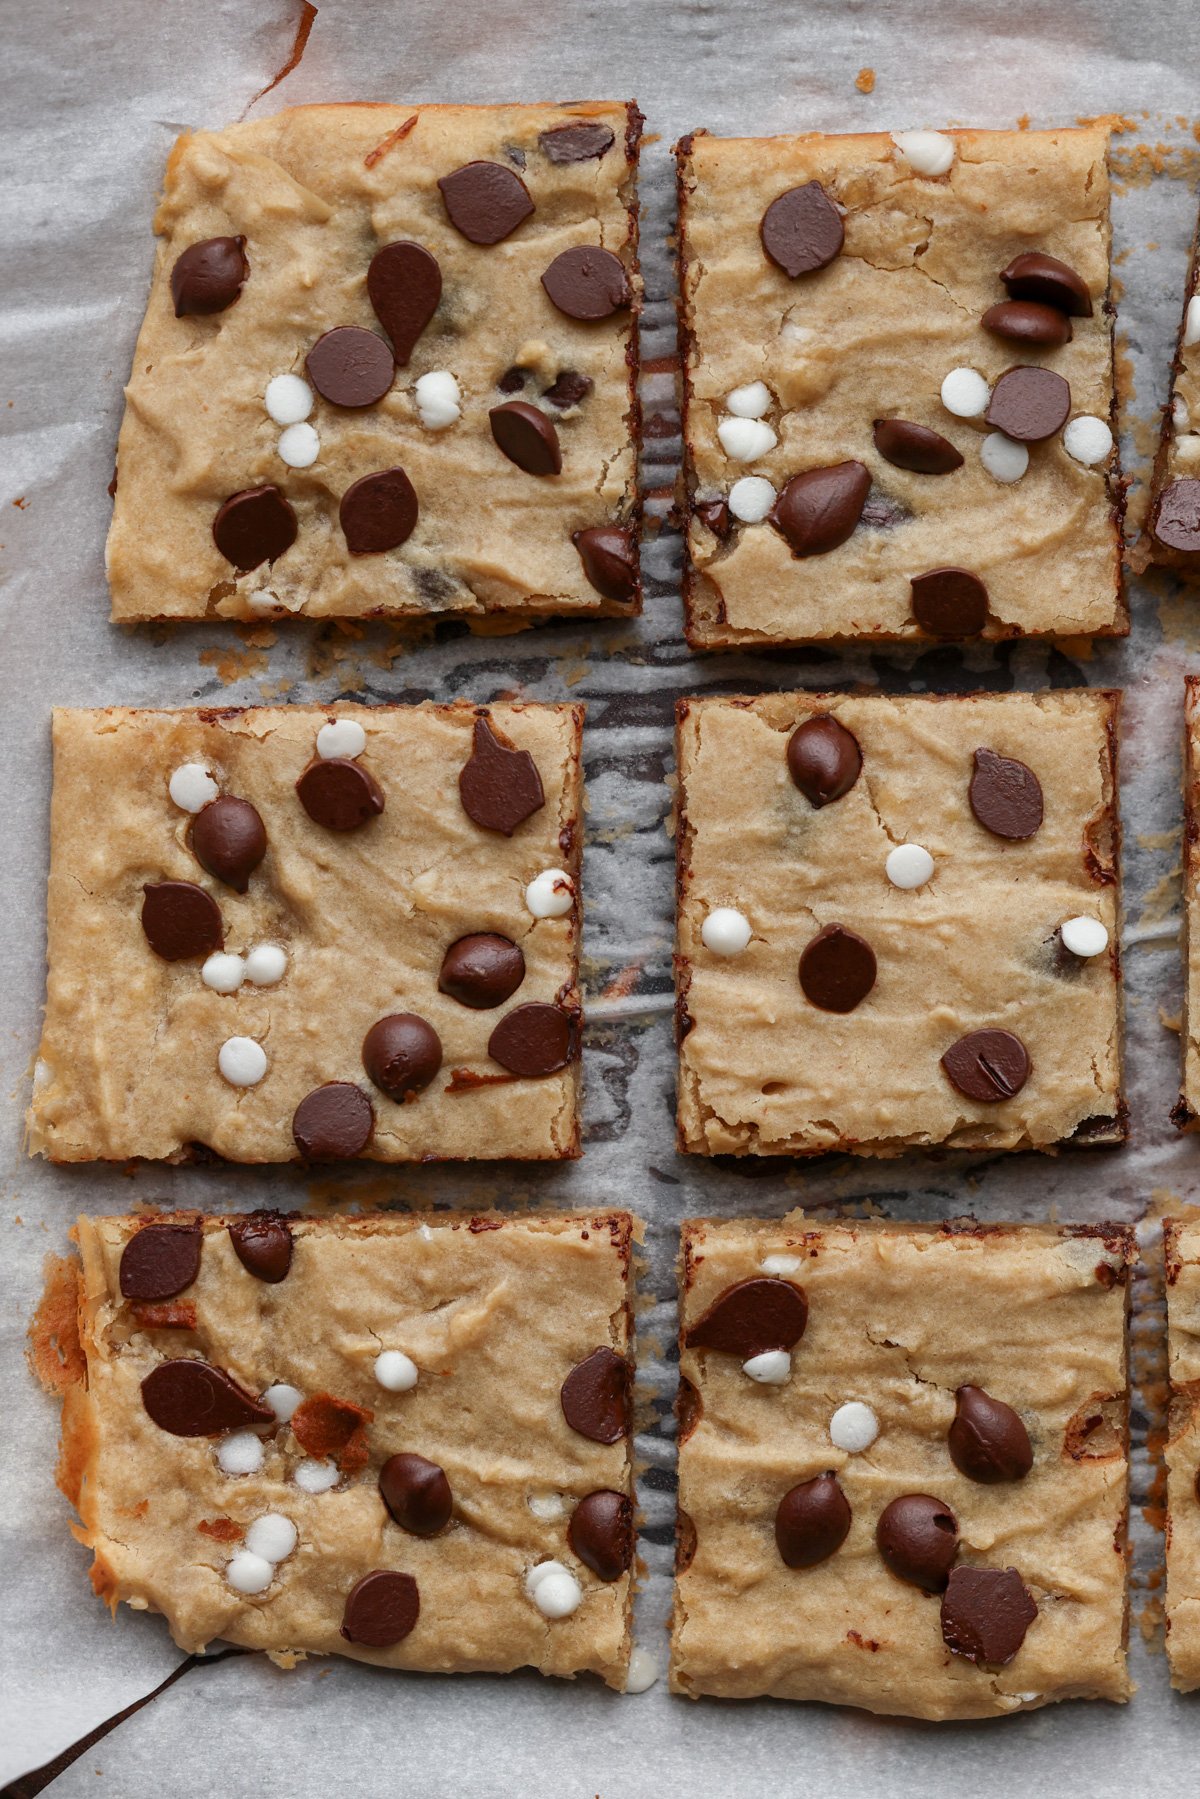
There are just so many ways to use all these legumes, so I decided to try using white beans. Chickpeas can sometimes be a little bit more grainy and gritty, even when you blend them That’s because chickpeas have thicker skin. The texture of the bean is also a bit more gritty compared to creamy white beans, so white beans actually are a great option to use in dessert recipes instead of chickpeas.
I made these blondies with white beans and tahini. Usually, I add some kind of nut butter to my brownies or cookie pies. I wanted to keep this recipe nut-free, so I’m using tahini here. But if you don’t want to use tahini, you can just add some smooth almond butter or peanut butter.
It’s a super simple recipe with just a few ingredients. Just add everything to a blender or a food processor, blend, then transfer to a baking pan. Add your chocolate chips and chunks if you want, and bake. That’s it!
These are amazing and super easy, and you’re going to want to make them again and again.
Why You’ll Love White Bean Blondies
super easy – you make the batter in the blender!
lots of protein and fiber from the beans and tahini
versatile! Make it with chocolate chips or use the snickerdoodle variation
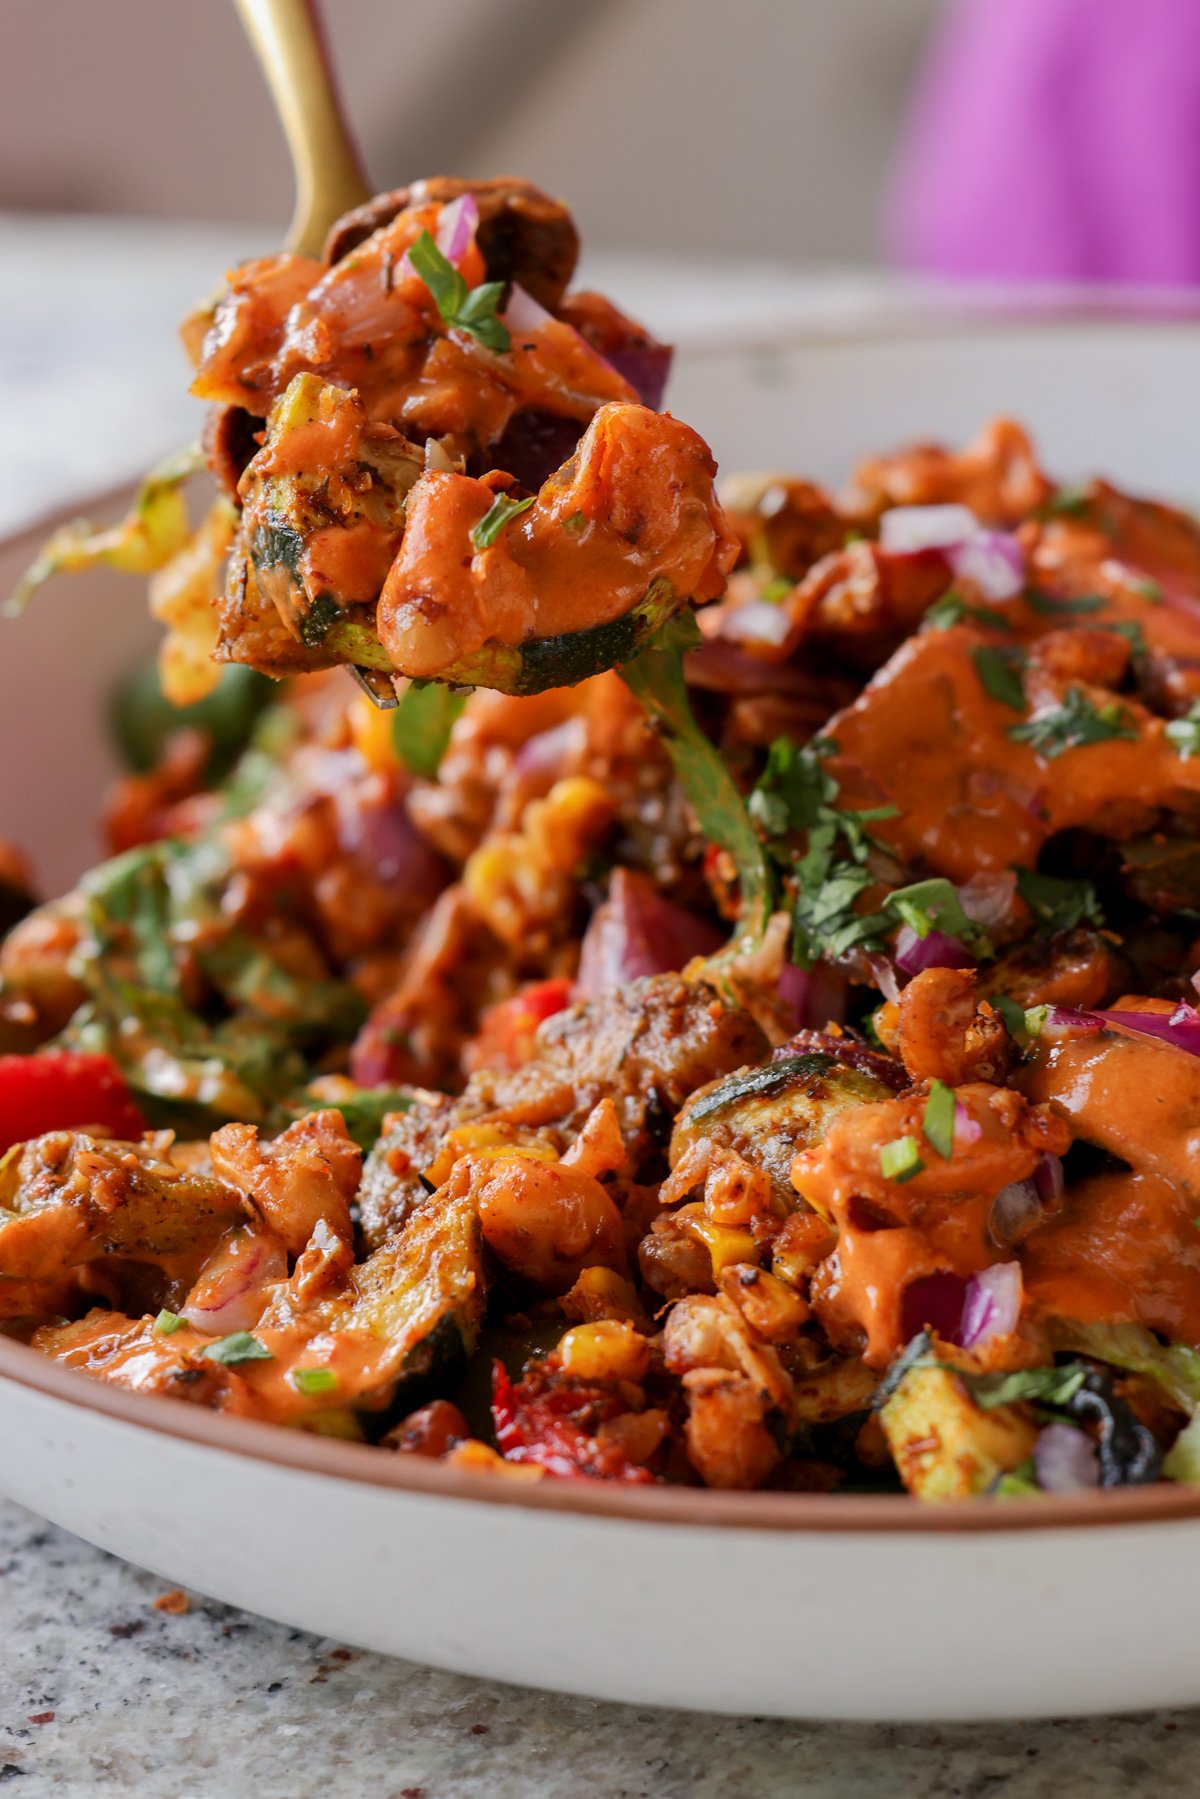
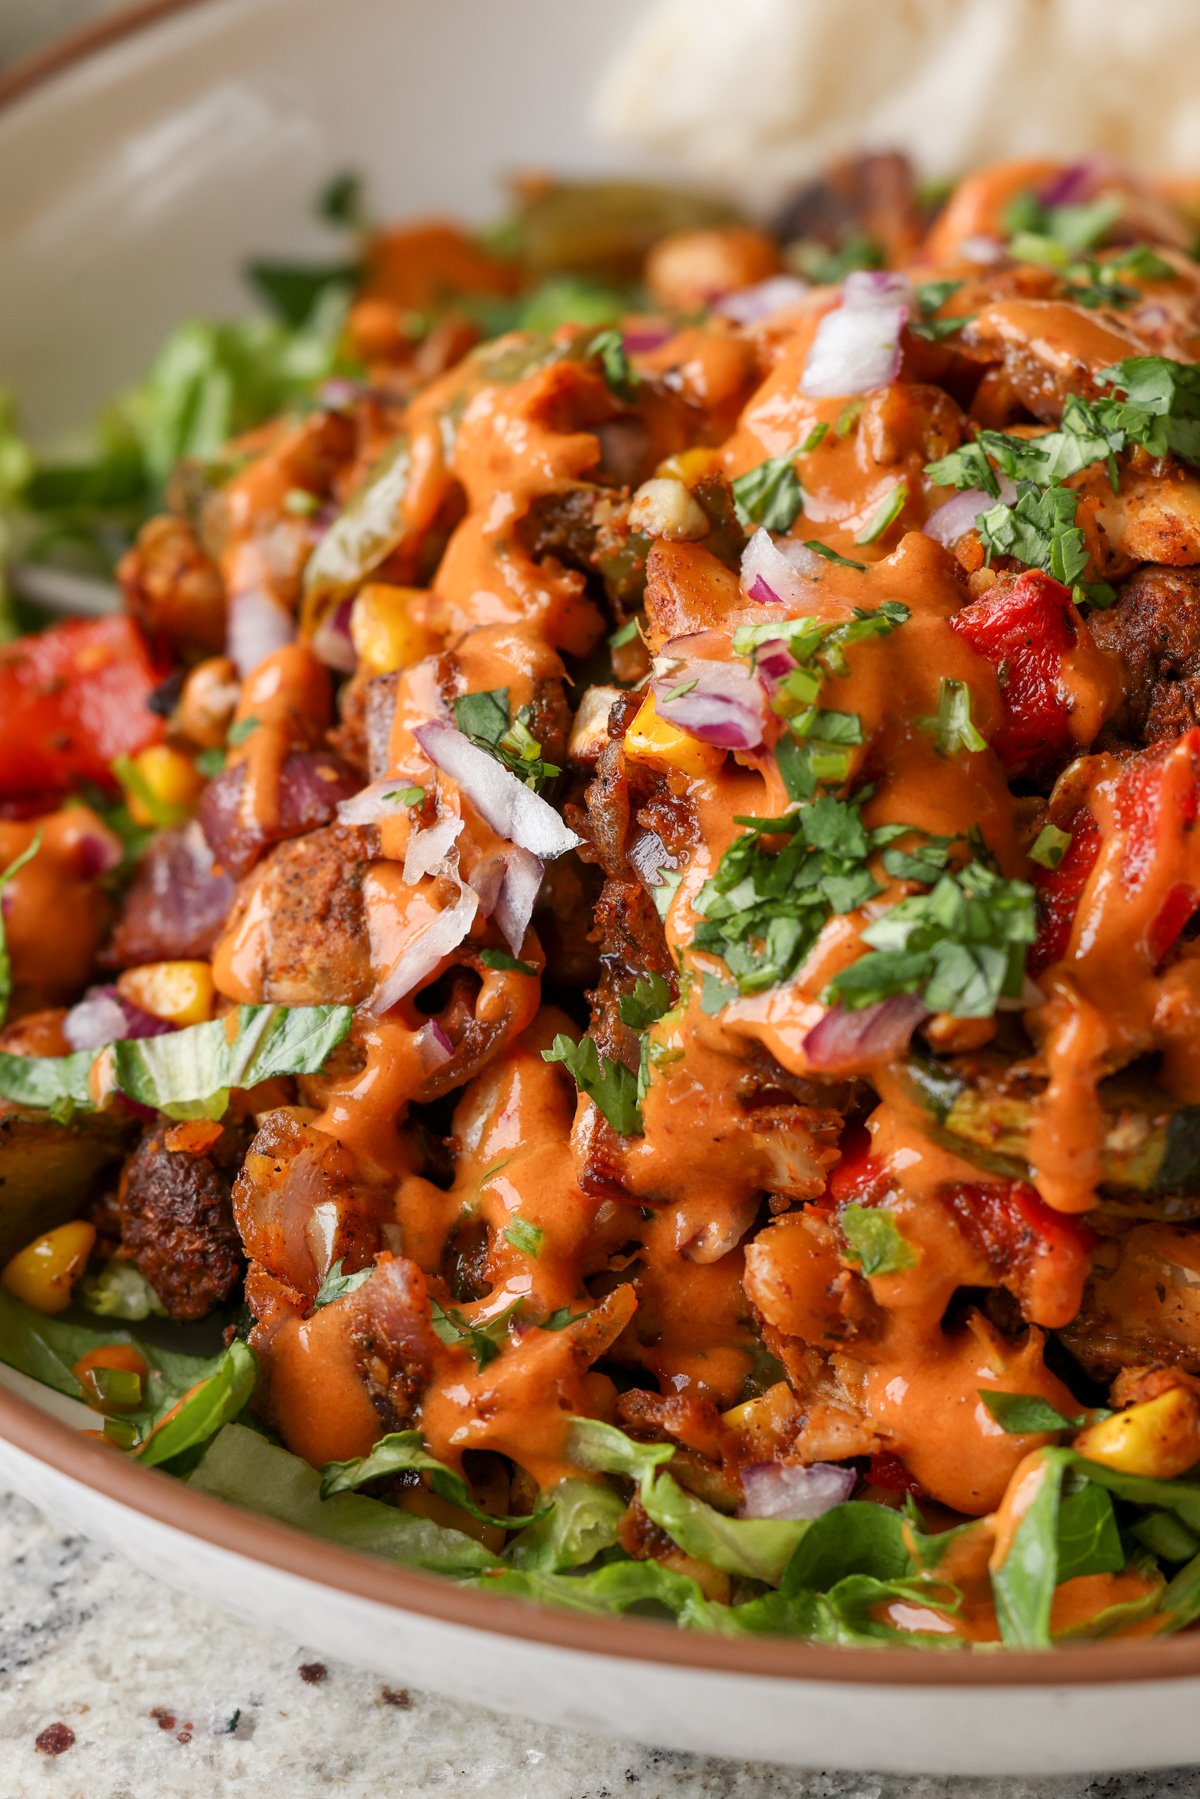
Crispy smashed white beans and Cajun veggies roasted on one sheet pan, then tossed in a creamy, tangy chipotle-lime dressing. A versatile meal you can serve in bowls, tacos, or wraps.
This is a super easy and absolutely delicious meal that comes together fairly quickly. You just chop up all of the vegetables and add them to a pan. Smash the beans using a bowl, and add them to the pan as well. Add some spices, oil, and lime juice, toss well, and then bake until the veggies are tender and the beans are lightly crisp.
Meanwhile, you make this creamy, delicious, spicy, lightly sweet, and tangy dressing. It goes amazingly well over these roasted veggies. I mean, this is a dressing you can use on any salad, wraps. burritos, or any which way. It’s just fantastic with all of that smoky chipotle spice flavor, the tang from the lime juice, the creaminess from the non-dairy yogurt, and some cheesiness from the nutritional yeast. It’s just fantastic.
You can serve this roasted bean and veggie mixture as a bowl, in wraps, stuffed into pita bread, or over a baked potato or rice. There are so many ways to serve this! Do let me know in the comments how you served it as well, because I love hearing from you guys, and many times you surprise me with the creative ways you serve the recipes.
You want the beans to be sort of lightly flattened but not entirely smashed. You’re just trying to increase the surface area, so they can bake up nice and crispy in the oven.
If you don’t want to smash them, that’s fine, too. Just add them directly to the veggies on the sheet pan and bake. The beans on the edges will still get crisp. If you want all of the unsmashed beans to get crisp and act like croutons, then bake them on a separate sheet so that they crisp up nicely.
This dish is spicy, smoky, creamy, and tangy. It’s just an amazing blend of flavors! It has protein from the beans, nutritional yeast, and yogurt. You can up the protein by adding hemp seeds into the dressing or as a topping.
Why You’ll Love these Smashed Bean Veggie Bowl
easy meal all cooks on one large or two small sheet pans
amazing textures from crispy smashed beans, tender roasted veggies, and creamy dressing
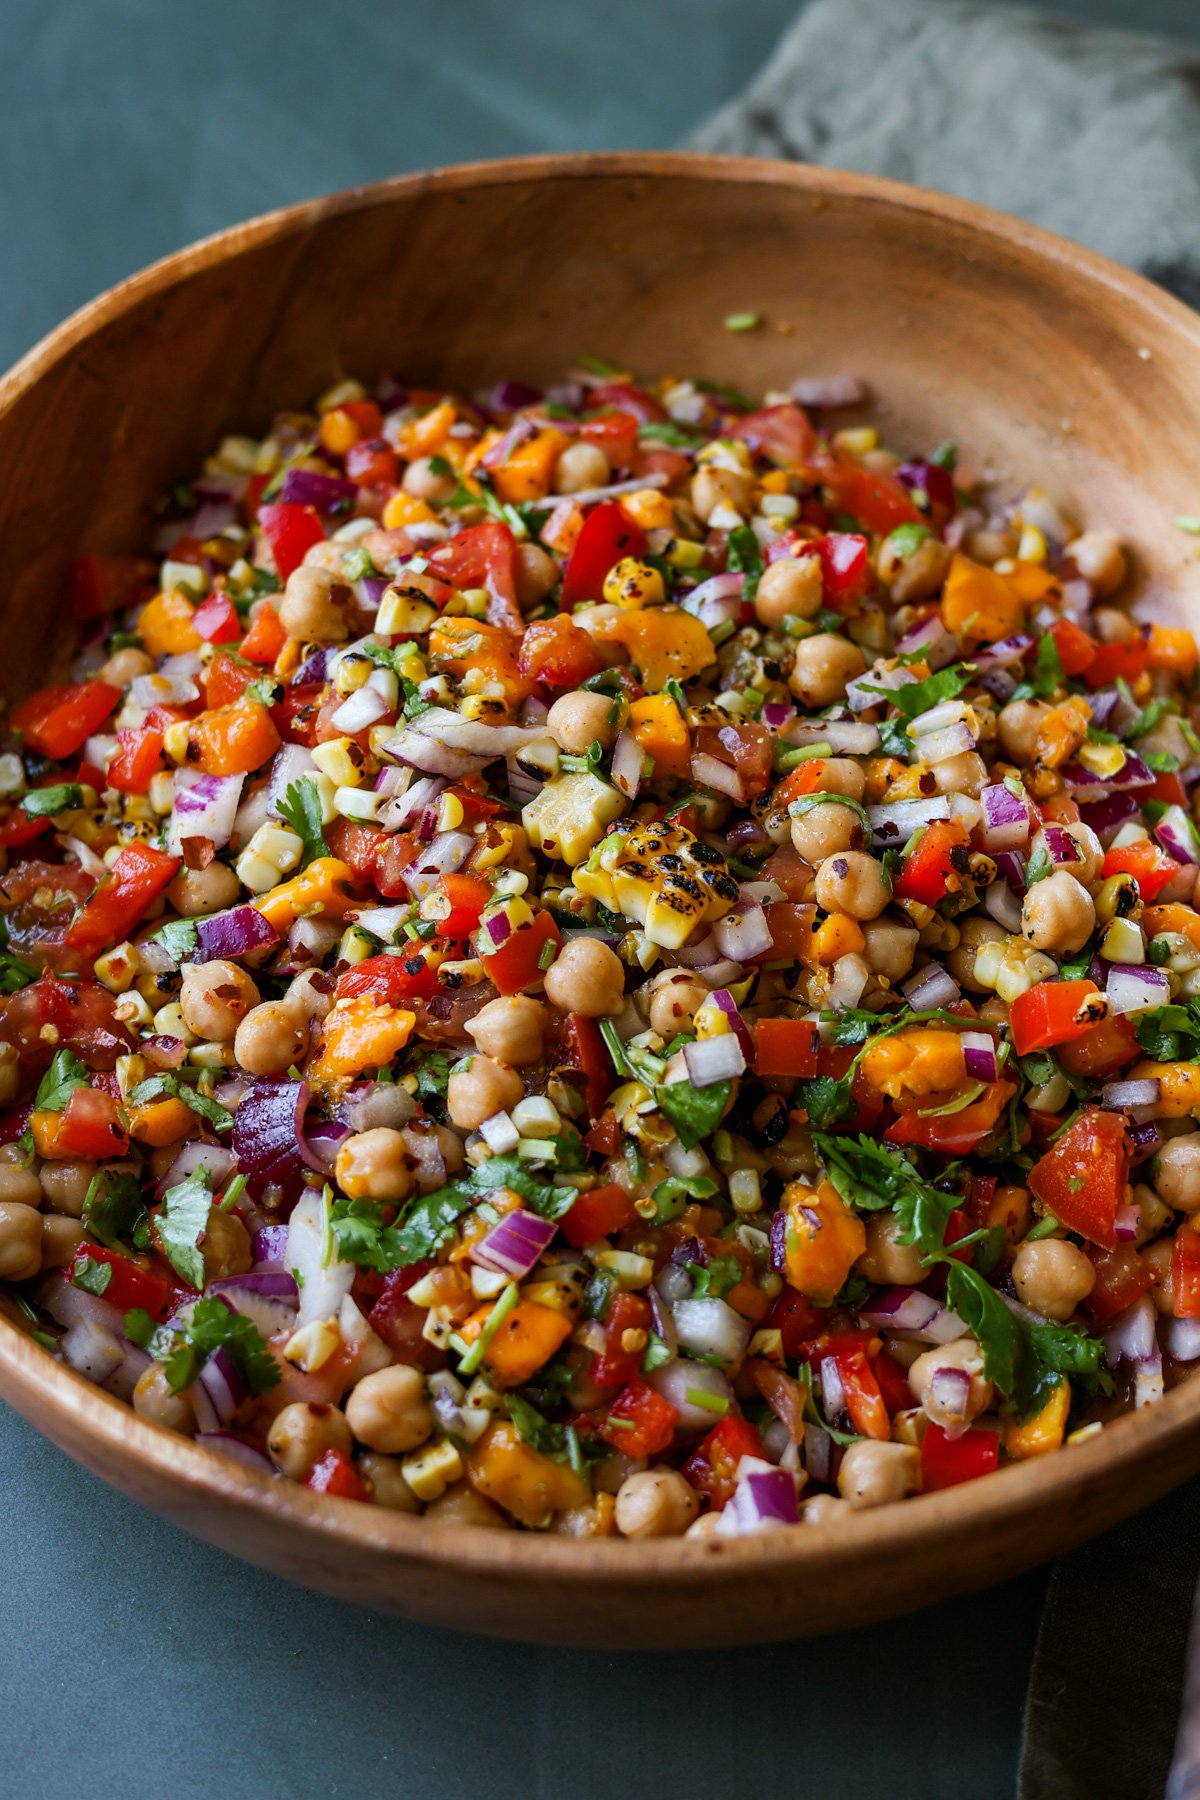
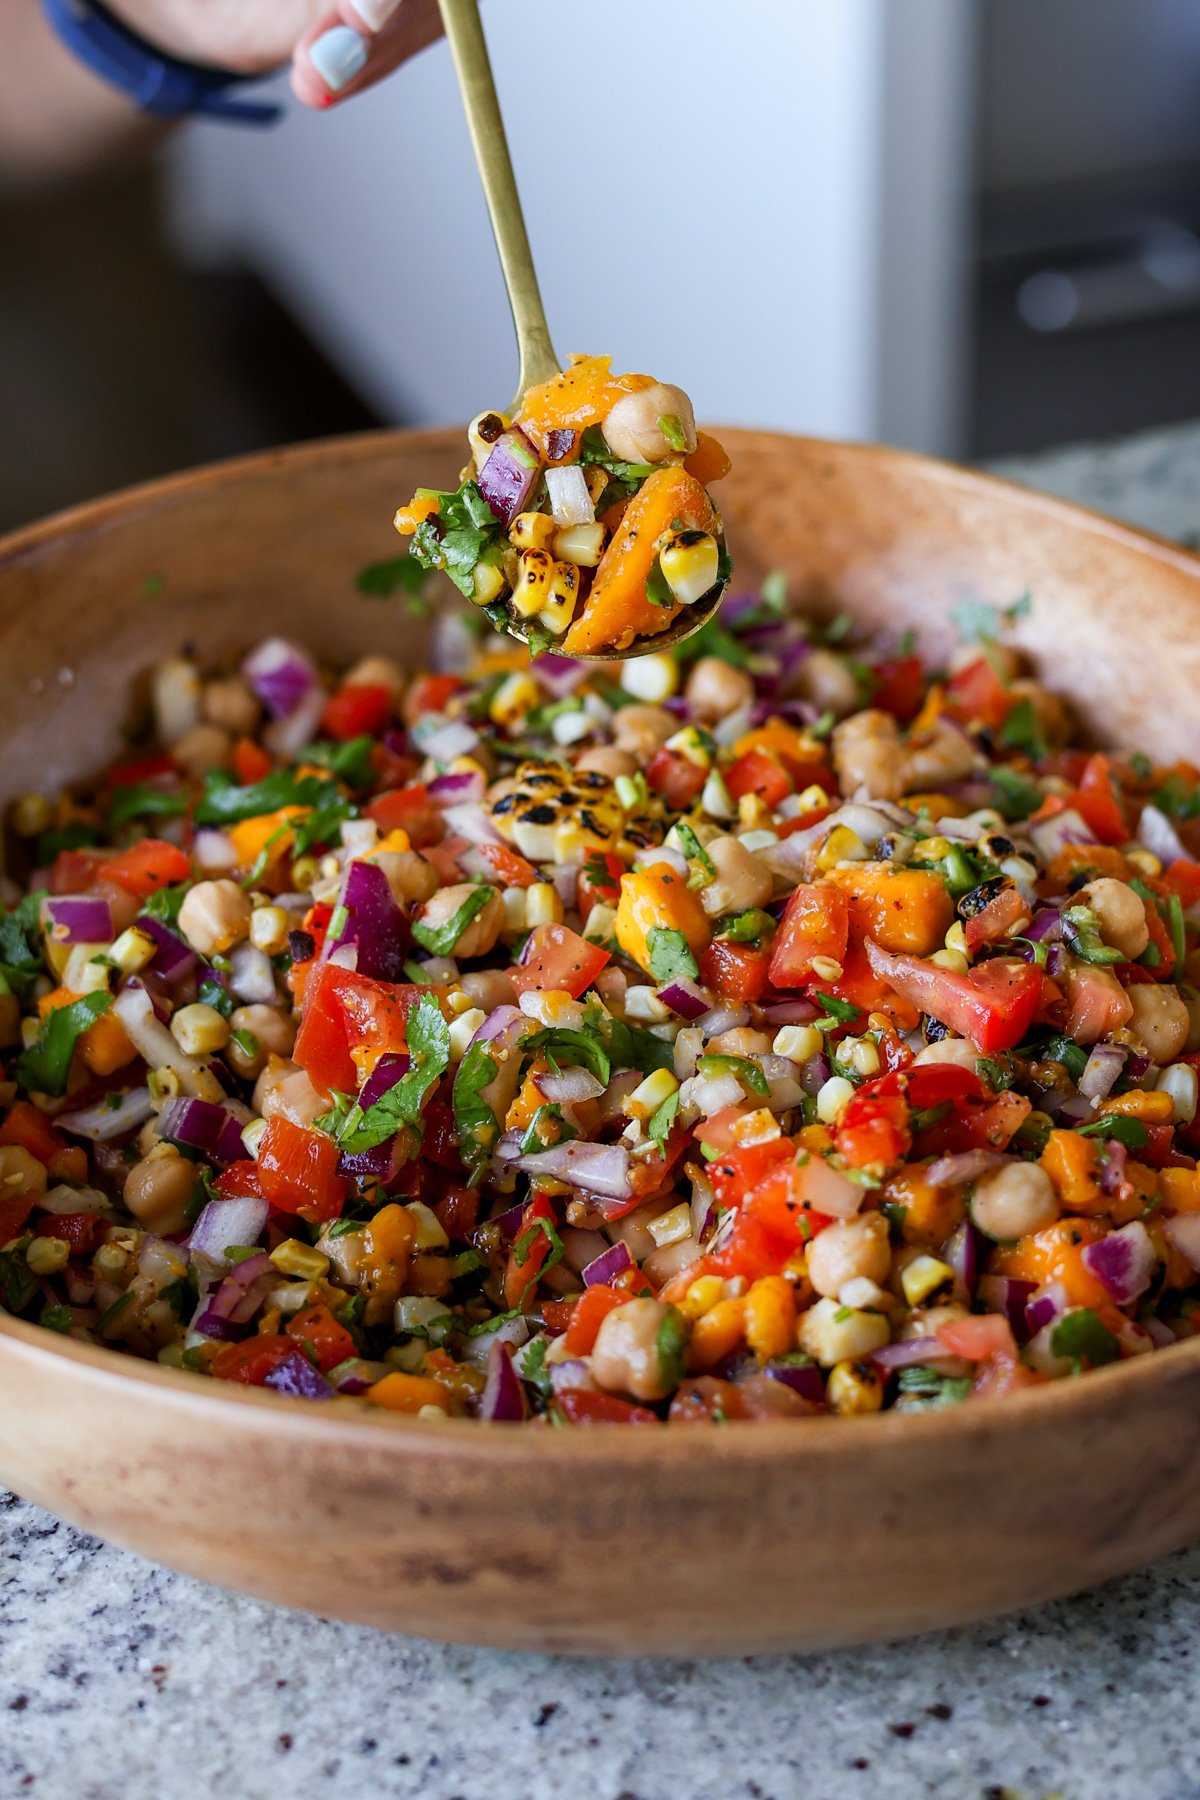
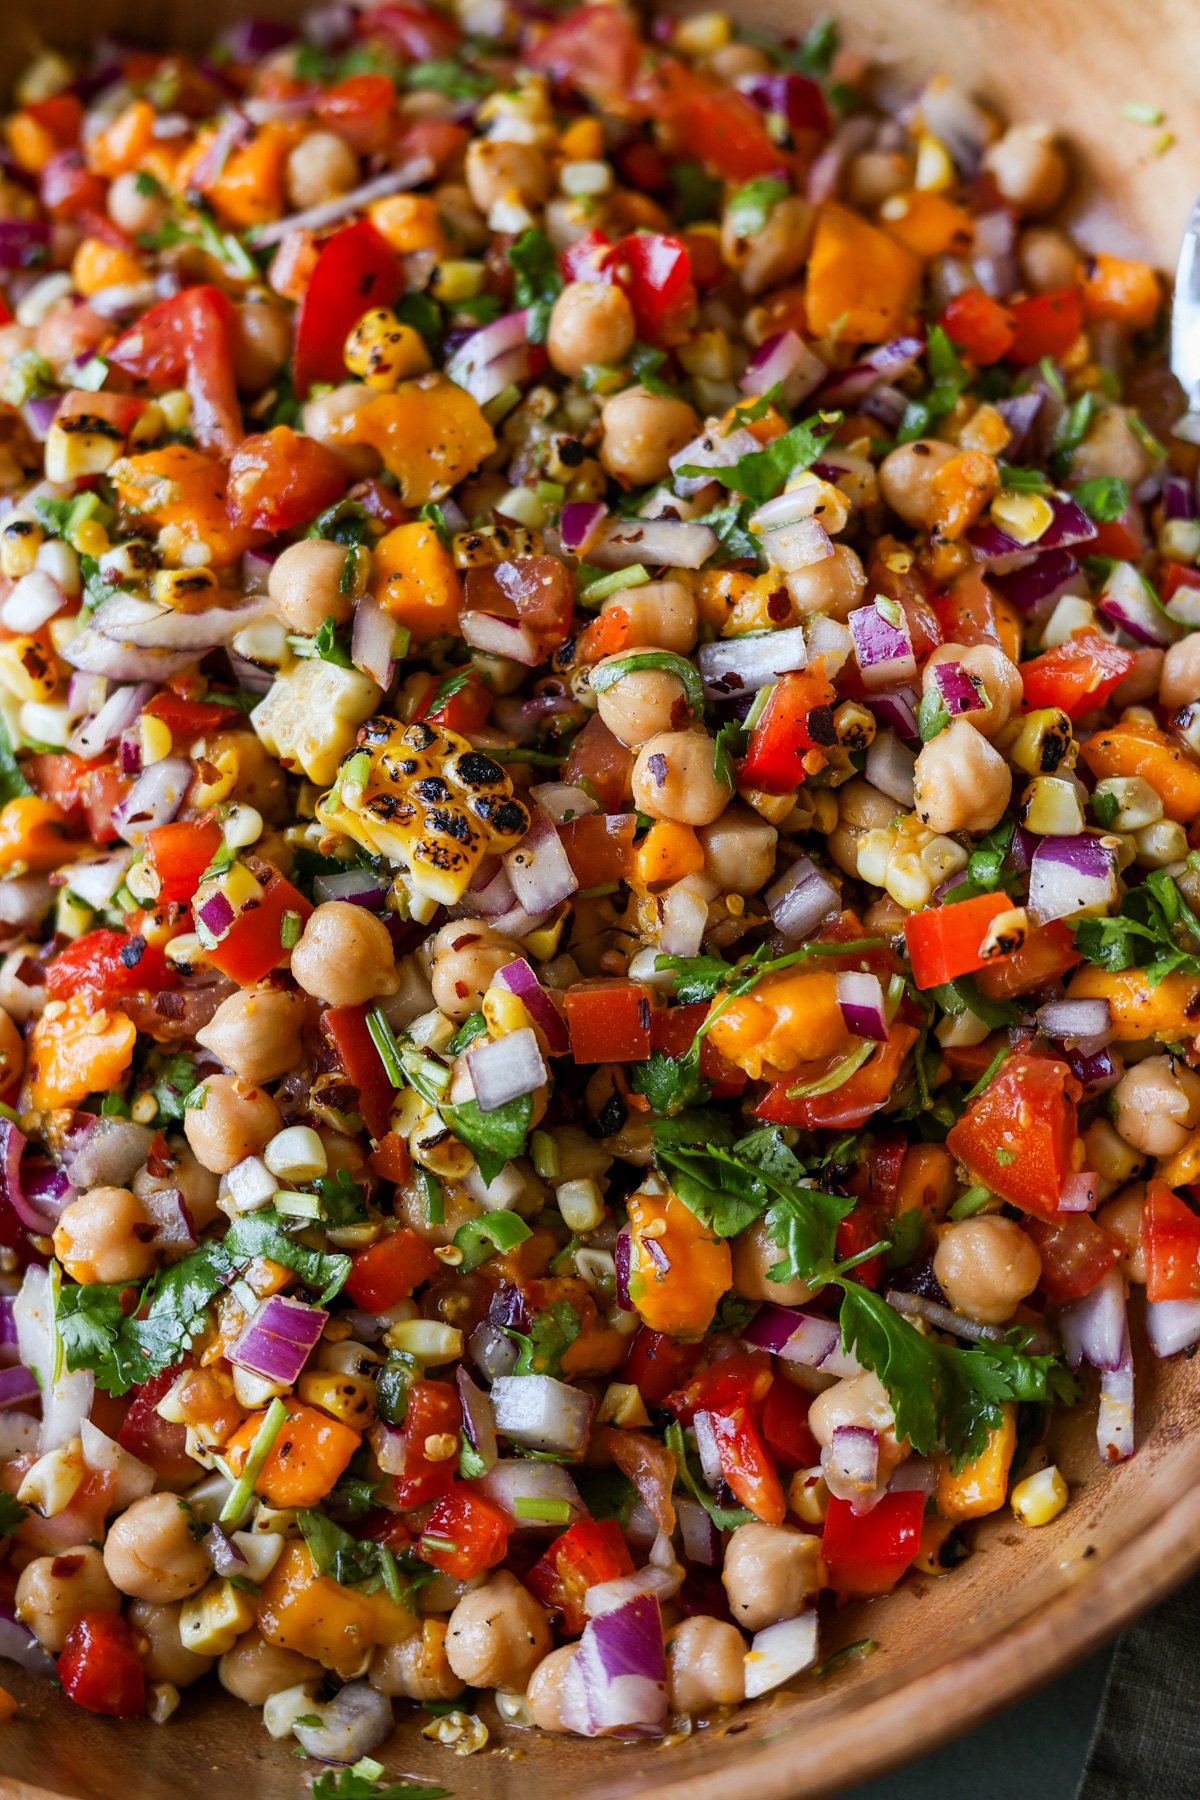
This hearty bean salad features chickpeas, sweet mango, fresh veggies, and sweet roasted corn in a cumin lime toasted chili oil dressing. Mango chickpea salad is a perfect, one-bowl summer lunch! (gluten-free, soy-free, nut-free, oil-free option)
I wanted to make a quick salad that was hearty and not very salad-like. That means not too many leafy greens, because my niece doesn’t like to eat those, but she loves chickpeas. That worked out really well because we added some lime, cumin, and cayenne to give it that Indian chaat-style flavor profile.
This salad is perfect for making the most of ripe, summer mangos and fresh corn on the cob.
It turned out magnificent as is, and then we leveled it up by toasting some red pepper flakes in oil, creating a spiced oil that brought everything together. If you want to make it oil-free, just omit the oil and add the red pepper flakes directly, but the oil definitely adds a nice, smoky, spicy flavor to the salad.
There are three types of heat in this salad:
green chilies
cayenne
red pepper flakes.
You can adjust the heat by using milder green chilies and reducing the amount of cayenne and red pepper flakes to your preference.
Serve this mango chickpea salad with pita chips, Indian papri/crackers or toasted pita bread for dipping.
Why You’ll Love Mango Chickpea Salad
easy, 1-bowl salad
sweet mango, earthy chickpeas, fresh veggies, and sweet, roasted corn
delicious cumin-lime dressing and red pepper spice oil bring out the flavors
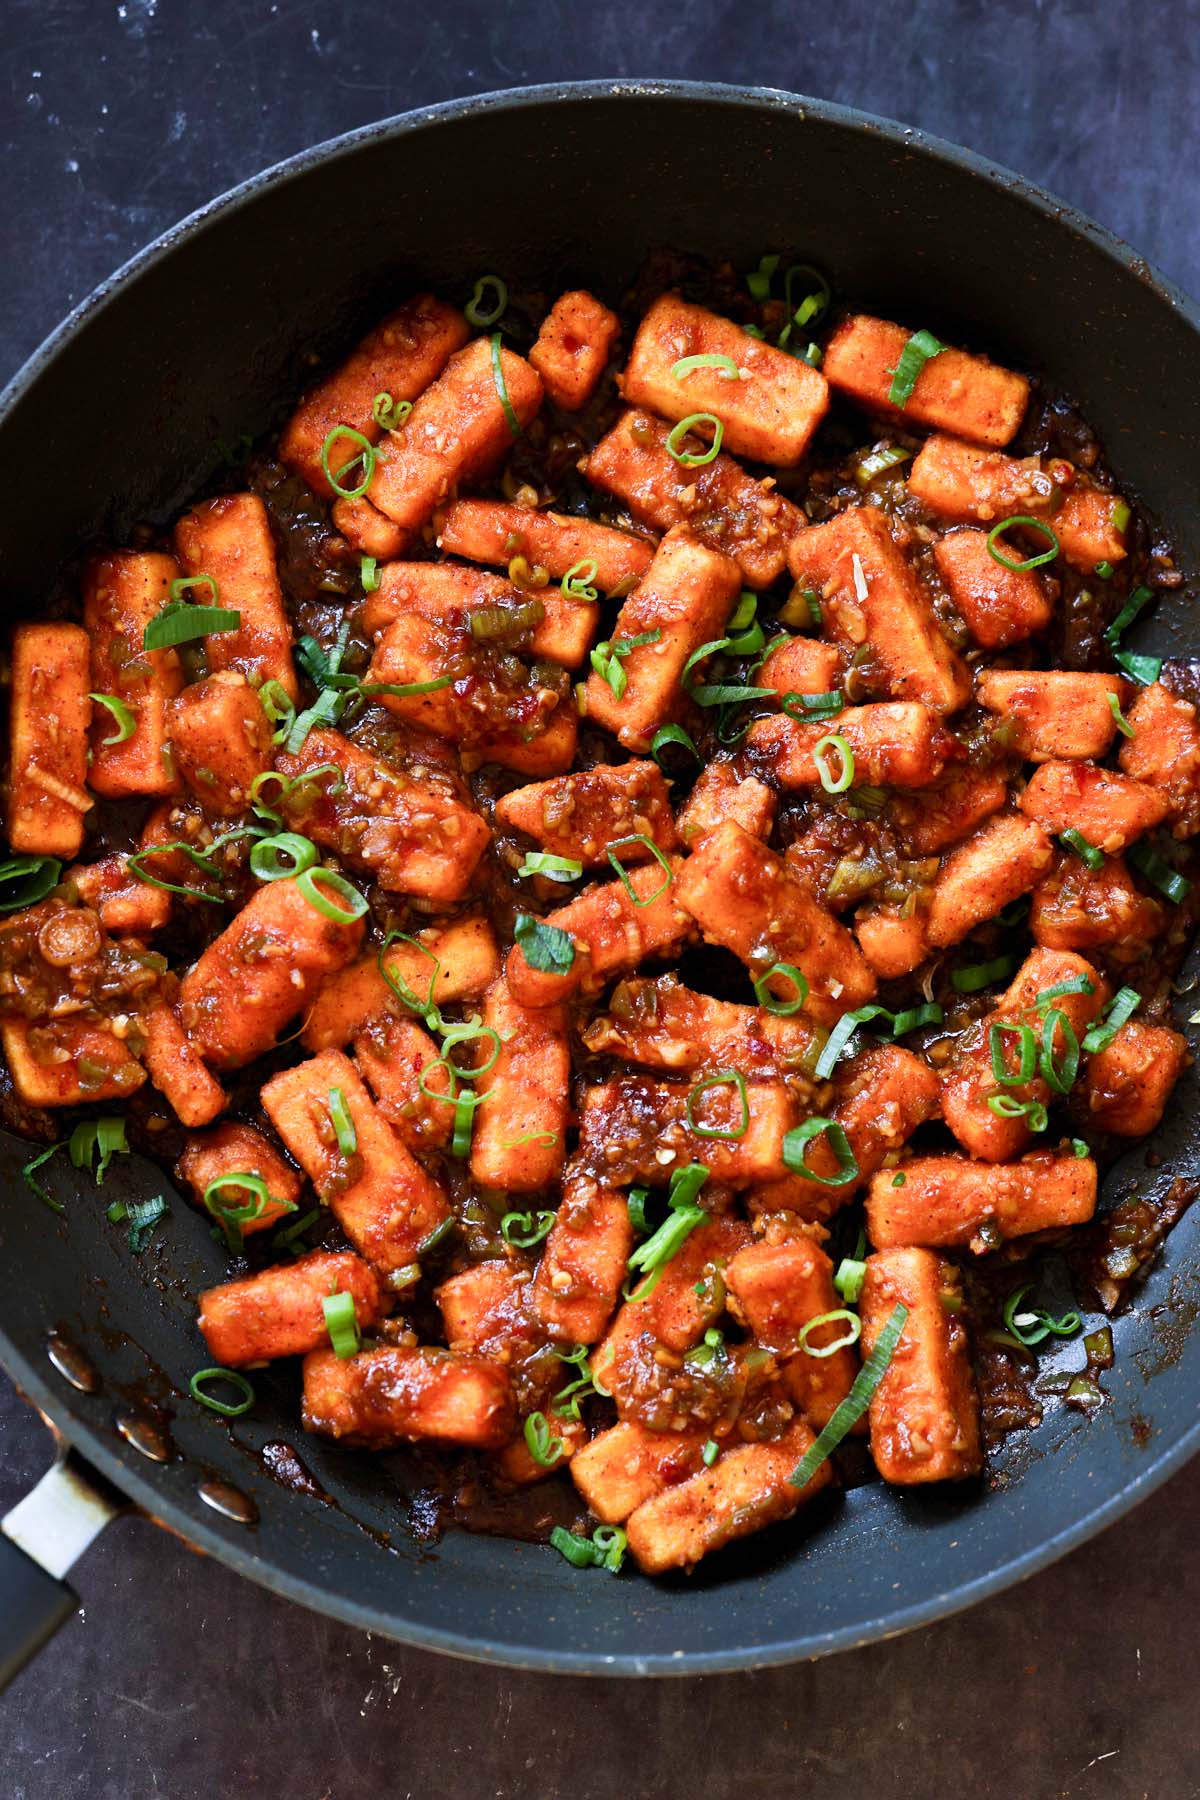
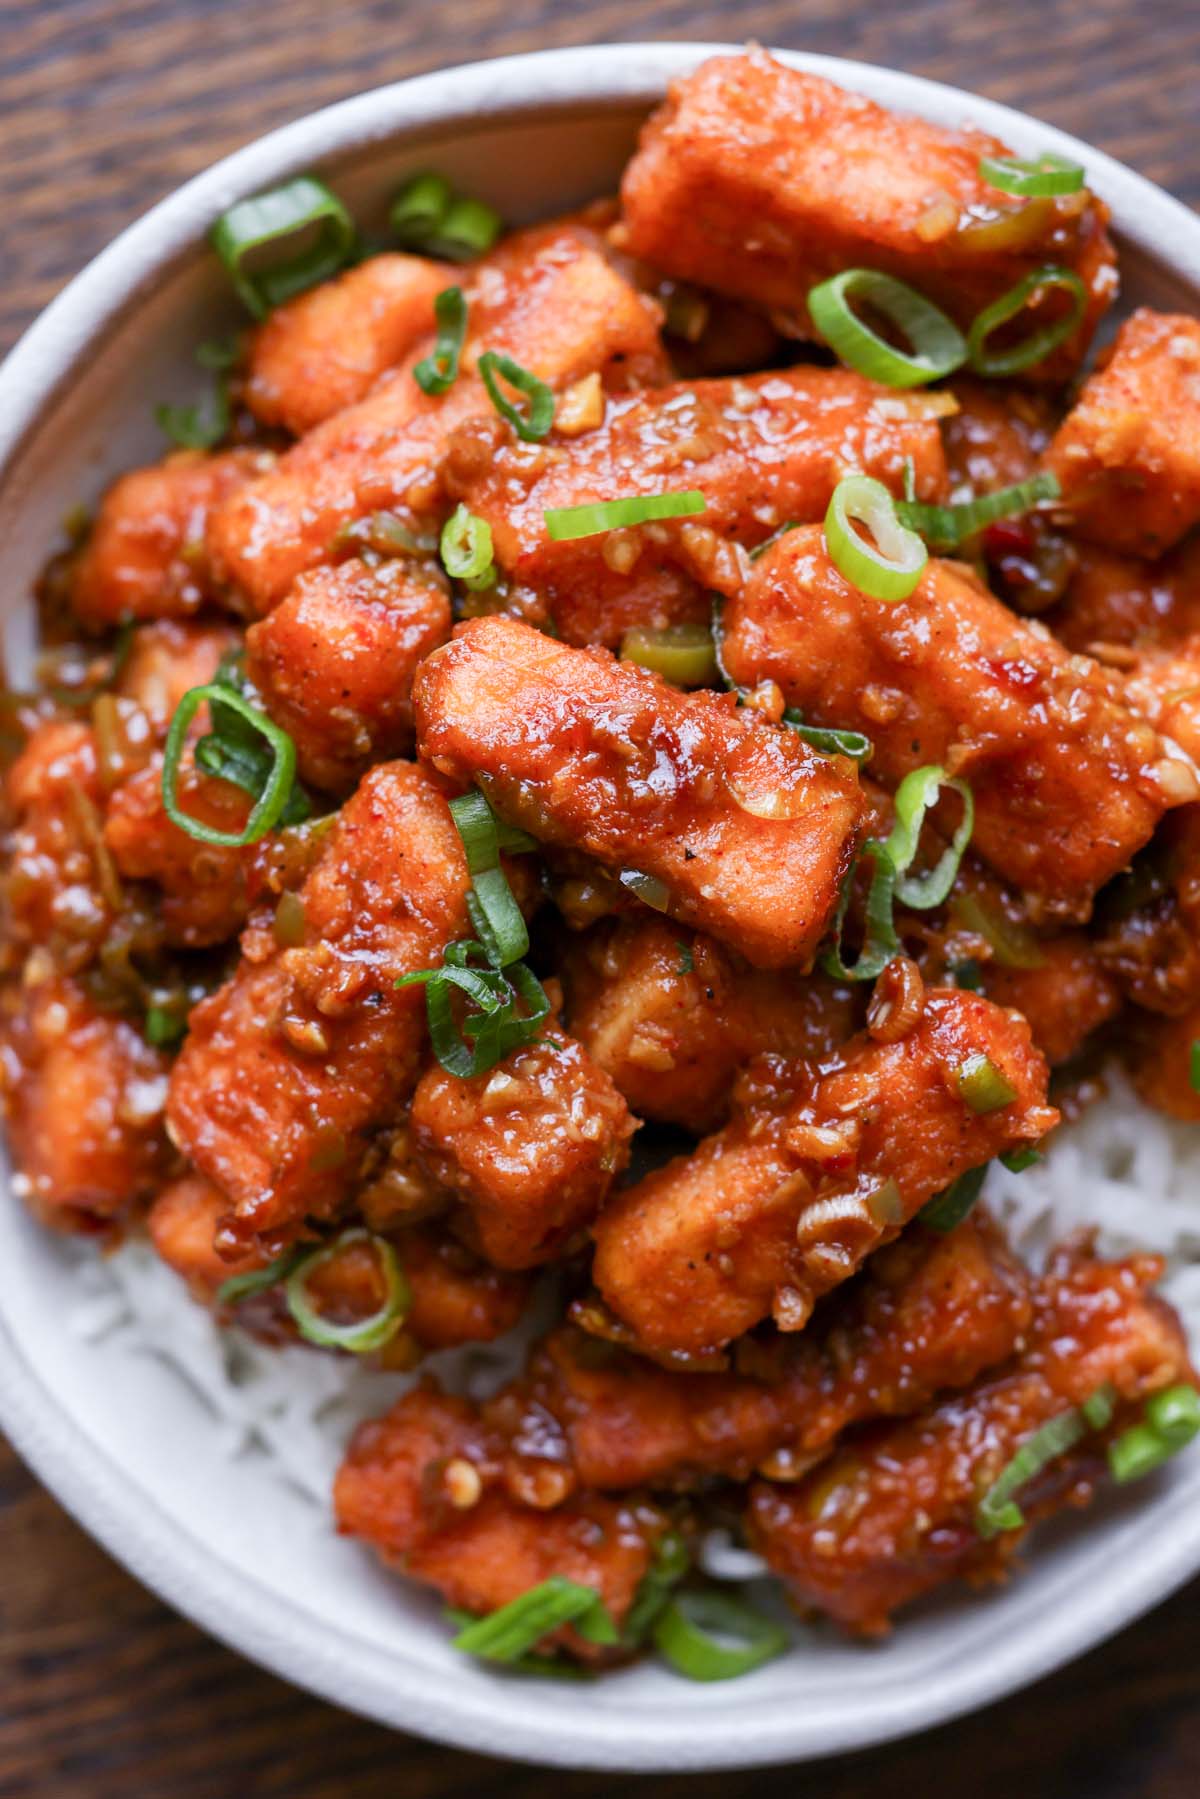
Sticky, crispy, ginger- and garlic-packed tofu Manchurian is an easy and delicious meal over rice, quinoa, noodles, or lettuce wraps. This popular Indo-chinese sauce has a sweet heat that is absolutely addictive! (nut-free with gluten-free and soy-free options)
Manchurian sauce is one of the most popular Indo-Chinese sauces, and it’s one of my favorites. You can use it in many different ways to make a variety of dishes. You can find it on restaurant menus paired with crispy fried chicken, crispy cauliflower, or fried veggie balls coated in the thick, sticky sauce.
This sauce is absolutely delicious, and it has tons of ginger and garlic, so be ready to chop up a lot of both.
You can also make a thinner version of Manchurian sauce to pair with rice, very saucy veggie balls, crispy chicken, or noodles. I have a couple of different ways to use Manchurian sauce on the blog that use these variations.
Today, let’s make tofu Manchurian. We toss tofu in rice flour and cornstarch to make a really crispy coating, then pan-fry it until it gets an amazing crunch. We make the Manchurian sauce in the same pan, then toss the crispy tofu in it right before serving, so it keeps that satisfying crunch.
Top your tofu Manchurian it with green onions, and serve it with rice, quinoa, noodles, or lettuce wraps. Or enjoy it as a starter on its own!
Why You’ll Love Tofu Manchurian
crispy tofu in sticky-sweet ginger-garlic Manchurian sauce
1-pan dish ready in about 30 minutes
flexible! Serve as a starter or over rice, grains, noodles, or in lettuce wraps.
naturally nut-free with easy gluten-free and soy-free options
Indian Chaat meets Tostadas! Cilantro mint lime chutney marinated beans on crunchy tostadas with sweet maple lime sauce and cooling yogurt, are an Indian fusion dish that’s a perfect starter, snack, or even entree! No cook (Options for soy-free nut-free gluten-free)
These no-cook tostadas use canned beans, prepared tostadas, and lots of delicious sauces – no cooking needed! The only cooking you’d need to do is if you are making your tostadas from tortillas. Prepared tostadas are readily available in most grocery stores.
I wanted to make a fun dish with beans, and I took inspiration from chaat, which is a family of Indian snacks or street food characterized by these awesome combinations of different textures and flavors. Especially papri chaat which has crisp crackers paired with mashed potatoes or chickpeas or both and chutneys, sauces and yogurt for a fantastic salad like hearty nachos if you will. Many chaat recipes have crispy, spicy, sweet, and tangy all together. They’re great as snacks or can be a refreshing meal.
I took inspiration from those flavors and textures. Usually, I make this chickpea potato chaat with small crackers, where you take some cooked chickpeas and cooked potatoes, toss them with some spices and chutneys, and layer them with yogurt, more chutneys, and some chopped crunchy veggies.
I turned that dish into this tostada, where we take crispy tostadas and make marinated beans that are soaked in a delicious green chutney, instead of chickpeas, along with cucumber and onion. We top the tostadas with these beans and then add a good drizzle of seasoned non-dairy yogurt and this sweet, tangy, maple-lime sauce to bring all of those flavors together. It’s absolutely fantastic and delicious! The maple lime sauce is a sub for tamarind date chutney. If you have tamarind chutney, use that for more Indian chaat flavor. Try more Indian salads- Mango Zucchini chickpea Indian spiced oil salad and my Kachumber Salad !
This recipe is very versatile. If you want to control the heat, use less of the green chili, and choose a milder chili. If you don’t have tostadas, you can make your own! Those instructions are in the recipe notes. If you don’t like cilantro, you can make a mint chutney with more mint leaves instead of the cilantro.
Chutney bean tostadas are just fabulously crispy, zesty, refreshing, and hearty. They are a perfect summer meal!
Why You’ll Love Chutney Bean Tostadas
perfect warm weather meal or snack – no cooking required!
incredible combination of flavors and textures! marinated beans, sweet and savory chutneys, creamy cooling cumin yogurt drizzle, on crunchy tostadas
soy-free and nut-free with easy gluten-free option
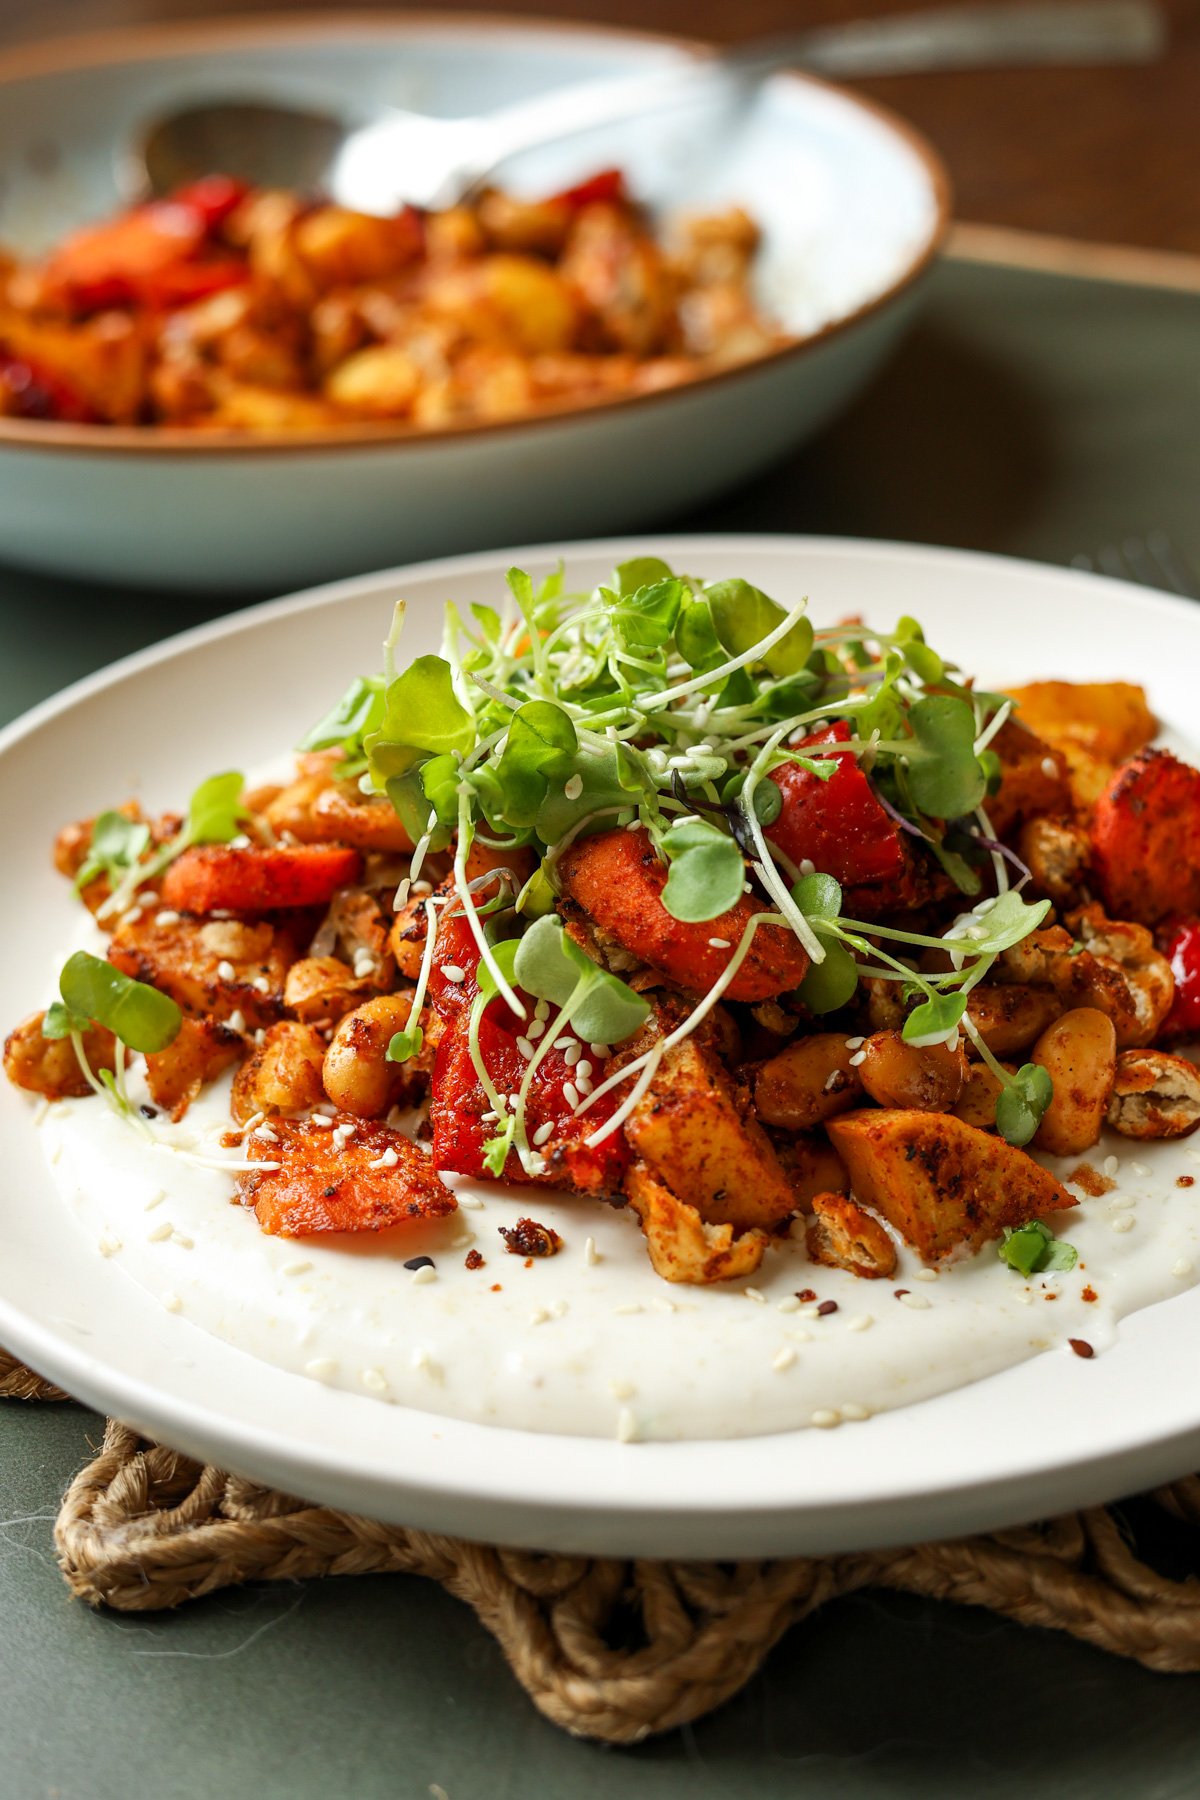
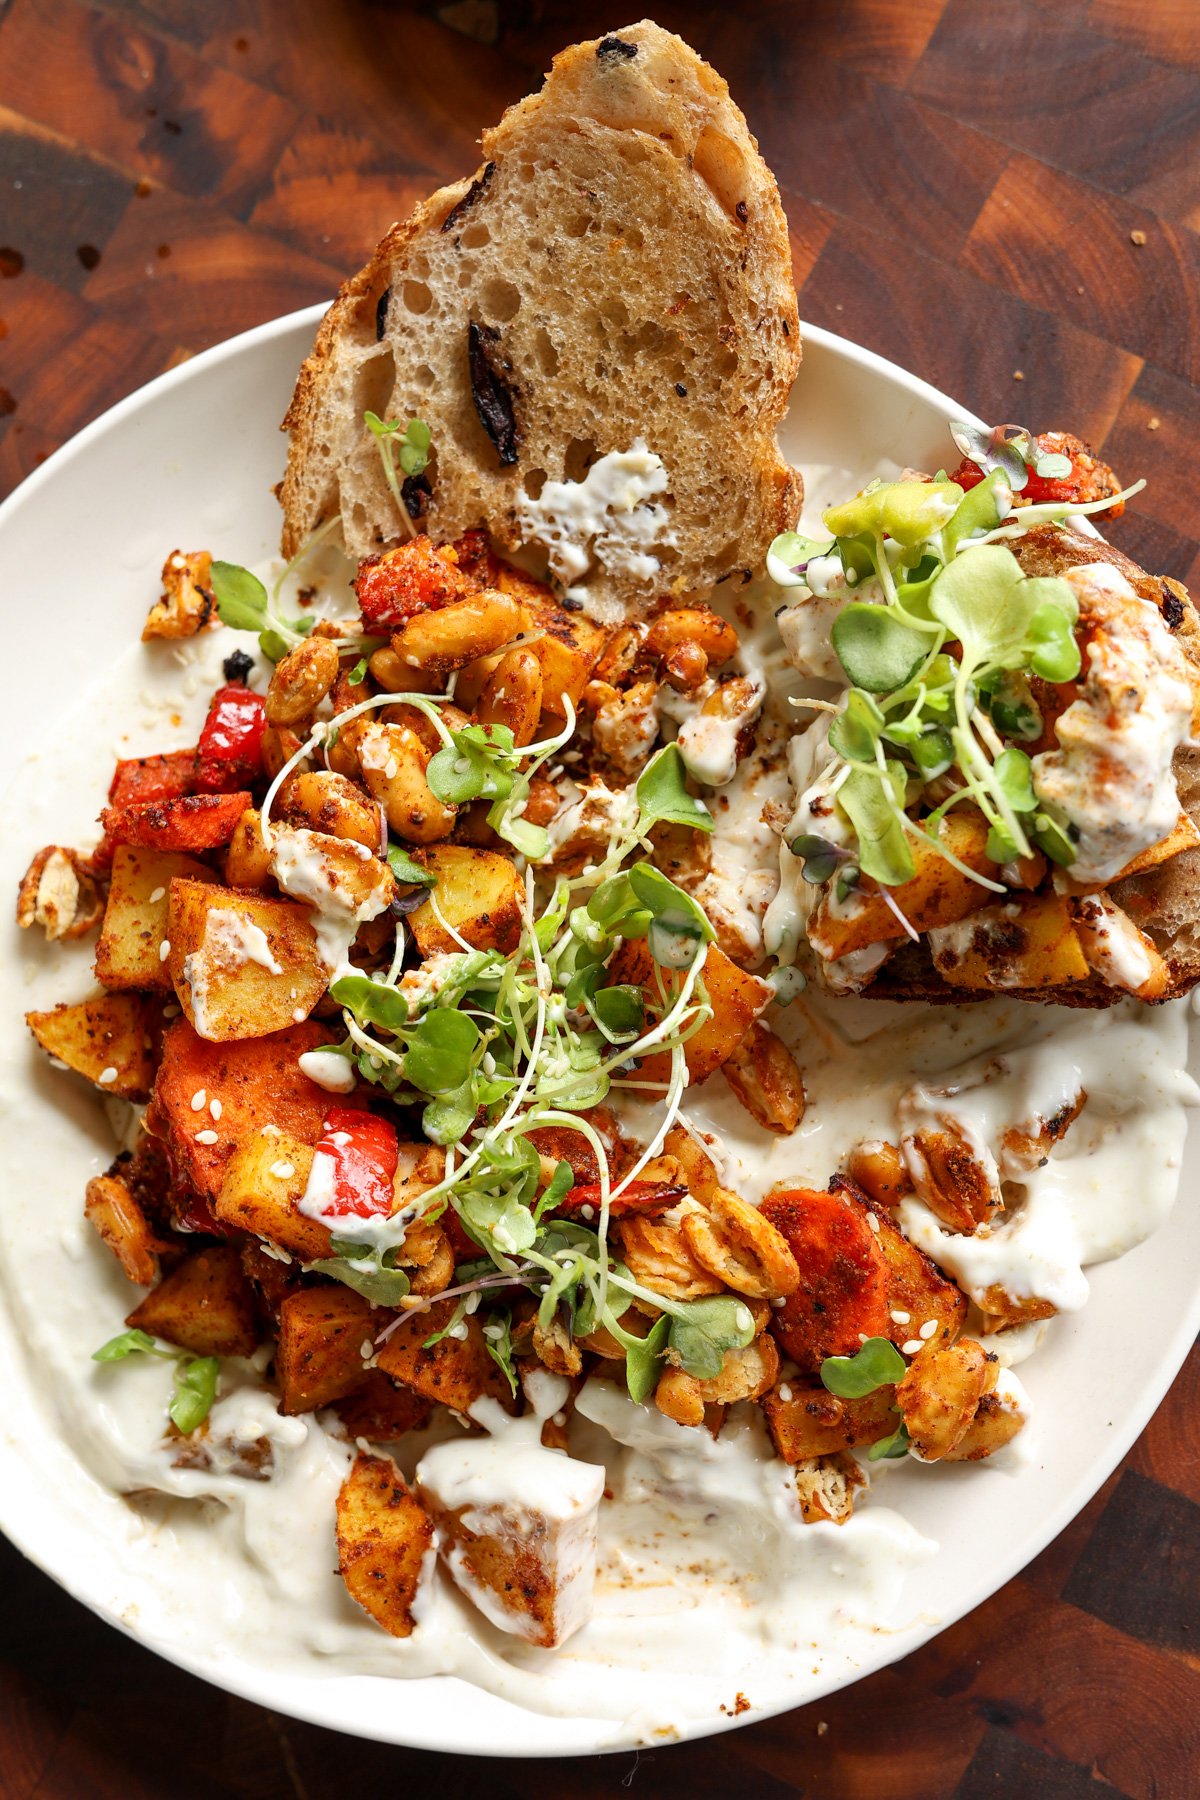
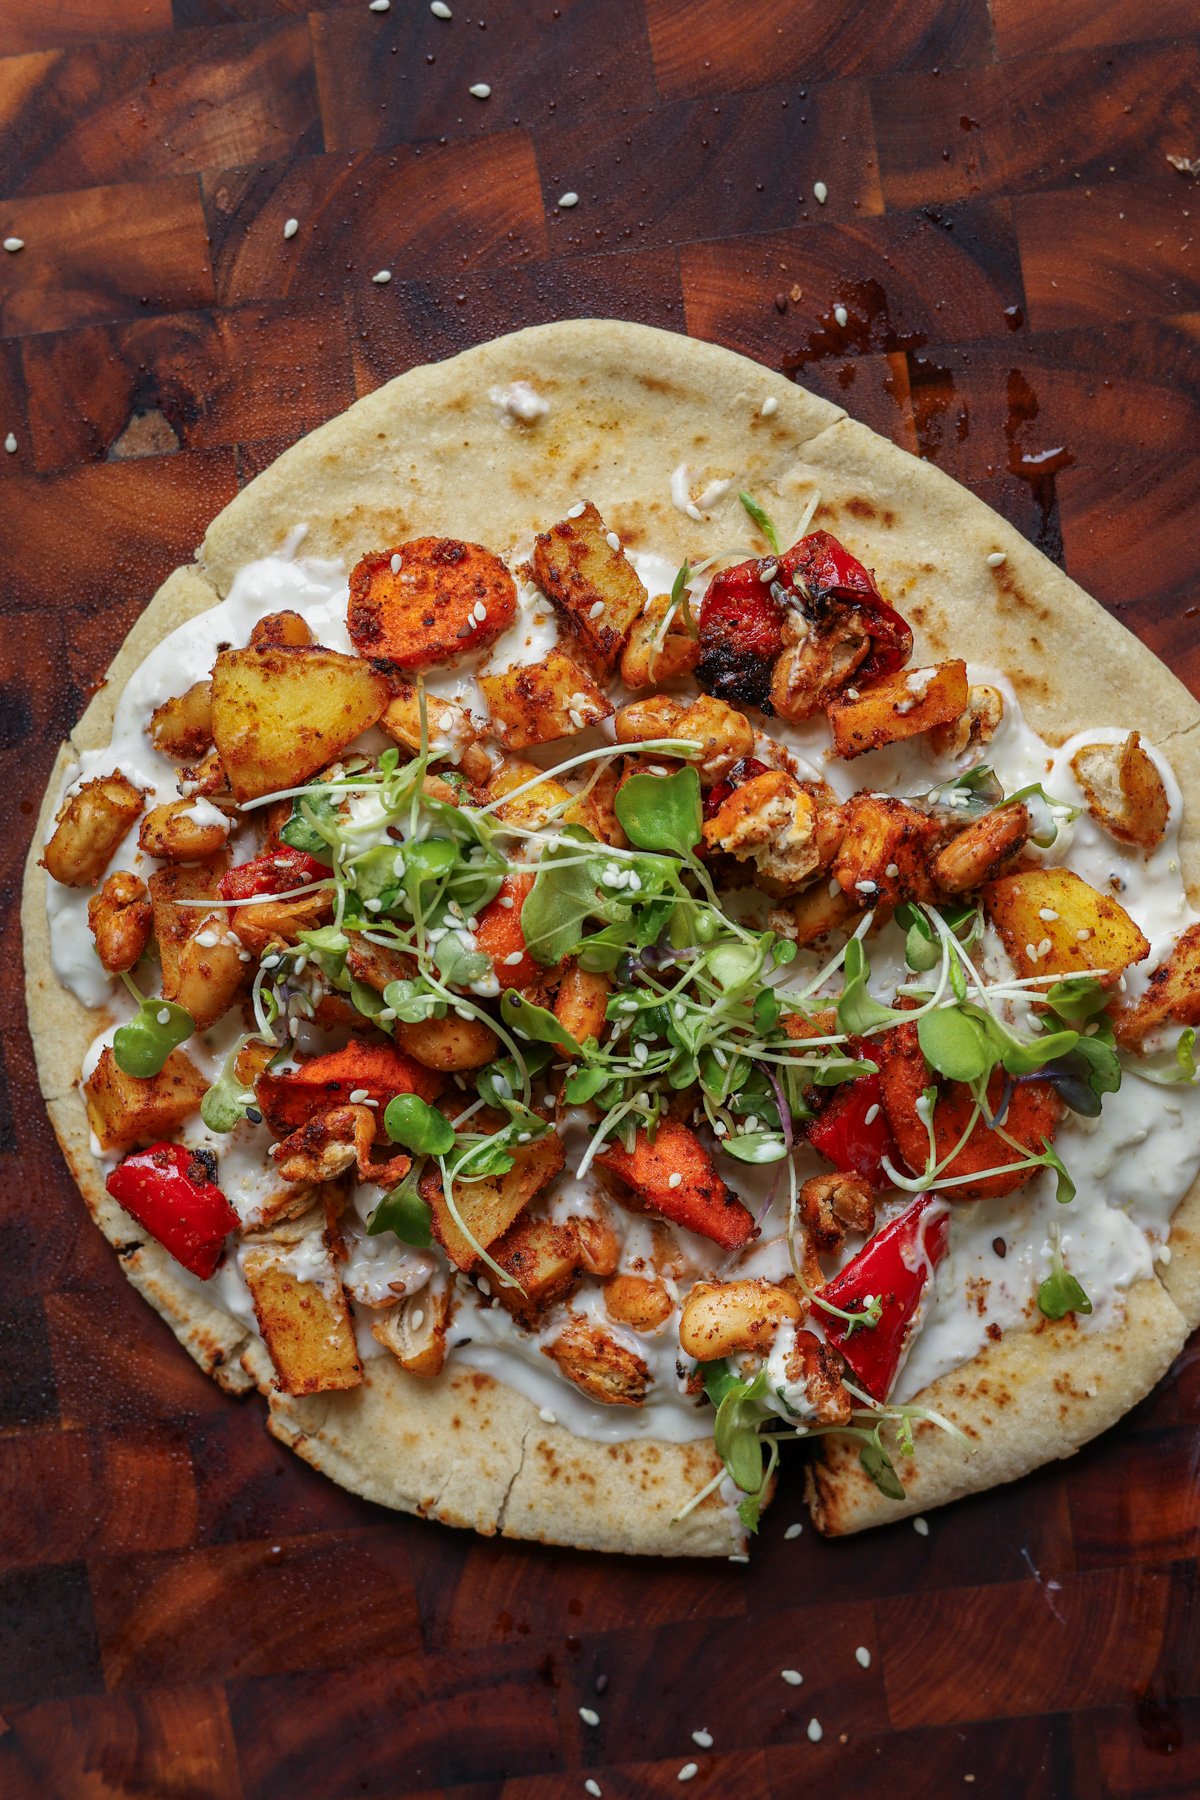
High protein and fiber. Mix everything right in the pan meal, this Sheet pan roasted veggies and beans with Creamy Lemon Yogurt sauce, has amazing flavor and texture! Wrap it, bowl it, swipe with bread! So good! Gluten-free, options for soyfree, Nutfree
This is an easy, refreshing, spring and summer meal that you can put together within minutes. You make this amazingly refreshing lemon yogurt sauce and pair it with savory roasted veggies and crispy, crunchy beans that have been tossed in spices like paprika, coriander, black pepper, and garlic. They are crisp on the outside and tender on the inside.
The warm veggies and the cooling yogurt sauce are just fabulous together.
This is a veggie-heavy recipe rich in fiber, with over 14 grams per serving. It contains 15 to 25 grams of protein per serving, depending on the garnishes and non-dairy yogurt used. The protein in these sheet pan roasted vegetables comes from the beans, yogurt, sesame or hemp seeds, and even the vegetables. For an even more filling meal, serve with whole grain flatbread, pita, or naan.
You can pair them with the sauce in any way you like. You can put the sauce on a plate, top it with the roasted veggies, then top with some seeds and sprouts and a good squeeze of lemon juice.
Or make a wrap with pita bread or naan bread. Just warm the bread, add the yogurt sauce, the roasted veggies, some more sauce, sprouts, cucumber, and a squeeze of lemon, then serve.
Sheet pan veggies and beans are absolutely delicious any which way you serve it. You can even make small tacos out of it!
Why You’ll Love Sheet Pan Veggies and Beans
super easy 1-pan meal celebrates delicious spring and summer veggies
tender-crisp roasted vegetables with crunchy roasted white beans
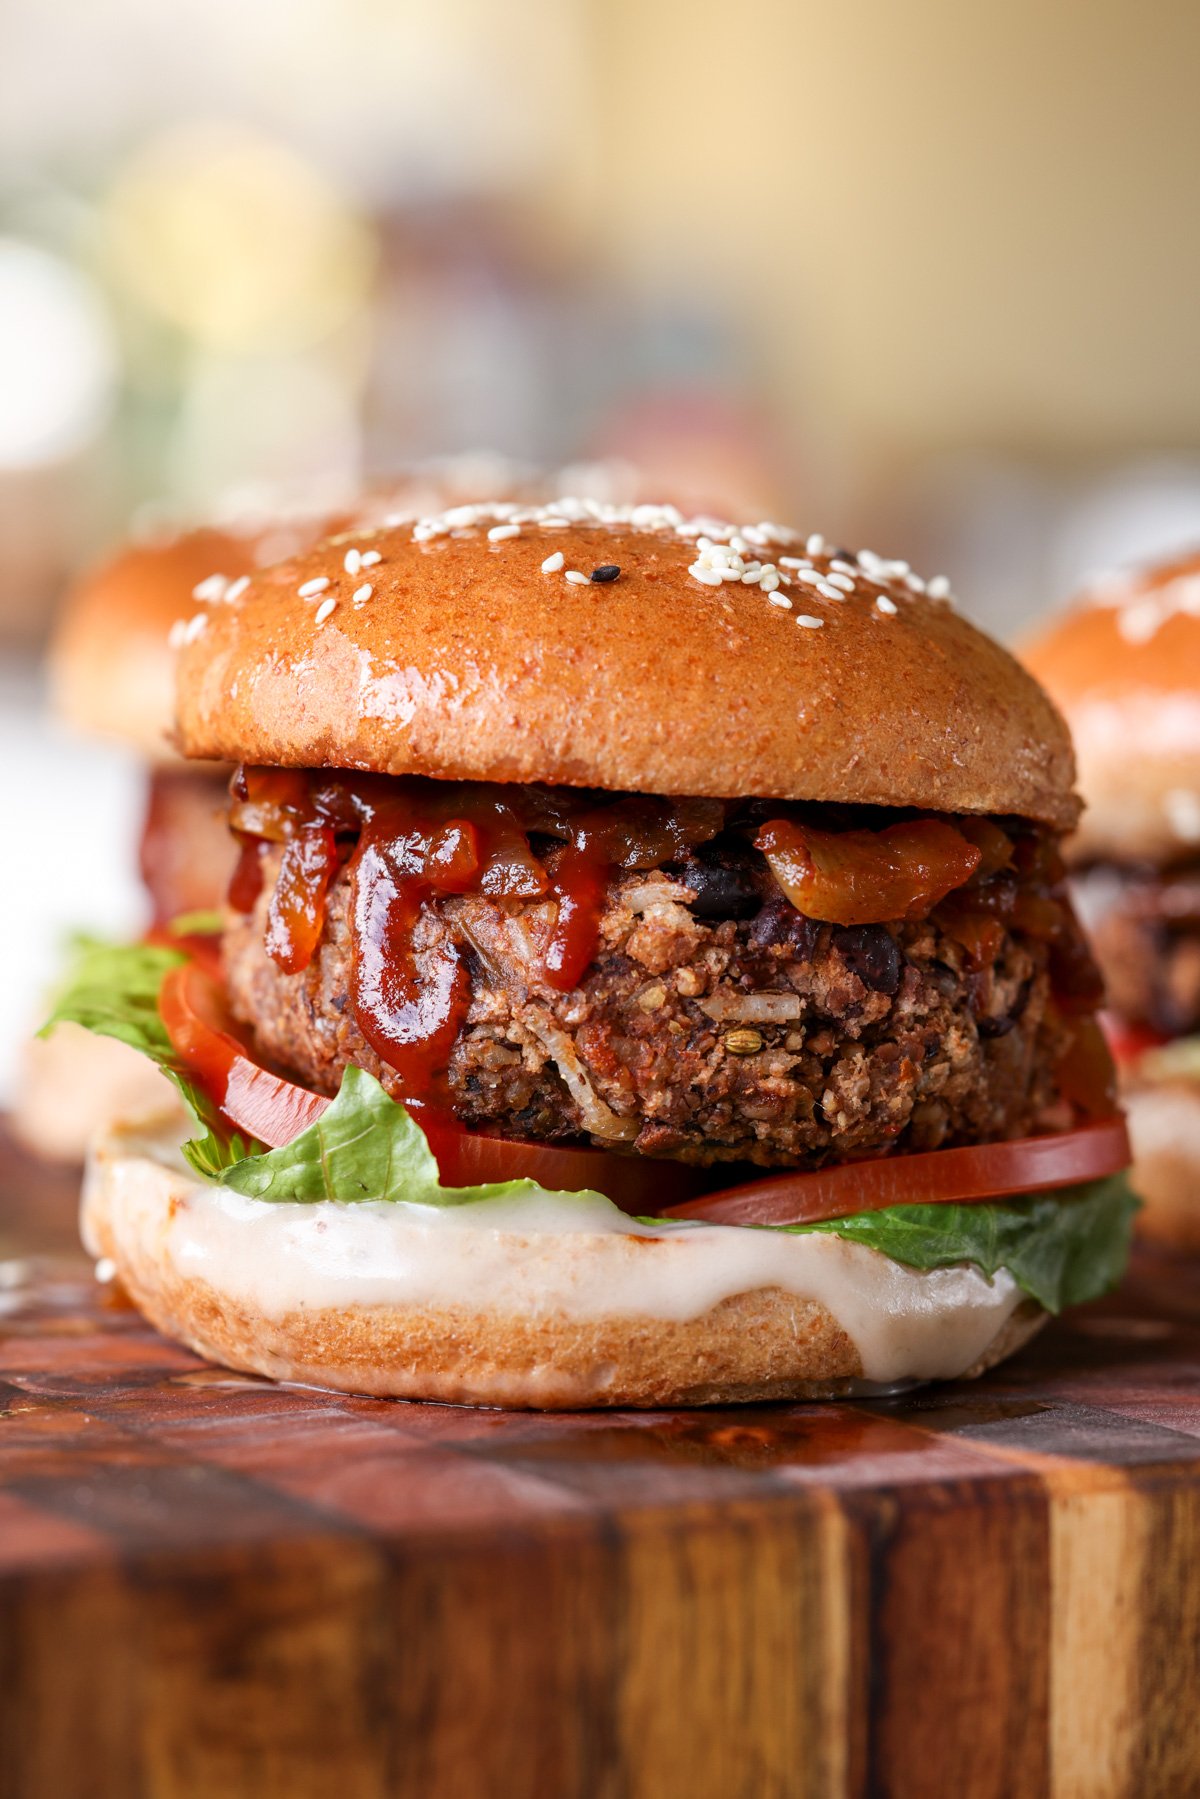
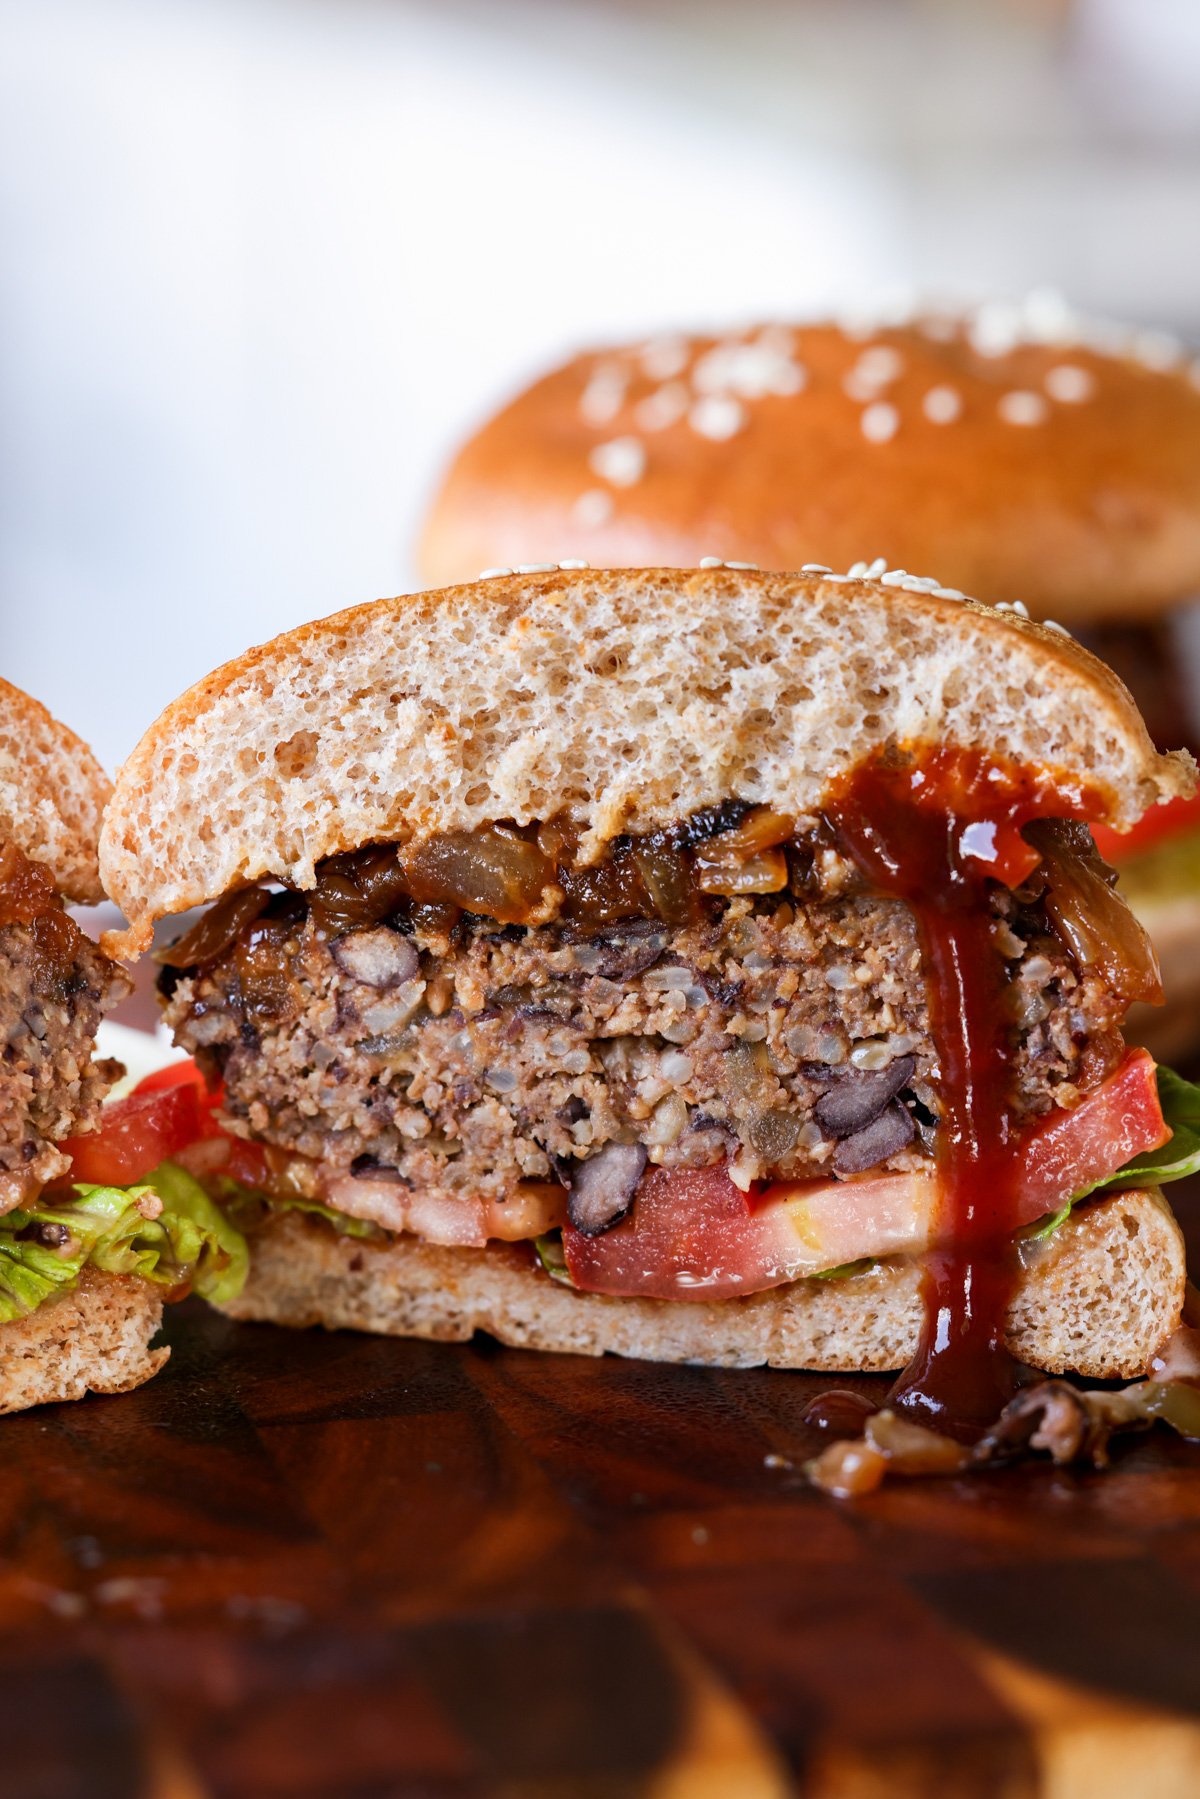
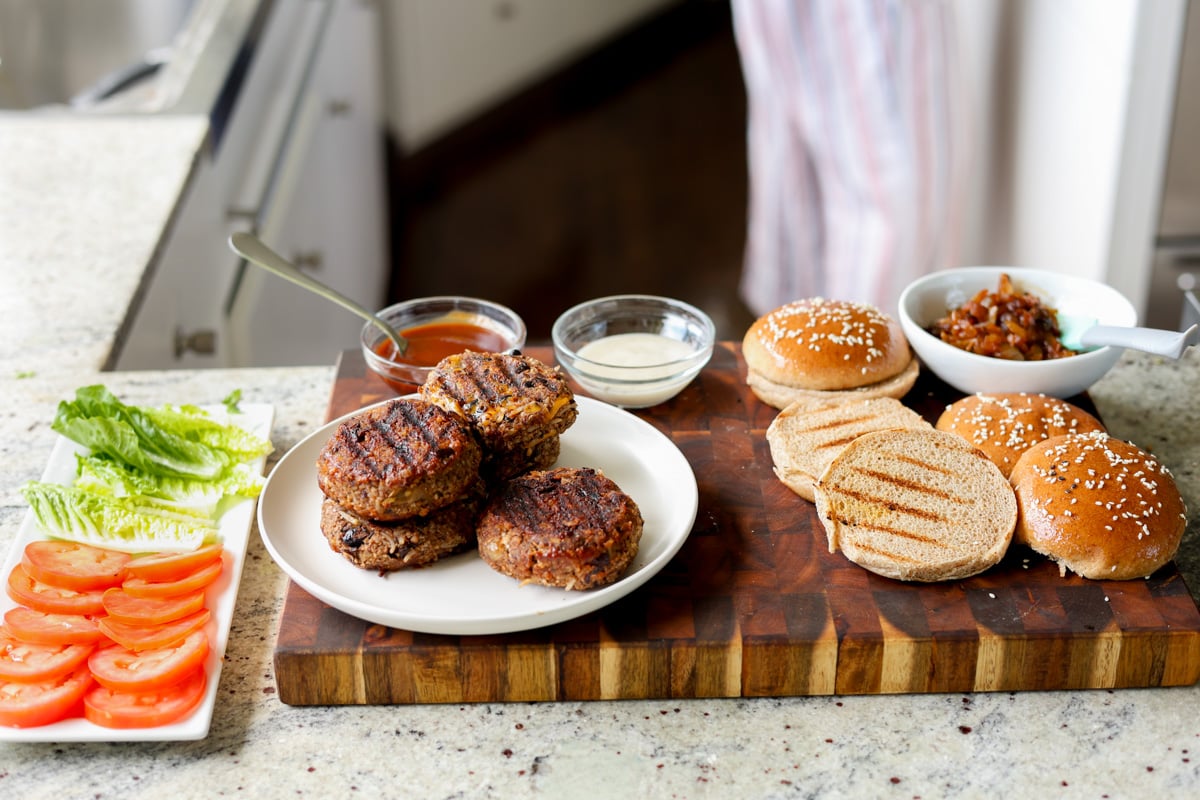
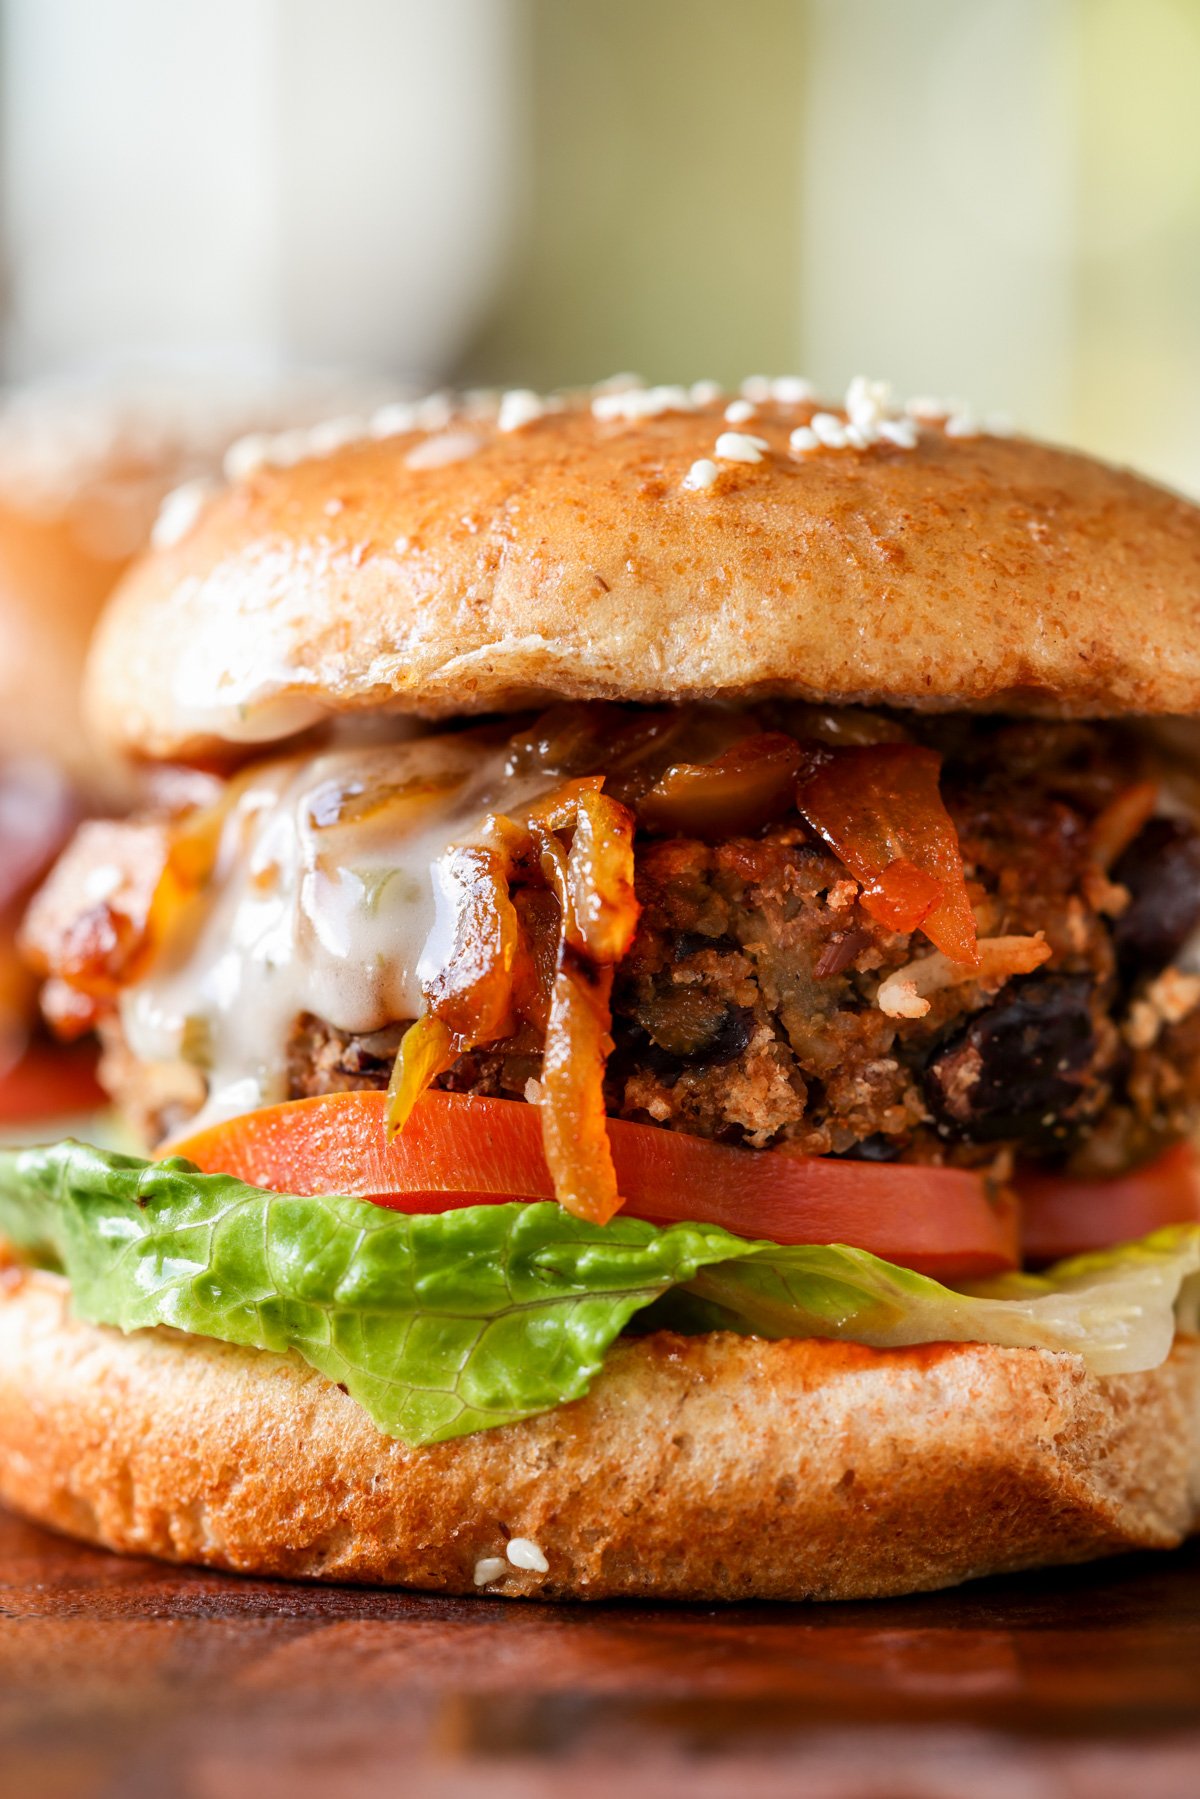
This grillable veggie burger is packed with flavor, holds up beautifully on the grill, and is easy to make ahead. No mush, no crumble, just a hearty, smoky, satisfying bite every time. Nutfree Black Bean Sunflower seed burger. This post was originally published on june 6 2017
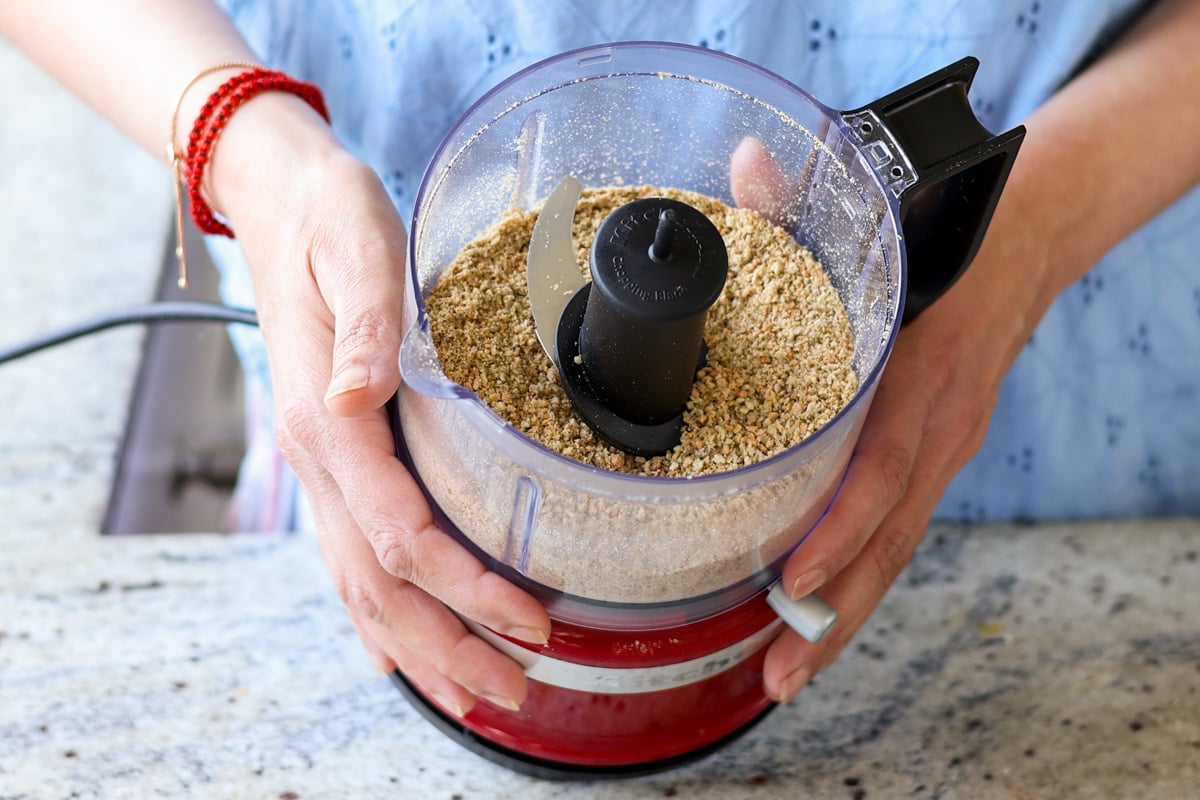
It is time to fire up the grill and flip some veggie burgers. These hearty burgers are made up of black beans, brown rice, sunflower seeds and amazing seasoning. You can grill or pan fry the patties.
Veggie burgers can be overly squishy (too many beans, too much moisture, too much mashing), or too crumbly (not enough binding, big unmashed ingredients such as whole beans or large chunks of onions, peppers, veggies). Both these issues can be solved with vital wheat gluten in the patties, but I don’t always like the texture of the patty with vital wheat gluten. So instead, I use just the right balance of cooked grains, beans, and some breadcrumbs to make a sturdy grillable patty. Like with any other veggie burger, mash and pack the ingredients well for sturdier results.
Black beans work really well in these burgers, but you can also use kidney beans. These patties are packed with flavor, paprika, Old Bay, coriander, and fennel seeds bring depth, while toasted sunflower seeds add a satisfying, hearty bite. These patties are a must make!
I think the first time I made a black bean burger version from a recipe on the internet, I found that it needed some, or wait a lot of flavor. So I set out to create my own. This version, takes the elements of a classic bean burger, but gets an upgrade with the spices and smoky caramelized onions to make a fantastically flavorful patty.
Do try this burger, and let me know in the comments if this replaced the usual black bean burger! You can find more 35+ Veggie Burger options here, no fake meats!
Why You’ll Love Grillable Veggie Burgers
Easy to make.
You can actually grill them and they won’t fall apart.
Grillable Veggie Burger ( Black Bean Sunflower Seed Burger)
This grillable Black Bean veggie burger is packed with flavor, holds up beautifully on the grill, and is easy to make ahead. No mush, no crumble, just a hearty, smoky, satisfying bite every time. Gluten-free option. Nut-free. Soy-free option
Course Burger
Cuisine Vegan
Prep Time 10 minutesminutes
Cook Time 35 minutesminutes
Total Time 45 minutesminutes
Servings 6patties
Calories 269kcal
Author Vegan Richa
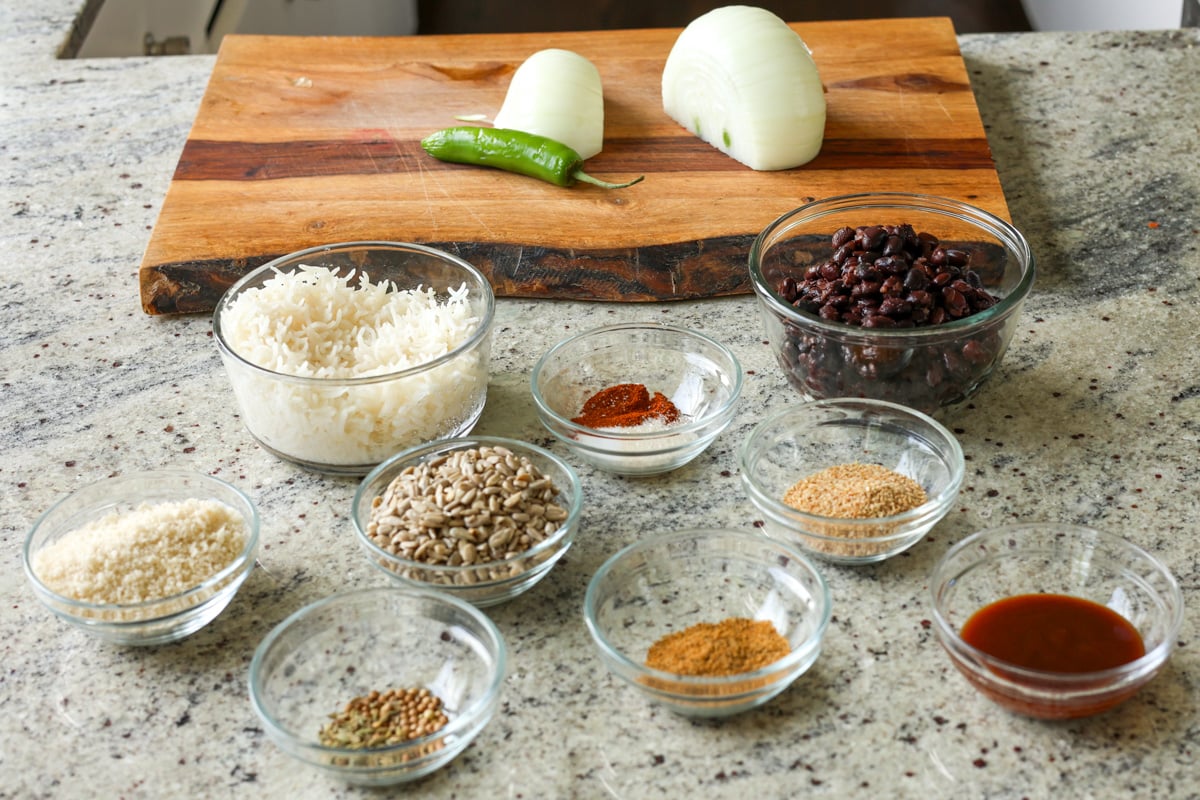
Ingredients
1/2cupsunflower seeds or pepitas or heaping 1/2 cup nuts such as walnuts or pecans if you are ok with nuts.
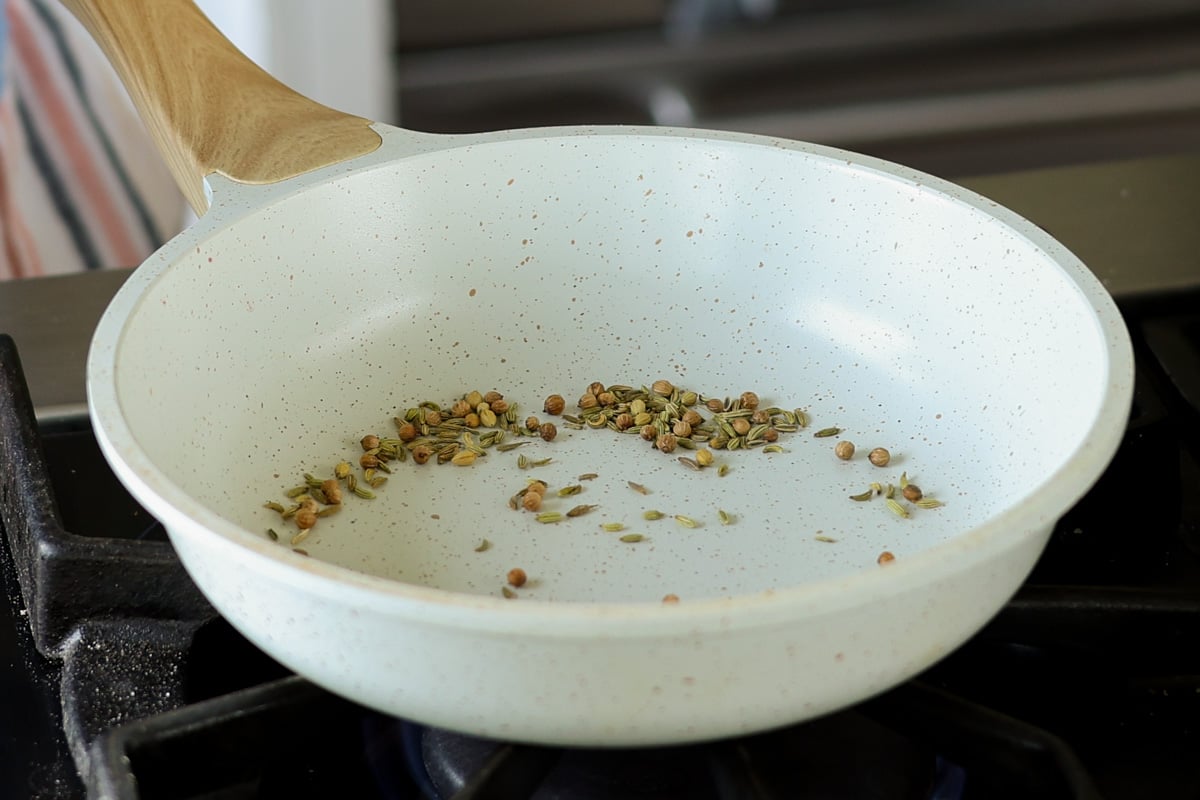
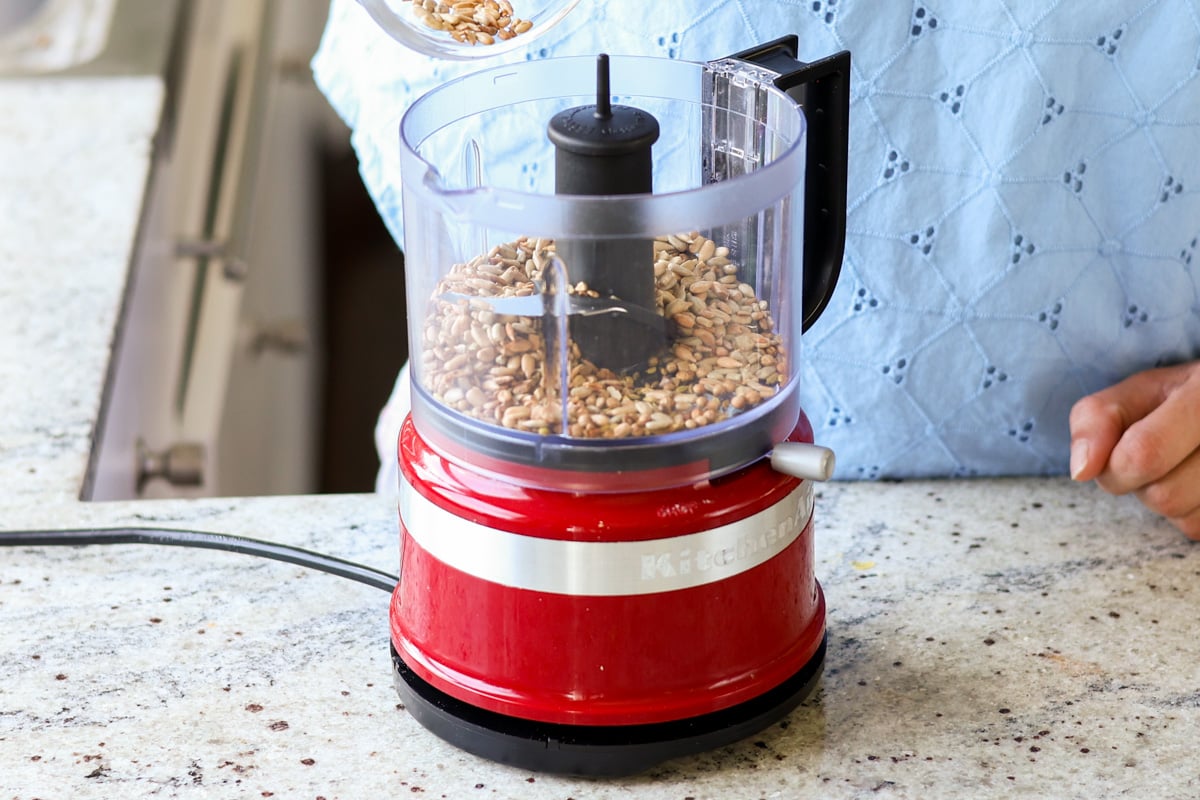
Toast the seeds : add sunflower seeds to a skillet over medium heat, toast for for 2 minutes. Stir occasionally to avoid burning. Remove from skillet annd let cool. Add the coriander seeds and fennel seeds and toast for a minute. Take off heat and set aside to cool.
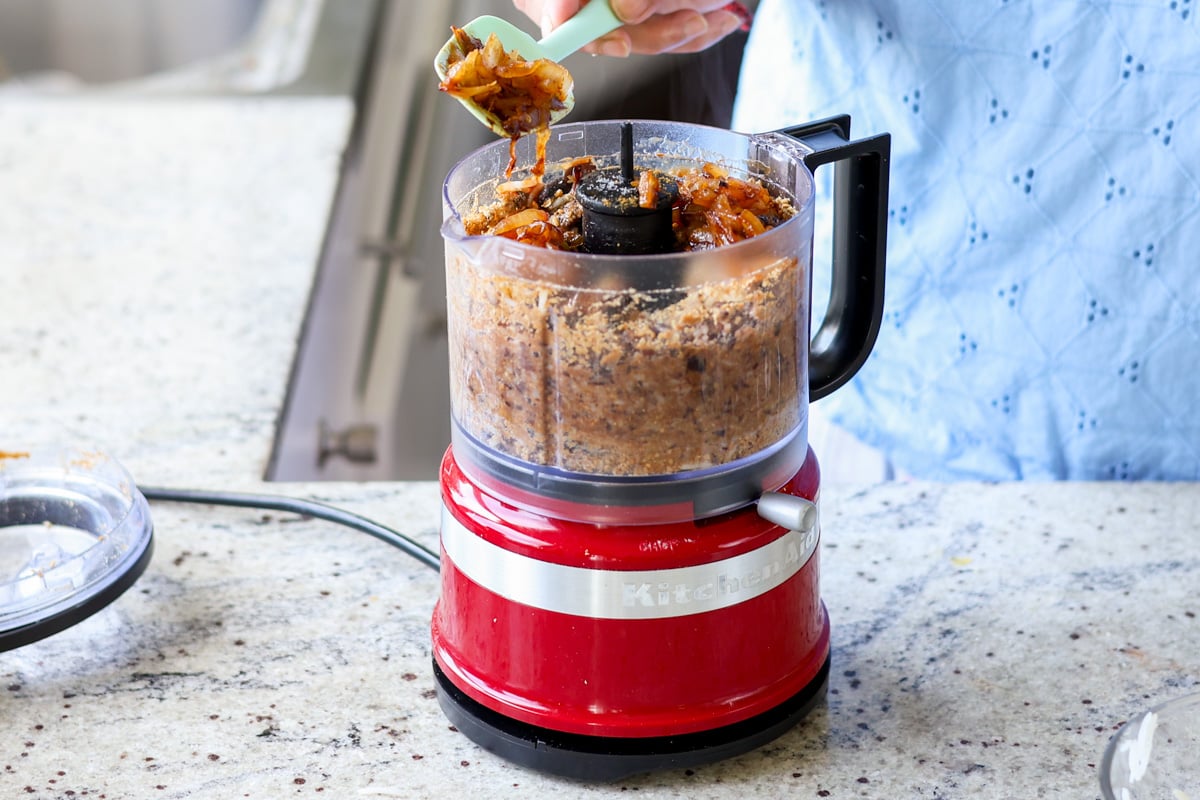
Make the smoky caramelized onions: Heat oil in a large skillet over medium heat. Add onion , green chile, 1/4 tsp salt and 1/4 tsp sugar. Cook for 5 minutes. Stirring occasionally. Add the smoked paprika and mix. Add a splash of water if the pan is drying up. Cook for another 3 mins, stirring occasionally .
In a food processor, add the sunflower seeds, fennel and coriander seeds and spices. process until they become a coarse meal. Flavor variation: add some oregano if you like, add cayenne for heat.
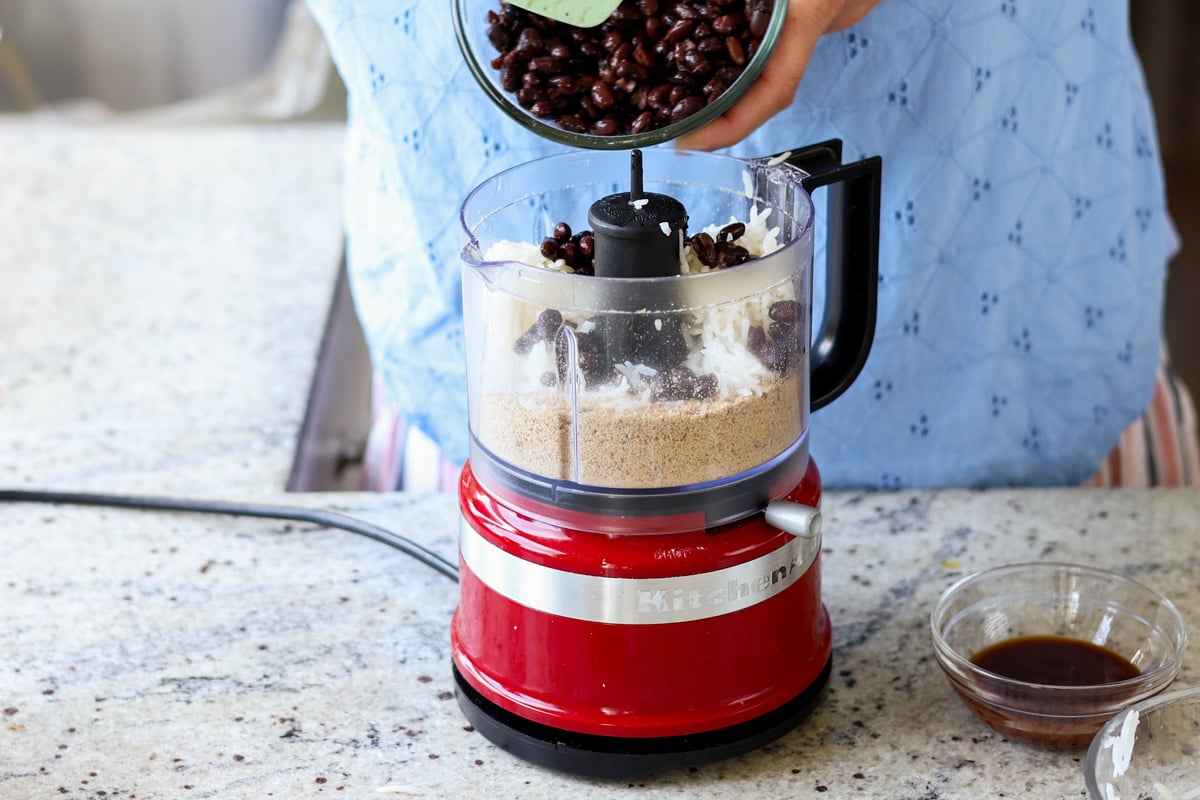
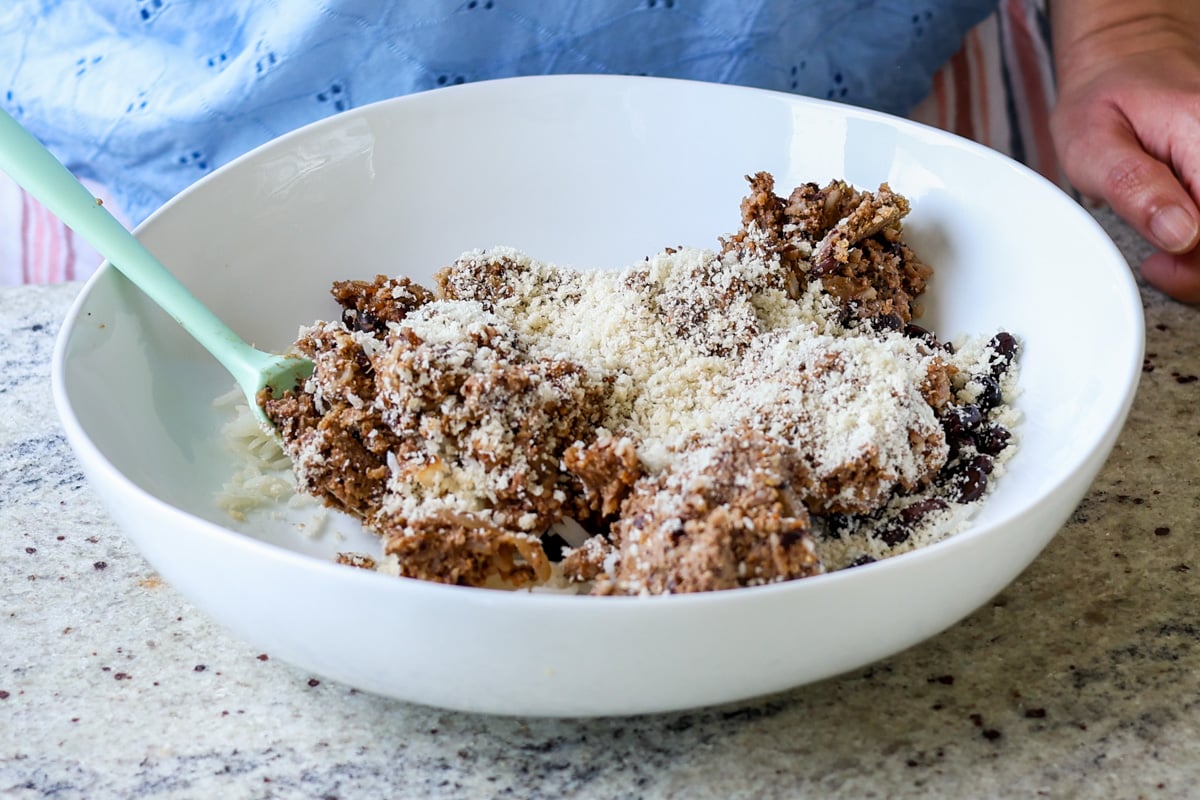
Add the two thirds of the rice and 1 cup of black beans, salt, 3 – 4 tbsp of the smoky caramelized onions, flaxmeal, bbq sauce. Process until most of the beans have broke down.
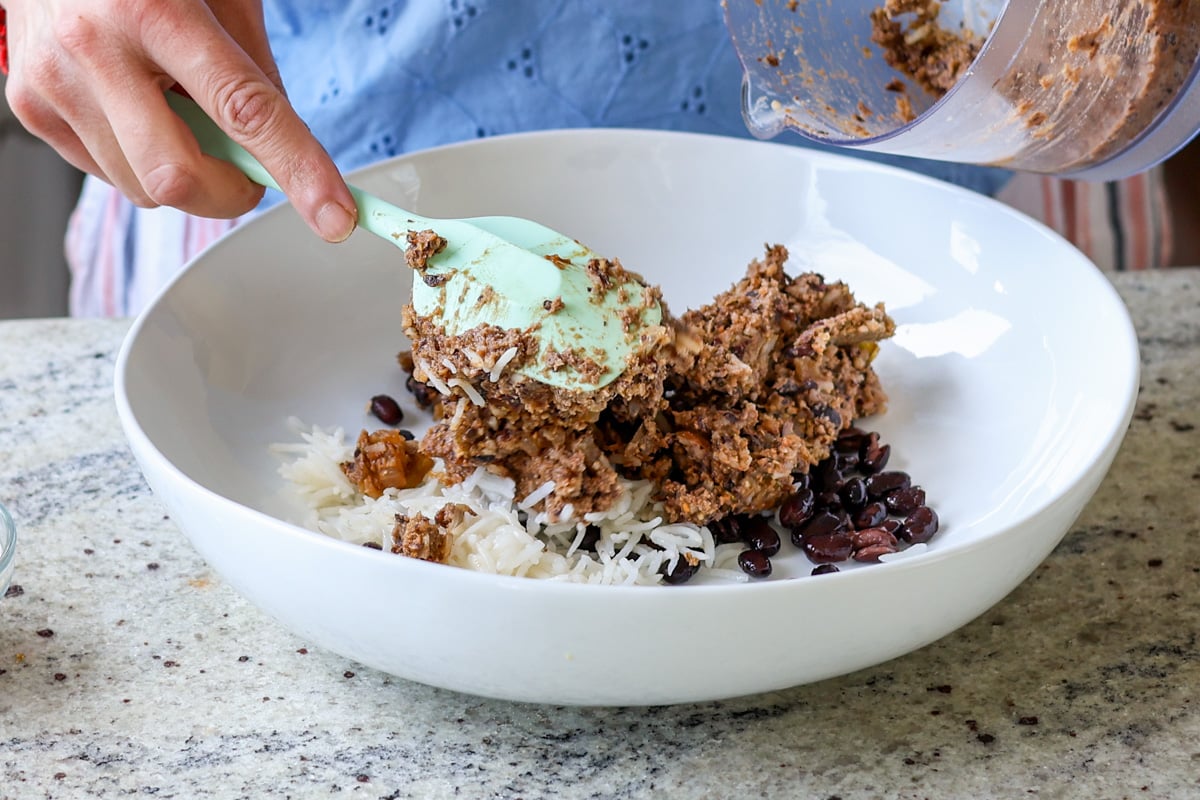
Transfer the mixture to a bowl. Mix in the breadcrumbs, remaining black beans and rice, Taste and adjust salt, heat and seasoning. Add more seasoning and bbq sauce if needed and mix in. Add flour or breadcrumbs if the mixture is too moist.. Chill for 10 minutes in the fridge.
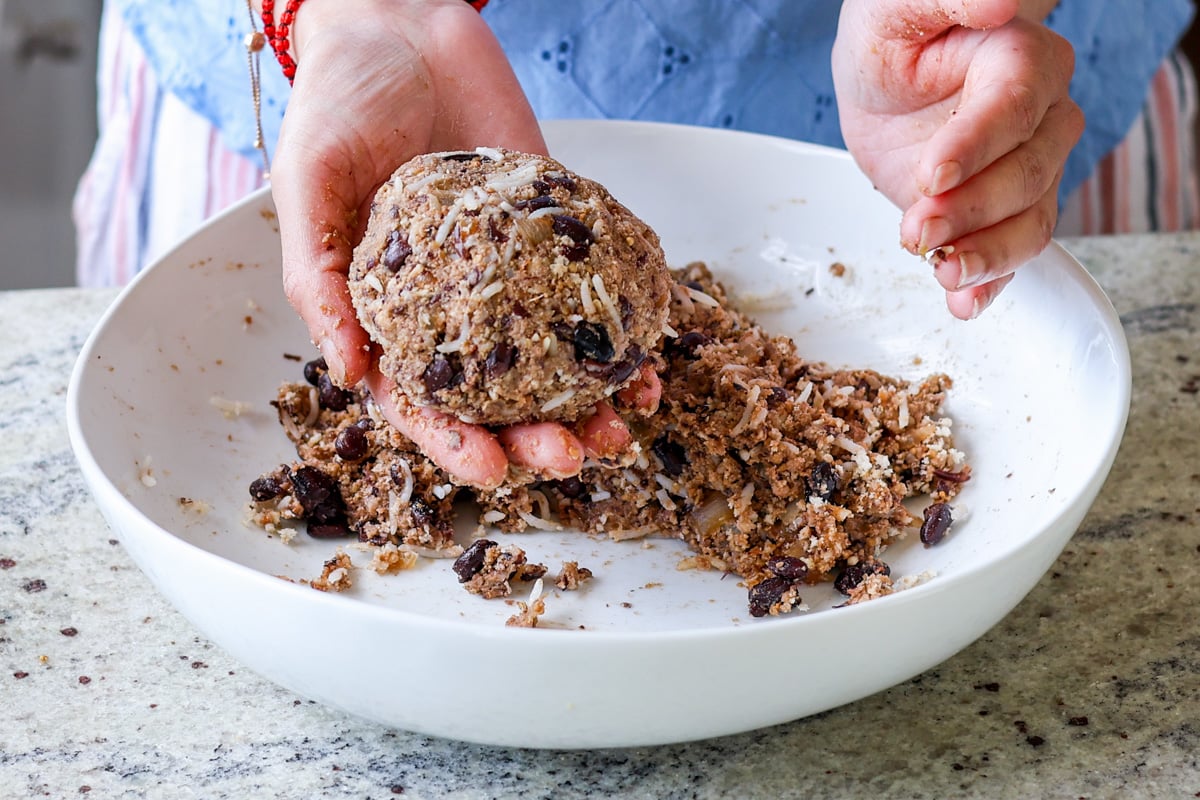
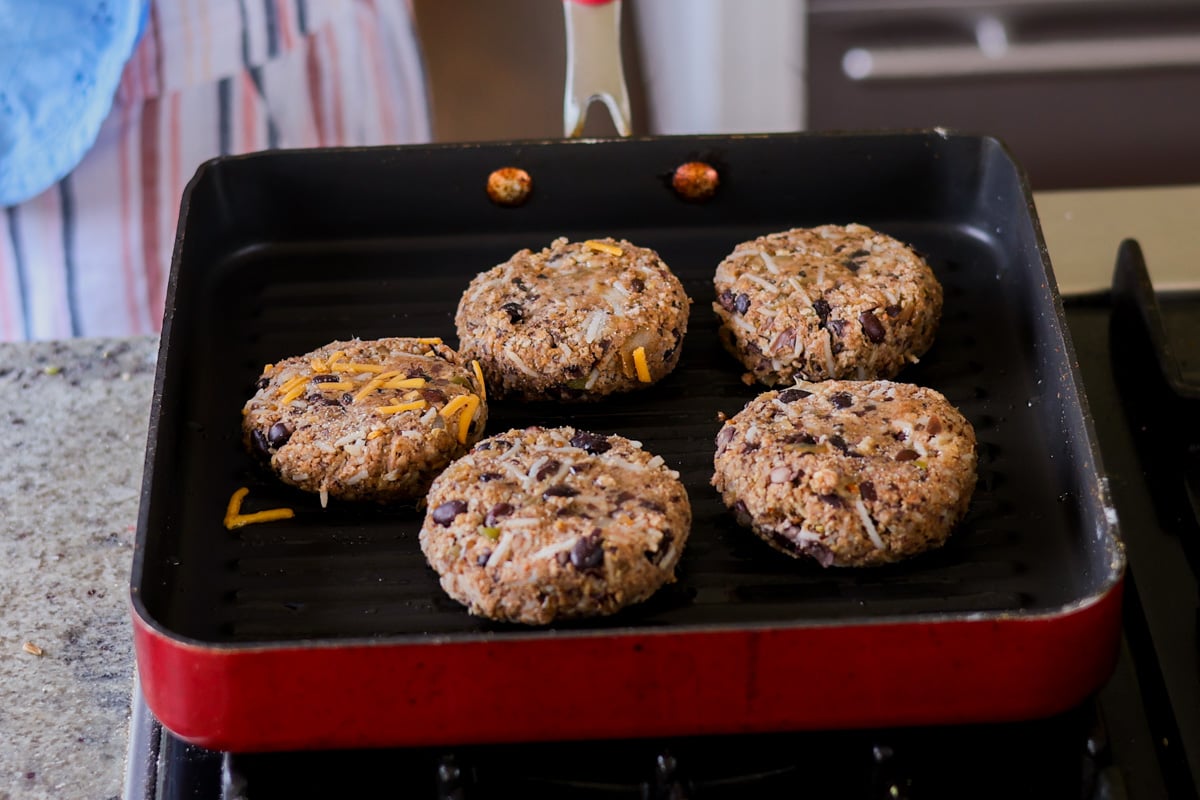
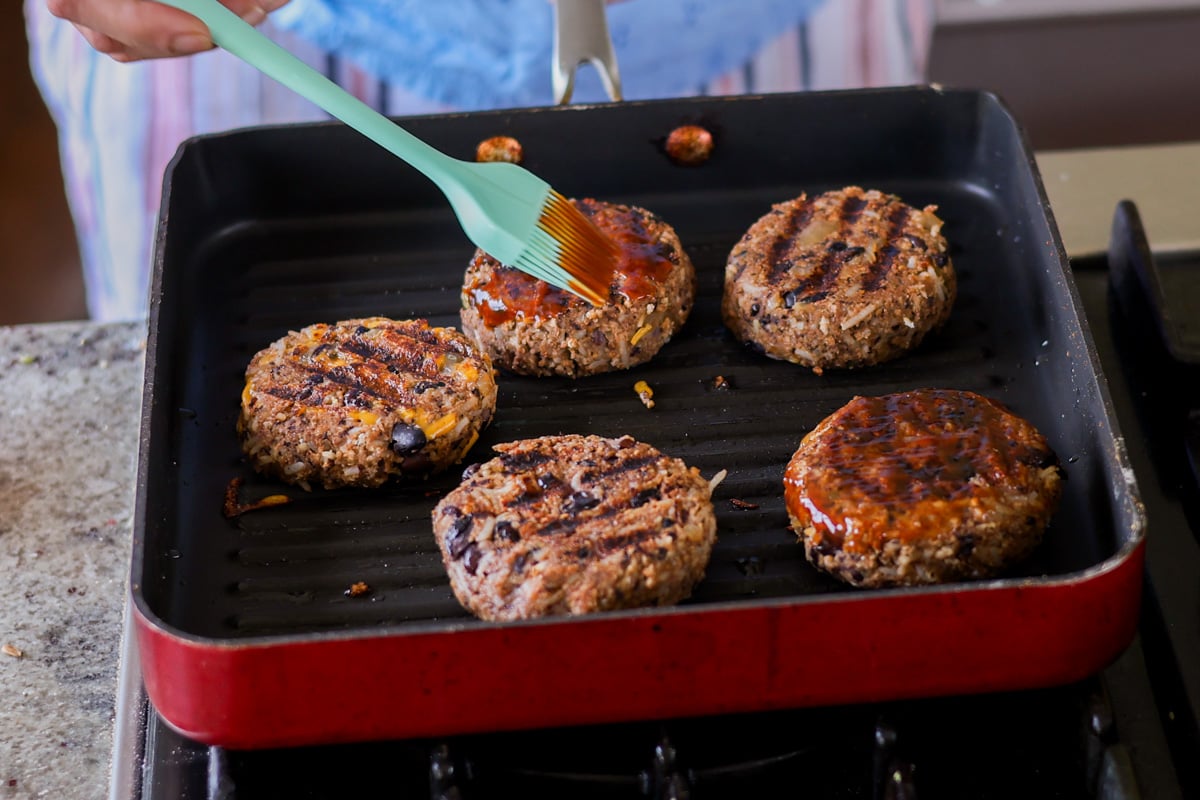
Shape into patties using a cookie cutter or by hand. (press mixture into a cookie cutter until packed. Tap to release. Even out the top). Heat up the grill over medium high heat. When hot, grill for 3 to 5 mins per side. Or pan fry in a skillet over medium heat with a little oil. Brush some bbq sauce or a mix of bbq sauce and hot sauce, on both sides and grill half a minute, then remove from grill.
Dress with the smoky caramelized onion, tomato slices, bbq sauce or ketchup and mustard, or vegan mayo/ranch between toasted burger buns or lettuce!
Video
Notes
To make the patties gluten-free use gluten-free breadcrumbs and rice flour or oat flour.To make the patties soy-free, use soy-free bbq sauceFor variation: Add zest of half a lemon with the lemon juice. Use ketchup + sriracha instead of bbq sauce. Add more smoked paprika for smokier onions.Storage: These burger patties uncooked or cooked can be stored in the fridge for upto 4 days. Reheat on the skillet or grill. they can be frozen uncooked for months. Grill directly from the freezer. Grill a minute or so longer
coriander, and fennel seeds: The seeds add flavor to the burger.
Black beans: Black beans work really well in these burgers, but you can also use kidney beans.
White Rice: You can use brown or white rice, but I prefer white rice for this.
Spices: Smoked paprika, Old Bay seasoning, and lemon add complex flavors.
BBQ Sauce: The bbq sauce adds a hint of sweetness and moisture
Breadcrumbs: The breadcrumbs help bind the burger patties.
💡Tips
Toast the sunflower seeds to add a hearty umami flavor to your burger.
If the onions begin to stick to the pan when you’re caramelizing the onion, add a splash of water, and cook for another 3 mins.
Mash and pack the ingredients well while forming your pattie for sturdier results.
After you’ve formed the patties, let them chill in the fridge for 10 minutes. This will help them keep together while cooking.
How to Make Black Bean Sunflower Seed Burgers
Toast the sunflower seeds for 2 minutes, add the coriander seeds, and fennel seeds and toast for 1 minute. Let cool. Add oil, onion, green chili, salt, and sugar to a skillet over medium heat and cook for 5 minutes.
Add smoked paprika and cook for 3 minutes. Add a splash of water in between if needed
The onions should be a golden brown color. Add the sunflower, fennel, and coriander, seeds to a food processor.
Grind them into a powder. Add two thirds of the rice and black beans to the food processor.
Add salt, 3 to 4 tbsp of the smoky caramelized onions, flaxmeal, bbq sauce, and process until most of the beans have broken down.
Transfer the mixture to a bowl. Mix in the breadcrumbs, remaining black beans. Taste and adjust salt, heat, and seasoning. Add flour or breadcrumbs if the mixture is too moist. Chill for 10 minutes in the fridge.
Shape into patties using a cookie cutter or by hand. Heat up the grill over medium high heat, grill for 3 to 5 minutes on each side.
Brush some bbq sauce or a mix of bbq sauce and hot sauce, on both sides and grill for half a minute, then remove from grill.
Dress with the smoky caramelized onions, tomato slices, bbq sauce or ketchup, and mustard, or vegan mayo/ranch between toasted burger buns or lettuce!
Yes, this recipe is nut-free and can be made gluten-free with gluten-free breadcrumbs, and soy-free with soy-free bbq sauce.
Can the patties be made ahead?
Yes, the patties can be made ahead and placed in the fridge until ready to use, or they can be frozen. Shape, place between parchment. Place on grill directly from the freezer. Cook a minute or so longer for frozen patties.
Tofu majestic is a vegan version of the popular South Indian starter, chicken majestic. Spicy, crispy tofu in a thick, spicy sauce is an absolutely delicious starter or side! You can easily control the heat, if you don’t like your food too spicy. (Options for gluten-free, soy-free, and nut-free)
Chicken majestic is pretty popular in restaurants in the state of Andhra Pradesh, and especially in the city of Hyderabad. It is a spicy, crispy chicken dish that is usually fried or pan-fried and tossed in a thick, delicious, spicy sauce. It has elements from indo Chinese cuisine and the combination with South Indian flavors makes it a finger licking can’t stop good appetizer!
It is served as-is as a starter with a side of chutneys or a side salad. You can also add it to wraps or serve with rice. It is absolutely mindblowingly delectable and delicious. The tofu is crisped with some cornstarch and rice flour and some spices. Then tossed in a thick sauce to coat. If you want to keep these crisp, toss and serve immediately!
Tofu majestic is definitely hot with 4 heat elements in it, there’s green chilies, Kashmiri chili powder, black pepper and sambal oelek! It can get hotter depending on the green chilies that you use. To manage the heat, use milder green chilies and use less of the black pepper and Kashmiri chili powder.
I like to serve this with a side salad of onion and cucumber. It’s kind of like quick pickled onion with Indian spices called laccha pyaza. See the recipe notes for instructions for making the crispy, vibrant laccha onions. You can also serve with chutneys of choice or a creamy dip on the side to mellow the heat.
Why You’ll Love Tofu Majestic
flavorful, crunchy, battered tofu in a thick, spicy sauce
bake or pan fry the tofu
versatile! Serve on its own, with chutney or creamy dipping sauce, with a fresh salad, or as wraps
easy to make gluten-free, nut-free, and even soy-free.
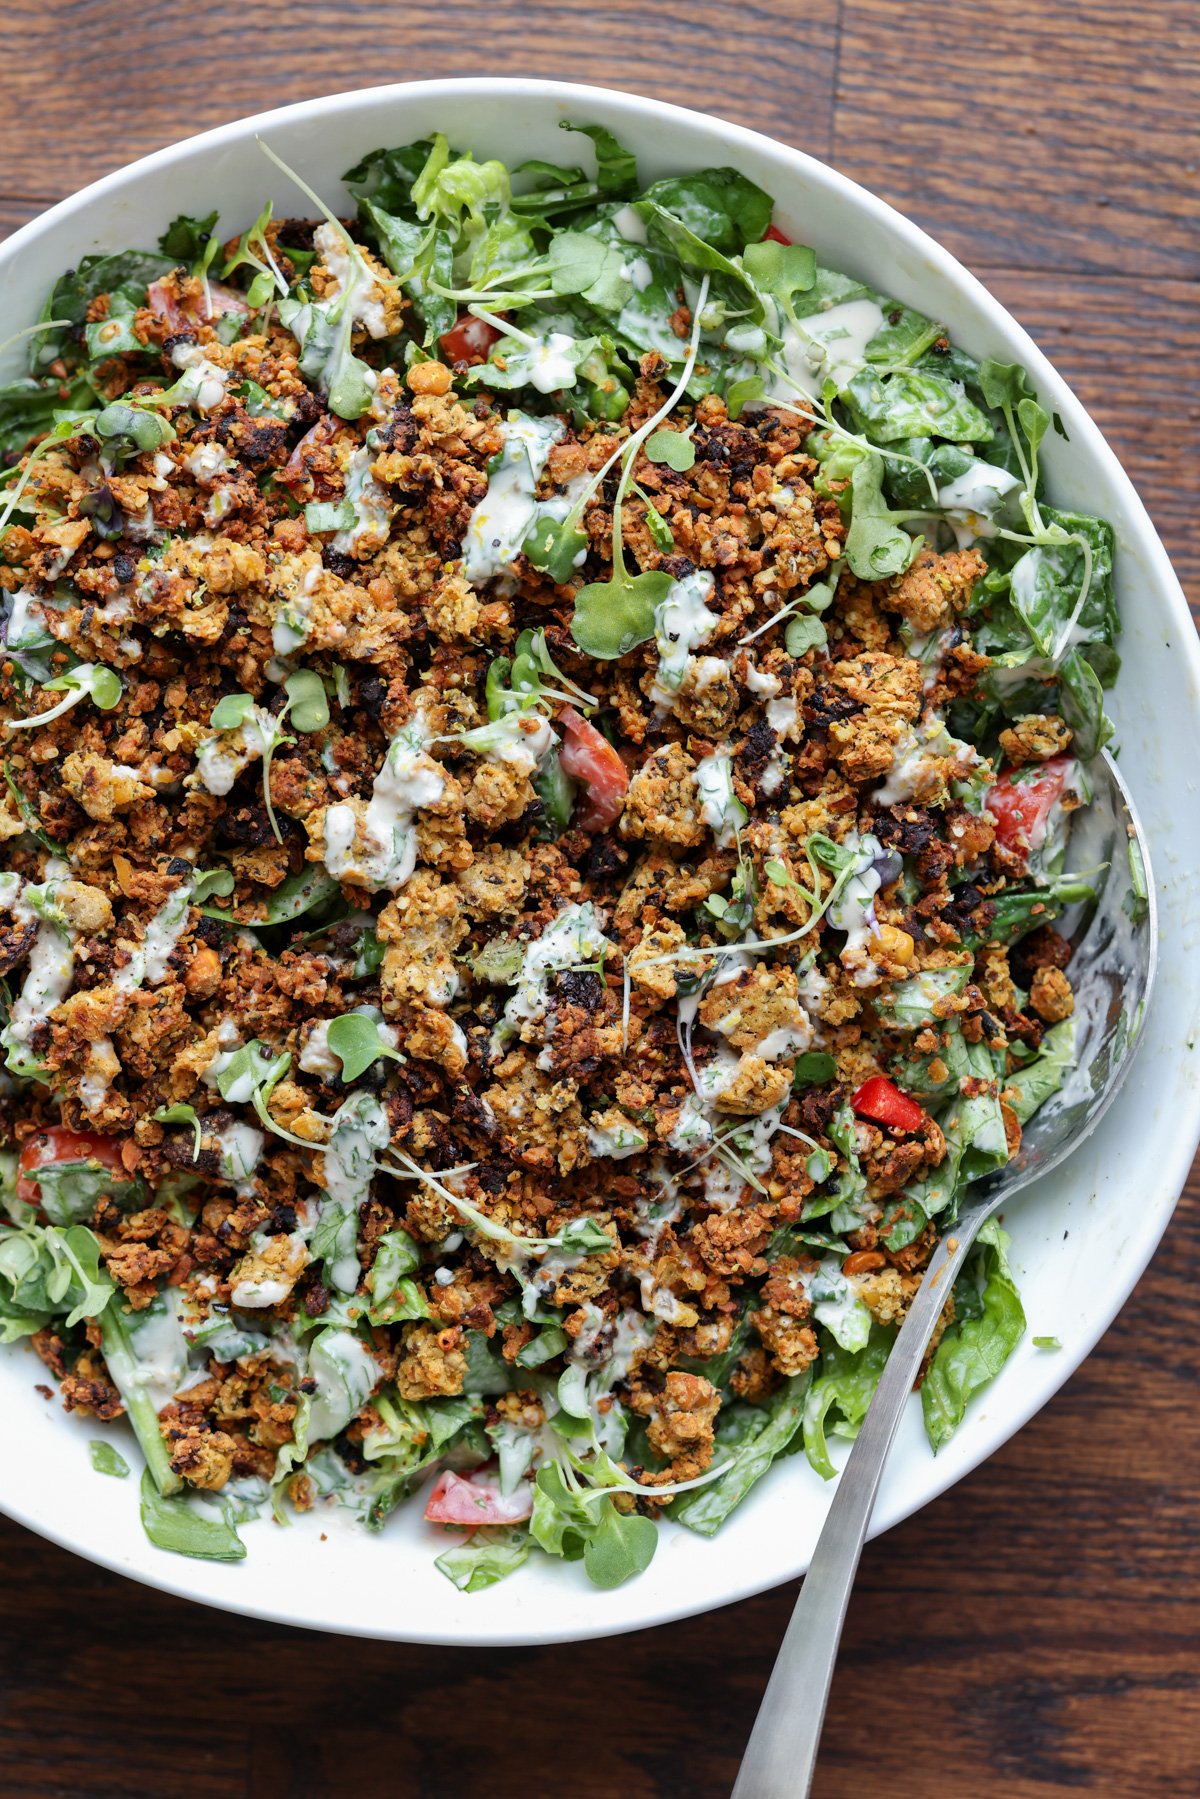
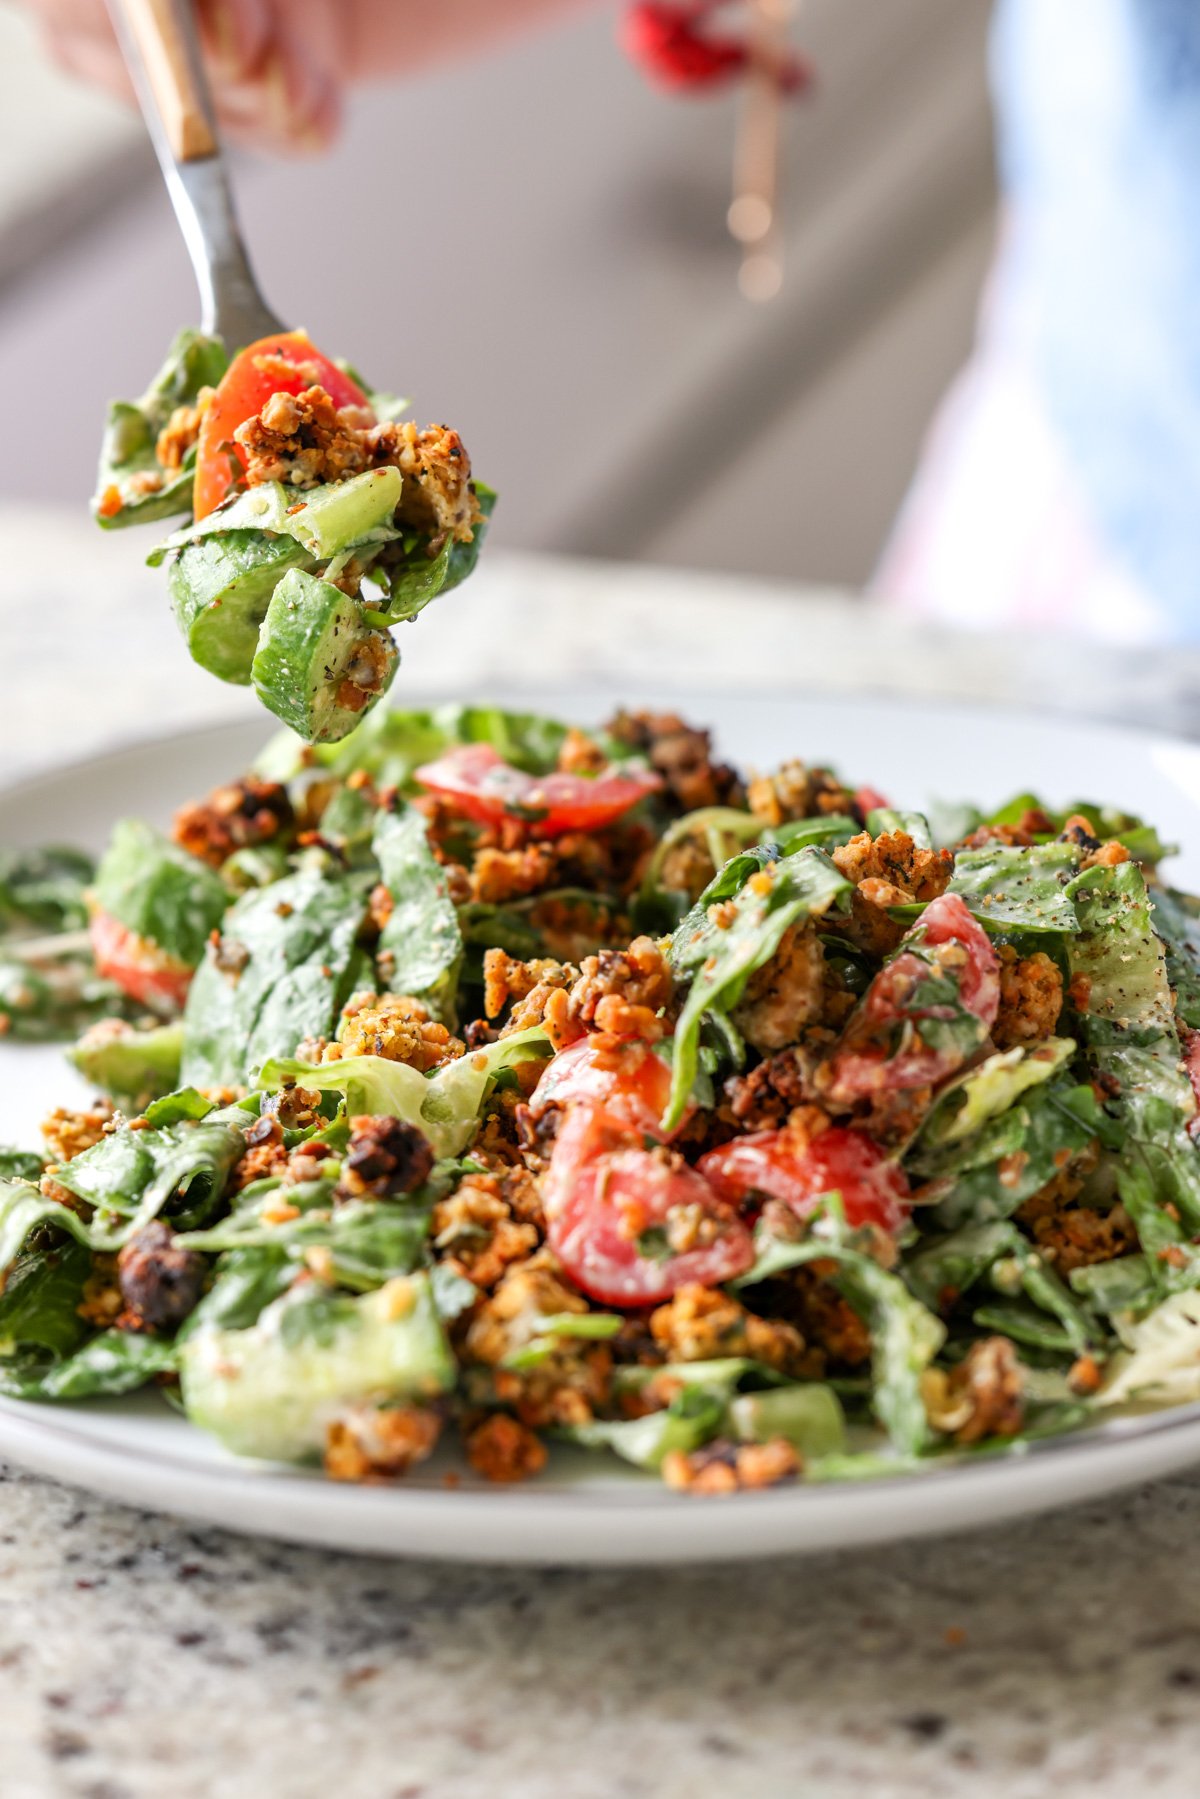
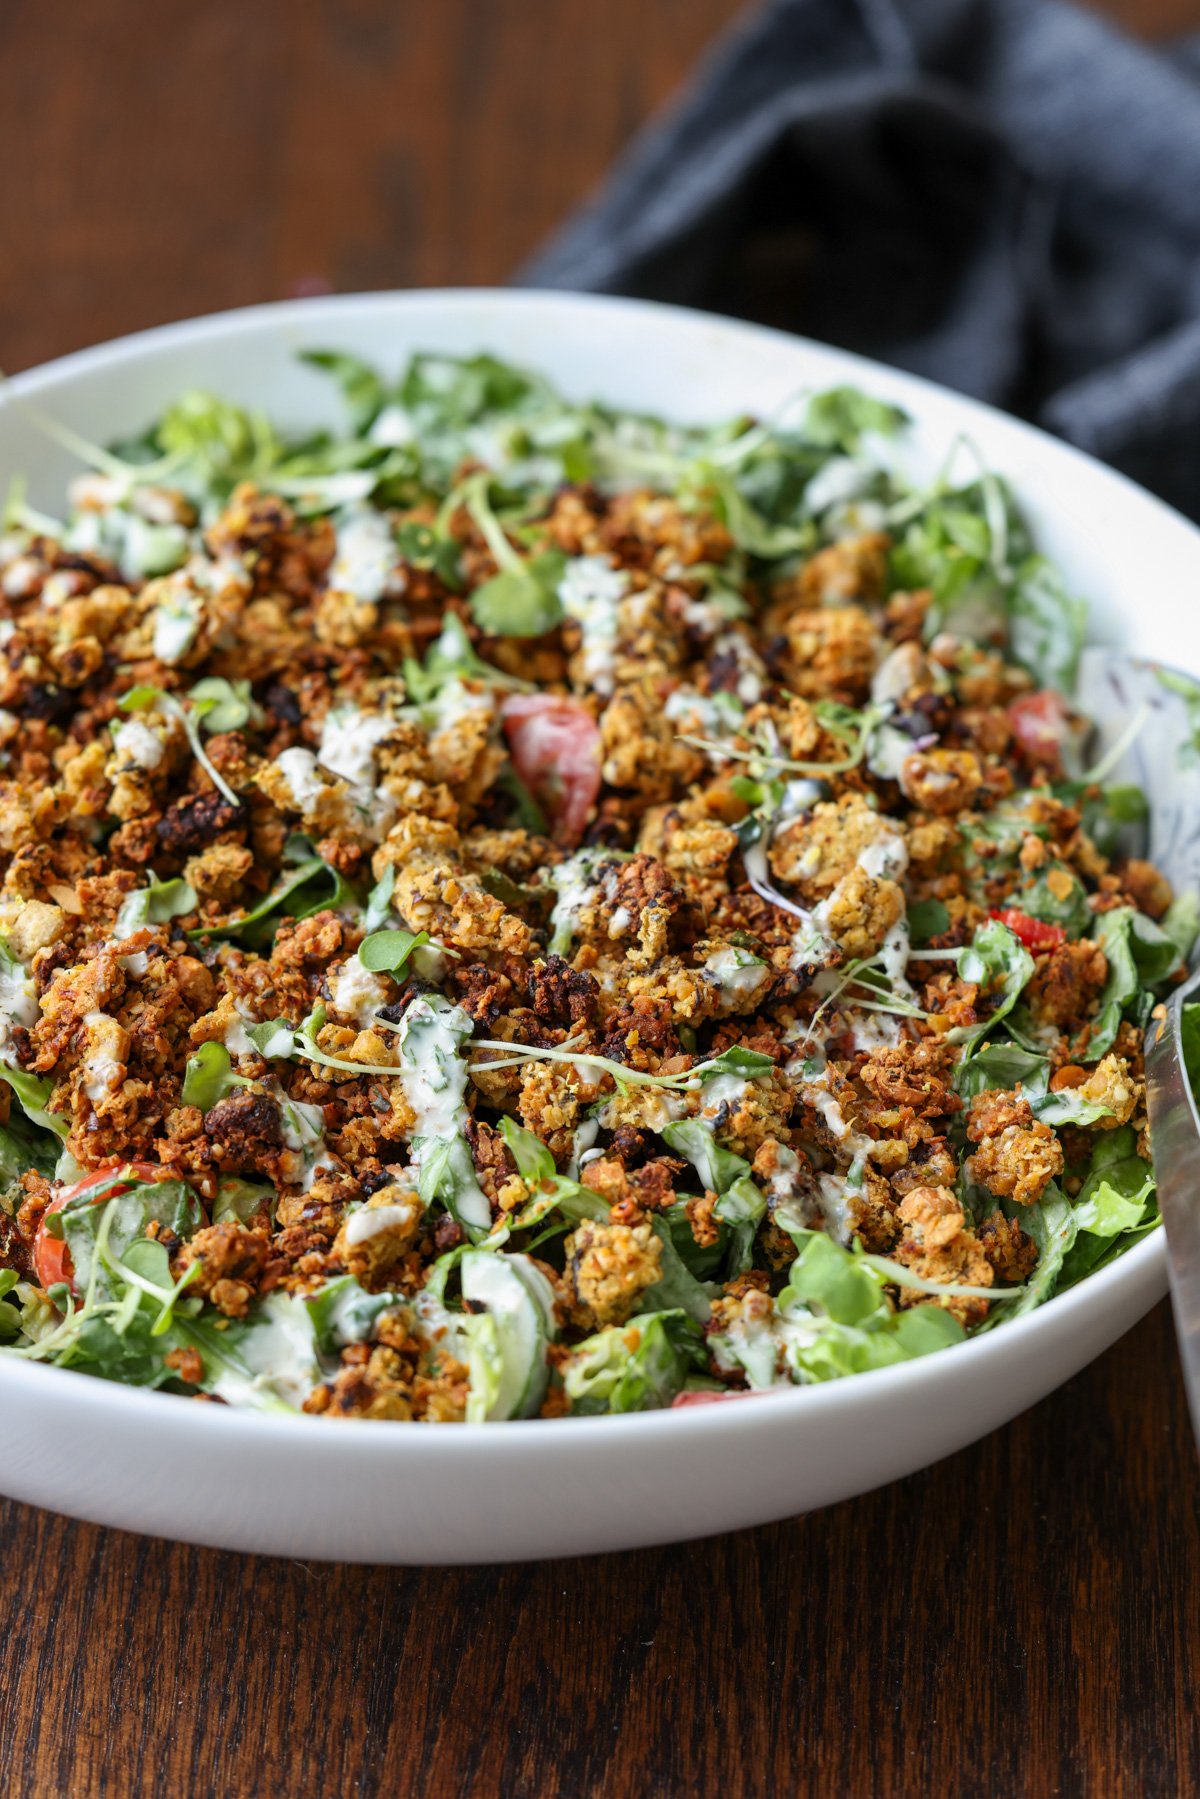
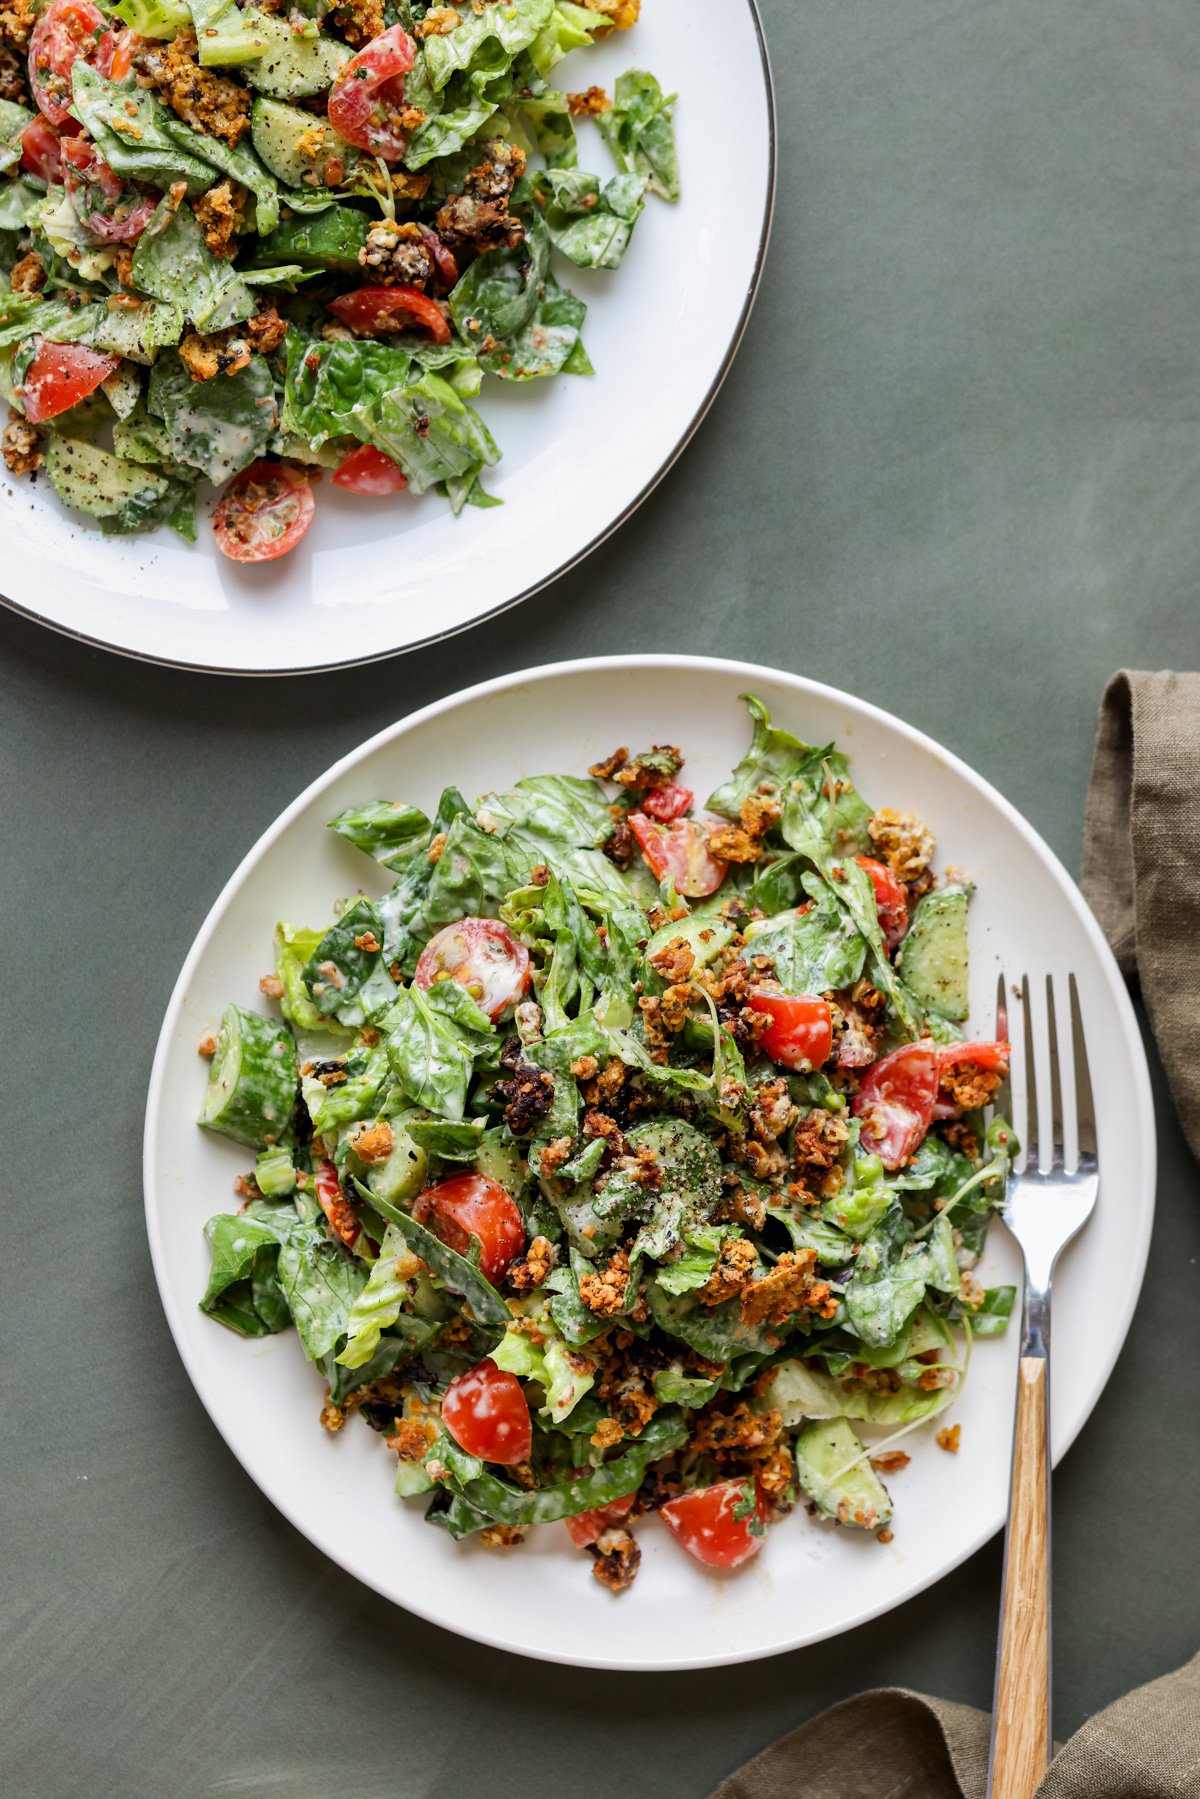
A fully loaded, flavor packed, protein rich summer spinach salad with an umami-packed crisp chickpea hemp seed olive crumble, nutrient dense greens, and creamy, vibrant tahini lemon dressing. A perfect hot weather dinner. (23g protein and 15g fiber per serving, (gluten-free, soy-free, nut-free, high protein)
This is a fantastically hearty summer spinach salad. It has so many textures and flavors, and it has 80 grams of protein for the entire salad. That’s 20 grams of protein per serving. For a salad!
There is protein from the chickpeas, from the hemp seeds, and from the nutritional yeast in the chickpea crumble. There’s also protein from the tahini in the dressing, the non-dairy yogurt (depending on the brand), as well as a little protein from the greens that you use in the salad. You can amp up the protein even more by sprinkling it with some hemp seeds before serving or adding some of my tofu bacon bits, or other high protein toppings.
The salad has this creamy texture from the dressing, the crunch from the fresh veggies, and crispiness from the chickpea crumbles, which we bake until they’re crispy-crunchy. The umami comes from the olives and the sun-dried tomato, and the refreshing, fresh flavor comes from lemon zest, the cucumbers, and any other crunchy veggies and greens.
It’s just a fabulous combination of flavors and textures. The combination of tahini and yogurt helps mellow tahini’s strong flavor and makes for a rich, creamy dressing.
Why You’ll Love this Summer Spinach Salad
incredible combination of flavors and textures! Crunchy veggies, creamy dressing, and savory, crisp chickpea-olive crumble.
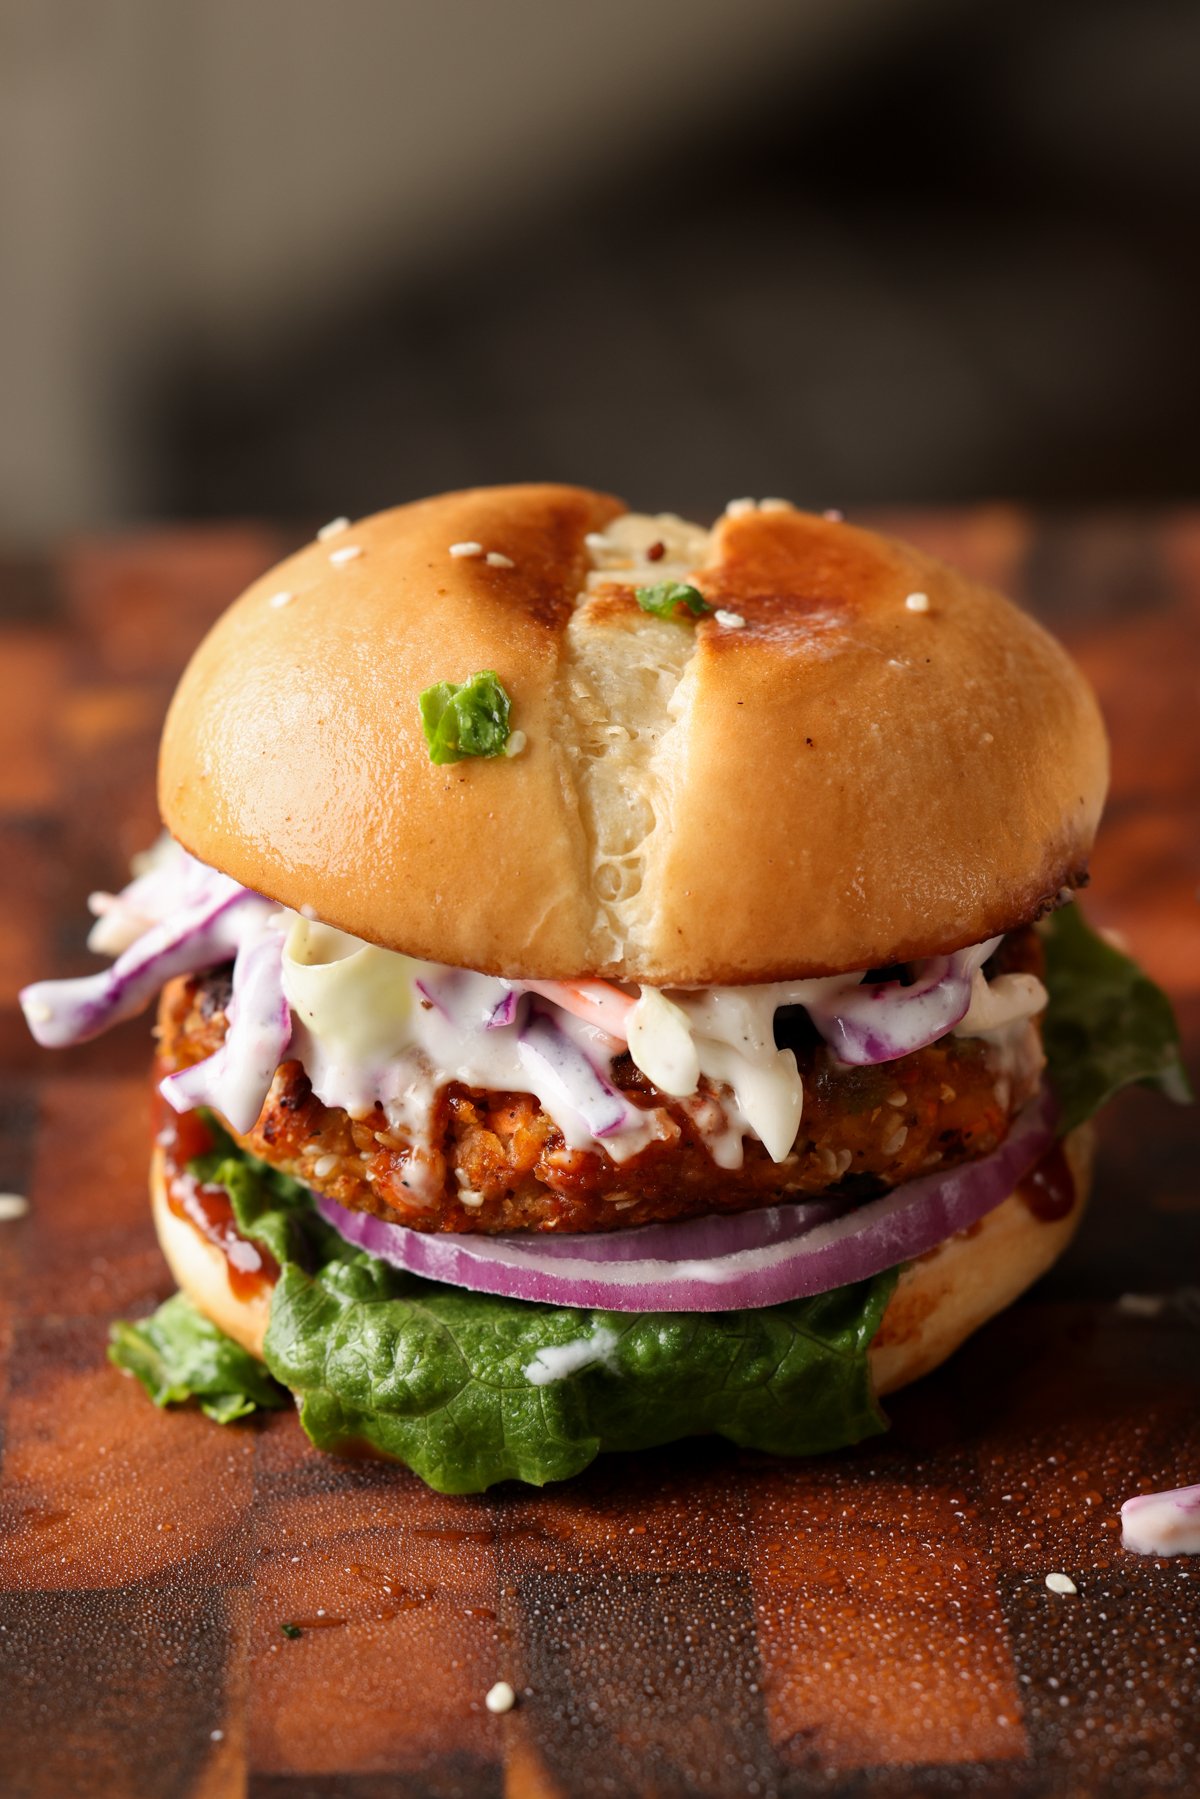
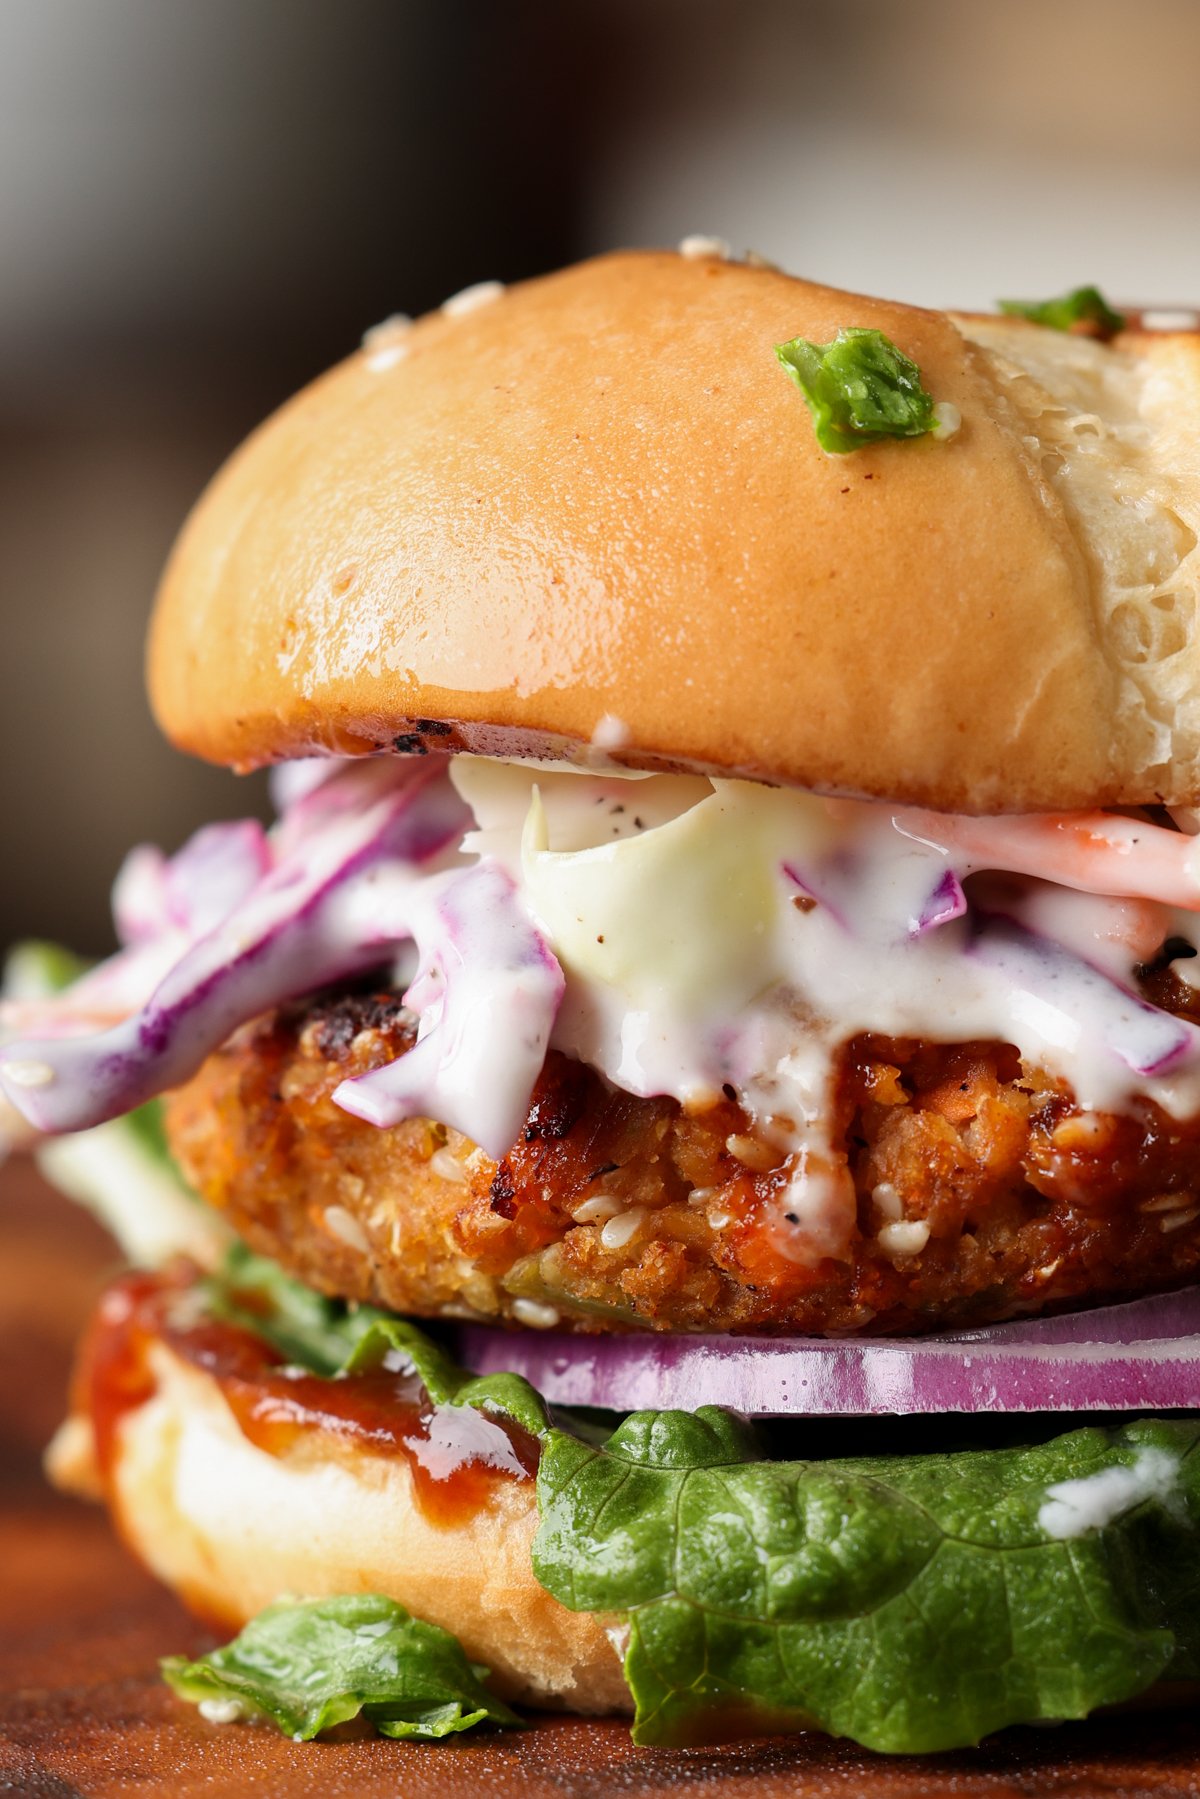
A hearty BBQ lentil burger topped with quick and easy creamy coleslaw is a perfect summer meal! Serve in a bun or over a crisp salad. (nut-free with gluten-free and soy-free options). This post was originally published May 6, 2013
Hello summer! It’s time for all things BBQ, and this BBQ lentil burger combines so many summer flavors in one delicious dish.
The patties have split red lentils, which cook really quickly, and they are loaded with BBQ sauce, inside and out! You can make them on the stovetop or in the oven.
These burgers are also absolutely loaded with veggies! Finely chopped cauliflower, carrots, garlic, ginger, and bell pepper give the patties bulk, texture, and flavor. These are veggie veggie burgers. Not trying to be meat anything. Just lentils and veggies and celebrating them. These veggie patties are delicious as is as well!
Serve these with a simple, creamy slaw or your favorite burger toppings on a bun, or use them to top a green salad for a lighter meal. I love adding fruit to the slaw. The original recipe was written with mango in the slaw. Mango add some juicy sweet to the creamy, tangy, crunchy slaw for amazing balance of flavor.
Why You’ll Love BBQ Lentil Burgers
veggie-packed!
easy to make in the oven or on the stovetop
loaded with so much amazing BBQ sauce flavor!
versatile – Serve on a bun with your favorite toppings or add the patties to a salad.
nut-free with easy soy-free and gluten-free options
Super delicious gochujang tacos with creamy, crunchy yum sauce slaw are incredibly easy to make without a ton of ingredients. Crispy gochujang tofu, creamy gochujang slaw dressing, sweet spicy maple gochujang drizzle! Triple gochujang!
These tacos! They celebrate gochujang in a way you’ve never experienced! Crispy gochujang tofu! Creamy gochujang sauce for the slaw and for dressing! And a sweet spicy gochujang glaze to finish! Triple gochujang.
These tacos are super delicious and amazing! They come together fairly quickly and use many same ingredients in the different components of the taco. Despite that, there’s so much overall texture and flavor that they’re fabulous to whip up and enjoy on any weekday or on the weekend.
I love to make this tofu. It’s just super flavorful. You’ll want to double or triple the tofu recipe, so you’ll have leftover tofu handy to use in salads, wraps, sandwiches, bowls, etc. throughout the week.
Gochujang tacos are very simple to make. We take some tofu and marinate it in a gochujang, ginger-garlic, soy, and maple mixture, and then bake it.
Meanwhile, make the crunchy, creamy slaw. We make a quick, creamy dressing using gochujang again along with some lime juice, maple syrup, and non-dairy yogurt or vegan mayo. You use that dressing to make the slaw and to dress the tacos later on, so you don’t have to make multiple dressings.
I usually like to finish it off with a gochujang-maple drizzle. You don’t have to do this, but it adds some extra heat and a flavor punch—so definitely try to make that one as well.
These tacos are fantastic when the slaw is fresh and crunchy, the tofu is spicy and chewy and crisp! The creamy dressing adds richness, and the gochujang drizzle adds sweet heat. The pickled jalapeños bring a tangy heat that ties it all together.
Why You’ll Love Gochujang Tacos
crispy gochujang tofu with creamy, spicy, crunchy slaw in warm tortillas
simple ingredients – slaw and tacos use the same sauce!
versatile! Use the tofu to make tacos or to top salads or bowl meals or in sandwiches or wraps!
naturally nut-free with gluten-free and soy-free options
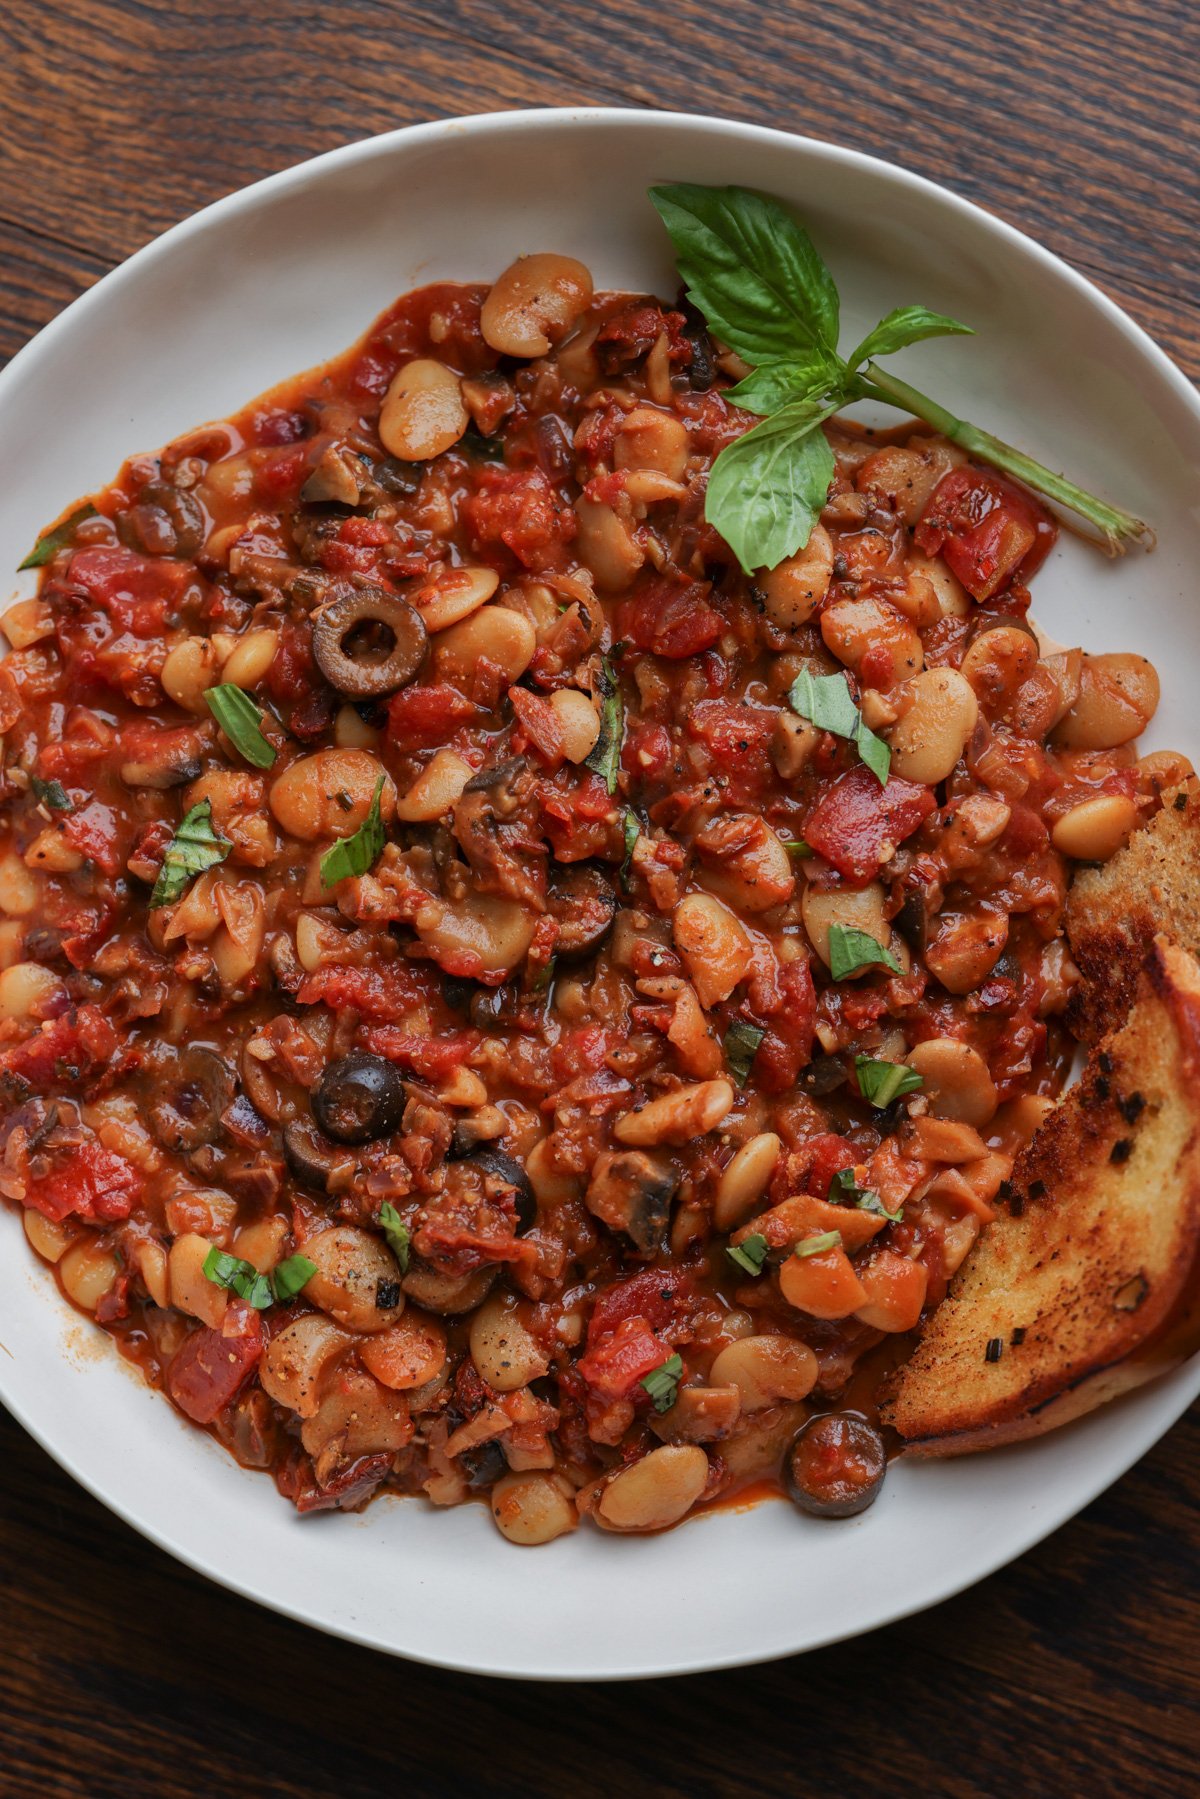
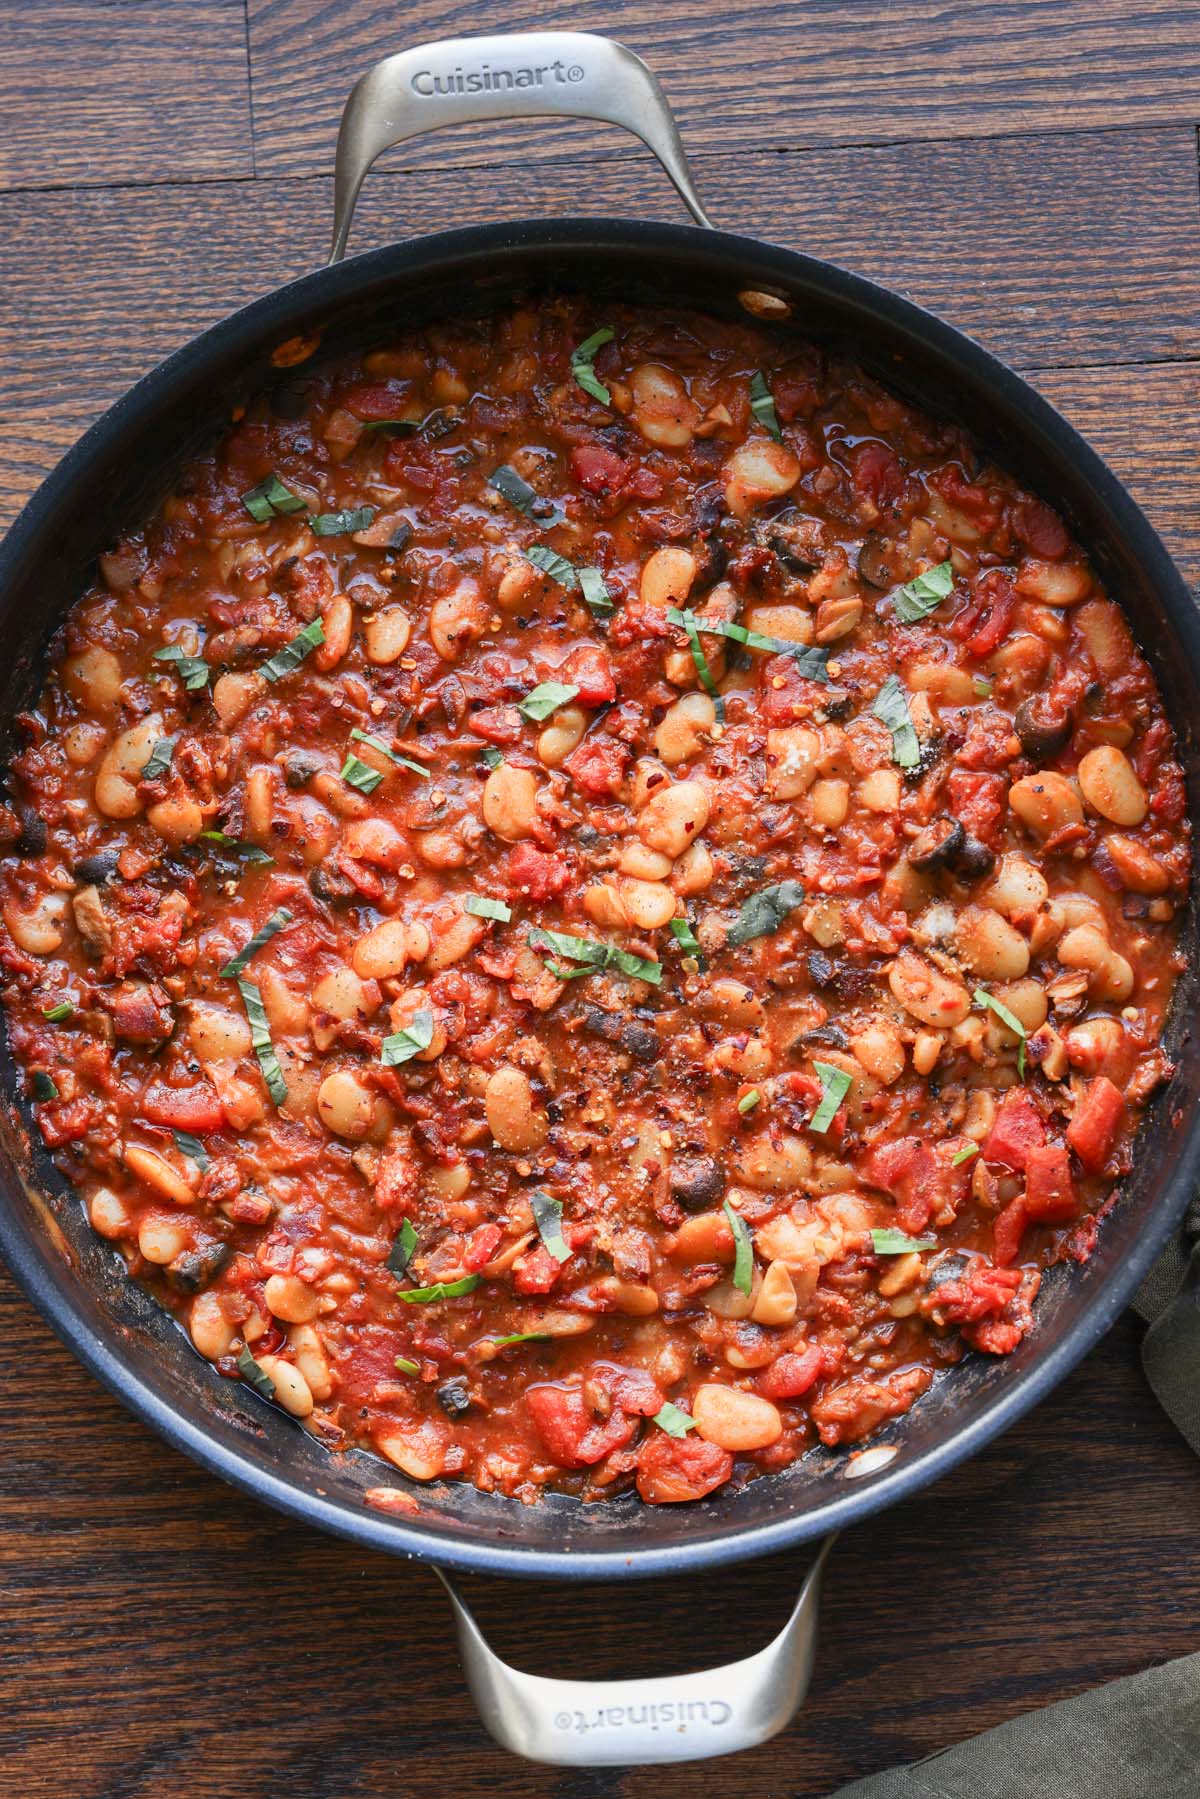
Umami-packed puttanesca sauce pairs beautifully with hearty butter beans! Puttanesca beans are a versatile, 1-pot meal that is absolutely full of flavor. Gluten-free Nutfree soyfree
I loved the incredible sauce that I made with my orzo puttanesca, so I decided to add some butter beans to it to make it into a one-pot bean dish. This is a fantastic and delicious pot of beans!
The puttanesca sauce has umami from the mushrooms, the sun-dried tomatoes, and the olives or capers, and it is just so flavorful. It also has Italian herbs and is slightly spicy from the red pepper flakes. All in all, it has a fantastic flavor profile.
Then you add some butter beans to that amazing sauce and simmer them together to meld the flavors. There’s protein and fiber from the butter beans, and it’s just a hearty and delicious stewy bean dish that you can serve with some garlic bread, sourdough or naan. You can also serve it over cooked pasta or a baked potato.
However you dish it up, it’s just fabulously delicious.
Puttanesca beans are also flexible! Use whichever ingredients you have on hand. There are different ways to add that umami using sun-dried tomatoes, olives, and capers. Even if you have two of those instead of three, it will still taste amazing.
If you can’t find butter beans, use other beans, like cannellini beans, other white beans, or use chickpeas. Or add some cooked lentils into the sauce to make it more like a puttanesca bolognese!
Why You’ll Love Puttanesca Beans
super easy 1-pot 30 minute meal
packed with protein, fiber, veggies, and FLAVOR!
umami-filled, tomato-based sauce with tender butter beans
versatile! Serve with bread to dip or over pasta or a baked potato
Tofu Koliwada is a plant-based version of the popular regional Indian appetizer. It’s like a tofu nugget with tons of fiery heat and so delicious served with green chutney or other of choice. It’s super delicious, crispy and packs flavor! (gluten free and nut-free with soy-free options)
I’ve been veganizing a bunch of decadent, meat-based Indian curries on the blog for a while, and I decided to switch gears. I wanted to explore these regional Indian starters and appetizers, which are just so flavorful —especially some of the meat-based ones. They’re pretty wild, with a lot of different sauces, flavors, and spices.
So welcome to veganizing some amazing appetizers! Let’s start with this delectable koliwada.
Koliwada is a popular crispy appetizer in Indian restaurants, especially around Mumbai city. It’s usually made with prawns ,is fried, and has a signature flavor. It originated with influences from Mumbai coastal cuisine and Punjabi cuisine.
The story goes that a man had moved down to an area close to Mumbai near Koliwada and created this dish, which became super popular.
Koliwada is usually made with prawns, shrimp, or chicken, but we’re using tofu. If you don’t want to use tofu, you can use an alternate protein of your choice.
It is usually served with a green chutney that is slightly different than the usual. It has onion tomato and tamarind and is vibrant and spicy sour with a hint of sweet!
Basically, all of the flavor is in the batter, the spices. It’s kind of like tofu nuggets or crispy fried chicken, but Indian, with tons and tons of heat. Serve it with the vibrant cilantro-mint chutney listed below or with Schezwan chutney, tamarind chutney, or mango chutney.
Why You’ll Love Koliwada
crispy, super spicy tofu with adjustable heat
delicious as a side or make it a meal by adding to a wrap or salad
incredible mint chutney for dipping comes together in the blender
versatile recipe – use dry coating or a batter, bake or pan fry!
naturally gluten-free and nut-free with soy-free options
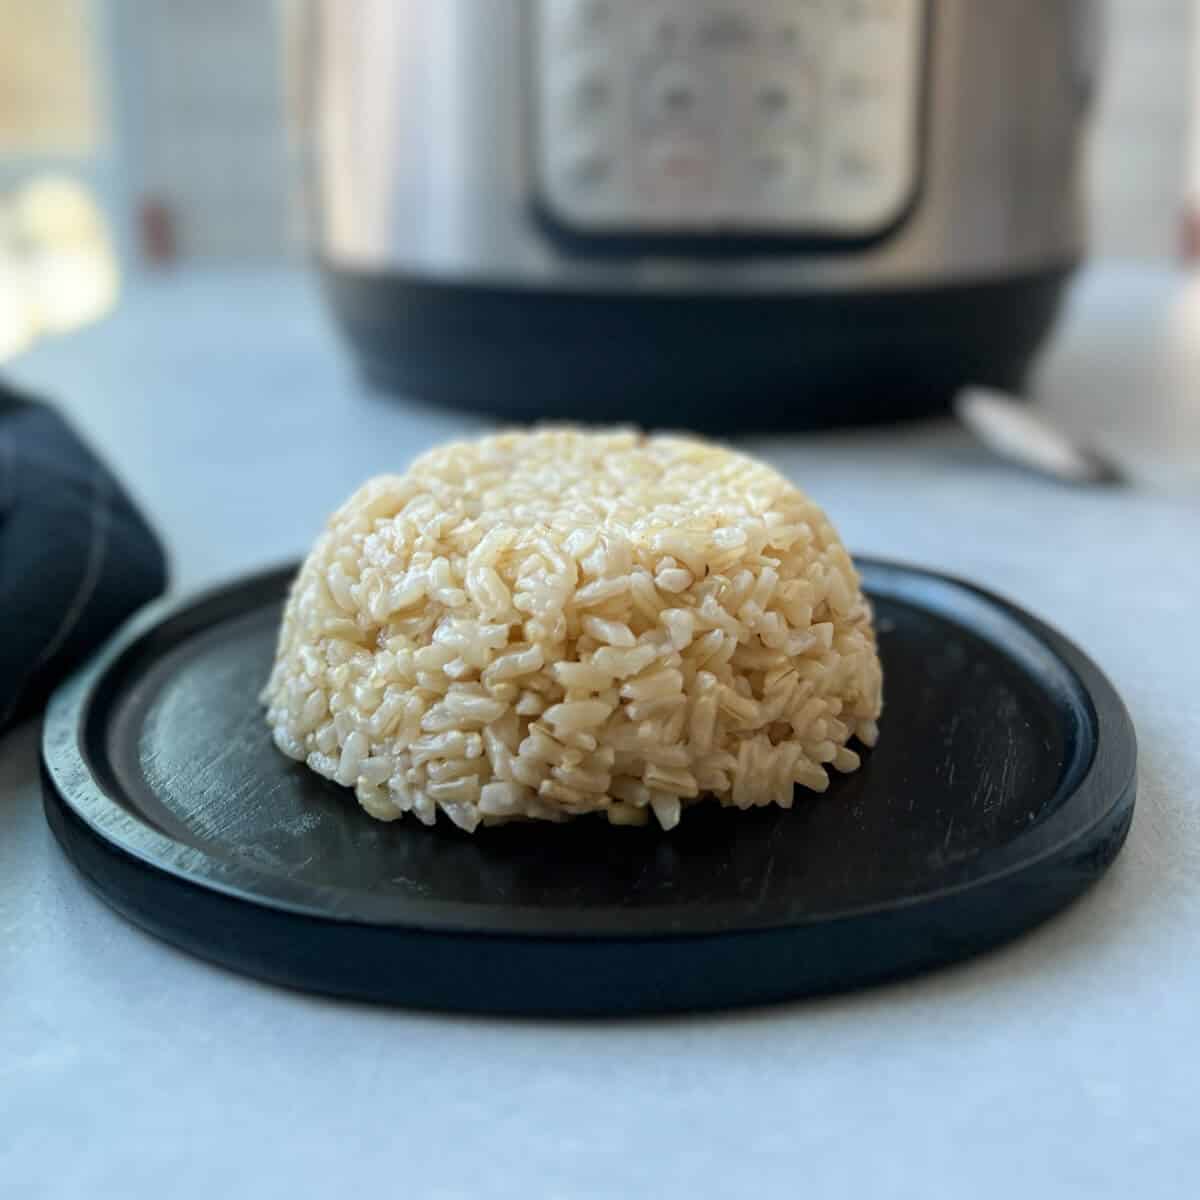
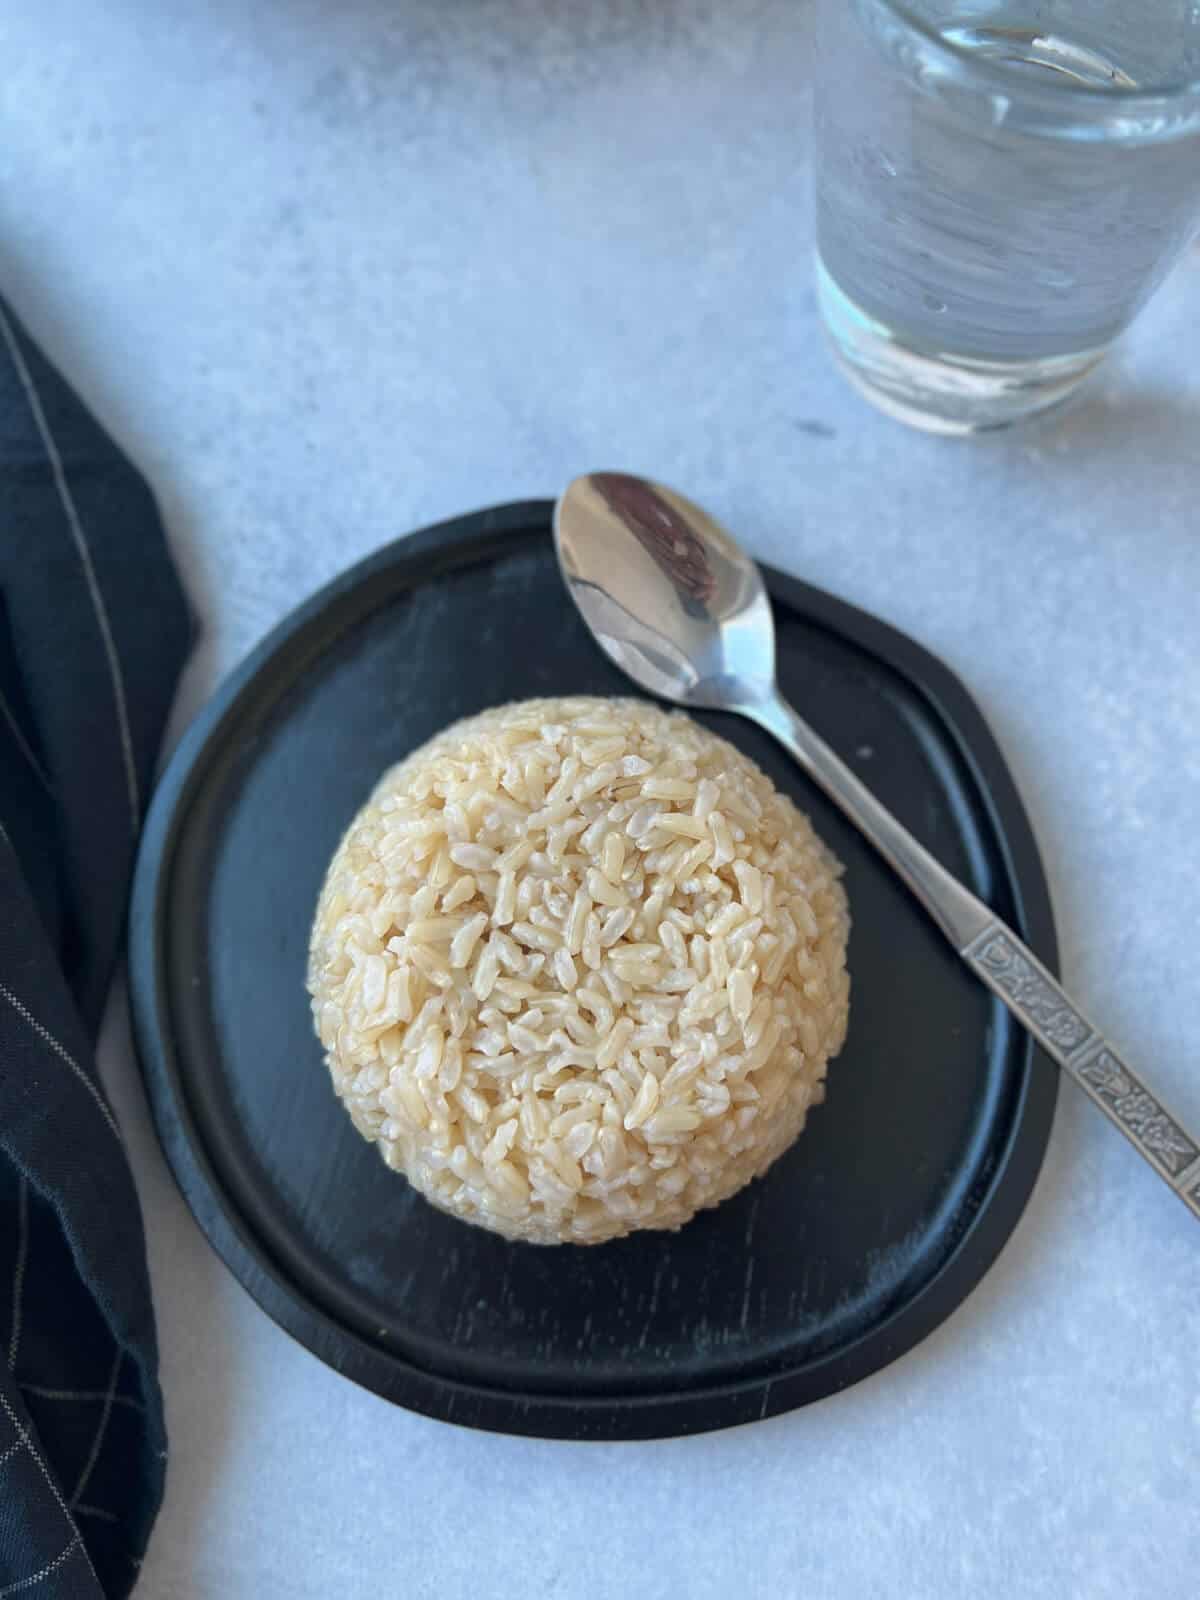
This easy recipe for Instant Pot Brown Basmati rice yields perfectly cooked, fluffy rice every time! This fragrant/aromatic rice can easily be prepared using the pot-in-pot method, making mealtime a breeze.
Brown Basmati Rice Instant Pot
As a South Indian, I am very passionate about rice. I don’t think a single day has passed that I haven’t had rice in some form or another. Whether it’s a delicious dessert like my rice kheer recipe or a simple rice side dish, I feel like eating rice is in my DNA.
But when you consume rice daily, it is best to eat a type with a good nutrition profile.
That’s why I love Brown Basmati rice.
Not only is brown Basmati rice good for you, but it’s also very delicious. It has a nutty aroma and fluffy texture and is easy to make using my favorite appliance: the Instant Pot! This magical device prepares meals in less than half the time of traditional stovetop or rice cooker methods.
This rice recipe is no exception – it cooks up quickly in the Instant Pot with little hands-on time and yields perfect rice every time. And thanks to the saute function, it can be toasted with a bit of ghee for improved texture and flavor. You can’t do that in your typical rice cooker!
What is brown Basmati rice?
Basmati rice is an aromatic and delicious variety of rice widely consumed and prized for its texture. Basmati rice does not tend to clump together like some starchier varieties, so it is often served at Indian restaurants.
Brown basmati rice is the whole-grain version, which has both the germ and bran left intact. This leaves it with a brown color and a lovely nutty taste. Like all brown rice, brown Basmati tends to be slightly chewier than its refined version.
Brown Basmati Rice
Brown vs. White Basmati rice
While brown Basmati rice is a whole-grain, white Basmati rice is made by removing the nutritious bran layer(also called the husk) and the germ, leaving just the starchy white portion behind. This process is also sometimes called “polishing,” and it results in rice that is less substantial and more subtle in both flavor and texture.
Brown rice is higher in dietary fiber and vitamins, while white rice tends to be more digestible. Whether you select brown or white rice for your dish is a matter of flavor and preference.
Why this recipe works
It’s an easy way to make Basmati rice without having to watch a pot on the stove.
You can easily make pot-in-pot Basmati rice by using a trivet and pairing it with your favorite Instant Pot curries and dals.
No soaking is necessary – meaning you can get nutty and fluffy rice without all the extra prep work.
A healthy alternative to polished rice varieties, meaning it is perfect for everyday dinners.
Here’s what you need to make the recipe
Ingredient notes/swaps
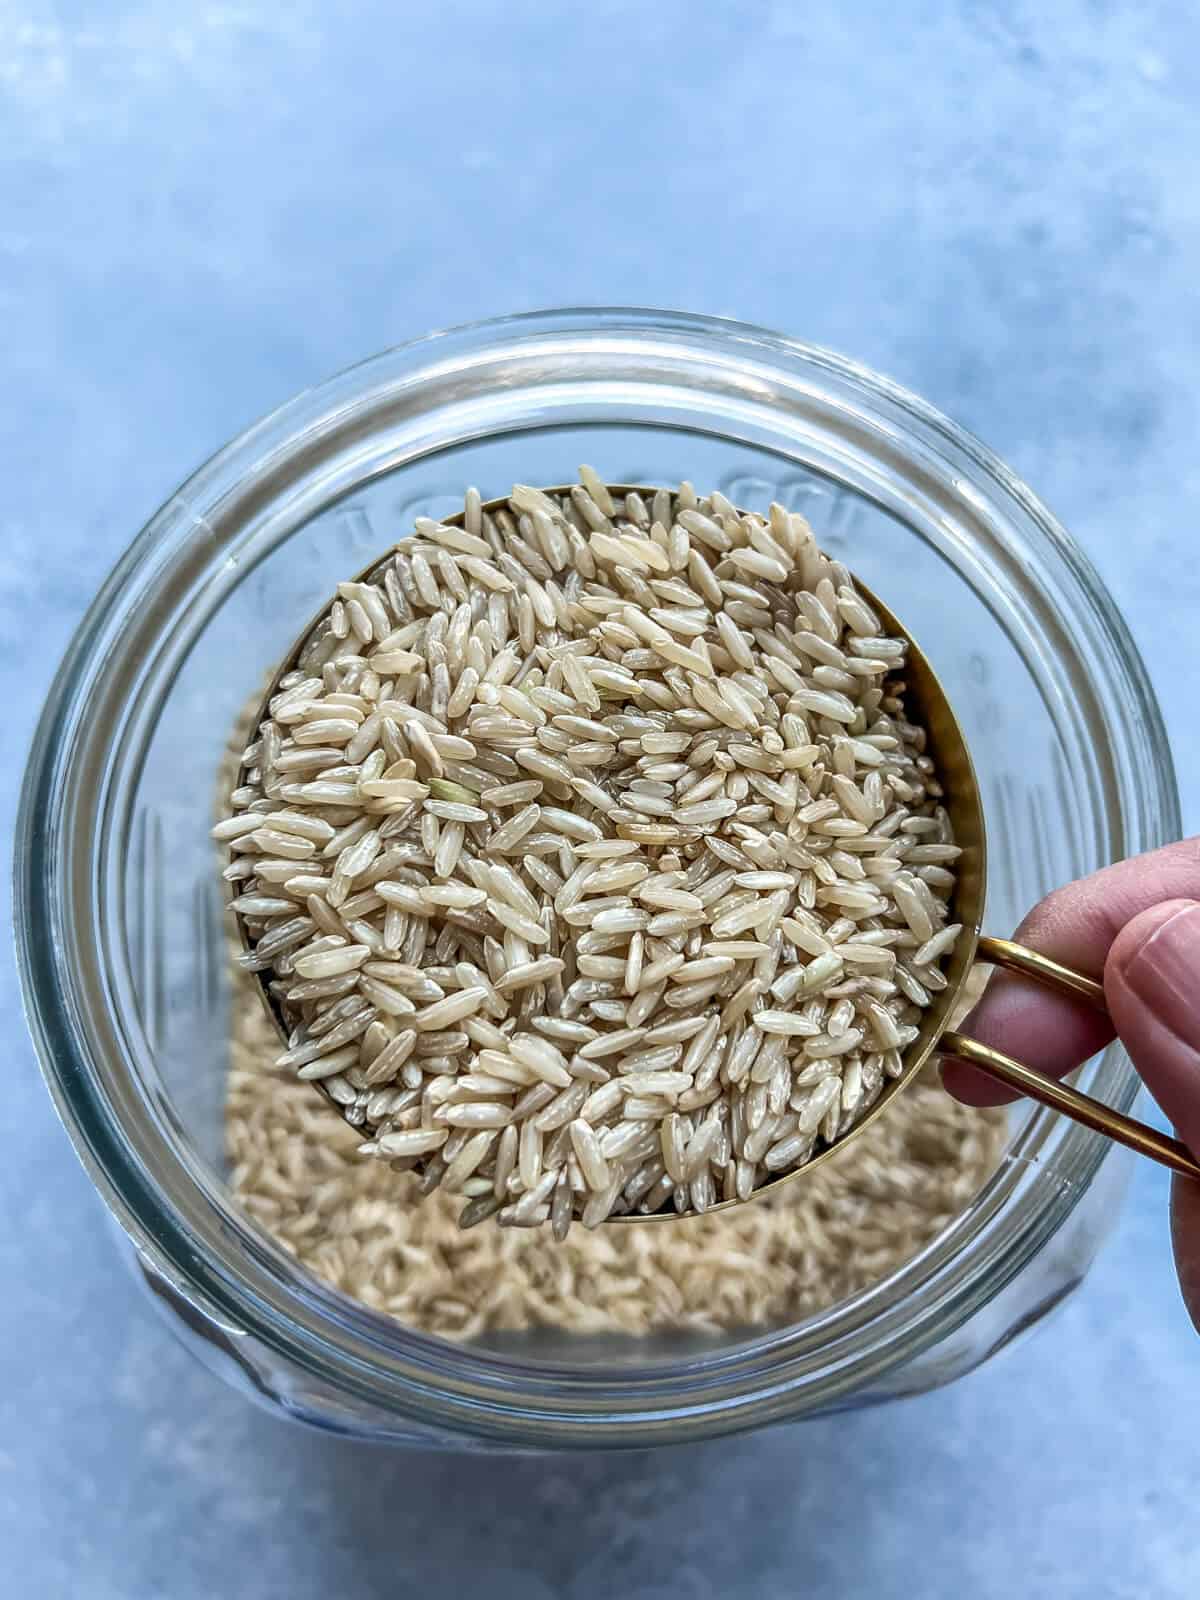
Brown Basmati Rice – Tilda and Royal are the brands that I recommend. You could also use organic brown Basmati rice if you prefer.
Storebought orhomemade ghee– This adds a nice nutty flavor to the rice and improves the texture. You can use butter or olive oil for a vegan version.
Salt – A touch of salt helps bring out the natural flavors of the rice.
Cups of water – Use the following 1:1.25 rice-to-water ratio i.e, for every cup of rice, use 1.25 cups of water.
While this article, the complete guide: Pot in Pot Indian cooking, goes in depth about this cooking technique, here’s a quick guide, Brown Basmati rice can be cooked pot-in-pot with any curries that have a cooking time between 25-35 minutes.
Scalable recipe: You can easily double or triple the recipe without changing the cooking time.
The cooking times between various brands will vary. You may have to try a few different cooking times between 15-22 minutes to get the right texture you want.
Wash / Soak the rice – Rinse the rice in a few changes of cold water to remove dirt and excess starch (which makes it easier to digest). If time permits, soak the rice. Soaking elongates the grains and makes them less brittle.
Let the rice rest – Once cooked, let the rice rest – this allows the steam to redistribute, and all the layers of the rice are evenly cooked. That is why it is important to wait 10 minutes before releasing pressure.
Add ghee (optional step) – After the rice is done, add a tablespoon of ghee. Once it melts, fluff the rice with a fork. Adding ghee amplifies the nutty flavor of Basmati rice and makes it even more fragrant. The result is a restaurant-style buttery Basmati rice that doesn’t dry out.
Avoid a clumpy mess – If not serving immediately, remove the inner pot from the Instant Pot to prevent the rice from drying out and sticking to the bottom.
Rinse the brown rice using a strainer till the water runs clear.
1 cup Brown Basmati Rice
Select the Saute program in the Instant Pot and set it to Normal.
Add one tablespoon of ghee or oil in the inner steel pot.
1 tablespoon ghee or olive oil
Drain the rice and add it to the inner pot.
Saute the rice for about 30 seconds. Press cancel.
Add water along with salt to the inner pot. Mix well.
1/2 teaspoon salt, 1.25 cups water
Close the lid and set the steam valve to sealing. Pressure cook for 20 minutes (soft rice) under high pressure. If soaked, cook for 15 minutes.
When the cooking cycle is complete, wait for 10 minutes before moving the valve to 'venting' to release pressure.
Open the lid and let the steam escape.
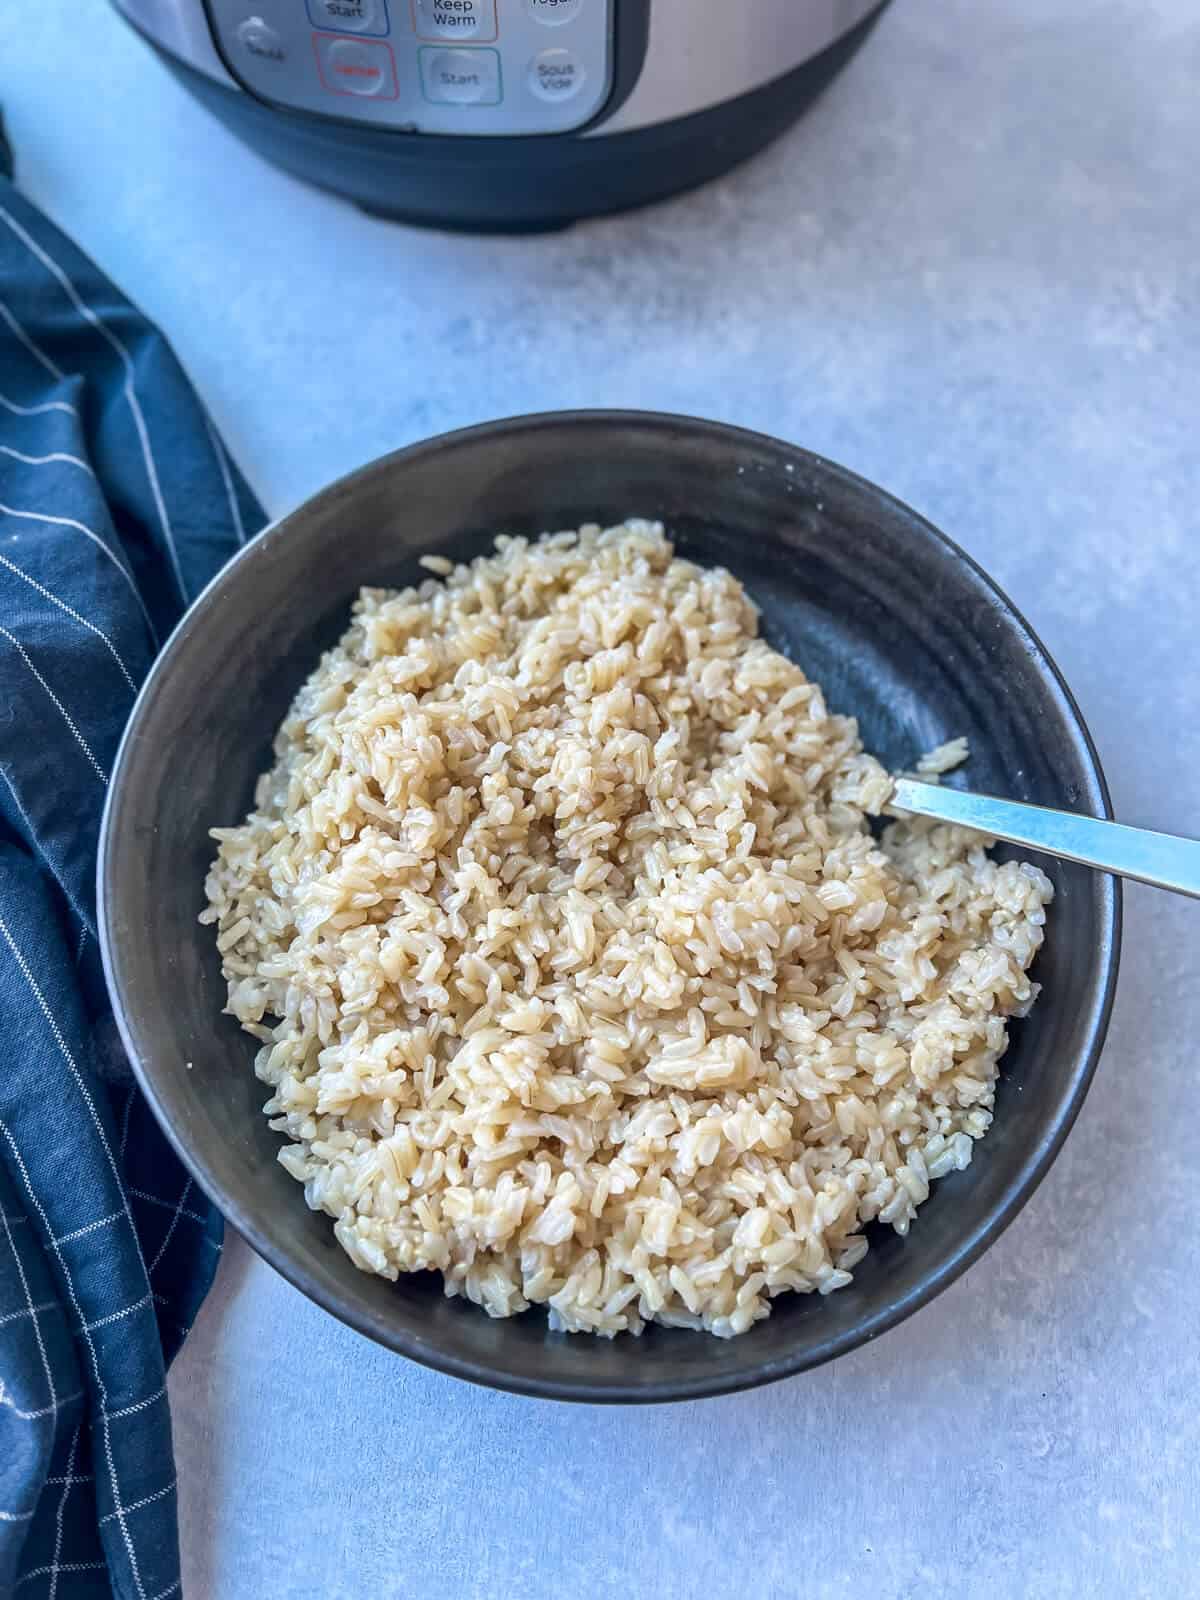
Wait a minute or two, and then fluff the rice gently with a fork. Serve with your favorite curry.
Notes
This recipe was tested in an Instant Pot Duo – 6 quart. To make this in an 8-quart Instant Pot, make at least 2 cups of brown rice since 8-quart needs at least 2 cups of water to come to pressure.
I used a standard measuring cup for the recipe, not the rice cup that came with Instant Pot.
If not serving immediately, remove the inner pot from the Instant Pot to prevent the rice from drying out and sticking to the bottom.
Reheating leftover rice – Add a tablespoon of water for every cup of leftover rice. Mix well and pressure cook for zero minutes. When the cooking cycle is complete, move the valve to ‘venting’ to release pressure immediately.
Using stock and butter – To add richness and flavor to your rice, try using veggie or chicken stock instead of water and unsalted butter instead of ghee or olive oil.
Vegan – If you want to make brown Basmati rice in the Instant Pot but prefer it to be vegan, try olive oil in place of the ghee.
Herbs – Feel free to experiment with the addition of herbs and other seasonings. A favorite of mine is cilantro lime rice, which is perfect for pairing with a variety of dishes.
How to prep ahead
Rice is best when eaten fresh, but you can prepare brown Basmati rice in advance if you would like. Just follow the cooking instructions for the recipe, let the rice cool down completely and then transfer the cooked rice to an airtight container and store it in the fridge. Reheat according to the instructions below.
Storage tips
Refrigerator: Up to 3 days in an air-tight container.
Reheating leftover rice – Add a tablespoon of water for every cup of leftover rice. Mix well and pressure cook for zero minutes. When the cooking cycle is complete, move the valve to ‘venting’ to release pressure immediately.
Freezer: Store it for a month in an air-tight, freezer-safe container.
Serve it with
This brown Basmati rice can be used as a substitute for white Basmati rice. You can also use the pot-in-pot method so you can cook the rice at the same time as your main dish. Here are a few of my favorite Instant Pot curries:
Langarwali dal – a creamy mixed lentil curry that cooks effortlessly in the Instant Pot.
Instant Pot Sukha Kala Chana – While it is often served as prasad (religious offering) it makes for an easy side dish on busy weeknights.
Punjabi Rajma Masala – This Dahba-style recipe is flavorful and delicious. The combination of rajma and chawal (rice) makes this dish special.
Frequently asked questions
Should I soak Brown Basmati rice before cooking?
While it is not essential, soaking Basmati rice reduces the cooking time and softens the grains. This helps them absorb more water and be less sticky when cooked.
How do I make the rice fluffy?
Soak Basmati rice for 30 minutes. You can do a few things to make rice fluffy – Saute in ghee or oil or add ghee once the rice is cooked. Once the rice is cooked, use a fork to fluff the rice. This helps redistribute the steam and makes the grain fluffy and separate. Lastly, let the rice rest for a few minutes before serving.
Is Brown Basmati rice the same as brown rice?
Brown Basmati rice is not the exact same as your typical “brown rice”. The standard brown rice available in supermarkets is short or medium-grain rice, while brown Basmati rice is long-grain rice. This makes for distinct differences in texture as well as flavor. Standard brown rice also tends to be a bit sticker than the Basmati variety.
What is healthier, Brown Basmati rice or Brown Jasmine rice?
Both brown Basmati and brown Jasmine are good choices when it comes to rice. They are both whole grains and are easy to incorporate into your favorite meals. Basmati rice, however, is much lower on the glycemic index, making it a better choice for those who are avoiding blood sugar spikes.
What is the healthiest rice to eat?
Any regular brown rice is a good choice since it will be whole-grain and high in fiber and vitamins. Some brown rice varieties are better than others, but brown Basmati is at the top of the list for the healthiest rice. Because of its low glycemic index, it’s gentle on the blood sugar and contains more complex carbohydrates than any other variety.
Other rice recipes to try
If you enjoyed making this fragrant brown Basmati rice in the Instant Pot, I highly recommend you try one of my many rice recipes. Here are a few of my most popular:
Instant Pot Basmati rice – Using the Instant Pot makes for perfectly cooked rice in less than half the time of a rice cooker.
Jeera rice (cumin rice) – This aromatic and flavorful rice pairs well with a variety of dishes but is delicious enough to stand on its own.
Instant Pot Red rice – Learn how to cook plump and nutty Kerala matta rice in a fraction of the time with the Instant Pot.
Instant Pot brown rice – Master the process of making brown rice in the Instant Pot and get perfect results every time!
Instant Pot Brown Basmati Rice
Troubleshooting rice
If you follow this recipe, you shouldn’t run into these problems. But sometimes, we eyeball ingredients instead of measuring them, and things can go wrong if our estimates are inaccurate. Here’s how we can fix most issues –
Undercooked rice – hard and chewy
Reasons
Not enough water.
The sealing ring was not inserted properly.
Cooked for an insufficient amount of time.
Solution – Check if the sealing is properly inserted. Add two tablespoons of water for every cup of rice and cook again for two more minutes. Immediately release pressure.
Clumpy rice
Reason – Rice has not been rinsed properly.
Solution – Rinse properly next time. Sorry, no fix!
Cooked rice with leftover water
Reason – Added more water than needed.
Solution – Use a strainer to drain the excess water. Saute on low heat till the water is absorbed.
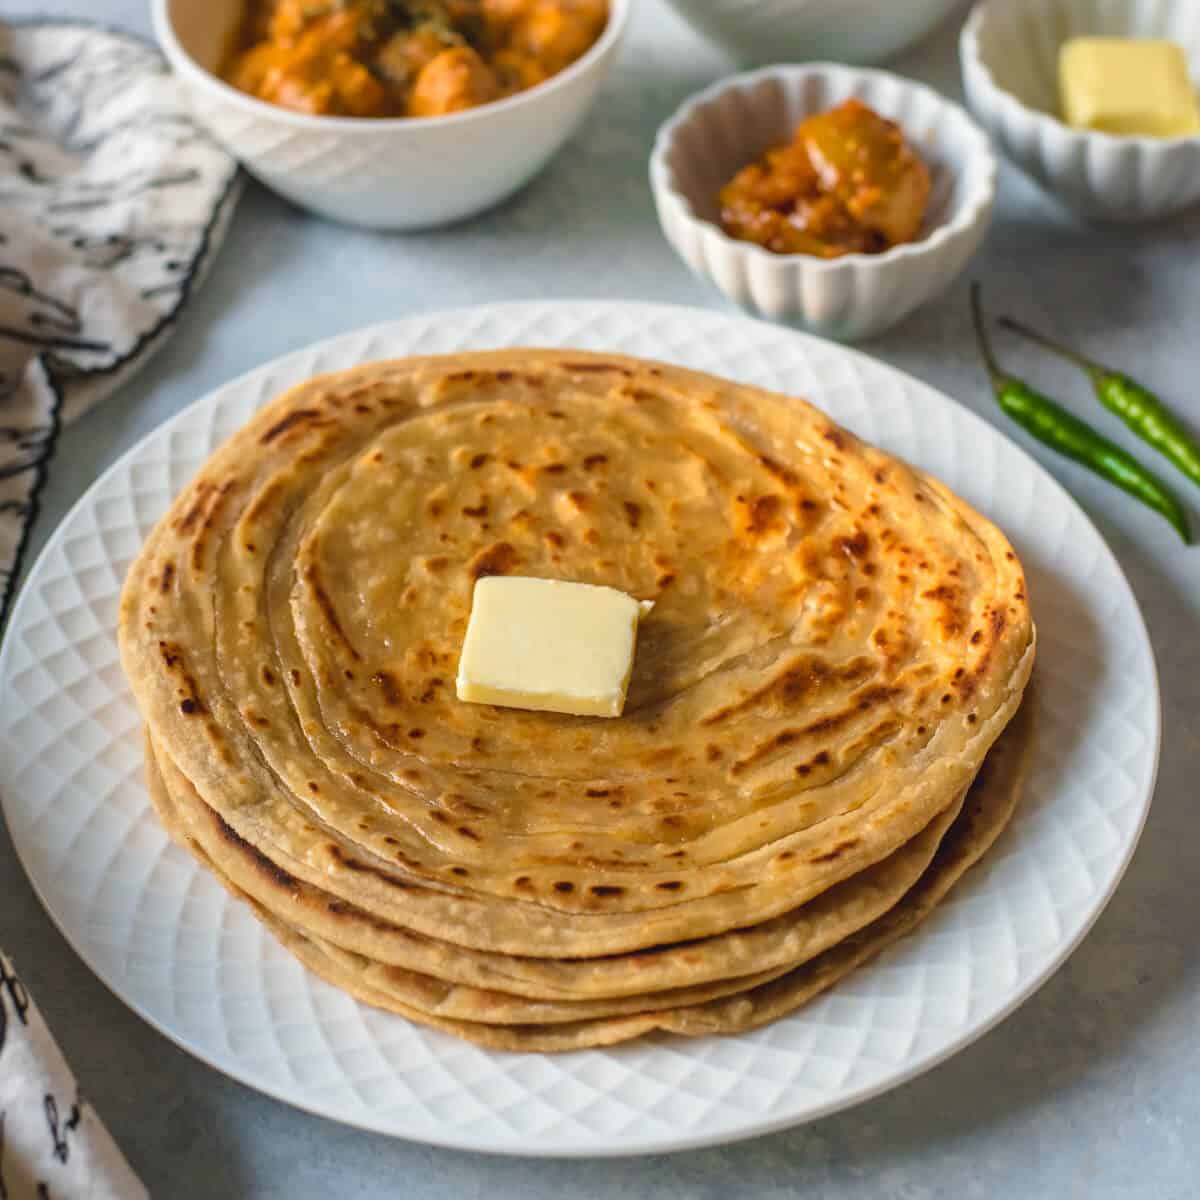
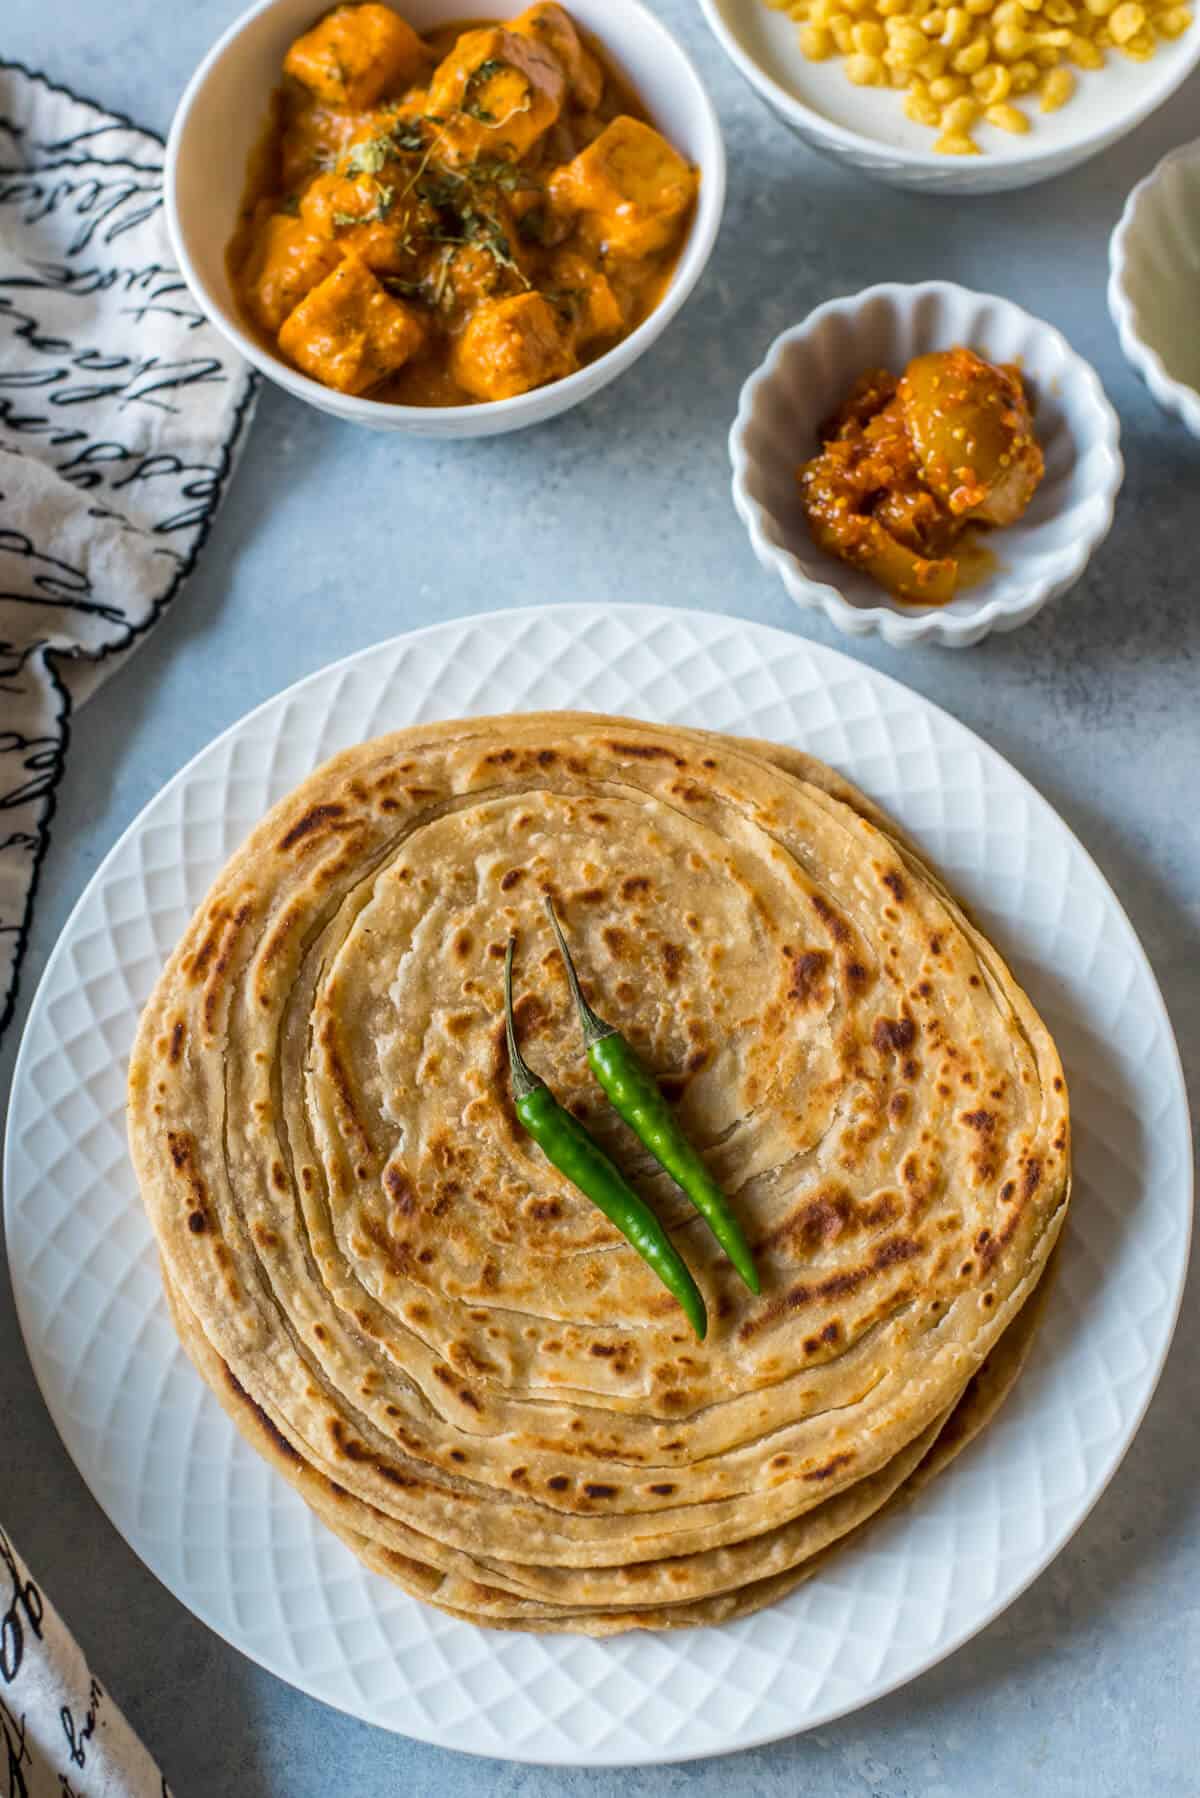
Master making lachha or lachedar paratha with this easy recipe. Flaky and crisp, this layered paratha comes together with five simple ingredients. Perfect for breakfast, a snack, or served alongside dals, curries, and more, this buttery Indian flatbread satisfies everyone!
Lachha paratha recipe
Paratha 101
Paratha is one of the most common flatbreads that originated in the Punjab region of northern India.
Nothing says comfort food quite like a warm paratha. Often served as breakfast, this filling unleavened flatbread made with whole wheat flour pairs well with just about everything.
If you have never made paratha before, they are similar to roti with a few key differences. While they both consist of roughly the same ingredients, paratha is rolled and folded to create layers which also results in a crispy, flaky flatbread with golden brown spots.
There are two main types of paratha, layered and stuffed. Layered parathas have spices or fillings added while making the dough, whereas stuffed parathas such as aloo paratha or paneer paratha have stuffings filled in during the rolling process.
Looking for a recipe for plain paratha? Learn how to make it 3 ways – round, triangle, and square-shaped.
What is lachha paratha?
Lachha paratha, pronounced laa·chuh pr·aa·thuh, also may be called lachedar paratha or paratwala paratha. Some other spellings of lacha include laccha, lacha, or laccha, but they all refer to the same whole wheat, multi-layered, unleavened bread.
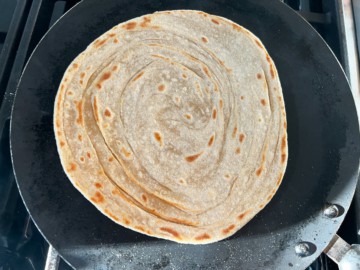
This variation of paratha gets its name from the unique layers or rings you can see in the rolled-out dough. To achieve these distinctive rings, the soft dough is rolled flat, like a roti, then coated in ghee or oil and pleated like a fan. The pleated dough is then rolled into a coil, flattened, and rolled again into a flat disk before being lightly fried.
Reasons to love this recipe
Fresh and flaky, there are so many reasons to love this buttery flatbread. Some of the main reasons we love this laccha paratha recipe would be because it is
Vegan-friendly – With a simple swap from ghee to avocado oil, you can easily make this layered and flaky paratha a vegan flatbread.
Freezer friendly – Both the dough and the cooked lachha paratha store well in the freezer for future meals.
Versatile – Spice this simple paratha dough with a masala blend or season with ajwain seeds for a different flavor, depending upon how you serve them.
Needs only a few ingredients – Made with 5 pantry-staple ingredients, this simple laccha paratha quickly comes together any day of the week.
Here’s what you need to make lachha parathas
Ingredients
Whole wheat flour– Used both in the dough for the paratha and to help roll out the dough later.
Salt– optional, but really enhances the flavor of this paratha.
Oil– Avocado or vegetable oil work best.
Water– At room temperature.
Melted ghee – Substitute with avocado oil to make this paratha vegan.
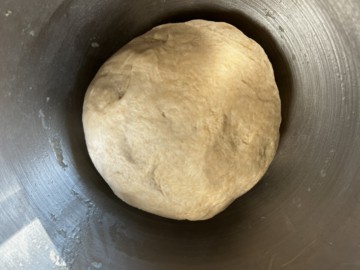
Knead the dough until it is smooth, soft, and pliable.
To fix hard dough, Sprinkle a spoonful of water and knead. Add more water as needed until the dough is neither hard nor sticky.
Sticky dough? Sprinkle a spoonful of dough and knead. Add more flour as needed until the dough is not sticky.
Rest the dough to allow time for the gluten to form. This makes it easier to roll out the dough and yields softer parathas.
Make sure to dust off the dry flour from the parathas before frying, or it dries up and turns hard.
Before storing it in an air-tight container or while packing it for lunch, let the paratha cool down for 5-6 minutes to prevent it from being soggy.
Note: Don’t forget to turn your exhaust fan on when making parathas, or else your smoke alarm may go off.
Variations to try
Spice it up – Make masala paratha by adding 1/2 teaspoon of these spice powders – chili powder, coriander, and cumin powder while making the dough.
Ajwain paratha – Ajwain or carom seeds aid digestion. Add 1/2 tablespoon of ajwain (carom) seeds for every cup of whole wheat flour while making the dough and make the paratha as usual.
For a vegan version, use oil instead of ghee.
How to prep ahead
The best way to prepare this lachha paratha in advance is to make the dough ahead of time. Follow the steps for making the dough as listed in the instructions, and when it is time to allow the dough to rest, store it in either the refrigerator or the freezer.
Refrigerated dough stays keeps in an air-tight container for up to 3 days.
The frozen dough keeps for a month.
Bring the lachha paratha dough to room temperature before rolling out the parathas.
Storage tips
Refrigerator – When cooled and placed in an air-tight container, the rolled paratha lasts for 4-5 days.
Freezer – Parathas keep for 2-3 months when frozen. I recommend separating them with parchment paper when freezing, or they’ll stick together.
Reheat – For refrigerated parathas, reheat in a microwave (15-20 seconds) or reheat in a tava / skillet kept over medium heat. If parathas are frozen, use a tava/skillet to reheat for best results.
Serve it with
This flaky and savory flatbread can be paired with curries to make a meal or savored for breakfast with butter on top with a side of pickle. Serve laccha paratha hot with some of your favorite Indian curries, such as
What is the difference between paratha and laccha paratha?
Paratha is the general term for an unleavened flatbread made with whole wheat. Laccha paratha refers to a specific type of paratha made from layering the dough during the rolling process.
What state is famous for laccha paratha?
Laccha paratha comes from the Indian state of Punjab.
Is laccha paratha made of maida / all-purpose flour?
The homemade version is made from whole wheat flour, but sometimes the store-bought frozen ones or the restaurant ones can be a mix of whole wheat flour or all-purpose flour.
Is Malabar parotta and Laccha paratha the same?
Malabar paratha is the South Indian variation of the laccha paratha, originating in the Northern part of India. Malabar parotta, or Kerala parotta, is made from maida (all-purpose flour), thus making it softer, whereas lacha paratha is traditionally made from whole wheat flour or atta.
Combine wheat flour, salt, oil with 1 cup of water in a large bowl and start kneading. Add water in small increments and continue to knead till the dough comes together as a ball.
Add 1/4th teaspoon oil to the dough and knead till the oil is absorbed.
If the dough is sticky, sprinkle approximately 1/4 teaspoon wheat flour (or more if needed) on the dough and knead again to form a dough that is not sticky. The dough should be supple and soft.
Cover the dough and set aside for 15-20 minutes.
Making parathas
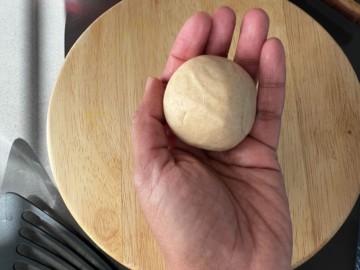
Pull a small piece approximately the size of a golf ball from the dough. Place the piece between the palms of your hands and shape them into a ball. Flatten the ball and cover both sides with flour.
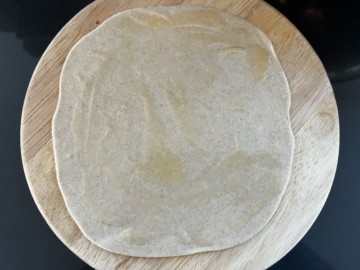
Roll out the flattened ball into a circular shape (approximately 6 inches in diameter).
Rolling parathas
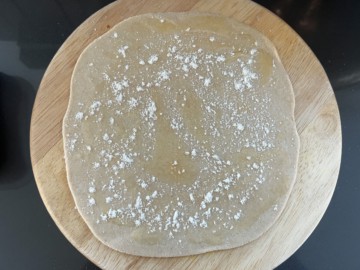
Smear the surface of the rolled-out dough with ghee.
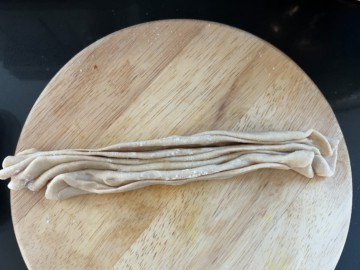
Sprinkle some flour evenly then begin to pleat the paratha.
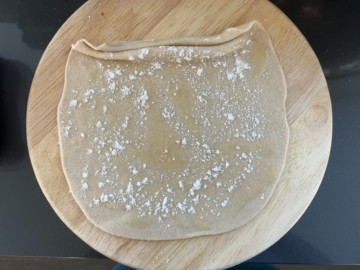
Pleat the rolled out paratha into a fan.
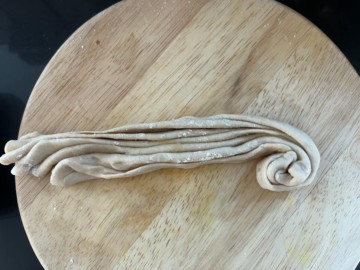
Roll the fan inward into a coil.
Once you reach the end, pull the edge and tuck it under the coil.
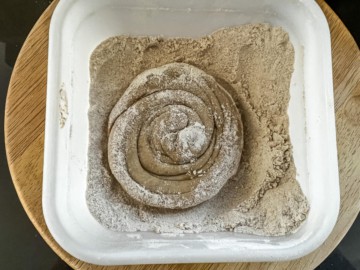
Flatten the coil until it looks like a disc.
Dip the flattened disc in the flour.
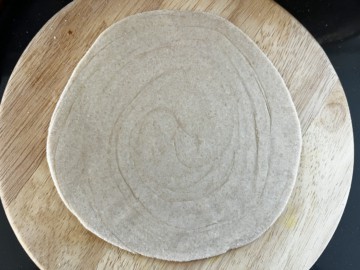
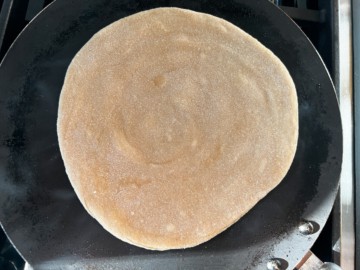
Roll out the flattened ball evenly into a circular shape (approximately 7-8 inches in diameter). Dust more flour as needed to help with the rolling.
Cooking paratha
Heat a pan / tawa over medium-high heat.
Dust off excess flour from the paratha by placing it on your palm of one hand and then flip it on the palm of your other hand. Repeat this process 3-4 times.
Place the paratha in the hot pan. Cook the paratha until small bumps form on the surface (approximately 1-2 minutes).
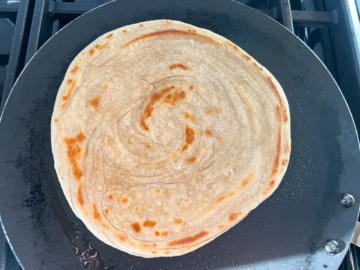
Flip the paratha onto the other side. Cook for 30-40 seconds or so until you see brown spots. Smear it with ghee and flip it.
Cook for 20-30 seconds, then brush the side facing up with ghee. Use a spatula to press down the paratha so that it evenly cooks.
Flip it and cook it for another 15-20 seconds while pressing the paratha down with the spatula.
Transfer the paratha to a plate lined with paper towels. Repeat this process for the rest of the dough.
Serve it hot with dal, vegetable or chicken curry.
Notes
To fasten up the process, roll out the next paratha as one cooks in the pan.
Make sure to dust off the excess flour from the paratha before you cook it. This prevents the paratha from getting hard.
Before storing it in an air-tight container, let the paratha cool down a bit so as not to make it soggy.