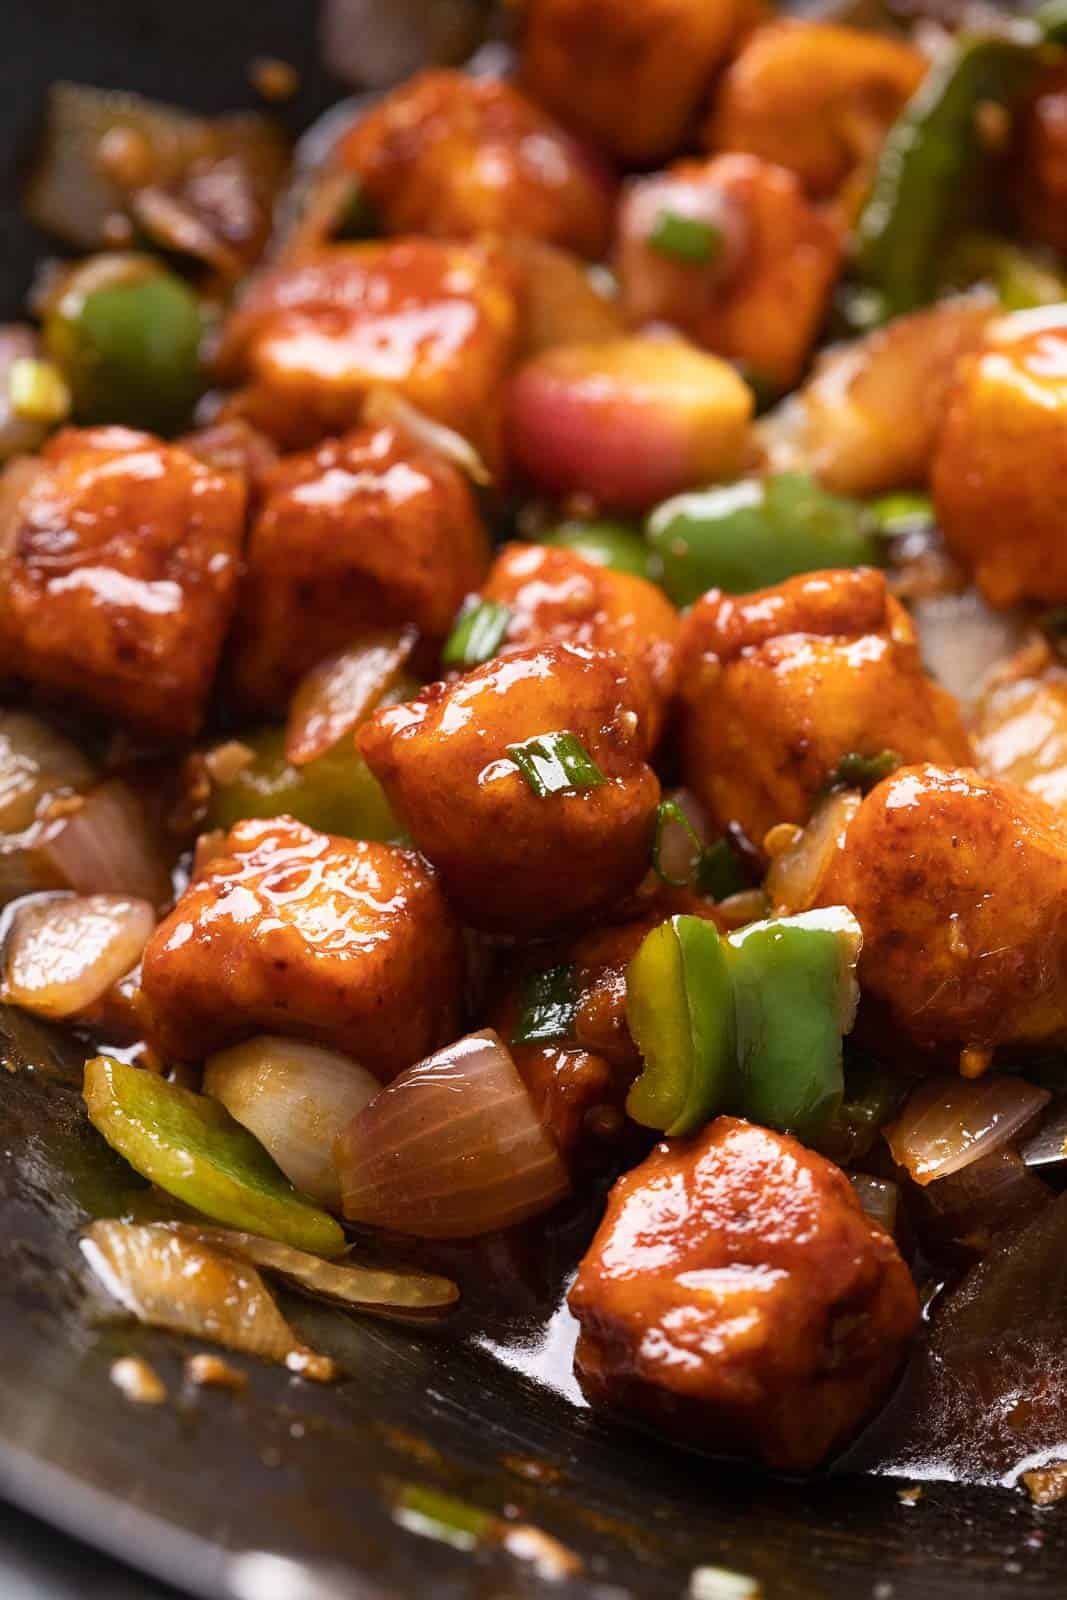
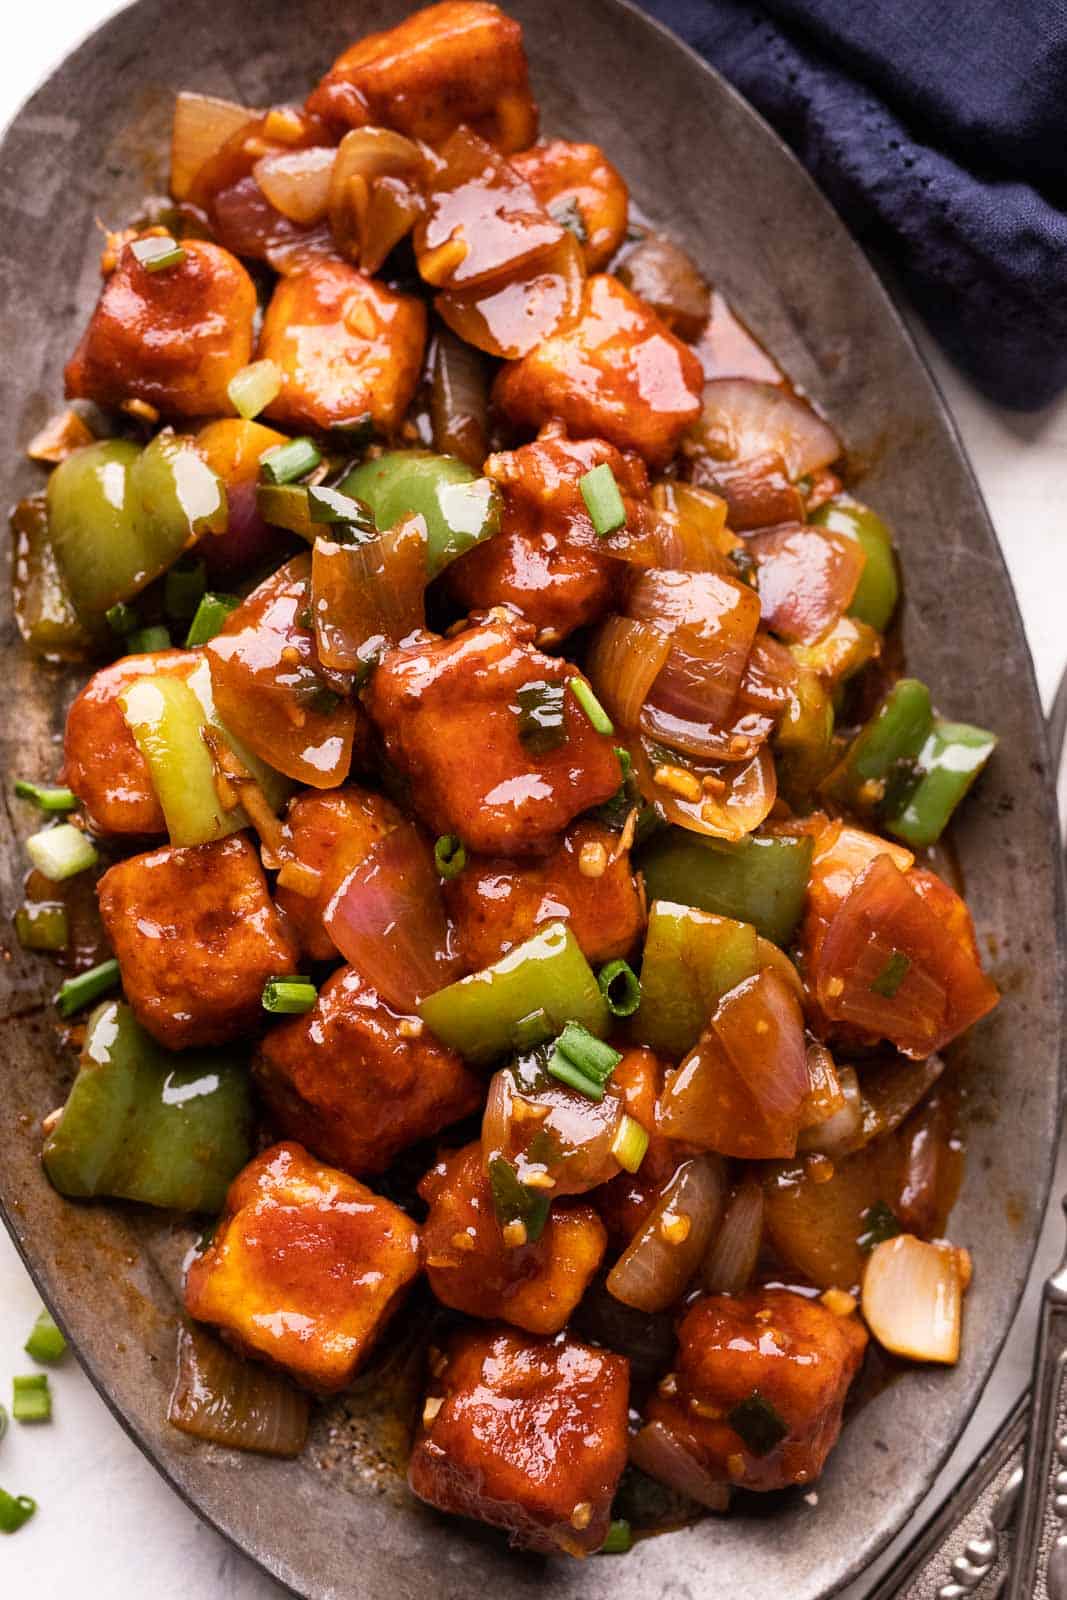
Crispy Honey Chilli Potatoes
Crispy Honey Chilli Potatoes are a super addictive snack – fried chilli potato fingers are tossed in a sesame honey chilli sauce that’s sweet and spicy and will give you sticky fingers that you’ll be licking clean!

Let’s just say we ate these straight from the wok.
If you have ever eaten honey chilli potatoes, what really stands out is how crisp these potatoes are, in spite of being tossed in the sauce. They retain their signature crunch and that’s really what this recipe is all about.
I really went all out to achieve that texture and taste but without all the excess oil, so hello to the crispiest honey chilli potatoes made healthier in the air fryer! But don’t worry, this does not the change the texture at all; everything’s still crispy, crunchy, but it’s sooo much healthier that you’ll want to eat it all the time!
Jump To section: Crispy Honey Chilli Potatoes
The Secret To Crispy Potatoes
The key to making super crispy honey chilli potatoes is to air fry the potato fingers twice. Air frying or deep frying them only once results in potatoes that don’t hold their shape and get soggy after a few minutes.
So the potatoes are first coated in a dry mixture, air fried or deep fried till they are almost cooked and then cooled for a bit. They are then coated in a second coating of batter and fried again till they are really crisp outside and cooked perfectly inside. This is a similar technique that a lot of people use to make French fries.
The last step is to coat them in a sesame honey chilli sauce that adds an extra layer of texture and is sweet and spicy.
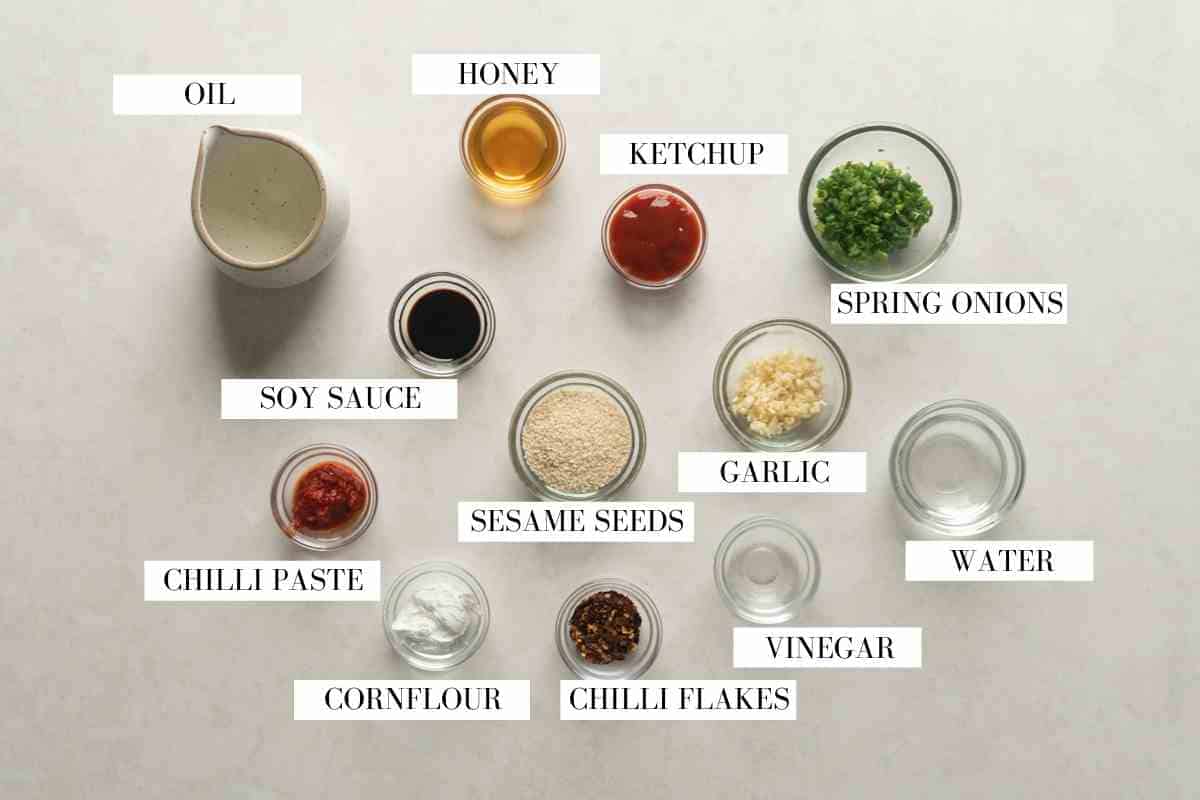
Ingredients for Chilli Potatoes
Here’s what you’ll need for batter frying these potatoes:
- Potatoes: Use old potatoes. Cut into 1/3 inch thickness, approx 2-3 inches long. Ideally cut them all the same size so they cook at the same time
- Chilli Paste: Basically ground chillies made by soaking dried red chillies in hot water for 10-15 minutes and grinding to a paste
- Chilli Powder: Ground red chilli powder, different from ‘chili powder’ that you get in the U.S. which is a seasoning mix
The honey chilli sauce is really addictive. Its sweet, spicy, sticky and like a coating on the potatoes.
- Garlic: Finely chopped – lots of it because flavour bomb!
- Honey: Plain honey, flavoured will not work well here
- Ketchup: It has the perfect balance and umami
- Soy sauce: Light soy sauce to add saltiness and rich flavour
- Chilli Paste and Chilli Flakes: To pack in some heat. If you are not a fan, reduce both the quantities in the sauce
- Sesame Seeds: They add flavour and crunch and stick to the potatoes because of the sauce
- Cornflour: Thickening agent. You can substitute with potato starch or tapioca starch
- Vinegar: To add some acidity and balance
Richa’s Top Tips
- It’s important to cut the potato fingers into a uniform size so that they cook evenly while frying. I like to cut them into 1/4 inch to 1/3 inch thickness
- The temperature of the oil should be between 175C to 180C for frying the potato fingers.
- You will need approximately two cups oil for deep frying, and you can use the same oil for the second frying
- You may adjust the quantity of honey as per your taste.
- A wok is the best way to coat the potatoes in sauce, because it provides enough space to toss them around, but if you don’t have one, feel free to use a frying pan
Serving Ideas
Honey Chilli Potatoes make an incredibly addictive Indo-Chinese appetizer, but they’re also super versatile. Here are a few ways to enjoy them:
- As a Party Starter: Serve them hot, straight from the wok, as part of your Indo-Chinese spread.
- With Fried Rice or Noodles: Pair with Veg Fried Rice, Hakka Noodles, or even Schezwan Rice for a restaurant-style combo.
- Loaded Lettuce Cups: Spoon the crispy potatoes into crunchy lettuce leaves for a fun bite-sized party snack.
- Wrap or Roll: Stuff into a tortilla or roti with some extra sauce and spring onions for an easy fusion wrap.

Once you try making these crispy honey chilli potatoes at home, there’s no going back! I have made these as snack for the family, as a party appetiser, as well as a side dish. And let me tell you, each time they’ve disappeared within minutes!
If you make this dish, don’t forget to send me pictures over on my IG @my_foodstory. I love seeing you guys make my recipe!
Watch the Recipe Video:
LOVE THIS RECIPE? Subscribe to my newsletter and be the first to receive all new recipes!

Crispy Honey Chilli Potatoes
Ingredients
- 4-5 Potatoes 450 grams, peeled and cut into fingers (1/3-1/2 inch thick, 2 -3 inches long), refer to Note 1
- Oil for brushing/deep frying refer to Note 2
First Coating:
- 2 teaspoon Chilli powder
- 1 teaspoon Garlic Paste
- 1 teaspoon Red Chilli Paste
- 3 tablespoon Corn Flour
- 3 tablespoon All Purpose Flour
- 1 tablespoon Salt
Second Coating:
- ⅓ cup All Purpose Flour
- ⅓ cup Corn Flour
- ¼ teaspoon Black Pepper
- ¼ cup Water
For the Sauce:
- 2 tablespoon Oil
- 1 tablespoon Garlic finely chopped
- 1 teaspoon Red Chilli Flakes
- 3 tablespoon White Sesame Seeds
- 1 teaspoon Vinegar
- 2 teaspoons Soy Sauce
- 2 tablespoon Tomato Ketchup
- 2-3 tablespoons Honey
- 2 teaspoons Red Chilli Paste
- 1/4 cup Water
- 1 teaspoon Corn Flour
- 2 tablespoon Spring Onion chopped (green part only)
Instructions
Prepping
- Wash potato fingers well in running water and set aside. This removes any extra starch in the potatoes.
First coating
- Mix together corn flour, all purpose flour, chilli powder, chilli paste and salt. Coat the potato fingers evenly with this flour mix.
First frying of potato fingers
For deep frying
- Heat oil in a wok or karahi and deep fry the potato fingers in batches till the potato is half cooked. It’s important that you drop one potato finger at a time into the oil so they don’t stick together (watch video above to see how to do this). Remove potato fingers on a tissue lined plate and let them cool.
For air frying
- Preheat the air fryer at 180C, brush the air fryer mesh with oil, place potato fingers on the mesh with some gap between them so they do not stick together (watch video to know how to do this). Brush with oil and air fry for 4 minutes just until they are half cooked. Transfer to a plate and repeat the same for the rest of the potato fingers.
For second coating
- Make a medium thick batter with all purpose flour, corn flour and pepper powder by adding just a few tablespoons of water to make a thick batter. Add the half done fries and gently toss so the fries are coated with the batter.
Second frying of potato fingers
For deep frying
- Heat oil in a wok or karahi and deep fry the potato fingers in hot oil till crisp and golden. Drain on kitchen paper and keep aside.
For air frying
- Brush the air fryer mesh with oil, place the potato fingers on the mesh with some gap in between so they do not stick together. Brush with oil and air fry at 200 C for 6 minutes, flip once and air fry at 200C for 2 minutes till they turn golden and crisp. Transfer to a plate and repeat the same for the rest of the potato fingers.(important to note that the air fried potato fingers must be used immediately in the stir fry and served hot as they tend to turn soggy & chewy later)
Honey chilli stir fry
- Heat 2 tablespoons of oil in another wok, add chopped garlic and stir fry for a few seconds. Add chili flakes, sesame seeds and saute for another minute to toast them. Add vinegar, soy sauce, ketchup, honey and the red chilli paste and stir together.
- Mix 1 teaspoon corn flour with 1/4 cup water to make a slurry and add this to the honey- vinegar mixture in the wok and stir for a few seconds till it thickens.
- Add the fried potato fingers and spring onion greens and toss together so that they are coated evenly in sauce.
- Switch off the flame and serve immediately garnished with some more sesame seeds and spring onion greens.
Video
Notes
- It’s important to cut the potato fingers in a uniform size so they cook evenly while frying.
- The temperature of the oil should be between 165C to 175C for frying the potato fingers.
- You will need approximately two cups oil for deep frying, and you can use the same oil for the second frying
- You may adjust the quantity of honey as per your taste.
- air fried potato fingers must be used immediately in the stir fry and served hot as they tend to turn soggy & chewy later.
- A wok is the best way to coat the potatoes in sauce, because it provides enough space to toss them around, but if you don’t have one, feel free to use a frying pan.
Nutrition
This article was researched and written by Urvi Dalal.
The post Crispy Honey Chilli Potatoes appeared first on My Food Story.