Eggless cashew pound cake is a soft, buttery cake made without eggs and it comes together beautifully with just a handful of basic ingredients. Every slice gives you that rich, nutty flavour and you can enjoy this treat any time of the day. Whether you're serving it with a cup of tea as an evening...
Bread Omelette is basically toasted bread covered with a simple spiced egg mix, and the flavors come together nicely when it gets toasted until golden on both sides. This dish has soft eggs and slightly crisp bread, so the texture itself feels satisfying. The spices are mild making it an ideal breakfast recipe. Bread and eggs are a winning combo and this one is no exception.
Bread Omelette is one of those easy breakfast dishes I end up making when I want something filling but really don't have much time to think what to cook. I mostly make this for a quick breakfast or even sometimes for evening snack, especially when someone wants something warm and tasty immediately.
[feast_advanced_jump_to]
About Bread Omelette
Bread Omelette is one of the oldest street-style snacks you will find in many places, and each shop has its own variations. The base idea is simple where eggs are beaten with onions, green chilies and spices, bread slices are dipped into this and cooked together. The bread absorbs the egg mixture and you get a soft inside and light toasted outside.
Bread Omelette always reminds me of train journeys as I love bread omlette served in the Indian Railways and should admit I look forward to day train journeys just for the sake of this dish. I make it when hungry in between meals or when we want a quick breakfast. It always turns out quite satisfying.
The taste also depends on how you like your omelette to be. Some people add more onion to make it bit crunchy, some keep it plain with only spices. The heat from pepper and chili gives a nice lift and the coriander leaves adds that fresh touch.
There are many ways people make this. You can toast the bread first and then sandwich the omelette, add little cheese on top, or even mix small pieces of capsicum or tomato into the egg. You can also make a bigger one by joining few bread slices like they do in shops. Each version has its own nice taste.
Bread Omelette Ingredients
Bread slices - I used white bread, you can use wheat bread or milk bread also, both works almost the same.
Eggs - I added two eggs as it gives enough mixture to cover the bread properly and keeps the omelette soft and fluffy. You can add one more egg if you feel it is coming bit thin.
Red chilli powder - I am using this for giving small spicy taste and little color. You can adjust it how much heat you want.
Garam masala - I added a pinch mainly for flavor, it blends well with onion and egg. You can skip also if you like very simple taste.
Turmeric powder - I used just a tiny pinch, it gives warm color and light earthy taste, and the omelette looks more bright too.
Pepper powder - I added this for heat which suits egg recipes very well. If you like pepper flavor more, you can add a bit extra also.
Onion - I used finely chopped onion as it gives small crunch and mild sweetness once cooked.
Green chilli - I added one green chilli for extra heat. You can skip if making for kids or if you don't want too much spice.
Coriander leaves - I have used little chopped coriander for fresh smell and flavor. It makes the omelette feel more light.
Oil - I used to cook the omelette and toast the bread even. You can use ghee also if you want richer taste.
1.Break open 2 eggs in a mixing bowl, then add all the spice powders along with required salt. Then add chopped onion.
2.Add finely chopped green chilies and coriander leaves to it. Mix it well with a spoon. Beat it for few seconds.
3.Heat a pan with oil,when it is hot - pour the egg mixture on it. Tilt it so that the egg mixture is even on all the edges.
4.Take a bread slice dip in the egg then flip over and place it. Repeat this for the other egg too. So the dipped side should come on top. Drizzle oil.
5.Once it gets cooked on one side, flip over to other side, press it with the ladle. Cook for 2 minutes then flip over and serve.
Serve hot!
Expert Tips
Beat well - First beat the eggs for few seconds so they become light and mix evenly with onions and spices.
Cook on medium flame - I have seen cooking on medium flame makes the omelette cook properly without burning the bread edges.
Flip slowly -Flip the omelette gently because the egg mixture will be soft at first and may tear if done fast.
Add extra pepper - I have tried adding little more pepper sometimes, and it gives a strong nice flavor which suits bread omelette well.
Cheese option - I sometimes place a small cheese slice on top, and it melts inside making the whole omelette more filling and tasty.
Serving and Storage
Serve this hot with chopped onions, coriander leaves or even little ketchup if you prefer. It goes well with tea or even as a quick meal by itself. This recipe tastes best served immediately. I don't recommend storing leftovers.
FAQS
1.Can I add in vegetables?
Yes you can add small pieces of capsicum or tomato also.
2.Can I skip green chil4lies?
Yes you can leave it out if you want a milder omelette.
3.Will cheese taste good in this?
Yes cheese melts well and makes it richer.
4.Can I make without onions?
You can make plain omelette too, but onions add good flavor.
5.Which bread works best?
Any regular bread works, but slightly firm slices toast better.
If you have any more questions about this Bread Omelette Recipe do mail me at sharmispassions@gmail.com. In addition, follow me on Instagram, Facebook, Pinterest ,Youtube and Twitter .
Tried this Bread Omelette Recipe? Do let me know how you liked it. Also tag us on Instagram @sharmispassions and hash tag it on #sharmispassions.
Bread Omelette is basically toasted bread covered with a simple spiced egg mix, and the flavors come together nicely when it gets toasted until golden on both sides. This dish has soft eggs and slightly crisp bread, so the texture itself feels satisfying. The spices are mild making it an ideal breakfast recipe. Bread and eggs are a winning combo and this one is no exception.
These high protein breakfast without eggs are perfect for you If you’re trying to eat more protein at breakfast but don’t enjoy eggs or can’t eat them. I am sharing these 21 Egg-Free breakfast Ideas to Keep You Full All Morning till lunch.
As a nutritionist, I get this question a lot: “What can I eat for breakfast that’s high in protein without eggs?” The good news is you do not need eggs to hit your morning protein goals. Greek yogurt, cottage cheese, tofu, lentils, beans, chia seeds, oats, nuts, and seeds can all give you a solid protein base to keep you full and fulfil your protein goal for the day.
In this post, I’m sharing 21+ high protein breakfast without eggs you can actually make and enjoy. Many of them are make ahead recipes from my blog, so you can batch cook/prep once and eat all week. Most of these land in the 20–30 g protein range when you build them right, and they’re perfect for busy mornings, weight-loss friendly meal prep, or simply staying full till lunch.
Why a High Protein, Egg-Free Breakfast Works So Well
Starting your day with enough protein can:
Keep you full longer and reduce mid morning snacking
Support muscle recovery and maintenance
Steady energy and fewer blood sugar crashes
Make weight-loss and body composition goals easier to stick to
Most people do well aiming for 20–30 g protein at breakfast, depending on total daily needs. With the ideas below, you can easily hit your protein goal that without cracking a single egg.
Dairy, soy, lentils, beans, and seeds are all fantastic protein options that can be turned into both sweet and savory breakfasts.
What Counts as a High Protein Breakfast (No Eggs)?
How much protein should breakfast have?
For most people, a good goal is to aim for roughly 20–30 grams of protein at breakfast. You don’t have to hit this perfectly every single day, but having one “anchor meal” with a solid protein hit makes it much easier to reach your total daily protein target.
How to Build a High Protein Breakfast Without Eggs(Simple Formula)
Use this as a plug and play formula to build your breakfast without eggs and Include one ingredient from each category listed below.
Protein Base (15–25 g)
Greek yogurt, skyr, cottage cheese
Chia seeds, hemp seeds
Protein powder, tofu, tempeh
Chickpeas, lentils, beans
Slow Carbs (15–40 g)
Rolled oats, wholegrain toast, cooked grains
Fruit (banana, berries, apple, mango)
Healthy Fats (5–15 g)
Nuts, nut butter, seeds, Avocado
Flavour & Texture
Spices (cinnamon, cardamom, smoked paprika)
Cocoa, matcha, coffee
Crunchy toppings (granola, seeds, toasted nuts)
All the recipe ideas below follow this basic pattern.
Example Combos
Greek Yogurt Power Bowl Greek yogurt + overnight oats base + berries + chia seeds + a sprinkle of nuts.
Toasted Savory Plate Cottage cheese + avocado on wholegrain toast + side of cherry tomatoes and cucumbers.
Smoothie + Side Protein smoothie + a slice of peanut butter toast or a small handful of nuts.
Star Ingredients for high Protein Breakfast without Eggs
For an Egg Free high protein Breakfast these are the ingredients include again and again in my own breakfasts:
Greek yogurt / Skyr: thick, creamy, and naturally high in protein.
Cottage cheese: blends beautifully into toasts, bowls, and spreads.
Tofu & tempeh: amazing for savory scrambles, stir-fries, and burrito-style fillings.
Lentils, chickpeas & beans: great in hashes, savory bowls, and sandwiches.
Edamame / soybeans: easy to toss into bowls and salads.
Quinoa: higher in protein than regular grains and works in both sweet and savory bowls.
Chia seeds & hemp seeds: small but mighty; a big boost to oats, puddings, and smoothies.
Protein powder (whey or plant-based): handy for smoothies, oats, and chia puddings.
When you mix one main protein Greek yogurt, cottage cheese, tofu, beans with fiber rich carbs and a bit of healthy fat, you get a breakfast that is satisfying, balanced, and egg-free.
High Protein No Eggs Breakfast Ideas
Below are egg-free breakfast ideas you can rotate through the week. Many of them link to full recipes on my blog, so you can just click through, make, and save.
Overnight Oats & Chia Pudding Jars (Grab-and-Go)
These are perfect for meal prep, and every jar can be tailored to your protein goals. High Protein overnight oats are perfect if you like to meal prep once and not think about breakfast for the next 3–5 days
Base Overnight Oats You Can Customize If you want one master formula you can flavor in 10 different ways, start here. It gives you the classic oats + milk + yogurt + chia base that you can turn high-protein with yogurt, nut butter, or protein powder. Guide: Overnight Oats Guide (Base Ratio + Variations)
1. High Protein Overnight Oats
This is your anchor recipe when you want a seriously filling breakfast. It’s packed with oats, Greek yogurt, chia seeds and seeds/nuts for extra crunch and staying power. High Protein Overnight Oats Recipe
Per serving: ~30 g protein | ~333 calories
Best for: Busy mornings, weight loss meal prep, post-workout breakfast
Use this as your core template for building other high protein overnight oats jars: oats + high protein dairy/plant yogurt + chia + seeds/nuts + fruit.
2. Apple Cinnamon Overnight Oats – MyTastyCurry
Layered oats, apple slices, pumpkin seeds and cinnamon that tastes like dessert but works beautifully for meal prep. Apple Cinnamon Overnight Oats
Per serving: ~16 g protein | ~351 calories
Boost the protein to 20 g+:
Stir in 2–3 tbsp Greek yogurt or
Add 1 tbsp peanut butter on top
3. Blueberry Banana Overnight Oats – MyTastyCurry
Classic creamy oats with banana and blueberries for antioxidants and natural sweetness. The base version is moderate protein, and you can easily bump it up.Blueberry Banana Overnight Oats
Per serving: ~13 g protein | ~314 calories
With Greek yogurt mixed in (as suggested in the post): up to ~18 g protein per serving
Tip: Turn this into a “power jar” by adding 1 tbsp hemp seeds (+3 g protein) or a scoop of your favourite protein powder.
4. Brown Sugar Overnight Oats
A cosy, dessert style overnight oats jar with a gentle molasses flavour from brown sugar and a good hit of fibre. Brown Sugar Overnight Oats
Per serving: ~10 g protein | ~248 calories
To push protein up:
Swap regular milk for high-protein milk (10 gm protein per 100ml)
Add 2–3 tbsp Greek yogurt before serving
1
High-Protein Overnight Oats
This High Protein Overnight Oats recipe is a nutrient-dense, 30 grams of protein per serving. protein-packed breakfast perfect for meal prep. Ideal for muscle gain, weight loss, or to simply stay full busy mornings, it offers slow-release carbs for sustained energy.
This easy apple cinnamon overnight oats recipe offers a healthy overnight oats option with delicious apple pie flavor—without the hassle of baking. As one of the best apple cinnamon overnight oats for busy mornings, it’s a no-cook breakfast that’s perfect for meal prep ideas.
blueberry banana overnight oats mix ripe banana, juicy blueberries, and a subtle cacao swirl for a creamy jar that hits antioxidants, fiber, and sweet-tooth cravings all without cooking.
Make brown sugar overnight oats with this nutrient-packed, meal prep breakfast perfect for busy mornings. This overnight oats recipe is an easy, quick breakfast with a creamy blend of oats, brown sugar, and cinnamon, balanced with fresh banana and crunchy toppings.
Whip up this antioxidant-rich mango-matcha chia pudding in 5 minutes! Vegan, dairy-free, high-protein option, meal-prep friendly & irresistibly tropical breakfast ready on the go.
Top with berries and a spoon of yogurt for extra volume without too many extra calories.
Chia seeds bring fiber + omega-3s, and when you pair them with enough protein, they make a fantastic egg-free breakfast.
DIY Idea: Greek Yogurt Power Jar
If you need something ultra quick, build a simple jar:
¾ cup plain Greek yogurt (2% or higher)
¼ cup granola or muesli
½ cup mixed berries
1 tbsp chia or hemp seeds
Approx. per jar: ~22–25 g protein | ~280–320 calories (depending on yogurt fat % and granola)
2. High Protein Breakfast Smoothies (No Eggs)
Smoothies are ideal when you don’t feel like chewing first thing in the morning.
9. Peanut Butter Coffee Oatmeal Smoothie
This is basically a breakfast + coffee + protein shake in one glass: oats, peanut butter, banana, dates, almond milk, hemp seeds and instant coffee.High-Protein Breakfast Smoothie Recipe
Per serving (recipe makes 2): ~10 g protein | ~296 calories
To turn this into a 20+ g protein smoothie, you can:
Add 1 scoop (20–25 g) of your favourite protein powder, or
Swap almond milk for high-protein soy milk and add 2 tbsp Greek yogurt when blending
9
Peanut Butter Coffee Oatmeal Smoothie
Peanut Butter Coffee Oatmeal Banana Smoothie! This high protein breakfast will keep you fueled and satisfied all morning.It’s a creamy, dreamy smoothie that combines the goodness of peanut butter, oatmeal, banana and coffee.
Start your day off right with this healthy and delicious vegan mango smoothie recipe. Made with coconut milk and high in protein, it’s the perfect high protein vegan breakfast option!
Approx. per serving: ~22–28 g protein | ~250–320 calories This combo is great when you want something very light to digest but high in protein.
Tip: For egg-free high protein smoothies, aim for:
1 scoop protein powder (20–25 g protein)
OR ¾–1 cup Greek yogurt
PLUS extras like chia, hemp seeds, or nut butter.
3. High Protein Toasts & Sandwiches (No Eggs)
Perfect for when you want something savoury and more meal-like than a smoothie these are for you.
10. High Protein Avocado Toast
This version of avocado toast adds cottage cheese + pistachio powder to give you a serious protein boost on top of sourdough. High Protein Avocado Toast
Per serving: ~15 g protein | ~387 calories
To push protein even higher:
Serve with an extra spoon of cottage cheese on the side, or
Use a higher protein bread (like sprouted grain or seeded bread)
Inspired by your Smashed Chickpeas Avocado Sandwich Recipe (chickpeas + avocado + spices on wholegrain bread):
½ cup chickpeas
¼ medium avocado
2 slices wholegrain bread
Approx. per sandwich: ~12–14 g protein | ~280–320 calories
For a 20 g protein target, serve with:
A side of Greek yogurt, or
Add 2 tbsp hummus or cottage cheese to the filling
13. Peanut Butter Blueberry Toast
Based on your peanut butter toast ideas:
1 slice wholegrain toast
1.5 tbsp peanut butter
¼ cup blueberries
Approx. per slice: ~8–10 g protein | ~200–230 calories
Have one slice plus a small latte/protein drink and you can easily hit 18–22 g protein at breakfast.
4. Putting It Together: Sample No Eggs High Protein Breakfast Plan
You can use these ideas to loosely structure your week. Here’s a simple High protein, no Egg Breakfast menu plan to show how macros might look:
Day 1
Breakfast: High Protein Overnight Oats
~30 g protein, ~333 calories
Coffee / tea as you like
Day 2
Breakfast: Strawberry Matcha Chia Pudding
~14 g protein, ~338 calories
Optional add-on: ½ cup Greek yogurt on the side
+8–10 g protein, +80–100 calories
Total: ~22–24 g protein, ~420–440 calories
Day 3
Breakfast: High Protein Avocado Toast
~15 g protein, ~387 calories
Add: 1 small glass of Peanut Butter Coffee Oatmeal Smoothie
+10 g protein, +296 calories
Total: ~25 g protein, ~680 calories perfect for a bigger, more “brunch-style” meal
You can easily rotate through and keep your breakfasts high protein, egg-free and interesting all week.
1–2 oat/chia jars
1 smoothie
1 toast or sandwich
FAQs About High Protein Breakfasts Without Eggs
What can I eat for breakfast with protein instead of eggs?
Use any of these protein bases: Greek yogurt, cottage cheese, tofu, tempeh, lentils, chickpeas, and protein powder. Turn them into overnight oats, chia puddings, smoothies, toasts, and bowls. All the recipes linked above are egg-free.
How do I get 30 g of protein for breakfast without eggs?
Are egg free high protein breakfasts good for weight loss?
They can be. Most of these recipes combine: High protein High fiber Moderate calories For weight loss, focus on single servings, avoid mindless extra toppings, and choose the lower-calorie options (like Brown Sugar Overnight Oats or Peanut Butter Blueberry Toast) on lighter days. For maintenance or muscle gain, simply add extra toast, smoothie, or toppings.
Can I build muscle without eating eggs at breakfast?
Absolutely. Total daily protein and strength training matter far more than whether your protein comes from eggs or from yogurt, tofu, lentils, and beans. Choose the sources you enjoy and can eat consistently.
Can I get enough protein without meat or eggs?
Yes. Dairy (if you use it), soy products, lentils, beans, nuts, seeds, and protein powders can easily help you reach your daily protein target, even on a vegetarian or vegan diet.
How far in advance can I meal prep these?
Overnight oats & chia pudding: 3–5 days in the fridge in sealed jars. Smoothies: Best fresh, but you can prep the ingredients in freezer packs. Toast/sandwich spreads: Avocado + chickpea mixes are best used within 1–2 days; keep them in an airtight container and assemble toast fresh.
If you want, you can now:
Pick 1–2 overnight oats recipes and 1 chia pudding from above,
Add 1 toast/sandwich recipe,
And rotate them through the week for a simple, egg-free high protein breakfast routine that’s already tested and measured on my blog.
If You like this recipe and made it Please rate the recipe. It helps us to reach more people. For the Latest updates Subscribe to Rekha’s Whatsapp. You can follow me onInstagram, Facebook, Youtube, Pinterestfor more food inspirations.
Coconut sambar is a simple delicious and comforting sambar made with cooked dal, a mix of vegetables, fresh coconut paste and a flavourful tempering. The addition of coconut gives the sambar a creamy, rich texture and a mild sweetness. This sambar perfectly pairs with tiffin items like idli, dosai, pongal, medu vadai or can be...
If you love idlis and dosas but want to make them a little more nourishing, this Ragi Idli Dosa Batter is the perfect place to start; simple, healthy, and absolutely delicious.
Starting your day with a plate of soft idlis or crispy dosas fresh off the pan is 100% guarantee of a wonderful day ahead. This Ragi Idli Dosa Batter recipe will only add a lil more to the same joy. It’s packed with all the wholesome goodness of finger millet that gives the idlis and dosas a little health and flavor boost.
If you’ve loved our Idli Dosa Batter recipe before, this version will feel like the healthier cousin that’s just as easy to make. Ragi, or finger millet, is rich in calcium, iron, and fibre, making every bite nourishing and satisfying.
This Ragi Idli Dosa batter recipe calls for simple, pantry-staple ingredients. Here’s everything you’ll need:
Ragi (Finger Millet): The star of this recipe. Gives the batter its earthy flavour and a big nutritional boost with calcium, iron, and fibre.
Idli Rice: The base of the batter. I have used idli rice, basically parboiled short grain rice, as its higher starch content delivers great results. But any short grain rice variety such as sona masoori or kollam will work in a pinch too.
Urad Dal: Makes the batter light, creamy, and airy.
Poha (Flattened Rice): Keeps the batter light and helps make crisp dosas.
Fenugreek Seeds (Methi): Aids the fermentation process and adds to the taste too. A little goes a long way.
Ice cubes/Ice cold water: To prevent the batter from heating up when grinding.
What is Ragi & What Are The Benefits of Ragi?
Ragi is also known as finger millet and it is a nutritious gluten-free cereal grain rich in fiber, protein, calcium, and iron. Because of its high fibre content and low glycaemic index, benefits of ragi include aiding digestion, promoting bone health, managing weight and blood sugar, and improving your skin and hair.
How to Make Idli Dosa Batter
The process of making idli dosa batter takes about 20 minutes over a day. Yes thats all!! Here’s the timeline that you can follow.
DAY 1 (Morning) – Washing and Soaking
In the morning, you need to wash and soak the ragi, rice and lentils. While it’s a pretty straightforward process, here are some tips I find helpful:
When washing the ragi, rice and lentils, rub them between your fingers as you wash, and rinse in clean water 3-4 times till the water starts running almost clean. Doing so helps get rid of dust, impurities, and excess starch from the rice.
Soak the ragi, rice and lentils in clean water. They should be completely submerged and have at least an inch of water over them. Soaking the lentils makes it easy to grind and makes the batter nice and fluffy which is very essential for the texture.
DAY 1 (Evening) – Grinding, Fermenting
In the evening, it’s time to grind the ragi, rice and lentils to make the batter. To do so:
Drain the excess water, transfer to a mixer jar, and grind. Using a mixer grinder can heat up the batter, which affects the flavour. Use ice cold water to prevent overheating and maintain the desired temperature.
The consistency should be such that it leaves a thick coat on the back of a spoon and falls in a ribbon like consistency when poured with a ladle. The ground batter should feel very slightly gritty between your fingers.
Pour the batter into a bowl that’s large enough so that there is room for the batter to rise. Mix the batter with clean hands as shown in the video – this is an important step as it helps in the fermentation so please don’t skip it.
Cover the bowl and set aside to ferment. Leave it in a warm, dry place away from direct sunlight to ferment. Fermentation takes anywhere between 12-24 hours depending on the humidity and temperature at your place. The warmer it is, the faster it’ll ferment.
DAY 2 (Morning) – Using or Storing
The next morning or after, the batter should have increased by almost 1.5 times, and that’s how you know it’s fermented and ready for use. If you follow the exact measurements of this recipe, you should have approx 1.75 litres (6-7 cups) of idli and dosa batter -1 cup batter makes 6-7 idlis or 4-6 dosas depending on the size.
How To Tell If The Batter Is Fermented
The batter will expand and almost double in size as it ferments.
When you mix the batter, you should be able to see tiny air bubbles in the batter (watch the video to see how fermented batter looks). It should look and feel frothy and airy
The batter should smell mildly yeasty or sour
If the batter smells very sour or smells bad, then it may have over fermented or gone bad. Unfortunately, there’s no coming back from this, so make sure the batter doesn’t get over fermented!
Which is The Best Blender to Grind Ragi Dosa Batter
If you make idlis and dosas frequently, I highly recommend using an electrical wet grinder which produces a light, fluffy batter without heating it up. The disadvantage is that they take up more counter space and are quite big and bulky.
Richa Recommends
I use a blender and mixer grinder at home and my favourite is the Sujata Dynamix Mixer Grinder. The disadvantage of using a mixer grinder is that it heats up the batter as it grinds, which is not ideal. To keep the batter from heating up, I use ice cold water while grinding.
Frequently Asked Questions
Is ragi dosa healthier than regular dosa?
Yes, it is! Ragi is packed with calcium, iron, and fibre, which makes it more nutrient-dense than traditional rice-based dosa. It’s also gluten-free and helps keep you fuller for longer.
Can I make ragi dosa without fermenting the batter?
Technically, yes. You can make an instant version by adding curd and a pinch of baking soda to the batter. However, fermenting naturally gives it a softer texture, better flavour, and that classic dosa rise.
Why didn’t my batter ferment properly?
Fermentation depends on warmth. If your kitchen is too cold, keep the bowl near a warm appliance or wrap it in a thick towel. You can also preheat your oven for a minute, switch it off, and let the batter rest inside overnight.
Can I use ragi flour instead of whole ragi?
Yes, but the texture will be slightly different. Whole ragi grains give a more natural, slightly coarse texture. If using flour, mix it with urad dal and rice batter for better consistency.
Top Tips to make the best Ragi Idlis & Dosas
Add salt later: Only salt the portion you plan to use immediately. This keeps the rest of the batter from turning too sour while stored.
Soak everything well: Give the ragi, rice, and dal enough time to soak. This helps them grind smoothly and ensures the batter ferments properly.
Use cold water while grinding: Adding ice cubes or chilled water prevents the batter from heating up, which can slow down fermentation and affect flavour.
Mix with your hands: Don’t skip this step! Mixing the batter by hand helps kickstart fermentation and gives the batter that light, airy texture.
Watch the consistency: The batter should be thick but pourable, it should coat the back of a spoon and fall in ribbons when lifted.
How to Make Ragi Idlis
Step 1: Once your batter has fermented and doubled in volume, take the portion you’ll use and add ½ teaspoon salt just before steaming.
Step 2: Grease your idli plate with a little oil (or ghee), which helps the idlis demould easily.
Step 3: Pour the batter into the molds, filling them just shy of the rim (the batter will rise a little more during cooking).
Step 4: Steam on medium heat for about 10 minutes until a toothpick inserted in the centre comes out clean. Over-steaming makes ragi idlis dry.
Step 5: Let the idlis rest in the steamer for 2 minutes with the lid on, then cool for another 2-3 minutes before removing them gently with a spoon.
Tip: If the batter is slightly sour, skip adding sugar at this stage. If it tastes flat, a tiny pinch of sugar helps the idlis rise better and improve flavour.
How to Make Ragi Dosas
Step 1: Using chilled batter helps you spread the dosa thin and crisp. So make sure it’s either cold or room temperature, avoid using hot temperature batter.
Step 2: Heat your non-stick pan or seasoned cast iron tawa until water droplets sizzle and evaporate instantly. That’s your cue.
Step 3: Pour a ladle of batter onto the centre of the pan and spread in circular motion (for a thin dosa) or keep thicker for soft-roast style. Drizzle a teaspoon of oil or ghee around the edges.
Step 4: For a crisp edge keep heat on medium-high, cook for 30 seconds with lid, then another minute uncovered. For a softer version: cook on medium heat, cover for 30 seconds, then finish without flipping.Step 5: Flip once and cook for 30 seconds if you prefer it both sides roasted; otherwise, keep it single-sided for maximum crisp.
Tip: Serve immediately with chutney or sambar. Do not wait, as ragi dosas lose their crispness if left too long.
Equipments To Make Ragi Idlis & Dosas
For Idlis: You can make idlis in an idli stand in a regular Idli steamer. Alternatively, you can also place the idli stand inside a pressure cooker without using the whistle. If you don’t have an Idli stand – no worries! You can make idlis in greased steel tumblers that can withstand high heat!
For Dosas: A well-seasoned cast iron tawa or pan is the best for making dosas. A cast iron tawa will last you a lifetime, but keep it exclusively for making dosas and uttapams. A non-stick tawa is an easier alternative. I prefer the cast iron tawa because it heats up evenly, it stays hot for longer and the dosas come out extra crispy. Non-stick pans tend to overheat faster and spreading the dosas can become difficult after a while.
Recipes with Ragi Idli Dosa Batter
Dhokla
Idli
Dosa
Appe / Paniyaram
Mysore Masala
Uttapam
Dosa Waffle
Schezwan Idli Fry
Storage Tips
Fridge: Store unsalted ragi idli dosa batter in a clean, airtight container for up to 3–4 days. When ready to use, take out only what you need and add salt before making idlis or dosas.
Freezer: The batter can be frozen for up to a month. Portion it into smaller airtight containers or silicone trays so you can thaw just what you need. Let it defrost overnight in the fridge before using.
Room Temperature: Once fermented, avoid leaving the batter out for more than a few hours. Warm weather can cause it to over-ferment and turn too sour.
Serving Ideas
This ragi idli dosa batter gives you endless breakfast (or dinner) options, it’s light, wholesome, and goes beautifully with a variety of sides. Here are some ideas to get you started:
Recipes to try:Idli, Ragi Dosa, Appe / Paniyaram, Mysore Masala Dosa, Dosa Waffles etc.
With Coconut Chutney: A classic combo that never fails. Try our Coconut Chutney for that perfect creamy, nutty balance.
With Sambar: Pair your hot idlis or crisp dosas with a bowl of Homemade Sambar for a hearty, protein-packed meal.
With Tomato Chutney: Add a tangy twist with Tomato Chutney, it’s slightly spicy and brightens up every bite.
Ragi Idli Dosa Batter is now one of the regular recipes that has become part of my kitchen. It’s wholesome, light, and gives you that comfort of a homemade South Indian breakfast, but with a healthy twist.
If you’re already a fan of classic Idli Dosa Batter, this version is the perfect next step. Tried it out? Tag me on Instagram @my_foodstory, I’d love to see your breakfast table!
Wash & soak ragi, idli rice, urad dal, poha, fenugreek seeds in enough water in a bowl so that there is at least an inch of extra water over the rice and dal. Soak for 8 hours.
Day 1 evening
Once the grains have soaked for 8 hours, drain the excess water from the bowl.
Grind till almost smooth with approx. 1 cup of water and 4-5 ice cubes in a mixer grinder. Add additional water if required. The consistency should be such that it can leave a thick coat on the back of a spoon and falls in a ribbon like consistency when poured with a ladle. The ground batter should feel very slightly gritty between your fingers.
Pour the batter into a bowl that’s large enough so that there is room for the batter to rise. Mix the batter with clean hands as shown in the video – this is an important step as it helps in the fermentation, so please don’t skip it.
Cover the bowl and set aside to ferment. Leave it in a warm, dry place away from direct sunlight to ferment. Fermentation takes anywhere between 12-24 hours depending on the humidity and temperature at your place. The warmer it is, the faster it’ll ferment.
Day 2 – morning
Once fermented, the batter should have become almost 1 ½ times its size with a slight dome shape and a wrinkle, bubbly layer on top. You should be able to smell a little sourness in the batter. This smell means it has fermented. If it is too sour, it has fermented too much! You can use a spoon to check the batter – the texture should be frothy with air bubbles.
Take out 2 cups of batter in a bowl, add ½ teaspoon of salt and make idlis, dosa etc.
Making Idlis
Heat water in an idli steamer and bring to a boil. Grease the idli plate with oil or ghee so its easier to demould the idlis.
Only once the water in the steamer comes to a roaring boil, pour batter into the idli mould and fill them up almost to the top (as shown in the video)
Place the idli mould in the steamer and steam on medium for 10 minutes till the idlis are cooked. To check doneness, insert a toothpick in the centre of idlis and it should come out clean.
Let the idlis rest in the steamer for 2 minutes, then take it out and let it cool for another 2-3 minutes. Use a spoon or butter knife to demould idlis from the idli plate.
Making dosas
Take 1 cup of batter in a bowl, add ⅛ teaspoon salt, ⅛ teaspoon sugar and mix well.
Heat a non-stick pan or seasoned cast iron dosa tawa over medium heat. Once hot, reduce the heat to low & pour one ladle of dosa batter and pour in the center of the tawa. Spread by using the back of the ladle, moving it in concentric circles to form a big round dosa.
Increase the heat to medium, drizzle a spoon of oil or ghee around the edges and in the center, cover with lid & cook for 30 seconds.
Remove the lid and let this roast for 1-2 minutes till golden brown on medium. Flip it over and roast for 30 seconds. Flip it back, fold and serve hot.
Follow the same steps for making the rest of the dosas.
Video
Notes
Ice cubes are added to avoid the batter from getting too hot while grinding.
Batter should be thick & fall in ribbons without being too runny.
Salt to be added to the quantity of batter you are using to avoid the batter getting too sour.
If you are not using all of the batter, store the remaining unsalted batter in an air tight container in the fridge for up to 3 days or freeze the batter for up to a month.
Do not over steam the idlis as they become dry & hard.
Demoulding idlis easier, if they are cooled for a few minutes.
To check if the pan is hot enough to make dosa, sprinkle a few drops of water over the tawa & if it is ready, it should sizzle.
For best results, dosa should be fried on medium heat.
Makhana Paratha is a soft and mild paratha that I make by adding roasted and grind makhana to regular wheat flour dough. It has nice mild crunch from makhana and gives a different texture compared to usual plain parathas. This paratha is simple to prepare and feels both healthy and tasty at the same time. Makhana paratha could be relished for breakfast, dinner & as snack and a good idea for lunch box.
The flavor is warm and light with small hint of spice. I like to have it with chutney, pickle or just a cup of tea in morning. It's good choice for breakfast, lunch or even quick dinner because it cooks so fast. I like how makhana makes it filling but not heavy, so it feel nice and comforting to eat even on busy days.
[feast_advanced_jump_to]
About Makhana Paratha
Makhana Paratha has mild flavor with a mix of simple spices and it tastes soo good without being heavy. It feels filling yet light, nice to have any time of the day. You can have it for breakfast, lunch or even quick dinner. The paratha turns little golden brown when roasted on tawa with ghee, giving that nice homemade smell.
The dough has turmeric, red chili powder and roasted cumin which gives good flavor but not too spicy. I add some coriander also, it gives freshness and small color to it. You can also make this as base and boiled potatoes filling to this in aloo paratha version.
This paratha recipe is also healthy because makhana is full of protein and easy to digest. When mixed with wheat it becomes more filling yet stays light on stomach. It keeps you full for long so it is good for breakfast or travel food also. You can pack it for lunch box or serve hot with curd or pickle.
I usually make this whenever I am craving something tasty and healthy. I like to serve it hot with a spoon of my homemade pickle and little chilled curd on the side.
Though makhana's flavor was very mild that I could hardly find out any difference, the parathas were very soft. I am buying phool makhana (lotus seeds) often these days as mittu has started to like it, she loves to munch on ghee roasted makhana with a drizzle of chat masala powder, perfect snack for evenings.
Makhana Paratha Ingredients
Wheat flour - It is base for the dough. It gives soft texture and helps parathas stay soft. You can use also use maida if you want.
Phool makhana - I roast the makhana till crisp and grind to fine powder, it adds a nutty flavor to the paratha.
Spice powders - I just used turmeric, red chili and cumin powder for color, spice and flavor. You can skip the turmeric if you want plain paratha.
Coriander leaves - I chop fresh coriander finely and add it, it just lift the taste a bit and give nice freshness. You can skip if not available.
Ghee - I add small spoon of ghee for roasting makhana and also while kneading. It gives softness and subtle flavor.
Oil - I used for cooking the parathas. Cook till golden spots and crisp edges.
1.Heat ghee in a tawa, add makhana and roast till golden or until crispy. If you taste it it will be crispy and not chewy that's the right stage. Switch off and cool down.
2.Transfer to a mixer jar and grind it to a fine powder. In a mixing bowl take all other ingredients (except oil) along with makhana powder.
3.First mix well with a spoon, then add water and knead it to a soft pliable dough. Allow i to rest for 15 minutes at least.
4.Then knead again and form lemon sized balls. Take a ball and start rolling. Dust flour if needed to avoid sticking
5.Roll to thin parathas. Roll the rest of the parathas too and keep it ready. Heat a dosa tawa, drizzle oil, then carefully transfer a paratha.
6.Cook till small bubbles starts to appear, then flip to other side, drizzle little oil/ghee and cook until brown spots appear here and there. Flip again if needed.
Serve hot!
Expert Tips
Roasting makhana - I usually roast the makhana till it turns nice and crisp. You can check by pressing one between your finger, it should break easy.
Grinding part - I always cool down and grind well into fine powder and mixes easily with wheat flour. Sometimes I keep it little coarse also for some crunch.
Dough - Mix all dry ingredients first and then add water slowly little by little. This helps to make the dough soft and smooth, not sticky.
Rolling parathas - I dust the board and dough with some flour while rolling. It stop sticking and helps to roll evenly. You can make it thin or bit thick, both taste nice in its own way.
Cooking method - I cook the paratha on medium flame and drizzle some oil or ghee around. It cook evenly and gives nice golden brown color with crisp edge and soft inside.
Serving and Storage
You can serve this dish with curd or any pickle. It also goes well with dal or sabzi for a simple meal. You can pack it in lunch box or take it for short trips also.
Store leftover in airtight box for few hours. Reheat on tawa before serving to keep it soft and warm. It taste best when eaten fresh but stays fine for a day.
FAQS
1.Can I skip turmeric?
Yes, you can skip it if you do not like the yellow shade. It is just for color and mild warmth.
2.Can I make this without ghee?
You can use oil both for kneading and cooking. Paratha will still come soft though taste little different.
3.Can I add other flours?
You can mix little millet or rice flour if you want. I usually stick to whole wheat for soft texture.
4.Will it stay soft if stored?
Yes, it stays soft for few hours in airtight box. Just reheat slightly on tawa before serving.
5.Can I use makhana powder from store?
Yes, you can use store bought powder but freshly roasted makhana gives more aroma and better taste.
If you have any more questions about this Makhana Paratha Recipe do mail me at sharmispassions@gmail.com. In addition, follow me on Instagram, Facebook, Pinterest ,Youtube and Twitter .
Tried this Makhana ParathaRecipe? Do let me know how you liked it. Also tag us on Instagram @sharmispassions and hash tag it on #sharmispassions.
Makhana Paratha is a soft and mild paratha that I make by adding roasted and grind makhana to regular wheat flour dough. It has nice mild crunch from makhana and gives a different texture compared to usual plain parathas. This paratha is simple to prepare and feels both healthy and tasty at the same time. Makhana paratha could be relished for breakfast, dinner & as snack and a good idea for lunch box.
Heat ghee in a tawa, add makhana and roast till golden or until crispy. If you taste it it will be crispy and not chewy that's the right stage. Switch off and cool down.
Transfer to a mixer jar and grind it to a fine pwoder.
In a mixing bowl take all other ingredients (except oil) along with makahana powder.
First mix well with a spoon, then add water and knead it to a soft pliable dough.
Allow it to rest for 15 minutes at least.
Then knead again and form lemon sized balls.
Take a ball and start rolling. Dust flour if needed to avoid sticking.
Roll to thin parathas. Roll the rest of the parathas too and keep it ready.
Heat a dosa tawa,drizzle oil, then carefully transfer a paratha.
Cook till small bubbles starts to appear, then flip to other side, drizzle little oil/ghee and cook until brown spots appear here and there. Flip again if needed.
Serve Makhana Paratha hot!
Notes
Roasting makhana - I usually roast the makhana till it turns nice and crisp. You can check by pressing one between your finger, it should break easy.
Grinding part - I always cool down and grind well into fine powder and mixes easily with wheat flour. Sometimes I keep it little coarse also for some crunch.
Dough - Mix all dry ingredients first and then add water slowly little by little. This helps to make the dough soft and smooth, not sticky.
Rolling parathas - I dust the board and dough with some flour while rolling. It stop sticking and helps to roll evenly. You can make it thin or bit thick, both taste nice in its own way.
Cooking method - I cook the paratha on medium flame and drizzle some oil or ghee around. It cook evenly and gives nice golden brown color with crisp edge and soft inside.
Egg Bhurji literally translates to scrambled eggs prepared with sautéed onion, green chili, capsicum and added spices that can be stuffed with sandwich, chapati, paratha etc. It is the most delicious but also among the simplest of the sandwich recipes which could be done on a sandwich maker or a tawa.
Egg Bhurji Sandwich is usually the top-selling menu in street food stalls. This especially when served with pav is loved the most as a street food. Egg bhurji sandwich is a quick option for breakfast or dinner that can be filling as well as nutritious because of its high protein content.
[feast_advanced_jump_to]
About Egg Bhurji Sandwich
Egg bhurji sandwich is a wholesome breakfast or dinner recipe when you have nothing but just bread and eggs at home. It is a healthy option that can be prepared in no time. Loaded with goodness of onion, capsicum and fragrant spices, this egg bhurji sandwich makes for a soul-satisfying meal.
The Indian-style bhurji is flavorful with the right punch of Indian spices. The bhurji filling has the right amount of savory and slightly spicy taste. Leftover egg bhurji can be used as a filling for chapatti, paratha, or rice.
This recipe takes me down the lane when me and my cousins would want something spicy after coming from school and my mum used to whip this up as a quick evening snack that used to be quite filling as well.
I love trying variety of sandwich recipes so wanted to try egg sandwich with the last few slices of bread I had. I always end up making sandwich with the last few leftover slices every time we buy bread.
This is just my easy idea of making egg bhurji sandwich, you can feel free to modify it according to your liking. We had the sandwich with hot chocolate and it was such a yum breakfast. You can serve this an evening snack too.
Egg Bhurji Sandwich Ingredients
Bread - White bread, whole wheat bread, or multigrain bread can be used as per your choice, white bread is usually softer and the most ideal choice.
Vegetables - I have used onion and capsicum you can use other vegetables like carrots, mushrooms, corn etc.
Egg - I have used regular eggs. You can use brown eggs too.
Spice powders - Enhances the overall flavor and can be increased or decreased as per your liking.
Grated cheese - Freshly grated cheddar is preferred. I have used processed cheese you can use mozzarella cheese too.
Butter - is added to toast the bread slices and enhances the taste of the sandwich.
1.In a mixing bowl add oil, red chili powder, coriander powder, garam masala power and required salt. Then add onion, capsicum and mix well.
2.Transfer onion capsicum mixture to a pan and fry for few mins till raw smell of the spices leave, Set aside. Then scramble eggs well, add salt and pepper powder, Set aside.
3.Take bread slices. First take a heaped spoon full of scrambled egg and add it to a bread slice. On top of it add onion capsicum masala.
4.Then add a spoon of grated cheese. Close with another bread slice. Apply butter generously on the bread slice.
5.When the sandwich maker is preheated and ready, brush butter. Carefully transfer the bread to the sandwich maker, cook for 3-4 minutes until the bread slices have nice golden grill marks and is crisp. Cut and serve.
Serve hot!
Expert Tips
Nutritional value - For a healthier option, you could opt for brown bread or multigrain bread that provides more fiber when compared to the white bread.
Customization - You can opt for other vegetables like spinach, lettuce, cabbage along with onion and capsicum. You can add more cheese if you prefer to get a gooey cheese-egg sandwich.
Sauteing - Saute the veggies well but do not make it soft, it should retain its crunch.
Butter - Apply generous amount of butter while toasting the bread as it adds to the crispness of the sandwich as well as enhances the aroma and flavor.
Excessive stuffing - Do not stuff in too much as the excess tends to ooze off during toasting.
Preparation - Grill your bread on low to medium as too much heat can burn the stuffing.
Alternate method - If you do not have sandwich toaster, you can use your dosa tawa for toasting.
Serving & Storage
You can pre-boil eggs and have the masala done the night before and store in the refrigerator. Sandwich can be served with any sauce/mayonnaise of your choice. You can trim the crust off the bread by refrigerating them for one hour for extra neat edges. This sandwich keeps well for 2 days in the refrigerator and has to be brought to room temperature before consuming.
FAQS
1.What variant of bread is best suited for this recipe?
White bread is the most preferred one as it yields sandwiches that keep soft for a long time but if you are opting to go for a healthier option, then your ideal choice should be either multigrain or whole wheat bread.
2.Can cheese be skipped?
Yes, instead you can use mayonnaise as an alternate spread. It is for taste and also to hold the filling together.
3.Can I use this recipe and add vegetables skipping eggs?
Yes, you can skip eggs altogether and proceed with the same procedure by adding vegetables of your choice like spinach, lettuce, mushrooms, cabbage, carrot for a vegetarian variant.
4.What are the other options for egg bhurji?
Egg bhurji can also be served with pav, roti or rice.
5.Can kids and adults have this often?
It is best to opt for a smaller portion size and usage of whole wheat bread/multigrain bread for added fiber content.
If you have any more questions about this Egg Bhurji Sandwich do mail me at sharmispassions@gmail.com. In addition, follow me on Instagram, Facebook, Pinterest ,Youtube and Twitter .
Tried this Egg Bhurji Sandwich? Do let me know how you liked it. Also tag us on Instagram @sharmispassions and hash tag it on #sharmispassions.
Egg Bhurji literally translates to scrambled eggs prepared with sautéed onion, green chili, capsicum and added spices that can be stuffed with sandwich, chapati, paratha etc. It is the most delicious but also among the simplest of the sandwich recipes which could be done on a sandwich maker or a tawa.
In a mixing bowl add oil, red chilli, coriander, garam masala power and required salt.
Then add onion, capsicum and mix well.
Transfer onion capsicum mixture to a pan and fry for few mins till raw smell of the spices leave, Set aside.
Then scramble eggs well, add salt and pepper powder, Set aside.
Take bread slices. First take a heaped spoon full of scrambled egg and add it to a bread slice. On top of it add onion capsicum masala.
Then add a spoon of grated cheese. Close with another bread slice.
Apply butter generously on the bread slice.
When the sandwich maker is preheated and ready, brush butter.
Carefully transfer the bread to the sandwich maker, cook for 3-4 minutes or until the bread slices have nice golden grill marks and is crisp.
Cut and serve egg bhurji sandwich hot!
Notes
Nutritional value - For a healthier option, you could opt for brown bread or multigrain bread that provides more fiber when compared to the white bread.
Customization - You can opt for other vegetables like spinach, lettuce, cabbage along with onion and capsicum. You can add more cheese if you prefer to get a gooey cheese-egg sandwich.
Sauteing - Saute the veggies well but do not make it soft, it should retain its crunch.
Butter - Apply generous amount of butter while toasting the bread as it adds to the crispness of the sandwich as well as enhances the aroma and flavor.
Excessive stuffing - Do not stuff in too much as the excess tends to ooze off during toasting.
Preparation - Grill your bread on low to medium as too much heat can burn the stuffing.
Alternate method - If you do not have sandwich toaster, you can use your dosa tawa for toasting.
Channa masala sandwich is a wholesome dish that is served for breakfast or a quick snack. It also works perfectly for a lunchbox recipe too. This flavorsome spiced chickpea masala combined with toasted bread makes an exceptional sandwich recipe. The sandwich is just not tasty but also a great way to use leftover chana masala.
A simple idea of not wasting food evolved into a go-to option for easy meals for tiffin boxes or evening snacks. And this also proves how experimenting in the kitchen with our dishes can bring out new variations to relish. This recipe has been our personal favorite and on the weekly menu. So if you are making channa masala, ensure you're making a little extra for this chana masala sandwich.
[feast_advanced_jump_to]
About Channa Masala Sandwich
Channa Masala Sandwich is an interesting fusion that is loved and relished by sandwich lovers. This recipe indeed tells us how our kitchen experiments can lead to surprisingly delicious results. Additionally, this recipe stands as one of the most satisfying recipes I have created in recent times.
The sandwich filling is prepared with overnight soaked chickpeas, sautéed and tempered with onions, tomatoes, and Indian spices making it a great option for a sandwich. A dash of lemon juice adds to the tanginess and the chopped coriander leaves give in its goodness to the dish. The mixture is mildly spicy, tangy, and perfect to go between the buttered breads.
This chana masala sandwich is just an idea of using leftover chana masala rather than a recipe. I always end up using leftover chana masala for making chana masala dosa or sandwiches. This recipe was born out of the need for something really interesting and quick.
I heated the chana masala for the gravy to thicken, assembled the slices of bread, and got the sandwich maker ready. In no time, I served these sandwiches hot with ketchup, ginger chai, and milkshake for kids. I also served this chana masala sandwich for my blogger friend who visited me last year and she loved it too so that justifies a post right?!
Chana Masala Sandwich Ingredients
Bread - This is the base of the recipe. You can trim the sides if you want. Apply butter on the outside while grilling for the brown tints.
Chana masala - You can use fresh or leftover masala. Ensure there is no water in the masala. Dry the masala completely otherwise the sandwich might get soggy.
Onion - I have added finely chopped onions to the masala. You can skip it if you don't like the flavor of raw onions.
Chat masala powder - this is optional. Sprinkling the powder will add tanginess and give a nice desi-style sandwich vibe.
1.Take leftover chana masala and heat it up until it becomes thick, Set aside and cool down. Take bread slices, spread a generous spoon of chana masala on one side of the bread slice.
2.Add chopped onion, sprinkle chat masala powder and coriander leaves.
3.Close with another bread slice. Apply butter generously on the bread slice. When the sandwich maker is preheated and ready, brush butter.
4.Carefully transfer the bread to the sandwich maker, cook for 3-4 minutes or until the bread slices have nice golden grill marks and is crisp. Cut and serve.
Serve hot!
Expert Tips
Texture - Texture is very important as the chana masala can make the sandwich soggy. Ensure the masala is dry. Excessive moisture can mess up the sandwich.
Mash a little - You can smash a few of the chickpeas while sauteing. This helps in bringing the filing together and prevents them from falling out.
Spice Level - You can spice it up as per your requirement. It also depends on the bread you are using. For wheat or multigrain style of bread, bold flavors work well.
Butter it up - Butter is another important ingredient and can use them generously. Apply butter on the outer side of the bread for that crisp golden finish.
Add-ons - You can add fresh elements to the sandwich like cucumber, lettuce, and onions.
A layer of cheese - You can add a slice of cheese or grated cheese to the sandwich before grilling them. It adds flavors to the sandwich and stands as a barrier against moisture.
Grill it up - You can easily grill the sandwiches, or simply tawa fry them with a dollop of butter. Easy toasting is important.
Serving and Storage
Serve this sandwich hot with green chutney, ketchup, or a simple yogurt bowl. You can pair it well with chai or coffee and make it a satisfying tea-time snack. You can add a bowl of salad or roasted peanuts to complete the meal. You can cut them into triangles or squares depending on your guest.
The chana masala can be stored in the fridge in an airtight container for 3-4 days. It is recommended to enjoy the sandwiches fresh, however, you can pack them for lunch box, and can be consumed within 4-5 hours. Freezing the sandwiches is not recommended. You can freeze the chana masala for up to a month. Thaw completely and saute to remove the extra moisture.
FAQS
1.Can I use canned chickpeas for this recipe?
Yes, you can. Just rinse and drain them well before using it.
2.What kind of bread works best?
Any type of bread works for this sandwich. Ensure you are using fresh bread.
3.Can I make the sandwich ahead of time?
This is not recommended as it might turn the sandwich soggy. However, you can prepare the filling in advance and assemble the sandwich just before serving.
4.How do I prevent the sandwich from becoming soggy?
The chana masala you are using should be semi-dry. Consume the sandwiches immediately.
5.Is it necessary to toast the sandwich?
No, it is not. You can serve them plain. However, toasting enhances the flavors.
If you have any more questions about this Chana Masala Sandwich do mail me at sharmispassions@gmail.com. In addition, follow me on Instagram, Facebook, Pinterest ,Youtube and Twitter .
Tried this Chana Masala Sandwich? Do let me know how you liked it. Also tag us on Instagram @sharmispassions and hash tag it on #sharmispassions.
Channa masala sandwich is a wholesome dish that is served for breakfast or a quick snack. It also works perfectly for a lunchbox recipe too. This flavorsome spiced chickpea masala combined with toasted bread makes an exceptional sandwich recipe. The sandwich is just not tasty but also a great way to use leftover chana masala.
Take leftover chana masala and heat it up until it becomes thick, Set aside and cool down.
Take bread slices, spread a generous spoon of chana masala on one side of the bread slice.
Add chopped onion, sprinkle chat masala powder and coriander leaves.
Close with another bread slice. Apply butter generously on the bread slice.
When the sandwich maker is preheated and ready, brush butter.
Carefully transfer the bread to the sandwich maker, cook for 3-4 minutes or until the bread slices have nice golden grill marks and is crisp.
Cut and serve Chana Masala Sandwich hot!
Notes
Texture - Texture is very important as the chana masala can make the sandwich soggy. Ensure the masala is dry. Excessive moisture can mess up the sandwich.
Mash a little - You can smash a few of the chickpeas while sautéing. This helps in bringing the filing together and prevents them from falling out.
Spice Level - You can spice it up as per your requirement. It also depends on the bread you are using. For wheat or multigrain style of bread, bold flavors work well.
Butter it up - Butter is another important ingredient and can use them generously. Apply butter on the outer side of the bread for that crisp golden finish.
Add-ons - You can add fresh elements to the sandwich like cucumber, lettuce, and onions.
A layer of cheese - You can add a slice of cheese or grated cheese to the sandwich before grilling them. It adds flavors to the sandwich and stands as a barrier against moisture.
Grill it up - You can easily grill the sandwiches, or simply tawa fry them with a dollop of butter. Easy toasting is important.
Ever wonder how restaurants get those picture-perfect puffed pooris every single time? The secret? A few tiny tricks you’ll wish you knew sooner.
There’s a special kind of joy in watching a poori puff up, like a golden little balloon rising out of hot oil. If you’ve always thought pooris are only something expert home cooks can pull off, this is your sign to give them a try.
And honestly? They’re way easier than they look. With the right dough, a few simple rolling tricks, and hot oil at just the right temperature, you’ll be dishing out light, airy pooris that stay crisp on the outside and soft inside. This step-by-step guide will walk you through everything, even if it’s your very first time making them.
Water – to bring the dough together (just enough to make a stiff dough)
Oil (for the dough) – kneaded in at the end to make the dough smooth
For Frying
Oil (for deep frying) – about 1½ to 2 cups; choose an oil with a high smoke point like sunflower or rice bran oil (so the pooris fry crisp without soaking up too much oil)
Dough for Poori
Poori dough is made in the same way as the dough for rotis but with a lot less water. It has a comparatively stiff texture as opposed to the soft dough for rotis.
The two main ingredients for the poori dough are atta (whole wheat flour) and water.
The key is to make the dough stiff. It should be kneaded well but without adding a lot of water. The stiff dough is what makes it easy to roll pooris and helps the poori puff up properly.
More Tips To Perfect The Poori Dough
If the dough is too dry and doesn’t come together, add water one teaspoon at a time till it comes together
Once the dough has been kneaded well, add a teaspoon of oil and knead again for a minute or two – this makes the dough smooth
Also, poori dough shouldn’t be rested for too long – just five to ten minutes will do
Recipe Tip
You can add a small amount of sooji in this dough. Sooji makes pooris crisper and keeps them that way for longer – most restaurants add some sooji to their puri or bhatura dough. That’s how I’ve shown the recipe in the video, but to be honest, we rarely add sooji to our dough when making puris at home. So you can skip the sooji if you prefer it that way.
Rolling out Pooris
Ideally puris should be round or oval in shape, but there is no judgement here. Even after years of practice, sometimes I still dish out puris in all sorts of shapes.
In the video below, I’ve demonstrated how to make puris which are roughly the size of my palm. The thickness of the poori should approximately be about 1 mm (shown in video). If they end up being too thin, they won’t puff up properly. Too thick and they won’t cook well.
Dip the ball of dough in a tiny amount of oil before rolling it out. The oil helps grease the dough and makes it easier to roll them out without sticking. Avoid using dry flour to dust puris (like we do for rotis). When dry flour comes in contact with hot oil, the flour particles will just burn and leave burn bits in your oil. And that’s an unpleasant taste. It’s important that the oil remains clean as we fry the puris.
Pooris are such a fun food experience for kids! So if you have kids to entertain, don’t hesitate to use a cookie cutter on your rolled out dough and make fun-shaped puris for the kids!
How to Fry Fluffy Crispy Pooris
There are a few technicalities involved in the poori-frying process. Here’s a quick checklist before you begin:
Oil temperature: The pooris should be fried in hot oil to keep them from getting too oily or soggy. Do a temperature test in the beginning by putting a tiny piece of dough in the oil – it should sizzle and come to surface immediately. You can also add a pinch of salt to the oil which prevents puris from becoming oily.
Best Oil for frying puris: Since pooris need to be fried in very hot oil, use oils with a high smoke point such as sunflower oil or rice bran oil. These will not smoke easily and will keep the oil clean
Dropping the poori: Don’t just plop the rolled out poori flat onto the oil – Dangerous! The trick is to hold the poori vertically above the kadhai and gently slip it into the oil from one side.
The fluff factor: Super crucial step – When the poori starts sizzling, pick up your skimmer and gently press the poori into the oil. As soon as the puri starts puffing up, turn it over and press it gently again from the other side. In a few seconds, the poori will start to become golden brown – that’s when it’s time to remove them. Each poori should take about 20-25 seconds to cook. You can roll them out before hand and fry them one after another. Or if you have someone to help you, you can fry them as and when they are rolled out.
Richa’s Top Tips
Make the dough firm – A stiff dough (firmer than roti dough) helps the pooris puff up and keeps them from soaking in oil.
Don’t skip the resting time – Let the dough rest for just 5–10 minutes, this relaxes the gluten enough to roll easily without making the pooris chewy.
Skip the dry flour – Instead of dusting with dry flour (which burns in hot oil), dip each dough ball in a little oil before rolling to prevent sticking and keep the oil clean.
Get the thickness right – Roll each poori to about 1 mm thickness, too thin and they won’t puff, too thick and they’ll stay doughy inside.
Check your oil temperature – Drop a tiny bit of dough in the oil, it should sizzle up instantly. If it sinks, the oil’s too cold; if it burns quickly, it’s too hot. (Here’s our guide to testing oil for frying).
Frequently Asked Questions
Is it puri or poori?
Both are correct! Puri is the Hindi spelling, while poori is the anglicised version, they mean the same thing.
Can I make the dough ahead?
It’s best to make the dough fresh, but you can knead it 2–3 hours ahead. Keep it tightly covered at room temp, don’t refrigerate, or the pooris won’t puff well.
Why is my poori not puffing up?
Usually it’s because the dough is too soft, they were rolled too thin, or the oil isn’t hot enough. Keep the dough firm, roll evenly, and test the oil before frying.
Why are my pooris hard to roll?
If the dough feels tough or cracks, it’s either too dry or hasn’t rested enough. Let it rest 5–10 minutes, then knead briefly with a few drops of oil to smooth it out.
Which is the best oil for frying pooris?
Use an oil with a high smoke point, like sunflower or rice bran oil. They heat quickly, stay stable at high temperatures, and keep your pooris light and crisp.
Storage Tips
Room temperature: Store fried pooris in an airtight container for up to 1 day. Line with paper towels to absorb excess oil and keep them from going soggy.
Fridge: Not ideal, but if you must, refrigerate cooled pooris in an airtight container for up to 2 days. Please note that they will not stay crisp, and will soften.
Freezer: Freeze dough balls (not rolled or fried pooris) for up to 1 month. Thaw completely, roll, and fry fresh.
Reheating: Reheat pooris on a hot tava for 20–30 seconds on each side until they regain some puff. Avoid microwaving, it makes them chewy and limp.
Customisation Ideas
Want to give your pooris a fun twist? Try these simple tweaks to make them a little different each time without complicating the recipe:
Try spiced pooris – Mix a pinch of turmeric, red chilli powder, and crushed black pepper into the dough for a gentle kick.
Add ajwain or carom seeds – Knead a pinch into the dough for a subtle earthy flavour that also aids digestion.
Mix in spinach purée – Swap part of the water with spinach purée to get bright green, nutrient-packed pooris.
Use beetroot juice – Add beetroot juice instead of water for naturally pink pooris that are perfect for festive platters.
Best accompaniments for Poori
Here’s a list of our favourite accompaniments for pooris! Some of these are super popular, some are an acquired taste! Here’s a list of side dish options to serve with your pooris:
Chana Masala – The best, spicy, north Indian dish to go with pooris – work up your appetite before this heavy meal
Poori Bhaji – Simple potato-veggie-loaded bhaji and poori – all time favourite
Poori Aloo – Ignore the carbs and dig into this sinfully satisfying dry side dish made of aloo, onions, peas, etc.
Poori Chutney – Most restaurants in South India serve poori with coconut chutney, and it is so addictive!
Poori Korma – A richer variant of poori bhaji, this veggie korma one is for special occasions
Poori Aamras – This combo is soooo underrated! When mango season is on, this is literally all we eat!
Poori Shrikhand – Sweet and so delicious, this one is for all those with that insatiable sweet tooth
And if you are craving pooris but don’t feel like making an accompaniment, grab that bottle of achar and a bowl of raita, and tuck in!
Making perfect pooris isn’t as tricky as it looks, once you get the dough right and the oil hot, it’s pure fun watching them puff up like golden balloons. Serve them fresh, hot, and crisp while they’re at their fluffiest, and don’t forget to pair them with something delicious on the side.
And if you try this recipe, tag me on Instagram @my_foodstory, I’d love to see your poori plates!
Mix together flour, sooji and salt in a bowl and add half cup water a little at a time to make a stiff dough. If the dough is too dry and doesn’t come together, add more water a teaspoon at a time. The dough should be stiffer than roti dough, and should not be too pliable. At the same time, you shouldn’t see any dried bits of dough. Once the dough has been kneaded well, add 1 1/4 teaspoon oil and knead again for a minute or two to get a smooth dough. Cover this with a cloth and set this aside for 5-10 minutes.
Once the dough has rested, roll it into a log and divide it into small gooseberry sized balls (slightly smaller than limes). Roll each piece of dough into smooth balls and then press it slightly. Repeat this till all the balls are formed and cover and set them aside.
Heat oil in a kadhai or deep pan for frying. To roll out the pooris, take one ball, dip it slightly in oil and roll it out into a circle to 1 mm thickness. Don’t worry if you don’t get the perfect circle – just make sure it’s evenly rolled.
Make sure the oil is very hot. To check, take a small pieces of dough and put it in oil. If it sizzles immediately to the top, the oil is ready for frying.
Take the rolled out dough, hold it vertically above the oil near the edge of the kadhai and gently slide it in (don’t plop it in or the oil will splash back). The puri should immediately sizzle to the top. Start pressing it with the back of the spoon and as soon as it starts to puff up, flip it over gently. Keep pressing it gently as it puffs up. Once the puri is golden brown from the bottom, take it out. Repeat this till all the puris are fried.
Video
Notes
Add 1/4 teaspoon to the oil to the dough if you’d like. This keeps the pooris from becoming oily
The best oils for frying pooris are sunflower oil and rice bran oil because they have a high smoke point
Make sure the dough is rolled out evenly
Semolina or sooji is an optional ingredient in pooris – it helps them become crisp and stay crisp for longer. I’ve used it in the video but don’t generally use it while making them at home
Pumpkin Pie Overnight Oats are a creamy, delicious, no-cook breakfast made with rolled oats, pumpkin puree, warm spices, and a touch of sweetness. It is a healthy and easy way to enjoy all the fall flavors for breakfast. What are Pumpkin Pie Overnight Oats? Overnight oats are one of the easy breakfast recipes made with...
A lettuce and cheese-loaded sourdough sandwich that’s a tasty, filling way to start the day
Remember those childhood days when the parents used to come up with innovative ways to make you eat those dreaded greens? There’s a role reversal situation on that front at home here, where I have to find ways to make the parents eat ‘foreign’ vegetables, namely non-Indian veggies or those they haven’t grown up with aka lettuce, broccoli, zucchini, etc. I get the reluctance, I do. But as I tell them, “You got to eat your greens.” #payback
With lettuce, I started with the tried and tested salad route which worked well for my father – he loves salad. But my mother? Nope. She was and continues to be reluctant. And because I was determined to get her to eat them, I tweaked a few recipes, and voila! She ate the lettuce-loaded food and I got what I’m dubbing the ‘Lettuce Series’, starting with the Lettuce Sourdough-wich.
The parents have developed a taste for sourdoughs and since all three of us love pan-grilled sandwiches, I snuck in a few leaves in our breakfast sandwich one day and delight oh delight! It’s hearty, tasty, and has that golden crunch when you bite in… mmmmm.
You can use vegetables other than tomato here but there’s something pure and nostalgic about the combination of bread+cheese+tomato that I adore. Just one thing to remember, these sourdough-wiches (sandwich – sourdough-wich… get the drift?) are pretty heavy on the stomach so ended up skipping lunch and had supper and a late-night snack.
Things to remember
You can use vegetables of choice but as I’ve mentioned, tomato and cheese is pure nostalgia and classic.
If the idea of pan grilling terrifies you, pop the sourdough-wich into a sandwich maker – whatever makes life easier!
Do let me know if you try this recipe! Leave a comment and don’t forget to tag me on Instagram at from.the.corner.table and hashtag it #fromthecornertable. I’d love to see it
Lettuce Sourdough-wich
2 slices Sourdough bread
3-4 Lettuce leaves
1 Tomato ((small))
Feta Cheese
Smoked Cheddar Cheese
Freshly ground black pepper powder
Butter
Wash the lettuce leaves well and shake/pat them dry.
Crumble feta cheese, slice the Smoked Cheddar and set aside.
Wash the tomato, cut into thin slices and set aside.
Butter one side each of the sourdough slices.
Assemble all the ingredients before you start.
Place a non-stick pan on low heat and add a pat of butter.
As the butter begins to melt, place a slice of sourdough on the pan.
Layer with lettuce leaves, tomato slices and cheeses.
Season with freshly ground black pepper.
Top with the second slice of sourdough bread and cover with a lid.
If you don’t have a lid, use a heatproof plate and press it down using a heavy object.
Cook for a minute or two, until the bottom slice is golden (do the corner lift test here).
Flip over, add another pat of butter and cook the second side as you did the first.
Once done, remove from the heat, slice into two or just bite in!
For regular updates on recipes, recommendations on things to read and watch and ramblings that make sense, subscribe to the newsletter – you’ll find the form in the sidebar if viewing on a screen and at the bottom if viewing on the phone. Since spamming or flooding your inbox is a huge no for me, these newsletters go out only when I’ve put up a new post or sometimes, once in a month only.
This apple chutney flavoured with butter and star anise is perfect as a dip, a spread and an ideal addition to your grazing plate for parties
Not every kitchen experiment is a success. But it isn’t necessary that the ‘not success’ dish is unpalatable. In fact, some of these end up being delightful, tasty surprises, like this apple chutney.
Inspired by a friend’s superwoman-like ability to make relishes, I’d set out to make an apple relish but with the wrong core ingredient – the apples I’d picked (or rather, found piled on the fruit tray) had a strange texture. Rather than being crisp and crunchy, they were of a soft, brittle variety that started to crumble when peeled. But hey, no one called me a quitter! I forged ahead, determined to make something out of the apples I’d peeled to the tune of Kishore Kumar’s ‘Mere saamne wali khidki mein’ – please note, tunes are important during the act of peeling because ‘good mood is important to make ‘good food’!
The mini mound of roughly chopped apples ready to be dealt with, I reached for butter, because darlings, irrespective of what it does to your arteries and your hips, it makes the world right. In went all the goodies into the pan and with a little bit of this and that thrown in, I had this apple chutney which eventually got a huge thumbs up from the parents. It has now been made twice, is being used to slather on butter-toasted sourdoughs sprinkled with sumac powder or smoked cheese shavings. It is also being used generously on rotis and parathas to make rolls for the instant hunger moments.
NOTE: If you aren’t in a rush, then let the apple chutney rest for a day. It tastes so much more deliciouser the next day.
Give it a shot and stick around for when I get the apple relish right! Until then, happy cooking.
Do let me know if you try this recipe! Leave a comment and don’t forget to tag me on Instagram at from.the.corner.table and hashtag it #fromthecornertable. I’d love to see it
For regular updates on recipes, recommendations on things to read and watch and ramblings that make sense, subscribe to the newsletter – you’ll find the form in the sidebar if viewing on a screen and at the bottom if viewing on the phone. Since spamming or flooding your inbox is a huge no for me, these newsletters go out only when I’ve put up a new post or sometimes, once in a month only.
Apple Chutney
A mushy apple chutney flavoured with butter and star anise
1¾ cups Peeled & chopped apples
1.5 tablespoon Butter
½ tablespoon Brown sugar
1 Star anise
¼ teaspoon Paprika
Wash, peel and roughly chop the apples. Do note, the measurement noted in the recipe is of apples AFTER the peel-chop process.
Place a non-stick saucepan on low heat.
Add the butter and sugar in the pan and stir until the sugar has melted.
Add the chopped apples and give it a good stir.
Drop in the star anise, cover and cook till the apples have nearly melted and the mixture is leaving the sides of the pans.
Add a pinch of paprika and do a quick taste test.
Adjust the amount of sugar and paprika if required.
Remove from the heat and let it cool.
Store in a glass container with a tight lid; if you have the willpower, let it rest for a day before you dig in.
Bo Moreno grew up in Austin but spent his summers with his paternal grandparents in Odem, near Corpus Christi. On Sunday mornings his grandmother would prepare breakfast, and he would ride the few miles to Sinton with his grandfather to pick up barbacoa. Moreno can’t recall the name of the now closed shop they went to, but, he says, “I can tell you how to get there.” Eggs, refried beans, and tortillas were everyday breakfast foods, but barbacoa was a monthly treat, an experience he tries to re-create with his Sundays-only version at Moreno Barbecue, in Austin.Moreno doesn’t use the whole cow head, as the cooks in Sinton did. Instead, he makes his only with beef cheeks. “You don’t get that greasy and gritty taste,”…
A lettuce and cheese-loaded sourdough sandwich that’s a tasty, filling way to start the day
Remember those childhood days when the parents used to come up with innovative ways to make you eat those dreaded greens? There’s a role reversal situation on that front at home here, where I have to find ways to make the parents eat ‘foreign’ vegetables, namely non-Indian veggies or those they haven’t grown up with aka lettuce, broccoli, zucchini, etc. I get the reluctance, I do. But as I tell them, “You got to eat your greens.” #payback
With lettuce, I started with the tried and tested salad route which worked well for my father – he loves salad. But my mother? Nope. She was and continues to be reluctant. And because I was determined to get her to eat them, I tweaked a few recipes, and voila! She ate the lettuce-loaded food and I got what I’m dubbing the ‘Lettuce Series’, starting with the Lettuce Sourdough-wich.
The parents have developed a taste for sourdoughs and since all three of us love pan-grilled sandwiches, I snuck in a few leaves in our breakfast sandwich one day and delight oh delight! It’s hearty, tasty, and has that golden crunch when you bite in… mmmmm.
You can use vegetables other than tomato here but there’s something pure and nostalgic about the combination of bread+cheese+tomato that I adore. Just one thing to remember, these sourdough-wiches (sandwich – sourdough-wich… get the drift?) are pretty heavy on the stomach so ended up skipping lunch and had supper and a late-night snack.
Things to remember
You can use vegetables of choice but as I’ve mentioned, tomato and cheese is pure nostalgia and classic.
If the idea of pan grilling terrifies you, pop the sourdough-wich into a sandwich maker – whatever makes life easier!
Do let me know if you try this recipe! Leave a comment and don’t forget to tag me on Instagram at from.the.corner.table and hashtag it #fromthecornertable. I’d love to see it
Lettuce Sourdough-wich
2 slices Sourdough bread
3-4 Lettuce leaves
1 Tomato ((small))
Feta Cheese
Smoked Cheddar Cheese
Freshly ground black pepper powder
Butter
Wash the lettuce leaves well and shake/pat them dry.
Crumble feta cheese, slice the Smoked Cheddar and set aside.
Wash the tomato, cut into thin slices and set aside.
Butter one side each of the sourdough slices.
Assemble all the ingredients before you start.
Place a non-stick pan on low heat and add a pat of butter.
As the butter begins to melt, place a slice of sourdough on the pan.
Layer with lettuce leaves, tomato slices and cheeses.
Season with freshly ground black pepper.
Top with the second slice of sourdough bread and cover with a lid.
If you don’t have a lid, use a heatproof plate and press it down using a heavy object.
Cook for a minute or two, until the bottom slice is golden (do the corner lift test here).
Flip over, add another pat of butter and cook the second side as you did the first.
Once done, remove from the heat, slice into two or just bite in!
For regular updates on recipes, recommendations on things to read and watch and ramblings that make sense, subscribe to the newsletter – you’ll find the form in the sidebar if viewing on a screen and at the bottom if viewing on the phone. Since spamming or flooding your inbox is a huge no for me, these newsletters go out only when I’ve put up a new post or sometimes, once in a month only.
This apple chutney flavoured with butter and star anise is perfect as a dip, a spread and an ideal addition to your grazing plate for parties
Not every kitchen experiment is a success. But it isn’t necessary that the ‘not success’ dish is unpalatable. In fact, some of these end up being delightful, tasty surprises, like this apple chutney.
Inspired by a friend’s superwoman-like ability to make relishes, I’d set out to make an apple relish but with the wrong core ingredient – the apples I’d picked (or rather, found piled on the fruit tray) had a strange texture. Rather than being crisp and crunchy, they were of a soft, brittle variety that started to crumble when peeled. But hey, no one called me a quitter! I forged ahead, determined to make something out of the apples I’d peeled to the tune of Kishore Kumar’s ‘Mere saamne wali khidki mein’ – please note, tunes are important during the act of peeling because ‘good mood is important to make ‘good food’!
The mini mound of roughly chopped apples ready to be dealt with, I reached for butter, because darlings, irrespective of what it does to your arteries and your hips, it makes the world right. In went all the goodies into the pan and with a little bit of this and that thrown in, I had this apple chutney which eventually got a huge thumbs up from the parents. It has now been made twice, is being used to slather on butter-toasted sourdoughs sprinkled with sumac powder or smoked cheese shavings. It is also being used generously on rotis and parathas to make rolls for the instant hunger moments.
NOTE: If you aren’t in a rush, then let the apple chutney rest for a day. It tastes so much more deliciouser the next day.
Give it a shot and stick around for when I get the apple relish right! Until then, happy cooking.
Do let me know if you try this recipe! Leave a comment and don’t forget to tag me on Instagram at from.the.corner.table and hashtag it #fromthecornertable. I’d love to see it
For regular updates on recipes, recommendations on things to read and watch and ramblings that make sense, subscribe to the newsletter – you’ll find the form in the sidebar if viewing on a screen and at the bottom if viewing on the phone. Since spamming or flooding your inbox is a huge no for me, these newsletters go out only when I’ve put up a new post or sometimes, once in a month only.
Apple Chutney
A mushy apple chutney flavoured with butter and star anise
1¾ cups Peeled & chopped apples
1.5 tablespoon Butter
½ tablespoon Brown sugar
1 Star anise
¼ teaspoon Paprika
Wash, peel and roughly chop the apples. Do note, the measurement noted in the recipe is of apples AFTER the peel-chop process.
Place a non-stick saucepan on low heat.
Add the butter and sugar in the pan and stir until the sugar has melted.
Add the chopped apples and give it a good stir.
Drop in the star anise, cover and cook till the apples have nearly melted and the mixture is leaving the sides of the pans.
Add a pinch of paprika and do a quick taste test.
Adjust the amount of sugar and paprika if required.
Remove from the heat and let it cool.
Store in a glass container with a tight lid; if you have the willpower, let it rest for a day before you dig in.
Learn how to make quick and easy Tomato Onion Thokku recipe in a pressure cooker with recipe video and detailed step by step pictures. Easy Pressure Cooker Tomato Thokku, simple side dish for idli, dosa or chapati. Looking for a quick side dish that is ready in minutes but tastes like you have spent hours...
Being a daily consumer of chia seeds, I had to try this viral Tiramisu chia pudding to see if it’s worth all the hype at all! So I tried it and, lo behold, it is so damn good that I have to now repeat it frequently!
If you ask me to name one dessert among the universe of all desserts that I can have without thinking twice then that has to be a classic Italian Tiramisu!
But yes, that will be in a parallel universe where I wouldn’t worry about consuming excess calories that come free of cost with the delicious taste of a generous serving of Tiramisu!
With all that love and affection towards Tiramisu, I also jumped into the bandwagon of a spin-off of Tiramisu made with the cult favorite of all fitness enthusiasts these days!
Chia seeds! So here I present my version of the viral Tiramisu chia pudding!
What is Tiramisu chia pudding?
If you love to watch cooking/recipe videos, I am sure you have come across this viral recipe in your feed many times already!
Just in case this is something new to you and I have the privilege to introduce you to this current social trend, then let me decode it for ya!
First, let’s see what Tiramisu is and then we can figure out its connection with the Tiramisu chia pudding!
A classic Tiramisu has multiple layers of classic lady finger biscotti soaked in freshly brewed coffee with alternating thick layers of whipped up mascarpone cheese in between two layers of lady fingers.
The final layer of mascarpone is dusted with a generous amount of cocoa powder. Then the assembled Tiramisu is chilled in the refrigerator overnight to set things up.
This also allows the flavors of coffee and cocoa to mingle with each other resulting into a mind-blowing no-bake dessert making you fall in love with it instantly!
Scrambled eggs with cottage cheese recipe is one high protein breakfast thatTikTok and nutrition pros can’t stop talking about. The curds melt into pillowy eggs, adding 30 grams plus of complete protein in under 10 minutes. If you need a low‑carb, high protein high‑satiety breakfast that still feels indulgent, this one‑pan recipe of high protein, cottage cheese scrambled eggs is your new favourite breakfast.
Move over, plain scrambled eggs scrambled eggs with cottage cheese are the 2025 TikTok breakfast star. Curds melt into pillowy eggs, giving high protein scrambled eggs (30 g!) in five minutes. Perfect for low‑carb, muscle‑fuel mornings or budget‑friendly meal prep.
Make High Protein Scrambled Eggs With Cottage Cheese
30 g protein, 270 kcal: ideal for weight‑loss or muscle‑fuel meals.
Crack eggs in a bowl, crush some black pepper, add cottage cheese and salt to taste. Whisk everything well to a uniform consistency. (there maybe small lumps of cottage cheese which is fine)
Cook the eggs
Now, heat some oil in a skillet and pour the egg mixture in it.
After about a minute, lightly drag the partially cooked eggs to the center using a spatula. It should look like making folds in the center.
Keep the heat low and make these folds until no liquid remains.
Don’t aggressively stir the eggs, otherwise it will make the scrambled texture rubbery. Once cooked to your liking, turn off the heat, garnish with basil leaves and serve warm!
Pro Tips
Don’t over whisk: air pockets = fluff.
Pull off the heat just before fully set because residual heat finishes cooking.
For lactose free: swap in lactose free cottage cheese or soft tofu plus 1 Tbsp nutritional yeast.
Variations
Tex‑MexCottage Cheese eggs: add diced jalapeños & top with salsa verde.
Mediterranean: Stir in sun dried tomatoes & fresh oregano.
Veggie packed: fold in sautéed spinach or bell pepper mix.
Servings Suggestions & Pairing
Balanced macros:Half an avocado or ½ cup air-fried sweet-potato cubes adds heart-healthy fats & fibre
Grab and go Breakfast:Wrap scramble in a high-protein tortilla Meal-prep 3 days; reheat 45 sec
Weekend brunch: Top with roasted cherry tomatoes & feta, Finish with za’atar for a Mediterranean twist
Storage
Best hot off the pan, but you can refrigerator meal‑prep in glass containers up to 2 days. Reheat gently at 50 % power.
FAQs
Can you taste the cottage cheese?
Barely! the curds melt, giving creaminess without a “cheesy” hit.
Is this recipe keto / low‑carb?
Yes. 3 eggs + ¼ cup 2 % cottage cheese ≈ 3 g net carbs.
Can I meal‑prep and freeze?
Scrambled eggs can become rubbery when frozen; stick to fridge storage, 48 hrs max for best texture. I personally make the numbers of serving that we can eat fresh.
Can I use egg whites only?
Swap 4 egg whites + 2 Tbsp cottage cheese for similar texture.
Best cottage cheese brand for eggs?
Look for small‑curd, 2 % milkfat; Good Culture or Daisy work well.
If You like this recipe and made it Please rate the recipe. It helps us to reach more people. For the Latest updates Subscribe to Rekha’s Whatsapp. You can follow me onInstagram, Facebook, Youtube, Pinterestfor more food inspirations.
Scrambled eggs with cottage cheese turn fluffy, melt‑in‑your‑mouth and high‑protein scrambled eggs 30 g protein, keto‑friendly, ready in 10 minutes.
Course Breakfast, brunch, Side Dish
Cuisine American
Keyword , Breakfast Egg Recipes, cottage cheese, eggs, high protein diet
Prep Time 5 minutesminutes
Cook Time 10 minutesminutes
Total Time 15 minutesminutes
Servings 2people
Calories 267kcal
Ingredients
6eggs
Salt to taste
Freshly ground black pepper
1tbspOlive Oil
200gramsLow fat cottage cheese
Instructions
Prep egg Mixture
Crack eggs in a bowl, crush some black pepper, add cottage cheese and salt to taste. Whisk everything well to a uniform consistency. (there maybe small lumps of cottage cheese which is fine)
Cook the eggs
Now, heat the oil in a skillet and pour the egg mixture in it.
After about a minute, lightly drag the partially cooked eggs to the center using a spatula. It should look like making folds in the center.
Keep the heat low and make these folds until no liquid remains.
Don’t aggressively stir the eggs, otherwise it will make the scrambled texture rubbery.
Once cooked to your liking, turn off the heat, garnish with basil leaves and serve warm!
Vegan Dark Chocolate Chickpea Pudding ... adding protein to desserts is often not very difficult if you just stretch your imagination a little! Dessert for breakfast or breakfast for dessert, these desserts made with chickpeas will win your heart.
Craving a comforting bowl of sambar with idlis and dosas? This one-pot sambar recipe is the perfect solution — quick, flavorful, and made effortlessly in a pressure cooker!
I am the kind of person who cannot imagine having my idlis and dosas without a big bowl of piping hot sambar on my plate. I think it’s the perfect way to round up the simple flavors of idli and dosa, as well as make the meal more nutritious.
And considering how often we make South Indian dishes in this household, the whole shabang of making sambar the traditional way started to feel too cumbersome pretty soon. Enter: My one pot sambar recipe! With no compromise on the taste or texture, it delivers all the authentic South Indian goodness in a fraction of the time. So if you love sambar but like me, not the long cooking, this quick method might just become your new go-to.
Toor dal: Split pigeon peas form the base of this sambar.
Aromatics: Garlic, green chillies, and curry leaves for flavor and aroma
Veggies: Diced carrots, tomatoes, sambar onions, or cubed regular onions, beans, and drumsticks add lots of flavor, texture, and nutrition
Spices: Turmeric, red chilli, and coriander powders along with sambar powder for warmth and flavor
Tamarind pulp: For a nice, refreshing tang. I highly recommend not skipping this
Salt: For seasoning
Water: To pressure cook and adjust consistency
Oil: Prevents the dal from overflowing and foaming when releasing pressure. Any neutral-flavored oil such as vegetable, sunflower, peanut, canola, etc.
For tempering:
Ghee or oil: Ghee adds a really nice flavor and richness, but you can replace it with any neutral-flavored oil to make it vegan
Spices: Mustard seeds, cumin seeds, hing or asafoetida, and curry leaves for warmth, flavor, and aroma
Fenugreek seeds: It adds aroma and more depth of flavor to the sambar, along with aiding in digestion. A little goes a long way here. You can skip it if you don’t have it. Coriander leaves: Finely chopped for garnish. Adds fresh, earthy flavors to the whole dish
How to Make One Pot Sambar
Unlike the traditional sambar recipe that This one pot sambar recipe comes together entirely in the pressure cooker in just three simple steps:
01 Cooking dal: We start by pressure cooking our toor dal along with some turmeric powder, tomato, and oil until everything is cooked down and soft
02 Making sambar: Now to the same pressure cooker, we add all our veggies, curry leaves, tamarind, and spice powders and cook for one more whistle
03 Tempering: Once everything is cooked through, we make a tadka with mustard and cumin seeds, hing, curry leaves, etc. add it to the prepared sambar in the pressure cooker, mix everything well, and that’s it–our delicious, warming, one-pot sambar is ready to be served!
What is sambar powder
Sambar powder is a special spice and lentil mix blend that lends sambar its authentic flavor, warmth, and aroma. It’s usually made from chana dal (split chickpeas) as the base along with spices like coriander seeds, dried red chillies, cumin seeds, fenugreek seeds, and hing (asafoetida). Some people also add peppercorns to this blend, but that’s optional.
Sambar powder is easily available at most grocery stores online and offline in India, and at local Indian stores outside India. You can also easily make it at home in under 15 minutes. It has a long shelf life (stays good in the fridge for up to 6 months). In my experience, homemade sambar powder makes the dish a lot more flavorful, but store-bought can easily be used in a pinch.
Common Sambar Vegetables
Even though this sambar recipe uses just a handful of veggies, there are so many you can choose from. Here are all the veggies you can add depending on preference and availability:
Potato
Carot
Drumstick
Beans
Cauliflower
Pumpkin
Ladies Finger or Okra
Brinjal or Egg plant
Radish
Bottle gourd
Broad beans
Long beans
Plantains
Which lentils work best in Sambar?
Traditionally sambar uses just just toor dal or split pigeon peas and that’s what we have used for this one pot sambar recipe as well. However, you can use a mix of toor and moong or masoor dal. The flavor will change a little bit, but it will still be delicious!
Frequently Asked Questions
What is the difference between sambar and dal?
Sambar and dal are both lentil-based dishes, but here’s how the two are different: – Sambar is generally made with just toor dal, contains lots of veggies, has a sour flavor, and has many more spices than a regular dal – Dal on the other hand can be made with toor, masoor, chana, or moong dal, or even a mix of various dals and usually has no veggies. It has a thicker, creamier consistency as compared to sambar which is usually more watery.
Is it possible to make sambar without sambar powder?
Yes, absolutely! Sambar powder adds more warmth and an authentic flavor to the sambar, but you can easily skip it in a pinch. Even though the taste will differ slightly, the sambar will still be delicious.
Richa’s Top Tips
Follow the pressure cooking time mentioned in the recipe card, especially when cooking the veggies. We need our veggies to be completely cooked, but still have a little bite. Over cooking will lead to mushy veggies, which is not ideal for this sambar recipe
Sambar is generally watery, but feel free to adjust the consistency to your liking.
I would highly recommend using fresh spices and lentils for the best flavor and texture
It’s important to make the tempering on a medium flame to avoid burning and keep the spices and herbs aromatic
This sambar has medium spiciness and sourness. You can easily adjust the quantities of chilli powder, and tamarind to suit your preference. You can also add some jaggery to balance out the sourness if you like.
Ghee is traditionally to temper as it adds a beautiful richness and aroma to the sambar. However, you can easily replace it with coconut oil or neutral-flavored oil to make it vegan.
Storage Tips
Refrigerator: When stored in an airtight glass or steel container, sambar stays good in the fridge for up to 2-3 days.Reheat thoroughly on the stovetop and bring it to a boil to kill any bacteria before serving.
Freezer: Sambar is super freezer-friendly and stays well for up to 3 months. Store in single-servings as repeated thawing and freezing causes it to spoil very quickly. Thaw it out in the fridge overnight and then reheat in the microwave or on the stovetop before serving. Please note: Veggies may become a bit mushy when thawed which may change the texture slightly, but the flavors still remain intact.
Serving Ideas
There are so many ways to eat sambar. Here are a few favorites that always hit the right spot:
Poured over crispy medu vadasfor the most satisfying breakfast ever
Simply drink it by the bowl for a light and satisfying meal
Sambar Variations
Oil: While oil is traditionally used to temper sambar, some recipes, especially from Tamil Nadu, use gingelly or sesame seed oil (different from toasted sesame oil), while recipes from Kerala use coconut oil.
Jaggery: In Karnataka, adding a little jaggery to the sambar is a pretty common practice. Jaggery helps balance out the sourness from tamarind, while adding just a hint of sweetness.
Coconut: You can add toasted coconut shavings or make a paste by grinding toasted coconut and whole dried red chilli to add a nutty, spicy flavor to your sambar.
Raw mango: A lot of sambar recipes add raw mango when it’s in season for a deliciously tangy kick.
So now that you know how easy and hassle-free it can be to make sambar, there’s no reason to not make it the next time you’re making a South Indian spread. Once you make sambar for idli and dosa in this way, there’s no going back, I promise!
If you try this easy sambar recipe, don’t forget to send a DM with the pictures over on my IG @my_foodstory as well as tag me in your stories!
This is an easy vegetable sambar recipe where I show you how to transform store bought Sambar Powder into an amazing Sambar. Perfect for idlis, dosas and uttapams.
Add toor dal, turmeric powder, garlic,half the tomatoes, 1 ½ cups of water and 1 teaspoon oil to a pressure cooker and cook on medium for about 4 whistles (first whistle on high and then lower the flame and cook for 3 more whistles) till it’s cooked well. Mash the dal with the back of a spoon or a whisk and set aside.
Making Sambar
Add curry leaves, carrots, beans, drumsticks, sambar onions, green chillies, sambar powder, chilli powder, coriander powder, tamarind pulp and salt along with another cup of water. Mix well. Cook for one more whistle on high. Turn off the flame immediately after the whistle goes off. Once the pressure releases naturally, open the cooker and add more water if required to adjust the consistency. Keep the sambar on a simmer while you make the tempering or tadka.
Tempering
Heat ghee/oil in a tadka pan or a saucepan on a medium flame. add mustard seeds and cumin seeds. As they start to splutter, add hing, whole red chilli, curry leaves and fry till fragrant. Add chopped coriander and mix well. Turn off the heat and add tempering to the prepared sambar, mix well and serve.
Video
Notes
I like this sambar with almost fully mashed dal. If you like yours to be more chunky, do not mash it as much as I have. You can also reduce the cooking time for the dal by 5 minutes.
I have used MTR sambar powder in this recipe, you can use any trusted variety.
You can substitute fresh tamarind pulp with pre-packed tamarind paste.
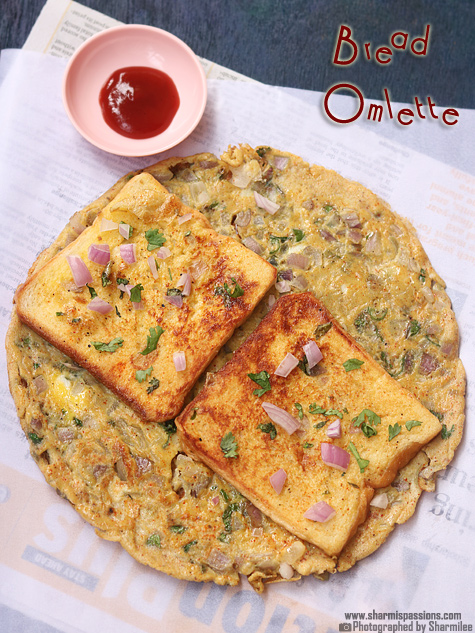

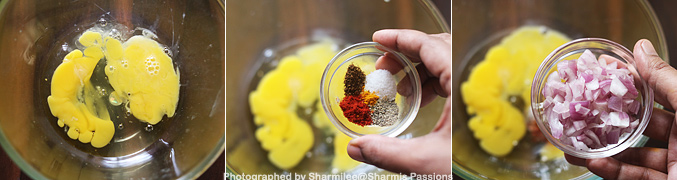
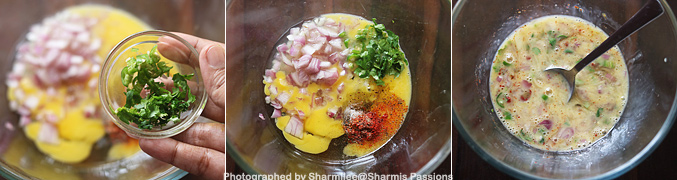
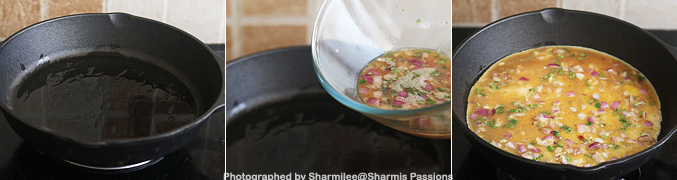
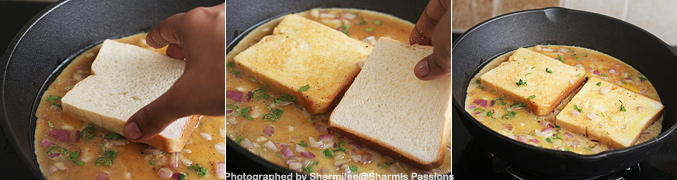


 Guide:


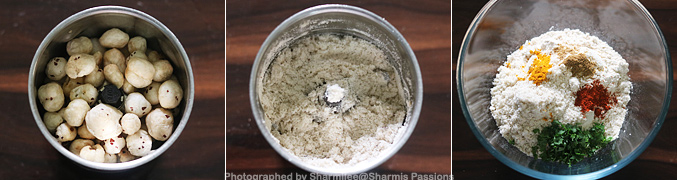
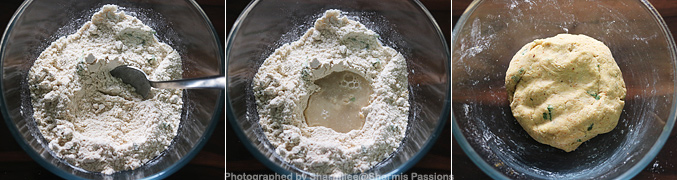
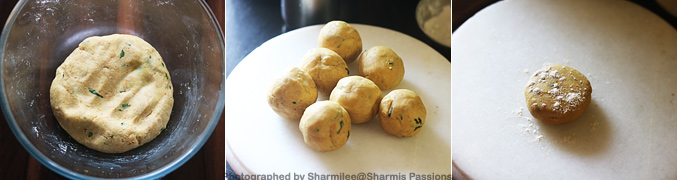
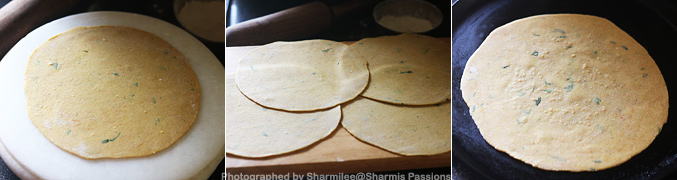
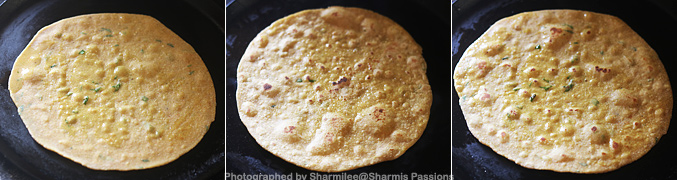


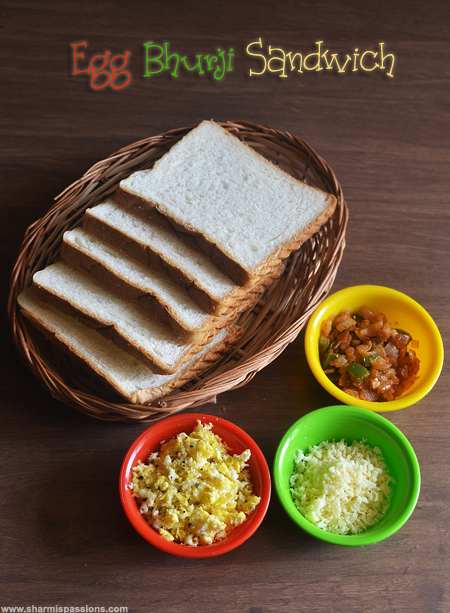
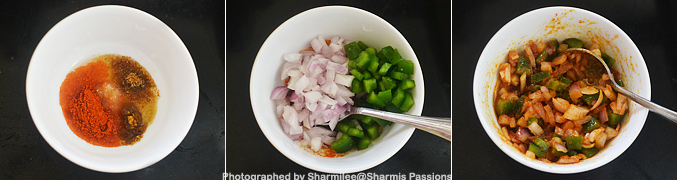
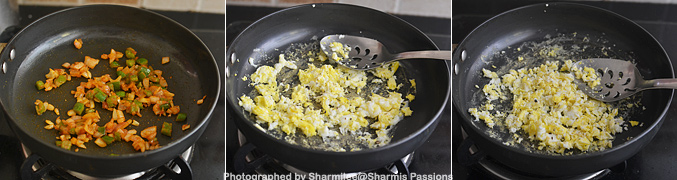
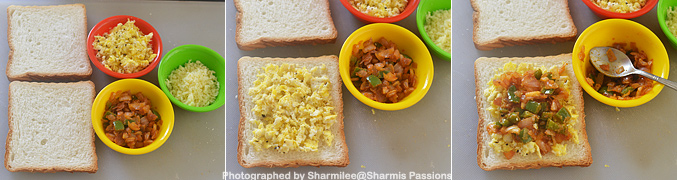
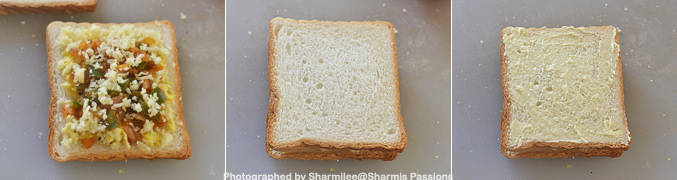
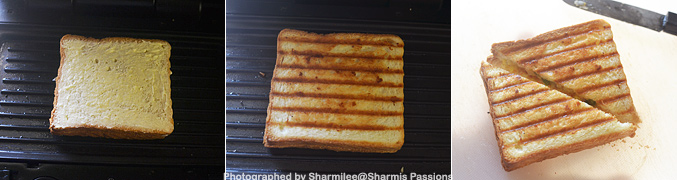


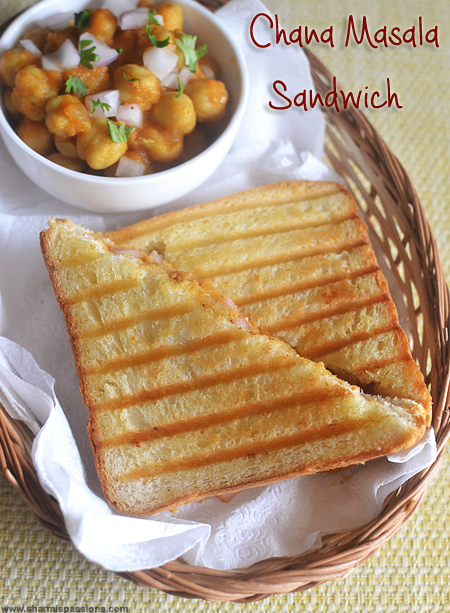
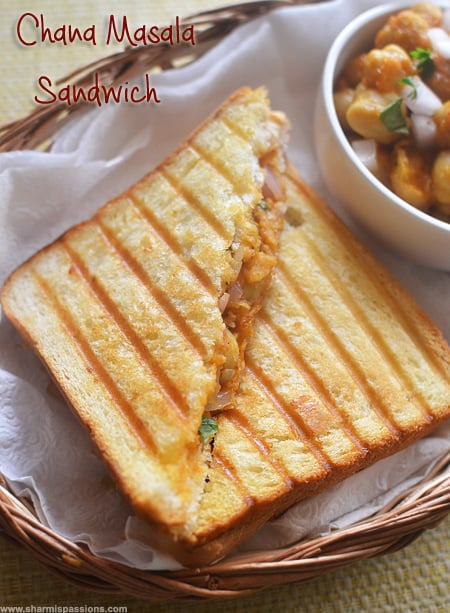
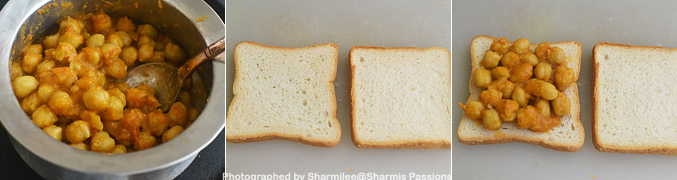
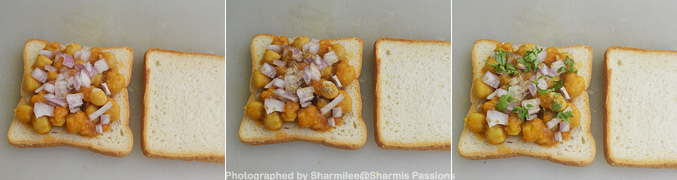
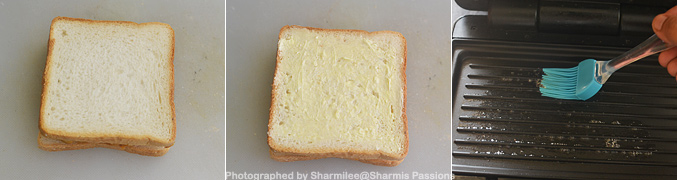
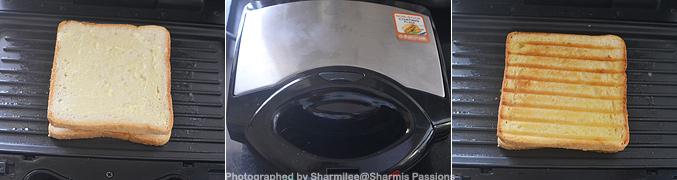
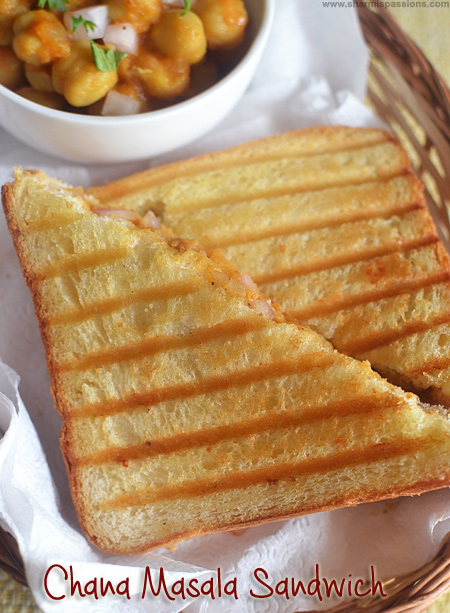
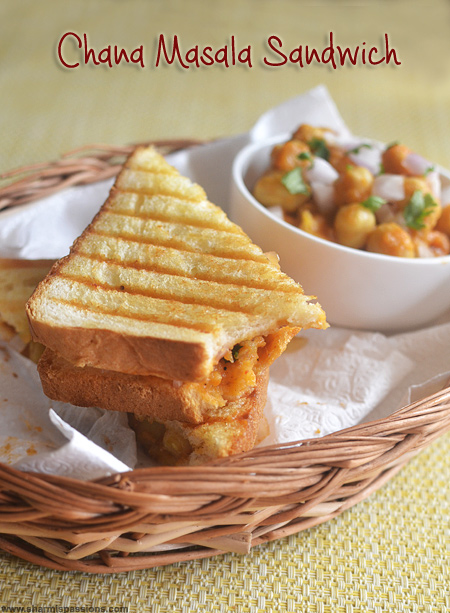


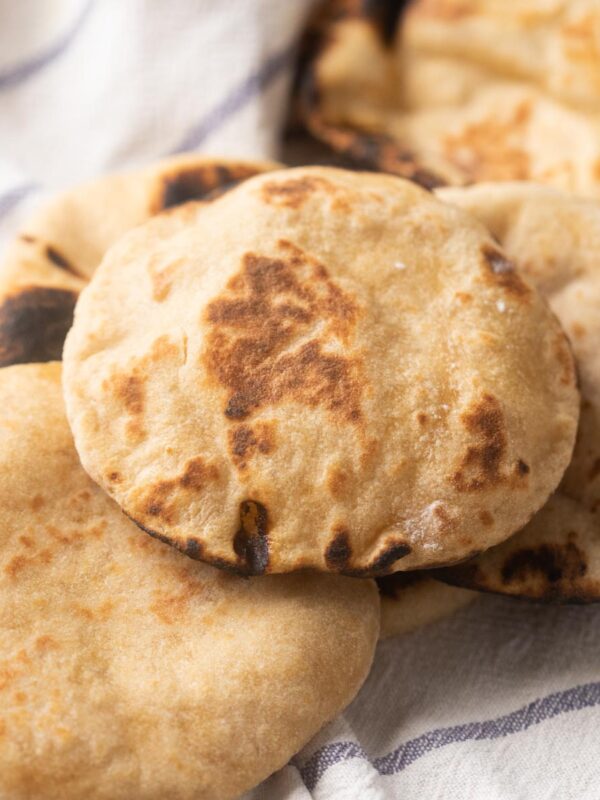
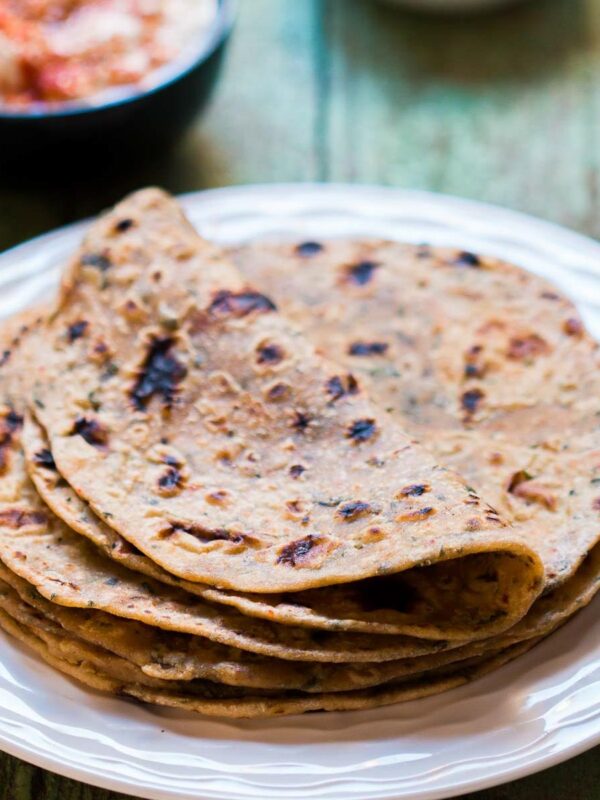


 Bo Moreno grew up in Austin but spent his summers with his paternal grandparents in Odem, near Corpus Christi. On Sunday mornings his grandmother would prepare breakfast, and he would ride the few miles to Sinton with his grandfather to pick up barbacoa. Moreno can’t recall the name of the now closed shop they went to, but, he says, “I can tell you how to get there.” Eggs, refried beans, and tortillas were everyday breakfast foods, but barbacoa was a monthly treat, an experience he tries to re-create with his Sundays-only version at Moreno Barbecue, in Austin.Moreno doesn’t use the whole cow head, as the cooks in Sinton did. Instead, he makes his only with beef cheeks. “You don’t get that greasy and gritty taste,”…