Eggless white fruit cake is a soft, delicious and creamy cake. It is one of the easiest fruit cakes that you can make because there are no complicated steps involved. The batter is made with flour, oil, butter, condensed milk and a good amount of soaked fruits. If you are looking for an eggless fruit...
If you love the warm flavour of a classic Christmas fruit cake, but don't want to wait for long soaking or forget to soak the fruits, then I got you covered. This fudgy fruit cake brownie gives you the same Christmas flavour, but with an easy method. It is made with dried fruits, rum, sugar,...
Lemon Bundt Cake is a soft and bright cake I keep making many times, especially when I feel like eating some light dessert. The mild lemon flavor comes even when I am mixing the batter, and once it bakes the warm citrus smell spreads everywhere and gives a cozy feel at home.
This cake suits tea time or even a small home celebration. I sometimes pack few slices for travel also because it stays good for a day. The fresh lemon flavor keeps the cake light and pleasant and if you like a little extra tang a simple lemon drizzle on top goes very nicely with the soft crumb.
[feast_advanced_jump_to]
About Lemon Bundt Cake
Lemon Bundt Cake is a basic sponge style cake baked in a bundt pan that gives a cute ring shape. I used simple ingredients like flour, baking powder, baking soda and fresh lemon zest which gives a bright citrus smell. The batter is easy to mix and because the bundt pan bakes a little faster the cake gets done pretty quick.
In this recipe, lemon is the main flavor and you can also use fresh zest and juice to make the taste more tangy and fresh. This recipe flavor is gentle, and it feels comforting without making the cake heavy. It has soft and spongy texture and has that light golden shade after baking.
There are few small variations too. Some people add little vanilla along with lemon flavor and some add poppy seeds for a small crunch. You can make an orange version using the same method and it comes out really nice. If you do not have a bundt pan you can use cupcake trays or a small loaf tin also.
I usually bake this when everyone at home wants a simple and light after meal dessert. The lemon flavor gives a small fresh lift and since the cake is not heavy even kids enjoys a slice happily. Lemon Bundt is a flavorful treat that has to be tried for the joy of baking.
Lemon Bundt Cake Ingredients
Whole wheat flour - I added this as base for the cake as it gives flavor that blends nicely with lemon. You can use maida also if you want more lighter texture.
Baking powder - I use this for helping the cake rise softly and give a gentle lift. You can add little more only if your flour is very dense.
Baking soda - I added this along with the lemon juice since it reacts well and gives that small airy feel. You can skip if your batter feels already too loose.
Cane sugar - I am using cane sugar as it gives a mild caramel-like taste which suits this cake. You can use white sugar also if that is what you have.
Oil - I have used oil instead of butter to keep the cake more moist and soft for long time. You can add melted butter also but the texture will be slightly firm.
Milk - I added milk to loosen the batter and give a smooth flowy texture. You can use warm milk also if the sugar is not melting properly.
Lemon zest - I grated the outer skin lightly for bright aroma and taste. You can skip if you feel the lemon flavor is already strong.
Lemon juice - I have used fresh lemon juice which gives the refreshing taste. I also added this to make a tangy syrup to drizzle over the small cakes. You can adjust according to how tangy you want.
Icing sugar - I use this to make the topping glaze smoother. It dissolves quickly and gives that shiny look.
Why This Recipe Works
This recipe is easy and simple so you can make it even on busy days.
It has a soft and slightly spongy texture that lemon taste.
You can easily adjust the sweetness as cane sugar blends nicely.
It bakes fast and works even if you don't have a large oven.
You can use the same mixture to bake cupcakes or a small loaf also.
1.Measure and take milk in a mixing bowl, add oil and cane sugar to it.
2.Whisk it well. Strain to remove impurities, Set aside. Extract lemon juice, measure and keep aside.
3.Using a grater take lemon peels, Set aside. To a mixing bowl take wheat wheat along with baking powder, soda and lemon zest.
4.Whisk well then add oil milk mixture.
5.Mix well using a whisk. Add lemon juice, mix once.
6.The batter should be thickish. Grease the bundt tin with oil using a pastry brush. Now spoon the batter. While you prepare this, preheat oven at 180 deg C for 10 minutes.
7.Fill it till ¾th of each hole. Bake in preheated oven for 15-18 minutes or till the top turns golden.
8.Cool down for few mins then carefully lift the cake using a fork. Let it to cool down.In a small mixing bowl take icing sugar,
9.Add lemon juice to it, mix well until it forms a thick syrup. Drizzle over the cake
Serve with lemon sauce!
Expert Tips
Use fresh lemon - I usually use fresh lemon juice as bottled one gives slight bitterness sometimes.
Don't overmix - I often stop mixing once everything is just combined so the cake doesn't turn dense.
Grease well - I usually grease the bundt tin fully as these molds tend to stick at corners.
Check early - I have noticed small bundt cakes cook faster so I check a little early to avoid overbrowning.
Cool properly - I always let the cakes cool completely before drizzling or else the syrup becomes runny.
Serving and Storage
Serve this with warm milk, tea or even pack it in snack box. This goes well as a light evening sweet too. You can store leftover pieces in an airtight box for one day in room temperature. If you want to keep longer just refrigerate and warm little before eating. The drizzle sets nicely once cooled so it stays neat.
FAQS
1.Can I skip the lemon glaze?
Yes you can, the cake tastes good plain also.
2.Can I use full maida instead of wheat flour?
Yes you can use maida fully if you want softer cake.
3.Will butter work in place of oil?
Yes but the texture becomes little firm, not very soft.
4.Can I add vanilla essence along with lemon?
You can add few drops if you like that mixed flavor.
5.How do I know it's baked?
Just touch the top, if it springs back or a toothpick comes clean it is done.
If you have any more questions about this Lemon Bundt Cake Recipe do mail me at sharmispassions@gmail.com. In addition, follow me on Instagram, Facebook, Pinterest, Youtube and Twitter .
Tried this Lemon Bundt Cake Recipe? Do let me know how you liked it. Also tag us on Instagram @sharmispassions and hash tag it on #sharmispassions.
Lemon Bundt Cake is a soft and bright cake I keep making many times, especially when I feel like eating some light dessert. The mild lemon flavor comes even when I am mixing the batter, and once it bakes the warm citrus smell spreads everywhere and gives a cozy feel at home.
Mirror glaze recipe, is a shiny, glossy coating that gives the cake a super mirror finish look. It is made with very few ingredients like gelatin, cocoa powder, sugar, cream, water and the final output will be absolutely stunning. This glaze can be used to decorate any type of desserts like cake, cupcakes, chocolate bar,...
Citrus pound cake is a rich, soft and moist cake that bursts with fresh citrus flavour. This is a simple cake made with basic ingredients like egg, all purpose flour, sugar, butter, orange and homemade candied orange peel. This cake can be enjoyed on its own, but it tastes even better when served with a...
Eggless cashew pound cake is a soft, buttery cake made without eggs and it comes together beautifully with just a handful of basic ingredients. Every slice gives you that rich, nutty flavour and you can enjoy this treat any time of the day. Whether you're serving it with a cup of tea as an evening...
Eggless Coconut Cake Recipe with step by step pictures. This is a rich and spongy cake recipe made with coconut, all purpose flour, sugar, butter and coconut milk. Coconut is mixed to the cake batter, so the flavor is evenly infused to the cake. This version is a simple tea time coconut cake, for more...
Marshmallow fondant is a quick and easy way to make fondant at home using simple ingredients like icing sugar and marshmallow. It is used to cover the cakes, cupcakes and also used to make fun edible designs like flower, bow, number, animal and letters. If you're new to baking, marshmallow fondant is a great idea...
Orange Bundt Cake is one of those simple bake that taste so fresh and soft. It is made with flour, butter, sugar, orange juice and zest then baked in bundt mold which gives pretty shape. The cake turn out moist and flavorful with a nice citrus kick. It looks very pretty when serving and feels special even though it very simple to make.
This recipe is eggless so it suitable for everyone. It not need any special ingredient and comes together very quickly. The flavor of orange really shine in the cake and I feel it a good choice for tea time or when you want bake something light but still tasty. Even a beginner in baking can try this recipe as it is very forgiving and easy to follow.
[feast_advanced_jump_to]
About Orange Bundt Cake
Orange Bundt Cake is a cake made using fresh orange juice and zest along with flour and butter. The bundt pan makes it look cute and stylish but if you don't having one you can always bake in any normal tin too. The cake texture are soft, spongy and with mild tangy flavor from the orange.
This cake is different from usual vanilla cake because of citrus taste. Butter and sugar together makes it light and rich while orange zest bring out strong aroma. It is eggless but still rise well because of baking soda and baking powder. Each bites feel refreshing and not overly sweet which makes it perfect for evening snack.
There are many variations you can try with this base recipe. I baked with lemon juice once and it come out very refreshing. You can even add cocoa powder and make chocolate orange version. If you eating eggs then this recipe can also be done with egg substitution.
I usually bake Orange Bundt Cake on lazy weekend. It is quick, not very messy and comes out looking neat in the bundt shape. Kids also like it because of small bundt pieces which easy for them to hold and eat.
Orange Bundt Cake Ingredients
Maida - I have used plain maida flour which makes the cake soft and light. You can also try with wheat flour if you prefer but I feel cake will turn little dense with it.
Butter - I have taken soft butter and beaten with sugar until creamy. You can replace with oil if needed but I like butter flavor more in this cake.
Powdered sugar - I have used heaped powdered sugar here. It blends quickly and gives the right sweetness. You can reduce or increase little based on your taste.
Baking soda and baking powder - You can see I have added both for good rising. It makes the cake fluffy and soft. Always check that they are fresh.
Orange juice - I have used fresh squeezed juice only. You can use any sweet orange, avoid the packed juice because it doesn't give the same flavor.
Orange zest - I usually grate zest from fresh orange. It adds strong citrus aroma and taste. You can skip if you don't like but I feel it really lifts the cake flavor.
Milk - I have boiled and cooled milk before adding. It gives moisture and balance to the tangy orange juice. You can even add little more if you feel batter too thick.
1.Beat butter and sugar together until creamy..Whisk flour, baking powder and baking soda together and set aside.
2.Add milk to butter mixture,whisk it well then add flour mixture. Whisk it well without any lumps.
3.Then add fresh orange juice and whisk to form a smooth creamy flowing batter. Then orange zest, give a quick mix. Preheat oven at 180 deg C for 10 minutes.
4.The batter will be flowing but spoonable. Grease your pan with oil.
5.Spoon the batter into the bundt pan till ¾th of the center stick. Bake in preheated oven for 12-15 minutes or until the top turns golden. Cool down for few mins then slowly invert and remove the cakes.
Serve as a snack!
Expert Tips
Zesting orange - I have used small grater to take zest. I don't grate the white part as it gives bitter taste. You can always zest just before baking for freshness.
Mixing batter - I usually fold the flour gently after mixing wet ingredients. If you whisk too much cake may become dense. You can just mix until no lumps.
Baking time - I have noticed the timing depends on oven and pan size. I usually check from 12 minutes with toothpick. You can keep an eye after that.
Bundt pan size - I have filled batter only ¾th in the bundt mold. You can also try other shapes but don't overfill else it may overflow while baking.
Cooling - I usually let the cake sit for few minutes before unmolding. You can invert slowly once edges are loosened, else cake may break.
Serving and Storage
Serve Orange Bundt Cake with tea, coffee or just as a snack for kids. It is small, light and looks pretty in the bundt shape so also good to keep for evening get together or kids parties. You can store this cake in airtight box for 2 days at room temperature. I have also stored in fridge for 4-5 days, just warm little before eating. The texture stays good and soft.
FAQS
1.Can I make this without bundt pan?
Yes, you can use round or square tin also. I have tried in both and it works fine.
2.Can I use wheat flour?
Yes, you can, but cake will be bit heavy and dense. I usually prefer maida for soft texture.
3.Can I replace butter with oil?
Yes, you can use neutral oil. But I have always liked the butter flavor in this cake better.
4.Do I really need orange zest?
You can skip if you don't like strong citrus, but I feel zest is what gives cake its best aroma.
5.Can I double this recipe?
Yes, you can double easily. I have done it for bigger pan but make sure to bake evenly.
If you have any more questions about this Orange Cake Recipe do mail me at sharmispassions@gmail.com. In addition, follow me on Instagram, Facebook, Pinterest, Youtube and Twitter .
Tried this Orange Cake Recipe? Do let me know how you liked it. Also tag us on Instagram @sharmispassions and hash tag it on #sharmispassions.
Orange Bundt Cake is one of those simple bake that taste so fresh and soft. It is made with flour, butter, sugar, orange juice and zest then baked in bundt mold which gives pretty shape. The cake turn out moist and flavorful with a nice citrus kick. It looks very pretty when serving and feels special even though it very simple to make.
Whisk flour, baking powder and baking soda together and set aside.
Add milk to butter mixture, whisk it well then add flour mixture. Whisk it well without any lumps.
Then add fresh orange juice and whisk to form a smooth creamy flowing batter.
Then orange zest, give a quick mix.
Preheat oven at 180 deg C for 10 minutes.
The batter will be flowing but spoonable. Grease your pan with oil.
Spoon the batter into the bundt pan till ¾ th of the center stick.
Bake in preheated oven for 12-15 minutes or until the top turns golden.
Cool down for few minutes then slowly invert and remove the cakes.
Enjoy Orange Bundt Cake!
Notes
Zesting orange - I have used small grater to take zest. I don't grate the white part as it gives bitter taste. You can always zest just before baking for freshness.
Mixing batter - I usually fold the flour gently after mixing wet ingredients. If you whisk too much cake may become dense. You can just mix until no lumps.
Baking time - I have noticed the timing depends on oven and pan size. I usually check from 12 minutes with toothpick. You can keep an eye after that.
Bundt pan size - I have filled batter only ¾th in the bundt mold. You can also try other shapes but don't overfill else it may overflow while baking.
Cooling - I usually let the cake sit for few minutes before unmolding. You can invert slowly once edges are loosened, else cake may break.
Cake flour is a readymade flour blend that we can use for baking cakes, cupcakes or any soft bakes. Cakes baked using this flour gives that kind of fluffy and soft bakery style texture which we all like. Cake flour is not easily available everywhere, So I started making it at home. Once you try using this mix, you can feel the difference in the texture of your cakes.
You can even prepare this in bulk if you bake regularly. It's very handy and blends well into most cake batters. The method is super easy and takes just 2 minutes. All you need is maida and corn flour, the regular white corn flour we use for soups or sauces. I just whisk it well using a fork or small whisk and store it in a dry container.
[feast_advanced_jump_to]
About Cake Flour
Cake Flour is a simple mix of all purpose flour (maida) and corn flour in a certain ratio. It is used to make cakes soft, fluffy and light. Since it has lower protein than regular flour, it helps in getting a tender crumb and airy texture. This mix works great for sponge cakes, muffins and cupcakes.
It holds air in batter and helps cakes rise with a light soft texture. Also I feel the cake doesn't sink in middle when I use this. Sieve it once then mix well and store it. This flour makes soft and fluffy cakes.
I came to know about this when I started learning baking basics. Most international recipes mention cake flour but we don't get it easily here. So I began making it myself using ingredients I already had in the kitchen. Since then, I'm only using this homemade version and it works well for my basic cakes.
I first tried cake flour when I was testing a vanilla sponge cake and noticed it came out much softer than before. After that, I started keeping a small jar of cake flour always ready in my baking shelf.
If you are someone who bakes often, then this mix will be really useful. This flour comes handy to make homemade baked goodies in a jiffy. Do try this and stock your pantry with homemade cake flour.
Cake Flour Video
Cake Flour Ingredients
Maida - This is the main ingredient. I use the regular store-bought maida. After measuring 1 cup, remove 2 tablespoon from it. That's the exact quantity we need.
Corn flour - This is added to reduce the gluten in maida. It makes the flour more soft and gives that bakery-style lightness. Use the plain white corn flour which we usually use for soups and sauces.
3.Level it using a spatula and remove 2 tablespoon flour from it.
4.Now take 2 tablespoon corn flour that is 16 grams. Level and measure.
5.Add 2 tablespoon measured corn flour to the flour. So it is basically removing 2 tablespoon flour and adding 2 tablespoon corn flour to it.
6.Add the cup measure to a sieve.
7.Sieve it well for even mixing.
8.Give a quick mix. Homemade cake flour is ready.
Store in a clean jar. Measure and use it when mentioned as cake flour.
Expert Tips
Don't skip corn flour - Corn flour is what makes this mix special. It helps make cakes more soft and spongy. If you skip it, then you're just using maida again.
Measure right - It's important to remove exact 2 tablespoon maida from 1 cup, then add same amount of corn flour. Try not to guess, use proper measuring spoons for this.
Whisk or sieve - Sieving is always best so that it is evenly mixed.
Store clean and dry - Always use a clean dry jar or box. Any moisture inside will spoil the flour or make it lumpy. So make sure the container is dry before storing.
Make in advance - If you bake often, you can make more and keep ready. I usually make 2 to 3 cups and store. It keeps well for few months and saves time too.
Serving and Storage
Cake flour is used only for baking soft cakes, cupcakes, muffins etc. You can't use it like regular maida for other dishes. You can store it in an airtight for 2 to 3 months if stored right. No need to refrigerate, just make sure the jar is clean and dry.
FAQS
1.Can I skip corn flour?
Not really. Then it becomes just maida again. Corn flour is the main thing that makes cake flour soft.
2.Is it same like bakery cake flour?
Almost same only. Bakery one may have some added stuff, but this homemade version works just as good.
3.Can I use this for all cakes?
Works best for sponge cakes and cupcakes. Not for fruit cakes or brownies though.
4.Should I sieve it?
Yes it is better to sieve and use it so that it is evenly mixed.
5.Can I store in fridge?
Not needed. Room temperature is fine. Just keep in airtight dry container.
If you have any more questions about this Homemade Cake Flour Recipe do mail me at sharmispassions@gmail.com. In addition, follow me on Instagram, Facebook, Pinterest, Youtube and Twitter .
Tried this Homemade Cake Flour Recipe? Do let me know how you liked it. Also tag us on Instagram @sharmispassions and hash tag it on #sharmispassions.
Cake flour is a readymade flour blend that we can use for baking cakes, cupcakes or any soft bakes. Cakes baked using this flour gives that kind of fluffy and soft bakery style texture which we all like. Cake flour is not easily available everywhere, So I started making it at home. Once you try using this mix, you can feel the difference in the texture of your cakes.
Keyword 30 mins recipes, all purpose flour recipes, cake, Cake Recipes, christmas recipes, How to, maida recipes, no cook recipes
Prep Time 10 minutesminutes
Total Time 10 minutesminutes
Servings 1cup
Calories 516kcal
Author Sharmilee J
Ingredients
1cupflour(110 grams)
2tablespooncorn flour(16 grams)
Instructions
First measure 1 cup flour(maida).
Using 1 tablespoon measure scoop out.
Level it using a spatula and remove 2 tablespoon flour from it.
Now take 2 tablespoon corn flour. Level and measure.
Add 2 tablespoon measured corn flour to the flour. So it is basically removing 2 tablespoon flour and adding 2 tablespoon corn flour to it.
Add the cup measure to a sieve.
Sieve it well for even mixing.
Give a quick mix. Homemade cake flour is ready.
Store in a clean jar. Measure and use it when mentioned as cake flour.
Video
Notes
Don't skip corn flour - Corn flour is what makes this mix special. It helps make cakes more soft and spongy. If you skip it, then you're just using maida again.
Measure right - It's important to remove exact 2 tablespoon maida from 1 cup, then add same amount of corn flour. Try not to guess, use proper measuring spoons for this.
Whisk or sieve - Sieving is always best so that it is evenly mixed.
Store clean and dry - Always use a clean dry jar or box. Any moisture inside will spoil the flour or make it lumpy. So make sure the container is dry before storing.
Make in advance - If you bake often, you can make more and keep ready. I usually make 2 to 3 cups and store. It keeps well for few months and saves time too.
Looking for a sumptuous and moist chocolate cake? We have got one for you which is one of the quickest and easiest chocolate cake. Microwave chocolate cake is one-bowl cake recipe and is a savior for those who want to bake a super quick, easy, soft, moist and a rich chocolate cake.
This is a simple, fuss-free, easy to bake microwave chocolate cake perfectlybaked at 5 minutes. I’ve made this cake many times and each time it never disappoints me. So better late than never, finally I decided to shoot and blog it for my readers which was a long pending request. Trust me after the first trial, you are surely going to make this over again!
My very first baking experience was in microwave oven as I was not having the microwave convection oven or OTG. So I used to cook the cake in microwave. It was a great experience with cakes getting ready from 2 to 7 minutes depending upon the types of cake you’re making.
5 Minutes Microwave Chocolate Cake makes a quick and easy celebration bake or an amazing anytime treat. Need a cake at the end moment for some surprise celebration or treat? This is it! This recipe comes to your rescue. Make this microwave chocolate cake on your own in just 5 minutes. You can make layers and decorate with whipped cream, ganache, cream cheese or simply garnish with fresh fruits, nuts or drizzle homemade chocolate sauce/syrup just like I did.
This eggless microwave chocolate cake gets cooked in 5 minutes. So in total it takes only 15 minutes from preparation to cooking to get a scrumptious and delicious whole cake cooked in no time at all.
WHAT ARE THE INGREDIENTS NEEDED FOR MICROWAVE CHOCOLATE CAKE Let’s briefly see what all ingredients goes inside this delicious cake and what are the ingredients substitution for making this microwave chocolate cake. ● Whole wheat flour – The recipe uses whole wheat flour. You can use all purpose flour or 50-50% ratio of both. ● Cocoa powder – Used Ossoro’s cocoa powder. ● Sugar – White sugar is used in the recipe. You can use healthier sweeteners like brown sugar, jaggery, cane sugar etc. ● Baking powder ● Baking soda ● Salt ● Oil – Used sunflower oil. You can use any neutral flavor oil. ● Milk – Used coconut milk to make it vegan chocolate cake. You can use any dairy milk as well. Recommend to use whole milk for extra richness. ● Vinegar – You can used lemon juice instead of vinegar. ● Chocolate truffle essence – I have used Ossoro’s chocolate truffle essence. You can use other essence like vanilla or chocolate. For serving: ● Homemade chocolate sauce ● 2 tbsp white chocolate melted
I made a simple recipe video of this quickest and easiest microwave chocolate cake recipe for my readers which I have shared below. Please do watch and SUBSCRIBE to my channel if you haven’t yet. It will mean a lot to me and motivate me to come up with more videos for my readers. As always looking forward to your feedbacks!
MICROWAVE CHOCOLATE CAKE VIDEO TUTORIAL
VARIATIONS ● If you want to make these microwave cake even more decadent add in some chocolate chips in the batter. ● You can bake this microwave cake in mugs as well. Pour the prepared cake batter into individual coffee mugs and bake in microwave for 2 minutes. ● You can make this microwave chocolate cake with egg by replacing vinegar and baking soda with 2 eggs and will need to reduce the liquid by few tablespoons. ( 1 large egg will also work). ● You can add nuts and dry fruits in the cake batter.
WHICH BAKING DISH CAN BE USED Since we are making this cake in a microwave mode and not microwave convection mode so it is very important to note that the container or pan used is microwave safe. Use microwave safe glass ware, silicone ware, plastic ware or ceramic containers. I prefer glass or ceramic ware. Never use regular metal oven pans for any of your microwave baking.
CAN THIS BE BAKED IN MICROWAVE CONVECTION MODE AND OVEN (OTG)? This recipe is a versatile recipe so YES you can bake it in microwave convection mode, OTG and even in pressure cooker over a stove. The cake turns out beautifully. If you like this recipe and want to bake it in an microwave with convection mode or OTG (oven toaster griller), you can bake it at preheated oven at 180 degree celsius for 30 mins or until a toothpick inserted in the middle comes out clean. Just remember to preheat the oven for 10 minutes before starting to bake.
PRESSURE COOKER METHOD Put a stand inside the cooker or pan then preheat it for 5-10 minutes. Remove the gasket and whistle from the cooker cover. Place the cake pan on the stand and just cover the cooker with the lid. Bake at low heat for 40 minutes or until a toothpick or skewer inserted comes out clean.
HELPFUL TIPS WHEN BAKING CAKES IN THE MICROWAVE ● When cooking and baking on microwave at full power it’s important to stop in between and check because timing can differ slightly depending on the microwave. If you are baking a cake check your bake by inserting a toothpick in the middle of the cake, if the toothpick comes out clean, your cake is done. ● My microwave is 1000 watt so the baking time in my recipe is based on my microwave watt. This means that your baking time will vary by either a few minutes more or less depending on your microwave. ● Do not overbake. Keep in mind that in microwave cooking the dish continues to cook for at least another 2 minutes after it has been removed from the microwave. ● It is very important that the container or pan used is microwave safe. You can use microwave safe glassware, silicone ware and plastic ware.
TOPPINGS AND FROSTING SUGGESTIONS These can be as simple as a tea cake or a snack drizzle with homemade chocolate sauce. Also you can elaborate and make it fancy depending on the occasion or your mood. Here are a few toppings if you would like to give it a try: ● You can use a simple sugar glaze for topping ● Simply dust with powdered sugar. ● Drizzle or spread a generous amount of chocolate sauce to make it more decadent and chocolatey. ● Sprinkle chopped nuts and dry fruits ● Make layer cakes with fresh fruits or fruit crush filling and frost it with your choice of frosting like whipped cream, cream cheese or buttercream. ● You can also top the frosted cake with seasonal fruits. ● You can use chocolate ganache for filling and frosting the cake.
Here are all my Bakes & Cakes recipes if you’re craving more baking inspiration.
All of the above recipes are super easy to prepare, ready in no time, and will never disappoint you.
I hope you love this quickest and easiest chocolate cake recipe. Do give it a try and don’t forget to share your thoughts about the recipe with me here. So let’s get started with the recipe.
9☆ 1 cup = 240 ml ☆ 1 tablespoon = 15 ml ☆ 1 teaspoon = 5 ml ☆ Dish size = 1 litre capacity
Ingredients to make 5 minutes chocolate cake:
1 cup (125 grams) whole wheat flour ¼ cup (30 grams) cocoa powder 1 tsp baking powder ½ tsp baking soda ¼ tsp salt ½ cup sugar (100 grams) ¼ cup oil (60 ml) 200 ml coconut milk 2 tsp (10 ml) vinegar or lemon juice ¼ tsp Ossoro chocolate truffle essence (You can also use vanilla essence -1 tsp) Homemade chocolate sauce as required for glaze 2 tbsp white chocolate chip melted
Step by step pictorial instructions to make 5 minutes chocolate cake:
Take a microwave safe bowl or pan and grease it with oil or butter. You may line a parchment paper as well. Keep aside.
In a mixing bowl add in the milk, sugar and oil. Stir nicely and let the sugar dissolve.
Take a sift and add in the flour, cocoa powder, baking powder, baking soda and salt. Sieve the ingredients together. Gently fold and make a smooth batter.
Add in the essence and vinegar or lemon juice and give a gentle quick mix.Pour the batter into the greased cake pan and tap the pan couple of times to release any air bubbles.
Place the cake pan in the microwave and microwave on high powder for 5 minutes. A toothpick inserted should come out clean. If it’s not done then bake for 1 minute more. Keep an eye from 4 minutes onwards since the microwave heat differs from one another.
Take it out of the microwave and allow to stand for about 10 minutes. Demould it and allow to cool down completely.
Once the cake is completely cooled down, spread the chocolate sauce over the cake. Randomly drizzle the melted white chocolate and swirl it with a toothpick or skewer.
Cut and serve. Enjoy!
NOTES: ● If you like this recipe and want to bake it in an microwave with convection mode or OTG (oven toaster griller), you can bake it at preheated oven at 180 degree celsius for 30 mins or until a toothpick inserted in the middle comes out clean. Just remember to preheat the oven for 10 minutes before starting to bake. ● Each microwave will vary so I recommend starting at 4 minutes and going for 30-60 seconds increments until it bounces back to the touch and a toothpick or skewer comes out clean.
Well, if you make this 5 minutes microwavechocolate cake, please do leave a feedback in the comments box below or snap a photo and tag Akum Raj Jamir on Facebook and akumrajjamir on Instagram with hashtag #atmykitchen. I would love to see your creations.
Thank you so much for stopping by my blog. I hope you liked the recipe. Your valuable feedbacks are always welcome, I love hearing from you guys and always do my best to respond to each and every one of you.
Happy Cooking! Love Akum
Disclosure: At My Kitchen is an Amazon Affiliate, which simply means that if you make a purchase through these links, I will earn a very small commission at no additional cost to you!
Please click on the link if you wish to purchase these products from Amazon.
A perfectly baked banana raisin loaf cake that’s so moist and speckled with raisins. Soft and moist banana cake sweeten up with brown sugar for a healthy and simple breakfast, snack, or dessert! This banana raisin cake recipe makes a sweet yet nourishing treat that is easy to put together and delicious to eat.
This soft and moist banana raisin loaf cake is insanely delicious and ridiculously easy to make with a few easy steps. This is one of my favourite cake style snacks. Serve fresh out of the oven with a cup of tea or coffee and even ideal for a light simple breakfast, dessert or as tasty snack!
The cake has a wonderful aroma as it bakes and even when you have a slice after a day. It’s a moist, soft, scrumptious cake with beautiful crumb which are to die for. The flavour of bananas is robust and the bits of the raisin you get in every bite takes it to another level.
Banana and raisin go very well together. This whole wheat banana raisin cake has a burst of flavor. The aroma from the banana and juicy bite of the raisin in each bite of the cake is drool worthy. This banana raisin loaf is insanely delicious that you can’t stop with just one slice! This scrumptious cake does not last more than 24 hours at my house.
Not a fan of raisins? You can try any other kind of dried fruit you enjoy. Or, skip them all together. You can even try it with your favourite nuts or chocolate chips!
If you’re a regular reader of my blog, by now you would have known that most of my cakes are eggless cakes. But this time I made this banana raisin cake with egg since my readers have requested for a egg based banana cake. I am happy to share this easy yet a no fail recipe. I am hoping you will love it as much as we!
But if you are looking for an eggless version of banana bread like cake then this banana nut bread is the closest one. Also I have couple of banana based cakes and muffins in my blog which I am sharing below. Do have a look at them I am sure you would.love to try some of them.
There are two main reasons why I like banana cake. One is taste, and the other is the simplicity of any banana cake recipe. And this banana raisin cake recipe is easy-to-make and tastes fantastic.
USE OVERRIPE BANANAS
When buying bananas, it is best to choose firm and unscarred bananas so you can monitor and figure out the best ways to use your bananas. I always let them over ripe at home when I want to use them kn my bakes. Over ripe bananas are perfect in recipes such as muffins, bread, and cakes. I always recommend to use overripe bananas in baking especially in cakes, muffins to make the very best banana cake with super moist, soft and flavorful outcome, The riper the bananas, the more moist your cakes will be and the more banana flavor it will have! The outcome of the cakes will be tender and packed with full of flavor.
HOW EASY IS THIS BANANA RAISIN LOAF CAKE?
This banana raisin cake recipe is super simple, easy and fuss-free. It doesn’t require a stand mixer or a hand mixer. There is no fancy equipment required. Just a bowl and a spatula or hand whisk does the work. The batter takes less than 15 minutes to throw together and gets perfectly baked in 35 minutes. This is one of the easiest banana cake recipe and the result is absolutely amazing. I am sure you’ll fall in love with it. Do watch the video tutorial below on how to make this moist banana raisin loaf cake. You will be surprised to see how easy it is to make at the comfort of your home with few easy steps.
● Mash the banana with fork. You can also use blender or mixie.
● In a mixing bowl beat the egg.
● Mix together the beaten egg, brown sugar, mash banana, essence, oil.
● Sieve in the flour, baking powder, baking soda, salt and mix.
● Add in the milk to loosen the batter.
● Add in the rasins and quick mix.
● Transfer the batter to prepared loaf pan and tap the pan for couple of times.
● Top up with rasins and bake as per the recipe.
I made a simple recipe video of this super easy banana raisin loaf cake recipe for my readers which I have shared below. Please do watch andSUBSCRIBEto my channel if you haven’t yet. It will mean a lot to me and motivate me to come up with more videos for my readers. As always looking forward to your feedbacks!
BANANA RAISIN LOAF CAKE VIDEO TUTORIAL
LETS TALK INGREDIENTS
It is a very basic banana bread recipe. It uses ingredients most commonly found in our pantries.
● Whole Wheat Flour – For a healthier version used whole wheat flour.
● Banana – Used over ripe bananas. Over ripe bananas are best to use in baking.
● Brown Sugar – Brown sugar yields soft and moist cakes. It adds an awesome flavor and texture to the cake. No doubt a healthier option too as compared to refined sugar.
● Milk – Used whole milk. Recommend to use whole milk for extra richness, taste and texture.
● Oil – I have used refined sunflower oil. You can use any flavorless oil. I prefer using oil than butter for a soft and moist outcome.
● Leavening agents (Baking powder & baking soda) – There’s a combination of baking powder and baking soda in this banana raisin loaf cake to give it the perfect amount of lift.
● Egg – I have used only 1 large egg and that does the work as banana itself is a perfect substitute of egg.
● Vanilla Essence – Used vanilla essence. You can choose extract over essence.
● Salt – A dash of salt to balance out the sweetness.
● Raisins – The slightly sweet and tartness from the raisin in this banana cake is amazing. You can feel it in every bite of the cake.
INGREDIENTS SUBSTITUTION IN BANANA RAISIN LOAF CAKE
● Whole wheat flour can be substituted with all purpose flour (maida) or you can use 50-50 ratio.
● You can use white sugar instead of brown sugar.
● You may also use other healthier sweeteners are jaggery, cane sugar, honey etc.
● You may use butter instead of oil or any flavorless oil will work.
● To make it vegan use any dairy free milk or just even water for the liquid.
● To make an eggless version you may choose anyone of these
☆ Use 1 tbsp vinegar or lemon juice and use ½ cup milk altogether.
☆ Use ¼ cup curd/yogurt instead of egg.
● You may use black raisins instead of the regular rasins.
● You may use vanilla extract instead of essence.
BANANA RAISIN LOAF CAKE VARIATIONS
● If you want nutty taste and texture, add nut in the batter also once the batter is ready. Lightly coat the nuts with flour and just throw in the batter and give a quick gentle mix.
● Use nut of your choice like pecans or walnuts etc. You can also use mixed nuts as per your palate preference.
● You may also replace the raisins with chocolate chunks or chocolate chips to make it banana chocolate chips cake.
● You can spice up the cake by adding cinnamon powder. The sweet aroma of the cinnamon adds extra flavor to your cake which will make you drool.
● You can use rum soaked raisins which will take your loaf cake to a different level. Its yummilicious!
● You can also soak the raisin in fruit juice. Any juice you love.
● You can put this batter into muffin tins and make banana raisin muffins.
To make muffins, line a muffin tin with paper liners or just grease it with oil or butter and fill each cup to roughly ¾ full, and bake for 20 minutes. Makes 12 muffins.
HOW TO STORE BANANA RAISIN LOAF CAKE?
Let the cake cool down completely and store it in airtight container. Banana raisin cake can be kept for upto 2-3 days at room temperature depending upon the temperature of your place. If you need to store it a couple days longer then I suggest storing it in an airtight container in the refrigerator.
HOW TO FREEZE BANANA RAISIN LOAF CAKE?
Cling wrap the cake and put it in a ziploc bag or airtight container then store in the freezer. I prefer to freeze sliced cake so it is much easier to take out the required servings and thaw them for breakfast or snacking. Freeze them for upto 3 months. It goes more than 3 months but best to use it within three months. To thaw the cake, remove from the freezer and allow it to come to room temperature and serve. You can also pop it in the microwave for few seconds and serve.
HERE ARE MORE AWESOME RECIPES TO INSPIRE YOUR NEXT BAKE:
If you’re just starting to get into baking, or a novice, nothing could be easier than banana cake. It’s a real confidence booster! Especially when it seems almost too easy to make one that turns out this good.
So try my banana cake with raisins recipe and let me know what you think.
Let’s get started!
Preparation time – 15 minutes Cooking time – 35 minutes Serves – 8-10
☆ 1 cup = 240 ml
☆ 1 tablespoon = 15 ml
☆ 1 teaspoon = 5 ml
☆ Pan size = 7×4×3 inches
Ingredients to make banana raisin loaf cake:
1 cup whole wheat flour (125 gms)
2 ripe banana (½ cup mashed banana)
½ cup brown sugar (90 gms)
1 large egg
½ tsp baking powder
½ tsp baking soda
¼ tsp salt
¼ cup oil (60 ml)
¼ cup whole milk (60 ml)
1 tsp vanilla essence
50 gms raisins or more + some extra for garnish
Step by step pictorial instructions to make banana raisin cake:
PREPARING THE OVEN AND PAN
Preheat oven at 180° C for 10 minutes with both the filaments (rods) switch on.
Grease the loaf pan with oil or butter and place a parchment paper. You can grease the pan and dust it with little flour if you dont have parchment/butter paper. Also you can use any shape pan as per your availability and preference.
PREPARING THE WET INGREDIENTS
Peel the banana and mash them using a fork or masher. You can also use a mixie or blender to do the work. Preferably use over ripe banana for better outcome.
In a mixing bowl add in the egg and beat it well. Add in the brown sugar and mix well until combined. Add in vanilla essence and mash banana. Mix well to combine.
PREPARING THE BATTER
Sieve in the whole wheat flour, baking powder, baking soda, salt into the wet ingredients. Add in the oil. ( oil can be added while preparing the wet ingredients. I missed to add it before hence added at this stage). Mix to incorporate into a thick batter. Add milk in batches and make into a semi-thick smooth batter. Add in the raisins and give a gentle quick mix.
BAKING THE LOAF CAKE
Pour the batter onto the prepared pan. Tap the pan for couple of times to release any air bubbles trapped inside. Sprinkle some raisins on the top.
Place the cake pan in the middle rack with both filaments (rods) on. Bake the cake at preheated oven @180° C for 35 minutes. A toothpick or skewer inserted should come out clean. Baking time will differ depending upon your oven temperature and settings. Start checking the doneness of the cake before the above mentioned time.
Remove the cake from oven and allow to stand for 10 minutes. Run a knife around the cake pan and demould the cake. Transfer the cake onto a cooling rack and allow to cool down completely. Slice and enjoy!
NOTES:
● Always preheat oven before starting to bake.
● All ingredients should be at room temperature.
● Whole wheat flour can be substituted with all purpose flour or can bake with 50-50 of both.
● Brown sugar can be substituted with regular refined sugar.
● If you like more sweeter bread, increase the sugar quantity.
● Oil can be substituted with butter.
● Use whole milk for extra richness, taste and texture.
● Other healthier sweeteners like jaggery or cane sugar can be used.
● Every oven reacts differently so baking time may vary.
● Both rods to be switch on.
● If you wish to bake without egg use either of these mentioned below –
☆ Use 1 tbsp vinegar or lemon juice and use ½ cup milk altogether.
☆ Use ¼ cup curd yogurt instead of egg
Well, if you make this banana raisin loaf cake, please do leave a feedback in the comments box below or snap a photo and tagAkum Raj Jamiron Facebook andakumrajjamiron Instagram with hashtag#atmykitchen. I would love to see your creations.
Thank you so much for stopping by my blog. I hope you liked the recipe. Your valuable feedbacks are always welcome, I love hearing from you guys and always do my best to respond to each and every one of you.
Happy cooking!
Love Akum
Disclosure:
At My Kitchen is an Amazon Affiliate, which simply means that if you make a purchase through these links, I will earn a very small commission at no additional cost to you!
Please click on the image if you wish to purchase these products from Amazon.
SKE Iron Sandwich Bread Mould/Tin Box with Cover for Baking- Small 400gms Size 7×3.5×3.5 inch
Syga Carbon Steel Cake Mould Pan, 1 Piece, Black
Ossoro French Vanilla Flavour, 30 ml
Sprig All Natural Bourbon Vanilla Extract Bottle, 50 ml
OMORTEX Kitchen Tools Combo 8 pcs Color Measuring Cups and Spoon Set and Spatula and Brush for Kitchen
QOAL Multipurpose Portable Electronic Digital Weighing Scale Weight Machine (10 Kg)
Inalsa Kratos 1000W Stand Mixer with Whisking Cone, Mixing Beater & Dough Hook, Champagne
Borosil PRO 42 L OTG, with Motorised Rotisserie and Convection, 2000W, 6 Stage Heat Selection, Black
Bajaj 4500TMCSS 45L Oven Toaster Grill, Silver
Kraftlytouch Handcrafted Square Platter || Food Safe || Acacia Wood || 8 inch || Water Resistant
Craftize Mstore Decorative Colorful Rustic Wooden Serving Tray for Coffee/Tea/Drinks for Living Room/Restaurant (11.5x7x1.5 inch)
T One Woods Round DIY Craft Wooden Log Natural Bark Coaster/Slices, 3 Inches Size – Set of 6
M VILLA Colorful Plastic Mixing Bowl Set for Kitchen | Plastic Soup Bowls | Microwave Safe, Freezer Safe Great for Cooking Serving Salads, Snack, Fruits- Multicolor (750 ml, Set – 4 pcs)
Eggless semolina coconut cake is a soft, moist and slightly dense cake. This egg free semolina coconut cake has a lovely aroma and taste of the coconut. It has a melt in mouth coconutty flavor which would make you love this cake even more!
If you’re looking for a simple yet absolutely delicious cake recipe which can be quickly whipped up and bake, then you’ve landed at the right place and this cake is for you! This is one of the simplest and easiest cake that one can make. This easy eggless sooji coconut cake will not disappoint you and I bet you’ll end up making it over and over again.
To me it makes the best tea time cake and perfect to pair it with some coffee or tea. But it doesn’t end up there itself. You can top it up with your choice of frosting or glaze to suit the occasion and make it as fancy as possible. Nevertheless a simple sugar syrup or glaze does wonders to this amazingly delicious rava coconut cake. Even I have cut the cake into halves and serve one part of the cake soaked in simple sugar syrup.
Semolina coconut cake aka rava coconut cake is a super easy, simple, absolutely delicious and one bowl cake recipe. It doesn’t require any fancy technique or equipment to bake this cake, hence even a novice baker can nail it.
The texture of the cake is soft and slightly dense with lovely aroma and flavor from the coconut. I especially loved the nicely brown coconut on the top of the cake. I am sure you will love it as much as we did!
This semolina coconut cake has a mild sweetness. If you are the kind of person who likes very sweet cakes, then you will have to increase the quantity of sugar by another few tablespoons.
I loved the beautiful texture of this cake. The semolina gave it a slight grainy texture, obvious as it doesn’t have any other flour added in large quantity apart from the 2 tablespoons cornstarch added to the batter. You can clearly make out from the crumbs.
My son and hubby loved the cake. The cake disappeared as soon as I served them after the cake cooled down. Infact my son was like mummy please don’t click photos today, he was not able to wait. So I had to hurry up and could able to click some.
LETS TALK INGREDIENTS
I really wanted to keep this semolina coconut cake super simple and easy for everyone, so you only need a few key ingredients here that are easily available in your pantry:
● Flour – Semolina is used to make this cake. You can use fine variety of semolina (rava/sooji)
● Cornstarch – Just 2 tablespoons of cornstarch is used which will help in softness and binding of the cake.
● Sugar – I used granulated white sugar here.
● Oil – I have used refined sunflower oil. I prefer using oil than butter for a soft and moist outcome.
● Curd/Yogurt – Hung curd (thick curd) is used here. Curd is used as an egg substitute.
● Coconut – Fresh coconut which is finely grated and air dried is used here. Your cake will come out extra rich and more flavorful.
● Milk – I have used full fat milk. Whole milk gives an extra richness, taste and texture to the cake.
● Essence – Vanilla essence is used here.
● Leavening agents – Both baking powder and baking soda is used here to give a good rise to the cake.
● Salt – A pinch of salt is used to balance out the sweetness in any dessert. You can skip this totally if you don’t want.
INGREDIENTS SUBSTITUTION
● You can use cake flour, all purpose flour or whole wheat flour to make this coconut cake.
● You can also use coconut sugar, brown sugar, cane sugar etc. Just keep in mind that your cake will be more tan in color!
● You can use butter or coconut oil instead of sunflower oil. Using coconut oil will give your cake a more coconut flavor and is more healthier than refined oil.
● You replace the yogurt with 2 eggs if you want to make the cake egg based. Still prefer eggless and want to replace yogurt then you can use apple sauce, buttermilk. You can also use 1 tablespoon vinegar or lemon juice and increase the quantity of the milk.
● You can use store bought dessicated coconut.
● Instead of vanilla essence you can use coconut extract or real vanilla extract.
VARIATIONS
● Along with coconut you can add flavors like orange, lime, cocoa etc.
● You can also make orange, mango or chocolate semolina cake without the coconut.
● You can add nuts to make a nutty coconutty cake.
I made a simple recipe video of this super easy eggless semolina coconut cake recipe for my readers which I have shared below. Please do watch andSUBSCRIBEto my channel if you haven’t yet. It will mean a lot to me and motivate me to come up with more videos for my readers. As always looking forward to your feedbacks!
EGGLESS SEMOLINA COCONUT CAKE VIDEO TUTORIAL
HOW TO USE FRESH COCONUT IN THIS RECIPE:
To use fresh coconut in this recipe first you need to grate the coconut. You can air dry inside the house or if have access to sunlight you can sun dry them which is more faster. If you are using coconut grater you will get finely grated coconut but if you are using normal grater your coconut will not be finely grated. Finely grate the coconut. Spread them nicely and let it dry inside the house or in the sun. Drying them in the sun will take only few minutes. Once the coconut is dried, store them in airtight container in the fridge for longer days.
To use in the cake if your dried coconut is not finely grated, you can pulse them for few seconds in your mixie or blender. This will make your coconut like a store bought desiccated coconut.
HOW TO. MAKE THIS VEGAN
This is a versatile recipe and can be easily adapted as vegan cake. In place of dairy milk, you can use plant-based milk like almond milk, cashew milk, oats milk, coconut milk etc. And inplace of curd aka yogurt use 1 tablespoon vinegar or lemon juice. Only thing is you need to increase the milk quantity a little bit more to get the correct batter consistency.
HOW TO STORE THE CAKE
The cake stays good over the counter for 2-3 days. You can refrigerate the cake in an airtight container for upto one week Freezing the cake will stay for longer days.
SERVING SUGGESTIONS
You can serve the cake as a tea cake simply with tea or coffee.
You can soak the cake with simple sugar syrup. This is another amazing way if serving this cake.
You can even serve with simple sugar glaze.
You can make the cake more fancy by frosting it with your favourite frosting like cream cheese, whipped cream or chocolate ganache. The sky is the limit!
If you’re looking for more semolina based recipe, here’s some few recipes you might like to try
All of the above recipes are super easy to prepare, ready in no time, and will never disappoint you.
So whip up this super easy and delicious sooji coconut cake. It’s a great tea cake and can be served as a dessert that everybody can enjoy and dig into. I’m sure everyone will love it as much as we do! Do share your thoughts about the recipe with me here.
So let’s get started with the recipe. Please do read the recipe notes given below for tips and tricks to make the very best eggless semolina coconut cake.
☆ 1 cup = 240 ml
☆ 1 tablespoon = 15 ml
☆ 1 teaspoon = 5 ml
☆ Pan size = 7″ diameter 3″ height
Ingredients to make semolina coconut cake:
1 cup fine semolina (rava/suji)
2 tablespoon cornstarch
½ cup curd/yogurt
½ cup sugar
¼ cup oil
½ cup desiccated coconut (for batter) + ¼ cup for topping
1 teaspoon baking powder
1 teaspoon baking soda
¼ teaspoon salt
½ cup full fat milk
1 teaspoon vanilla essence
Sugar Syrup (optional) – Make a simple syrup as required by mixing same proportion of water and sugar. Boil them together for 2-3 minutes and allow to cool down. You can add flavors like vanilla essence or cardamom powder.
Step by step pictorial instructions to make semolina coconut cake:
In a mixing bowl add in curd (yogurt), sugar and oil. Mix until well combined and smooth mixture.
Add in semolina (rava/suji) to the mixture and mix well. Let the mixture stand for 10-15 minutes.
(Please use fine variety of semolina. You can also grind them in the mixie or blender for few minutes).
Meanwhile grease the cake tin with oil and line with parchment paper. You can also grease the pan and dust with little flour.
Preheat oven @180° C for 10 minutes with both filaments.
Now add in cornstarch, desiccated coconut, baking powder, baking soda, salt and vanilla essence. Mix well.
Add in milk in batches and make a smooth batter.
Pour the batter into the prepared pan. Tap the pan for 3-4 times to release any air bubbles. Sprinkle the reserved desiccated coconut all over on the top.
Bake at preheated oven @180° C for 35 minutes or until a skewer inserted comes out clean. On the last 1-2 minutes of baking I turned on only the top filaments (rod) to nicely brown the desiccated coconut topping.
Remove from the oven and allow the cake to stand for about 10 minutes. Demould the cake and allow to cool down completely.
You can pour sugar syrup on the cake if you like. Cut and serve. Enjoy
I cut the cake into half. Soaked one part with sugar syrup. The cake taste absolutely delicious both ways.
NOTES:
● Always preheat oven before starting to bake.
● All ingredients should be at room temperature.
● Semolina can be replaced with whole wheat flour or all purpose flour or can bake with 50% of either all purpose flour or whole wheat flour.
● White sugar can be substituted with coconut sugar, brown sugar or cane sugar.
● You can increase the sugar with few tablespoons if you prefer very sweet cakes.
● You can use fresh finely grated coconut or store bought desiccated coconut.
● Oil can be substituted with butter or coconut oil.
● Use whole milk for extra richness, taste and texture.
● Yogurt can be substituted with buttermilk or Vinegar/lemon juice.
● To make with egg, use 2 eggs and omit the baking soda.
● Every oven reacts differently so baking time may vary.
● Bake with both the filaments (rods) on.
● You can soak the cake with simple sugar syrup before serving.
Well, if you make this semolina coconut cake, please do leave a feedback in the comments box below or snap a photo and tagAkum Raj Jamiron Facebook andakumrajjamiron Instagram with hashtag#atmykitchen. I would love to see your creations.
Thank you so much for stopping by my blog. I hope you liked the recipe. Your valuable feedbacks are always welcome, I love hearing from you guys and always do my best to respond to each and every one of you.
Happy cooking!
Love Akum
Disclosure:
At My Kitchen is an Amazon Affiliate, which simply means that if you make a purchase through these links, I will earn a very small commission at no additional cost to you!
Please click on the image if you wish to purchase these products from Amazon.
Ossoro French Vanilla Flavour, 30 ml
OMORTEX Kitchen Tools Combo 8 pcs Color Measuring Cups and Spoon Set and Spatula and Brush for Kitchen
Shilpa Aluminium Round Cake Pan/Mould Bake Ware Tools-6,7,8 inches(Set of 3-0.5 kg,1 kgand1.5 kg+ Cake Base Free Inside This Pack
Bulfyss Popular Combo – Non Stick Outperform Bread Loaf, 6 Muffin & Cupcake Mould Baking Tray Tin Pan
Borosil DIGIPRO 38L, Digital OTG, with Motorised Rotisserie and Convection, 1500W, 4 Stage Heat Selection, Black
Inalsa Kratos 1000W Stand Mixer with Whisking Cone, Mixing Beater & Dough Hook, Champagne
FAIRY HOME Cotton Stripe Microwave Oven Mitten for Microwave – Set of 4 PCS 2Oven Gloves& 2 Pot Holders- Heat Resistant
M VILLA Colorful Plastic Mixing Bowl Set for Kitchen | Plastic Soup Bowls | Microwave Safe, Freezer Safe Great for Cooking Serving Salads, Snack, Fruits- Multicolor (750 ml, Set – 4 pcs)
BICHI Electronic Digital Kitchen Scale, Kitchen Scale Digital Multipurpose, Weight Machines for Kitchen
Craftize Mstore Decorative Colorful Rustic Wooden Serving Tray for Coffee/Tea/Drinks for Living Room/Restaurant (11.5x7x1.5 inch)
Watermelon muffins with fresh watermelon are the perfect summer dish which is great to serve as a snack, for tiffin box or have it with your morning or evening tea or coffee. These delicious, soft and moist muffins are sure to be a hit for your kids and even adult will enjoy it as much as the kids.
We’ve been cooking and baking more since we’re spending a lot of time at home now. This has been a great way to spend quality time together. Well, my experiment with food continues and this time it is fresh watermelon in my bakes. Yes! It is watermelon muffins which is eggless and made with whole wheat flour and cane sugar as sweetner. I experimented and it worked! My kiddo is a picky eater but with the first small bite itself he loved it and finished off couple of muffins.
These muffins are made with regular pantry staples that most pantry already have like flour, sugar, baking powder, baking soda, salt, essence and chocolate chips. Since watermelon is in season and I had a whole watermelon in my fridge I decided to experiment something with fresh watermelon. I thought it’s a great idea to make something that reminded of summer since the whether is warm and the heat is scorching higher.
These whole wheat fresh watermelon muffins are something to die for. The combination of sweetness from the chocolate and watermelon worked really well. Watermelons adds colour, freshness and sweetness to the muffins. This is a healthier recipe. I have used whole wheat flour instead of refined flour, fresh watermelon which adds to most of the sweetness in the muffis and cane sugar to add in sweetness to the muffins.
LET’S TALK INGREDIENTS
This super easy and refreshing watermelon muffins uses ingredients most commonly found in our kitchen pantry which we regularly use in baking. Let’s go through briefly the ingredients that goes inside the muffins.
● Whole Wheat Flour – For a healthier version used whole wheat flour.
● Watermelon – Used fresh sweet watermelon. Riped watermelon are best for this recipe which adds sweetness, freshness and colour.
● Chocolate Chips – Semi-sweet standard sized chocolate chips is used.
● Cane Sugar – Cane sugar yields soft muffins and adds incredible flavor and texture to the muffins. It’s a healthier option too.
● Milk – Used whole milk. Recommend to use whole milk for extra richness, taste and texture.
● Oil – I have used sunflower oil. You can use any flavorless oil. I prefer using oil than butter for a soft and moist outcome.
● Leavening agents – Both baking powder & baking soda is used in the recipe to give it the perfect amount of lift.
● Vinegar – Vinegar plays a huge role in rising. The reaction of vinegar with the baking soda release carbon dioxide, which helps the cake rise as they bake.
● French Vanilla Essence – This is amazing flavor from Ossoro. You need to try this one. I’ll add a link below from where you can buy, if you buy from one of our links, we may earn a commission.
● Salt – A dash of salt is always good in baked goodies. The salt helps to balance out the sweetness too.
HOW TO MAKE WATERMELON MUFFINS
This is a easiest muffin recipe without using stand mixer or any fancy equipments. We make the batter using one bowl and a spatula. We would just need a mixie or blender to make the watermelon pulp or puree. Do watch the video tutorial below on how to make this soft, spongy and moist watermelon muffins. You will be surprised to see how easy it is to make at the comfort of your home.
● Deseed the watermelon and chopped them into pieces. Blend them into a pulp using a mixie or blender.
● In the mixing bowl mix together watermelon pulp, cane sugar, oil, essence, milk and vinegar.
● Sift together dry ingredients: flour, salt, baking powder and baking soda into the wet ingredients and make a lumps free batter.
● Stir in flour coated chocolate chips and give a quick mix.
● Pour the batter into lined muffin tray.
● Top up with chocolate chips and bake.
You can use this batter to bake tea cake or layer cake in any shape pan. This recipe can be used to make cupcakes too. You can frost it with your favourite frostings like whipping cream, cream cheese, butter cream or chocolate ganache.
To make tea cake or layer cake, line a cake tin with parchment paper or just grease it with oil or butter. Pour the batter into the prepared tin and bake for 30-35 minutes or until a skewer inserted comes out clean.
I made a simple recipe video of incredibly soft and moist watermelon muffins for my readers which I have shared below. Do watch and pleaseSUBSCRIBEto my channel if you haven’t yet. It will mean a lot to me and motivate me to come up with more videos for my readers. As always looking forward to your feedbacks!
WATERMELON MUFFINS VIDEO TUTORIAL
VARIATIONS
● The other way to use watermelon in this recipe is – In a pan add the watermelon peices and cook over low-medium heat till the moisture is absorb completely and watermelon peices turns soft. Grind or blend them into a puree and use. You need to either increase the watermelon peices or use the same amount as mentioned in the recipe and increase the milk in the recipe to adjust the batter consistency. I would suggest to use 2-2½ cup watermelon peices if using this method, that would add more watermelon flavor to the muffins.
● If you want more nutty taste and texture, add nut sof your choice in the batter once the batter is ready. Lightly coat the nuts with flour and just throw in along with the chocolate chips and give a quick gentle mix.
● You can either use nuts or chocolate chips or a mixture of both.
● Use nut of your choice like pecans, walnuts, almonds, cashewnuts etc. You can also use mixed nuts as per your palate preference.
● You can also make a simple watermelon muffins by just omitting the chocolate chips.
SUBSTITUTIONS:
● Whole wheat flour can be substituted with all purpose flour (maida) or you can use 50-50 of both.
● You can use white sugar, brown sugar or jaggery instead of cane sugar.
● You may use butter instead of oil or any flavorless oil will work.
● To make it vegan use dairy free milk like almond milk or just water. You can also omit the milk and completely use watermelon puree or juice.
● You may make this cake with egg. Use 2 eggs and omit the milk, baking soda and vinegar from the recipe.
● French vanilla essence can be substituted with regular vanilla essence or extract.
MAKE IT VEGAN
This cake is easily adapted to vegan. Simply omit the milk and replace the milk with watermelon pulp or juice.
1 cup = 240 ml
1 tablespoon = 15 ml
1 teaspoon = 5 ml
Ingredients to make watermelon muffins
1 cup whole wheat flour
1½ cup watermelon chopped
50 ml whole milk
1 tbsp vinegar
¼ cup (60 ml) oil
⅓ cup (80 ml) cane sugar/white sugar
1 tsp baking powder
½ tsp baking soda
¼ tsp salt
¼ cup chocolate chips + 2 tbsp for topping
½ tsp vanilla essence
Step by step pictorial instructions to make watermelon muffins:
Preheat oven at 180° C for 10 minutes. Line the muffin tray with liners or simply grease it with oil or butter.
In a bowl add the chopped watermelon and blend it until pulpy. You can use a mixie but we dont want to blend the watermelon completely. Keep it pulpy.
Add sugar, oil, milk, vinegar and mix until well combined.
Sieve in the flour, baking powder, baking soda, salt into the wet ingredients. Fold the mixture and make a batter.
Coat the chocolate chips in little flour. Stir in the chocolate chips into the batter and give a quick gentle mix.
Scoop the batter into the prepared muffin tray till ¾th of the cavity. Tap the muffin tray for 3-4 times to release any air bubbles inside. Garnish with some chocolate chips.
Bake the muffins at preheated oven @180° C for 20-25 minutes or until a skewer or toothpick inserted comes out clean.
Remove from oven and allow to rest for 5-10 minutes. Transfer to cooling rack and allow to cool down completely and serve. Enjoy!
NOTES:
● Always preheat oven before starting to bake.
● All ingredients should be at room temperature.
● Always sieve the flour atleast twice.
● Whole wheat flour can be substituted with all purpose flour or can bake with 50-50 of both.
● Cane sugar can be substituted with regular refined sugar, jaggery or brown sugar. You can increase the sugar to ½ cup if your watermelon is very sweet.
● Try using riped sweet watermelon.
● You can add nuts of your choice too.
● Oil can be substituted with butter.
● Use whole milk for extra richness, taste and texture.
● Vinegar can be substituted with lemon juice.
● To make with egg, use 2 eggs and omit the milk, baking soda and vinegar.
● Every oven reacts differently so baking time may vary.
● Bake with both the filaments (rods) on.
● You can make plain watermelon muffins by omitting the chocolate chips.
● You can make tea cake, layer cake or cupcakes with this recipe and frost it with your favourite frosting like whipped cream, cream cheese, butter cream or chocolate ganache.
Well, if you make this watermelon muffins, please do leave a feedback in the comments box below or snap a photo and tagAkum Raj Jamiron Facebook andakumrajjamiron Instagram with hashtag#atmykitchen. I would love to see your creations.
Thank you so much for stopping by my blog. I hope you liked the recipe. Your valuable feedbacks are always welcome, I love hearing from you guys and always do my best to respond to each and every one of you.
Happy cooking!
Love Akum
Disclosure:
At My Kitchen is an Amazon Affiliate, which simply means that if you make a purchase through these links, I will earn a very small commission at no additional cost to you!
Please click on the image if you wish to purchase these products from Amazon.
Curated Cart Premium 6 Cup Muffin Tray with 100 Muffin Liners, Baking Mould Made of Carbon Steel (Black) can be Used in Microwave or OTG, Easy to Clean
Bulfyss Small Mini Outperform Aluminium Nonstick 12-Slot Cup Midi Shape Muffin, Cupcake Mould (Small Size)
Arabs Reusable Silicone 12 Pieces Round Moulds for Muffins/Cupcake/Jelly/Cake
Ossoro French Vanilla Flavour, 30 ml
Organic Nature Premium Dark Chocolate Chips (Chocochips) (for Baking and Garnishing Cakes ,Cookies) (200 Gram)
OMORTEX Women’s First Choice 10 Pcs Color Measuring Cups and Spoon Set
Borosil DIGIPRO 38L, Digital OTG, with Motorised Rotisserie and Convection, 1500W, 4 Stage Heat Selection, Black
This easy cranberry banana cake is delicious & simple to make. It is incredibly tender and beautifully balanced. The mild sweetness and tartness from the cranberries in this banana cake is fabulous and tastes amazing. You can feel it in every bite of the cake.
This cranberry banana cake is soft, moist, flavorful and loaded with cranberries! I love a sweet-tart combo. You will love the taste of sweet bananas combined with slightly tart cranberries.
Do you ever find yourself with left over bananas that you just don’t know what to do with?! If so, you’re not alone! Why not pair them with cranberries to make an unexpectedly delicious cake! This simple, easy and flavor pack recipe is sure to become a staple in your kitchen! Give it a try!
My recipe calls for dried cranberries. However, you can also use fresh or frozen cranberries. Banana cranberry cake can be made with frozen cranberries, fresh cranberries or dried cranberries.
Here are all my Bakes & Cakes recipes if you’re craving more baking inspiration. All of the above recipes are super easy to prepare, ready in no time, and will never disappoint you.
If you’re a big fan of both banana cake and cranberries just like us, you’ll love this combination. The cake is sweet and moist, with plenty of banana flavor coming through with slightly sweet and tart cranberries.
Whether you need a dessert for your family or something sweet to take with you to your next gathering, I am sure this cranberry banana cake will hit the spot. If you end up making this recipe, please leave a comment below and let me know what you think. I can’t wait to hear all about it.
INGREDIENTS YOU’LL NEED
To make my cranberry banana cake, you will need:
FLOUR – All purpose flour was used in the recipe. For a healthier version use whole wheat flour.
BANANA – Used over ripe bananas. Over ripe bananas are best to use in baking cakes.
CRANBERRY – The recipe uses dried whole cranberries.
BUTTER – I used salted butter and in melted form. Unsalted butter works too.
OIL – I have used refined sunflower oil. You can use any flavorless oil. Oil gives the cake a soft and moist outcome.
SUGAR – Granulated sugar is used.
CURD / YOGURT – Thick curd aka yogurt is used. Recommend to use fresh curd which is thick and not sour.
MILK – Used whole milk. Recommend to use whole milk for extra richness, taste and texture.
LEAVENING AGENTS (Baking powder & baking soda) – There’s a combination of baking powder and baking soda in this banana raisin loaf cake to give it the perfect amount of lift.
VANILLA ESSENCE – Used vanilla essence. You can choose extract over essence.
SALT – A dash of salt to balance out the sweetness.
HOW TO MAKE CRANBERRY BANANA CAKE
This section shows how to make cranberry banana cake with step-by-step photos and details about the technique with video tutorial. For full ingredients measurements, see the recipe card below.
I made a simple video of this cranberry banana cake recipe for my readers which I have shared below. Please do watch to know how I made this delicious recipe. If you liked the video please do SUBSCRIBE to my channel if you haven’t yet. Also like, share and comment on it! It will mean a lot to me and really motivate me to come up and shoot more videos for my readers. As always I’m looking forward to your feedback!
Cranberry Banana Cake Video Tutorial
STEP BY STEP PICTORIAL INSTRUCTIONS TO MAKE CRANBERRY BANANA CAKE:
PREPARING THE OVEN AND PAN
Preheat oven at 180° C for 10 minutes with both the filaments (rods). Grease the loaf pan with oil or butter and place a parchment paper. You can grease the pan and dust it with little flour if you dont have parchment/butter paper. Also you can use any shape pan as per your availability and preference.
PREPARING THE WET INGREDIENTS
Peel the banana and mash them using a fork or masher. You can also use a mixie or blender to do the work. Preferably use over ripe banana for better outcome.
In a mixing bowl add in the curd and baking soda. Mix and keep aside for 5 minutes. After a few minutes the mixture will be bubbly.
Add in the sugar, melted butter, oil, vanilla essence and mix well until combined. Add in mash banana and mix well to combine.
PREPARING THE BATTER
Sieve in the flour, baking powder,, salt into the wet ingredients. Mix to incorporate into a thick batter. Add milk in batches and make into a semi-thick smooth batter.
BAKING THE CAKE
Lightly coat the cranberries with flour. Add in the cranberries reserving some for garnish and give a gentle quick mix.
Pour the batter onto the prepared pan. Tap the pan for couple of times to release any air bubbles trapped inside. Sprinkle some cranberries on the top. Place the cake pan in the middle rack with both filaments (rods) on.
Bake the cake at preheated oven @180° C for 30 to 35 minutes. A toothpick or skewer inserted should come out clean. Baking time will differ depending upon your oven temperature and settings. Start checking the doneness of the cake before the above mentioned time.
Remove the cake from oven and allow to stand for 10 minutes. Run a knife around the cake pan and demould the cake. Transfer the cake onto a cooling rack and allow to cool down completely. Slice and enjoy!
NOTES:
● Always preheat oven before starting to bake. ● All ingredients should be at room temperature. ● You can use either all purpose flour or whole wheat flour or can bake with 50-50 ratio of both. ● Brown sugar, cane sugar or jaggery can be used in place of regular refined sugar. ● I used both butter and oil but you can bake with either butter or oil. ● Use whole milk for extra richness, taste and texture. ● Every oven reacts differently so baking time may vary. ● Both rods to be switch on. ● If you wish to bake with egg use 2 eggs and opt out yogurt and baking soda.
This easy cranberry banana cake is delicious & simple to make. It is incredibly tender and beautifully balanced. The mild sweetness and tartness from the cranberries in this banana cake is fabulous and tastes amazing. You can feel it in every bite of the cake.
128Grams All purpose flour or whole wheat flour (1 cup)
2LargeBanana (250 grams)
60-70GramsDried cranberries (½ cup)
30GramsButter melted (2-3 tablespoon)
30mlOil(2 tablespoon)
100GramsSugar(½ cup)
⅓CupCurd/yogurt(80 grams)
60mlWhole milk(3-4 tablespoon)
1Teaspoon Baking powder
½Teaspoon Baking soda
¼Teaspoon Salt
1Teaspoon Vanilla essence
Instructions
Preheat oven at 180° C for 10 minutes with both the filaments (rods).
Grease the loaf pan with oil or butter and place a parchment paper. You can grease the pan and dust it with little flour if you dont have parchment/butter paper. Also you can use any shape pan as per your availability and preference.
Peel the banana and mash them using a fork or masher. You can also use a mixie or blender to do the work. Preferably use over ripe banana for better outcome.
In a mixing bowl add in the curd and baking soda. Mix and keep aside for 5 minutes. After few minutes the mixture will be bubbly.
Add in the sugar, melted butter, oil, vanilla essence and mix well until combined. Add in mash banana and mix well to combine.
Sieve in the flour, baking powder,, salt into the wet ingredients. Mix to incorporate into a thick batter.
Add milk in batches and make into a semi-thick smooth batter.
Lightly coat the cranberries with flour. Add in the cranberries reserving some for garnish and give a gentle quick mix.
Pour the batter onto the prepared pan. Tap the pan for couple of times to release any air bubbles trapped inside.
Sprinkle some cranberries on the top. Place the cake pan in the middle rack with both filaments (rods) on.
Bake the cake at preheated oven @180° C for 30 to 35 minutes. A toothpick or skewer inserted should come out clean. Baking time will differ depending upon your oven temperature and settings. Start checking the doneness of the cake before the above mentioned time.
Remove the cake from oven and allow to stand for 10 minutes. Run a knife around the cake pan and demould the cake. Transfer the cake onto a cooling rack and allow to cool down completely. Slice and enjoy!
Video
Notes
Always preheat oven before starting to bake.
All ingredients should be at room temperature.
You can use either all purpose flour or whole wheat flour or can bake with 50-50 ratio of both.
Brown sugar, cane sugar or jaggery can be used in place of regular refined sugar.
I used both butter and oil but you can bake with either butter or oil.
Use whole milk for extra richness, taste and texture.
Every oven reacts differently so baking time may vary.
Both rods to be switch on.
If you wish to bake with egg use 2 eggs and opt out yogurt and baking soda.
SUBSTITUTION
● Whole wheat flour can be used or you can use 50-50 ratio. ● You can use brown sugar, cane sugar or jaggery instead of white sugar. ● You can bake with butter or oil. ● To bake with egg you may use 2 eggs and opt out the curd (yogurt) and baking soda. ● You can bake with fresh and frozen cranberries as well. ● You may use raisins or other berries instead of the cranberries. ● Curd/yogurt can be replaced with same quantity of butter milk. To make your buttermilk at home for this recipe , take ½ cup (120 ml) milk and add 1 teaspoon vinegar or lemon juice. Stir and keep aside for about 5 minutes. Your buttermilk is ready to use.
VARIATIONS
● If you want nutty taste and texture, add nut in the batter. Lightly coat the nuts with flour and add in onto the batter and give a quick gentle mix. ● Use nut of your choice. You can also use mixed nuts as per your palate preference. ● You may also replace the cranberries with chocolate chunks or chocolate chips to make it banana chocolate chips cake. ● You can spice up the cake by adding cinnamon powder. The sweet aroma of the cinnamon adds extra flavor to your cake which will make you drool. ● You can use rum soaked cranberries which will take your cake to a different level. ● You can use chocolate chips as add-ons. ● You can put this batter into muffin cups and make cranberry banana muffins.
To make muffins, line a muffin tin with paper liners or just grease it with oil or butter and fill each cup to roughly ¾ full, and bake for 20 minutes. Makes 12 large muffins.
FREQUENTLY ASKED QUESTIONS
CAN WE THAW THE FROZEN CRANBERRIES
Frozen cranberries do not have to be thawed before baking the cranberry banana cake. They can be added directly to the batter and will thaw during the baking process. However, you need to make sure that you remove any ice crystals attached to the frozen cranberries or you will be end up adding extra liquid to the recipe. I like to wipe off the ice crystals if any in order to make sure there is no extra moisture.
HOW TO STORE THE CAKE?
Allow the cake to cool down completely. Place the cake in an airtight container and store at room temperature for up to 3 days or in the refrigerator for up to 1 week.
CAN WE FREEZE THIS CRANBERRY BANANA CAKE?
You can freeze the cake for longer storage. Slice the cake and wrap the individual cake slices with plastic wrap preferably double wrap them. Place them in a zip-lock freezer bag or in an airtight container and freeze for up to 3 months. Before enjoying, unwrap a slice and microwave it for 30-60 seconds to thaw it and warm it through or simply let it thaw at room temperature over the counter for a couple of hours.
Well, if you make this eggless cranberry banana cake recipe I’ll be glad if you take out some time and rate the recipe and leave a feedback in the comments box below. You can also snap a photo and tag Akum Raj Jamir on Facebook and akumrajjamir on Instagram with hashtag #atmykitchen. I would love to see your creations.
Thank you so much for stopping by my blog. I hope you liked the recipe. Your valuable feedbacks are always welcome, I love hearing from you guys and always do my best to respond to each and every one of you.
Eggless ragi chocolate cake is delicious, soft, moist cake and is a great way to use millets. Indulge in a guilt-free ragi chocolate cake made with wholesome ingredients like ragi flour aka finger millet flour, cane sugar, curd (yogurt) along with a few basic baking ingredients. Soft, moist and chocolatey, it’s a perfect snack for kids and adults alike.
WHAT IS RAGI CAKE?
Ragi cake is a finger millet cake. It is made with 100% ragi flour (finger millet flour). It is a delectable snack or dessert that combines the goodness of ragi flour, cane sugar, curd, chocolate, oil, milk l, leavening agents and with a hint of vanilla essence resulting in a moist and flavorful treat that is also healthy and nutritious.
Ragi chocolate cake or finger millet chocolate cake is gluten-free and also refine sugar free hence a healthier cake recipe. Despite being gluten free, this cake turns out to a perfect moist textured cake. You can hardly find out that it’s made of ragi if you are not told before hand, but just lots of chocolatey goodness.
Since this ragi cake is made of no refined ingredients so it is quite healthy if eaten in moderation. This can also be served to kids as an evening snack or as a tea/coffee snacks.
This ragi cake is a great way to include millets in your diet. The flavor combination of chocolate and ragi is undoubtedly amazing resulting is this beautiful millet cake which is really moist, rich and flavorful treat that is also healthy and nutritious.
Whenever I share any cake recipes, one request I receive often from my readers and followers is gluten-free cakes. So I made a cake using 100% ragi flour (finger millet flour) and chocolate which is an eggless version. Next I will bake an egg version with frosting. Do keep a watch at my blog!
Today we’re going to bake a delicious homemade chocolate cake using a unique ingredient –ragi flour aka finger millet flour! It’s a powerhouse of the good stuff like protein, fiber, vitamins and nutrients, and is the perfect healthy alternative to all your sweet cravings.
Read a detailed article about ragi (millets) by Healthline here
WHY YOU’LL LOVE RAGI CHOCOLATE CAKE?
* Easy To Make And Fuss Free– This ragi chocolate cake is a one bowl recipe making it super easy to make and a fuss free recipe. * Deliciously Soft, Moist And Chocolatey– This ragi chocolate cake recipe results in a moist and soft texture that is sure to impress. The combination of ragi flour and chocolate creates a wonderful texture and flavor that will leave you craving for more. * Gluten-Free– Ragi flour is naturally gluten-free, making this cake a great option for those with gluten sensitivities. * No Refined Sugar– The use of cane sugar instead of refined sugar makes the cake healthier making it a better option for those looking to manage their blood sugar levels. * Packed with Nutrients– Ragi, also known as finger millet, is a superfood that is rich in calcium, iron, and fiber. By incorporating ragi flour into the cake, you are adding a nutrient boost to your sweet treat. * Perfect for Snacking or Dessert– Whether you enjoy it as a morning or evening snack with a cup of tea or coffee or as a guilt-free dessert, this ragi cake is a versatile treat that can be enjoyed at any time of the day. * Great for Overall Health– The use of ragi flour, and cane sugar makes this cake a healthier option compared to cakes, making it a great choice for those looking at the overall well-being of health while enjoying a sweet treat.
VARIATIONS FOR RAGI CHOCOLATE CAKE
* Nutty Twist– Try adding a variety of nuts like almonds, cashews, pistachios or walnuts to the cake batter for a crunchy texture and added nutrition. * Fruity Flavors– You can also give a fruity twist by adding dried fruits like raisins, cranberries, cherries, blueberries or any candied fruits in the cake batter for a nutritious and fruity flavor. * Frosting- Frost the ragi chocolate cake with chocolate ganache, vanilla/chocolate whipped cream, cream cheese or simply drizzle melted chocolate or chocolate sauce all over to elevate the cake to a different level. * Gluten-Free Flour Blend– You can mix and match ragi flour with other gluten free flours like blend of millet flour, almond flour, oat flour, etc to cater to dietary restrictions.
INGREDIENTS TO MAKE EGGLESS RAGI CHOCOLATE CAKE
This section explains what all ingredients are used in making eggless ragi chocolate cake, how to use or choose certain ingredients and substitution options. For measurements, see the recipe card below.
* RAGI FLOUR– Used store bought ragi flour. Ragi is nutty in flavor and gives a healthy twist to the cake with its high nutritional value. * COCOA POWDER– Used unsweetened cocoa powder. It adds a rich taste, texture and gives the cake a deep brown color. * CHOCOLATE– Uses dark chocolate chopped into chunks. Adding chocolate takes the simple cake to another level because of the chocolate chunks loaded in the batter and you can feel the chocolatey taste in every bite of the cake. * SALT– To enhance the overall flavor and helps to balance out the sweetness too. * BAKING POWDER– Baking powder is used to lighten the texture of the cake. The carbon dioxide released into the cake helps make it light and airy. * BAKING SODA– The reaction between the yogurt and baking soda helps the cake rise * CURD / YOGURT– Used plain thick curd aka yogurt. Curd is used as a substitute to egg. Curd is a key ingredient to achieve the softness and lightness. Also the reaction of baking soda and curd allows the cake a perfect rise and turns out a soft and spongy cake. * CANE SUGAR– Sweetens the cake with its natural sweetness and imparts a caramel-like flavor. * OIL– You can use a 50-50 ratio of oil and butter. The oil adds moisture to the cake and the butter will enhance the taste and add a nice buttery taste. You can use any one or use both. * MILK– Used whole milk. Recommend to use whole milk for extra richness, taste and texture. * VANILLA ESSENCE– Vanilla essence is used here. It adds a nice vanilla flavor to the cake.
HOW TO MAKE EGGLESS RAGI CHOCOLATE CAKE:
This section shows how to make eggless ragi chocolate cake with step-by-step photos and details about the technique with video tutorial. For full ingredients measurements, see the recipe card below.
I made a simple video of this eggless ragi chocolate cake recipe for my readers which I have shared below. Please do watch to know how I made this delicious recipe. If you liked the video please do SUBSCRIBE to my channel if you haven’t yet. Also like, share and comment on it! It will mean a lot to me and really motivate me to come up and shoot more videos for my readers. As always I’m looking forward to your feedback!
Eggless Ragi Chocolate Cake Video Tutorial
STEP BY STEP PICTORIAL INSTRUCTIONS TO MAKE EGGLESS RAGI CHOCOLATE CAKE
Preheat oven to 180° C for 10 minutes. Grease cake tin and line with parchment paper. (If you don’t have parchment paper grease and just dust it with some flour).
In a mixing bowl add the curd (yogurt) and baking soda. Mix and keep aside for 5 minutes. The mixture will foam up after few minutes.
Add in cane sugar, oil, milk and vanilla essence to the curd mixture. Mix together until well combined.
Sift in the flour, cocoa powder, baking powder, salt and sieve them.
Gently fold and mix until everything is well combined and form a smooth batter without lumps.
Coat the chocolate chunks lightly with some flour. Add in the chocolate chunks and give a quick mix. Do not over mix at this stage.
Transfer the batter to the prepared cake pan and tap the pan to release any air bubbles.
Top up with some chopped chocolate.
Bake at preheated oven at 180° C for 30-35 minutes or until a skewer inserted in the center comes out clean.
Remove from oven and allow the cake to stand for 5 minutes.
De-mould the cake and allow the cake to cool down completely. Slice and serve. Enjoy!
NOTES:
* Always start by pre-heating the oven and preparing the cake pan. This is a general rule of thumb in baking * Grease the cake tin with oil or butter and dust it with flour or use parchment paper. * All ingredients should be at room temperature for the cake. * If you are okay, you can use ¾ of ragi flour and ¼ cup of whole wheat or all purpose flour. * You can use brown sugar or jaggery instead of cane sugar. Use whichever is available. * You can swap butter with oil. * If you want to make egg version use 2 eggs and skip the curd and baking soda. * Baking time will differ depending upon your oven temperature.
Eggless ragi chocolate cake is delicious, soft, moist cake and is a great way to use millets. Indulge in a guilt-free ragi chocolate cake made with wholesome ingredients like ragi flour aka finger millet flour, cane sugar, curd (yogurt) along with few basic baking ingredients. Soft, moist and chocolatey, it's a perfect snack for kids and adults alike.
80GramsDark chocolate chunks(use the amount as per your palate)
120GramsCurd /Yogurt(½ cup)
60 mlOil or butter(¼ cup)
100GramsCane sugar(½ cup)
60mlWhole Milk (¼ cup)
1Teaspoon Vanilla essence (5 ml)
Instructions
Preheat oven to 180° C for 10 minutes. Grease cake tin and line with parchment paper. (If you don't have parchment paper grease and just dust it with some flour).
In a mixing bowl add the curd (yogurt) and baking soda. Mix and keep aside for 5 minutes. The mixture will foam up after few minutes.
Add in cane sugar, oil, milk and vanilla essence to the curd mixture. Mix together until well combined.
Sift in the flour, cocoa powder, baking powder, salt and sieve them.
Gently fold and mix until everything is well combined and form a smooth batter without lumps.
Coat the chocolate chunks lightly with some flour. Add in the chocolate chunks and give a quick mix. Do not over mix at this stage.
Transfer the batter to the prepared cake pan and tap the pan to release any air bubbles.
Top up with some chopped chocolate.
Bake at preheated oven at 180° C for 30-35 minutes or until a skewer inserted in the center comes out clean.
Remove from oven and allow the cake to stand for 5 minutes.
De-mould the cake and allow the cake to cool down completely. Slice and serve. Enjoy!
Video
Notes
Always start by pre-heating the oven and preparing the cake pan. This is a general rule of thumb in baking
Grease the cake tin with oil or butter and dust it with flour or use parchment paper.
All ingredients should be at room temperature for the cake.
If you are okay, you can use ¾ of ragi flour and ¼ cup of whole wheat or all purpose flour.
You can use brown sugar or jaggery instead of cane sugar. Use whichever is available.
You can swap butter with oil.
If you want to make egg version use 2 eggs and skip the curd and baking soda.
Baking time will differ depending upon your oven temperature.
SERVING SUGGESTIONS
* Serve with a scoop of vanilla ice cream. They both compliment together so well creating a delightful dessert combination. * Pair with a warm cup of tea or coffee. The rich flavors of the cake pair beautifully with the aromatic notes of the tea or the boldness of coffee. * Top with a dollop of whipped cream for an indulgent touch. * Serve with fruit compote or sauce. * Enjoy with a drizzle of honey or maple syrup.
HOW TO STORE RAGI CAKE?
* Countertop– Once the cake has cooled completely, store it in an airtight container to prevent it from drying out and to maintain the freshness over the counter. It will last for at least 3 days in room temperature.
* Refrigeration– If you plan to keep the ragi cake for a couple of days, it’s best to store it in the refrigerator. Place the cake in an airtight container and store in the refrigerator for at least one week
* Freezing– If you want to store the cake for a longer period of time, you can freeze the ragi cake for at least one month or more. Slice the cake and wrap individual slices in cling wrap or aluminum foil to prevent any moisture in the cake. To thaw, simply remove it from the freezer and let it come to room temperature before serving. You can also pop them up in a microwave for few seconds and serve warm.
Here are all my Bakes & Cakes recipes if you’re craving more baking inspiration. All of the above recipes are super easy to prepare, ready in no time, and will never disappoint you.
Well, if you make this eggless ragi chocolate cake recipe I’ll be glad if you take out some time and rate the recipe and leave a feedback in the comments box below. You can also snap a photo and tag Akum Raj Jamir on Facebook and akumrajjamir on Instagram with hashtag #atmykitchen. I would love to see your creations.
Thank you so much for stopping by my blog. I hope you liked the recipe. Your valuable feedbacks are always welcome, I love hearing from you guys and always do my best to respond to each and every one of you.
Eggless banana nut muffins are soft and spongy muffins which are not overly sweet. It is quick and easy to make with simple pantry staples. These fluffy eggless banana muffins are a delicious way to use overripe bananas. It’s an egg-free version so everybody can devour it.
We make these often and they turned out amazing every time. Super moist and fluffy. The sweetness is perfect, not too sweet just the way we like it. This is the perfect muffin recipe, believe me you are not going to regret trying it.
Our favourite way to use up over ripe bananas so they never end up into the bin. This incredibly easy banana muffins is super moist, soft and spongy. It makes a great breakfast on-the-go or a tea snack and perfect for kids tiffin box and anytime quick snacking.
This banana nut muffins recipe is super simple, easy and fuss-free. It doesn’t require any fancy equipment. Just a bowl and a wired whisk does the work. The batter takes less than 15 minutes to put together and gets perfectly baked in 20 to 25 minutes. The end result is delicious banana nut muffins that’s so tender, moist and aromatic. You just can’t stop with one!
WHY YOU’LL LOVE THESE BANANA NUT MUFFINS
TASTE: Loaded with banana flavor and the perfect amount of sweetness. TEXTURE: Perfectly spongy, moist, and tender with a delicious crunch from the nuts in every bite. EASE: Ridiculously easy to make. No fancy equipment, just a bowl and a wired whisk or spatula. DURATION: Super quick to prepare. The batter is ready in under 15 minutes and the muffins are perfectly baked under 25 minutes. CONCLUSION: Everyone loves these muffins. Would I make this again? Absolutely, these banana nut muffins are perfect for any occasion. I make both egg and eggless versions. Both turn out so well every time.
INGREDIENTS TO MAKE EGGLESS BANANA NUT MUFFINS:
It is a very basic banana muffins recipe. It uses basic pantry ingredients. This section explains what all ingredients are used in making eggless banana nut muffins, how to use or choose certain ingredients and substitution options. For measurements, see the recipe card below.
● WHOLE WHEAT FLOUR: For a healthier version used whole wheat flour. You may use all purpose flour or 50:50 ratio.
● BANANA: Used over ripe bananas. Over ripe bananas are best for baking cakes, cookies or bread.
● SUGAR: The recipe uses regular white sugar. You may use brown sugar for a healthier option too.
● MILK: Used whole milk. Recommend to use whole milk for extra richness, taste and texture.
● BUTTER: I have used salted melted butter. You can use refined sunflower oil or vegetable oil or any neutral flavour oil. Using a combination of oil and butter also gives an awesome outcome, soft and moist.
● LEAVENING AGENTS(BAKING POWDER & BAKING SODA): There’s a combination of baking powder and baking soda in this banana nut muffins to give it the perfect amount of lift.
● VINEGAR: Vinegar plays a huge role in rising. The reaction of vinegar with the baking soda releases carbon dioxide, which helps cakes rise as they bake.
● ESSENCE: I used vanilla essence.
● SALT: A dash of salt is always good in baked goodies. The salt helps to balance out the sweetness too.
● NUTS: Topped with mixed nuts. I used chopped almond, cashew nut, walnut and pistachio. Since it is a banana nut muffins recipe nuts are added, but you can omit them to make plain banana muffins.
HOW TO MAKE EGGLESS BANANA NUT MUFFINS:
This is the easiest banana nut muffins recipe without using stand mixer or any fancy equipments. We make the batter using one bowl and a wired whisk. You will be surprised to see how easy it is to make at the comfort of your home.
* In the mixing bowl mix together mash banana, sugar, milk, butter, vinegar and vanilla essence. * Sift together dry ingredients: flour, salt, baking powder, baking soda into the wet ingredients and make a lumps free batter. * Dust the nuts with little flour and stir onto the batter (reserve some for topping). * Transfer to line muffin cups or tray. * Top up with chopped nuts and bake.
Try out this super easy and moist banana nut muffins at the comfort of your home and I’m sure everyone will love it as much as we do! Do share your thoughts about the recipe with me here. Please do read the recipe notes given below for tips and tricks to make the very best banana nut muffins. So let’s get started with the recipe.
VARIATIONS AND SUBSTITUTIONS IN EGGLESS BANANA NUT MUFFINS
VARIATIONS:
● If you want you can use both dry fruits and nuts. ● Instead of mixed nuts, you may use pecans or walnuts or a mixture of both. ● You may also replace the nut with chocolate chunks or chocolate chips to make it banana chocolate chips muffins.
SUBSTITUTION:
* Whole wheat flour can be substituted with all purpose flour (maida) or you can use 50-50 ratio of both. * You can use brown sugar instead of white sugar. * You may also use other healthier sweeteners are jaggery, cane sugar, honey etc. * You may use oil instead of butter or any flavorless oil will work. * To make it vegan use dairy free milk like almond milk or just even water for the liquid. * You may make this muffins with egg. Use 2 eggs and omit the baking soda and vinegar and use the quantity of milk as required. * You can put this batter into cake tins and make banana nut cake.
To make a cake, line a cake tin with paper liners or just grease it with oil or butter and pour the batter onto the prepared cake tin and bake for 30 to 35 minutes or until a toothpick inserted comes out clean.
HOW TO MAKE EGGLESS BANANA NUT MUFFINS
This section shows how to make eggless banana nut muffins with step-by-step photos and details about the technique with video tutorial. For full ingredients measurements, see the recipe card below.
I made a simple video of this Eggless Banana Nut Muffins recipe for my readers which I have shared below. Please do watch to know how I made this delicious recipe. If you liked the video please do SUBSCRIBE to my channel if you haven’t yet. Also like, share and comment on it! It will mean a lot to me and really motivate me to come up and shoot more videos for my readers. As always I’m looking forward to your feedback!
Step by step pictorial instructions to make banana nut muffins:
Line muffin cups or tray with liners or simply grease them with oil or butter. Preheat oven @180° C for 10 minutes.
Peel the ripe bananas and mash them with a fork or a food processor.
In a mixing bowl add the mash banana, sugar, milk, vanilla essence and mix well until combine.
Seive in the flour, baking powder, baking soda and salt.
Gently fold the wet and dry ingredients to make a smooth batter without lumps. Do not overmix the batter.
Add in the vinegar and mix.
Dust the nuts with flour to prevent from sinking at the bottom. Add in the nuts to the batter and give a quick mix. (Reserve some for topping)
Pour the batter into the prepared muffin cups or tray till ¾ of the cavity..
Tap the pan on the surface for couple of times to release any air bubbles inside. Now sprinkle the chopped nut on the top.
Bake at a preheated oven @180° C with both rods switched on for 20 to 25 minutes or until a toothpick or skewer inserted comes out clean.
Remove from the oven and let the it stand in the pan for about 5 minutes.
Transfer the muffins onto a cooling rack and let it cool down completely.
Serve it as a snack with two/coffee. It’s perfect for kids tiffin box too.
NOTES:
* Always preheat oven before starting to bake. * All ingredients should be at room temperature. * Whole wheat flour can be substituted with all purpose flour or can bake with 50-50 of both. * White sugar can be substituted with brown sugar or cane sugar for healthier version. * If you like more sweeter muffins, increase the sugar quantity. * Oil can be substituted with butter. * Use whole milk for extra richness, taste and texture. * Vinegar can be substituted with lemon juice. * Every oven reacts differently so baking time may vary. * Both rods to be switch on. * If you wish to bake with eggs, use 2 eggs and omit the baking soda and adjust the milk and use as required. * I used mixed nuts, you can use a mixture of nuts and dry fruits as per the availability.
Eggless banana nut muffins are soft and spongy muffins which are not overly sweet. It is quick and easy to make with simple pantry staples. These fluffy eggless banana muffins are a delicious way to use up overripe bananas. It's an egg-free version so everybody can devour it.
70Grams Mixed nuts (almond, cashew, walnut and pistachio)
Instructions
Line muffin cups or tray with liners or simply grease them with oil or butter. Preheat oven @180° C for 10 minutes
Mash the banana with a fork.
In a mixing bowl add the mash banana, sugar, milk, vanilla essence and mix well until combine.
Seive in the flour, baking powder, baking soda and salt. Sift them.
Gently fold the wet and dry ingredients to make a smooth batter without lumps. Do not overmix the batter.
Add in the vinegar and mix.
Dust the nuts with flour to prevent from sinking at the bottom. Add in the nuts to the batter and give a quick mix. (Reserve some for topping)
Pour the batter into the prepared muffin cups or tray till ¾ of the cavity.
Tap the pan on the surface for couple of times to release any air bubbles inside. Now sprinkle the chopped nut on the top.
Bake at a preheated oven @180° C with both rods switched on for 20 to 25 minutes or until a toothpick or skewer inserted comes out clean.
Remove from the oven and let the it stand in the pan for about 5 minutes.
Transfer the muffins onto a cooling rack and let it cool down completely.
Serve it as a snack with two/coffee. It's perfect for kids tiffin box too.
Video
Notes
Always preheat oven before starting to bake.
All ingredients should be at room temperature.
Whole wheat flour can be substituted with all purpose flour or can bake with 50-50 of both.
White sugar can be substituted with brown sugar or cane sugar for healthier version.
If you like more sweeter muffins, increase the sugar quantity.
Oil can be substituted with butter.
Use whole milk for extra richness, taste and texture.
Vinegar can be substituted with lemon juice.
Every oven reacts differently so baking time may vary.
Both rods to be switch on.
If you wish to bake with eggs, use 2 eggs and omit the baking soda and adjust the milk and use as required.
I used mixed nuts, you can use a mixture of nuts and dry fruits as per the availability.
FREQUENTLY ASKED QUESTIONS
WHAT IS THE BEST WAY TO MASH BANANA? The easiest and fuss-free way to mash banana is using a bowl/plate and a fork. Just peel the bananas, add them in a bowl and mash it with a fork or a potato smasher. Alternatively you can also grind it or blend it using a blender or food processor. But this creates an extra work of washing this equipment after use. It is not necessary to mash the bananas completely smooth, but if you like it completely smooth then use a food processor.
HOW TO STORE THESE BANANA NUT MUFFINS? Allow the muffins to cool down completely. Place them in an airtight container.
HOW LONG DOES EGGLESS BANANA NUT MUFFINS LAST? Banana nut muffins can be kept for up to 3-4 days over the counter depending upon the temperature of your place. It will last for up to a week if stored in a refrigerator.
HOW TO FREEZE THESE MUFFINS? Place the muffins in an airtight freezer safe container or zip-top freezer bag and freeze for up to 3 months. When you’re ready to enjoy, take out the required muffins and allow to thaw in room temperature or microwave it for 30-60 seconds.
CAN I MAKE THESE INTO BANANA NUT CAKE INSTEAD? Sure! You can use 7 inches cake tin. Bake at a preheated oven at 180° C for 30 to 35 minutes or a tester inserted into the center comes out clean.
WHAT NUTS ARE BEST IN THIS RECIPE? You can use mixed nuts like I did though it depends upon your palate preference. It’s amazing with pecans or walnuts in these muffins. The texture and flavor of nuts pairs well with the tenderness of the muffins and sweetness of the bananas.
CAN I OMIT THE NUTS? YES! The recipe will still work even if the nuts are omitted. I make it nut-free sometimes and it just turns out amazing with super soft, moist and scrumptious muffins. You can also replace them with some chocolate chunks or chips to make chocolate chip banana bread.
Here are all my Bakes & Cakes recipes if you’re craving more baking inspiration. All of the above recipes are super easy to prepare, ready in no time, and will never disappoint you.
Well, if you make this eggless banana nut muffins recipe I’ll be glad if you take out some time and rate the recipe and leave a feedback in the comments box below. You can also snap a photo and tag Akum Raj Jamir on Facebook and akumrajjamir on Instagram with hashtag #atmykitchen. I would love to see your creations.
Thank you so much for stopping by my blog. I hope you liked the recipe. Your valuable feedbacks are always welcome, I love hearing from you guys and always do my best to respond to each and every one of you.
This lemon blueberry bundt cake is super moist and soft, infused with the zesty lemon flavor and with a burst of juicy blueberries. It’s packed with wonderful flavor and is topped with a lemony glaze. An easy and delicious recipe for The BEST Blueberry Bundt Cake! It’s perfect for brunch and pairs well with coffee or tea.
This lemon blueberry cake recipe is bursting with lemon flavor as it uses both fresh lemon juice and fresh lemon zest. The zest is added together with the wet ingredients and blended well which releases even more of the lemon flavor from the zest.
Tart lemon and sweet blueberries combined in this lemon blueberry bundt cake is a must for this summer. If you love the combination of lemon and blueberries as much as I do, then this is a perfect summery dessert that you would love!
Non-frosted cakes as we call tea cakes are my most made cakes at home. They are great for snacking, great with coffee and tea, potluck, travelling and more. So I love making them for my family. This super soft and moist lemon blueberry bundt cake recipe is so delicious and great for all occasions and only takes less than ten minutes to prepare and gets baked perfectly in 30 minutes.
WHY YOU’LL LOVE THIS EGGLESS LEMON BLUEBERRY BUNDT CAKE RECIPE
* Super easy to prepare with simple preparation steps. * Preparing the cake batter takes less than 10 minutes and perfectly gets baked in 30 minutes. * Require only a handful of kitchen staples to make this absolutely delicious cake. * It’s a versatile recipe. * So moist, tender and delicious. * Bursting flavor from fresh blueberries. * Amazing taste and texture, tartness from the lemon and sweetness from the blueberries
INGREDIENTS FOR EGGLESS LEMON BLUEBERRY BUNDT CAKE
FLOUR– I used all-purpose flour. You may substitute whole wheat flour or use 50:50 ratio of all purpose flour and whole wheat flour.
CUSTARD POWDER– Used the custard powder to enhance the taste and texture of the cake. Actually I wanted to use milk powder but it was not available at my pantry at the time of baking this cake. This is an optional ingredients. You may use milk powder or dairy whitener instead or skip it.
LEAVENING AGENT– Both leavening agents baking powder and baking soda is used in the recipe to give a perfect rise to the cake.
SALT– Salt is used to neutralizes the sweetness of the cake.
BUTTER– I used salted butter and in melted form. Unsalted butter works too. You can use vegetable or sunflower oil if you don’t prefer to use butter. You may use a combination of butter and oil though.
MILK– Used whole fat milk. Recommend to use full fat milk to enhance the richness and taste of the cake.
SUGAR– I use granulated white sugar. For healthier version you can use brown sugar or cane sugar but the colour of the cake will slightly change.
ESSENCE– I use vanilla extract for best flavor.
BLUEBERRIES– This recipe uses fresh blueberries. Recommend to use small to medium size blueberries as the larger blueberries tends to sink at the bottom. I experienced that as my blueberries were larger in size. Make sure to dust the blueberries with flour before adding in the cake batter. You can use frozen blueberries if fresh one is not available but do not thaw them otherwise you’ll end up with a purple batter!
LEMON JUICE AND LEMON ZEST– Lemon and blueberries makes a great match. If you don’t like zesty taste and tartness of the lemon you can skip the lemon. But you won’t regret giving it a try as this lemon blueberry combo is a hit and a perfect summery dessert.
HOW TO MAKE LEMON BLUEBERRY BUNDT CAKE
This section shows how to make eggless lemon blueberry bundt cake with step-by-step photos and details about the technique with video tutorial. For full ingredients measurements, see the recipe card below.
I made a simple video of this Eggless Lemon Blueberry Bundt Cake recipe for my readers which I have shared below. Please do watch to know how I made this delicious recipe. If you liked the video please do SUBSCRIBE to my channel if you haven’t yet. Also like, share and comment on it! It will mean a lot to me and really motivate me to come up and shoot more videos for my readers. As always I’m looking forward to your feedback!
Eggless Lemon Blueberry Cake Recipe Video Tutorial
STEP BY STEP INSTRUCTIONS TO MAKE LEMON BLUEBERRY CAKE
PREPARE THE CAKE TIN:
I used a 6.5 inch bundt tin. Grease the tin very nicely with oil or butter. Dust it with some flour and remove excess flour. Keep aside. (Since we can’t line the bundt tin with parchment paper we need to grease the tin very nicely and also dust it with flour so the cake easily comes out when unmoulding).
PREPARE THE OVEN:
Preheat the oven at 180° C for at least 10 minutes with both (filaments) rods on.
MAKE YOUR CAKE BATTER:
In a mixing bowl add in the sugar, melted butter, milk and vanilla essence. Using a wire hand whisk, whisk it until the mixture is combined and sugar is dissolved.
Add in the lemon juice and the lemon zest. Mix well to combine.
Sieve in the flour, custard powder or milk powder, baking powder, baking soda, and salt. Sift them. Now gently fold them and make a smooth batter.
ADD BLUEBERRIES:
Dust the blueberries with some flour.
Add in the blueberries into the cake batter and give a quick mix. Do not over mix.
BAKE THE CAKE:
Pour the batter onto the prepared tin. Tap the tin for 3-4 times to release any air bubbles.
Place your cake tin in the oven on the middle rack at 180 degrees Celsius for 30 to 35 minutes. A toothpick or skewer inserted should come out clean.
REMOVE CAKE FROM OVEN:
You would want to do the toothpick test at around 30 minutes to make sure the cake is baked through. Baking time will differ as every oven temperature is different.
Remove the cake from the oven and allow to rest for 5 to 10 minutes: Invert the cake and allow the cake to cool down completely.
MAKE THE GLAZE:
In a bowl add in the powdered sugar, lemon juice and lemon zest. Mix well and make a thicker glaze. ( Add 1 or 2 teaspoons of water if the glaze is too thick).
Once the cake is cooled down, pour the glaze over the cake. Slice it and enjoy!
TIPS TO MAKE LEMON BLUEBERRY BUNDT CAKE
* Always bake your cakes in a preheated oven. * Use more blueberries if you like your cakes to be more fruity and embedded all over your cake. * The best is to select small to medium blueberries. * Be sure to toss your blueberries in some flour before adding them to the batter. This helps keep the blueberries from sinking to the bottom of the pan. * You can spray the blueberries with some baking spray to help the flour bond to them, unless they are still a bit wet after washing. * Grease the bundt pan with oil or butter and dust it well with flour to prevent the cake from sticking to the pan. * You can also use non-stick baking spray. * Bake the cake on the middle rack with both rods switched on. * Test your cake with a toothpick or skewer at around 30 minutes to make sure the doneness before removing the cake from the oven. * Allow the cake to stand for 5-10 minutes and then invert the cake and allow it to cool down completely in a cooling rack.
This lemon blueberry bundt cake is super moist and soft, infused with the zesty lemon flavor and with a burst of juicy blueberries. It’s packed with wonderful flavor and is topped with a lemony glaze. An easy and delicious recipe for The BEST Blueberry Bundt Cake! It’s perfect for brunch and pairs well with coffee or tea.
I used a 6.5 inch bundt tin. Grease the tin very nicely with oil or butter.
Dust it with some flour and remove excess flour. Keep aside. (Since we can't line the bundt tin with parchment paper we need to grease the tin very nicely and also dust it with flour so the cake easily comes out when unmoulding).
PREPARE THE OVEN:
Preheat the oven at 180° C for at least 10 minutes with both (filaments) rods on.
MAKE YOUR CAKE BATTER:
In a mixing bowl add in the sugar, melted butter, milk and vanilla essence.
Using a wire hand whisk, whisk it until the mixture is combined and sugar is dissolved.
Add in the lemon juice and the lemon zest. Mix well to combine.
Sieve in the flour, custard powder or milk powder, baking powder, baking soda, and salt. Sift them.
Now gently fold them and make a smooth batter.
ADD THE BLUEBERRIES:
Dust the blueberries with some flour.
Add in the blueberries into the cake batter and give a quick mix. Do not over mix.
BAKE THE CAKE:
Pour the batter onto the prepared tin. Tap the tin for 3-4 times to release any air bubbles.
Place your cake tin in the oven on the middle rack at 180 degrees Celsius for 30 to 35 minutes. A toothpick or skewer inserted should come out clean.
REMOVE CAKE FROM OVEN:
You would want to do the toothpick test at around 30 minutes to make sure the cake is baked through. Baking time will differ as every oven temperature is different.
Remove the cake from the oven and allow to rest for 5 to 10 minutes: Invert the cake and allow the cake to cool down completely.
MAKE THE GLAZE:
In a bowl add in the powdered sugar, lemon juice and lemon zest.
Mix well and make a thicker glaze. ( Add 1 or 2 teaspoons of water if the glaze is too thick).
Once the cake is cooled down, pour the glaze over the cake. Slice it and enjoy!
Video
Notes
Always bake your cakes in a preheated oven.
Use more blueberries if you like your cakes to be more fruity and embedded all over your cake.
The best is to select small to medium blueberries.
Be sure to toss your blueberries in some flour before adding them to the batter. This helps keep the blueberries from sinking to the bottom of the pan.
You can spray the blueberries with some baking spray to help the flour bond to them, unless they are still a bit wet after washing.
Grease the bundt pan with oil or butter and dust it well with flour to prevent the cake from sticking to the pan.
You can also use non-stick baking spray.
Bake the cake on the middle rack with both rods switched on.
Test your cake with a toothpick or skewer at around 30 minutes to make sure the doneness before removing the cake from the oven.
Allow the cake to stand for 5-10 minutes and then invert the cake and allow it to cool down completely in a cooling rack.
FREQUENTLY ASKED QUESTIONS
CAN I USE FROZEN BLUEBERRIES? Yes! And you can directly add them to the batter straight away from the freezer. Just dust it with flour and add to the cake batter.
CAN I USE OTHER BERRIES? Yes for sure! This is a great base recipe to add different berries which would go so well with this recipe. Strawberries, blackberries, black currant or raspberries and even cherries would be lovely too!
WHAT KIND OF BLUEBERRIES SHOULD I USE? Always try to get small to medium blueberries. Large blueberries will tend to sink no matter what. You see in the photos, mine still sank because the blueberries were a little larger in size.
HOW TO PREVENT BLUEBERRIES FROM SINKING ? The best way to prevent blueberries from sinking to the bottom of a cake is to coat the blueberries in flour and also size matters. Try to use small to medium size blueberries. Toss the blueberries in about 1 to 2 teaspoons of all purpose flour before folding them into the cake batter.
CAN I USE OIL INSTEAD OF BUTTER? Yes, you can swap butter for oil. You can use unflavored vegetable or sunflower oil or any neutral flavour oil. However the texture and flavor will be slightly different. You may also use a mixture of oil and butter. The 50:50 ratio works fine.
HOW DO YOU KNOW IF THE CAKE IS DONE? Test your cake with a toothpick or skewer at around 30 minutes to make sure it’s baked through before removing the cake from the oven. Bake an additional 5 minutes at the most for extra cooking if the toothpick comes out with crumbs. Please note that the cake will continue to cook for a few more minutes after it is out of the oven.
HOW TO STORE BUNDT CAKE? Store leftover cake in an airtight container. It stays good and fresh in the room temperature for up to 3 days and up to one week in the refrigerator. You can freeze it for up to 3 months. Slice the cake, wrap the individual slices and place it in an airtight container. Take out the required slices and thaw it before serving. You can reheat it for a few seconds in the microwave just before serving.
Well, if you make this Eggless Lemon Blueberry Bundt Cake recipe I’ll be glad if you take out some time and rate the recipe and leave a feedback in the comments box below. You can also snap a photo and tag Akum Raj Jamir on Facebook and akumrajjamir on Instagram with hashtag #atmykitchen. I would love to see your creations.
Thank you so much for stopping by my blog. I hope you liked the recipe. Your valuable feedbacks are always welcome, I love hearing from you guys and always do my best to respond to each and every one of you.
Rich fudgy brownie with the perfect shiny, crinkly top. These chocolate fudgy brownies have a rich, dark chocolate flavor, moist, fudgy and the perfect crinkly top. The only chocolate brownie recipe you’ll ever need – quick, easy, and ultimate fudgy!
This crinkle top brownie recipe is really easy to put together with all the essential ingredients, minimal fuss and yields a perfect brownie – super chocolatey, moist and crinkle top.
This classic chocolate brownie recipe is my absolute favourite foolproof crinkly fudgy brownies (with a shiny top!)! I promise shiny, crinkly-top brownies every time you make. It gives a beautiful, glossy, paper-thin top. You won’t be able to stop eating these!
The texture of the edge brownie pieces is chewy and more fudgy at the center.
The best thing about these brownies is that it is sweet, but not tooth-achingly sweet. Not only this brownie recipe but most of my cakes are not overly sweet as I prefer it that way. The sugar in this recipe is just the right amount of sweetness for me.
WHY YOU’LL LOVE THIS
* They’re easier to make so you’ll make them over again. * Quick to make and always a crowd pleaser. * Better taste and texture. * It’s a no-fuss and no-fail brownie recipe. * Seriously fudgy and have a richer chocolatey flavor and the texture is more fudgy. * Versatile * It has a shiny crackly top. They get that perfect crackly top everytime you make them. And thus, this fudgy brownie recipe will absolutely become your new favorite.
INGREDIENTS TO MAKE CHOCOLATE FUDGY BROWNIES
FLOUR: I used all-purpose flour. You may substitute whole wheat flour or use 50:50 ratio of all purpose flour and whole wheat flour.
BUTTER: I used salted butter but unsalted butter works too. The butter gets melted so it doesn’t matter if it’s cold. You may use a combination of butter and oil though.
CHOCOLATE– I used dark chocolate, you can use milk chocolate or semi-sweet chocolate. Sometimes I prefer to use a combination of dark chocolate and milk chocolate.
EGGS– Always use room temperature eggs.If eggs are refrigerated remove them and place them in the counter for couple of minutes ahead of your baking.
SUGAR– I used white sugar. You can use both brown sugar and granulated sugar in this recipe for the perfect flavor and texture combination. Light or dark brown sugar works fine.
COCOA POWDER– The better quality, the better your brownies will taste. Cocoa powder plays a vital role and is the most important ingredient in chocolate cake recipe when it comes to flavour and taste. Always try to use good quality cocoa powder while making any chocolate cake or any cocoa powder based dessert as the overall taste and texture of the cakes and desserts depends upon it. I’ve used Hershey’s brand cocoa powder. Don’t use sweetened cocoa powder though!
ESSENCE– I use vanilla extract instead of essence. For vanilla extract I always use SPRIG’s vanilla extract. You may also totally skip the essence while making brownies.
SALT– A pinch of salt is used to balance out the sweetness in any dessert. You can skip this totally if you don’t want.
HOW TO MAKE CHOCOLATE FUDGY BROWNIES
This section shows how to make chocolate fudgy brownies with step-by-step photos and details about the technique with video tutorial. For full ingredients measurements, see the recipe card below.
I made a simple video of this chocolate fudgy brownies recipe for my readers which I have shared below. Please do watch to know how I made this delicious recipe. If you liked the video please do SUBSCRIBE to my channel if you haven’t yet. Also like, share and comment on it! It will mean a lot to me and really motivate me to come up and shoot more videos for my readers. As always I’m looking forward to your feedback!
Chocolate Fudgy Brownies Recipe Video Tutorial
STEP BY STEP INSTRUCTIONS TO MAKE FUDGY BROWNIE
Take a 7 by 7 inch square tin and grease it with oil or butter or line it with parchment paper. Keep aside.
In a heat proof bowl add in the chopped chocolate and the butter. Melt them using a microwave or a double boiler method. Keep it aside and allow it to cool down.
Meanwhile preheat the oven at 170° C for at least 10 minutes.
In a bowl sieve the flour, cocoa powder and salt. Mix well and keep aside.
Take the sugar and grind it into a fine powder.
In a mixing bowl add in the powdered sugar and eggs. ( If using coffee add it at this stage) Whisk it well till the sugar is completely dissolved and the mixture doesn’t feel grainy. Add in vanilla extract and mix.
Add in chocolate mixture into the whisked egg mixture and fold them until well combined.
Add in the dry ingredients and gently fold to make a smooth batter. Do not over mix the batter.
Pour the batter onto the prepared tin and tap gently to remove air bubbles if any.
Bake them in a preheated oven @170° C for 20 or 25 minutes or until a screwer inserted into the centre comes out with some moist crumbs and not wet batter. Do not overbake the brownies or it will turn dry. (Do the toothpick test at 20 minutes)
Remove it from the oven and allow to rest for about 5 minutes. Carefully grab the parchment paper and transfer the brownie sheet onto the wire rack and allow the brownies to cool down completely.
Do not slice the brownie but cut it into squares as per your preferred sizes.
The recipe gives 500 grams of brownie and is perfect for 16 small pieces or 9 big pieces.
Enjoy it with coffee or as dessert with a scoop of vanilla ice cream.
NOTES:
* Remember to use all ingredients at room temperature. * You can use a combination of white and brown sugar if you like. * You may add a teaspoon of coffee if you wish to. * Cut the brownies after it has cooled down completely. * You may sprinkle some choco chips/chocolate chunks or chopped walnuts if desired. * Do not overbake the brownies.
VARIATION
* Make fudgy walnut brownies by adding chopped walnuts in the batter as well as topping. * You can make nutella brownies by substituting nutella with chocolate. * Make caramel brownies, pour half of brownie batter, then gently put a layer of caramel sauce, followed by remaining brownie batter and spread the caramel sauce on top gently and bake as instructed. * Make orea brownie. Add some big chunks of orea in the batter. Once the batter is poured in the pan. Level up and then place randomly orea cookies and bake
Rich fudgy brownie with the perfect shiny, crinkly top. This chocolate fudgy brownies have a rich, dark chocolate flavor, moist, fudgy and the perfect crinkly top. The only chocolate brownie recipe you’ll ever need – quick, easy, and ultimate fudgy!
Course baking, Dessert
Cuisine American
Keyword brownies, crinkle top brownies, fudgy brownies
Prep Time 15 minutesminutes
Cook Time 25 minutesminutes
Total Time 40 minutesminutes
Servings 500Grams
Author Akum Raj Jamir
Equipment
2 Mixing bowl
OTG
weighing scale
240 ml measuring cups and spoons set
Wired whisk
7 inches rectangle cake tin
Ingredients
80GramsAll purpose flour (⅔ cup)
15Grams Cocoa powder (3-4 tablespoon)
¼Teaspoon SaltOr a pinch
150GramsDark chocolate chopped (¾ cup)
1Teaspoon Vanilla extract (optional)5 ml
2Large Eggs
60GramsButter(¼ cup)
80 Grams SugarOr 100 grams/½ cup
Instructions
Take a 7 by 7 inch square tin and grease it with oil or butter or line it with parchment paper. Keep aside.
In a heat proof bowl add in the chopped chocolate and the butter. Melt them using a microwave or a double boiler method. Keep it aside and allow it to cool down.
Meanwhile preheat the oven at 170° C for at least 10 minutes.
In a bowl sieve the flour, cocoa powder and salt. Mix well and keep aside.
Take the sugar and grind it into a fine powder.
In a mixing bowl add in the powdered sugar and eggs. ( If using coffee add it at this stage) Whisk it well till the sugar is completely dissolved and the mixture doesn’t feel grainy.
Add in vanilla extract, chocolate mixture into the whisked egg mixture and fold them until well combined.
Add in the dry ingredients and gently fold to make a smooth batter. Do not over mix the batter.
Pour the batter onto the prepared tin and tap gently to remove air bubbles if any.
Bake them in a preheated oven @170° C for 20 or 25 minutes or until a screwer inserted into the centre comes out with some moist crumbs and not wet batter. Do not overbake the brownies or it will turn dry. (Do the toothpick test at 20 minutes)
Remove it from the oven and allow to rest for about 5 minutes. Carefully grab the parchment paper and transfer the brownie sheet onto the wire rack and allow the brownies to cool down completely.
Do not slice the brownie but cut it into squares as per your preferred sizes.
The recipe gives 500 grams of brownie and is perfect for 16 small pieces or 9 big pieces.
Enjoy it with coffee or as dessert with a scoop of vanilla ice cream.
Video
Notes
Remember to use all ingredients at room temperature.
You can use a combination of white and brown sugar if you like.
You may add a teaspoon of coffee if you wish to.
Cut the brownies after it has cooled down completely.
You may sprinkle some choco chips/chocolate chunks or chopped walnuts if desired.
Do not overbake the brownies.
FREQUENTLY ASKED QUESTIONS
HOW DO WE KNOW BROWNIE IS PERFECT BAKED? When you think it’s time to do the test, insert a toothpick in the center of the brownie pan and pull back the toothpick — if it’s coated in wet batter, the brownies still need baking. The toothpick inserted into the centre should come out with some moist crumbs and not wet batter.
WHICH CHOCOLATE IS BEST FOR BROWNIES? Couverture chocolate is best for making brownies. It gives a better taste and texture to the brownies. If couverture is not available to you, try to use good and high quality compound chocolate.
HOW TO GET A THIN CRACKLY TOP FOR BROWNIES? To get the perfect crackly top on these brownies you want to make sure you whisk the eggs with the sugar aggressively for 2-3 minutes. Also the melted chocolate and butter contribute to that crackly top so make sure not to skip anything in the recipe.
HOW TO PERFECTLY SLICE BROWNIES? To get a perfect clean cut you can follow this trick – Dip the knife (not the serrated one) in hot water, wipe it well and make cuts on the brownie. Do not slice it, rather cut it. Repeat dipping the knife in hot water and cut into as many pieces as desired. Yes, between every slice because they’re fudgy, some of the gooey chocolate gets stuck on the knife and if you just go to cut another slice it gets less and less pretty. OR If you’re not in a rush to shot your brownies then you can follow this. Allow the brownie to chill for few minutes in refrigerator or freezer. After they’ve cooled you can cut them as desired sizes.
HOW TO STORE BROWNIES? Once the brownies are cooked down completely, place your brownies in an airtight container at room temperature for 3 to 4 days. Or store them in the fridge for upto 1-2 weeks. You can also freeze brownies for up to 3 months! I like wrapping them individually so I can take them out of the freezer as required whenever I feel like serving them.
SERVING SUGGESTIONS
You can serve brownies as it is to satisfy your sweet carvings or with your team/coffee. For a light dessert serve brownies with a dollop of vanilla ice cream.
If you like more brownie recipes, I have some in my blog.
Here are all my Bakes & Cakes recipes if you’re craving more baking inspiration.
Well, if you make this chocolate fudgy brownies recipe I’ll be glad if you take out some time and rate the recipe and leave a feedback in the comments box below. You can also snap a photo and tag Akum Raj Jamir on Facebook and akumrajjamir on Instagram with hashtag #atmykitchen. I would love to see your creations.
Thank you so much for stopping by my blog. I hope you liked the recipe. Your valuable feedbacks are always welcome, I love hearing from you guys and always do my best to respond to each and every one of you.
The quintessential Black Forest Cake has got easy enough elements to play around with, and takes well to add ins like a dark chocolate ganache etc. And as always, the outcome is always spoon licking or bowl licking if not finger kicking good! Here are a few reimagined eggless black forest cake ideas to keep you busy through summer!
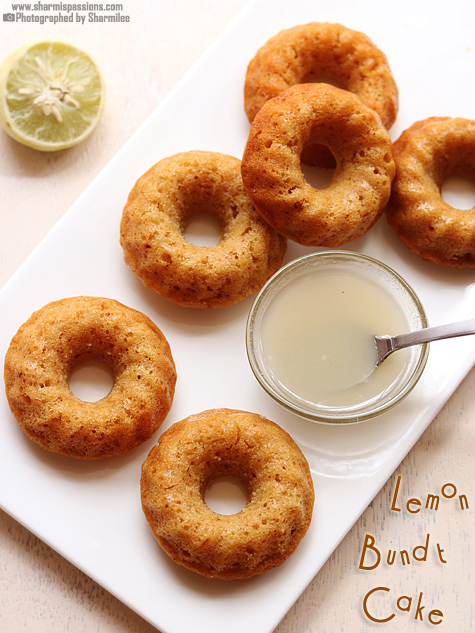
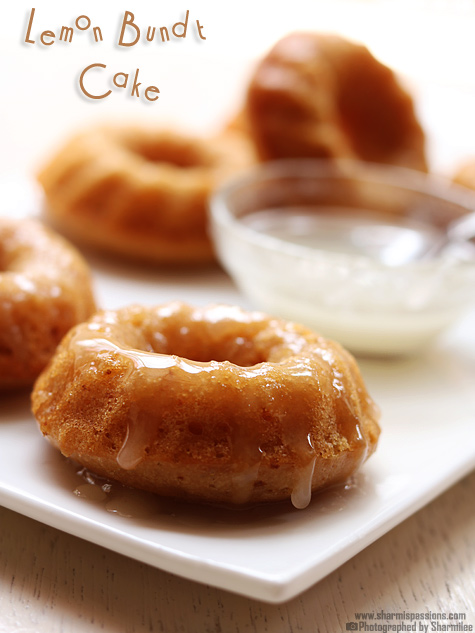
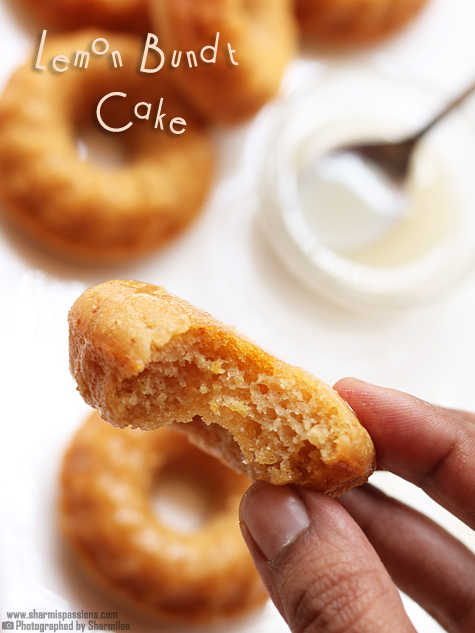
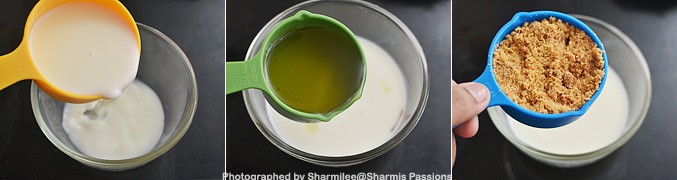
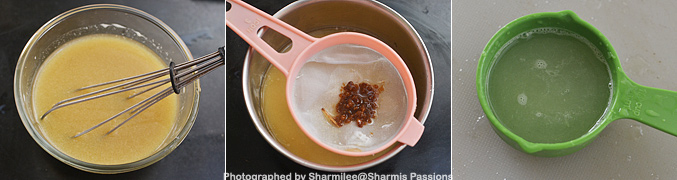
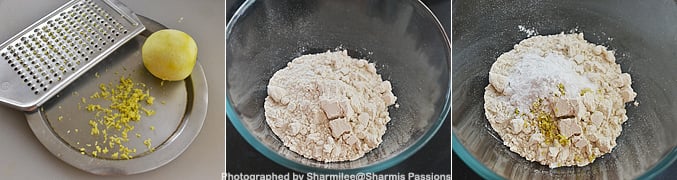
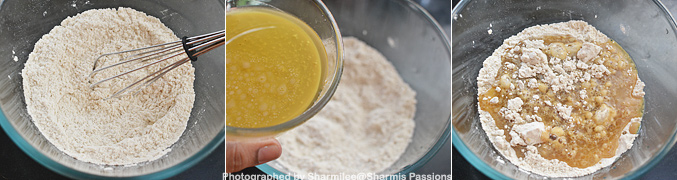
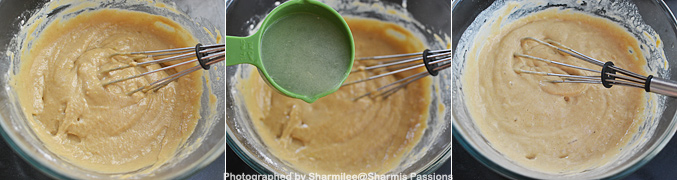

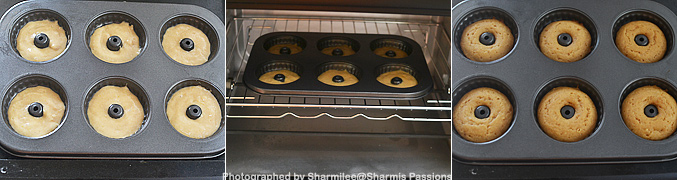
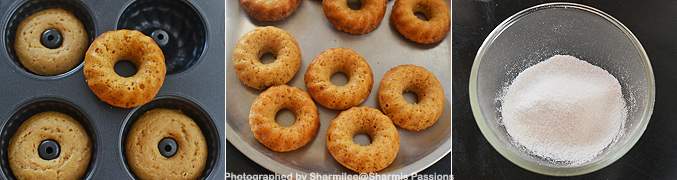
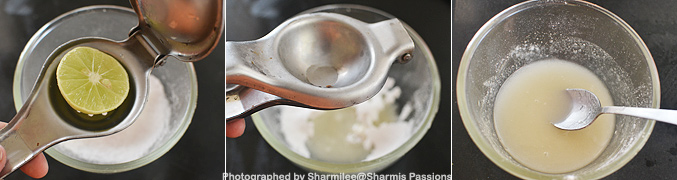
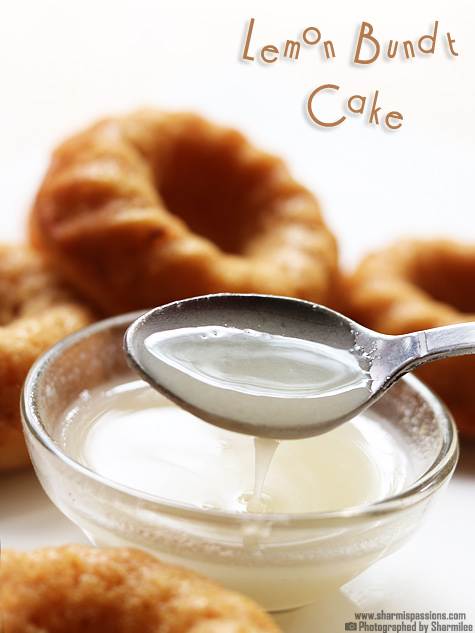
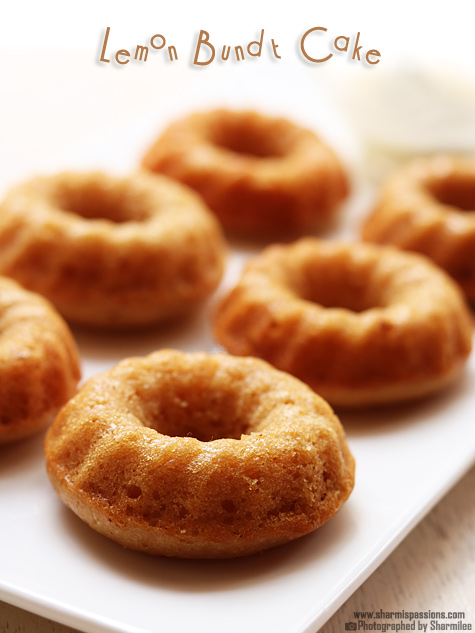
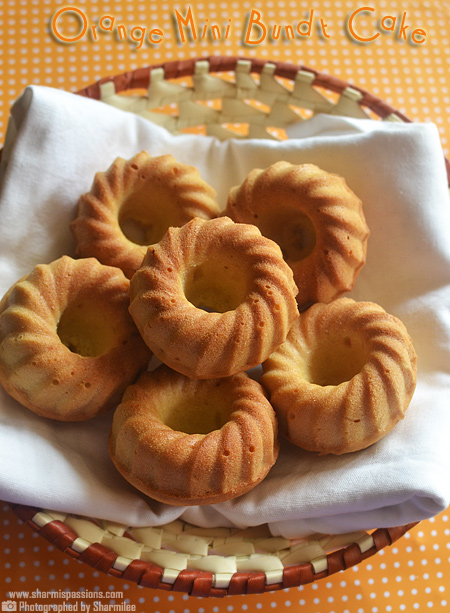
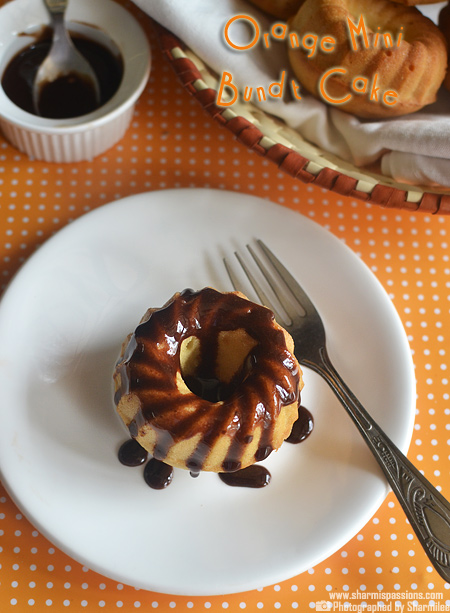
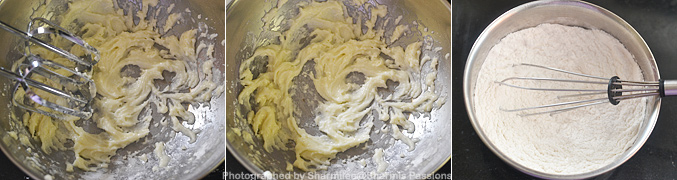
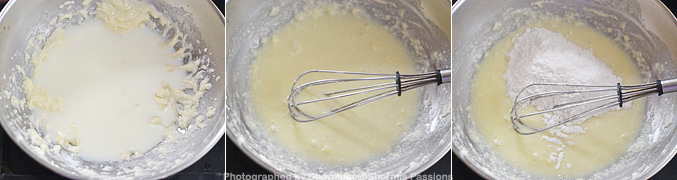
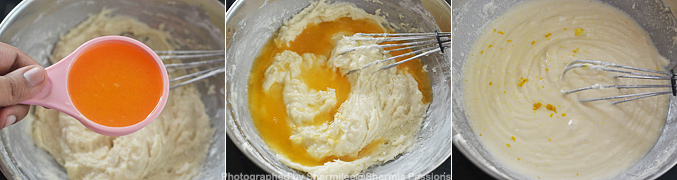
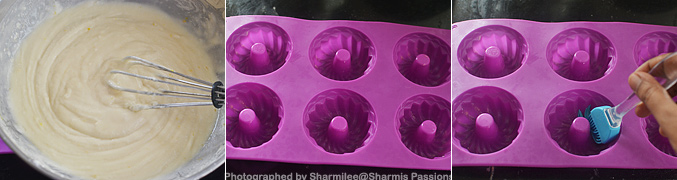
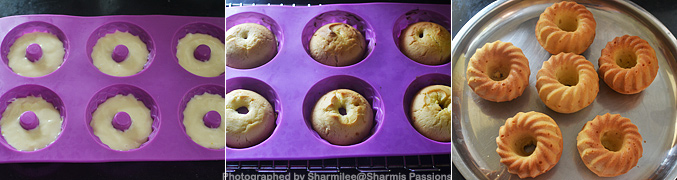

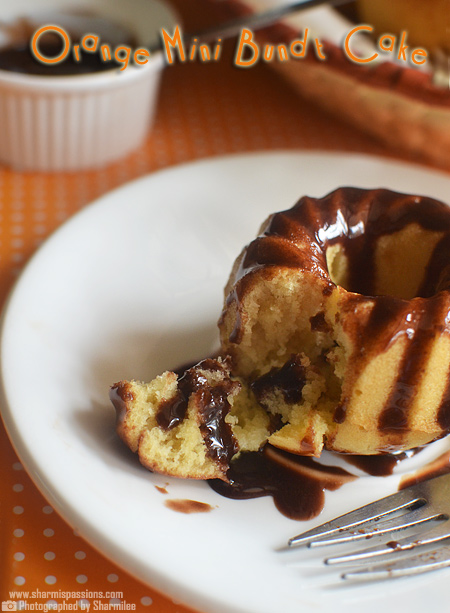
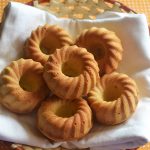
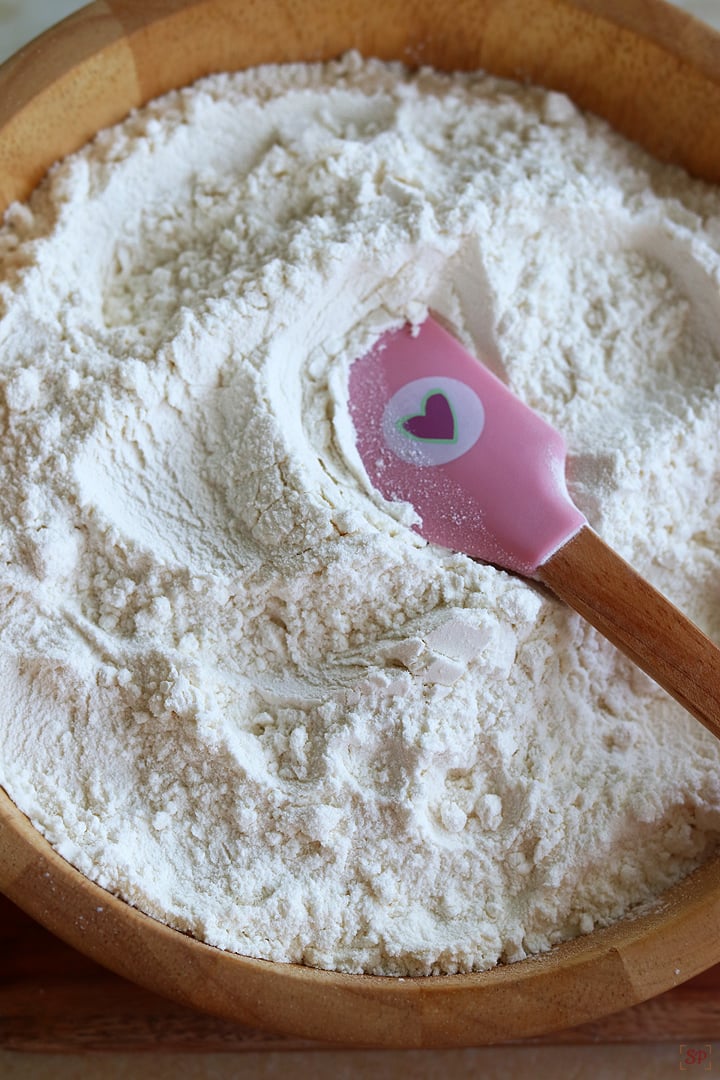
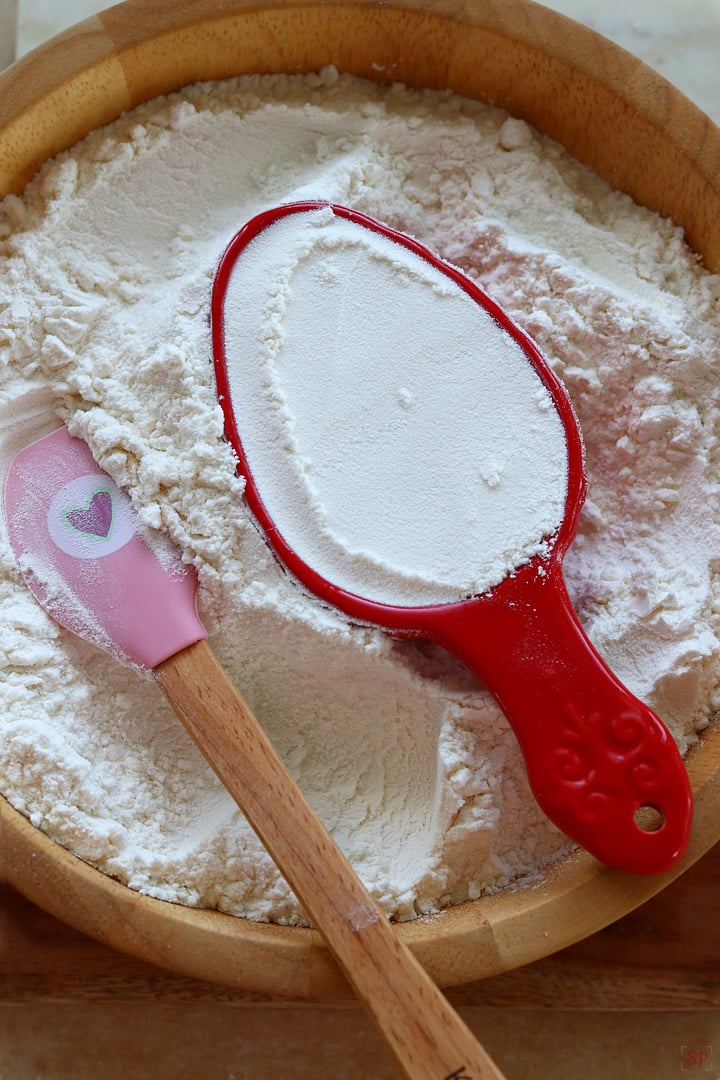
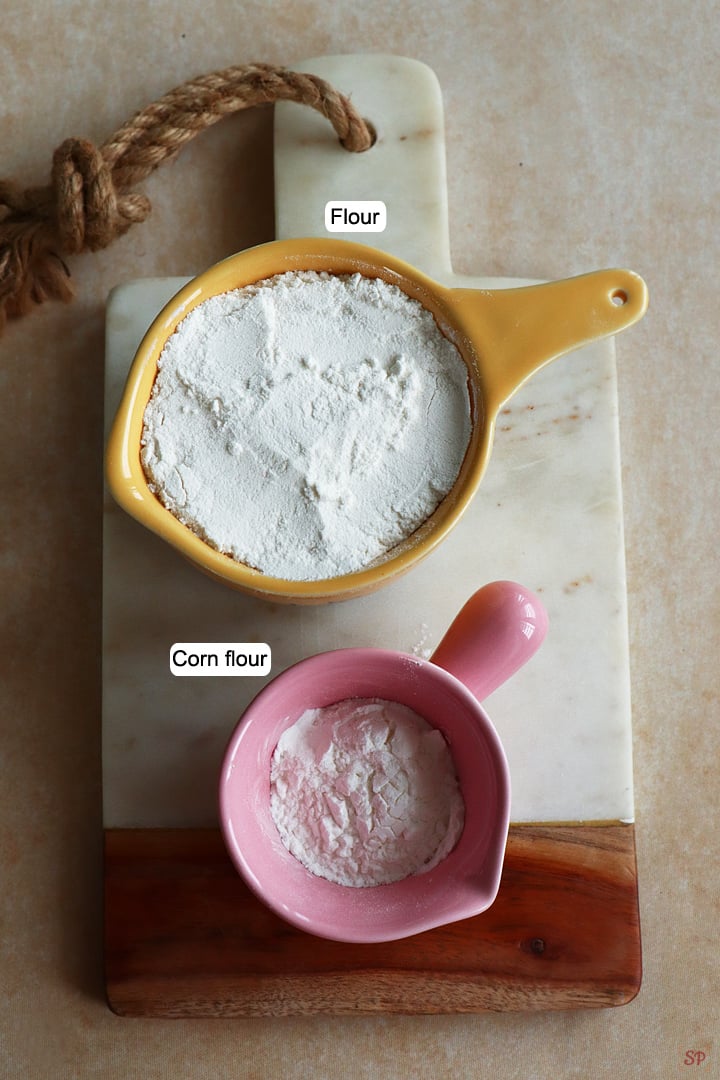
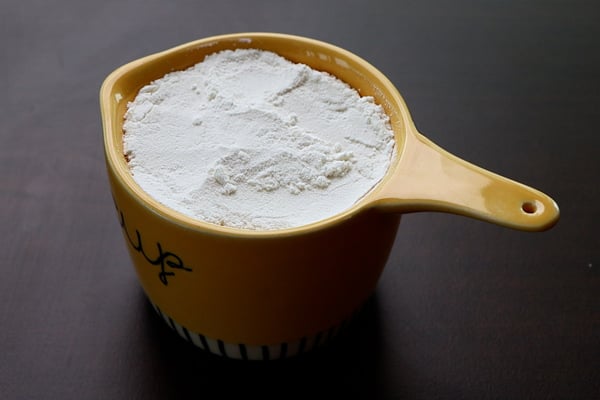
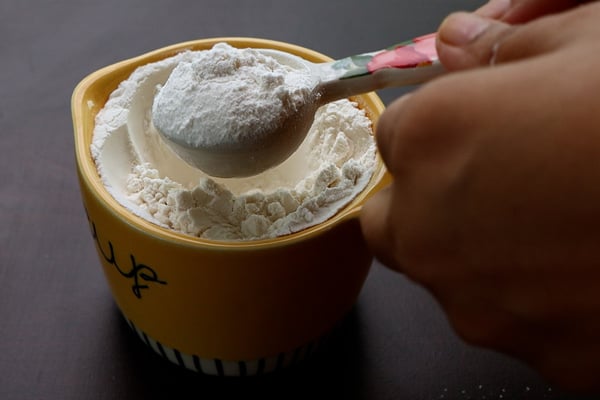
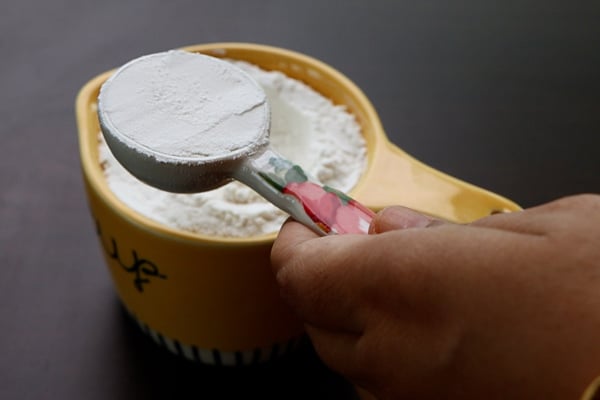
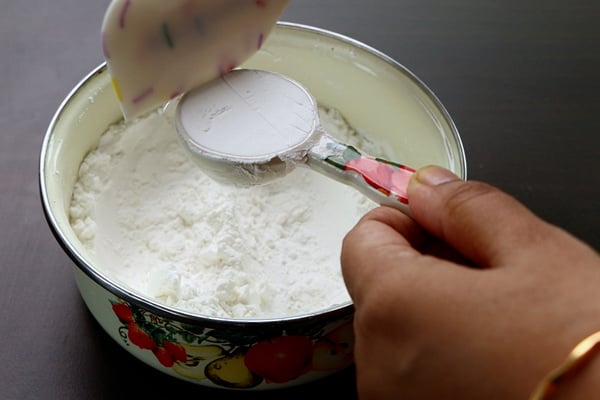
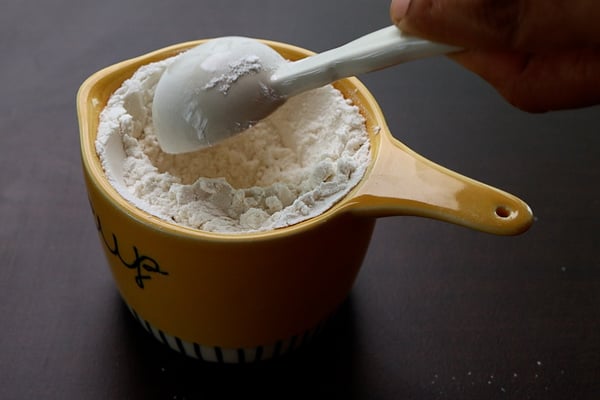
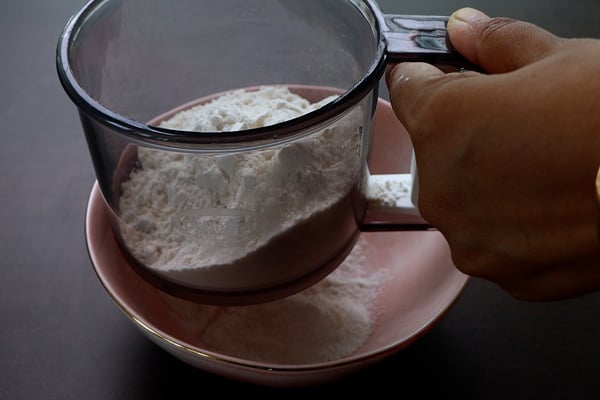
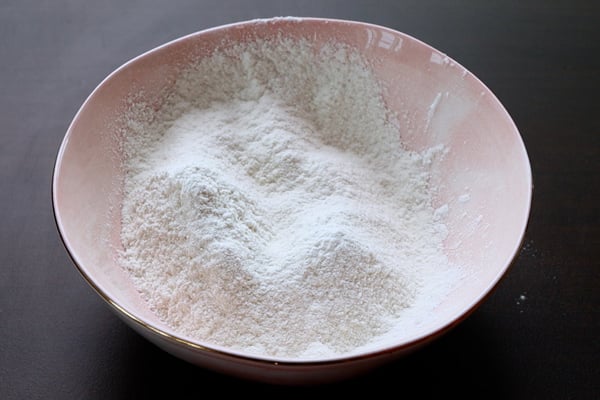
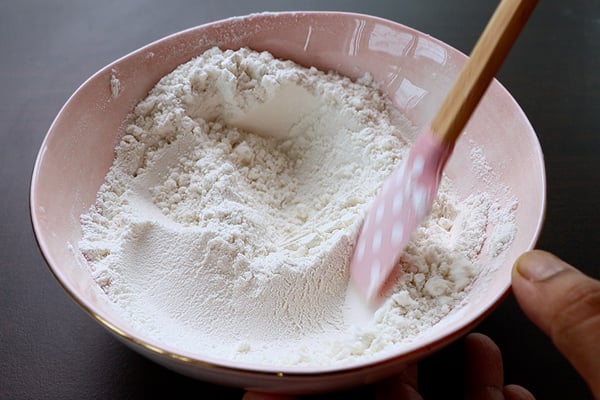
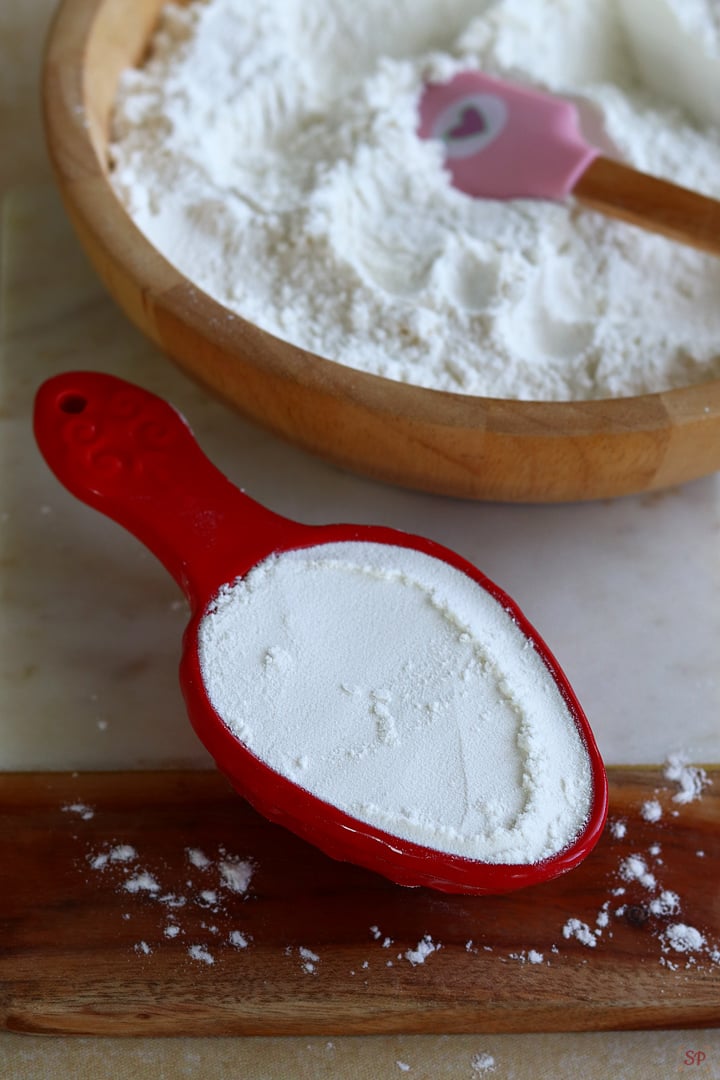


 Iron Sandwich Bread Mould/Tin Box with Cover for Baking- Small 400gms Size 7×3.5×3.5 inch


