Learn how to make Karnataka-style Vegetable Palav, also known as Rice Bath with a video tutorial and detailed step by step photos. Vegetable Palav is a flavorful one-pot meal that's aromatic, comforting and loaded with fresh vegetables. Vegetable Palav (yes, it is not pulao or pulav!) is a much loved one pot meal recipe very...
If you thought there’s no such thing like veg biryani, then mushroom biryani will change your mind. It’s quicker and lighter, but carries the same depth of flavor as the classic non-vegetarian counterparts!
If you love biryani but want something lighter, quicker, and just as flavour-packed as the classic, this Mushroom Biryani is it! From caramelised onions in the base and biryani masala to perfectly cooked, fluffy basmati rice, this one’s got it all. And because mushrooms cook so fast, this biryani feels indulgent but comes together in a fraction of the time.
This is the kind of recipe you make on a Sunday and then wonder why you don’t cook it more often. If you have tried my makhani paneer biryani or jackfruit biryani, then you’d know just how delicious and fulfilling vegetarian biryanis can be. And if you haven’t, this is your sign to find out.
Mushrooms: The hero of this biryan. The meaty texture and earthy flavors of mushroom mimic meat in biryani, and it soaks up the marinades beautifully. I would recommend cutting mushrooms in half to keep their texture intact
Curd + Spice Marinade: Curd, ginger-garlic paste, and powdered spices tenderize the mushrooms and give the gravy a creamy, spicy base. The biryani masala (I recommend Shan biryani masala) and fresh, homemade garam masala to depth and that classic biryani flavour
Whole Spices: Cumin, cardamom, bay leaf, cinnamon, cloves, and mace are bloomed in hot oil to form the aromatic foundation of the biryani. These spices add warmth, fragrance, and that signature restaurant-style aroma
Onions (Birista): Slow-cooked onions bring caramelized sweetness and richness. We add this to the gravy as well use it as a topping for flavor and texture
Tomatoes: Adds just enough acidity to balance the spices and form a thick base masala base
Fresh Herbs (Mint + Coriander): For freshness and to brighten the flavors
Basmati Rice: Long-grain basmati ensures fluffy, separate grains. Par-boiling it with whole spices seasons the rice lightly before layering
Saffron + Milk: Adds aroma and that lovely yellow color of biryani
Ghee: A finishing drizzle that ties everything together with warmth and richness
How to Make Mushroom Biryani (Step-by-Step)
1. Soak the Rice: Start by washing and soaking the basmati rice for 30 minutes. This helps the grains stay long, fluffy, and separate.
2. Marinate the Mushrooms: Mix mushrooms with ginger garlic paste, curd, biryani masala, and some basic Indian spices. Let them marinate for 10–15 minutes — they absorb flavour quickly, so this short marination is enough.
3. Prepare the Biryani Base: Heat oil in a biryani handi or kadhai. Add sliced onions and sauté on low heat for 10–12 minutes until golden. Remove about ¼ cup and keep aside for later layering. Push the remaining onions to one side of the pan. Add cumin seeds and let them splutter. Add bay leaf, black cardamom, green cardamoms, cinnamon, cloves, and mace, and sauté for a few seconds till aromatic. Add ginger garlic paste and cook briefly till fragrant. Add tomatoes, mix with the onions and spices, and sauté for 2–3 minutes until soft. Now add the marinated mushrooms and cook on low heat for 10–12 minutes until the mushrooms are tender and the gravy thickens. Sprinkle 3 tablespoons of the birista plus 1 tablespoon each of mint and coriander.
4. Cook the Rice: Heat water with cinnamon, cardamom, salt, oil, and lemon juice. Add the soaked rice and cook for 5–6 minutes until 75% done (the grains should be soft on the outside but firm inside). Drain immediately to stop further cooking.
5. Layer the Biryani: Layer the rice on top of the mushroom gravy. Sprinkle the remaining birista, saffron milk, ghee, and the leftover mint and coriander.
6. Dum (Steaming) Time: Place the biryani pot over a heated tawa and steam on low heat for 20–25 minutes. Let the biryani rest for another 30 minutes before serving — this helps the flavours settle beautifully.
Roast the onions slowly: Frying the onions on low heat gives you golden birista without burning.
Alwaysmarinate mushrooms: Even 10 minutes makes a big difference as mushrooms soak flavour very fast.
Cook rice only till 75% done: It will finish cooking during dum, so don’t wait for it to soften fully.
Use fresh mint and coriander: They brighten the biryani and add that restaurant-style aroma.
Let it rest after steaming: This step is magic to make the biryani become fluffier and more aromatic.
Storage Tips
Leftover biryani tastes even better the next day as the spices have a chance to deepen and the flavours to settle.
Refrigerator: Mushroom biryani stays perfectly fresh for up to 2 days. Add a splash of water or milk when reheating to bring some of the moisture back.
Freezer: Biryani can be frozen for up to 1 month. Cool completely, portion it, and reheat covered in the microwave or on the stovetop
Customisation Ideas
Add veggies: I love adding peas, potatoes, carrots, or cauliflower along with the mushrooms to for added texture and nutrition.
Make it richer: To make this creamer and richer, layer in a splash of ghee or extra cream. It’s definitely indulgent, but sooo perfect for special occasions.
Make it spicier: Add in a slit green chilli or two if you like it spicy! .
Make birista in advance: I usually make a big batch of birista at home and store it in an airtight container. It stays good for up a month, and saves sooo much time when making biryani. However, you can always use store-bought birista in a pinch.
Make it vegan: You can easily make this vegan by using plant-based yogurt and skipping the ghee and saffron milk.
Frequently Asked Questions
How do I prevent the rice from turning mushy?
This trick to perfectly fluffy and separated grains of rice is to cook it only 75% done. Also avoid over mixing the layers to prevent it from breaking.
I don’t have saffron. Can I make the biryani without it?
Saffron adds aroma and colour, but you can skip it or use a pinch of turmeric mixed with milk.
Which variety of mushroom work best for mushroom biryani?
I have used button mushrooms as they are easily available here and the soft, spongy texture soaks up the flavors beautifully. But oyster, shiitake, and cremini also work really well here.
Serving Ideas
Onion Raita – The classic combo that balances the spices perfectly.
Cucumber or Mixed Veg Raita – Light, cooling, and refreshing.
Kachumber Salad – Fresh tomatoes, cucumbers, onions, lemon, and coriander for brightness.
Pickled Onions – Adds tang and a bit of crunch.
Green Chutney – Great if you like a spicy side.
Papad – Roasted or fried for texture.
Simple Dal (like Dal Tadka) – Makes the meal more wholesome without overpowering the biryani.
A squeeze of lemon – Right before serving to lift all the flavours.
Mushroom Biryani is one of those dishes that feels comforting and indulgent without being complicated. It’s the kind of recipe that works for weeknights, weekends, or when you just want something special without too much effort.
If you try this recipe, don’t forget to send me your recreations over on my Instagram @my_foodstory. It’s always so special to hear from you!
Aromatic, spicy, and just as flavorful as it's non-veg counterparts, this mushroom biryani is a quick and easy vegetarian biryani you won't be able to have enough of!
Marinate mushrooms with ginger garlic paste, red chilli powder, coriander powder, garam masala, biryani masala & curds for 10- 15 minutes.
4 packets mushrooms, 1 teaspoon ginger garlic paste, ½ teaspoon red chilli powder, 1 teaspoon coriander powder, ½ teaspoon garam masala, 2 tablespoons biryani masala, ½ cup curds
Heat oil in a kadai or biryani handi, add sliced onions and saute on low for 10-12 minutes till they turn golden brown. Remove approx. ¼ cup of roasted onions(birista) and set aside. Move the roasted onions to the side of the biryani handi, add cumin seeds, once they crackle, add bay leaf, black & green cardamoms, cinnamon, cloves, mace & saute for a few seconds till they sizzle. Add ginger garlic paste and saute for a few seconds till fragrant, add tomatoes, mix with roasted onions and aromatics and saute for 2-3 minutes till they soften. Add marinated mushrooms, saute for 10-12 minutes on low till mushrooms are cooked and the gravy thickens. Sprinkle 3 tablespoons of birista, 1 tablespoon each of chopped mint & coriander leaves.
2 tablespoons oil, 1 teaspoon cumin seeds, 1 black cardamom, 3-4 green cardamoms, 4-5 cloves, 2 inches dalchini, 1 blade mace, 2 bay leaves, 1 ½ cup thinly sliced onions, 2 tablespoons ginger garlic paste, 1 tomato, 2 tablespoons finely chopped mint leaves / pudina, 2 tablespoons finely chopped coriander leaves
Boil water with dalchini, cardamoms, salt, oil, lemon juice, add rice & cook for 5-6 minutes until it is 75% cooked. Drain immediately & add the rice to the biryani handi. Spread the rice to form a layer on top of the mushroom gravy. Sprinkle remaining 1 tablespoon of birista, saffron milk, ghee, remaining 1 tablespoon of chopped mint & coriander leaves.
1 pinch of saffron soaked in 3 tablespoons warm milk, 2 teaspoons ghee, 8 cups water, 2 tablespoons salt, 2 dalchini, 2 green cardamoms, 1 tablespoon groundnut oil
Place the layered biryani pot on a heated tawa and steam on low for 20-25 minutes, rest for 30 minutes and serve.
Some days, you just need a one-pan wonder that makes you feel good without making a mess. That’s where this Basil Fried Rice comes in–light, aromatic, and ready in minutes.
If you’re like me and could happily eat fried rice every other day, you’ll love how quick this Basil Fried Rice is to make. It’s light, herby, and feels fresher than the usual Indo-Chinese stir-fries.
A handful of basil, some leftover rice, and ten minutes in the kitchen, that’s all it takes to make this comforting bowl of Basil Fried Rice. The mix of garlicky aroma and fresh basil instantly lifts your mood and turns old plain rice into something crave-worthy. And if fried rice is your thing, you should also check out my Veg Fried Rice or Egg Fried Rice recipe next, they’re just as easy, just as delicious.
Rice: Use cooked basmati or long-grain rice. Day-old rice works best since it’s a bit firm and doesn’t turn mushy while stir-frying.
Basil: Fresh Thai basil is key here. It brings a lovely fragrance and peppery flavor that makes this dish special.
Veggies: Finely chopped carrots and baby corn add crunch and color. Feel free to add beans, bell peppers, or peas if you have them on hand.
Aromatics: Garlic gives the rice its signature stir-fry aroma.
Seasoning: Just salt and pepper to keep it simple.
Oil: Any neutral oil works well. Sunflower or vegetable oil keeps the flavors balanced.
Richa’s Top Tips
Use day-old rice: Freshly cooked rice tends to clump together. Cold, leftover rice gives you that perfect, non-sticky fried rice texture.
High heat is key: Cook everything on high heat to get that signature smoky, restaurant-style flavor.
Don’t overdo the basil: A little goes a long way. Add it right at the end so it stays bright and aromatic.
Add soy sauce sparingly: If you decide to season further, start with a light splash, too much can overpower the basil.
Chop small, cook fast: Keep the veggies finely chopped so they cook quickly and blend well with the rice.
Frequently Asked Questions
What’s the difference between Thai fried rice and basil fried rice?
Thai fried rice uses soy sauce or fish sauce for seasoning, while basil fried rice gets most of its flavour from fresh Thai basil and garlic. It’s a little spicier and more aromatic.
Can I use regular basil instead of Thai basil?
You can, but Thai basil has a stronger, slightly peppery flavour that really makes this dish stand out. Regular basil will give a milder, more Italian-style taste.
Can I add chicken, shrimp, or tofu?
Absolutely! Stir-fry your protein first, then mix it in with the rice and basil at the end. It turns this quick side into a full meal.
Why is my fried rice sticky?
That usually happens if the rice is freshly cooked and still warm. Use cold, day-old rice for the best texture, it stays fluffy and doesn’t clump.
Is basil fried rice healthy?
Yes, especially when you use minimal oil and load it up with veggies or lean protein. Thai basil also has antioxidant and anti-inflammatory benefits.
Storage Tips
Fridge: You can let the fried rice cool completely before transferring it to an airtight container. It’ll stay fresh for up to 3 days.
Freezer: Basil fried rice freezes well for up to a month. Portion it into freezer-safe containers, thaw overnight in the fridge, and stir-fry again for a few minutes before serving.
Reheating: Cook it in a pan with a splash of water or oil to bring back that just-cooked texture.
Serving Ideas
Basil Fried Rice is one of those dishes that goes with just about anything — here are a few ways to make it shine:
With Chilli Paneer: The spicy, tangy sauce of Chilli Paneer pairs perfectly with the freshness of basil rice.
Add Protein: Toss in some pan-fried tofu, prawns, or shredded chicken to turn it into a hearty meal.
More Veggies: Throw in bell peppers, mushrooms, or snap peas for extra crunch and colour.
Make it Spicier: Stir in a spoonful of homemade Chilli Oil or finely chopped Thai chillies for that fiery edge.
Fried Egg on Top: A sunny-side-up egg makes this feel like comfort food with a little extra flair.
Saucy Twist: Drizzle some soy sauce or a dash of fish sauce at the end for a deeper umami flavour.
And there you have it, a quick, flavourful Basil Fried Rice that tastes just as good as your favourite takeout version (maybe even better). It’s fresh, fragrant, and endlessly adaptable, whether you want to keep it veggie-loaded or toss in some protein.
If you give it a try, don’t forget to tag@my_foodstory on Instagram. I’d love to see how your version turns out!
Schezwan Fried Rice is a vibrant Indo-Chinese dish made by stir-frying cooked rice with a spicy, tangy Schezwan sauce, mixed vegetables and mushrooms, garlic, spring onions, celery, vinegar, salt and pepper, creating a flavorful, zesty rice dish that’s perfect as a main or side, often served with manchurian or other Chinese-inspired dishes. Schezwan Fried Rice...
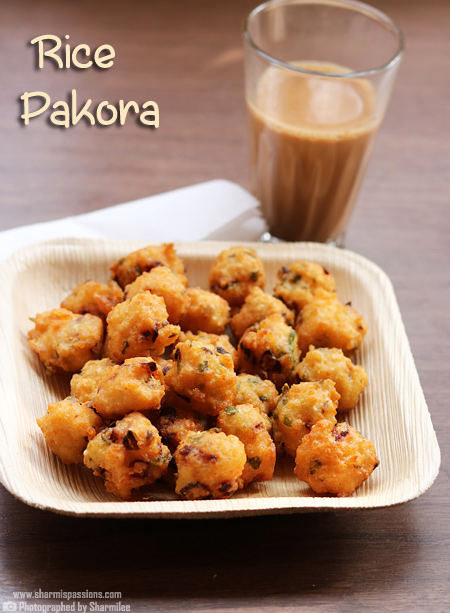
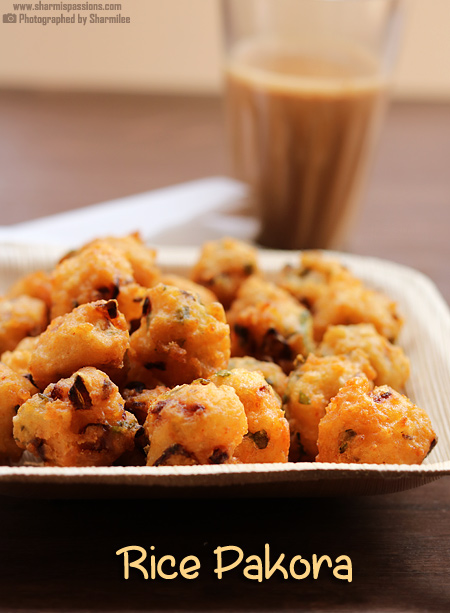
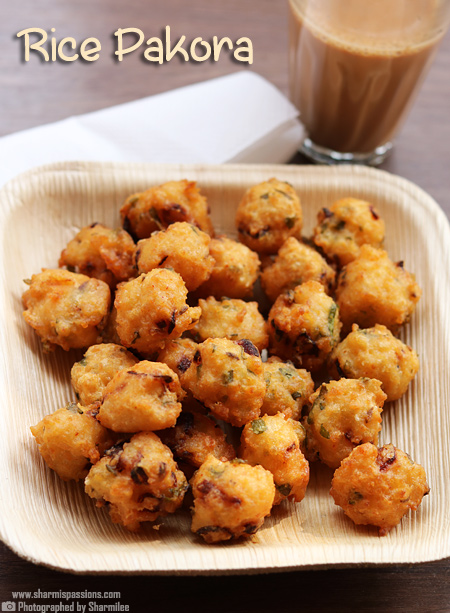
Rice Pakora is a crunchy, tasty snack made by deep frying dollops of mashed rice blend with spices, onion & herbs. Rice Pakora is an age old snack or side dish that is prepared with leftover cooked rice. This is one snack which is very simple but truly satisfying to have with hot tea or coffee.
I usually make rice pakora when I have little leftover rice from lunch. It is one of the best ways to use up leftover rice and make a quick evening snack. These pakoras are crunchy, golden and full of flavor that nobody can stop with one. They are perfect for rainy evening or when you crave for something hot and crispy.
[feast_advanced_jump_to]
About Rice Pakora
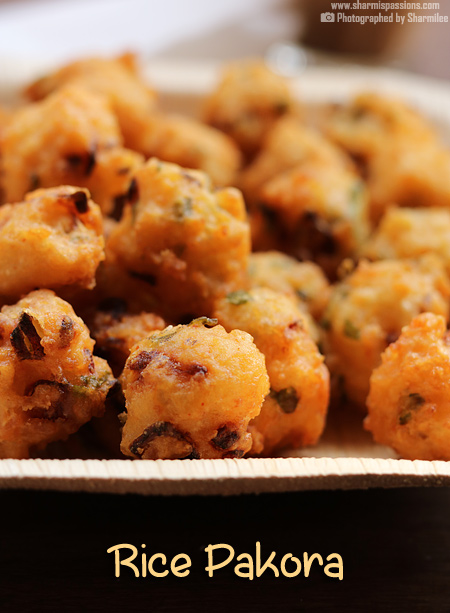
Rice Pakora is a popular Indian tea time snack made with cooked rice. The leftover rice is mashed and mixed with gram flour, rice flour, onion and few spices. Then the mixture is shaped roughly and deep fried till golden brown. The texture is crisp outside but soft inside with light chewy rice bits.
The flavor of onion and herbs mixed with curd rice base makes it very comforting. The chili powder gives little spice and coriander adds nice aroma. It also makes the outer layer crisp and helps pakoras hold shape while frying. You can also add little green chili or ginger for extra spice and kick.
There are many ways people make it, some grind the rice smooth, but I like to keep it little coarse. That small uneven bits gives nice crunchy feel while eating. It is one of those recipes which turns simple leftover into such tasty snack. It is one of those snacks that vanish very fast at my home, everyone like to have it with ketchup or chutney.
I make this often on weekends or evenings when I feel the craving of hot pakoras on rain. The kitchen smells so good when these pakoras are frying.
Rice Pakora is an easy snack recipe made with leftover rice. It's crispy outside and soft inside with nice flavor of onion and herbs. The mixture of rice, gram flour and spices give wonderful taste and texture.
Rice Pakora Ingredients
Leftover rice - I used leftover rice which was bit dry. If rice is fresh and soft, it may become too sticky while mixing. Just mash it little with hand or spoon before using.
Gram flour - I used this to bind everything together. This helps pakora hold shape. You can add extra if it feels loose.
Rice flour - I just added small amount of rice flour for crispiness. It helps pakora turn crunchy and light.
Onion - I added finely chopped onion for crunch and sweet taste. You can also add little green chili if you want more spice.
Coriander leaves - I just added freshly chopped coriander leaves for color and flavor.
Mint leaves - I added few chopped mint leaves. It gives light refreshing flavor which goes well with onion. Can skip if you don't have.
Red chilli powder - I used mild red chilli powder. It gives light spice and nice color to pakora. Adjust as per your taste.
Oil - I used oil for deep frying. Oil should be hot enough before dropping mixture else pakoras will drink oil and become greasy.
Why This Recipe Works
It's a simple and quick to make recipe using leftover rice.
The gram flour and rice flour in this recipe gives crisp and light texture.
You can change spice and herbs as per your taste easily.
It is best evening snack to have with tea or coffee.
The pakoras turn golden, crisp outside and soft inside making it so tasty.
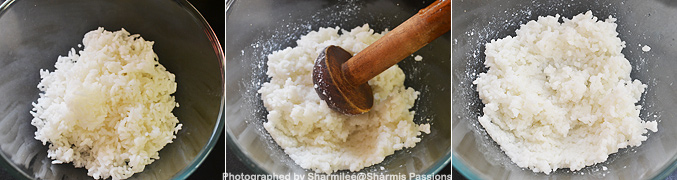
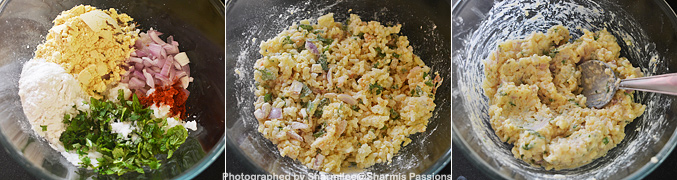
1.Take rice in a mixing bowl, mash it well with a ladle.
2.Now add all other ingredients except oil mix well first then add little water and mix with a spoon, mash it and mix.
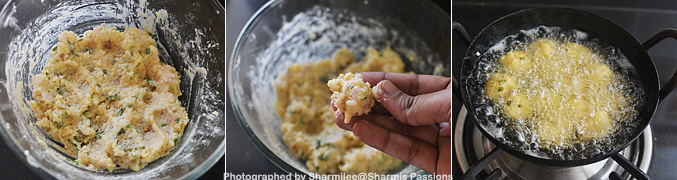
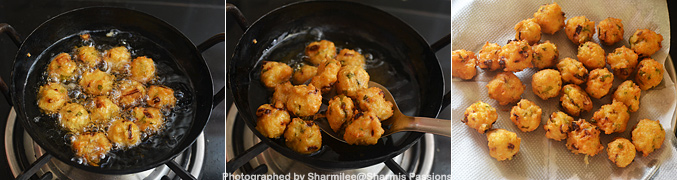
3.Now form small balls and drop the mixture into preheated oil. Cook in low medium flame.
4.Deep fry until golden brown. Drain in tissue paper and serve hot! Repeat this for the rest of mixture.
Serve hot with tea!
Expert Tips
Rice texture - I always use leftover rice that is bit firm. If you use fresh rice it becomes sticky and difficult to fry. You can even keep rice in fridge for some time before using.
Mashing rice - I mash the rice only slightly so that few grains remain whole. It gives nice bite and crunch while eating. You can also grind if you want smooth mixture but I like rough one.
Oil temperature - Keep oil medium hot always. Too hot oil will make outside brown soon but inside stays uncooked. Too low oil makes pakoras absorb oil and turn soggy.
Water adding - Do not add much water in the mixture. Just sprinkle little to bring it together. It should be thick, not like batter.
Shaping - I usually take small portions and drop directly into oil. Do not try to make perfect balls, the uneven edges become very crispy.
Batch frying - Fry in small batches. If you put too many together the oil temperature drops and pakoras become soft.
Extra crisp - For extra crispy pakoras, add little more rice flour and fry till deep golden brown. Be patient and fry slowly for perfect texture.
Serving and Storage
Serve this hot with tomato ketchup or green chutney. It also goes well with masala tea during evening time. You can sprinkle little chat masala on top before serving if you like that tangy flavor.
It taste best when eaten fresh and hot. If there is some leftover, keep it in airtight box for few hours and warm it little before serving again. The crispness may reduce little but still tastes good.
FAQS
1.Can I use fresh cooked rice for this recipe?
Yes you can use, but make sure to cool it completely before mixing. If rice is hot it will turn sticky and make mixture too soft.
2.Can I skip rice flour?
Yes you can skip, but rice flour gives that nice crisp texture. Without it pakoras come bit soft.
3.Can I bake or air fry this?
You can try baking or air frying, but it will not get same crisp like deep fried ones. Taste will be good but texture change little.
4.Why my pakoras broke in oil?
That happens when mixture is too loose or oil is not hot enough. Add little more gram flour and check if oil heated properly.
5.Can I add vegetables?
Yes you can add some carrot, cabbage or spinach to make it more colorful and healthy. It gives different taste also and adds some crunch.
If you have any more questions about this Rice Pakora Recipe do mail me at sharmispassions@gmail.com. In addition, follow me on Instagram, Facebook, Pinterest, Youtube and Twitter .
Tried this Rice Pakora Recipe? Do let me know how you liked it. Also tag us on Instagram @sharmispassions and hash tag it on #sharmispassions.
Rice Pakora is a crunchy, tasty snack made by deep frying dollops of mashed rice blend with spices, onion & herbs. Rice Pakora is an age old snack or side dish that is prepared with leftover cooked rice. This is one snack which is very simple but truly satisfying to have with hot tea or coffee.
Course Snack
Cuisine Indian
Keyword 30 mins recipes, 30 mins rice recipes, fry, fry recipes, Rice, rice flour recipes, rice recipes, snack recipes
Take rice in a mixing bowl, mash it well with a ladle.
Now add all other ingredients except oil mix well first then add little water and mix with a spoon, mash it and mix.
Now form small balls and drop the mixture into preheated oil.
Cook in low medium flame. Deep fry until golden brown. Drain in tissue paper and serve hot!
Repeat this for the rest of mixture.
Serve Rice Pakora hot with tea!
Video
Notes
Rice texture - I always use leftover rice that is bit firm. If you use fresh rice it becomes sticky and difficult to fry. You can even keep rice in fridge for some time before using.
Mashing rice - I mash the rice only slightly so that few grains remain whole. It gives nice bite and crunch while eating. You can also grind if you want smooth mixture but I like rough one.
Oil temperature - Keep oil medium hot always. Too hot oil will make outside brown soon but inside stays uncooked. Too low oil makes pakoras absorb oil and turn soggy.
Water adding - Do not add much water in the mixture. Just sprinkle little to bring it together. It should be thick, not like batter.
Shaping - I usually take small portions and drop directly into oil. Do not try to make perfect balls, the uneven edges become very crispy.
Batch frying - Fry in small batches. If you put too many together the oil temperature drops and pakoras become soft.
Extra crisp - For extra crispy pakoras, add little more rice flour and fry till deep golden brown. Be patient and fry slowly for perfect texture.
This cranberry rice pilaf recipe is the perfect holiday side dish for Thanksgiving or Christmas. Fluffy rice, tart cranberries, and fresh herbs come together in a colorful, festive dish that’s both easy and make-ahead friendly. Whether you’re looking for a vegetarian rice pilaf side dish or just want a bright, flavorful upgrade to your dinner table, this recipe checks all the boxes.
Cranberry rice pilaf recipe is colorful, flavorful, and easy side dish to brighten your holiday table. Fluffy basmati rice, sweet-tart cranberries, and fresh herbs come together in this side dish that feels festive yet simple enough for everyday dinners.
Perfect for Thanksgiving, Christmas, or a cozy winter meal, this pilaf recipe is naturally vegetarian, can be made vegan, and is a guaranteed crowd pleaser. The best part? It’s make ahead friendly, so you can save precious time on busy holiday cooking days.
What Is Rice Pilaf?
Rice pilaf is a method of cooking rice where the grains are first sautéed with aromatics like onion and garlic, then simmered in broth until tender. This technique gives the rice a nutty flavor and ensures it stays fluffy and separate.
In North America and Europe, pilaf is the common term, but the dish shares roots with versions called pilau in the UK and East Africa, and pulao in South Asia. Whatever the name, pilaf is a delicious upgrade from plain steamed rice.
Why You’ll Love This Cranberry Rice Pilaf Recipe
Festive & beautiful: tart cranberries add jewel-like pops of color.
Easy & make ahead friendly: perfect for busy holiday kitchens.
Vegetarian & vegan option: swap butter for olive oil.
Versatile: works as a Thanksgiving side, Christmas pilaf, or weeknight dinner rice dish.
Ingredients for Cranberry Rice Pilaf
Rice: basmati or long-grain white rice for fluffiness.
Cranberries: fresh for a tart pop, or dried for natural sweetness.
Broth: vegetable broth keeps it vegetarian, but you can use chicken broth.
Aromatics: onion, garlic, olive oil or butter.
Herbs & Spices: parsley, thyme, cinnamon (optional), black pepper.
Optional Garnish: toasted almonds, walnuts, or pistachios for crunch.
Tip: Soak rice for 20 minutes and rinse until water runs clear for the fluffiest pilaf.
How To Make Cranberry Pilaf
Heat some oil on medium heat. Add some cumin seeds and a bay leaf, letting them crackle.
Add chopped onions and saute them till soft and transparent. Then add all the veggies and the tomato paste.
Mix and cook for a few minutes, season with spices and keep stirring occasionally.
Now add soaked rice and mix to coat everything evenly.
Pour in water, cover with a lid, and let it cook undisturbed.
Once rice is cooked and fluffy, top with cranberries over it and serve hot with raita and papad.
Tips & Variations for Holiday Rice Pilaf
Wild rice cranberry pilaf: substitute part of the rice with a wild rice blend for earthy flavor.
Dried cranberries: swap if fresh aren’t available; reduce sweetness elsewhere if needed.
Add citrus: stir in orange zest for a bright holiday twist.
Vegan option: make with olive oil instead of butter.
Nut lovers: almonds, pistachios, or pecans add crunch and richness.
Serving Suggestions
This cranberry rice pilaf is a versatile side dish that pairs beautifully with:
Holiday mains – roasted vegetables, lentil loaf, or grilled tofu.
Thanksgiving classics – green beans, glazed carrots, or vegetarian stuffing.
Everyday dinners – baked halloumi, simple salads, or roast chickpeas.
FAQs – Cranberry Rice Pilaf for Holidays
Can I make cranberry rice pilaf ahead of time?
Yes! Cook and refrigerate for up to 3 days. Reheat on the stove or in the microwave with a splash of broth.
Can I use wild rice or brown rice?
Absolutely. Wild or brown rice adds earthy flavor but requires more cooking time and extra broth.
Should I use fresh or dried cranberries?
Both work. Fresh cranberries add tartness, while dried cranberries make the dish sweeter.
Is cranberry rice pilaf vegan?
Yes, just use olive oil instead of butter.
How do I keep pilaf fluffy?
Rinse rice thoroughly, avoid over stirring, and let it rest for 5 minutes before fluffing.
Storage & Freezing Instructions
Fridge: Store in an airtight container for 3–4 days.
Freezer: Freeze for up to 1 month without garnishes.
Reheat: Warm gently with a little broth to restore texture.
If You like this recipe and made it Please rate the recipe. It helps us to reach more people. For the Latest updates Subscribe to Rekha’s Whatsapp. You can follow me onInstagram, Facebook, Youtube, Pinterestfor more food inspirations.
Cranberry Rice Pilaf Recipe is a festive and flavorful side dish made with fluffy rice, tart cranberries, and fresh herbs. Perfect for Thanksgiving, Christmas, or any holiday meal.
Course Main Course, Side Dish
Cuisine American
Prep Time 10 minutesminutes
Cook Time 15 minutesminutes
Servings 6
Calories 243kcal
Author Rekha Kakkar
Ingredients
1/2cupchopped onion
3tbspof ghee
1tspcumin
1bay leaf
1tspgreen chilichopped
1/2cupgreen pea
1/2cupmushrooms
1cupbell pepperschopped, both yellow and green
1cuptomato paste
1cupricesoaked
2cupwater
1star anise
powder seasoning
1/2tspturmeric powder
1tspcorriander powder
1tspchilli powder
1tspcumin powder
1tspsalt
cranberrieshandful
Instructions
Heat some oil on medium heat. Add some cumin seeds and a bay leaf, letting them crackle.
Add chopped onions and saute them till soft and transparent. Then add all the veggies and the tomato paste.
Mix and cook for a few minutes, season with spices and keep stirring occasionally.
Now add soaked rice and mix to coat everything evenly.
Pour in water, cover with a lid, and let it cook undisturbed.
Once rice is cooked and fluffy, top with cranberries over it and serve hot with raita and papad.
This festive cranberry rice pilaf recipe is made with fluffy rice, tart cranberries, and fresh herbs. A perfect vegetarian side dish for Thanksgiving, Christ...
If you love biryani and fried chicken, this Boneles Chicken Biryani will blow your mind! It’s a super flavorful, layered biryani that’s a Sunday ritual for every Bangalorean household (and now it can become YOURS too!).
My Bangalore readers know that there’s nothing like Meghana’s Boneless Chicken Biryani. I mean, fried chicken in biryani is genius 🤌and everyone deserves to know what this biryani tastes like. So here is how to make the city’s favorite biryani right at home!! Make this once, and you’ll be making it every Sunday 😉
I love taking inspiration from Bangalore when I’m testing recipes, like my favorite Donne Biryani Style Chicken Pulao and Kavitha Aunty’s Rice Bath. We’ve been big fans of the chicken biryani at Meghana for years now and it was about time it made it to the blog!
This Meghana biryani isn’t like your average biryani. It’s got spiced masala rice that’s layered with a rich, herby tomato gravy and topped with the most delicious fried chicken gravy. There’s a homemade spice mix involved, a little saffron, some cream, and all sorts of whole spices galore that make this preparation truly unique. It’s indulgent, bold, and absolutely perfect for special days or whenever you’re in the mood to treat yourself!
Boneless Chicken Biryani Ingredients
Special Spice Powder: magical things happen when you bring together nutmeg, star anise, cinnamon, cloves and cardamom
Chicken Marinade: boneless chicken, turmeric powder, cumin powder, salt, chilli powder, and thethen that special spice powder from above, along with ginger garlic paste and green chilli sauce to add some depth. We also add and egg, curd, corn flour, and maida so that the chicken is perfectly crispy when fried
Biryani Rice: basmati rice, water, and salt along with but we also add bay leaves, cinnamon, cardamom and cloves forhere to add another layer of flavor
Chicken Gravy: curry leaves, green chillies, onions, ginger garlic paste, turmeric powder, chilli powder, tomato puree, salt, water, more of our special spice powder, garam masala, cardamom powder, fresh cream and coriander seeds. Each step of the way we keep adding spices – that’s what makes this biryani so unique!
Biryani Rice Gravy: ghee, cardamom, cloves, cinnamon, kapok bud, black cardamom, star anise, blade mace, onions, ginger garlic paste, green chillies, coriander leaves, spice powders, tomato puree, curd, kasuri methi, shahi jeera, cow milk, lemon juice
Other: we’ll also need cooking oil to fry our chicken, along with some hot water, saffron and ghee for the topping
Frequently Asked Questions
Which is the best cut of chicken for this recipe?
Boneless chicken thighs work best — tender, juicy, and perfect for frying.
Can I make this recipe with bone-in chicken?
Yes, but adjust frying time. Bone-in pieces release juices during dum, which changes the texture slightly.
Can I make it with lamb or mutton?
Definitely! Cook mutton/lamb till tender before layering. The flavor will be deeper and richer.
How spicy is this biryani?
This Meghana Boneless Biryani is meant to be medium-hot, but you can adjust chilli powder and green chillies to suit your taste.
Can I prep ahead?
Yes, you can marinate and fry chicken, and prep the gravies a day in advance. Just cook the rice and layer when ready.
Serving Ideas
Pair this delicious fried chicken biryani with Onion Raita
Top it with salan to take the heat up
Serve with a side of kachumber salad or even crispy papad
Storage Tips
You can store this biryani in an airtight container in the refrigerator for up to 2 days
Life has been significantly better since I’ve started making this Meghana Boneless Chicken Biryani – and I’ll let the biryani speak for itself! You neeed to try this one, it’s worth all the effort and is truly a recipe that everyone will be requesting more of. I
If you love biryani and fried chicken, this Boneless Chicken Biryani from the famous Meghana's In Bangalore will blow your mind! Super flavorful and layered to perfection, this biryani will become a Sunday ritual!
Add all the ingredients listed to a mortar & using the pestle grind to a fine powder and set aside. This will yield approx. 2 ¼ teaspoons.
½ nutmeg, 1 star anise, 1 inch cinnamon, 5 cloves, 5 green cardamoms
Chicken marination
Take all the ingredients listed for marination in a bowl, mix well and set aside for 30 minutes.
750 gms boneless chicken, ⅛ teaspoon turmeric powder, ¾ teaspoon salt, ½ teaspoon cumin powder, 1 tablespoon kashmiri chilli powder, 1 ½ teaspoons special spice powder, 1 tablespoon ginger garlic paste, 1 tablespoon green chilli sauce, 1 egg, 2 ½ tablespoons curds, ¼ + ⅛ teaspoon black pepper powder, 3 tablespoons corn flour, 3 tablespoons maida
Biryani rice
heat water in a pot, add salt and whole spices. Once it boils, add soaked rice & boil on high for 3-4 minutes. Drain immediately and set aside. by this time rice is 90% cooked
2 cups basmati rice, 2 ¼ litres water, 2 bay leaves, 1 inch cinnamon, 3 cardamoms, 3 cloves, 2 tablespoons salt
Frying chicken
heat oil in a kadai or pan, add marinated chicken into the oil and fry for 4-5 minutes on medium flame until chicken is cooked from the inside & crisp from the outside. Do not overcrowd the pan and fry in batches. Set aside.
¼ cup + 2 tablespoons cooking oil
saffron water
add a pinch of saffron to hot water or cooked rice water, mix and set aside to soak for 10 minutes.
2 tablespoons hot water, 1 pinch saffron
Fried chicken gravy
Heat 3 tablespoons of fried chicken oil in a pan or kadai, add curry leaves, green chillies, saute for a few seconds on high till fragrant.
2 sprigs curry leaves, 3 green chillies
Add chopped onions and fry for 2 minutes on medium till they turn light golden. Add ginger garlic paste and fry for a minute on low. Add turmeric powder, red chilli powder and saute for a few seconds. Add tomato puree, salt and cook on low for 3-4 minutes till the tomatoes are cooked well and oil appears at the sides of the pan. Add ¼ cup water and boil for a minute. Add the remaining ½ teaspoon of special spice powder, garam masala, cardamom powder and mix well.
¾ cup finely chopped onions, 1 ½ teaspoons ginger garlic paste, ¼ + ⅛ teaspoon turmeric powder, 1 ½ teaspoons red chilli powder, ¾ cup tomato puree, ¾ teaspoon salt, ¼ cup + 2 tablespoons water, ¾ teaspoon special ground masala, ¼ + ⅛ teaspoon garam masala, ⅛ teaspoon cardamom powder
Add fried chicken pieces and saute for 2-3 minutes on low flame. Add 1 ½ tablespoons of fresh cream, cook for a minute, garnish with coriander leaves and take off the heat.
Take 3 tablespoons of fried chicken oil & 2 teaspoons ghee preferably in a wide pan or kadai, add the whole spices – cardamoms, cloves, cinnamon, kapok bud, black cardamom, star anise, mace and saute for a few seconds till they are fragrant.
2 teaspoons ghee, 4 cardamoms, 4 cloves, 1 ½ inch cinnamon, 1 kapok bud / marathi moggu, 1 black cardamom, 1 star anise, 1 blade mace
Add onions, salt and saute of medium for 2-3 minutes till they turn light golden. Add ginger garlic paste and saute for a minute. Add slit green chillies, mint & coriander leaves and cook for a minute. Add turmeric powder, kashmiri chilli powder, salt and saute for a minute.
1 cup thinly sliced onions, 2 teaspoons ginger garlic paste, 2 green chillies, 20 mint leaves, 2 tablespoons finely chopped coriander leaves, ¼ teaspoon turmeric powder, 1 teaspoon kashmiri red chilli powder, ¾ teaspoon salt
Add tomato puree and cook on low for 3-4 minutes till the tomatoes are cooked well and oil appears at the sides of the pan. Add curds and cook for 2 minutes till the rawness goes & oil separates from the masala. Add garam masala, cardamom powder, kasuri methi, shah jeera, milk and cook for 2 minutes. Add lemon juice and take off the heat. Take out ¼ cup of the gravy and set aside separately.
¾ cup tomato puree, 2 ½ tablespoons curds, ¼ teaspoon garam masala, ⅛ teaspoon cardamom powder, 1 teaspoon kasuri methi, ½ teaspoon shahjeera, ¼ cup buffalo milk or cow milk, Juice of ½ lemon
Layering biryani
spread cooked basmati rice evenly on top of the gravy. Add ¼ cup of gravy that was set aside and cover with rice, so the flavour stays within. Sprinkle ghee and cover with a lid. Heat a tawa and place the biryani kadai on top of it and steam for 10 minutes on low and rest for half an hour before serving.
Serving biryani: fluff up the biryani rice and add 1 ½ cups of it to a serving bowl. Spread approx. 1 ladle of fried chicken gravy on top and serve.
Tomato Rice, also known as Thakkali Sadam, is a flavorful South Indian rice dish made with rice sautéed in a spiced tomato masala, tempered with mustard seeds, curry leaves, herbs and aromatic spices. Tangy, mildly spicy and comforting, this one-pot meal is a popular choice for lunchboxes and quick meals, best enjoyed with raita or...
Mushroom rice is a flavourful recipe made with basmati rice, whole spices and mushrooms. The mushrooms soak up all the masala and add a meat-like taste to biryani which makes this recipe more satisfying and comforting. This is a one pot recipe that you can make in a pressure cooker, instant pot or in a...
This one pot chicken drumsticks and rice is one of my favorite wholesome meals that fits the bill in all respects - it’s balanced, filling and satiates our taste buds so beautifully that we don't miss any takeaways whatsoever!
If you are new to my blog and are liking what you see here, I can assure you that you won’t regret your decision to stay on this page!
Here I share my tried and tested recipes that I make for my family & myself for a healthy & balanced meal to nourish our body & soul!
And the same goes for this one pot chicken drumsticks and rice which is a rightly balanced meal of carb and good protein without any fuss whatsoever!
Being a one pot recipe, this one pot chicken drumsticks and rice is perfect for a weeknight meal and will not only save you from those unhealthy takeaways but also will satiate your taste buds beautifully!
Why must you try this one pot chicken drumsticks and rice?
If you are a chicken lover then chances are that you have already tried many versions of chicken and rice, one of which may already be your absolute favorite!
However, I would urge you to try my version of one pot chicken drumsticks and rice which is so minimalistic yet so powerfully flavorful that you can’t help but fall in love with it!
The key flavor of my chicken and rice comes from the aromatics which is why I used a generous amount of it.
The only spice I used was two heaped teaspoons of cumin powder which imparts an earthy tone to the dish complementing the flavors of the aromatics. And it turned out to be a match made in heaven!
Chicken drumsticks are seared in oil to seal in the flavors of the spices into the meat and develop the brown crust on top that makes the drumsticks irresistibly tasty!
Finally the chicken drumsticks and rice are cooked together in the pot leaving you with chicken flavored fluffy rice and juicy chicken legs!
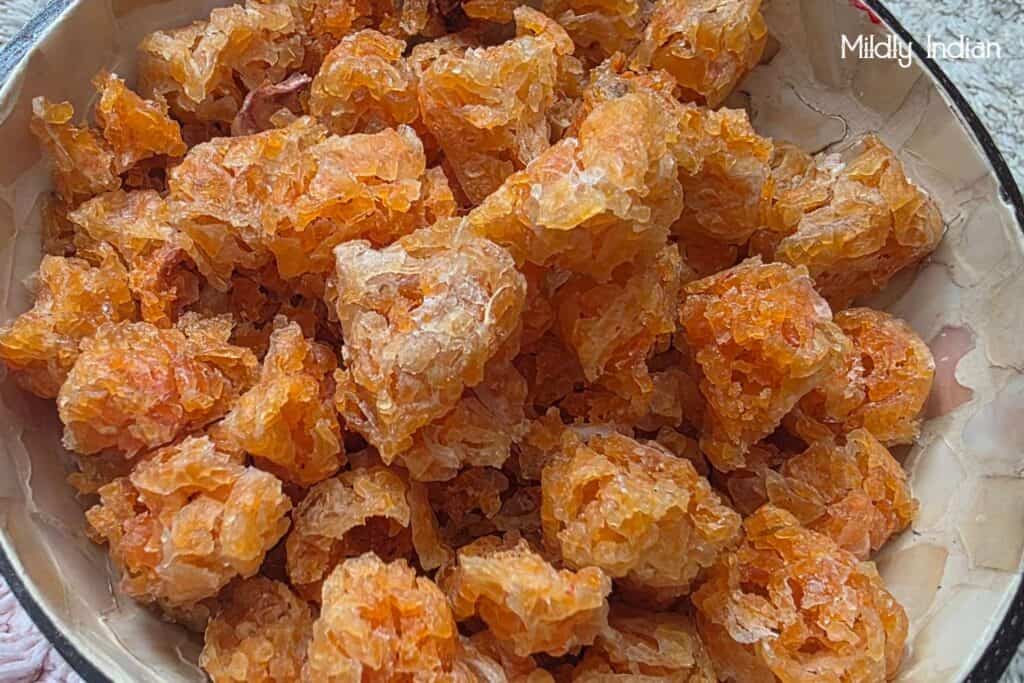
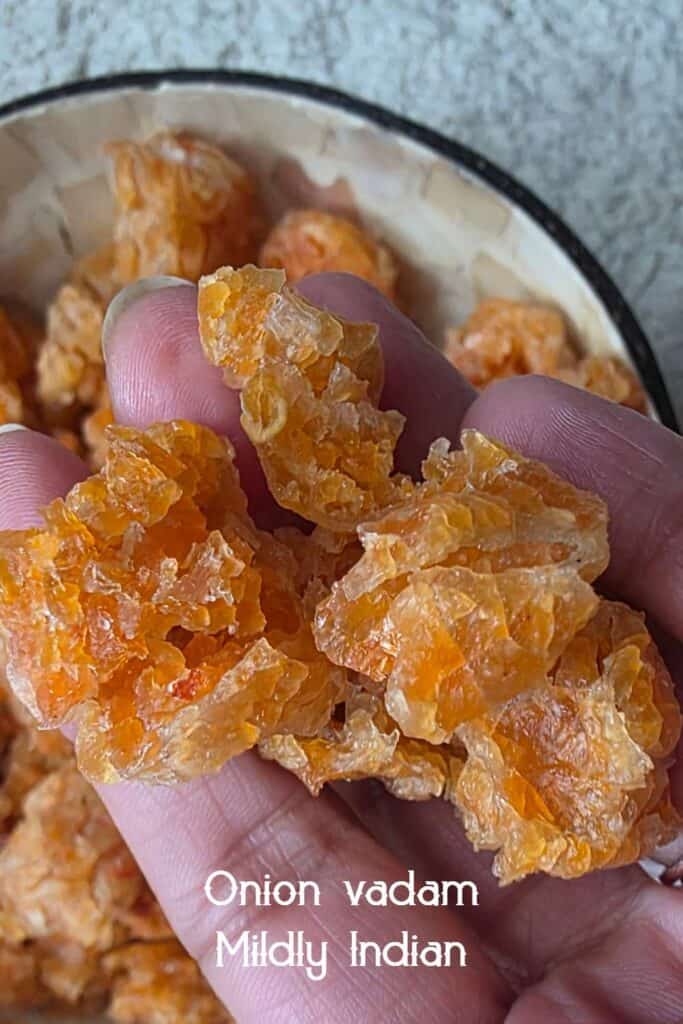
Vengaya killu vadam or onion vadam is a flavourful crispy side to your simple Indian meal. Made in summer, this vadam stays good for the whole year and is absolutely loved during the rainy months. Try it?
Since our household is divided with respect to love for the allium family we end up with excess of onions during some grocery runs. When the sun was blazing (back to gloomy autumn now) i made a batch of vengaya killi vadam to use up the onions. With pouring rains last week, the weather was just about cozying up Netflix and chill kind of feel. So we fried a few of these as snacks. Apparently now they are no onion haters for this form of sun dried fryums. So here is the recipe for you.
What is vengaya killu vadam?
Killu vadam is a version of the old method of making sun dried grain preserves where the cooked batter is pinched off and placed and small bits to dry rather than being extruded. Since this is fairly easy and of less washing, it seems to do a lot more of these than extruded ones. When you add shallots or onion as flavoring to the batter and then pinch off bits to dry then you get vengaya killu vadam.
How is vengaya killu vadam different from vengaya vadagam?
Vengaya vadagam or thalippu vadagam is a very different preparation made to be used in curries rather than being fried to eat on the side of a meal or as snack. This is usually made with urad dal, chillies, curry leaves and lots of ground onions. However the vengaya killu vadam is a version of rice vadam with onions to flavour it.
Ingredients to make onion vadam
Onions: Indian onions are pale pink and not as intense as the Spanish ones. They are perfect for this recipe. However, if that is not available use the Spanish reds. If none, the yellow one is fine (it is a bit sweeter). If you get shallots that is a much better alternative. I have tried a small batch with spring onions however, the flavour did not really come through.
For the vadam maav: the vadam maav mix in this case is one that you want to puff up and fry fast as the onions can burn easily. So, I use raw white rice (ponni) and sago pearls. I prefer these in equal ratio as that gives the best results.
Spices and seasoning: I prefer to use red chilli powder and salt. You can use chilli flakes, or even crushed green chillies to make this recipe.Cumin seeds taste good to add to the mix.
Lets make vengaya killu vadam
Soaking for the vadam maav: for this recipe we take an equal proportion of rice to sago.wash the rice till it runs clear and soak it for 4 hours. Wash and soak the sago separately.
Grinding the batter: Into the blender add the soaked rice, sago, salt red chilli powder (or green chillies) and blend into a smooth paste with enough water. Let this be in a pouring consistency.
Cooking the batter: Once the thinned out batter is ready, pour this into a deep pot set on low heat and keep mixing till the batter cooks and thickens. This is a slow process that is going to take time. Be watchful as it thicken as it will catch the bottom easily. You can add a bit of oil to help you mix well at this stage. Also, be mindful that the batter will splutter a lot and easily burn you as they bubble up.
Adding the onions: Wash peel and finely chop the onions.Once cooked the batter is fairly thick. Mix in the chopped onions and leave it covered for 10 minutes.
Drying: the batter after resting would have extracted some of the juice of the onions and flavour it. Mix well. Spread out some plates and brush them with oil ( sesame oil). When lukewarm,wet you hands in water and pinch of bits of the thick batter on to he plates. Place the plates in hot sun. In the evening, remove from sun, pull off the pieces from the plate and flip them over. Cover with a thin cloth and leave indoor in an airy part of the house. repeat the sun process for a couple of days till the center of the killu vadam also turns glassy and crisp. Once completely dry, Store in an airtight container.
Frying: In a frying pan add oil and let then come to a medium heat. Add a small piece of the vadam and check it it rises up easily and sizzles well. The oil is ready at this stage. Fry a few pieces at a time till the sizzling stops so as to have the center also cooked well. Remove from he oil, drain and serve with meals.
How to use this onion fryums?
When it comes to vadams unlike vattal you don’t have to restrict them to meals. They are wonderful teatime snacks and can replace popcorn too. In classic meal sense, onion vadam tastes awesome with parippu saadam, lemon rice , shallot rice or pongal. They can accompany any curry bowl too.
Storage and meal prep.
Since these are sundried, storing it right is key to ensuring they don’t get spoilt and can be used throughout the year. The dried vadam can be sealed in airtight boxes, preferably with a paper tissue lining. You can pack them in double zip lock bags for space saving storage. When ready to use, remove the quantity you need. I don’t prefer to put back the left over to avoid any accidental moisture. You can save them separately in a bottle to use it later. Once fried (or air fried) these vadams stay great for a week in storage container retaining their crunch.
Is this recipe vegan?
The vengaya vadam recipe is vegan. It is a great treat for anyone who is going dairy free,nut free or even gluten free.
Vengaya killu vadam or onion vadam is a flavourful crispy side to your simple Indian meal. Made in summer, this vadam stays good for the whole year and is absolutely loved during the rainy months. Try it?
Course Preserves
Cuisine gluten free, South indian
Keyword Indian vegetarian dinner, sun dried recipe
Prep Time 15 minutesminutes
Cook Time 25 minutesminutes
soaking time 4 hourshours
Servings 0
Equipment
blender
Steel plates
frying pan
Ingredients
1/2cupRaw rice
1/2cuptapioca pearlssago
2mediumOnion
salt to taste
1/2 tspred chilli powder
Instructions
Wash and soak the rice and sago separately
After 4 hours, add salt and red chilli powder and grind to a smooth batter.
Ad the ground paste to a deep pot.
On low heat cook this mix till the mix is thick and cooked.
Peel and finely chop the onions.
Mix it into the cooked batter and cover it for 10 minutes.
Prepare the plates with a thin layer of oil.
Once the batter is lukewarm, pinch off pieces.
Sundry the onion vadam for 3 to 4 days till the center of the batter is glassy.
Once dry store in air tight bottles.
To fry the vadam
Set oil to heat on medium warmth.
Once the oil is hot, add a couple of pieces of the onion vadam and fry till the sizzling stops.
Drain from oil and sere with meals.
Other vadam ideas from our blog
We are slowly experimenting and building up a collection.So far we make
Making vadams and vattals seems like a long process. however,they are tacklable if you do small batches and like me resort to killu vadams than elaborate settings. When you try out this onion vadam recipe do let us know in the discussion below how it turned out for you. Pin this for later Stay subcribed and see you in the next post.
An irresistible savory cake with a crispy exterior like Dosa and a soft interior like an Idli, yes I’m talking about this classic Andhra Breakfast DIBBA ROTTE. Serve this delicious Dibba rotte with Aavakaya, chutney, or sambar, this recipe is filling and absolutely delicious. Dibba rotte is a classic recipe that is very easy to make and a total crowd-pleaser.
Traditionally Dibba rotte is made with freshly ground Idli batter, and Idli Rava or Rice Rava is used here. The Telugu-speaking regions use Idli Rava for their Idli batter instead of parboiled rice/uppudu biyyam. The coarse texture of the Rava gives it’s signature crisp exterior and granular soft interior. I bet once you try this, you’ll end up making Dibba rotte every time you make Idli batter. And the good part is you needn’t ferment the batter, just add the tempering to it and make Dibba rotte right away. But we have tried making it with fermented batter and the beautiful sour notes adds more magic. Now to get the perfect color and crunch, the key is to use a heavy cast-iron Kadai/pan. Let the Dibba rotte cook on low flame for longer to get the irresistible crunchy exterior.
I have learnt making this dish from my best friend who hails from Machilipatnam and they make it quite regularly. I remember tasting this dish at her home and I fell in love with the dish instantly and I’m telling you if you are a person who loves slightly crispy bits in the bottom of the pan(like me) in dishes like upma, then this is just for you.
What is Dibba rotte and how to make it?
The word Dibba means plump or fat and rotte means bread/flatbread. And traditionally rice Rava or Idli Rava is used instead of rice. As throughout Telugu-speaking regions, Idli is made with Rice Rava or Idli Rava, the granular idli texture is just irresistible.
First, we need to soak the Urad dal and later grind it to a fine consistency, and then we add soaked rice Rava/Idli Rava to this batter. You can let this batter ferment to make idlis or use it to make Dibba rotte instantly. You can take a portion of this batter and add a simple tempering to the batter, using mustard seeds, cumin seeds, green chili paste. If you are making for younger kids, you can skip green chilies or omit them.
Traditionally we use a heavy and shallow cast-iron Kadai or brass Kadai(itthadi ginne) to make this Dibba rotte. But any thick bottomed pan will work, just make sure to keep an eye on Dibba rotte and it’s not burning. Our goal is to achieve a golden-brown crispy exterior and cook through completely. While making spread light cooking oil on the Kadai and then pour the batter. Cover the pan and cook on a slow flame until it turns crispy on the bottom. Flip it through and cook until done. Then Serve hot Dibba rotte with pickle or chutney of your choice. Ginger chutney makes a great combination with this.
More names of Dibba rotte
This Dibba rotte is also known as Dibba rotti or minapa rotti in some parts of Telugu-speaking regions.
Serving suggestions
Dibba rotte is traditionally cut in wedges and served as you get to taste the outside crusty exterior and the soft fluffy texture inside. The taste is not like that of idli as there is no sourness in the batter (since the batter is not fermented), but you can make it with fermented batter too. The crisp texture is what makes the dish more interesting.
This Dibba rotte is a savory cake and has a similar color, shape, and texture. One of the reasons why people call it Andhra cake and most loved by kids. Serve with your favorite pickle or chutney or Podi of your choice. But I’d recommend you try with Ginger chutney.
So what all Ingredients do we need?
All you need to make this dish is idli batter. So, you can use your favorite idli recipe. To make the Andhra way, use urad dal and idli Rava. You only need a handful of ingredients for this recipe:
urad dal – either whole or split.
Rice Rava or idli Rava – Look for idli Rava in your nearby Indian grocery stores. The key for its signature granular crispy exterior is Idli Rava.
Dibba Rotte is a classic Andhra dish made of Idli batter. It has an irresistible crispy exterior and fluffy interior.
Course Breakfast, Lunch box recipes
Cuisine Andhra
Keyword healthy breakfast, plant based, vegan
Prep Time 10 minutesminutes
Cook Time 30 minutesminutes
Soaking time 4 hourshours
Total Time 4 hourshours40 minutesminutes
Servings 6Servings
Author Shravani Abhishek
Equipment
Cast iron skillet or wok
Ingredients
½cupUrad dal
1cupIdli rava
½tspFenugreek seeds
Saltto taste
Tempering
1tbspCooking oil
½tspMustard seeds
1tspCumin seeds
1sprigCurry leaves
1tspGreen chili paste
½tspMinced ginger
Instructions
Let's prep for the batter
Wash and soak the Urad dal + fenugreek seeds and Idli rava separately for 3-4 hours.
Drain the water from the urad dal and reserve about 2 cups of soaking water. Grind the urad dal+fenugreek seeds into soft and smooth paste by adding little water.
Transfer the ground urad dal paste to a mixing bowl, and to this add drained idli rava. Add salt to taste and mix it well with your hand.
It's tempering time
Heat a small tadka pan, add oil and once its hot add in mustard seeds, cumin seeds, minced ginger, green chili paste and torn curry leaves. Let it splutter for a minute.
Turn off the heat and add this tempering to the Idli batter and give it a good mix.
Let's make some dibba rotte now!!
Heat a thick Cast iron kadai or Appam pan, and add oil and let it heat for a minute.
Now add in 1-1½ cups ladleful of batter into the pan, let it sizzle for a minute of medium heat.
Lower the heat to low flame, cover the pan and cook for 15 mins until it turns crispy on the bottom. Insert a clean knife or spoon and see if its cooked, it should come out clean.
Now flip the Dibba rotte and cook it for another 5-10 mins. Do not cover the pan at this time.
Turn off the heat, remove the dibba rotte on a plate, cut into wedges and serve with chutney, podi or pickle of your choice.
Notes
There is no need to ferment it, you can make Dibba rotte as soon as you grind the batter. But feel free to use the fermented idli batter too, the sourness adds a nice flavor profile to the Dibba rotte.
If you are using wet grinder or blender, make sure to add water in increments to make a soft, fluffy and smooth batter.
I would recommend you to use a cast iron kadai or appam pan to get irresistible crispy exterior.
If you’ve tried this recipe, please share your valuable feedback in the comments below. Also you can Tag your photo and share it with #mycurryveda on Instagram @mycurryveda or on Facebook .
This sticky black rice porridge made with coconut milk, cream and sugar is a rich and creamy decadence with a sweet fruity floral fragrance that envelopes your mouth as if it is bathed in a perfume and just a spoonful of this delight is enough to give you that soothing feeling of relaxation and later...
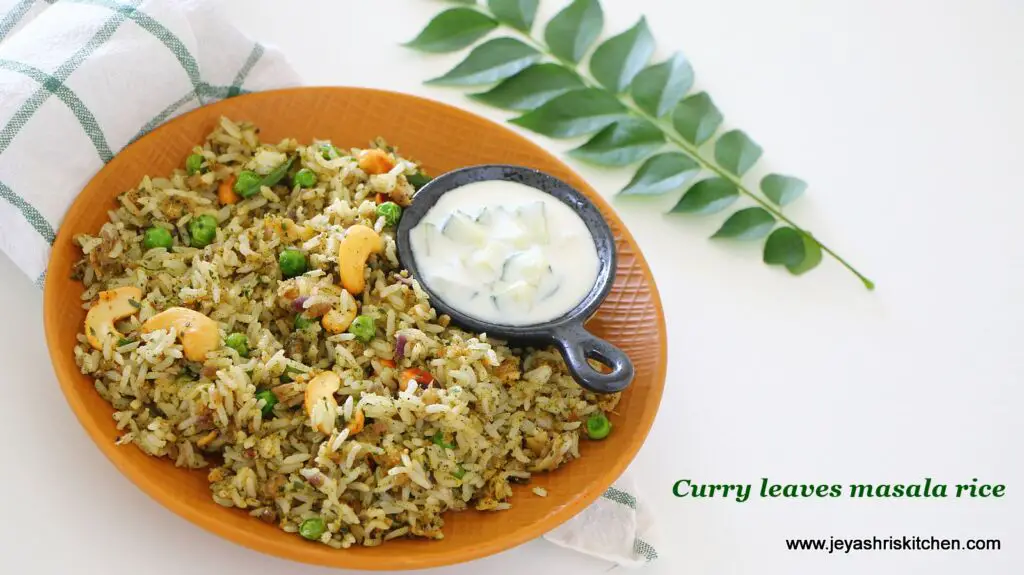
Curry leaves masala rice – Easy karuveppilai masala rice recipe, perfect for lunch box too – Recipe with full video and step-by-step pictures.
Usually, we make curry leaves rice in the South Indian style. Curry leaf is an aromatic herb used widely in South cuisine. It lends an amazing flavour to the dishes. We widely use this in sambar, rasam, poriyals,kootu,aviyal, kurmas,podis, and chutney. I have tried curry leaves pulao and shared the recipe also in Jeyashris kitchen.
A few days back I tried curry leaves masala rice and everyone at home loved it. So I thought I will shoot a video and document the recipe here. I used onion and ginger garlic paste in this recipe. Also, fennel seeds are added to give a nice flavour.
Many times we see people take out the curry leaves from their food and discard it. But if you add this way, even kids will eat without any fuss.
I used sona masoori rice, you can also use par boiled rice or basmati rice.
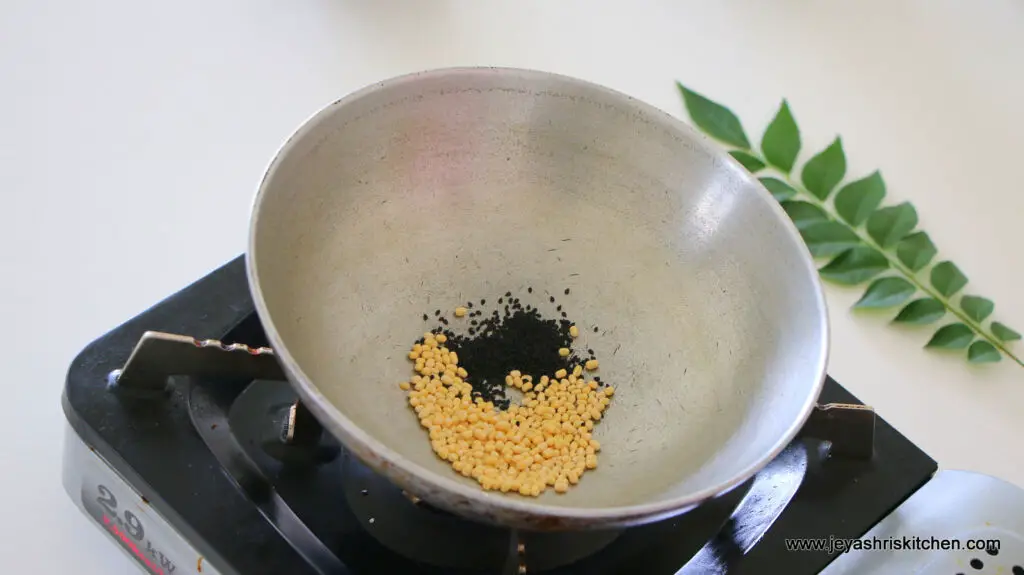
In a pan add the urad dal and roast for 2 minutes in medium flame.
Now add the sesame seeds keep sauting. The seeds will pop up and the dal will turn golden brown.
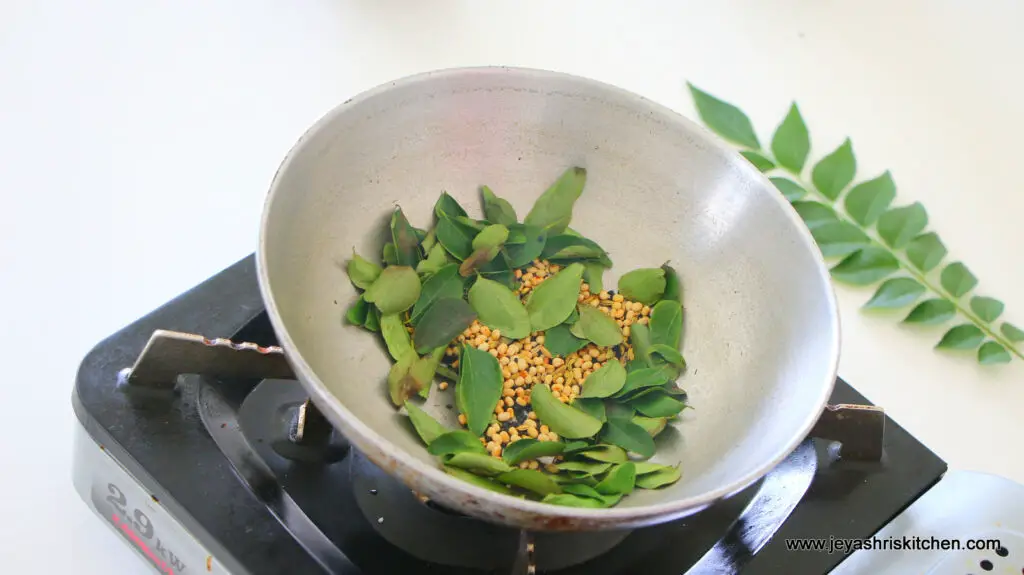
Now add the curry leaves and fennel seeds and cook for a minute.
Switch off the flame.
Let this be in the heat for a minute.
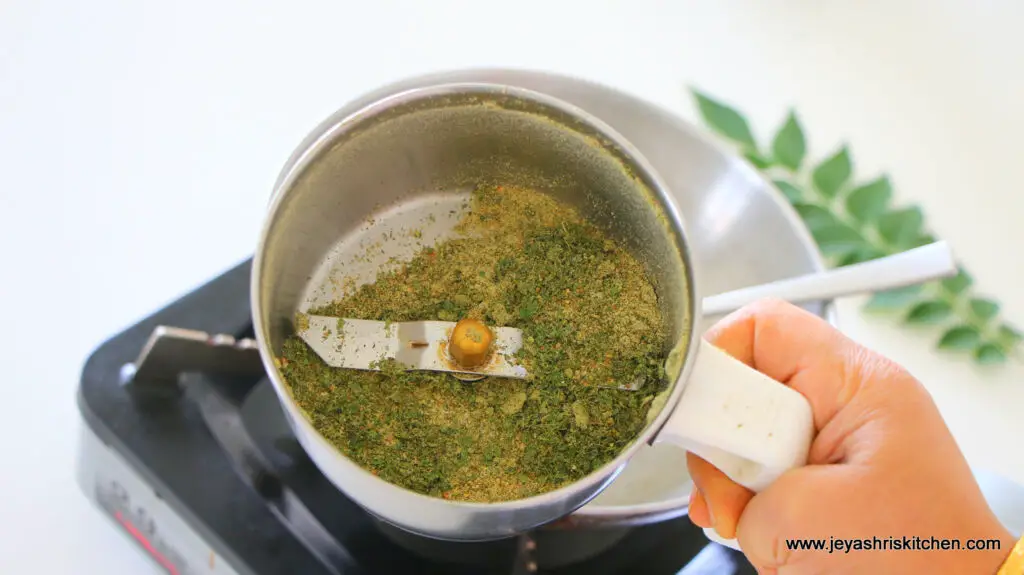
Transfer this to a mixie jar and when it is warm powder this.
You can make this in advance too and store for a week.
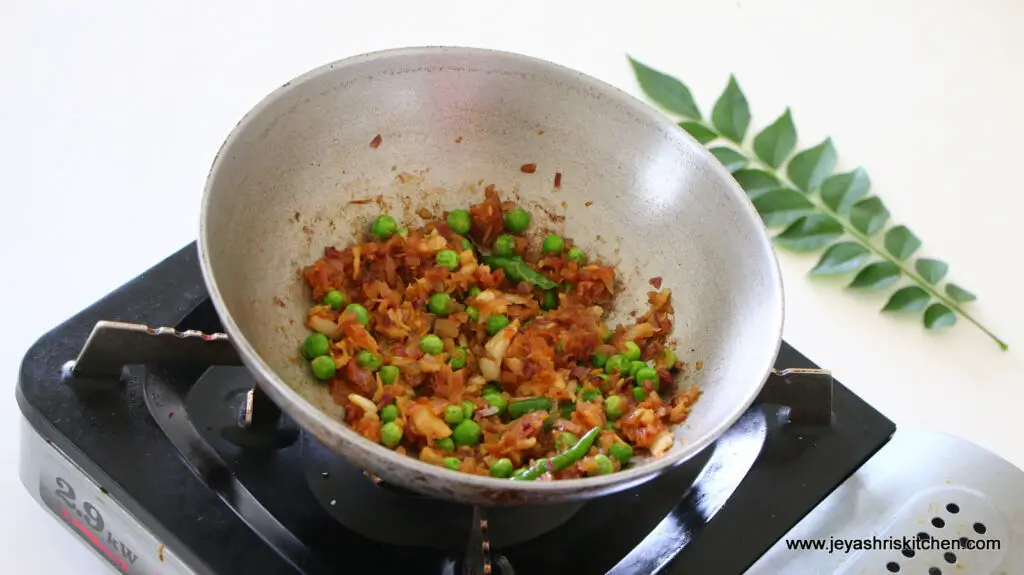
In the same pan add oil and add the finely chopped onions and slit green chilis.
Saute this till they translucent.
Now add the ginger garlic paste.
Cook till the raw smell goes off.
Now add the frozen peas and cook for 3 minutes. If needed add 1 tbsp of water and cook.
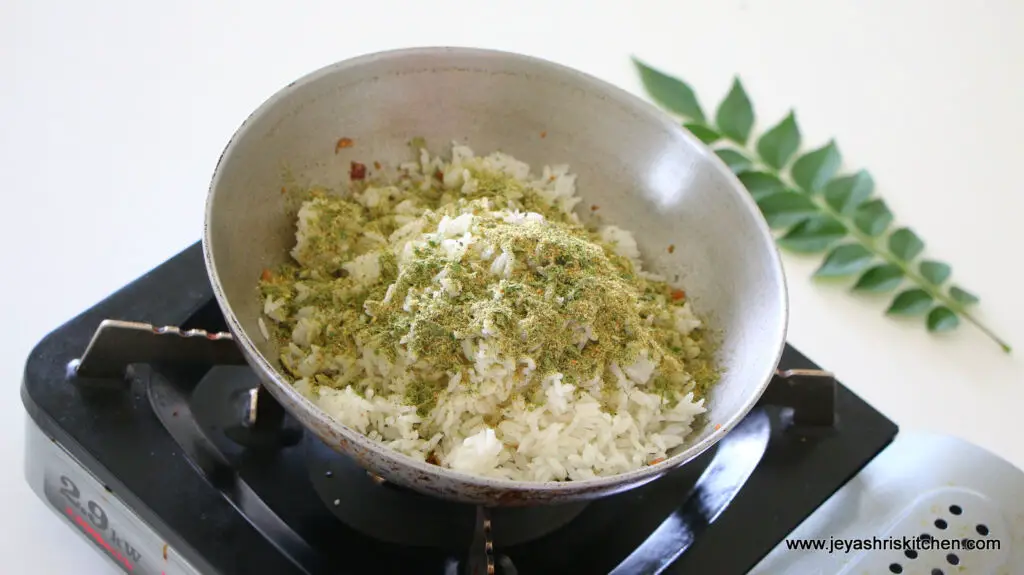
Add in the cooked rice to this.
Sprinkle the curry leaves spice powder on the top.
Gently mix well.
You can keep the flame in low.
Cook for 2 minutes and switch off.
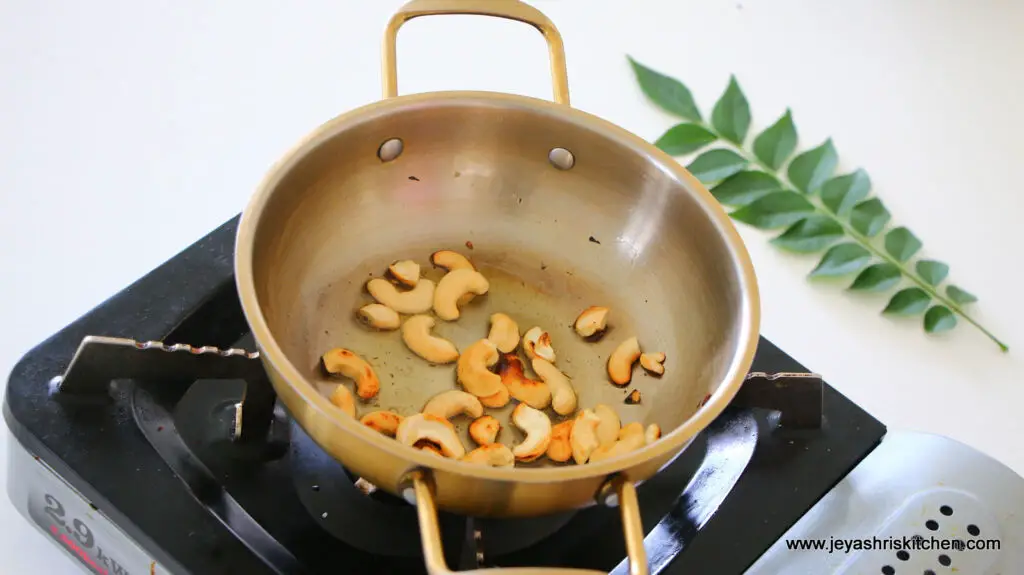
Roast cashew nuts in ghee, this step is optional.
You can just add 1 tsp of ghee if you do not want to add cashew nuts. Else you can add peanuts instead of cashew nuts.
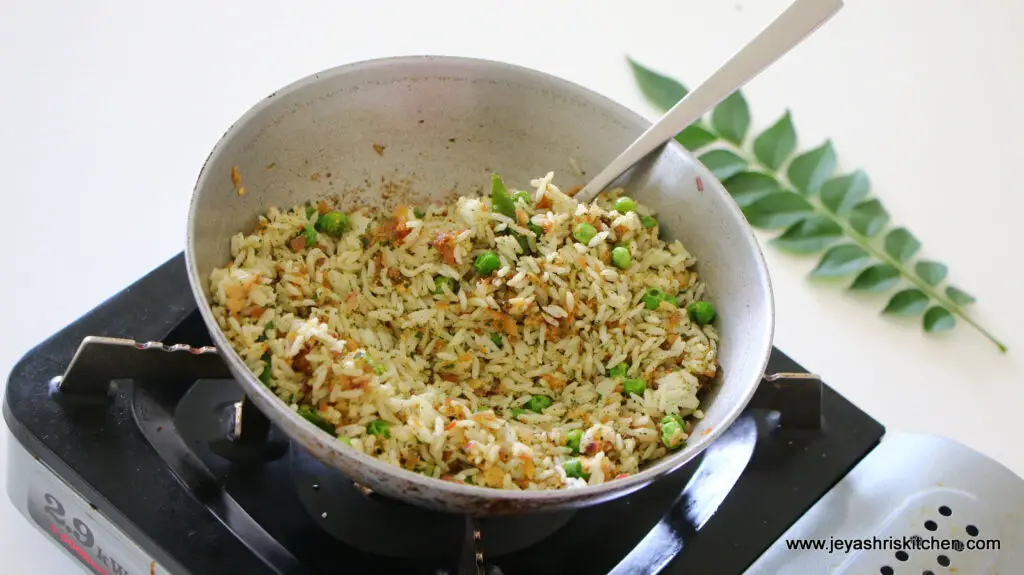
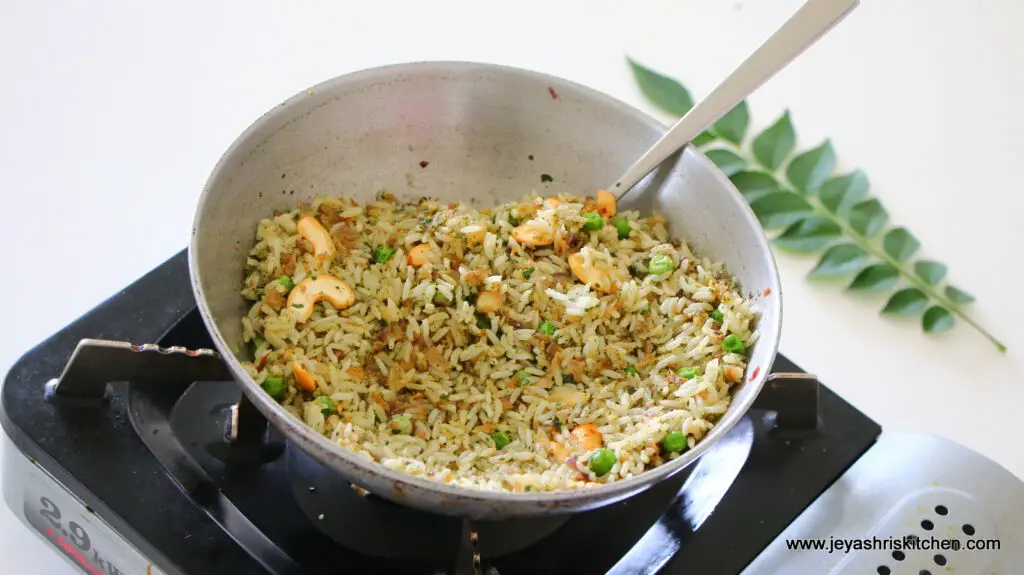
Add this to the rice.
Mix well gently
Curry leaves masala rice is ready to serve.
Any raita or papad or vadam pairs well with this.
Video
Notes
1. You can replace curry leaves with coriander leaves, but ensure that the coriander leaves are well roasted. Else the powder will be wet.2. If you are allergic to sesame seeds, feel free to skip them.3. You can add cumin seeds instead of fennel4. Curry leaves masala rice is a perfect lunch box recipe.
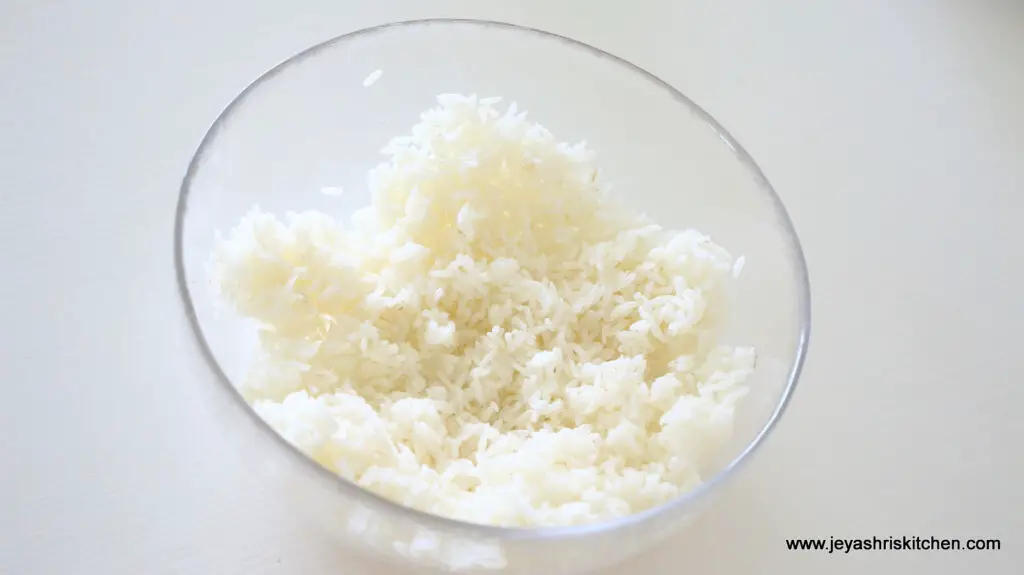
Cook the rice and spread it in a wide bowl.
I used sona masoori rice, you can also use parboiled rice or basmati rice.
In a pan add the urad dal and roast for 2 minutes on medium flame.
Now add the sesame seeds and keep sauting. The seeds will pop up and the dal will turn golden brown.
Now add the curry leaves and fennel seeds and cook for a minute.
Switch off the flame.
Let this be in the heat for a minute.
Transfer this to a mixie jar and when it is warm powder this.
You can make this in advance too and store it for a week.
In the same pan add oil add the finely chopped onions and slit green chilis.
Saute this till they are translucent.
Now add the ginger garlic paste.
Cook till the raw smell goes off.
Now add the frozen peas and cook for 3 minutes. If needed add 1 tbsp of water and cook.
Add the cooked rice to this.
Sprinkle the curry leaves spice powder on the top.
Gently mix well.
You can keep the flame low.
Cook for 2 minutes and switch off.
Roast cashew nuts in ghee, this step is optional.
You can just add 1 tsp of ghee if you do not want to add cashew nuts. Else you can add peanuts instead of cashew nuts.


 Tip: Soak rice for 20 minutes and rinse until water runs clear for the fluffiest pilaf.