If you wanna live with just one pasta recipe for the rest of your life then that has to be the recipe of this marry me shrimp pasta! This is the undisputed winner of best pasta ever!
If you are looking for a fail-proof family friendly pasta recipe for the upcoming holiday season, then I have the absolutely right one for you today!
Look no further and lock this marry me shrimp pasta in your menu and trust me it will become the showstopper of your dinner table!
The spin-off of the iconic marry me chicken, this marry me shrimp pasta is no less in its glory and for shrimp lovers like me this is an ultimate pasta dish which will keep reappearing on our dinner table!
What is Marry Me Shrimp Pasta?
I was literally intrigued by the name of this pasta! So I had to research it! Legend has it that this pasta is so good that it could inspire a marriage proposal—hence the quirky name!
Well, the cooking enthusiast in me had to test it for herself if it is really THAT good! Even though I do not have any upcoming proposal ideas on my mind!
And I thank my stars I did!
This marry me shrimp pasta is one such phenomenal recipe that anyone can hardly resist its addictiveness no matter how hard she/he has programmed themselves not to overeat!
Breakfast taquitos filled with a quick scramble along with veggies, cheese, and your favorite toppings is such a quick, easy, and satisfying meal! Make the super versatile scramble seasoning ahead, so you can whip up all kinds of eggy breakfasts in a flash. (gluten-free, nut-free, with easy soy-free option)
These breakfast taquitos are super easy and super quick, if you have my scramble seasoning on hand. Even if you don’t, making the scramble seasoning is also easy. You just get all the spices, mix them in a jar, and it’s ready. You can use that scramble seasoning on scrambles, omelettes, frittatas, or to make a quick tofu egg salad in many different ways. It works well wherever you want any kind of eggy breakfast flavor.
Definitely make some and use that in this recipe, because then it’s super quick. You just crumble the tofu, add some chopped veggies, the scramble seasoning, and vegan cream cheese. Mix it all up in a bowl, and your scramble is ready to stuff into your breakfast taquitos.
Then, you roll that scramble up in warm tortillas and bake or pan fry. Serve with your favorite toppings, like pico de gallo, salsa, vegan sour cream, etc., and they are just fabulous!
Why You’ll Love Breakfast Taquitos
quick and easy breakfast that’s super satisfying
cheesy, veggie-packed tofu scramble stuffed into soft tortillas, baked or pan fried until crisp
versatile! Customize mix-ins and flavors to taste.
easy to make gluten-free, nut-free, and even soy-free
A quick and easy plum compote with a hint of cinnamon. This easy plum compote is incredibly simple and easy to make with only a few ingredients. It is the perfect topping for.your desserts, pancakes, waffles, cakes, ice cream and more.
This homemade plum compote is bursting with fresh plum flavor! It is sweet, slightly sour from the natural sourness of plum and lime, and a beautiful flavor from cinnamon. This plum compote is so delicious and all you need are a few ingredients and less than 15 minutes to make this delicious plum compote.
Create a cozy fall treat with this delightful plum compote. Enjoy it warm or chilled as a delicious topping or filling to your favorite breakfast or dessert.
This easy plum compote is made with fresh plum, sugar, lemon juice, cinnamon and water. This easy 5 ingredient plum compote is sweet, chunky, and bursting with beautiful flavor. It’s a perfect topping for pancakes, cakes, waffles, yogurt, ice cream and more.
If you’ve not yet tried or attempted to make your own plum compote, you can try out this recipe and I am sure you will love it!
INGREDIENTS TO MAKE EASY PLUM COMPOTE
This section explains what all ingredients is used in making the easy plum compote, how to use or choose certain ingredients and substitution options. For measurements, see the recipe card below.
PLUM – Fresh plums are used here, but frozen berries will work just as well. You can use any variety of plums available with you.
LEMON JUICE – Freshly squeezed lemon juice is used. It also add a bright flavor as well as a boost of natural pectin to help thicken the blueberry sauce.
CINNAMON – I’ve used cinnamon powder. You can also use cinnamon stick. You can discard the as stick once the compote is ready. Cinnamon gives it a nice hint of spice that’s great for fall. SUBSTITUTION – You can use vanilla extract or essence or can totally skip it.
SUGAR – Sugar is used to slightly sweeten the sauce and balance the tartness from the lemon and the plum. You can add the sugar as per the sweetness of your plum, especially if the plums are off-season and not very sweet. SUBSTITUTION – You use maple syrup to sweeten the compote but you can also use honey for a non-vegan version if you’d like.
WATER – Very less water is used to cook the plum.
HOW TO MAKE EASY PLUM COMPOTE
This section shows how to make blueberry sauce with step-by-step photos and details about the technique with video tutorial. For full ingredients measurements, see the recipe card below.
I made a simple video of this easy plum compote recipe for my readers which I have shared below. Please do watch to know how I made this delicious recipe. If you liked the video please do SUBSCRIBE to my channel if you haven’t yet. Also like, share and comment on it! It will mean a lot to me and really motivate me to come up and shoot more videos for my readers. As always I’m looking forward to your feedback!
STEP BY STEP PICTORIAL INSTRUCTIONS TO MAKE EASY PLUM COMPOTE
Wash the plum and pat them dry with clean kitchen towel.
Now roughly chop the plum into medium pieces.
Add in the plum pieces, water, sugar and cinnamon powder in a sauce pan. Bring it to a boil over high heat.
Reduce the heat to medium and cover the pan. Cook for about 8-10 minutes or until the plum is tender and mixture is syrupy. We prefer the compote with some chunks.
Note: If you prefer a mashed texture, use a potato masher or the back of the ladle to mash the plum as it cooks.
Add in the lenon juice and give a quick stir.
Remove pan from heat and allow to cool down completely.
Transfer the plum compote onto a sterilized jar. Store in a refrigerator for longer shelf life and use a clean spoon on every serving.
NOTES: ● You can also use frozen plums. ● Lemon juice is optional. ● Use beautifully ripe plums as you’ll get the best flavour that way. ● Use sugar as per the sweetness of your plums. You can add more if your plums are not very sweet. ● A pinch of salt can he added to enhance the flavor of the compote. ● Cinnamon is optional ● You can also use maple syrup or honey for the sweetner. ● You can also add some lemon zest for the extra punch of flavor. ● Refrigerate the compote for longer shelf life. ● You can follow the same recipe and make other fruit compote – blueberry, cranberry, raspberry, black currant, mulberry etc. ● Store in clean jars and refrigerate for longer shelf life.
A quick and easy plum compote with a hint of cinnamon. This easy plum compote is incredibly simple and easy to make with only few ingredients. It is the perfect topping for.your desserts, pancakes, waffles, cakes, ice cream and more.
Course Condiment
Cuisine American
Keyword filling for cakes, sauce, spread
Prep Time 5 minutesminutes
Cook Time 10 minutesminutes
Total Time 15 minutesminutes
Servings 300Grams
Author Akum Raj Jamir
Equipment
sauce pan
Ingredients
300Grams Plum
60mlWater (¼ cup)
50 Grams Sugar(¼ cup)
¼Teaspoon Cinnamon powder Or 1 medium stick
1Tablespoon Lemon juice (15 ml)
Instructions
Wash the plum and pat them dry with clean kitchen towel.
Now roughly chop the plum into medium pieces.
Add in the plum pieces, water, sugar and cinnamon powder in a sauce pan. Bring it to a boil over high heat.
Reduce the heat to medium and cover the pan. Cook for about 8-10 minutes or until the plum is tender and mixture is syrupy. We prefer the compote with some chunks.
Note: If you prefer a mashed texture, use a potato masher or the back of the ladle to mash the plum as it cooks.
Add in the lenon juice and give a quick stir.
Remove pan from heat and allow to cool down completely.
Transfer the plum compote onto a sterilized jar. Store in a refrigerator for longer shelf life and use a clean spoon on every serving.
Video
Notes
You can also use frozen plums.
Lemon juice is optional.
Use beautifully ripe plums as you’ll get the best flavour that way.
Use sugar as per the sweetness of your plums. You can add more if your plums are not very sweet.
A pinch of salt can he added to enhance the flavor of the compote.
Cinnamon is optional
You can also use maple syrup or honey for the sweetner.
You can also add some lemon zest for the extra punch of flavor.
Refrigerate the compote for longer shelf life.
You can follow the same recipe and make other fruit compote – blueberry, cranberry, raspberry, black currant, mulberry etc.
Store in clean jars and refrigerate for longer shelf life.
HOW TO USE PLUM COMPOTE
Speaking of serving, plum compote can be used in many ways. You will love homemade plum compote with many recipes too. It’s the perfect topping for so many things! Here’s are some listed below. But I’m sure you’ll find lots of other ways to enjoy it as well. ● Use as fillings in tarts, apple pie, cinnamon rolls, buns etc ● Pour it over ice cream, pancakes, waffles, toast etc. ● Drizzle it over cakes ● Spread it over cake filling in layer cakes and pastry cakes. ● Stir it into milkshakes. ● Drizzle it over brownies and cakes. ● Layered it in trifle. ● Pour into decorated jars and give it as a gift for the holidays or just like that.
WHAT IS THE SHELF LIFE OF THIS EASY PLUM COMPOTE ?
This easy plum compote will last for upto to 3-4 weeks in refrigerator. You can store your homemade plum compote in a sterilized jar preferably glass jar in the refrigerator. Use a clean spoon everytime you serve them.
Well, if you make this easy plum compote recipe I’ll be glad if you take out some time and rate the recipe and leave a feedback in the comments box below. You can also snap a photo and tag Akum Raj Jamir on Facebook and akumrajjamir on Instagram with hashtag #atmykitchen. I would love to see your creations.
Thank you so much for stopping by my blog. I hope you liked the recipe. Your valuable feedbacks are always welcome, I love hearing from you guys and always do my best to respond to each and every one of you.
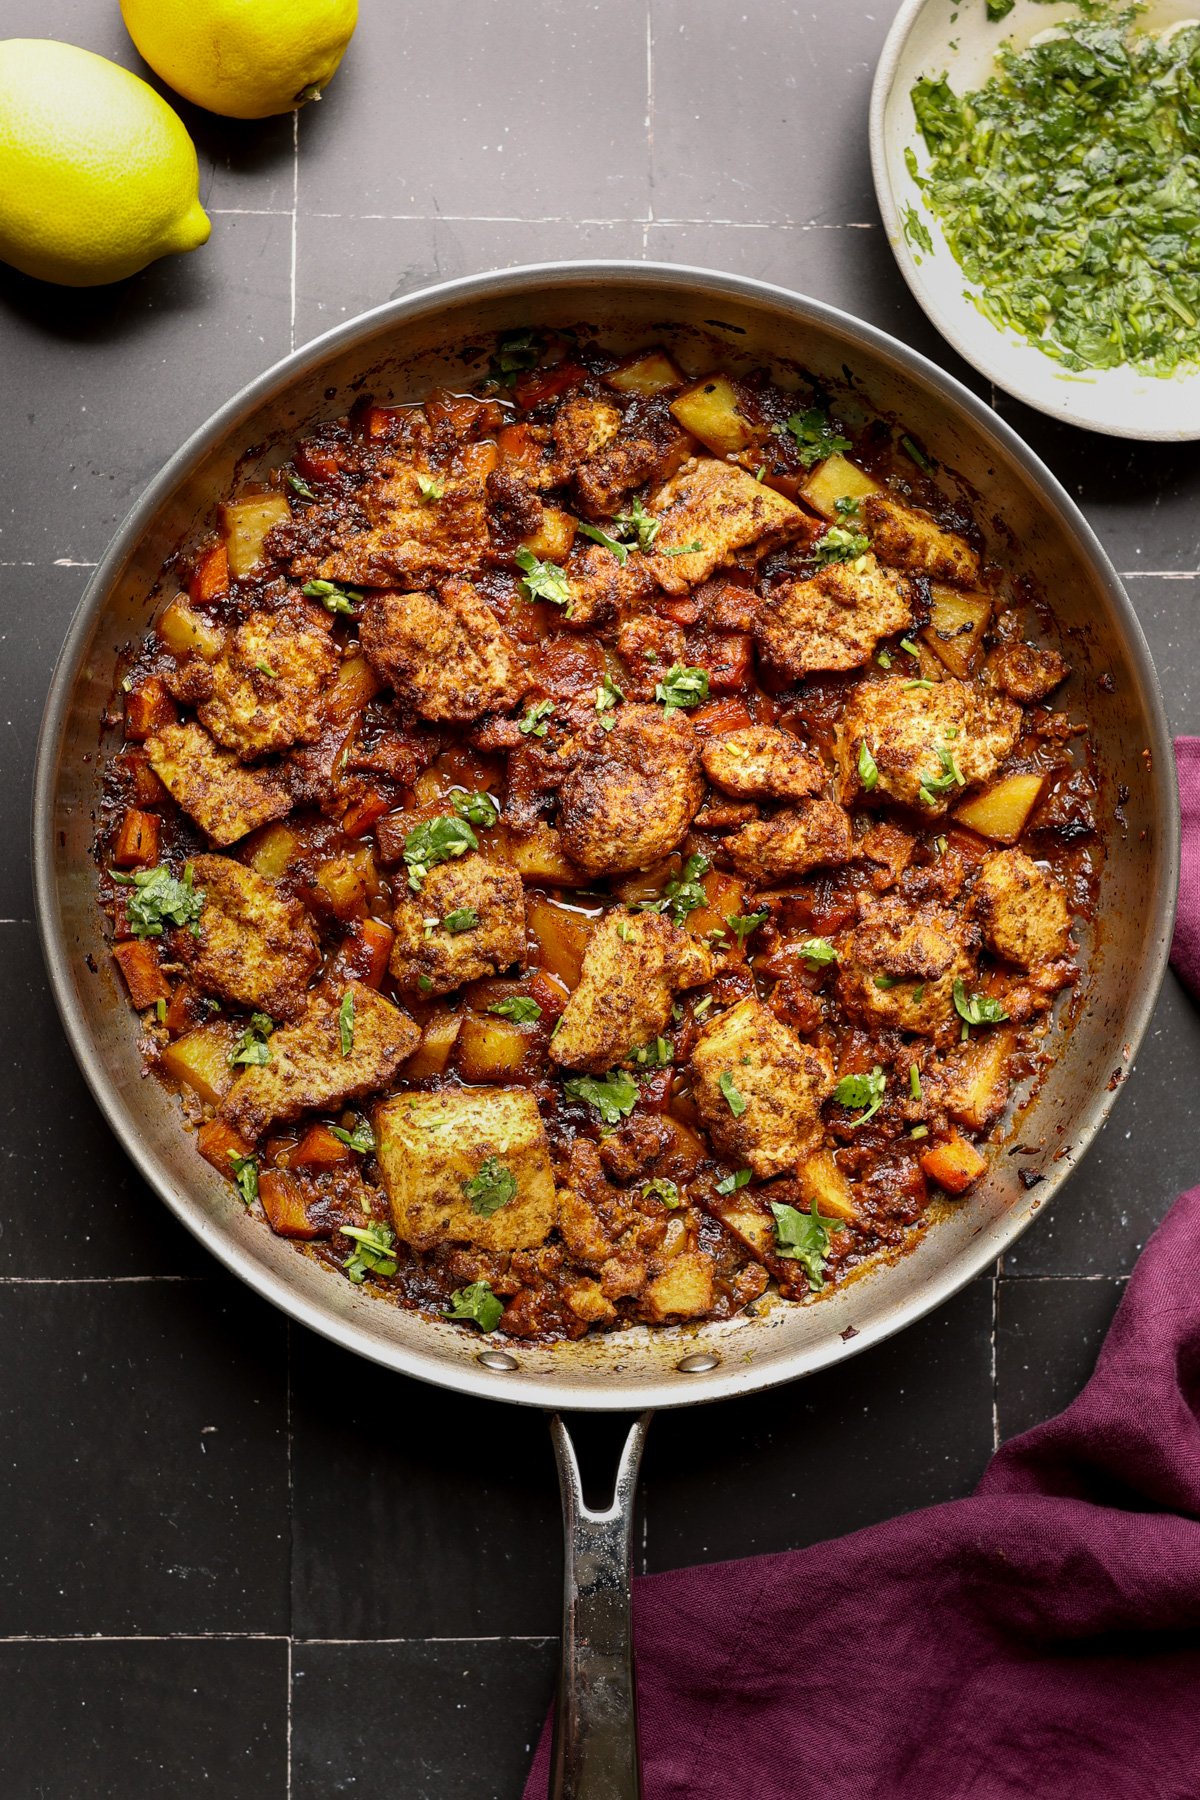
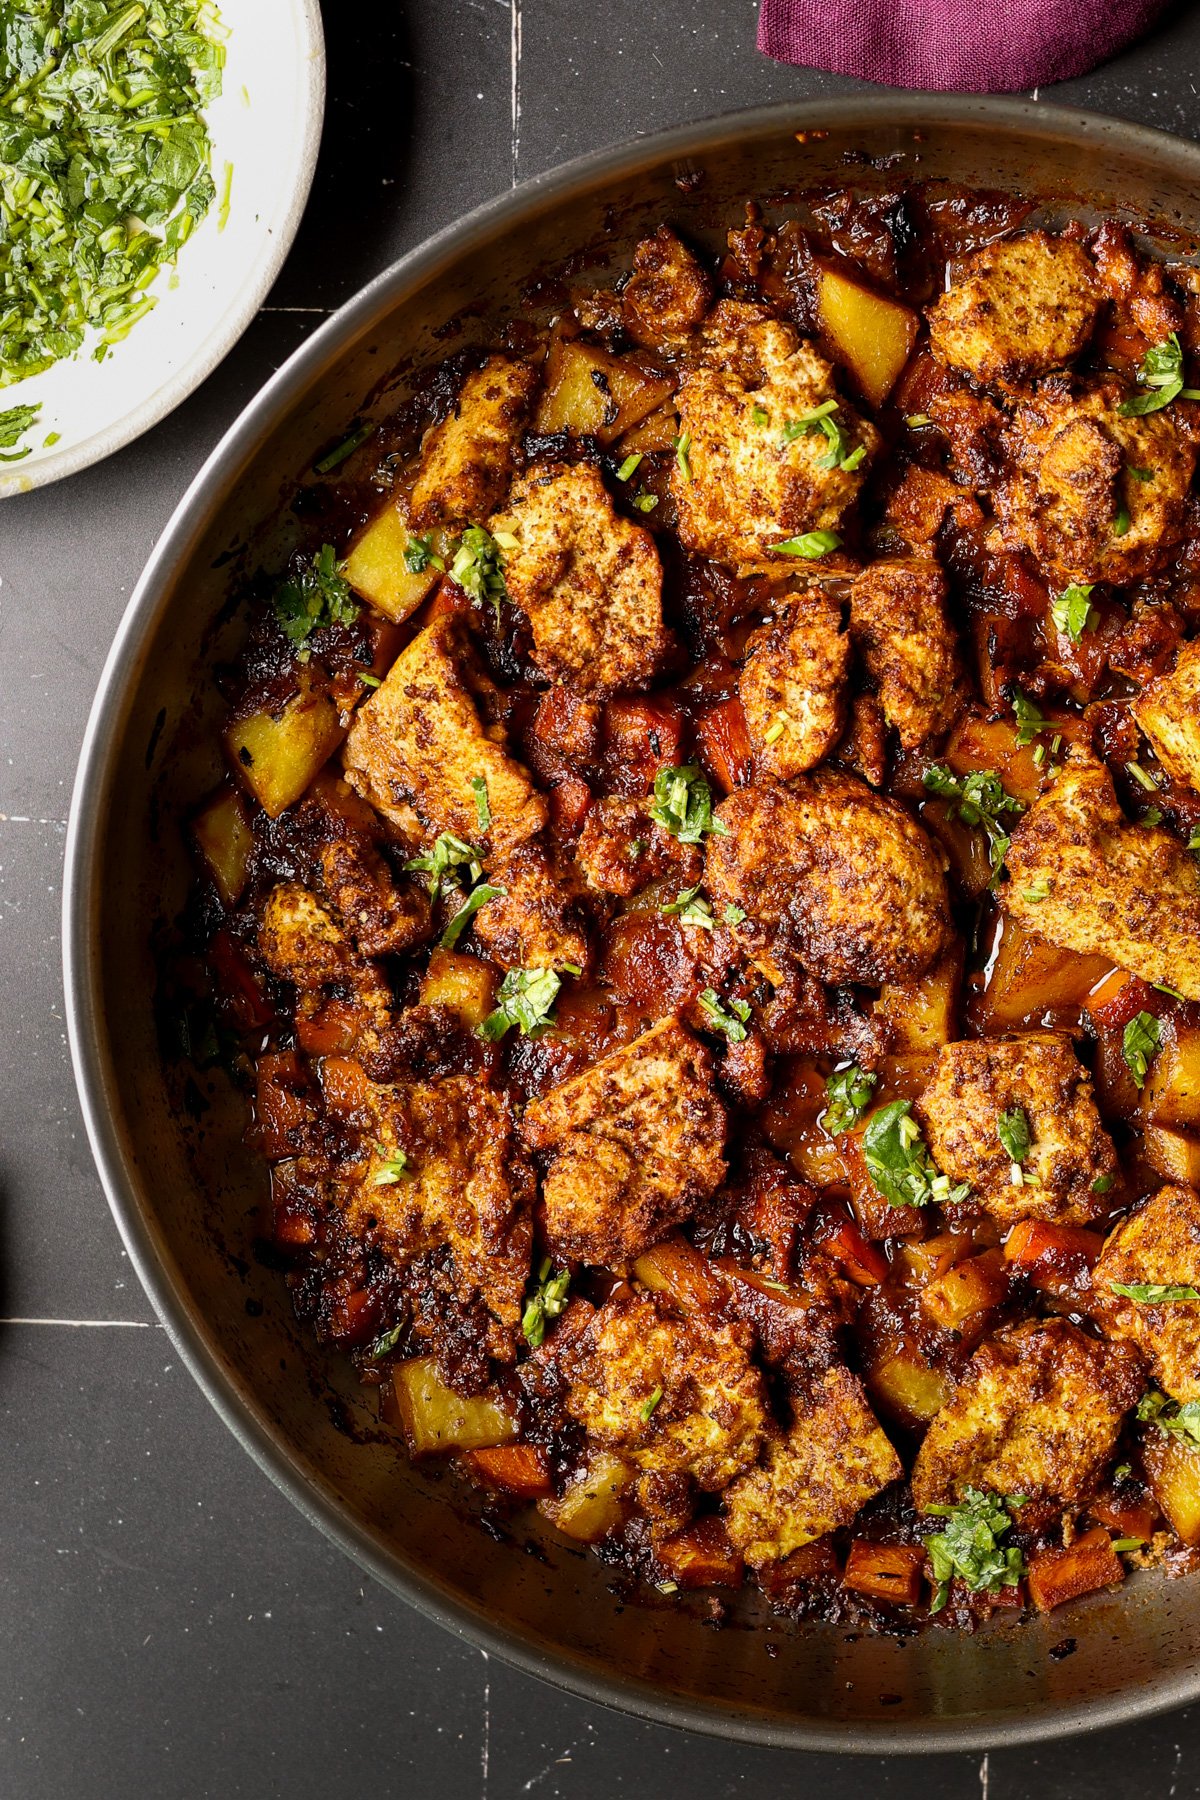
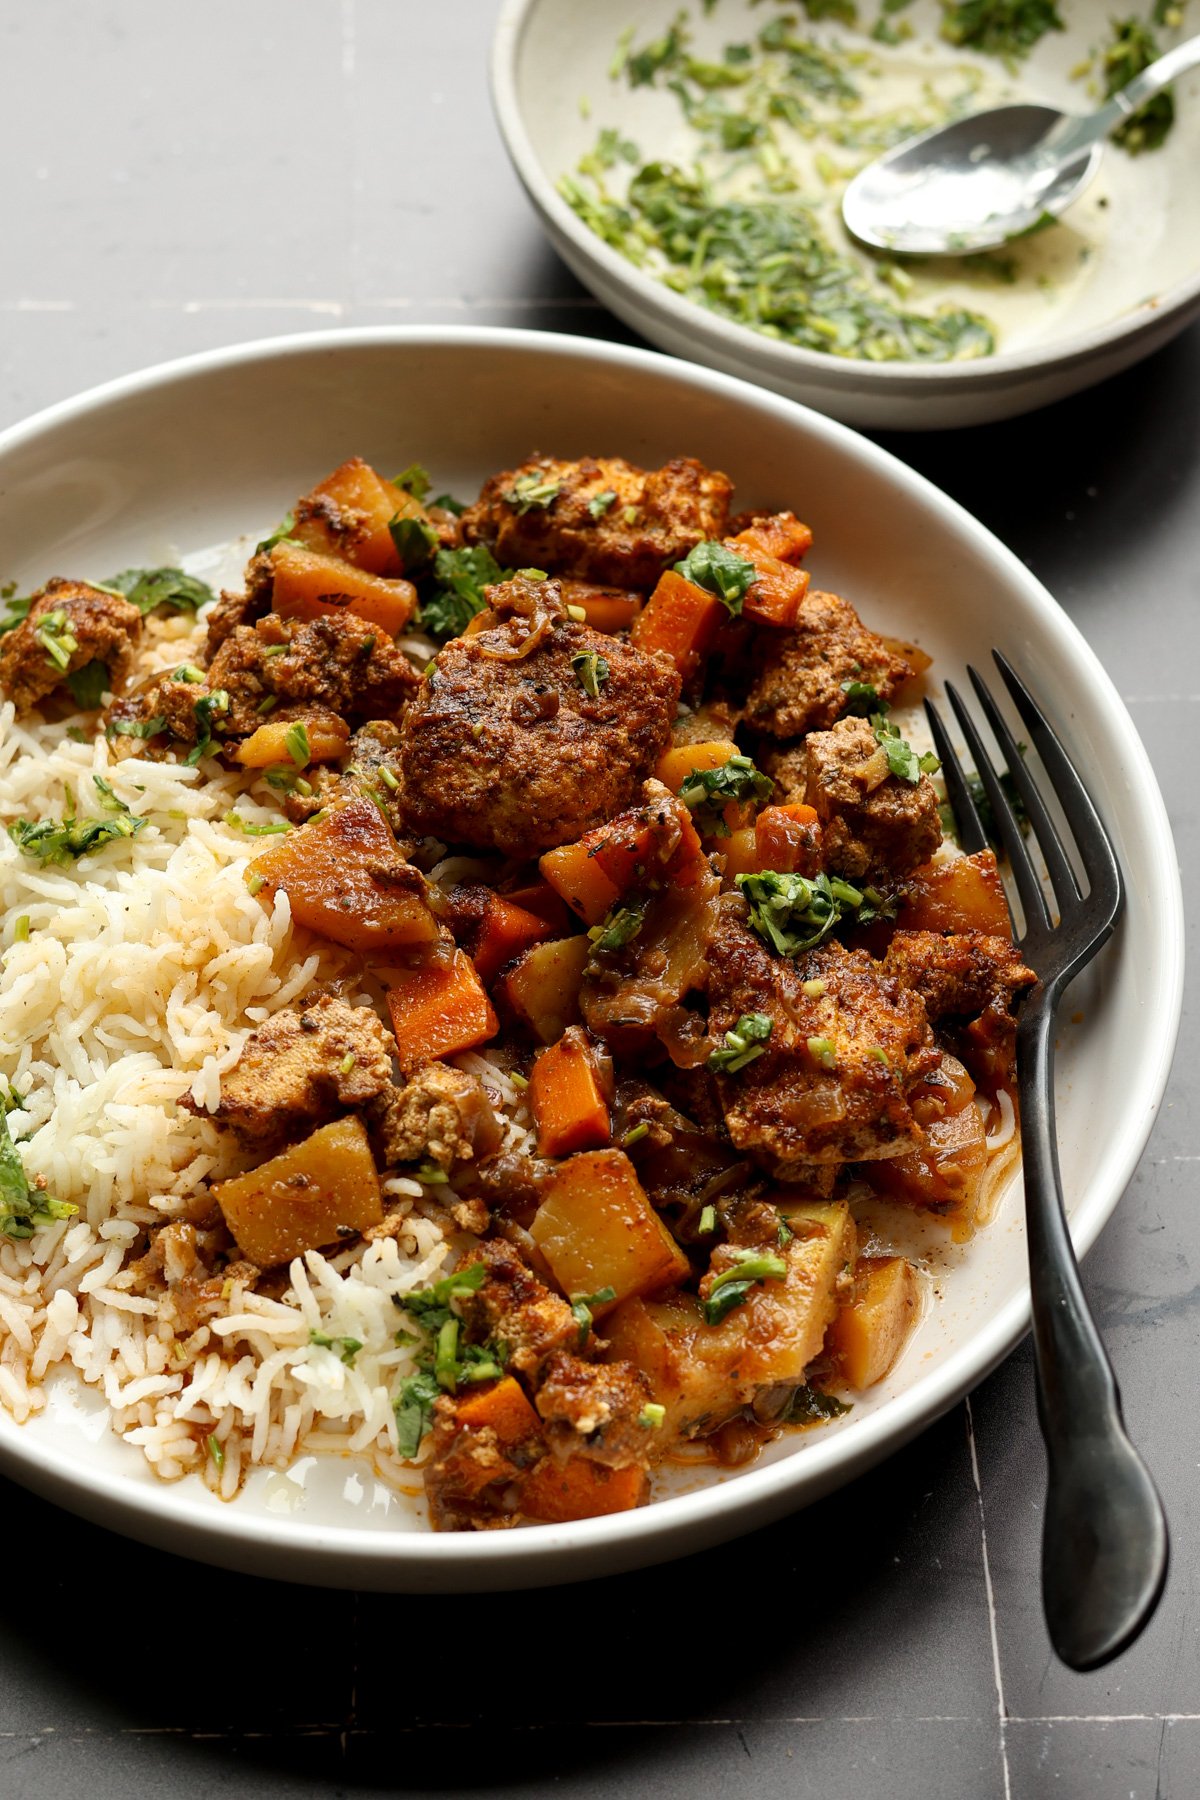
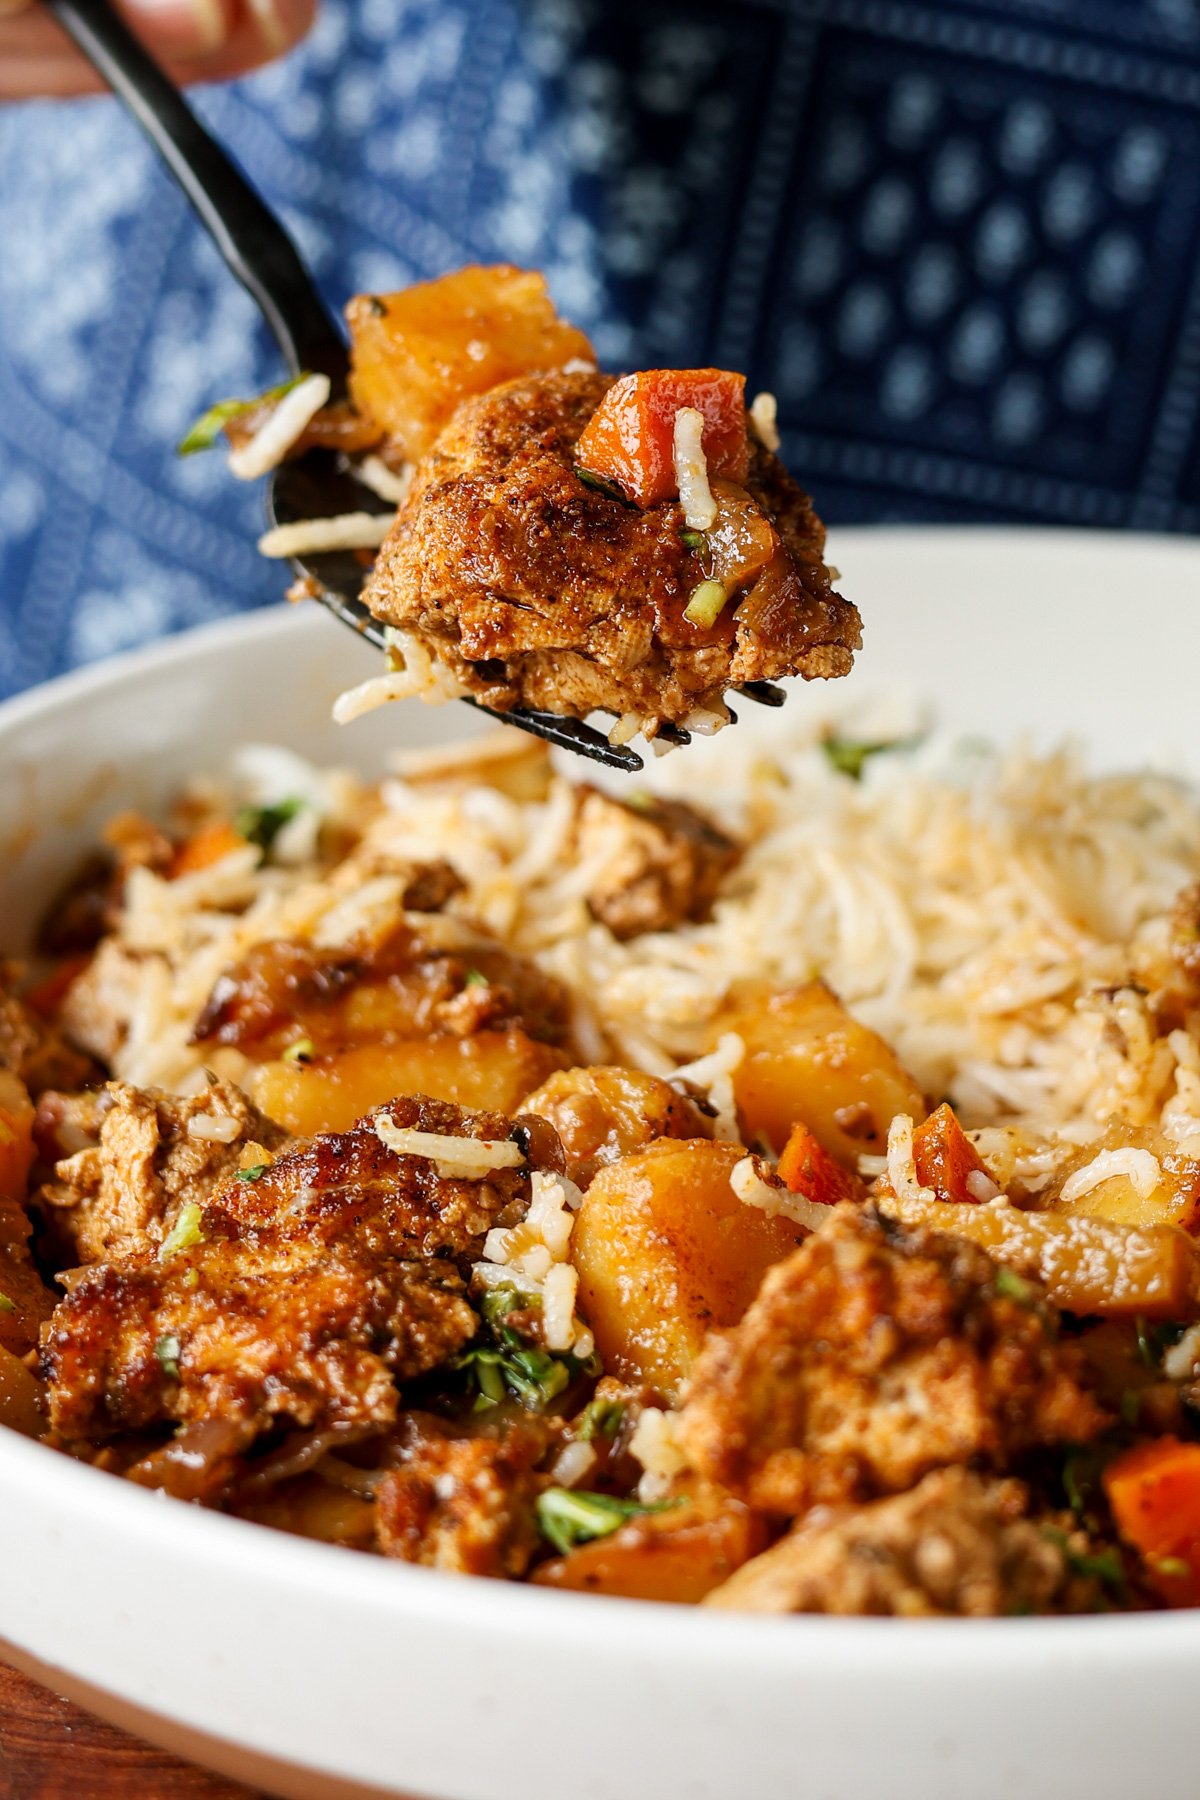
Spice-Rubbed Braised Tofu with Vegetables in a Savory Umami Sauce. A unique delicious holiday entree that all cooks in one pan! (gluten-free and nut-free with soy-free options)
I wanted to make a vegan braised meat-style dish for the holidays, so I came up with this one-skillet meal that’s rich, hearty, and incredibly flavorful. It features an amazing, aromatic spice rub that smells so meaty you’ll be surprised it’s entirely plant-based. The spice rub coats tofu that’s been frozen, thawed, and pressed, giving it a dense, chewy texture perfect for braising.
The base for the braise starts with crisped-up potatoes and carrots. After searing the vegetables, we make a deeply flavorful sauce with caramelized onions, lots of aromatics, and fresh herbs, and flavor boosters.
The tofu and vegetables braise together in this sauce, allowing the tofu to absorb all that flavor while developing a slightly crispy top and a tender, chicken-like interior.
We use an oven-safe pan to start the dish on the stovetop and finish it in the oven, where the vegetables become perfectly tender and the tofu gets a gorgeous golden top.
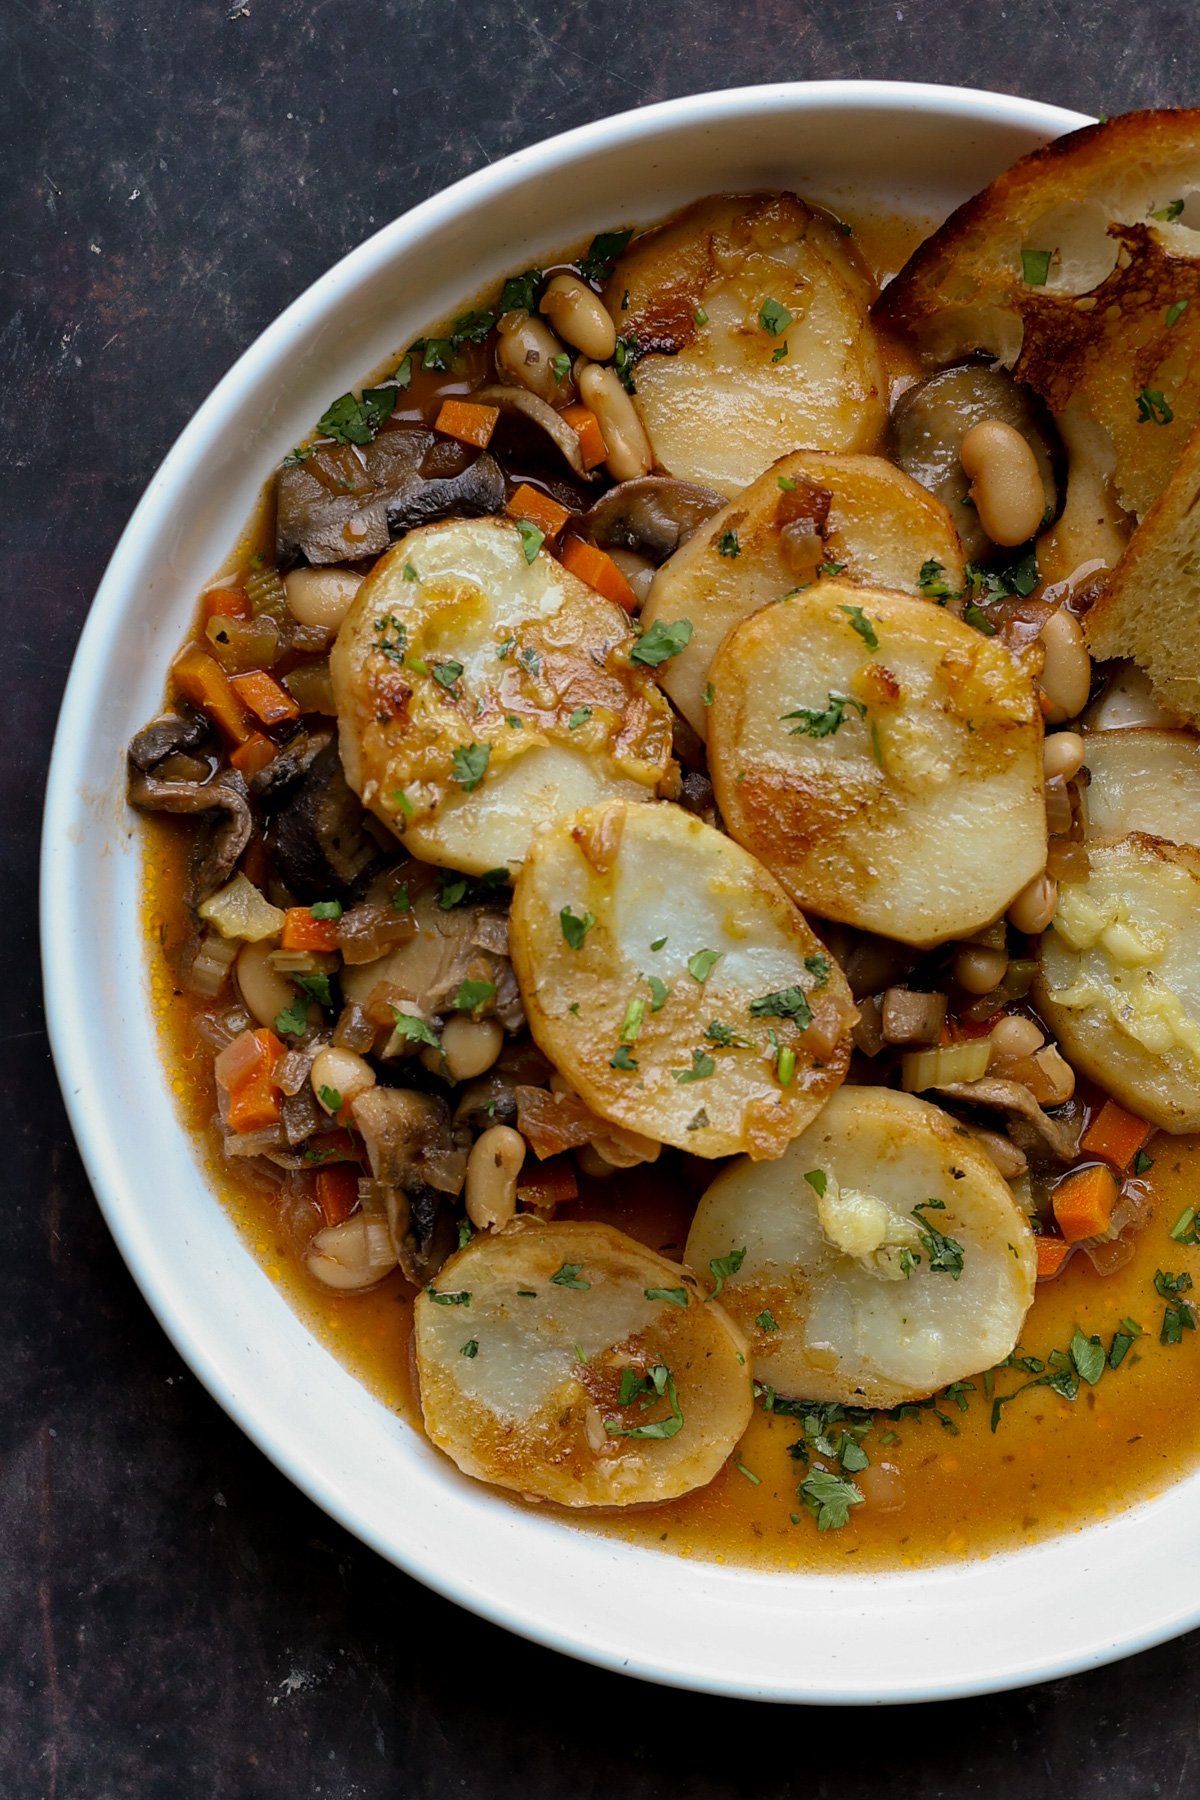
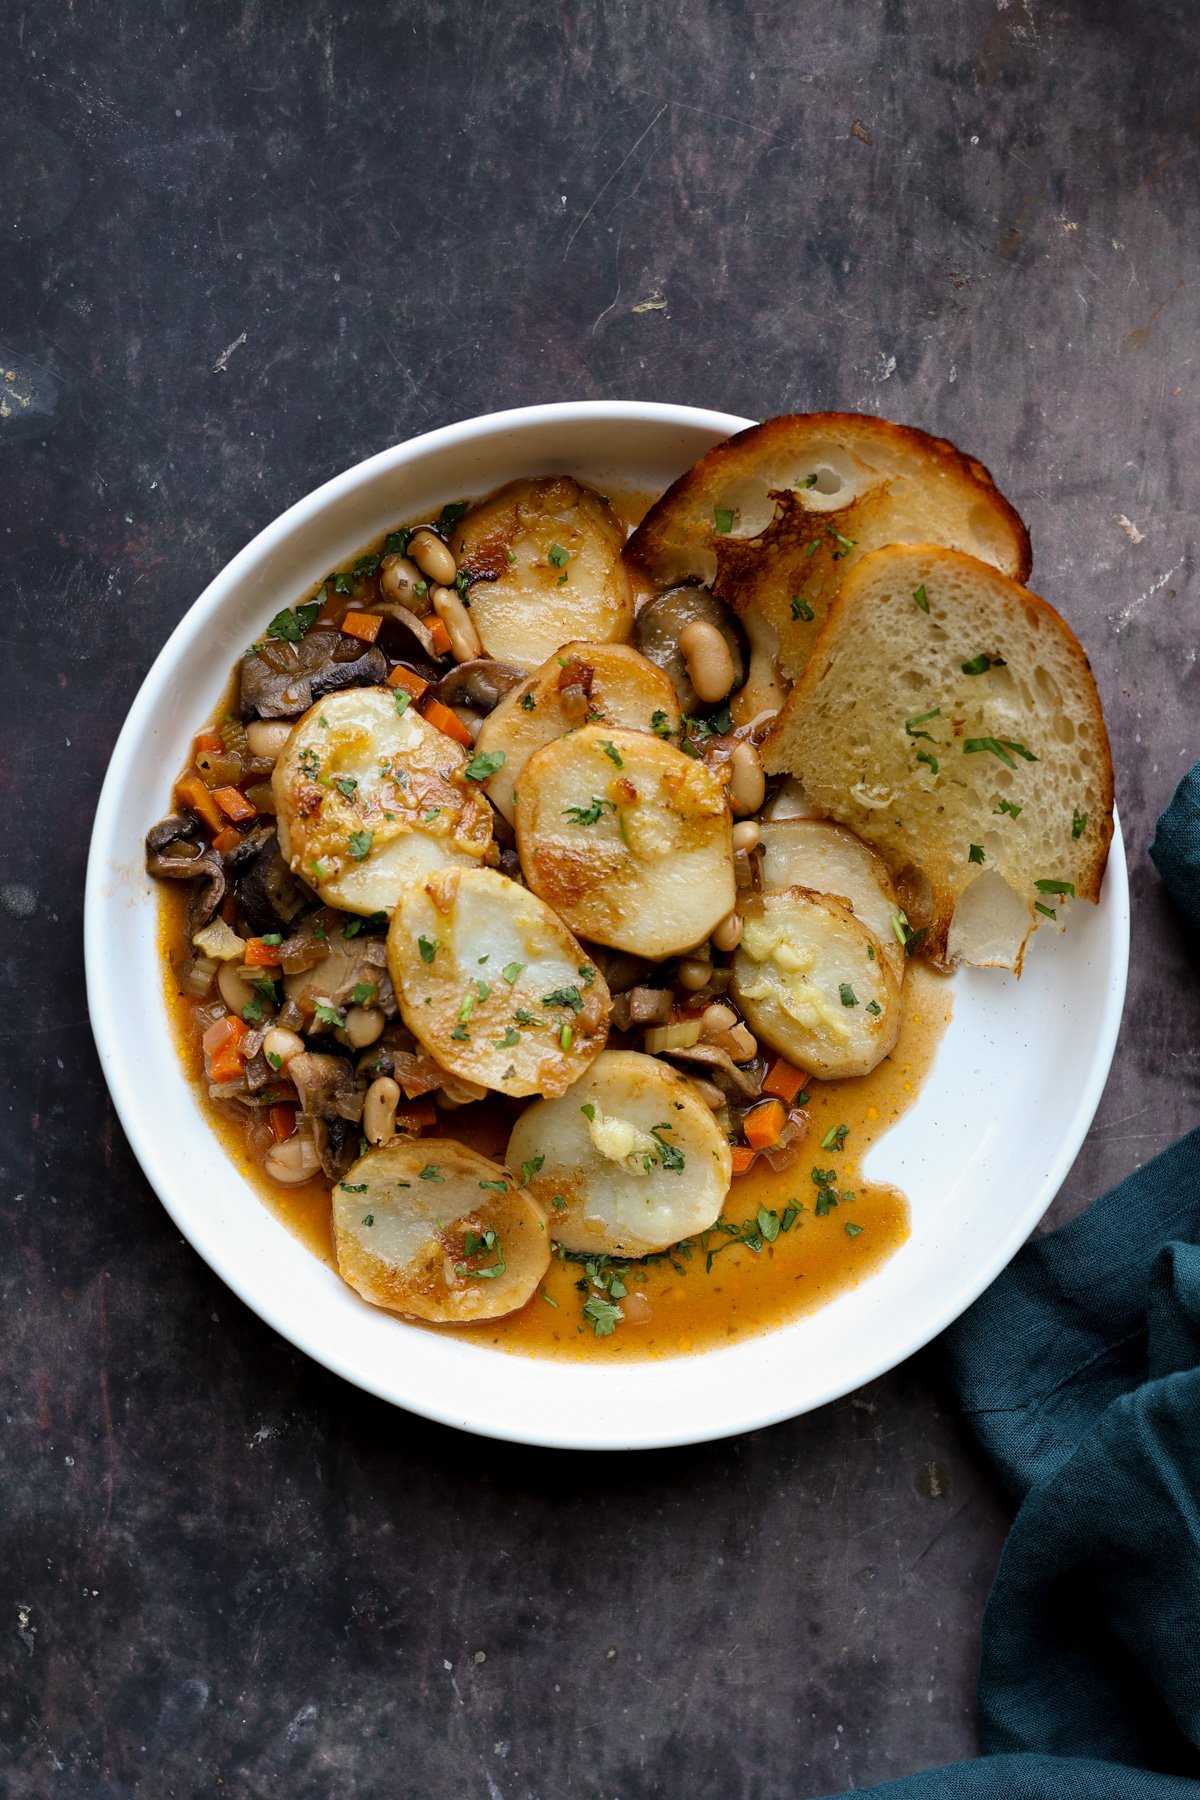
It’s fantastic served with rice, couscous, mashed potatoes or other mashed vegetables, bean purée, some crusty bakery bread, or a side salad.
A simple herb sauce adds a bright, fresh contrast, but you can enjoy it on its own, too. It’s full of amazing flavors with or without. The herb sauce just bumps up the flavor even more.
Why You’ll Love Braised Tofu and Vegetables
1-pan entree that’s perfect for the holiday table
flavorful braised vegetables in caramelized onion sauce
big pieces of crisp, herb-rubbed tofu
naturally gluten-free and nut-free with easy soy-free option
If you want a simple to make yet mindblowing to eat restaurant style pasta recipe, then this penne pasta in red sauce would hit the right spot for you! This creamy & tangy red sauce pasta is full of fresh flavors thanks to the homemade tomato sauce made from scratch!
After sharing so many pasta recipes in my blog over these past few years, I discovered that I have missed sharing the simplest yet tastiest pasta that I make so often for ourselves!
Hence enters the classic penne pasta in red sauce! The creamy red sauce pasta is going to become your new favorite, if not already, in just no time and I am absolutely sure of it!
Even though this is a meatless pasta, the classic homemade red pasta sauce makes this super-addictive, ensuring you don't miss having meat with this one!
And I can bet you won’t!
What is special about this penne pasta in red sauce?
As the name suggests, this recipe is nothing but penne pasta cooked in homemade tomato sauce; so what’s the big deal about it?
Yes, I agree that it can’t be simpler than this!
Yet, I can’t help but tell you guys that this may look simple but the taste & flavor that you will experience in this pasta in red sauce will undoubtedly blow your mind!
Like it does to us every time I make it for our fancy Italian dinner at the comfort & coziness of our sweet home!
So trust me on this and make this penne pasta in red sauce as soon as you get your hands on the ingredients below and come back to thank me later!
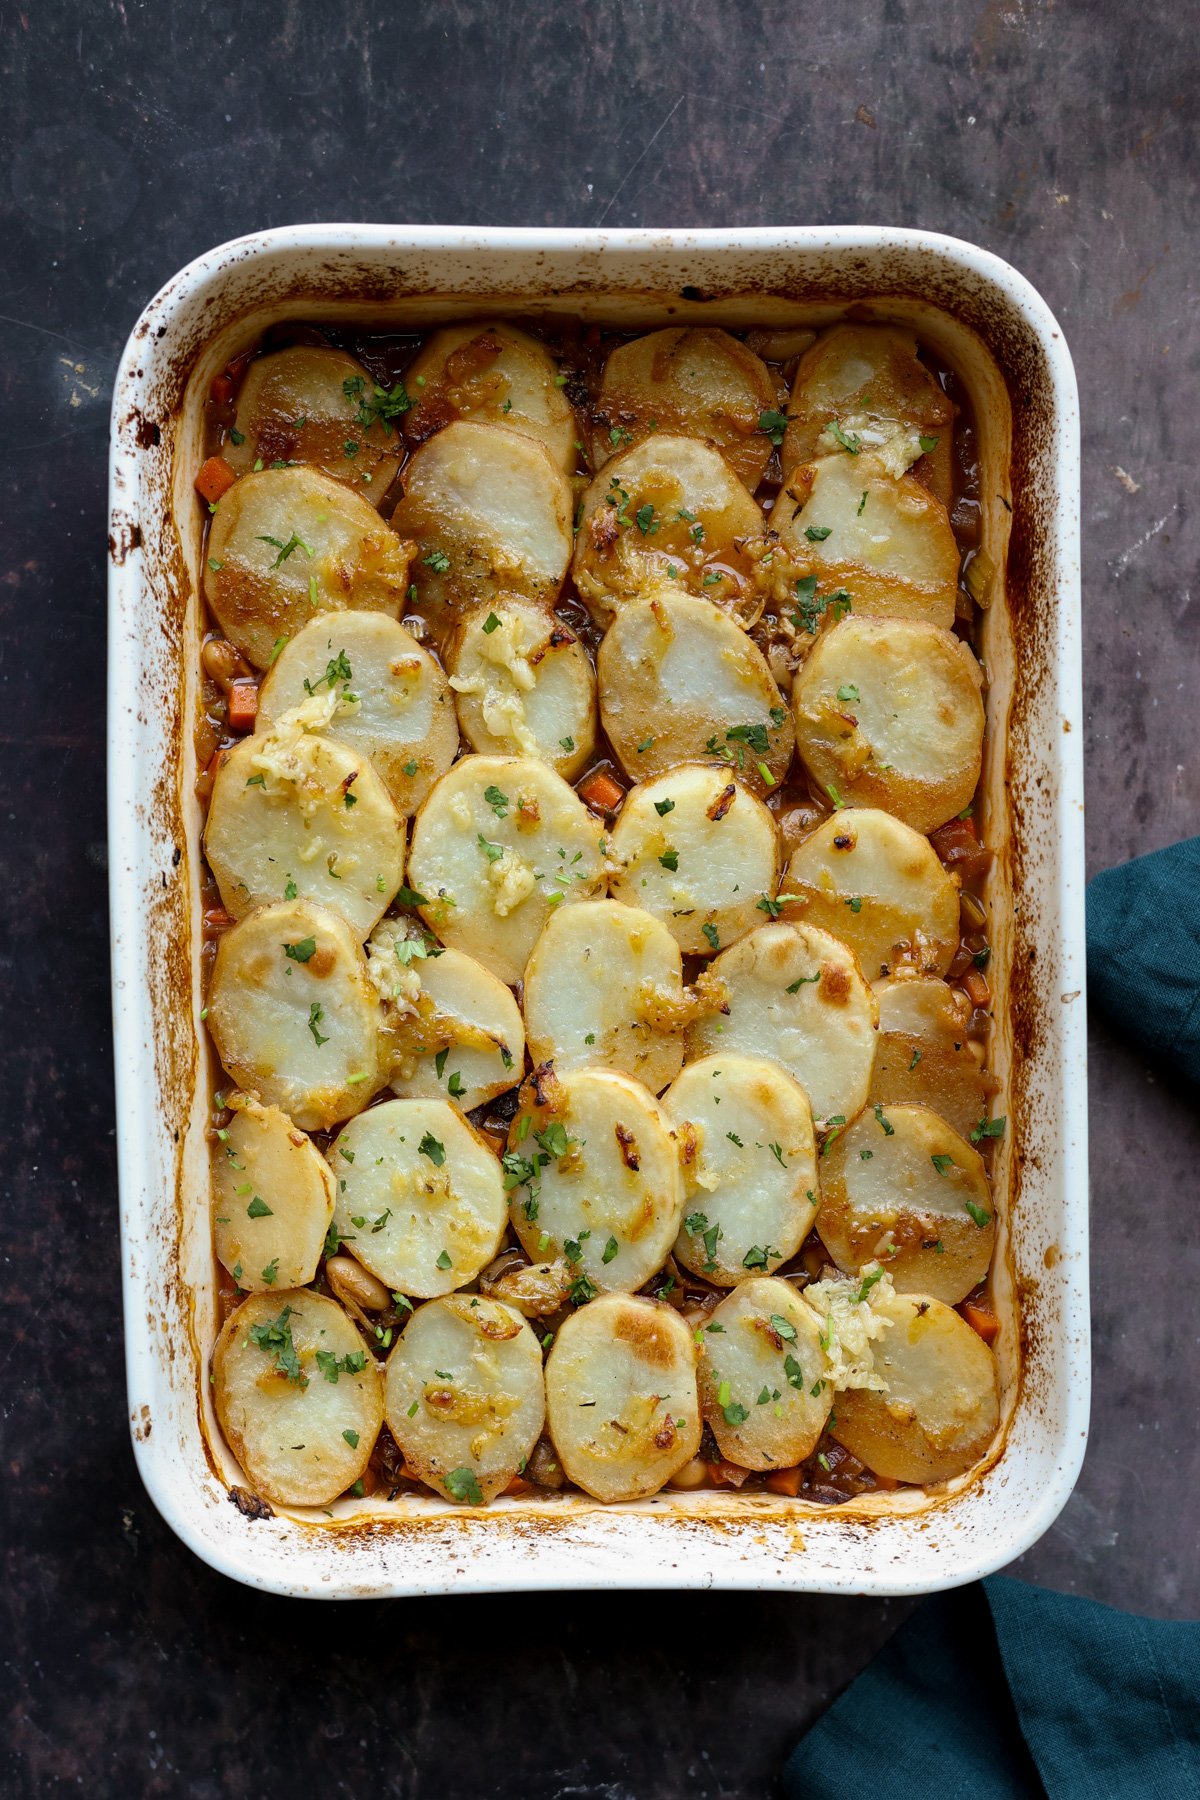
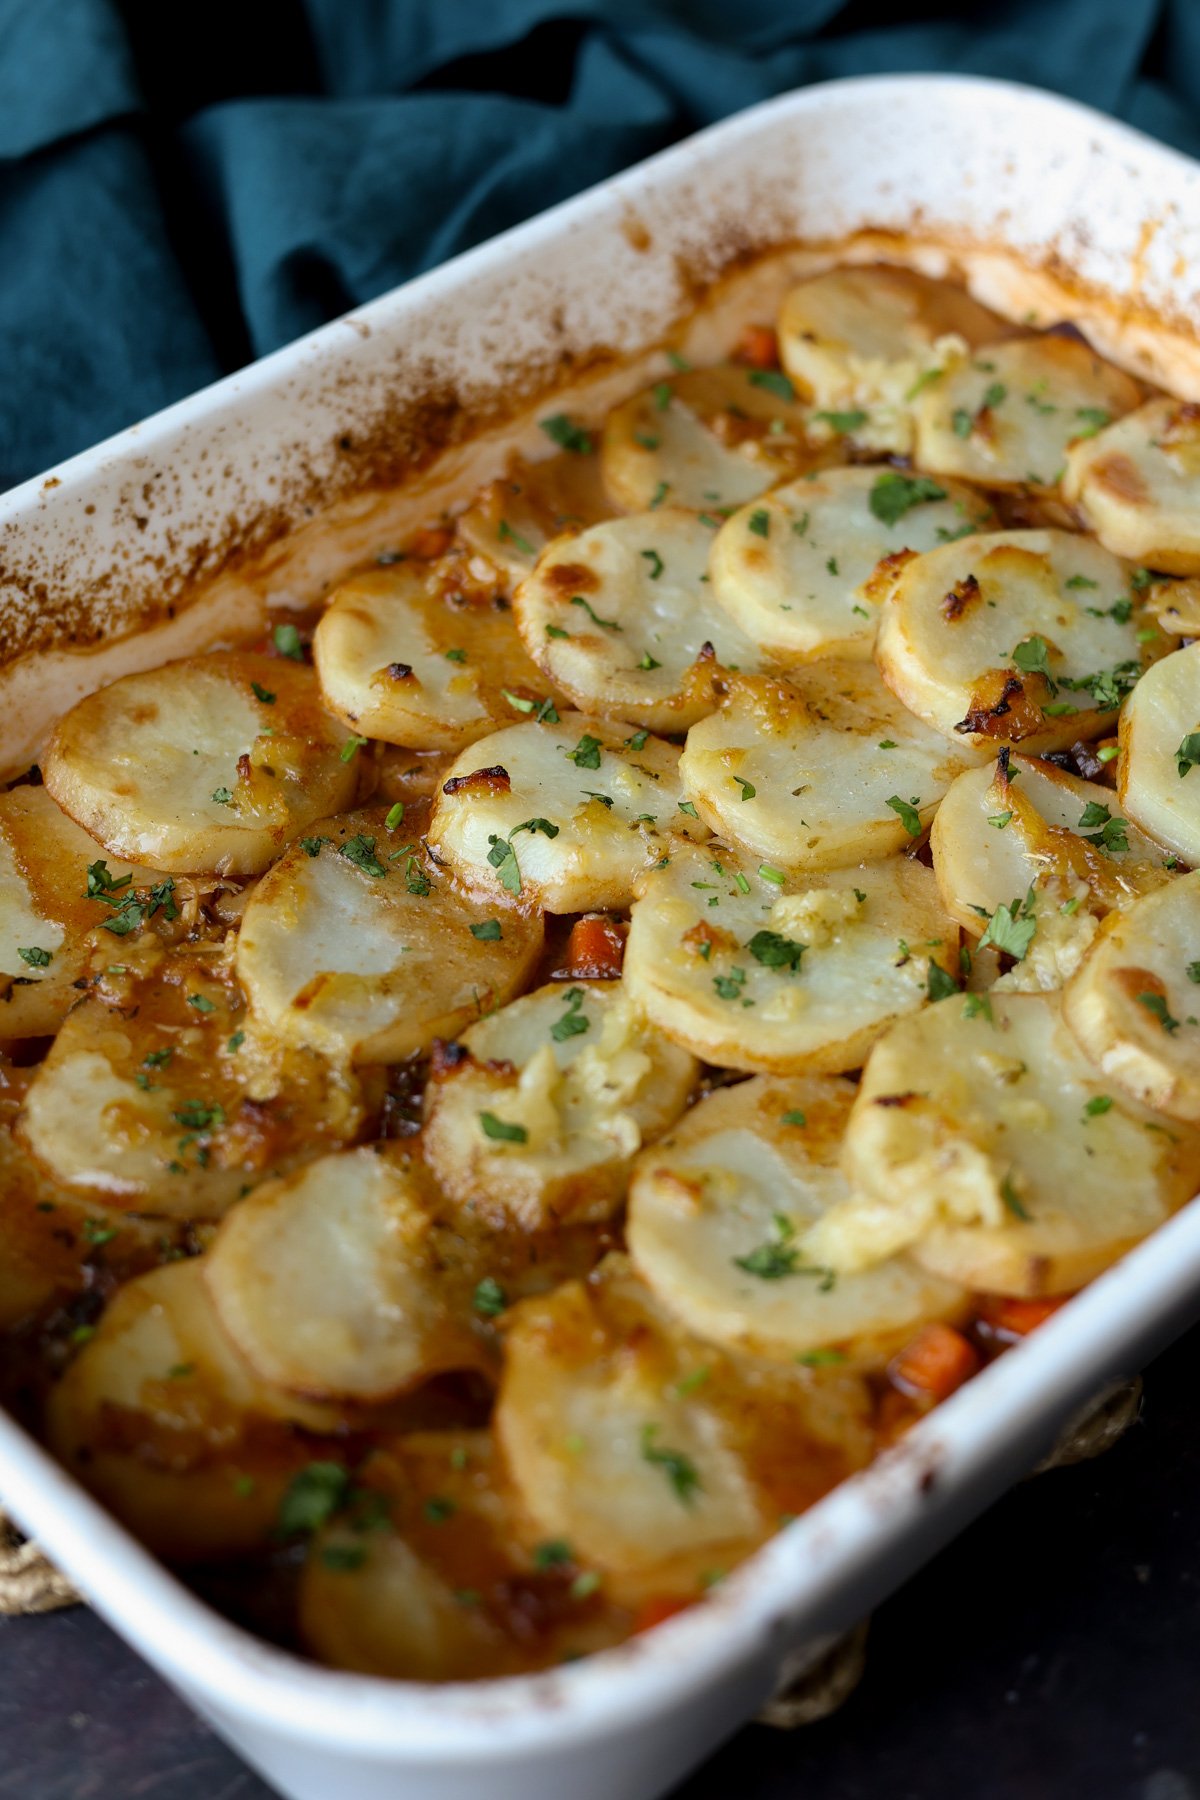
A cozy, hands-off, no sauté mushroom potato casserole that needs just 1 pan. Layers of rich mushroom gravy with beans and veggies, layered with crisp garlic herb potatoes that take only minutes to put together as the oven does all the work. (gluten-free with soy-free and nut-free options)
It’s fall, and it’s time for some comfort food. And what’s more comforting than this casserole, which has a stewy mushroom gravy with beans and veggies, topped with potatoes smothered in garlic butter? There are lots of fall herbs, like fresh thyme and sage, and it all comes together really quickly.
This is a super easy one-pan casserole. No need to sauté or stand around the kitchen for long periods of time cooking the onions and mushrooms. Everything goes right into the baking dish, and the oven does all the work.
Once the mushroom and onions are cooked, add the beans, herbs and stew ingredients and top them with some sliced potato and bake, and thats it. You get all the fall flavors and a dish that reminds of mashed potatoes and mushroom bourguignon w/o all the work.
It’s comforting, stewy, and perfect for a fall dinner with your family, served with a side salad, garlicky dinner rolls, or some crusty bakery bread. Or serve it however else you like!
Why You’ll Love Mushroom Potato Casserole
cozy, hearty, stewy beans and veggies in a rich, mushroom gravy
1-pan oven recipe, no standing at the stove!
very little active cooking time
No cooking the aromatics and potato separately
naturally nut-free with easy gluten-free and soy-free options
White Sauce Sandwich has a thick, creamy vegetable filling inside with crisp toasted bread outside. This sandwich is healthy as it uses white sauce and not mayonnaise or cheese for the filling. White Sauce Sandwich could be served as a breakfast or a snack and is savored by all. Learn how to make White Sauce Sandwich with step by step pictures.
I saw this White Sauce Sandwich recipe and wanted to try it instantly as I loved the idea. With no cheese or mayonnaise in it, this comes out so creamy and is a perfect sandwich for kids. You can make the white sauce well ahead of time and just use it as a spread.
[feast_advanced_jump_to]
About White Sauce Sandwich
White Sauce Sandwich is made with vegetable filling which includes onion, carrot, butter,milk, herbs and spices. This white sauce sandwich tastes so good that every one will love it so it can be perfect for party too.
I saw this White Sauce Sandwich recipe and wanted to try it instantly as I loved the idea. With no cheese in it, this comes out so creamy and is a perfect sandwich for kids. You can make the white sauce well ahead of time and just use it as a spread.
Last week I made this white sauce sandwich and I thoroughly enjoyed it. Who will say no this creamy yummy sandwich. Bread slices smeared with white sauce filled with buttered vegetables as filling, yum combo.
White Sauce Sandwich Ingredients
Bread - You can choose to use white bread or brown bread.
Vegetables - I have used onion and carrot. You can use other vegetables like mushroom, capsicum etc.
Butter - Butter is added to sauté the vegetables and to make white sauce.
Flour - You can either use maida or wheat flour.
Milk - Use full cream milk boiled and cooled down.
Herbs - Oregano, mint leaves, coriander leaves are used.
1.In a pan - heat butter when it starts to melt add onion and fry till slightly golden then add carrots and sauté till raw smell leaves.
2.Now add maida and give a quick saute then add remaining ½ tablespoon butter. Now add milk and keep stirring. Keep stirring until the mixture becomes slight thick and creamy. Cook in low flame. Add required salt.
3.Once the sauce is thick in spreadable consistency add coriander and mint leaves, then oregano and pepper powder. Give a quick mix and switch off. Set aside to cool. Toast bread with ghee till both the sides turn golden brown.
4.Apply the prepared white sauce on one side of a bread and seal it with another bread. Cut into triangles and serve hot.
5.Another alternate method is apply the sauce, close with another bread and toast it.
Serve hot, yum!!
Expert Tips
You can add any vegetable of your choice. Capsicum, cabbage, peas, mushroom are few of my suggestions.
Oregano and pepper powder gives a great flavor.
I skipped green chilies and added pepper powder instead.
You can either toast and make sandwich and use sandwich maker.
I used white bread, you can use wheat or multigrain bread too.
I cut each them into small triangles to make serving for kids easier and they will love it too.
Just toast it till golden brown that is enough.
Make sure you cool down white sauce before you apply it.
The white sauce thickens with time so switch it off accordingly.
I haven't added cheese, if you want add 2 tablespoon of grated cheese after the milk starts thickening.
After applying the white sauce, serve immediately else the sandwich will become soggy if resting time is given.
Serving and Storage
Sandwiches should be served hot to enjoy the crisp texture. You can make the white sauce ready then make sandwich at the time of serving. White Sauce Sandwich tastes best when hot.
If you have any more questions about this White Sauce Sandwich do mail me at sharmispassions@gmail.com. In addition, follow me on Instagram, Facebook, Pinterest ,Youtube and Twitter .
Tried this White Sauce Sandwich? Do let me know how you liked it. Also tag us on Instagram @sharmispassions and hash tag it on #sharmispassions.
White Sauce Sandwich has a thick, creamy vegetable filling with crisp toasted bread outside. This sandwich is healthy as it uses white sauce and not mayonnaise or cheese for the filling. White Sauce Sandwich could be served as a breakfast or a snack and is savored by all. Learn how to make White Sauce Sandwich with step by step pictures.
In a pan - heat butter when it starts to melt add onion and fry till slightly golden then add carrots and sauté till raw smell leaves.
Now add maida and give a quick saute then add remaining ½ tablespoon butter. Now add milk and keep stirring. Keep stirring until the mixture becomes slight thick and creamy. Cook in low flame. Add required salt.
Once the sauce is thick in spreadable consistency add coriander and mint leaves, then oregano and pepper powder. Give a quick mix and switch off. Set aside to cool. Toast bread with ghee till both the sides turn golden brown.
Apply the prepared white sauce on one side of a bread and seal it with another bread. Cut into triangles and serve hot.
Another alternate method is apply the sauce, close with another bread and toast it.
Serve hot, yum!!
Notes
You can add any vegetable of your choice. Capsicum, cabbage, peas, mushroom are few of my suggestions.
Oregano and pepper powder gives a great flavor.
I skipped green chilies and added pepper powder instead.
You can either toast and make sandwich and use sandwich maker.
I used white bread, you can use wheat or multigrain bread too.
I cut each them into small triangles to make serving for kids easier and they will love it too.
Just toast it till golden brown that is enough.
Make sure you cool down white sauce before you apply it.
The white sauce thickens with time so switch it off accordingly.
I haven't added cheese, if you want add 2 tablespoon of grated cheese after the milk starts thickening.
After applying the white sauce, serve immediately else the sandwich will become soggy if resting time is given.
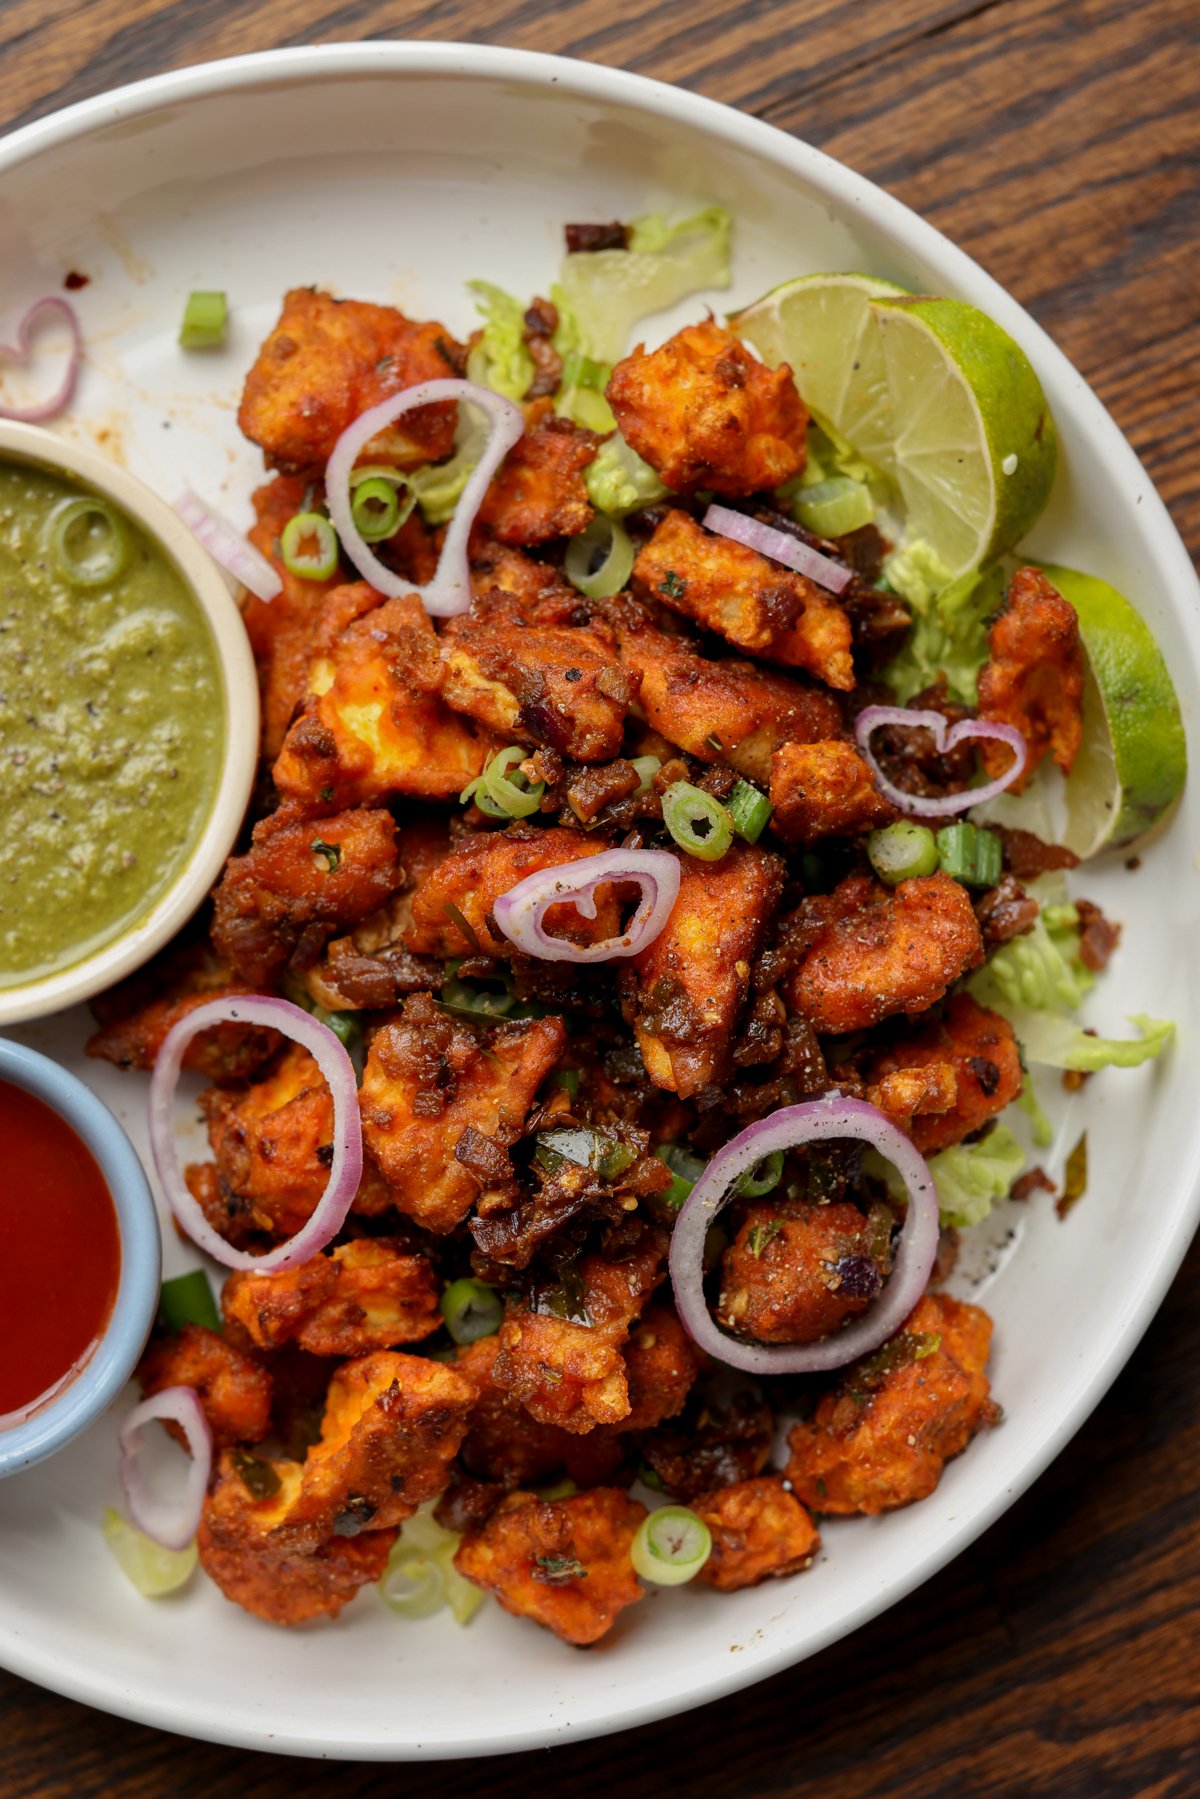
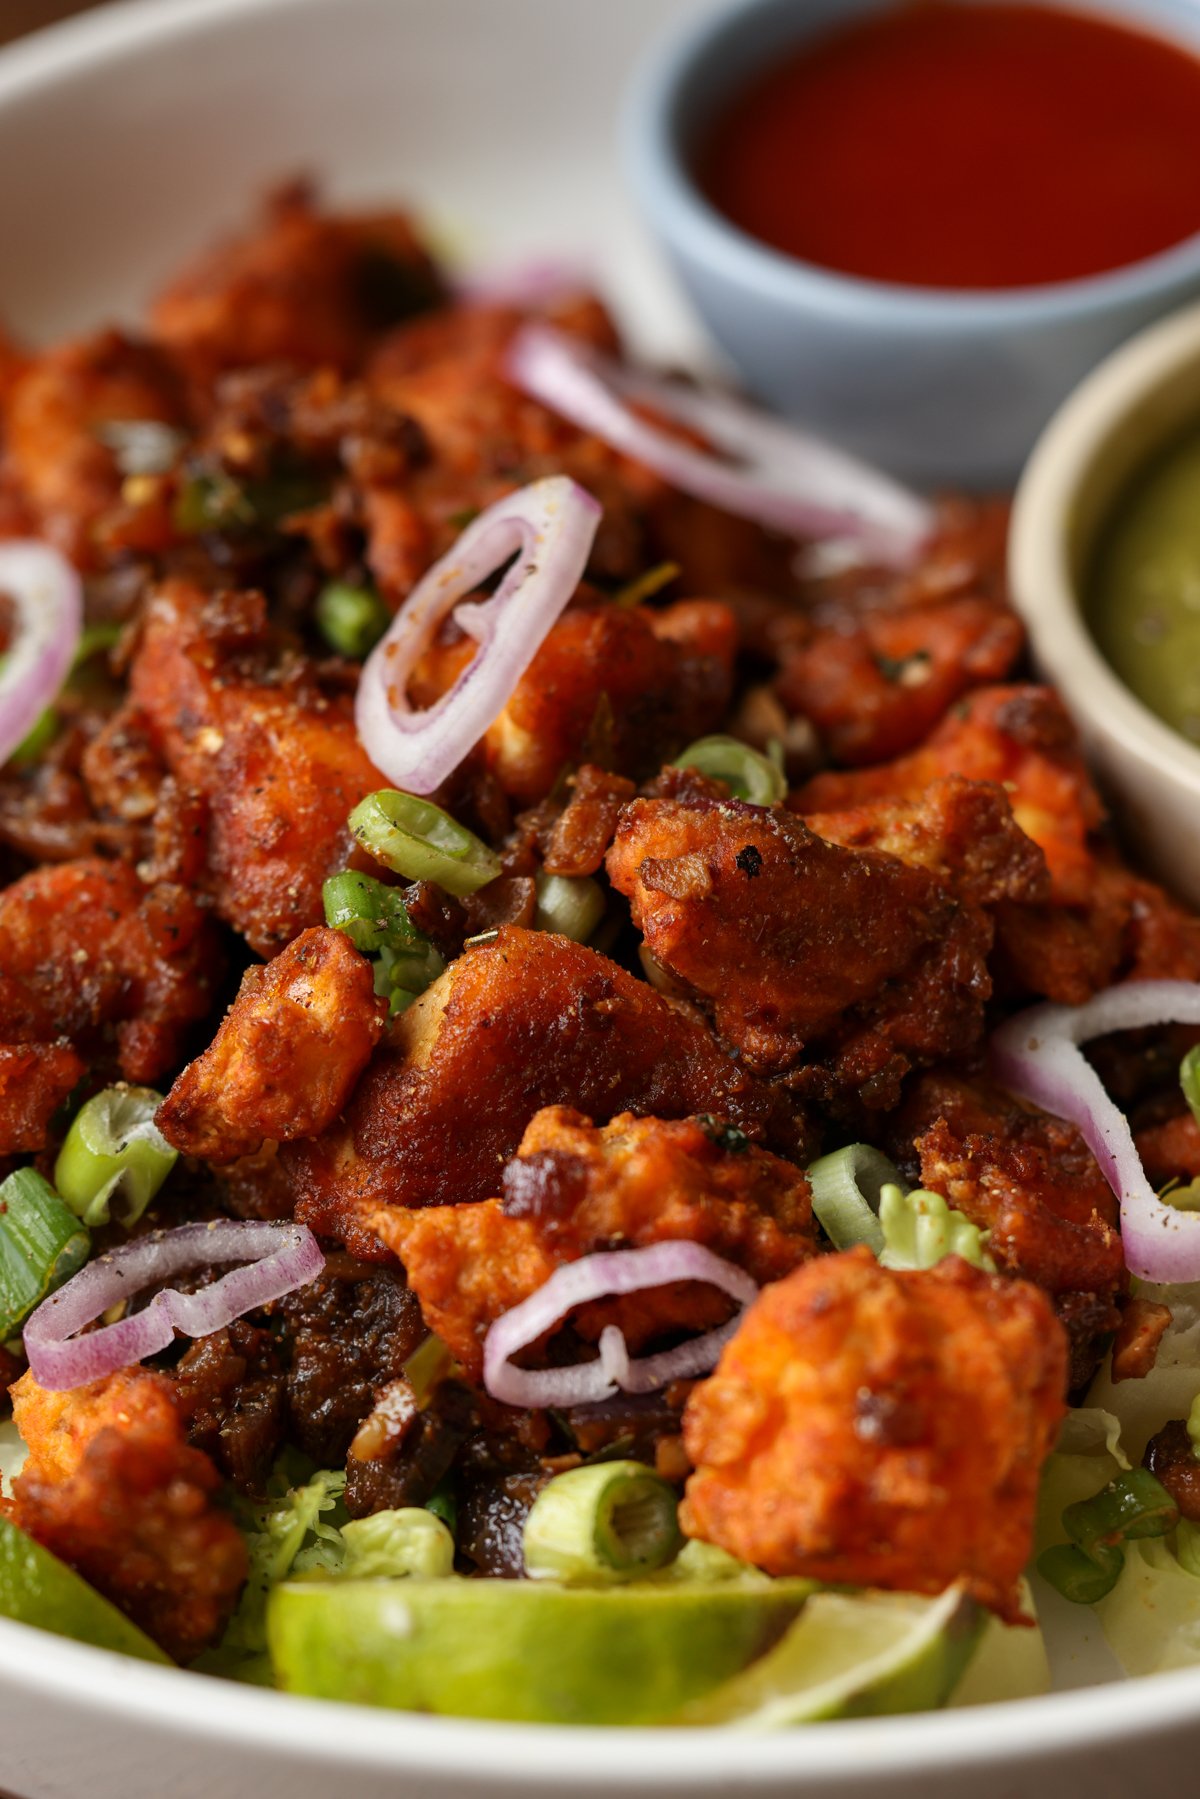
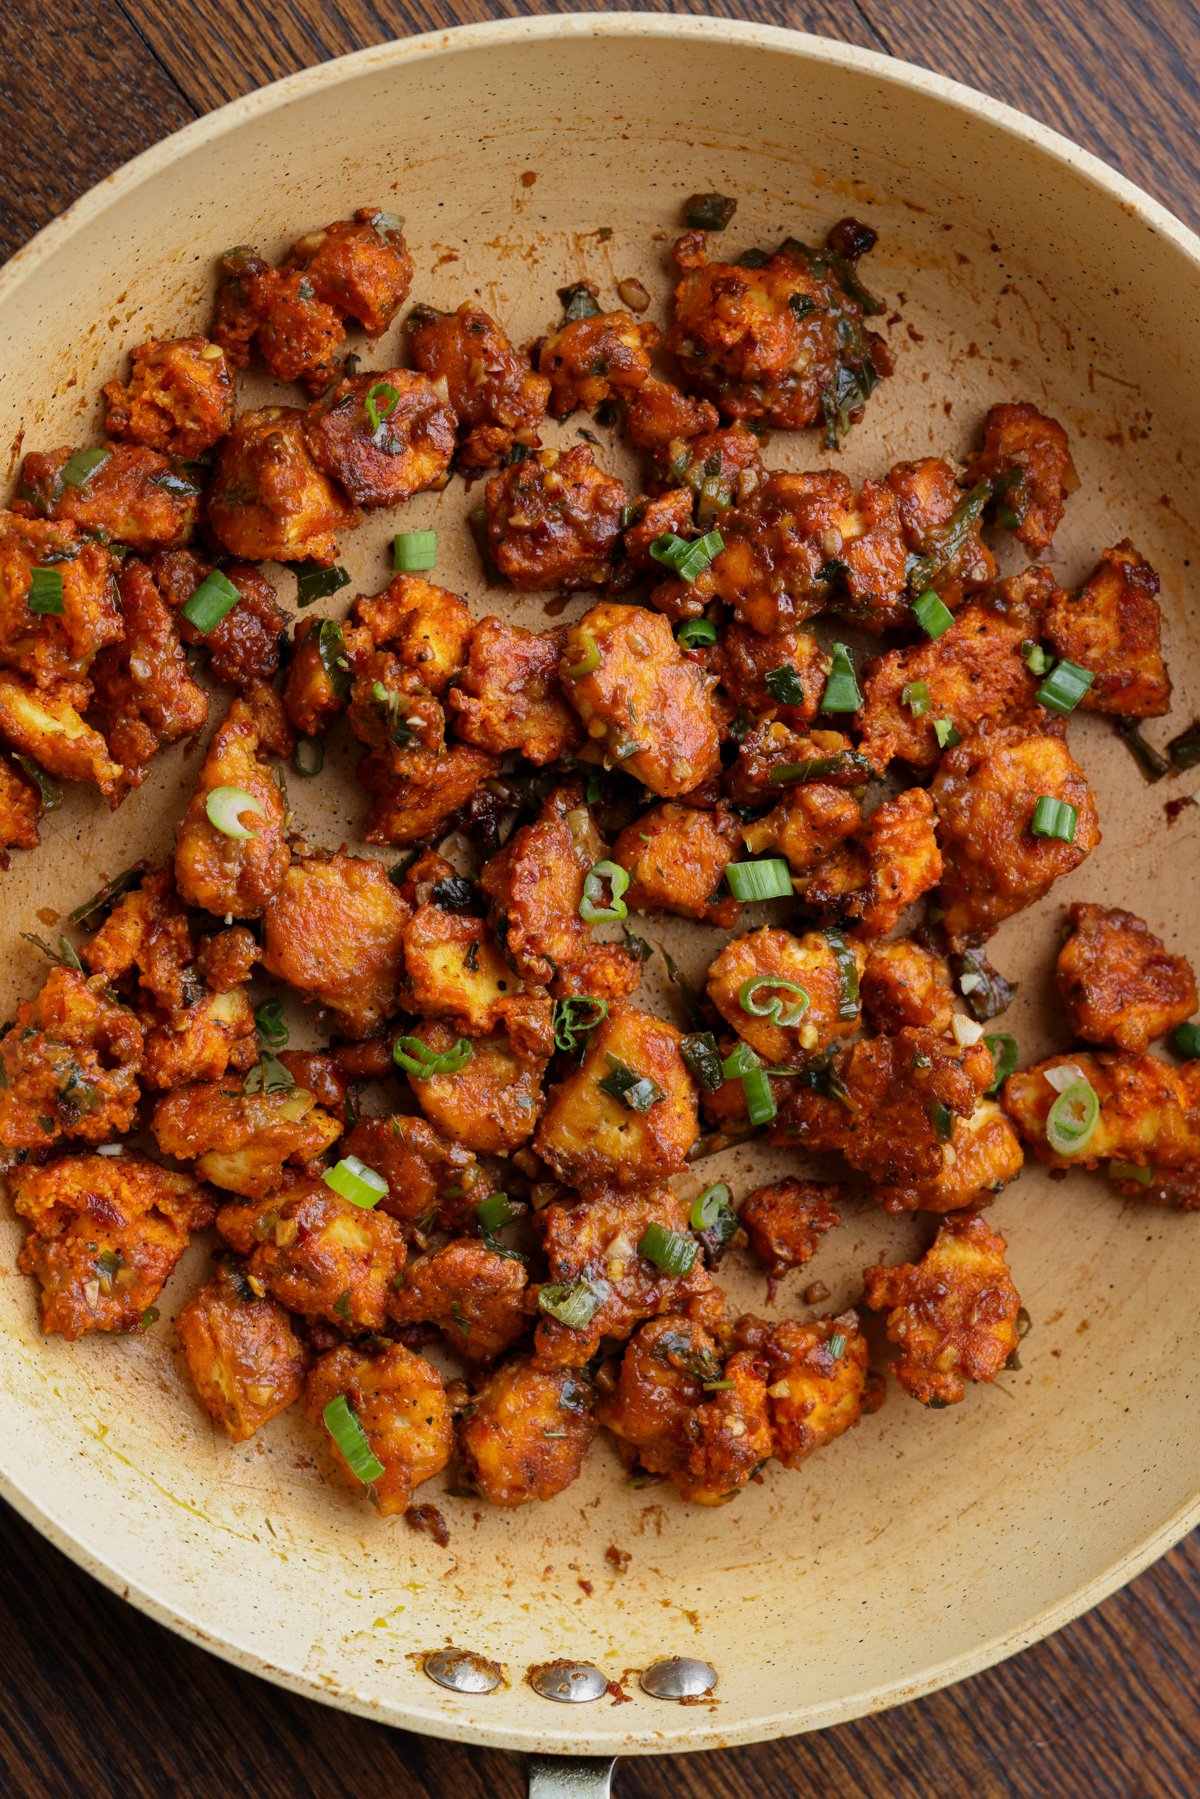
Vegan Chicken 555 reimagines a beloved South Indian street-style appetizer. Crisp golden tofu is coated in a richly spiced sauce infused with fennel, ginger, garlic, coriander, and peppers, and enough heat to make you reach for seconds (and maybe a cold drink). gluten free, nut free. soy free option.
This is another one in my series creating vegan versions of these amazing, meat-heavy, regional Indian appetizers. There’s just so much variety in all of these super delicious snacks and appetizers, and sometimes you don’t find those flavors and that spice in the vegetarian appetizers.
You can use this recipe with tofu, soy curls, chickpea tofu, chickpeas, or vegetables, like cauliflower. Basically, you coat your protein or vegetables of choice with this amazing, flavorful batter, and either pan fry or bake it.
Then, we make this easy, spicy, and delicious sauce mixture. It’s kind of a dry sauce, and you toss the crisped tofu “chicken” in it. Oh my god, it’s so incredibly delicious and also pretty spicy!
You can adjust the spice level to your preference. There are four kinds of chilies in this tofu 555: Kashmiri chili powder in the batter, and green chilies, cayenne, and red pepper flakes in the sauce. To get the flavor with less heat, reduce any or all of those. The combination of peppers adds a ton of flavor, so you definitely want to use some of each, even if you don’t use the full amounts. You can use a milder green chili to manage the heat, too, if you prefer.
Basically, adjust the heat based on your preference, but definitely try this vegan chicken 555. It’s just so fabulously delicious!
Tofu 555 is great on its own or in crunchy salads with juicy fruits like apples, pears, or mangoes, or with roasted or fresh vegetables. A cucumber salad with a simple lime, salt, and pepper dressing also pairs wonderfully with this Indian appetizer. Or, you can make wraps with lettuce, creamy dressing, and fresh green chilis or pickled jalapeños.
No matter how you serve it, you have got to try vegan chicken 555!
Why You’ll Love Chicken 555
crispy tofu in thick, spicy sauce with flavors of fennel, ginger, garlic, coriander, and 4 kinds of peppers
easily adjust the heat to your preference
use your plant based protein or use veggies of choice.
naturally gluten-free and nut-free with easy soy-free option
Looking for a high protein yet plant-based meal idea? You have come to the right place! I have the easiest yet tastiest soy garlic tofu bites recipe for you which is done in under 15 minutes from scratch!
I do share a lot of high protein recipes simply because I keep protein at the center of every meal of mine as I understand the need for adequate protein to support my workout regime.
But I am of course guilty of sharing mostly meat-based protein recipes as being a meat-eater, that’s my primary source of protein.
But I do understand that many of you are looking for vegan high-protein recipes which will not only fulfil your quota of protein but will also taste good!
I too turn to vegetarian high protein meals when I am too bored of having chicken or fish back to back for consecutive meals.
And that’s where tofu makes its grand entry! Tofu is not only a vegan’s delight but also a high-protein alternative even for meat-eaters!
I have already shared quite a few tofu recipes till date, but these soy garlic tofu bites emerge as a winner thanks to the ease of making these & how delicious they turn out!
What is 15-minutes soy garlic tofu bites?
These 15-minutes soy garlic tofu bites will prove to be an all-rounder. These are soft & succulent bites of tofu cubes stir fried in a soy & garlic infused stir fry sauce!
They are so incredible in taste that you can savor them as a fulfilling lunch/dinner with rice or a quick snack on its own when you want to binge on something tasty but guilt-free!
The best part of these soy garlic tofu bites is that they literally can be prepared in under 15 minutes, no joke! You gotta trust me on this!
This homemade Schezwan sauce is fiery, garlicky, and totally addictive — perfect for tossing into noodles, rice, or using as a spicy dip! The best part? You can make a batch and keep it in the fridge for whenever those Indo-Chinese cravings hit.
I’ve always been that person asking for extra Schezwan Sauce with my momos so it just made sense for me to start making it at home! It’s cleaner, pocket-friendly, and I can now put this schezwan chutney on everything – dosas, fried rice, noodles. It also makes for a great dipping sauce.forliterally any snack from spring rolls to chakli, and is a must to have in the fridge for whenever those Indo-Chinese cravings hit!
My sister and I have the BEST childhood memories of ordering extra schezwan sauce at our fav Chinese restaurant just to take home and eat it with papad the next day. You guys have to trust me on this combination. It is the ultimate chatpata snack! And now I can have it all the time, and the best part? This Schezwan Sauce recipe is fresh and preservative-free, just how we like it.
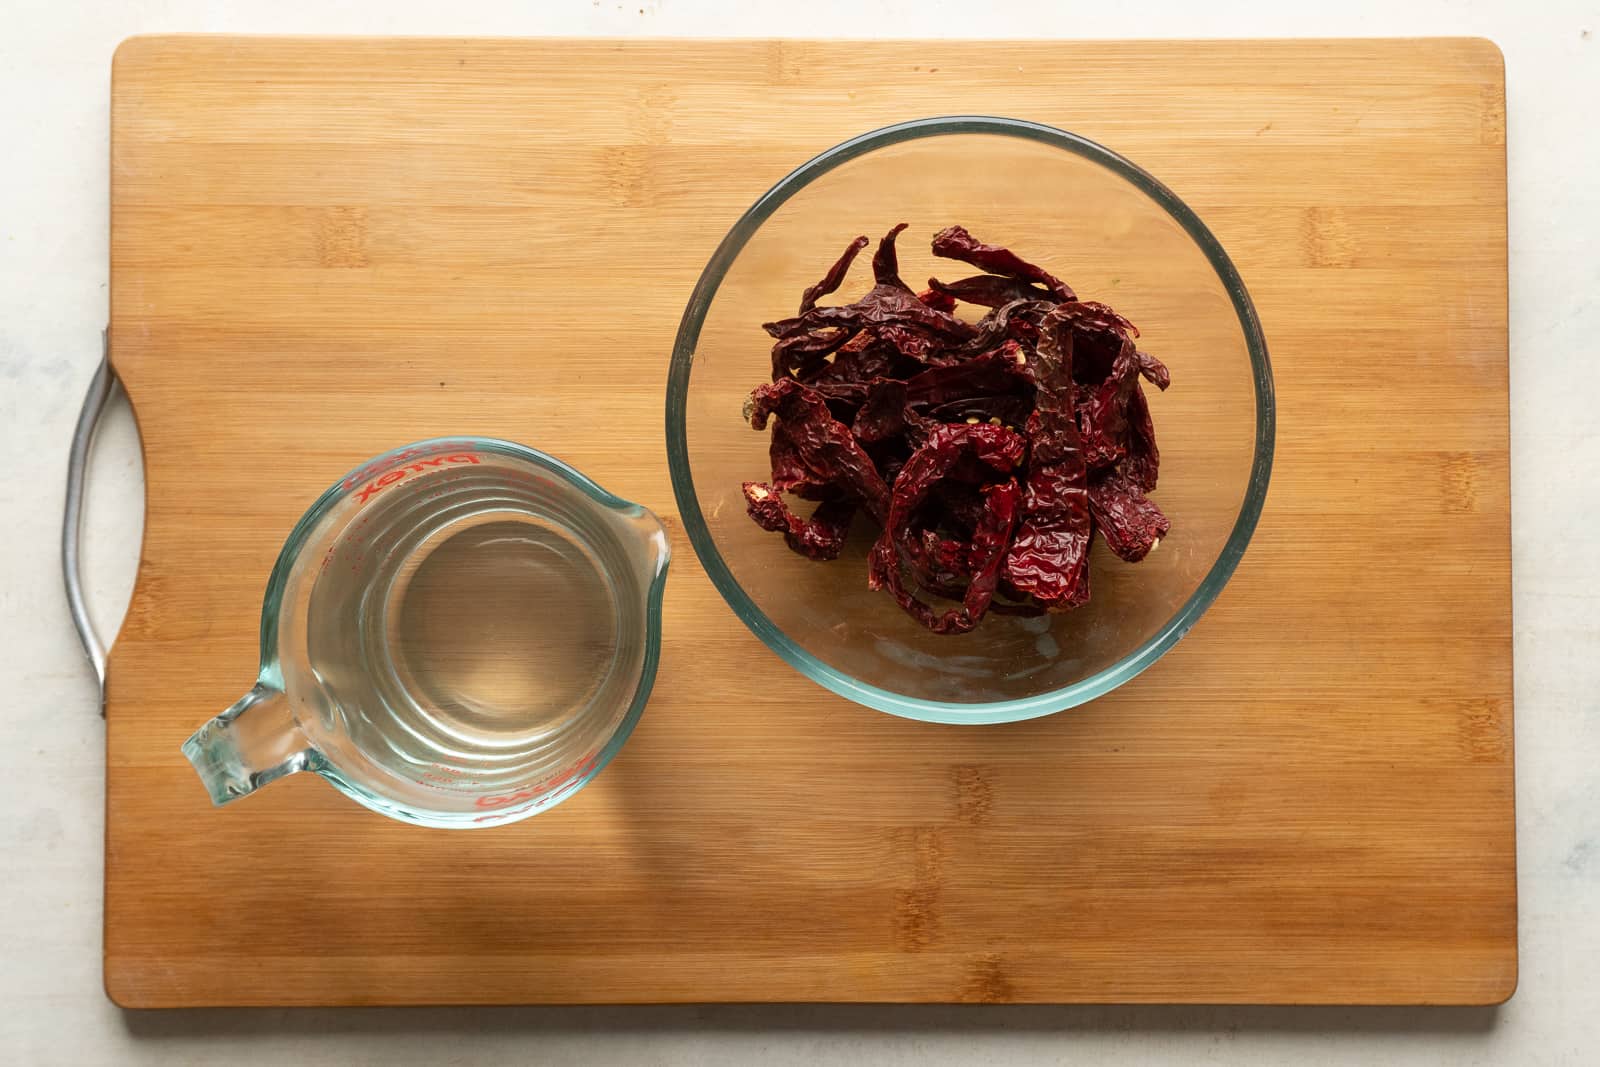
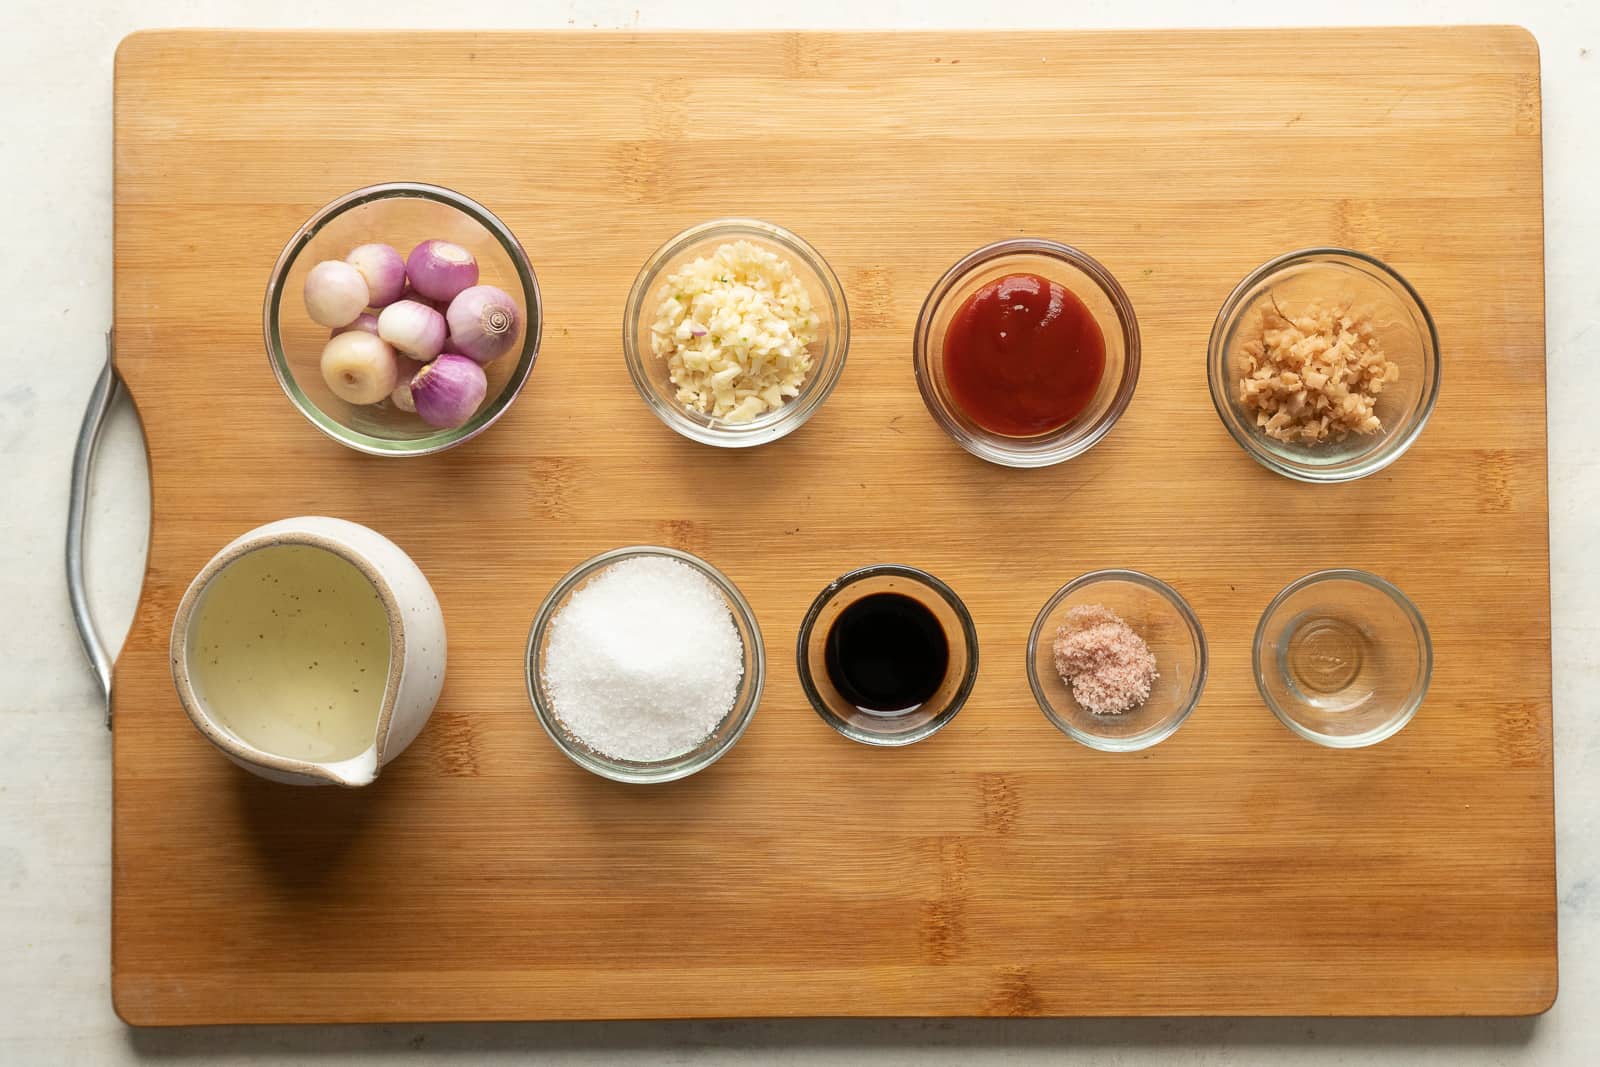
Chillies: I used a combination of Byadgi Chillies (for heat) and Kashmiri Chillies (for colour and flavour). You can change the proportions a little if you want it to be more or less spicy.
The chillies are soaked in hot water to soften them and then blended with a little bit of that water into a coarse paste. We don’t want to break them down completely because we want texture as well. So keep the mixture coarse where you can still see bits of chillies
Shallots/Sambar Onions/Pearl Onions: Any of these smaller varieties of onions will work here. They have a milder flavour than red onions and soften beautifully
Garlic and Ginger: Lots of finely chopped garlic and ginger. I usually buy peeled garlic when I make this schezwan sauce/ schezwan chutney to make life easier
Ketchup: My favourite thing to add when I’m making Indo Chinese because it has the perfect balance of sweet, salty, acidic
Sugar: Might seem like a lot but you need this to balance out the heat from the chillies
Soy Sauce: Light soy sauce to add that hit of umami
Vinegar: To add acidity. Use synthetic or rice vinegar
Oil: There is 1/3 cup of oil in this recipe. I don’t recommend reducing it. The oil does two things – it helps cook the chillies till they are jammy and helps preserve this sauce so that it can last up to a month in the fridge
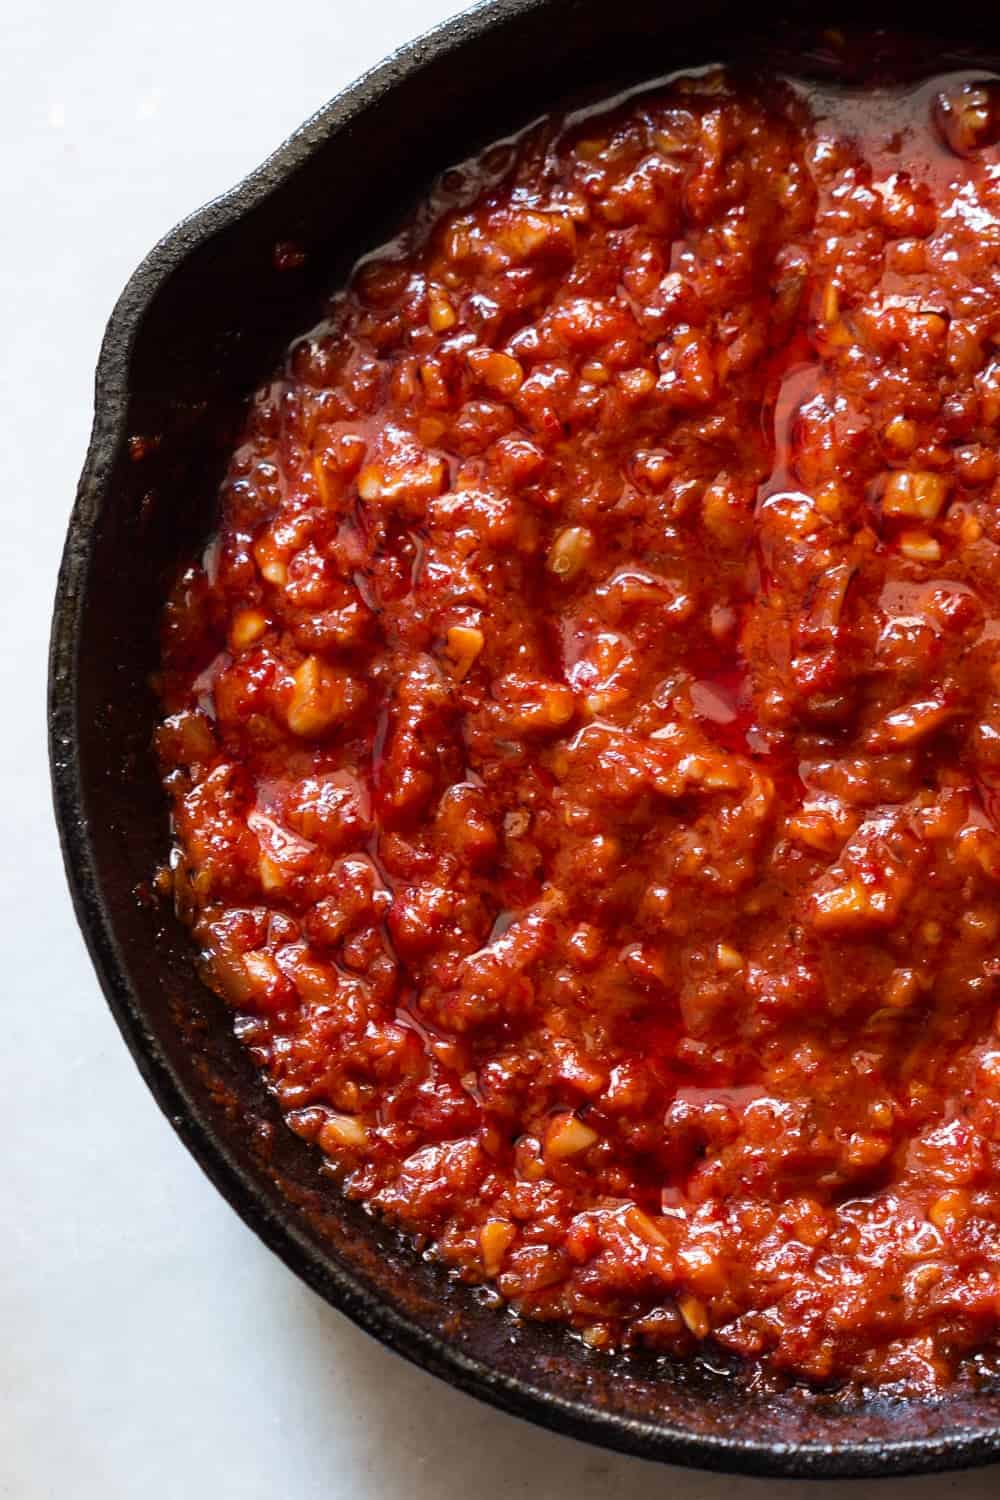
How to make Schezwan Sauce
This is a simple recipe that has a lot of hands off time while the sauce is simmering and reducing
Soak: Soak the chillies in hot water to soften them. I like to discard the stems before soaking
Blend: Blend to a coarse paste with a little water. The smoother the chilli paste, the less texture you’ll have in the sauce. And that texture makes a big difference
Saute: Saute the ginger, garlic and onions in oil till they soften but be careful not to brown the onions. As soon as they are translucent, you know they are ready.
Chillies: Add the coarsely blended chillies and all the other ingredients along with water and mix well
Simmer: Let the sauce come to a simmer and then cover and cook, stirring occasionally in between till the sauce reduces and takes on a jammy consistency. You should also see oil floating on top. That’s when you know the sauce is ready and the chillies have cooked down. This process can take anywhere between 25-40 minutes.
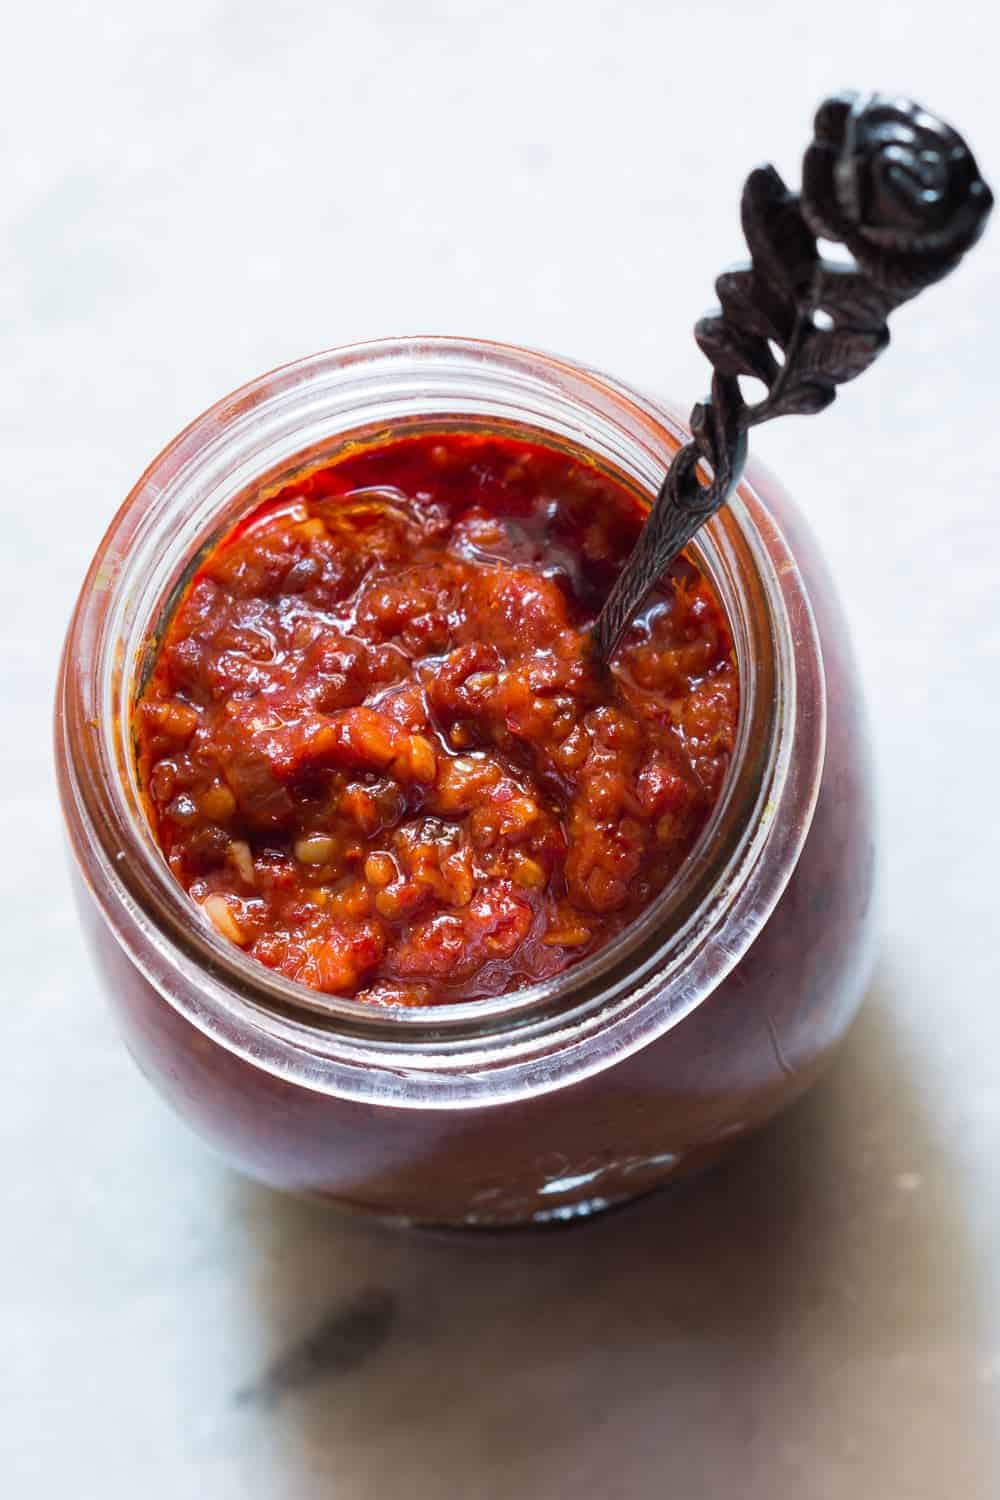
Cool and store: Let the sauce cool completely before you transfer it to an airtight container. This will last for up to 4 weeks in the fridge (if you don’t finish it before that 😂)
Frequently Asked Questions
What is Schezwan sauce?
Schezwan sauce is an Indo-Chinese spicy chutney made with red chillies, garlic, vinegar, and sugar. It’s used in fried rice, noodles, stir-fries, and famously, as a dip for momos at streetside stalls.
Is Schezwan sauce spicy?
Yes! It’s fiery, but the heat is balanced with tang from vinegar and a hint of sweetness. Using Kashmiri chillies makes it less sharp but still bold.
How long can I store homemade Schezwan sauce?
It stays fresh in the fridge for up to 1 week. For longer storage, freeze in small portions and thaw before use.
Can I use regular chillies instead of Kashmiri chillies?
Yes, but the color will be less vibrant and the sauce spicier. Adjust the chillies based on your spice preference.
Richa’s Top Tips
The proportion of chillies will determine heat levels in this sauce. You can play around with this proportion based on how spicy you’d like your schezwan chutney/sauce to be I wouldn’t recommend reducing the oil in this recipe as it helps preserve the sauce so that it can be stored for a month or so. We’ll also be using very small quantities of it for dipping or as a condiment so the total calories are not very high
Use a chopper or food processor to chop the shallots, ginger and garlic finely. Makes the task much faster!
Taste and adjust sugar, vinegar, and salt until balanced.
Make sure to cool the schezwan sauce before storing and refrigerating.
Store in the fridge in a clean, dry glass jar.
Serving Suggestions
If you still aren’t convinced about this low-effort high-rewards sauce, here are a few more reasons:
Slather on parathas, roll it up and enjoy a quick snack
Storage Suggestions
Storage: The sauce can be store in a clean, air tight container in the fridge for up to a month
Freezer Friendly: You can also portion the sauce and freeze it and it can last for up to 3 months. I sometimes like to portion it out into ice trays and freeze it. Once frozen, I remove the cubes, transfer them to a zip lock and freeze. Then I have perfect portions anytime I want to thaw them.
Ever since I discovered this Schezwan Sauce recipe, I make a large batch at least once a month and use it for as long as it lasts (which TBH, is not that long!). I have this with everything!! Once you try this, you’ll never go back to store-bought and I think that’s beautiful ❤️
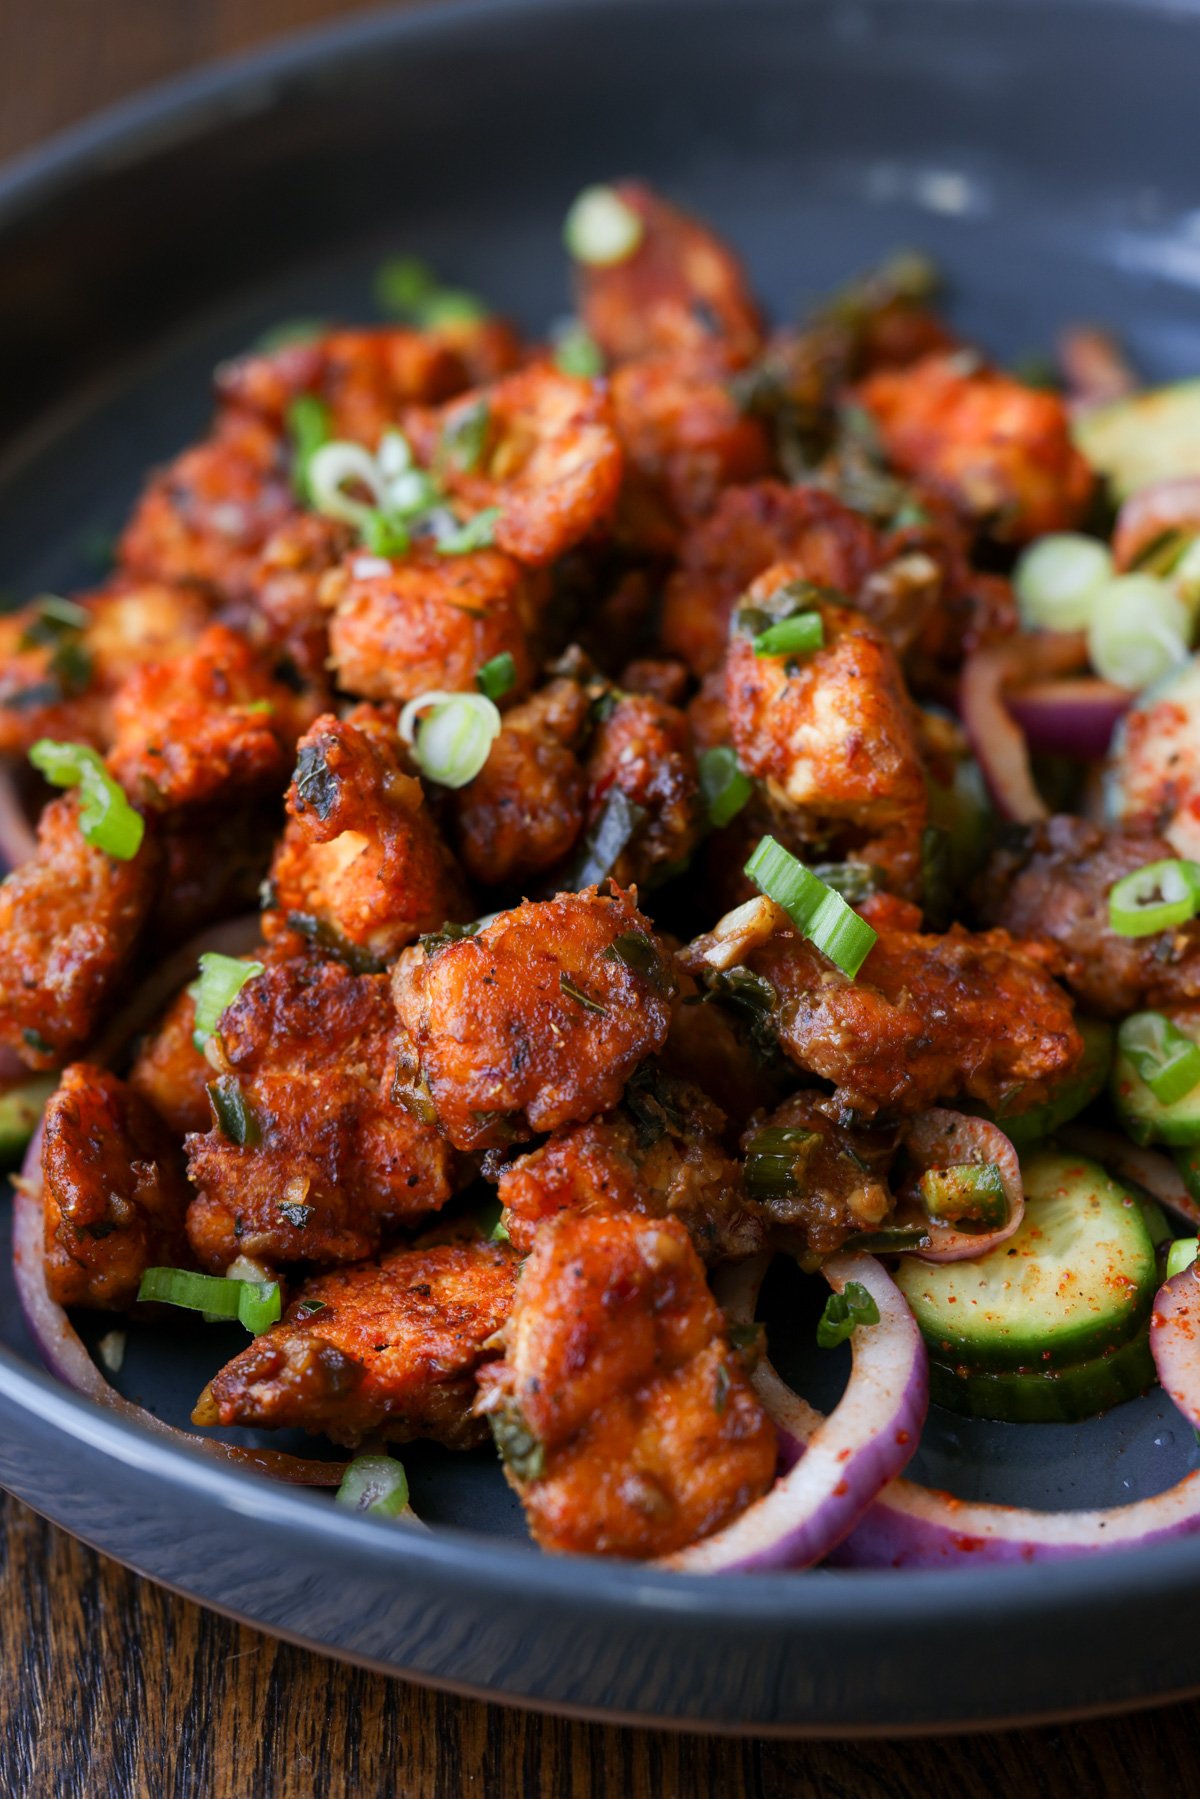
If you liked this recipe, be sure to check my other saucy Indo-Chinese recipes like these Chilli ChickenNoodles and Corn Bhel!
Learn how to make this simple indo-chinese schezwan sauce/condiment which goes really well with chicken lollipops, schezwan rice, noodles and manchurian. Makes 1.5 cups. Each serving size is estimated at 1 tbsp.
Soak the chillies in hot water for half an hour. Add only the chillies to a blender along with 2-3 tbsp water and blend to a coarse paste
Heat oil in a pan and add garlic and ginger. Saute on a low flame till the raw aroma goes. Be careful not to brown or burn the ginger garlic.
Add the minced onions and let them cook on a low flame till they soften and turn translucent. Be careful not to let them brown.
Once the onions look like they are almost melting, add ground chilies, soy sauce, vinegar, ketchup, sugar, salt and 1/4 cup water. Mix well.
Bring this to a boil and simmer till the sauce thickens. Oil should have separated, and there should be some oil floating on top.
Switch off the flame and let it cool. Once the sauce has completely cooled down, transfer to an airtight container and store in the refrigerator for up to 15 days.
Video
Notes
Chillies: I used a combination of Byadgi Chillies (for heat) and Kashmiri Chillies (for colour and flavour). You can change the proportions a little if you want it to be more or less spicy.
Shallots/Sambar Onions/Pearl Onions: Any of these smaller varieties of onions will work here. They have a milder flavour than red onions and soften beautifully
Simmer: You should also see oil floating on top. That’s when you know the sauce is ready and the chillies have cooked down. This process can take anywhere between 25-40 minutes.
Cool and store: Let the sauce cool completely before you transfer it to an airtight container. This will last for up to 4 weeks in the fridge.
This firecracker shrimp rice has simply flabbergasted me with its insanely delicious flavors thanks to its firecracker sauce! I had no idea a simple sauce can be so incredibly tasty that you can make such a stunning meal in under 30 minutes!
With an unavoidable disruption in my blogging schedule, I came back today with an extraordinary recipe to make up for the couple of days delay!
This firecracker shrimp rice will make your home dining a special affair and I can vouch without an iota of doubt that everyone in your family will love it!
I will be honest with you that before trying it on my own, I was also not expecting something as mind-blowing as it proved to be.
I was drawn to it for my favorite thing which is, surprise surprise, shrimp! LOL! The secret behind the crazy deliciousness of this firecracker shrimp rice is not in shrimp; it is in its sauce!
Let’s deep dive into it, shall we?
What is Firecracker Shrimp Rice?
You may have assumed from its name that firecracker shrimp rice is a hot & tangy fried rice topped with sweet & salty shrimps!
Well, you are partly right! This firecracker shrimp rice is indeed a hot & tangy fried rice topped with soft & succulent shrimps! But there is more to it!
It won’t be justified if we simply describe this firecracker shrimp rice as another fried rice! Nope, it’s much more than that!
Let’s talk about the secret sauce of this dish and you will know why I'm claiming it to be so special!
The firecracker sauce is an amalgamation of sweet, tangy, spicy and salty ingredients which come together to make a stir-fry sauce which is beyond perfection!
When the rice & shrimps are stir fried in this incredible sauce, they take a makeover which is way too delicious than anything I had ever imagined!
This firecracker shrimp rice truly turned out to be a pleasant surprise for both of us! My better half was just assuming it to be another shrimp fried rice!
But when he saw its gorgeousness he guessed that it might be something different. And then came the final taste test!
Voila! We both loved it so much that we had to recreate it again to share it with all of you guys as this firecracker shrimp rice is just a must-have!
Homemade Chocolate Sauce is incredibly easy to make and very much better than the store bought chocolate sauce. Whip up a batch in only 5 minutes and then drizzle it on all your favorite desserts!
Don’t have chocolate sauce at home and need it immediately? Don’t worry, you have landed at the right place. Try this extremely easy 5 minutes chocolate sauce. It is much better than the packaged chocolate sauce. I bet you’ll make them over again!
This is the BEST chocolate sauce recipe I’ve been making over the years. This is the absolute favorite in my repertoire. I came up with it years ago when I was compelled to create a chocolate sauce that was rich, thick, glossy for one of my favourite chocolate cake recipe.
You only need a few ingredients to make this homemade chocolate sauce and it tastes better than any chocolate syrup you can buy at the store. Silky smooth, glossy, not overly sweet, and incredibly chocolatey. This is the chocolate sauce I make each time I need it.
I love my chocolate sauce with chocolate. It makes the sauce richer in taste and texture. Many don’t use chocolate for making chocolate sauce. They make the work done with cocoa powder and cornstarch. To be honest I don’t like using cornstarch in my chocolate sauce.
Here I have used Ossoro’s cocoa powder. You can use any brand of cocoa powder, but make sure to use unsweetened cocoa powder.
I used a bit of butter in my chocolate sauce which tends to give an extra gloss to the chocolate sauce, though adding butter is totally optional. You just need to use a good quality chocolate and cocoa powder. You’ll appreciate the difference in this intensely dark and flavorful chocolate sauce.
Then comes the essence, though you can skip the essence here. I have used Ossoro’s chocolate truffle essence. You can totally skip the essence or use vanilla or chocolate essence.
WHY YOU’LL LOVE THIS CHOCOLATE SAUCE
● Quick and easy ● Ready in 5 minutes ● No preservatives ● So smooth, thick and glossy ● It has chocolate which makes it chocolatey and richer. ● Requires only a handful of pantry items ● No plain flour or cornstarch used ● Better than packaged chocolate syrup
Making homemade chocolate sauce is not only economical but also free from any preservatives. It is ridiculously easy to make at home and takes only few minutes of your time. It is also convenient for you that you don’t need to go to the store to buy the sauce when you need it, you could have already made some and be enjoying it. That’s how quick and easy this homemade chocolate sauce recipe is. Are you buying the chocolate sauce/syrup from store? Stop from now on and make your own chocolate sauce.
I have made a small batch of it. But of course you can double the recipe as needed.
I always keep a jar of chocolate sauce on hand to take a simple ice cream or a cake or dessert to the next level and make it an extra special treat. I also gulp a spoonful of the chocolate sauce when I carve something very chocolatey or to kill my sweet tooth carving. My little one is mad after this chocolate sauce. You’ll find endless uses of it once you make it for yourself.
What Ingredients do I need for this Homemade Chocolate Sauce recipe? LET’S TALK INGREDIENTS. You will need only few ingredients to make this super easy homemade chocolate sauce. ● Sugar – Granulated sugar is used here. ● Chocolate – I’ve used dark chocolate but you can also use milk chocolate. ● Cocoa powder – Ossoro’s unsweetened cocoa powder is used. You can use any brand of cocoa powder, but make sure to use unsweetened cocoa powder. ● Butter – Stir in a tablespoon of butter for an extra touch of richness. It also give a nice gloss to the sauce. Well using butter is optional here. ● Water – Used room temperature water. ● Chocolate truffle essence – Ossoro’s chocolate truffle essence is used in this chocolate sauce recipe. A few drops of this essence does the work.
INGREDIENT SUBSTITUTION ● Granulated sugar can be substituted with brown sugar. ● Use your choice of chocolate like milk chocolate, semisweet chocolate or bittersweet chocolate instead of dark chocolate. ● Ossoro’s chocolate truffle essence can be substituted with vanilla essence or chocolate essence. ● You can use milk instead of water. Use whole milk for extra richness.
VARIATIONS FOR CHOCOLATE SAUCE ● Use milk instead of water for a creamier texture. ● Turn it into mocha chocolate sauce by including a teaspoon of espresso powder or coffee powder. ● Give it a spicy Mexican flair by adding a dash of cayenne pepper or chili powder. ● You can make chocolate sauce with a combination of cocoa powder and cornstarch if you don’t want to use chocolate. Add 2 tsp cornstarch dissolved in bit of water and add. You will need to increase the liquid to 150-200 ml, depends upon the thickness of sauce you want. You can increase the sugar upto ½ cup (100 grams)
I made a simple recipe video of this super easy chocolate sauce recipe for my readers which I have shared below. Please do watch and SUBSCRIBE to my channel if you haven’t yet. It will mean a lot to me and motivate me to come up with more videos for my readers. As always looking forward to your feedbacks!
HOMEMADE CHOCOLATE SAUCE VIDEO TUTORIAL
WHAT TO USE CHOCOLATE SAUCE FOR? SOME SERVING SUGGESTION
● Drizzle the chocolate sauce on top of ice cream, cake, brownies, pancakes, waffles, donuts etc. ● Drizzle over pan cakes and waffles. ● Drizzle it over your favourite dessert ● Stir it into milk. ● Use it to make chocolate milkshakes. ● Drizzle it over tea cakes, donuts and brownies ● Layered it in a chocolate trifle. ● Use it as a dip for fruit. ● Spread a layer on top of cream in layer/frosting cakes ● Pour some in whipped cream to make chocolate flavor whipped cream. ● Use as a garnish on top of milkshake, cold coffee or smoothies.
So next time when your kid asks for chocolate milk, simply mix a tablespoon of this homemade sauce with a glass of milk. Voila, delicious chocolate milk is ready.
STORAGE SUGGESTIONS
Store the chocolate sauce in a jar or container in the refrigerator for up to 2 weeks. Rewarm before serving if required.
Love chocolate sauce? Give this super quick, easy and simple homemade chocolate sauce recipe a try which simply takes only 5 minutes to make. Top this hot chocolate sauce over ice creams or a favourite dessert or even into your milkshake at home. Satisfy your chocolate craving with this chocolate sauce – it’s guaranteed happiness!
SOME CAKE RECIPES YOU MIGHT LIKE TO TRY TO SERVE WITH THIS DECADENT CHOCOLATE SAUCE
Here are all my Bakes & Cakes recipes if you’re craving more baking inspiration.
All of the above recipes are super easy to prepare, ready in no time, and will never disappoint you.
I hope you love this quick and simple recipe. Do give it a try and don’t forget to share your thoughts about the recipe with me here. So let’s get started with the recipe.
Preparation time: 5 minutes Cooking time: 5 minutes Serves: 150 ml Jar
☆ 1 cup = 240 ml ☆ 1 tablespoon = 15 ml ☆ 1 teaspoon = 5 ml
Ingredients to make homemade chocolate sauce:
67 grams / ⅓ cup sugar 60 grams / ¼ cup +2 tbsp dark chocolate 45 grams / ⅓ cup cocoa powder 1 tbsp / 15 grams butter (optional) ½ cup / 120 ml water 3-4 drops Ossoro chocolate truffle essence (optional) (You can use vanilla essence or chocolate essence – 1 tsp)
Step by step pictorial instructions to make homemade chocolate sauce
Take sugar, cocoa powder and water in a saucepan.
Stir well to combine and make sure there are no lumps.
Now turn on the heat to low-medium flame. Keep cooking stirring it constantly.
As soon as the mixture started to heat up, the mixture will thicken up and gets darker in color. It will take only approximately 2-3 minutes.
Once the mixture becomes thick (coat the spoon), reduce the flame to low and add the chopped chocolate, essence and butter. Stir it constantly for about a minute and once the chocolate started melting turn off the stove.
Continue stirring the mixture until the chocolate is completely melted and your thick, glossy and silky smooth chocolate sauce is ready.
It will thicken more as it cools down. Allow to cool down completely and store in a sterilized jar.
Well, if you make this easy homemade chocolate sauce, please do leave a feedback in the comments box below or snap a photo and tag Akum Raj Jamir on Facebook and akumrajjamir on Instagram with hashtag #atmykitchen. I would love to see your creations.
Thank you so much for stopping by my blog. I hope you liked the recipe. Your valuable feedbacks are always welcome, I love hearing from you guys and always do my best to respond to each and every one of you.
Happy cooking!
Love Akum
Chocolate Sauce
Disclosure: At My Kitchen is an Amazon Affiliate, which simply means that if you make a purchase through these links, I will earn a very small commission at no additional cost to you!
Please click on the link if you wish to purchase these products from Amazon.
After using an air fryer for more than three years now, it’s a shame that I haven’t tried making air fryer chicken stir fry yet! So without any further delay, here is my fail-proof air fryer chicken stir fry recipe that’s perfect for your high protein weight loss meal while also satisfying your craving for stir fry chicken to some extent!
I was an absolute sucker for chicken stir fry! I remember gorging uncountable crispy stir fried chicken bites during my pre-fitness era without even batting an eyelid about the calorie consumption!
Now that I am way too mindful of what I eat, it’s pretty much impossible for me to indulge in those deep fried items irrespective of how delicious they are!
If you are also in a similar journey like mine, I have a solution to curb our cravings for those crispy chicken stir fry!
And that perfect solution is nothing but my crispy air fryer chicken stir fry which fits right into the high-protein meal that we all fitness enthusiasts aim for!
What is air fryer chicken stir fry?
I agree that the name air fryer chicken stir fry is kind of an oxymoron! I know we are not stirring anything here as everything is getting done on its own inside the air fryer!
But the term “stir fry” invokes that irresistible craving which is quite difficult to ignore and this air fryer chicken stir fry flawlessly satisfies that temptation simply by replicating the same crispy chicken but without the truckload of oil!
Quick tip: Just so you know that excess oil is the hidden culprit in our food which we tend to overlook and then wonder why we are not losing body fat even after having balanced meals!
Slow-smoked wings get seared for crispy skin, then tossed in a tang-forward Mississippi white BBQ sauce—juicy, smoky, and done right.
Ingredients
1 family pack whole chicken wings (about 12–14 whole wings)
Spicy ranch seasoning (generous coating)
Killer Hogs AP Seasoning (generous coating)
Killer Hogs Mississippi White Sauce (or your favorite white BBQ sauce)
Instructions
Season the Wings
Trim and separate wings if desired, or leave them whole.
Season all sides generously with spicy ranch seasoning and AP seasoning. Let them sit while you fire up the grill.
Set Up the Grill
Prepare a 2-zone fire on your grill (one side hot, one side cool).
Target grill temperature: 375–400°F.
Pellet grill works too — just hold temps steady in that same range.
Smoke the Wings
Place seasoned wings on the cool side of the grill.
Close the lid and cook about 30 minutes.
Flip the wings and cook another 15–20 minutes, until they reach 180–185°F internal.
Crisp Over the Hot Zone
Working in batches, move wings directly over the hot side of the grill.
Sear for 2–3 minutes per side until skin is golden and lightly charred.
Use the cool side as a holding zone if wings start cooking too fast.
Final target internal temp: 195°F — this ensures fat is rendered and the meat pulls clean from the bone.
Sauce & Serve
Remove wings from the grill and toss in Killer Hogs Mississippi White Sauce (or your favorite tangy white BBQ sauce).
Serve hot and enjoy with extra sauce on the side.
Here’s the deal—bone-in wings get a liberal rub of spicy ranch and AP seasoning, then they smoke low and slow on the cool side of your grill until they hit about 180–185°F. Next stop: the hot zone, where I give them a quick sear until the skin’s golden and laced with char. Final move? Dunk ’em in that killer Mississippi White Sauce—tangy, creamy, and absolutely mouthwatering. These wings—smoky, juicy, and loaded with tangy white BBQ flavor—hit different.
Tangy, sweet and mildly spicy, this restaurant style saucy shrimp noodles stir fry is hell of a recipe that you must try asap! You will be amazed to see how easy it is to recreate your favorite asian shrimp noodles stir fry at the comfort of your home when you have the right ingredients in place!
If you love a good stir fry then you will love my shrimp noodles stir fry recipe that I’m sharing today! This was due for long as it is quite a common affair at my home!
This is one such recipe which comes around in about 30 minutes or so but promises big flavors on your plate!
That's why it's not an ordinary stir fry but a classic restaurant style shrimp noodles stir fry and you will come back to it again and again!
What is shrimp noodles stir fry?
Like a good stir fry recipe, my shrimp noodles stir fry also follows the standard grammar of an authentic one!
You have your choice of noodles, your choice of protein which is shrimp in this case and a killer sauce that brings everything together in the most irresistible way possible!
You can of course add a few veggies in your shrimp noodles stir fry that increases the fiber quotient of the dish while also making it more hearty and fulfilling!
I only added shredded cabbage today to keep things simple and fast as I wanted to bring the dinner from kitchen to table in thirty minutes!
Chewy outside & melt-in-mouth inside, these delectable air fryer sweet chilli chicken meatballs may just become your best weight loss meal for good! I'm serious!
Chicken meatball is one of those fancy ways that makes everyday homemade meals extra-special!
And when you make these crazy delicious sweet chilli chicken meatballs, it’s a different ballgame altogether! These are a must-try and that too at the earliest!
I have good news too if you are in a similar weight loss journey as me! You can have these even when you are on a calorie deficit diet!
But of course in a controlled portion!
My sweet chilli chicken meatballs are almost oil-free as they do not contain any oil or fat in the mixture; only a couple sprays of oil while air-frying.
Being oil-free makes these chicken meatballs significantly low in unnecessary calories and that makes it a winner for all us fitness enthusiasts!
What are Sweet Chilli Chicken meatballs?
Meatballs are nothing new and I have shared many chicken meatballs dishes here on my blog. So what’s so special about these sweet chilli chicken meatballs?
These sweet chilli chicken meatballs are your no-fuss high-protein low-oil dinner that you can enjoy guilt-free even during your weight loss journey!
If you have been following my blog for quite some time now, you know that I am crazy about high protein yet low calorie recipes to include into my intentionally balanced meal routines.
I really can’t get over pesto! On the contrary, my eternal love towards this classic Italian pasta sauce has gone a notch up when I made this vegan pesto fusilli with zucchini and asparagus using my homemade avocado basil pesto!
This is not a cheat meal recipe!
I do not believe in cheat days! With my experience of 34 kgs/75 pounds of weight loss, I truly believe that real success lies in everyday habits!
A single uncontrolled cheat day, even once in a month, can ruin your weeks of effort and hard work within minutes! But that doesn't mean you can't enjoy good food!
You definitely can! And you must! Simply because mindful eating is a lifelong habit and not a sprint!
You can enjoy good food by becoming smart about it! By being smart I simply mean controlling certain parameters of your meals.
Like being conscious of the portion you are consuming; or having it at the right time and not as a random meal.
For example, a high carb dish like this pesto fusilli is best suited for a fulfilling lunch or even weekend brunch in a moderate portion no matter how tasty it is!
Then you would have enough time to digest the food during the course of the day and carb will give you a good amount of energy to carry out your planned chores. Win-win!
It’s been a while since I made a Korean recipe and when I saw that Gochujang chicken thighs are doing their viral rounds on the internet, I could not resist jumping on the bandwagon!
If you have tried & loved Korean recipes, then I am sure you are also a spice-lover just like us! Hence I can bet that you will also gush over these Korean Gochujang chicken thighs!
We love spicy food and as a natural instinct we are drawn towards Korean food (and also Thai) when we have to opt for one from Oriental cuisines.
Though I haven't shared many Korean recipes in my blog yet, we both love them thanks to the flavor-packed dishes that Korean cuisine offers!
The strong aromas of Korean recipes may be a little overwhelming for a few of you, but the one I have come with today will fit into everyone’s palate!
Sticky Korean Gochujang chicken thighs! This is a keeper as it takes minimal prep time and produces maximum flavors!
What are Gochujang chicken thighs?
When you generously marinade a few skin-on & bone-in chicken thighs with a generous amount of Gochujang, the Korean chilli-bean paste, and air fry them until cooked, you get the most flavorful, juicy & tender Korean flavored chicken ever without the guilt of deep-fried food!
And that’s Gochujang chicken thighs for you!
If you are familiar with Korean recipes, you may already be aware that many Korean recipes involve double-frying, which enhances the crispiness of the food and retains the crunch longer.
Since I intentionally try to avoid deep-fried foods, most of the authentic Korean recipes are out of my league, unfortunately!
Then appeared these sticky Gochujang chicken thighs! Why did I love these? Because they are baked/air-fried and not deep fried! Absolute win-win!
Hey there hackers! Let’s delve into a topic often overlooked but vital to becoming a truly seasoned software engineer: testing your code. Sometimes taking a backseat to developing innovative projects and leveraging the latest APIs, Major League Hacking (MLH) is partnering with Sauce Labs to show you that testing isn’t as bland as you might think.
Why is testing important?
If writing software is like a recipe, then think of testing as the foundational flavor upon which your code is built, providing stability and resilience against challenges and edge cases you may not have seen at first! Testing isn’t just about ensuring your code works or catching bugs (although that’s pretty important, too). It’s about building confidence in your creations. Avoid the existential dread of live demo malfunctions. When you know your code has been thoroughly tested, you can serve up your applications with the confidence of a master chef.
Now, I know what you’re thinking. “But testing is soooo tedious!” Well that’s where Sauce Labs comes in. Think of Sauce Labs as the secret ingredient that keeps your kitchen from falling into a state of all-out panic and disarray.
With Sauce Labs, you can sprinkle a dash of automation onto your testing workflows, freeing up your precious time to focus on more exciting challenges like sprucing up your UX or integrating even more useful features to your projects. No more manually writing unit tests for all of your functions. With Sauce Labs, you can automate your tests and watch how your application performs across different browsers and devices!
Knowing how to test your code isn’t just a valuable skill — it’s a badge of honor that sets you apart from other developers. It shows your commitment to delivering high-quality and dependable software to users. Testing represents a cornerstone of excellence in the realm of software development, and embracing it will help to ensure that the code you write doesn’t leave a bad taste in anyone’s mouth!
Sauce Labs is a natural partner for MLH because it highlights and represents a unique opportunity to nurture the next generation of software developers. Testing plays a critical role in the software development lifecycle and by equipping student developers with the tools and mindset needed to be better devs, together we can ensure their creations are not only innovative but also reliable and user-friendly, and begin to instill in them a holistic understanding of software quality.
Sauce Labs x MLH
This year, Sauce Labs will be spicing up 50 in-personMLH Member Events! We’re encouraging all hackers to try out the Sauce Labs platform by entering the Sauce LabsHot Sauce Naming Competition. That’s right! You can suggest a new name for Sauce Labs’ famous hot sauce by spinning up a test and giving it a flavorful name like Picante Performance Testing Pepper Sauce, A/B Ancho Automation, Scoville Smoke Test Salsa, or Bug Free BBQ Beta. All valid entries will be entered into a raffle for some great prizes, including a bottle of Sauce Labs’ famous hot sauce… because just like testing, it goes well with anything!
“In partnering with MLH, Sauce Labs is excited to invest in nurturing student developers’ skills in automated testing,” said Jason Baum, Senior Director, Developer Relations and Marketing at Sauce Labs. “Our goal is to demystify testing, making it as integral as coding itself, ensuring tomorrow’s tech innovators build with both creativity and quality in mind. This effort reflects our commitment to advancing software excellence among the next generation of developers.”
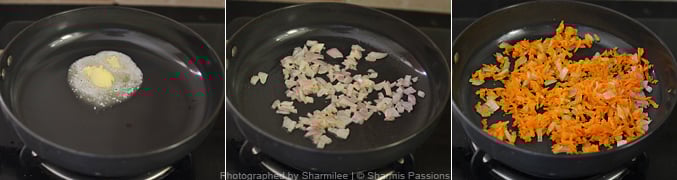
Tofu majestic is a vegan version of the popular South Indian starter, chicken majestic. Spicy, crispy tofu in a thick, spicy sauce is an absolutely delicious starter or side! You can easily control the heat, if you don’t like your food too spicy. (Options for gluten-free, soy-free, and nut-free)
Chicken majestic is pretty popular in restaurants in the state of Andhra Pradesh, and especially in the city of Hyderabad. It is a spicy, crispy chicken dish that is usually fried or pan-fried and tossed in a thick, delicious, spicy sauce. It has elements from indo Chinese cuisine and the combination with South Indian flavors makes it a finger licking can’t stop good appetizer!
It is served as-is as a starter with a side of chutneys or a side salad. You can also add it to wraps or serve with rice. It is absolutely mindblowingly delectable and delicious. The tofu is crisped with some cornstarch and rice flour and some spices. Then tossed in a thick sauce to coat. If you want to keep these crisp, toss and serve immediately!
Tofu majestic is definitely hot with 4 heat elements in it, there’s green chilies, Kashmiri chili powder, black pepper and sambal oelek! It can get hotter depending on the green chilies that you use. To manage the heat, use milder green chilies and use less of the black pepper and Kashmiri chili powder.
I like to serve this with a side salad of onion and cucumber. It’s kind of like quick pickled onion with Indian spices called laccha pyaza. See the recipe notes for instructions for making the crispy, vibrant laccha onions. You can also serve with chutneys of choice or a creamy dip on the side to mellow the heat.
Why You’ll Love Tofu Majestic
flavorful, crunchy, battered tofu in a thick, spicy sauce
bake or pan fry the tofu
versatile! Serve on its own, with chutney or creamy dipping sauce, with a fresh salad, or as wraps
easy to make gluten-free, nut-free, and even soy-free.