❌

Reading view

There are new articles available, click to refresh the page.

Hotel Style Ghee Roast Dosa Recipe | How to make Perfect Dosa Batter

By: Sharmili

Ghee roast dosa is a popular dish in South India, where it is often enjoyed as a breakfast food or a snack. The dish has a crispy texture on the outside and a soft and spongy interior, and ghee gives it a rich buttery flavor. The batter for ghee roast dosa is traditionally made by soaking and grinding rice and urad dal and then fermenting the mixture for several hours or overnight. This process helps to develop the flavor and texture of the dosa.

When making ghee roast dosa, the batter is spread thinly on a hot griddle or tawa and then cooked until it is crispy and golden brown. The ghee is added to the griddle before cooking the dosa and drizzles on top of it while it is cooking, which helps to enhance the flavor and crispiness.

Ghee roast dosa is typically served with various chutneys, such as coconut chutney or tomato chutney, as well as sambar, a spicy soup or stew made with lentils and vegetables. The dish can also be enjoyed with various other accompaniments, such as masala potatoes, or with different fillings, such as cheese or paneer (cottage cheese).Β Overall, ghee roast dosa is a delicious and versatile dish many people enjoy in India and beyond. Let us see how to prepare this recipe.

Enjoy the video of the Paper ghee roast. Subscribe for more recipes.

Hotel Style Ghee Roast Dosa Recipe | How to make Perfect Dosa Batter
Crispy ghee roast hotel style.
Servings15-20 dosa approx
Prep Time10 min(excluding soaking time)
Cook Time30 mins
Ingredients
Instructions
  1. Place idli rice, raw rice, urad dal, chana dal, and fenugreek seed in a bowl. Wash them thoroughly in water 2 to 3 times. Drain the water completely. Add enough fresh water and soak rice and lentils for 2 to 3 hours.
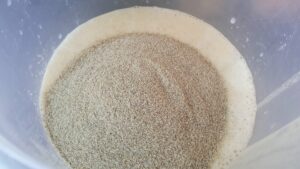
  2. Now add soaked rice and dal along with a little water in the wet grinder or mixer. Add little by little water at a time while grinding. Grind it into a slightly coarse paste, as shown. Once done, remove the batter from the grinder and place it in a bowl.
  3. Then add sugar and the required salt and mix it thoroughly using your hand.
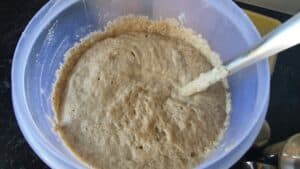
  4. Let it rest for 8-10 hours to ferment. I usually grind it in the evening and let it ferment overnight. You can see how well the batter is fermented from the picture.
  5. Transfer the required amount of batter into another bowl. You can adjust the batter by adding water if it is a thicker consistency. The dosa batter should be slightly thinner than the idli batter.
  6. Heat a pan and pour a ladle of batter, and spread it in a circular motion as shown. Drizzle a spoonful of ghee. Close a lid and let it cook on low flame until the dosa is cooked well. Then remove the lid and cook for one more minute until it turns crispy.
  7. Now roll the dosa and serve hot with sambar, chutney, or any side dish of your choice.
Recipe Notes
  • An equal amount of raw rice and idli rice is used to get crispy dosa.
  • Use good quality urad dal.
  • Fermentation is essential to get crispy dosa.
  • If you are grinding in a mixie, it very often gets heated. So add ice-cold water to grind the batter.
  • To get a nice golden brown color of the dosa adding sugar is a must.

Crispy and crunchy ghee roast dosa is ready to relish.

If you found this post useful, I would really love it if you pin it or share it with your Facebook fans or Twitter followers, or Google+ circles today. All it takes is a simple click on the β€œpin it” β€œlike,” β€œshare,” β€œtweet,” or Google+ buttons below the post. It will keep me motivated. Thank you!

Bajra rava idli | Kambu idli

Kambu idli| bajra rava idly

The steamed perfection of idli beats any other breakfast recipe. As a child, this South Indian classic was my arch-enemy!! Now it is the best comfort that life can offer in two or three pieces of steamed perfections. Though classic rice idlies still rule my world, we add variety to this with some twists and turns. When the weekend is of limited hours and lots of work,Β  the rava-based idlies are a handy bunch. This kambu idli is one such that is fermented and with whole grains yet much faster to grind and prep than the usual rice idlies.

What is Kambu?

Kambu or bajra is edible seeds of, Pennisetum glaucum, the pearl millet plant. This winter-friendly millet is slightly greyish in colour. As a millet, it is a gluten-free grain that is popularly used as a cereal in Indian and African cuisines. This has a lower glycemic index than the popular white rice and wheat. We have shared pearl millet ladoos and bajra roti posts before that use whole bajra. This time, we have broken bits of pearl millet seed, the bajra rava.

Ingredients and proportions for bajra rava idli

The kambu idli batter is a combination of grain and lentils.
Bajra : the pearl millet grits are what I have used to make this set of idli. These are a pack of crushed bajra seeds. If you have the whole bajra, you can use that too to make the idli. However,Β  the soaking time will be 6 hours or overnight to soften the bajra.
Black gram dal: the ulundu or black gram dal is the skinned white cotyledon of the black gram. This is available either as two cotyledons stuck together (gota) or split ones. The black gram as such can be used for making the batter too, however, the idlies will be denser coz of all the fibre and the colour changes.
Salt: regular cooking salt will flavour the idlies well. It is approximately to taste that we add the salt.
Water: plain drinking water is what I use to grind the batter. In hot climates, my mother-in-law recommends using ice-cold water to grind the soaked dal as it will cool the batter and it will remain sticky.

Steps to make the bajra rava idli batter

The kambu idli batter needs a bit lesser attention than the classic rice idly. Here are the steps to achieve that perfect fluffy kambu idlies.
Soaking:

this idli batter is less cumbersome that the classic rice idlies. This is because the softening time is required only for the black gram dal. Since the bajra is broken into bits it is much faster to soak up cutting down the overall soaking time to two hours. Soak the dal and the bajra rava separately. Don’t forget to wash them both gently with 2 or 3 changes of water.
Grinding
Once the dal is soaked, that is the only one that needs to be ground to paste. This can be done with a blender or a wet grinder. The dal paste can be a bit more fluid than the rice batter as the bajra rava will soak up more water as it ferments.
Fermentation
The lentil and millet batter forms the fluffy idli when it is fermented perfectly. humid equatorial conditions are congenial for bacterial fermentation. It takes about 6 to 8 hours away from direct heat to ferment. However, if you are residing in a colder region follow the tips from the bamboo rice idli post to get a well-fermented batter.

Kambu idli made with bajra.
How will I know if the batter is fermented well?

In the fermentation process for idli, we are taking the help of air-borne bacteria. This process makes the batter rise adding a spongy texture to it. When stirred with a ladle you can see the bubbles that break. The aroma of a fermented batter is also a good test. The batter starts from a bland aroma of grains and beans to a fruity slightly sour one.

Steaming

Greased idly moulds filled halfway through are placed in the steamer. A good 15 minutes of steam without any pressure ensure the rise is optimal. Steam can be scalding so be careful when you open the steamer. Once opened, rest the kambu idli for 5 minutes in the hot moulds. If the bajra idli is cooked through, the idly will bounce back if pressed gently on the surface (careful! it will be hot).

What if I don’t have an idli cooker?

Though the idly cooker is a handy piece of equipment it can easily be substituted. An egg poacher ramekin or small bowls can be used as moulds. To steam, place them in the instant pot, steam mode or in the classic Indian pressure cooker without the whistle. A simple vegetable steamer or a wok wide enough to place a raised plate will work well too.

Print

Kambu idli with bajra rava.

Enjoy hot and fluffy idli made with pearl millet made with bajra grits ( rava).
Course Breakfast, Main Dish
Cuisine Indian, South indian
Keyword Indian vegetarian dinner, Lunch recipes, Millet recipe, steamer recipe
Prep Time 20 minutes
Cook Time 15 minutes
fermentation time 4 hours
Total Time 4 hours 35 minutes

Equipment

  • blender
  • Steamer
  • idli moulds
  • ladle

Ingredients

  • 1 cup Urad Dal
  • 3 cups Pearl millet broken into bits, rava.
  • salt to taste
  • drinking water

to grease the moulds

  • 2 tbsp Sesame oil indian sesame oil has a lovely aroma that complements the steamed idli.

Instructions

  • Wash the urad dal ( skinless) and soak with water about an inch above the bean.
  • Wash and soak the bajra rava with water an inch above it too.
  • After about 2 hours the beans will be well soaked, grind the urad dal using the same water of soaking (and a bit excess if needed.)
  • The dal batter should be in a pouring consistency.
  • Drain the bajra rava and mix it well into the urad dal batter.
    bajra idly batter.
  • Add salt, mix well, put a loose lid and place the batter to ferment in a warm corner of the house.
  • Let this ferment for bout 6 to 8 hours till the batter turns fluffy and airy.
    bajra idly batter fermented.
  • Once fermented, mix the batter and set it aside till the moulds are ready.
  • Prep the steamer with water.
  • Grese the idli moulds with oil
  • Pour the batter half way into each mould.
    making bajra idli.
  • Place them in the steamer.
  • Steam for 15 minutes on a high steam.
  • Then lower the steam and continue for another 5 minutes.
  • Remove from heat after the time and let it stand for 10 minutes.
    bajra rava idly ready.
  • Unmould the idlies and they are ready to serve.
    Kambu idli made with bajra.

Idli recipes on our blog

Classic rice idly
Quinoa and oats idli
Malligai poo idly
Bamboo rice idly

Stay connected

Hope this rice-free idli recipe comes of use to you. We have greatly benefited from using a variety of grains in our diet. This helped us mainly in reducing our staple white rice content and brings about a great bit of variety in our home menu. Share with us your thoughts and feedback when you make our recipes. You can save this recipe as a pin too. If you have idli leftovers, you can always make one of the three varieties of idli upma we have on this blog.

Stay on and explore more before you go.

Bajra rava idli

Milagu Jeeraga Adai Recipe | Thirukarthigai Adai – Karthigai Deepam Special

By: Sharmili

Milagu jeeraga adai is similar to the regular dal adai, with a little difference in taste. You can taste the jeera and pepper flavor in this adai. This adai is specially prepared on the occasion of Karthigai Deepam.

We don’t add onions in this as we serve it to God as Prashad. This adai can even be had as breakfast or dinner. Best served with jaggery powder or coconut chutney, or idli podi. This adai tastes delicious, and it is also filling for breakfast or dinner.

Several other recipes were also made during this Karthigai Deepam. Some are peanut jaggery laddu, puffed rice laddu, sweet appam, sweet adai, pasiparuppu payasam, and so on. Now let us see how to prepare this recipe.

Enjoy the video of milagu seeraga adai. Subscribe or more videos.

Milagu Jeeraga Adai Recipe | Thirukarthigai Adai - Karthigai Deepam Special
Delicious milagu jeeraga adai.
Servings10 pieces appox
Prep Time10 min(excluding soaking time)
Cook Time20 mins
Ingredients
Instructions
  1. Add rice, urad dal, toor dal, and chana dal in a bowl. Add enough water and wash it thoroughly 2 to 3 times. Add fresh water and soak rice and dal for 2 to 3 hours.
  2. Once soaked, transfer rice and dal to a mixer jar. Add salt and cumin seeds and grind to a coarse batter by adding little water.
  3. Transfer the batter to a bowl. Add grated coconut, curry leaves, and pepper powder to this, and mix all thoroughly. Adjust the batter consistency if required.
  4. Adai is usually made thick. If you want thinner adai, add the water and make it like crispy dosa.
  5. Heat a pan, pour a ladle of batter, and spread it in a circular motion, as shown. Drizzle a spoon of oil. Let it cook.
  6. Now flip to the other side and drizzle another spoon of oil. Once cooked again, flip to the first side and cook for a few more minutes till it gets crispier. Now transfer to a plate. Milagu jeeraga adai is ready.
Recipe Notes
  • Soak lentils and rice for at least 2-3 hours.
  • Coarsely grind the batter, and keep it slightly thicker than the dosa batter consistency.
  • Adai can be made immediately after grinding. You need not ferment the batter. But it is better to keep it for an hour or two and then make adai.
  • If you want to use the remaining batter, refrigerate it for later use. (approx two days)

Delicious Milagu jeeraga adai is ready to serve as Prashad to God.

If you found this post useful, I would really love it if you pin it or share it with your Facebook fans or Twitter followers, or Google+ circles today. All it takes is a simple click on the β€œpin it” β€œlike,” β€œshare,” β€œtweet,” or Google+ buttons below the post. It will keep me motivated. Thank you!

❌