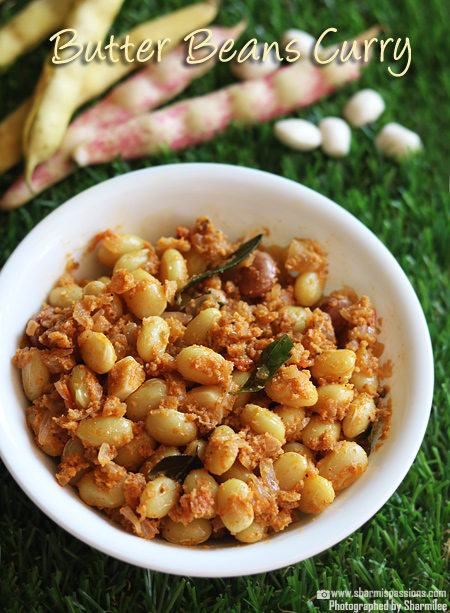
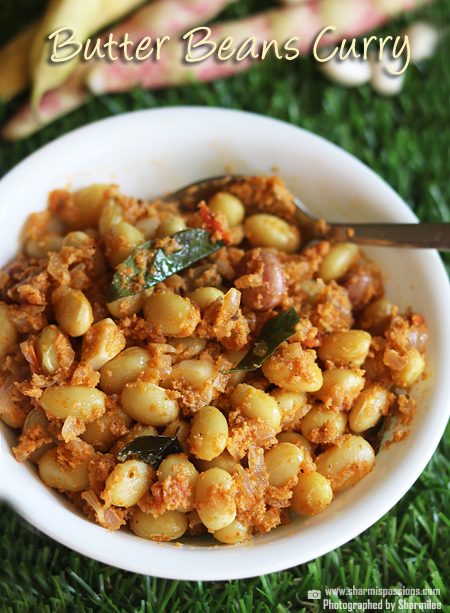
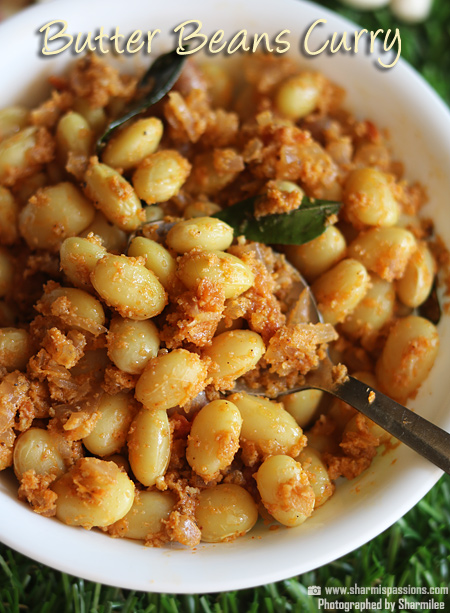
Butter Beans Curry is a tasty and wholesome dish that you can enjoy with both rice and flat breads. It's made by cooking butter beans with onion, tomato, coconut and few simple spices. The beans make it filling while the masala brings lot of flavor. Its a simple and quick recipe to make.
This curry is one of those recipes that can fit in everyday menu easily. It's healthy, rich in protein and gives nice variety compared to usual dal or sambar. The taste is mildly spicy, slightly creamy with coconut, and it works even as a stuffing for rolls or wraps or even as side dish.
[feast_advanced_jump_to]
About Butter Beans Curry
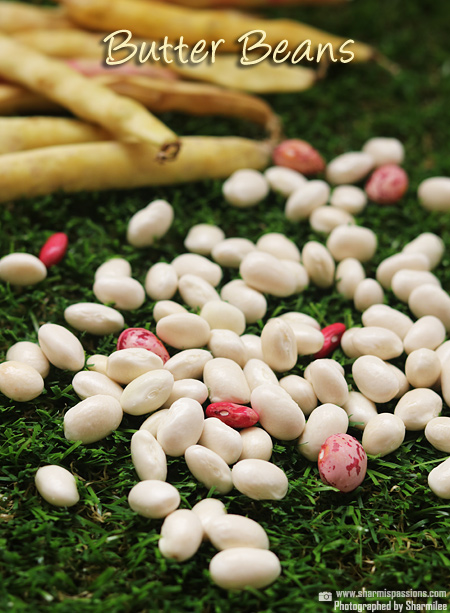
Butter beans also called lima beans in some places, has soft buttery texture when cooked. When mixed with onion, tomato and coconut masala, the beans soak up all the flavors so well. Usually this curry is made semi-dry, but it can also be made gravy type if you want it for chapati or roti.
The taste is balanced, not too strong. You get little heat from chilli powder, mild sweetness from onion and richness from coconut paste. Fennel seeds in the paste adds nice aroma, and whole spices in tempering give that extra punch. Each spoon feels warm and comforting.
There are many ways to change this recipe too. Some use jeera with coconut instead of fennel, some just do simple tempering with mustard seeds and curry leaves. Chilli powder can also be replaced with sambar powder for homely taste. You can even decide how dry or gravy you want, it works both ways.
I usually make this curry a bit semi dry for mixing with rice, but if we plan to eat with roti then I keep little gravy. My family likes both versions so I switch as per mood.
Butter Beans Curry Ingredients
- Butter beans - I have used fresh butter beans, they turn very soft and buttery after cooking, you can also use dried ones but soak well overnight.
- Onion - Finely chopped onion gives mild sweetness and also makes the masala thick, if you don't have small onions, regular ones will do.
- Tomato - I added for tanginess and to balance the spice powders, you can replace with a small piece of tamarind pulp if tomato is not there.
- Garlic - I have used roughly chopped garlic, you can even crush it slightly and add.
- Coconut - Ground coconut makes the curry creamy and gives thickness, if you don't like coconut much, you can reduce the quantity.
- Fennel seeds - Blended with coconut, gives that light sweet aroma to the curry, if you don't have fennel, a small pinch of cumin can be used.
- Spices - Red chilli powder and garam masala powder are the main spice powders, you can also use sambar powder if you prefer that flavor.
- Curry leaves - Always adds freshness to south Indian curries, if not available, you can skip but I like to add.
- Whole spices - Cinnamon, clove and cardamom give strong aroma while tempering, sometimes I replace with just mustard seeds and urad dal if I want a simpler version.
- Oil - I have used refined oil, but coconut oil can also be used for a stronger taste, it makes the curry more traditional.
Why This Recipe Works
- This recipe is easy and simple, uses very basic ingredients you will already have.
- It has a light creamy texture because of coconut, but still not heavy on stomach.
- You can enjoy it both as semi dry curry or slightly gravy, depends how you like.
- It goes well with rice, chapathi, or even as stuffing inside rolls.
- It is a healthy choice since butter beans are rich in protein and fibre.
Similar Recipes
How to make Butter Beans Masala Step by Step
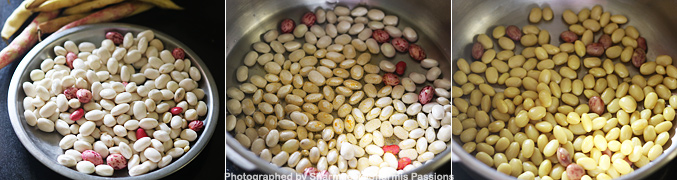
1.Remove butter beans from its shell, wash it well. Pressure cook with ½ cup water along with salt and turmeric powder for 2 whistles in low medium flame. Once pressure releases, Set aside to cool.
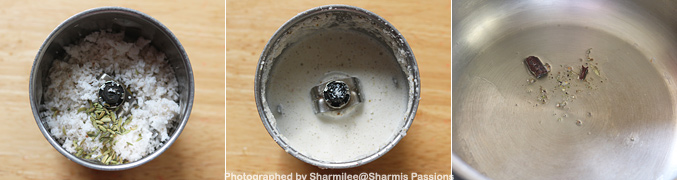
2.Grind coconut and fennel seeds along with little water to a semi fine paste, Set aside. Heat oil in a pan add the items listed under 'to temper'.
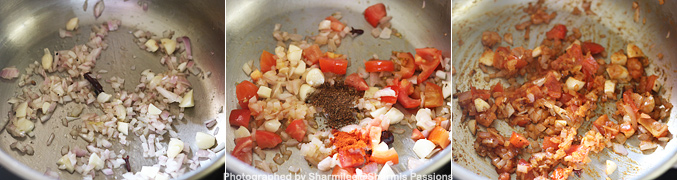
3.Then add onion and garlic sauté till slightly golden then add tomatoes along with red chili powder and garam masala powder. Sauté till tomatoes turn mushy and raw smell leaves.
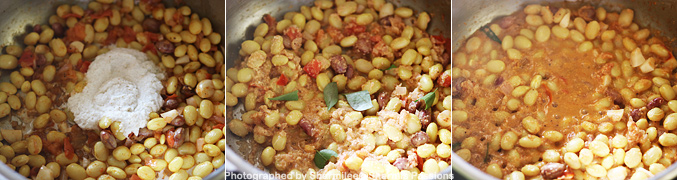
4.Add cooked butter beans along with coconut mixture cook for few mins then add curry leaves, add little water and cook for few mins.
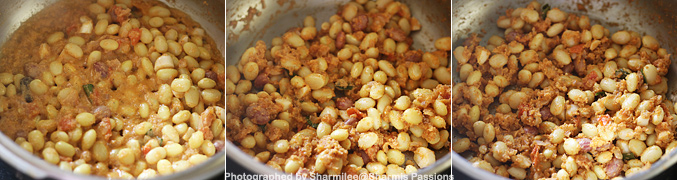
5.Let it cook until it turns dry and masalas are coated well..
Serve with rice and sambar / rasam.
Expert Tips
- Cooking beans - I usually pressure cook the butter beans for 2 whistles, you can even boil in open pot but it takes longer time.
- Grind smooth - When grinding coconut and fennel, make it semi fine, not too coarse or not too smooth, that gives right texture.
- Spice level - I like it medium spicy, you can add more red chilli powder if you like heat, or replace with sambar powder for different taste.
- Consistency - I make it semi dry version, but if you want more gravy, just add little extra water and cook less time.
- Oil choice - You can use coconut oil for that authentic taste, You can use any cooking oil of your choice
Serving and Storage
Serve Butter Beans Curry with hot steamed rice along with rasam or sambar, it is such a comforting combo. This also goes well with chapati, phulka or even parotta. You can also keep it inside wraps or rolls, it makes a nice filling.
Leftover curry can be stored in fridge for a day, reheat before serving, but honestly fresh always taste best.
FAQS
1.Can I skip coconut?
Yes, you can skip coconut and just use onion tomato base, but taste will be different, more like a dry sabzi.
2.Can I make this in advance?
Yes, you can cook in morning and reheat later, but don't make it too watery if you plan to reheat.
3.Can I use dried butter beans?
Yes, just soak them overnight and cook till soft, but fresh ones cook faster and taste slightly better.
4.Is it very spicy?
Not too much, it is medium spice level, you can reduce or increase chilli powder as per your taste.
5.What can I replace butter beans with?
You can try with green peas, double beans or even chickpeas, it works in similar way.
If you have any more questions about this Butter Beans Curry Recipe do mail me at sharmispassions@gmail.com. In addition, follow me on Instagram, Facebook, Pinterest, Youtube and Twitter .
Tried this Butter Beans Curry Recipe? Do let me know how you liked it. Also tag us on Instagram @sharmispassions and hash tag it on #sharmispassions.
📖 Recipe Card
Print
Butter Beans Curry Recipe
Butter Beans Curry is a tasty and wholesome dish that you can enjoy with both rice and flat breads. It's made by cooking butter beans with onion, tomato, coconut and few simple spices. The beans make it filling while the masala brings lot of flavor. Its a simple and quick recipe to make.
Course Lunch, Side Dish
Cuisine Indian
Keyword curry, curry recipes, legumes recipes, lunch box recipes, lunch recipes, lunchbox recipes, meals, Side Dish, stir fry recipes, veg recipes
Prep Time 10 minutes minutes
Cook Time 20 minutes minutes
Total Time 30 minutes minutes
Servings 2
Calories 268kcal
Author Sharmilee J
Ingredients
- 1 cup butter beans
- 5 nos garlic chopped roughly
- 1 small sized big onion chopped finely
- 1 small sized tomato chopped finely
- 1 teaspoon red chilli powder
- ½ teaspoon garam masala powder
- 5 nos curry leaves
- water as required
- salt to taste
To grind to a paste
- ½ cup coconut
- 1 teaspoon fennel seeds
To temper
- 2 teaspoon oil
- ½ inch cinnamon
- 2 nos cloves
- 1 cardamom I used cardamom powder
Instructions
Remove butter beans from its shell, wash it well.
Pressure cook with ½ cup water along with salt and turmeric powder for 2 whistles in low medium flame. Once pressure releases, set aside to cool.
Grind coconut and fennel seeds along with little water to a semi fine paste, set aside.
Heat oil in a pan add the items listed under 'to temper'.
Then add onion & garlic and sauté till slightly golden
Add tomatoes along with red chilli powder and garam masala powder. Sauté till tomatoes turn mushy and raw smell leaves.
Add cooked butter beans along with coconut mixture cook for few mins then add curry leaves, add little water and cook for few mins.
Let it cook until it turns dry and masalas are coated well.
Serve Butter Beans Curry with rice and sambar/ rasam.
Notes
- Cooking beans - I usually pressure cook the butter beans for 2 whistles, you can even boil in open pot but it takes longer time.
- Grind smooth - When grinding coconut and fennel, make it semi fine, not too coarse or not too smooth, that gives right texture.
- Spice level - I like it medium spicy, you can add more red chilli powder if you like heat, or replace with sambar powder for different taste.
- Consistency - I make it semi dry version, but if you want more gravy, just add little extra water and cook less time.
- Oil choice - You can use coconut oil for that authentic taste, You can use any cooking oil of your choice
Nutrition
Serving: 75g | Calories: 268kcal | Carbohydrates: 34g | Protein: 10g | Fat: 12g | Saturated Fat: 7g | Polyunsaturated Fat: 2g | Monounsaturated Fat: 3g | Trans Fat: 0.02g | Sodium: 32mg | Potassium: 838mg | Fiber: 12g | Sugar: 8g | Vitamin A: 1003IU | Vitamin C: 114mg | Calcium: 89mg | Iron: 4mg
The post Butter Beans Curry | Butter Beans Masala appeared first on Sharmis Passions.