Before the refrigerator became a normal part of any kitchen, those with enough money to throw around could get an icebox, which used melting ice to cool food and drinks in a second compartment. As refrigerators became available for sale in the 1920s, this created somewhat awkward transition models, like the 1924 Frigidaire B-9 that [David Allen] recently got offered for a restoration. This was part of the restoration of a 1926 house, which foresaw putting this venerable unit back into operation.
As [David] explains, this refrigerator was still in use until about 1970 when it broke down, and repairs proved tricky. Clearly, the fault wasn’t that severe as [David] got it working again after a number of small repairs and a lot of maintenance. The running unit with its basic elements can be seen purring away in the completion video, with the journey to get there covered in a video series starting with the first episode.
What’s fascinating is that during this aforementioned transition period, the vapor compression electric cooling system was an optional extra, meaning that the basic layout is still that of an icebox. Correspondingly, instead of ice in the ice compartment, you find the low-side float evaporator, with the basement section containing the condensing unit, motor, and compressor. The temperature sensor is also a miracle of simplicity, using bellows that respond to the temperature and thus volume of the evaporator coolant, which trigger a switch that turns on the compressor.
Despite a hundred years having passed since this refrigerator was constructed, at its core it works exactly the same as the unit we have in our kitchens today, albeit with higher efficiency, more electronics, and with the sulfur dioxide refrigerant replaced with something less toxic to us humans.
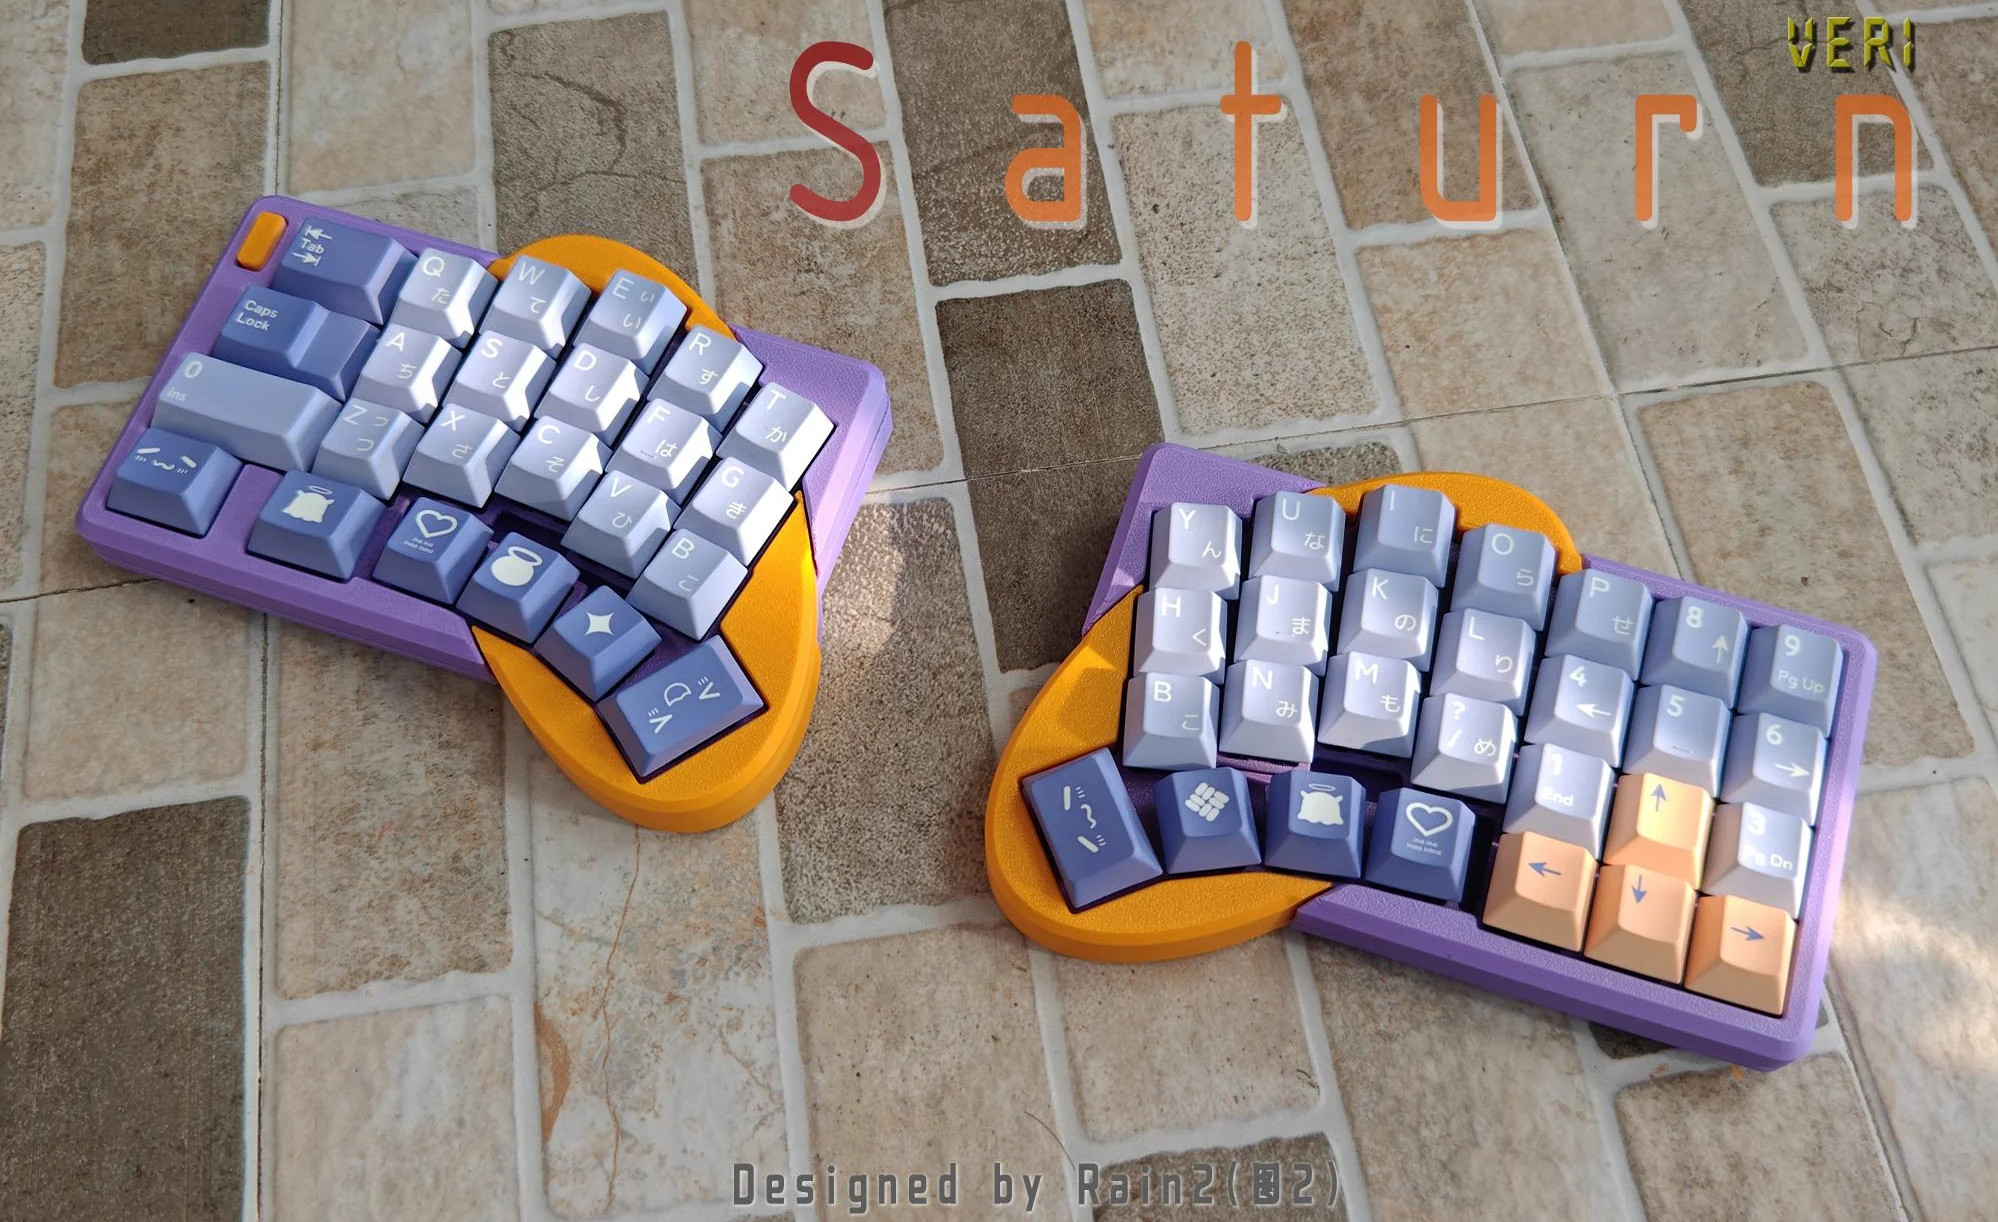
I love, love, love Saturn by [Rain2], which comes in two versions. The first, which is notably more complex, is shown here with its rings-of-Saturn thumb clusters.
Image by [Rain2] via redditSo what was the impetus for this keyboard? It’s simple: a friend mentioned that ergo keyboards are a no-go if you need a num pad really bad.
Saturn has one built right in. The basic idea was to add a num pad while keeping the total number of keys to a minimum. Thanks to a mod key, this area can be many things, including but not limited to a num pad.
Unfortunately, this version is too complicated to make, so v2 does not have the cool collision shapes going for it. But it is still an excellent keyboard, and perhaps will be open source someday.
Phanny Kicks Butt
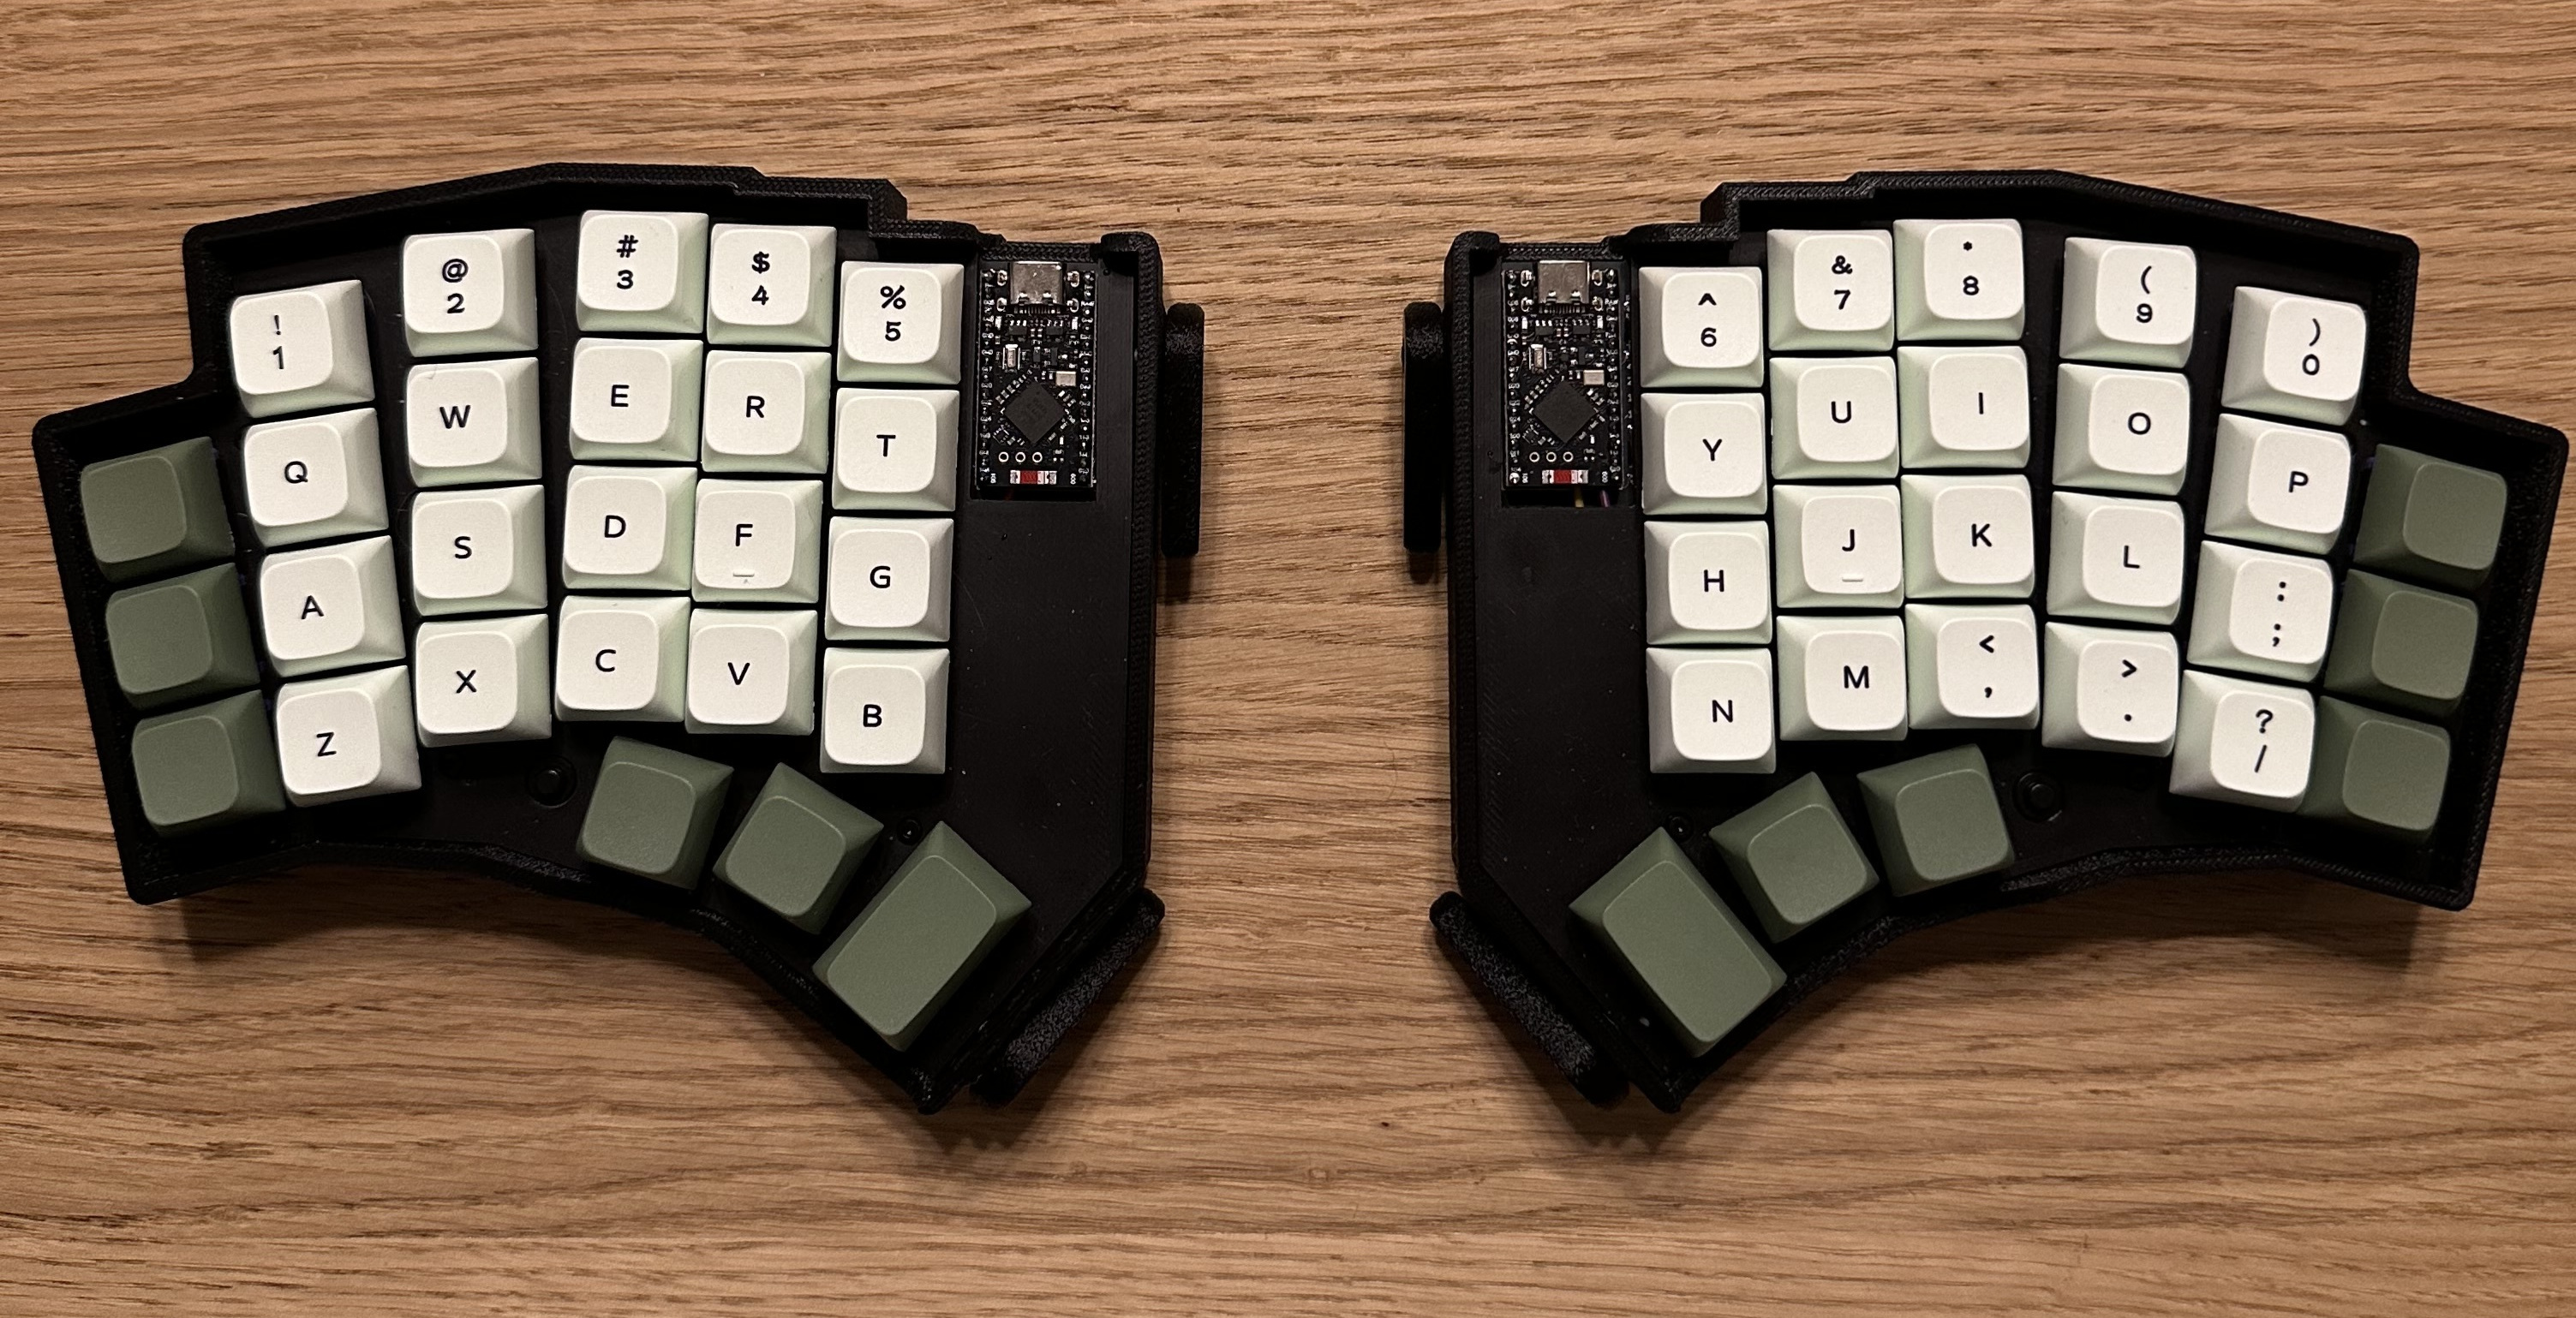
Say hello to Phanny, a custom 52-key wireless split from [SfBattleBeagle]. This interestingly-named board has a custom splay that they designed from the ground up along with PCBWay, who sponsored the PCBs in the first place.
Image by [SfBattleBeagle] via GitHubI personally think the thumb keys go a little too far inward for my taste, but I’m certain that [SfBattleBeagle]’s hands must be different. Probably doesn’t have these stubby little thumbs.
While Ergogen is all the rage, [SfBattleBeagle] still opts to use Fusion and KiCad, preferring the UI of the average CAD program. If you’re wondering about the lack of palm rests, the main reason is that [SfBattleBeagle] tends to bounce between screens, as well as moving between the split and the num pad. To that end, they are currently designing a pair of sliding wrist skates that I would love to hear more about.
Be sure to check out the GitHub repo for all the details and a nice build guide. [SfBattleBeagle] says this is a fun project and results in a very comfy board.
The Centerfold: Mantis WIP is Captivating
Image by [luckybipedal] via redditI love it when I can provide a lovely centerfold that’s also got a lot of story behind it. This is Mantis, a work-in-progress by [luckybipedal] aka [Felix Kühling]. You can read a lot more on GitHub, and the reasoning behind the design choices in [Felix]’s write-up over on KBD News. [Felix] expects to build the first prototypes in March or April, and publish a final design and build guide later this spring.
Do you rock a sweet set of peripherals on a screamin’ desk pad? Send me a picture along with your handle and all the gory details, and you could be featured here!
Historical Clackers: the Masspro
I must say, the Antikey Chop doesn’t have much to say about the Masspro typewriter, and for good reason.
But here’s what we know: the Masspro was invented by a George Francis Rose, who was the son of Frank S. Rose, inventor of the Standard Folding Typewriter. That machine was the predecessor to the Corona No. 3.
Frank died right as the Rose Typewriter Co. was starting to get somewhere. George took over, but then it needed financing pretty badly.
Angel investor and congressman Bill Conger took over the company, relocated, and renamed it the Standard Folding Typewriter Co. According to the Antikey Chop, “selling his father’s company was arguably George’s greatest contribution to typewriter history”.
George Rose was an engineer like his father, but he was not very original when it came to typewriters. The Masspro is familiar yet foreign, and resembles the Corona Four. Although the patent was issued in 1925, production didn’t begin until 1932, and likely ended within to years.
Why? It was the wrong machine at the wrong time. Plus, it was poorly built, and bore a double-shift keyboard which was outdated by this time. And, oh yeah, the company was started during the Depression.
But I like the Masspro. I think my favorite part, aside from the open keyboard, is the logo, which looks either like hieroglyphics or letters chiseled into a stone tablet.
I also like the textured firewall area where the logo is stamped. The Antikey Chop calls this a crinkle finish. Apparently, they came in black, blue, green, and red. The red isn’t candy apple, it’s more of an ox-blood red, and that’s just fine with me. I’d love to see the blue and green, though. Oh, here’s the green.
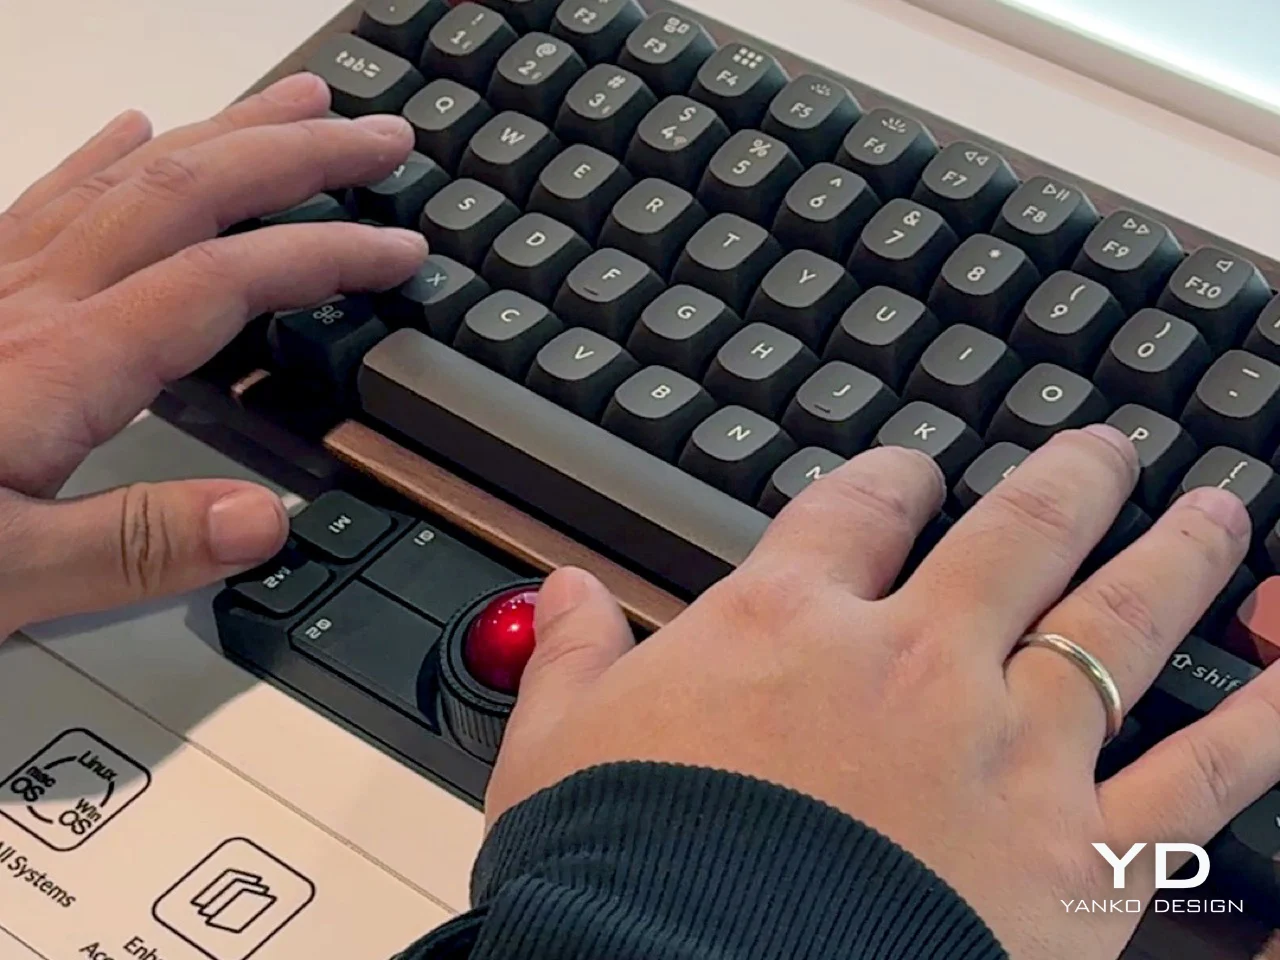
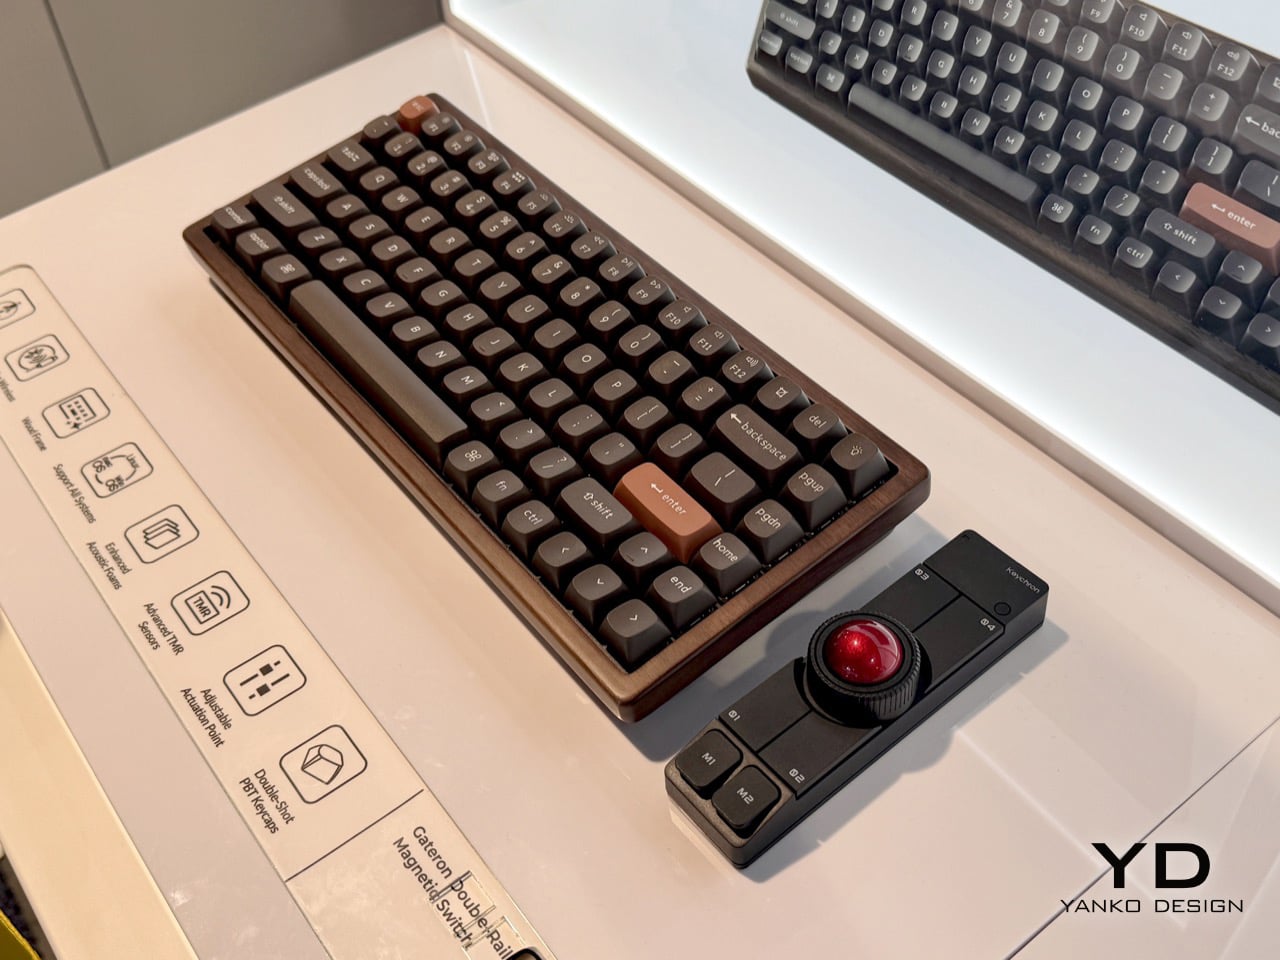
Finally, a Trackball Mouse With Nice Switches
Okay, so Keychron’s new Nape Pro mouse is pretty darn cool, and this is the best picture I could find that actually shows how you’re supposed to implement this thing on your desk. Otherwise, it looks like some kind of presentation remote.
So the idea here is to never take your hands off the keyboard to mouse, although you can use it off to the side like a regular trackball if you want. I say the ability to leave your fingers on the home row is even better.
There are plenty of keyboards with trackpads and other mousing functions that let you do this. But maybe you’re not ready to go that far. This mouse is a nice, easy first step.
The ball is pretty small at 25 mm. For comparison, the M575 uses a 34 mm ball, which is pretty common for trackball mice. Under those six buttons are quiet Huano micro switches, which makes sense, but I personally think loud-ish mice are nice enough.
I’ve never given it much thought, but the switches on my Logitech M575 are nice and clicky. I wonder how these compare, but I don’t see a sound sample. If the Nape Pro switches sound anything like this, then wowsers, that is quiet.
The super-cool part here is the software and orientation system, which they call OctaShift. The thing knows how it’s positioned and can remap its functions to match. M1 and M2 are meant to be your primary mouse buttons, and they are reported to be comfortable to reach in any position.
Inside you’ll find a Realtek chip with a 1 kHz polling rate along with a PixArt PAW3222 sensor, which puts this mouse in the realm of decent wireless gaming mice. But the connectivity choice is yours between dongle, Bluetooth, and USB-C cable.
And check this out: the firmware is ZMK, and Keychron plans to release the case STLs. Finally, it seems the mouse world is catching up with the keyboard world a bit.
Although there are a few hobbies that have low-cost entry points, amateur astronomy is not generally among them. A tabletop Dobsonian might cost a few hundred dollars, and that is just the entry point for an ever-increasing set of telescopes, mounts, trackers, lasers, and other pieces of equipment that it’s possible to build or buy. [Thomas] is deep into astronomy now, has a high-quality, remotely controllable telescope, and wanted to make it more accessible to his friends and others, so he built a system that lets the telescope stream on Twitch and lets his Twitch viewers control what it’s looking at.
The project began with overcoming the $4000 telescope’s practical limitations, most notably an annoyingly short Wi-Fi range and closed software. [Thomas] built a wireless bridge with a Raspberry Pi to extend connectivity, and then built a headless streaming system using OBS Studio inside a Proxmox container. This was a major hurdle as OBS doesn’t have particularly good support for headless operation.
The next step was reverse engineering the proprietary software the telescope uses for control. [Thomas] was able to probe network traffic on the Android app and uncovered undocumented REST and WebSocket APIs. From there, he gained full control over targeting, parking, initialization, and image capture. This allowed him to automate telescope behavior through Python scripts rather than relying on the official Android app.
To make the telescope interactive, he built a Twitch-integrated control system that enables viewers to vote on celestial targets, issue commands, and view live telemetry, including stacking progress, exposure data, and target coordinates. A custom HTML/CSS/JavaScript overlay displays real-time status, and there’s a custom loading screen when the telescope is moving to a new target. He also added ambient music and atmospheric effects, so the stream isn’t silent.
If [Thomas]’s stream is your first entry point into astronomy and you find that you need to explore it more on your own, there are plenty of paths to build your way into the hobby, especially with Dobsonian telescopes, which can be built by hand, including the mirrors.
Carbon fiber (CF) has attained somewhat of a near-mystical appeal in consumer marketing, with it being praised for being stronger than steel while simultaneously being extremely lightweight. This mostly refers to weaved fibers combined with resin into a composite material that is used for everything from car bodies to bike frames. This CF look is so sexy that the typical carbon-fiber composite weave pattern and coloring have been added to products as a purely cosmetic accent.
More recently, chopped carbon fiber (CCF) has been added to the thermoplastics we extrude from our 3D printers. Despite lacking clear evidence of this providing material improvements, the same kind of mysticism persists here as well. Even as evidence emerges of poor integration of these chopped fibers into the thermoplastic matrix, the marketing claims continue unabated.
As with most things, there’s a right way and a wrong way to do it. A recent paper by Sameh Dabees et al. in Composites for example covered the CF surface modifications required for thermoplastic integration with CF.
Carbon Fibers
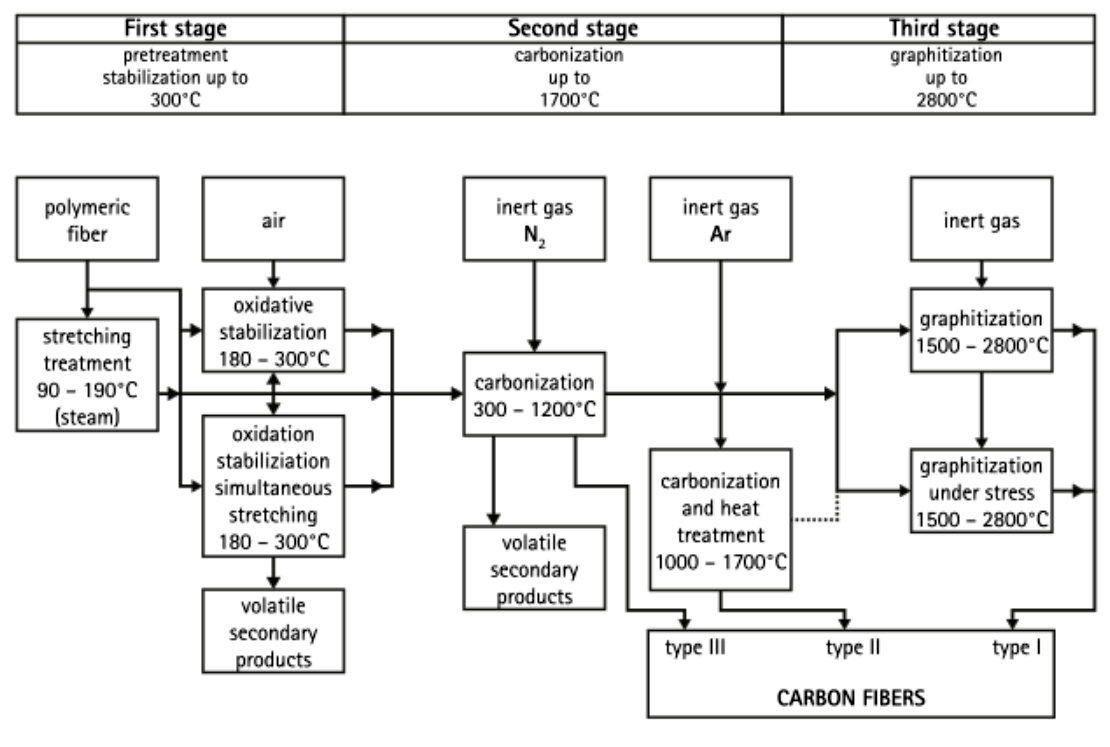
There are a number of ways to produce CF, often using polyacrylonitrile, rayon, or pitch as the feedstock. After spinning this precursor into a suitable filament, heating induces carbonization and produces the carbon fiber.
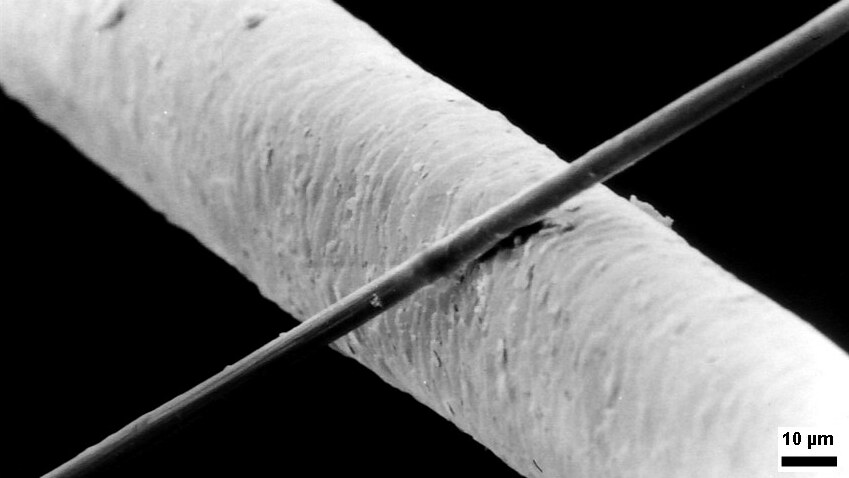
Schematic representation of carbon fiber preparation from polyacrylonitrile.A 6 μm diameter carbon filament, compared to 50 μm diameter human hair. (Source: Wikimedia)
Following this process, the CF is typically in the form of a few micrometer-thick fiber that is essentially pure carbon. To create a structural interface between the CF and the polymer of a composite material, some kind of process has to take place that creates this interface.
The fundamental difference between thermoset and thermoplastic polymers is that thermoset polymers are reacting in the mold as it sets, providing an environment in which the epoxy precursor and hardener can interact with the normally not chemically very reactive CF to form covalent bonds.
In comparison, thermoplastic polymers are already finalized, with covalent bonds between thermoplastics and CF unlikely. This means that the focus with CF-reinforced thermoplastics is mostly on weaker, non-covalent interactions, such as Van der Waals forces, pi-interactions and hydrogen bonds. Each of these interactions is further dependent on whether the thermoplastic is compatible, such as the presence of aromatic rings for pi-interactions.
Making It Stick
With those challenges in mind, how can thermoplastics be coaxed into forming a significant interface with CF? As noted in the earlier cited work by Sameh Dabees et al., there is no single surface treatment for CF that would work for every thermoplastic polymer, as a logical result of the limitations imposed by the available non-covalent interactions.
Carbon fiber in PLA after FDM printing, showing clear voids. (Credit: I built a thing, YouTube)
One way to prepare the CF is by applying a coating to the fiber, called a sizing. By applying a sizing to the fiber that is compatible with the target thermoplastic, the interface with the bulk material is expected to improve. In one cited study involving a polyamide-acid sizing for polyimide bulk material, this coating created an approximately 85 nm interface, with an interfacial shear strength increased by 32.3%. In another study targeting CF-PEEK, this had a polyimide-based, water-soluble sizing applied that also significantly improved the shear strength.
Of course, this sizing has to actually adhere to the CF, lest it simply vanishes into the bulk thermoplastic material. This is a problem that is easily observable in FDM-printed thermoplastic polymers as distinct voids around the CF where the bulk polymer pulled away during crystallization, and no interface formed. Obviously, these voids create a weak point instead of strengthening the material.
Fiber Modding
Although CF is often confused with carbon nanotubes, it does not have the rigidly ordered structure that they do. Instead it has a graphite structure, owing to the way that they are produced, meaning sheets of graphite placed together in a disordered fashion. Despite this, the external surface is still smooth, which is where the chemical inertness comes from. Combined with the lack of reactivity from the side of thermoplastics, this highlights the need for something to bridge the gap.
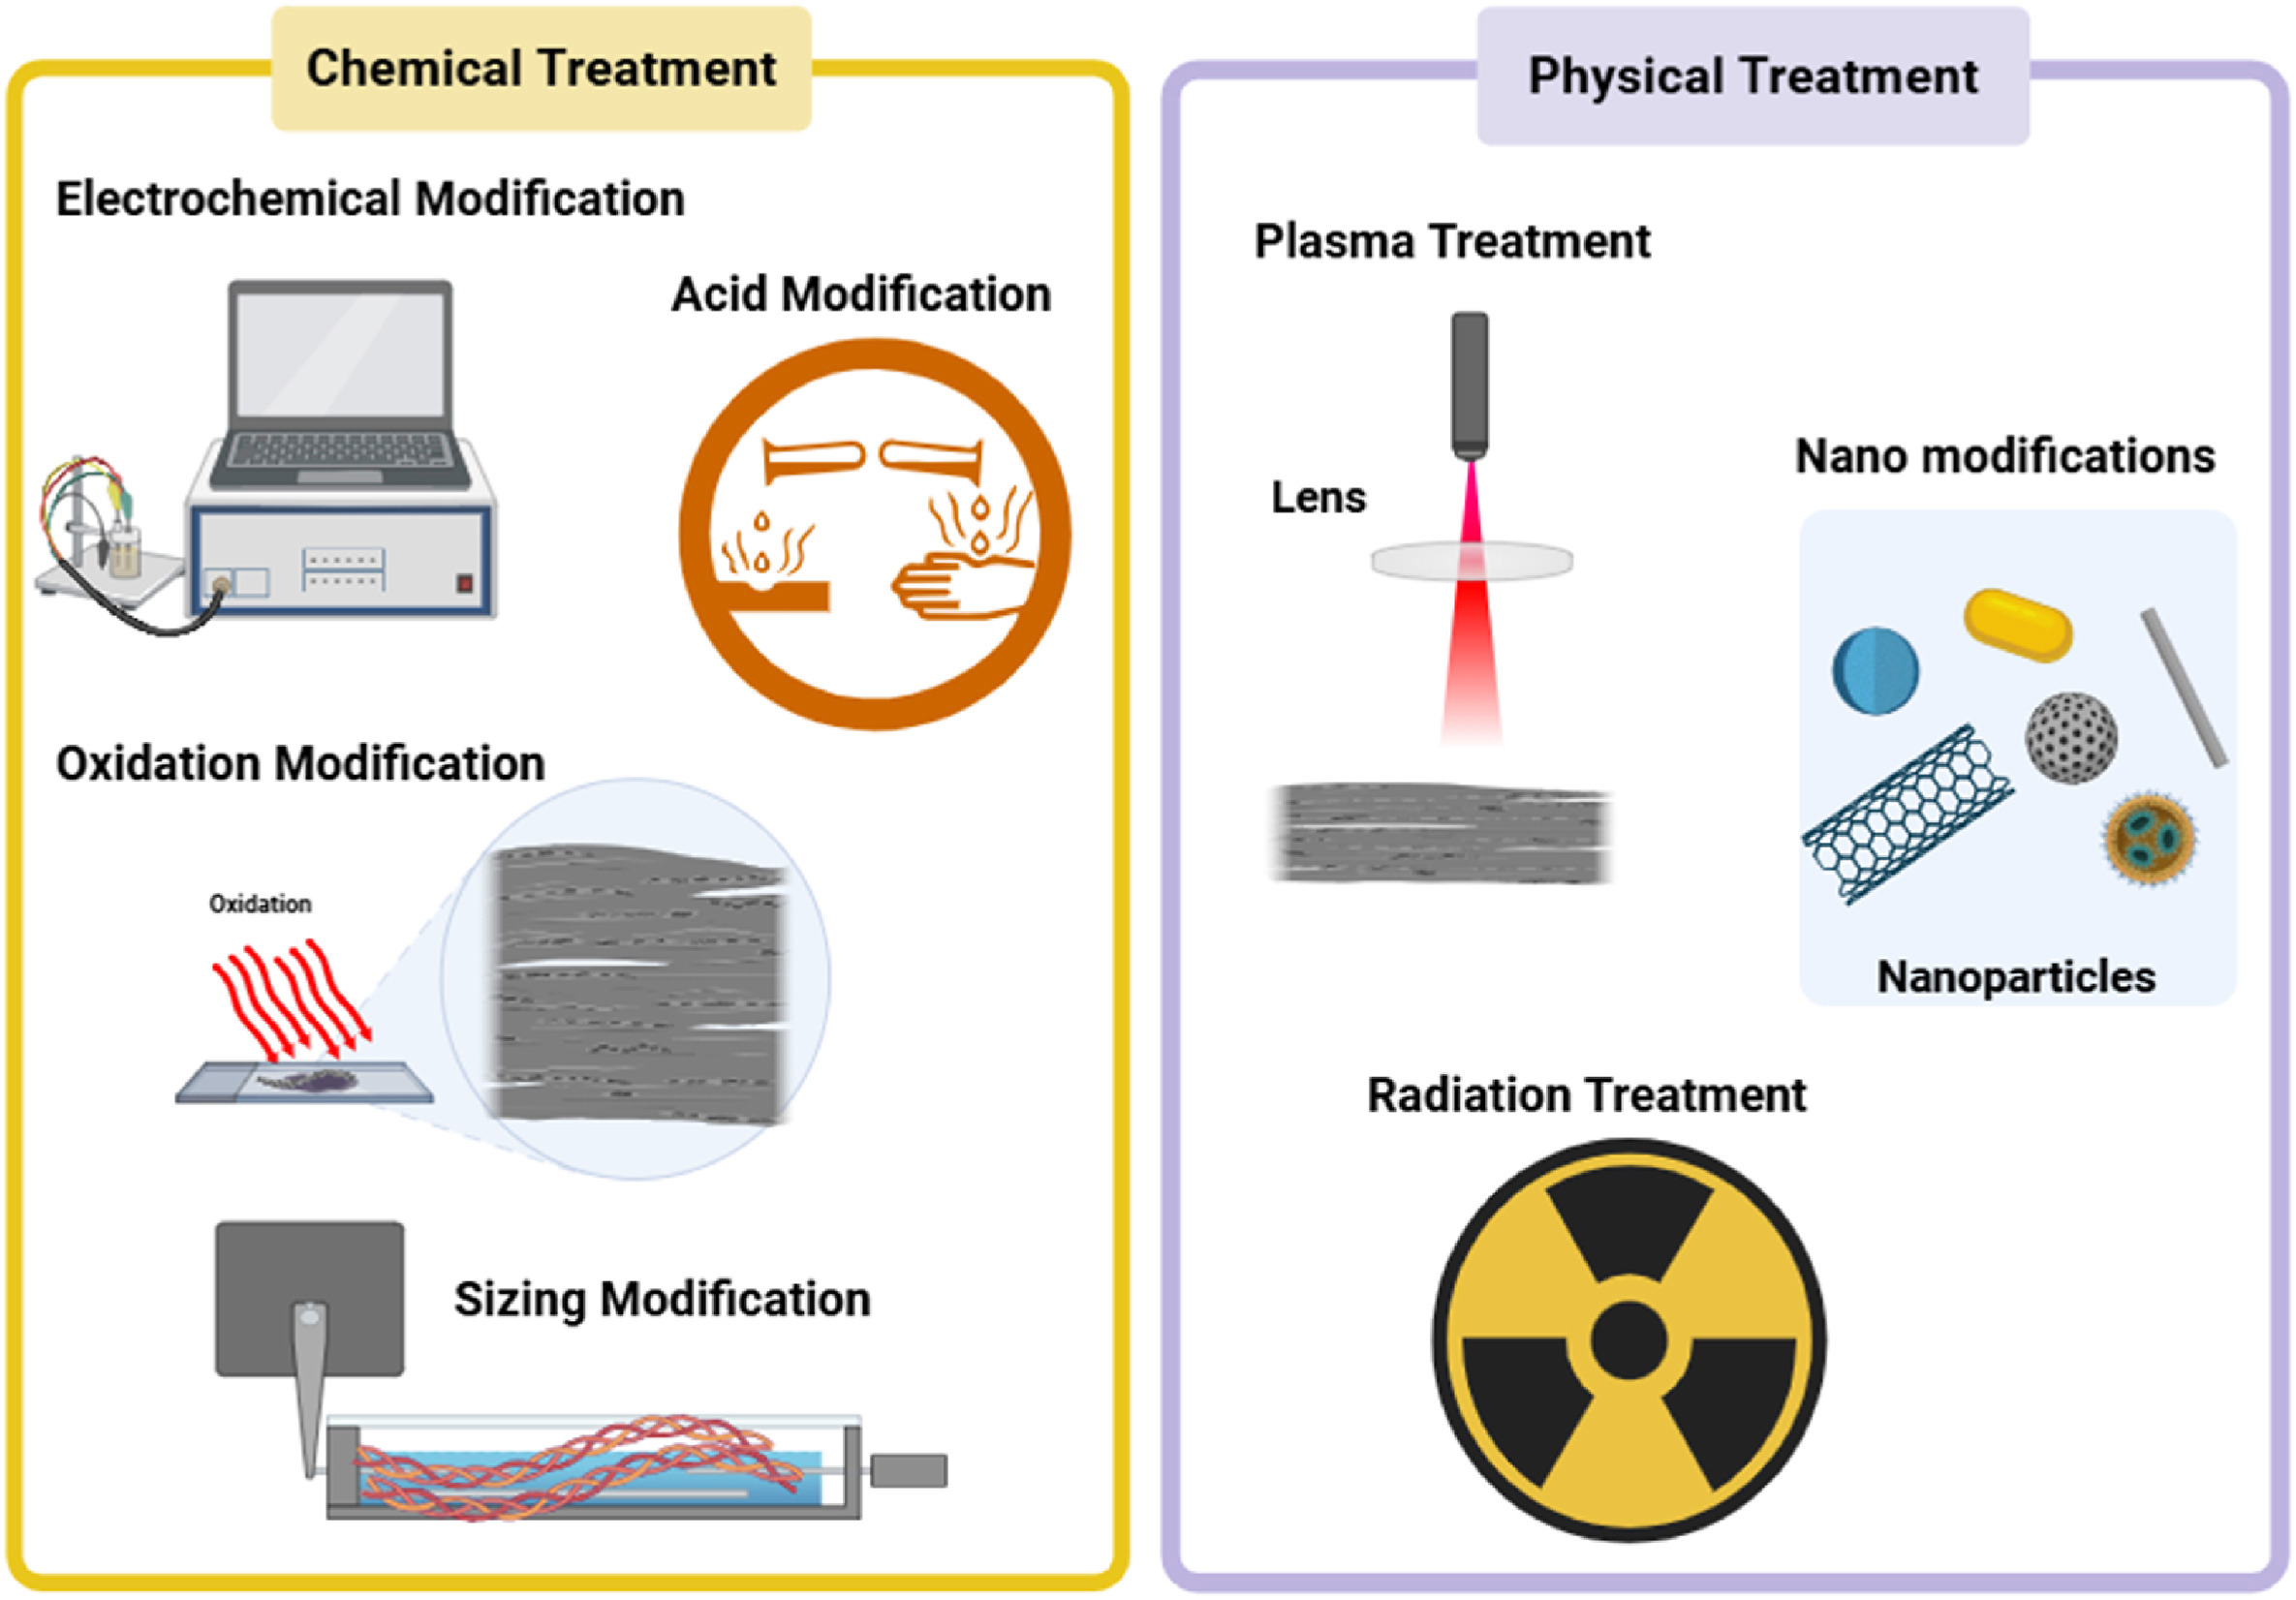
Various carbon fiber surface modification methods. (Credit: Dabees et al., 2025, Composites)
The review paper by Dabees et al. covers the most common types of surface treatments, with the above graphic providing a summary of the methods. Perhaps one of the most straightforward methods is the coating of the CF with an epoxy, thus shifting the interface from CF-thermoplastic to thermoset-thermoplastic. This kind of hybrid approach shows promising results, but is also cumbersome and not a universal fix.
Note that virtually all research here is focused on thermoplastic polymers like polycarbonate and PEEK, as these are most commonly used in industrial and medical settings. Yet even within that more limited scope the understanding of the exact effects of these modifications remains poorly investigated. Much of this is due to how hard it is to characterize the effects of one treatment when you take all other variables into account.
Perhaps most frustrating of all is how hard it is to research this topic considering the scale of the CF surface and the miniscule thickness of the CF-polymer interface. Relying on purely mechanical tests to quantify the impact is then tempting, but ultimately leaves us without a real understanding of why one method seems to work better than another.
Vibes Vs Science
The overall conclusion that we draw from this particular review paper is that although we know that composite materials can often provide improvements, in the case of thermoplastic-CF composites we realize that our understanding of the fundamentals is still rather lacking.
Outside of the less mainstream world of industrial and medical settings, CF is now widely being added to thermoplastic polymers, primarily in the form of filaments for FDM 3D printers. Without detailed information on whether the manufacturers of these filaments perform any kind of CF surface modification, it is very hard to even compare different CF-polymer filaments like this, even before taking into account individual FDM printer configurations and testing scenarios.
Considering that CF has for a few years now been identified as a potential carcinogen akin to asbestos, this raises the question of whether we really want to put CF and particularly the very small chopped carbon fibers into everything around us and thermoplastics in particular. When the empirical evidence available to us today shows that any mechanical improvements are not due to a solid CF-polymer interface, and any potential carcinogenic risks still years into the future of becoming clear, then the logical choice would be to hold back on CF-thermoplastics until we gain a better understanding of the benefits and risks.
Over the past years, the author of the cURL project, [Daniel Stenberg], has repeatedly complained about the increasingly poor quality of bug reports filed due to LLM chatbot-induced confabulations, also known as ‘AI slop’. This has now led the project to suspend its bug bounty program starting February 1, 2026.
Examples of such slop are provided by [Daniel] in a GitHub gist, which covers a wide range of very intimidating-looking vulnerabilities and seemingly clear exploits. Except that none of them are vulnerabilities when actually examined by a knowledgeable developer. Each is a lengthy word salad that an LLM churned out in seconds, yet which takes a human significantly longer to parse before dealing with the typical diatribe from the submitter.
Although there are undoubtedly still valid reports coming in, the truth of the matter is that the ease with which bogus reports can be generated by anyone who has access to an LLM chatbot and some spare time has completely flooded the bug bounty system and is overwhelming the very human developers who have to dig through the proverbial midden to find that one diamond ring.
We have mentioned before how troubled bounty programs are for open source, and how projects like Mesa have already had to fight off AI slop incidents from people with zero understanding of software development.
If you’re reading this, you probably have some fondness for human-crafted language. After all, you’ve taken the time to navigate to Hackaday and read this, rather than ask your favoured LLM to trawl the web and summarize what it finds for you. Perhaps you have no such pro-biological bias, and you just don’t know how to set up the stochastic parrot feed. If that’s the case, buckle up, because [Rafael Ben-Ari] has an article on how you can replace us with a suite of LLM agents.
The AI-focused paper has a more serious aesthetic, but it’s still seriously retro.
He actually has two: a tech news feed, focused on the AI industry, and a retrocomputing paper based on SimCity 2000’s internal newspaper. Everything in both those papers is AI-generated; specifically, he’s using opencode to manage a whole dogpen of AI agents that serve as both reporters and editors, each in their own little sandbox.
Using opencode like this lets him vary the model by agent, potentially handing some tasks to small, locally-run models to save tokens for the more computationally-intensive tasks. It also allows each task to be assigned to a different model if so desired. With the right prompting, you could produce a niche publication with exactly the topics that interest you, and none of the ones that don’t. In theory, you could take this toolkit — the implementation of which [Rafael] has shared on GitHub — to replace your daily dose of Hackaday, but we really hope you don’t. We’d miss you.
The concept is straightforward enough. The Nintendo DSi runs a small homebrew app which lets you use the stylus to make simple line drawings on the lower touchscreen. These drawings are then trucked out wirelessly as raw touch data via UDP packets, and fed into a Gemini tool which transforms them into animation frames. These are then sent to an iPhone app, which uses ARKit APIs and the phone’s camera to display the animations embedded into the surrounding environment via augmented reality.
One might question the utility of this project, given that the iPhone itself has a touch screen you can draw on, too. It’s a fair question, and one without a real answer, beyond the fact that sometimes it’s really fun to play with an old console and do weird things with it. Plus, there just isn’t enough DSi homebrew out in the world. We love to see more.
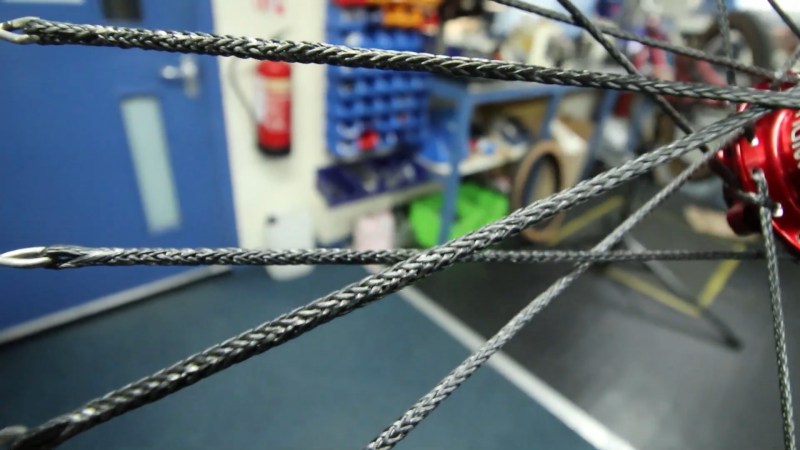
We know this one is a few years old, but unless you’re deep into the cycling scene, there’s a good chance this is the first time you’ve heard of [Ali Clarkson’s] foray into home made rope spokes.
The journey to home-made rope spoke begun all the way back in 2018, shortly after the company Berd introduced their very expensive rope spokes. Berd’s spokes are made of a hollow weaved ultrahigh molecular weight polyethylene (UHMWPE) rope with very low creep. They claim wheels stronger than steel spoke equivalents at a fraction of the weight. Naturally forum users asked themselves, “well why can’t we make our own?” As it turns out, there are a handful of problems with trying this at home.
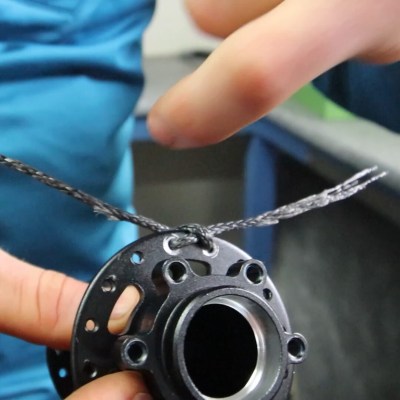
There are a number of ways to skin this proverbial cat, but they all center around some very special nautical ropes, namely, Robline DM20. This rope has excellent wear and creep characteristics, in a hollow weave much like what Berd developed. The hubs also require the addition of a bevel around the spoke holes to prevent wear. Beyond those two similarities, there are quite a number of ways to lace the spokes between the hub and wheels.
As detailed by [Ali Clarkson], one method involves creating loops out of bike spokes, with a custom jig and some brazing. Then a length of rope is passed through the hub and a special hitch is used to keep it in place. Two loops are made in the ends of this length of rope and passed through the spoke ends made earlier. Finally everything is brought up to tension and trued much like a normal wheelset. The front wheel ended up weighing around 700g, a rather impressive feat for a 24 inch downhill wheel.
However, a number of other methods have been tried on the forum threads. Namely, a number of users have attempted to varying degrees of success putting a length of spoke inside the hollow rope weave and “Chinese finger trapping” it together. The key issue here is sourcing a glue strong enough to hold the spoke piece on at lower tensions, but flexible enough to not crack with the cyclical loading on a rim.
If predictions hold steady, nearly half of the United States will be covered in snow by the time this post goes live, with the Northeast potentially getting buried under more than 18 inches. According to the National Weather Service, the “unusually expansive and long-duration winter storm will bring heavy snow from the central U.S. across the Midwest, Ohio Valley, and through the northeastern U.S. for the remainder of the weekend into Monday.” If that sounds like a fun snow day, they go on to clarify that “crippling to locally catastrophic impacts can be expected”, so keep that in mind. Hopefully you didn’t have any travel plans, as CNBC reported that more than 13,000 flights were canceled as of Friday night. If you’re looking to keep up with the latest developments, we recently came across StormWatch (GitHub repo), a slick open source weather dashboard that’s written entirely in HTML. Stay safe out there, hackers.
Speaking of travel, did you hear about Sebastian Heyneman’s Bogus Journey to Davos? The entrepreneur (or “Tech Bro” to use the parlance of our times) was in town to woo investors attending the World Economic Forum, but ended up spending the night in a Swiss jail cell because the authorities thought he might be a spy. Apparently he had brought along a prototype for the anti-fraud device he was hawking, and mistakenly left it laying on a table while he was rubbing shoulders. It was picked up by security guards and found to contain a very spooky ESP32 development board, so naturally he was whisked off for interrogation. A search of his hotel room uncovered more suspicious equipment, including an electric screwdriver and a soldering iron. Imagine if a child had gotten their hands on them?
But the best part of the story is when Sebastian tries to explain the gadget’s function to investigators. When asked to prove that the code on the microcontroller wasn’t malicious, he was at a loss — turns out our hero used AI to create the whole thing and wasn’t even familiar with the language it was written in. In his own words: “Look, I’m not a very good hardware engineer, but I’m a great user of AI. I was one of the top users of Cursor last year. I did 43,000 agent runs and generated 25 billion tokens.” Oof. Luckily, the Swiss brought in a tech expert who quickly determined the device wasn’t dangerous. He was even nice enough to explain the code line-by-line to Sebastian before he was released. No word on whether or not they charged him for the impromptu programming lesson.
It wasn’t hard for the Swiss authorities to see what was inside the literal black box Sebastian brought with him, but what if that wasn’t possible? Well, if you’ve got an x-ray machine handy, that could certainly help. The folks at Eclypsium recently released a blog post that describes how they compared a legit FTDI cable with a suspect knock-off by peering at their innards. What we thought was particularly interesting was how they were able to correctly guess which one was the real deal based on the PCB design. The legitimate adapter featured things like ground pours and decoupling caps, and the cheap one…didn’t. Of course, this makes sense. If you’re looking to crank something out as cheaply as possible, those would be the first features to go. (Editor’s note: sarcasm.)
It doesn’t take an x-ray machine or any other fancy equipment to figure out that the Raspberry Pi 5 is faster than its predecessors. But quantifying just how much better each generation of Pi is compared to the other members of the family does require a bit more effort, which is why we were glad to see that The DIY Life did the homework for us. It’s not much of a spoiler to reveal that the Pi 5 won the head-to-head competition in essentially every category, but it’s still interesting to read along to see how each generation of hardware fared in the testing.
Finally, Albedo has released a fascinating write-up that goes over the recent flight of their Very Low Earth Orbit (VLEO) satellite, Clarity-1. As we explained earlier this week, operating at a lower orbit offers several tangible benefits to spacecraft. One of the major ones is that such an orbit decays quickly, meaning a spacecraft could burn up just months or even days after its mission is completed. For Albedo specifically, they’re taking advantage of the lower altitude to snap closeup shots of the Earth. While there were a few hiccups, the mission was overall a success, providing another example of how commercial operators can capitalize on this unique space environment.
See something interesting that you think would be a good fit for our weekly Links column? Drop us a line, we’ve love to hear about it.
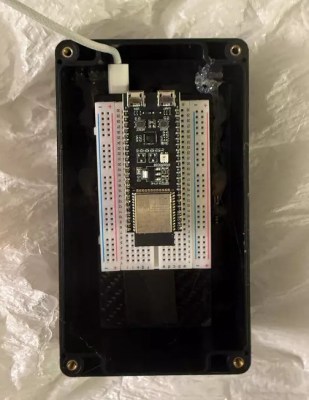
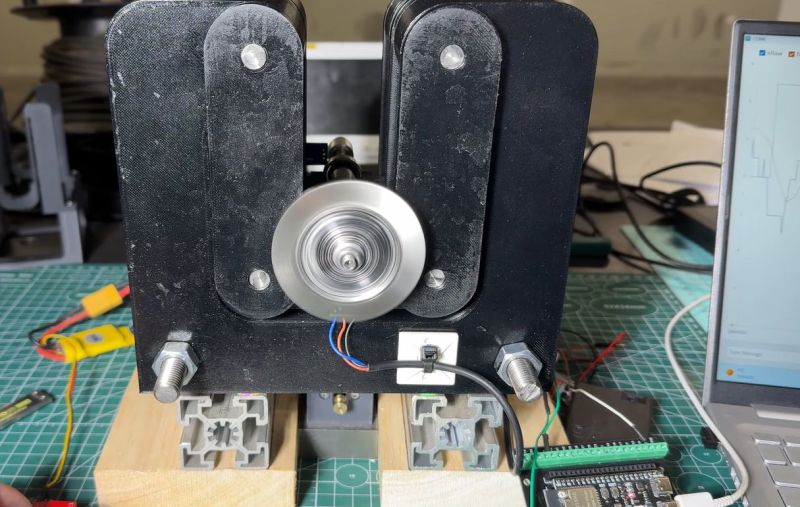
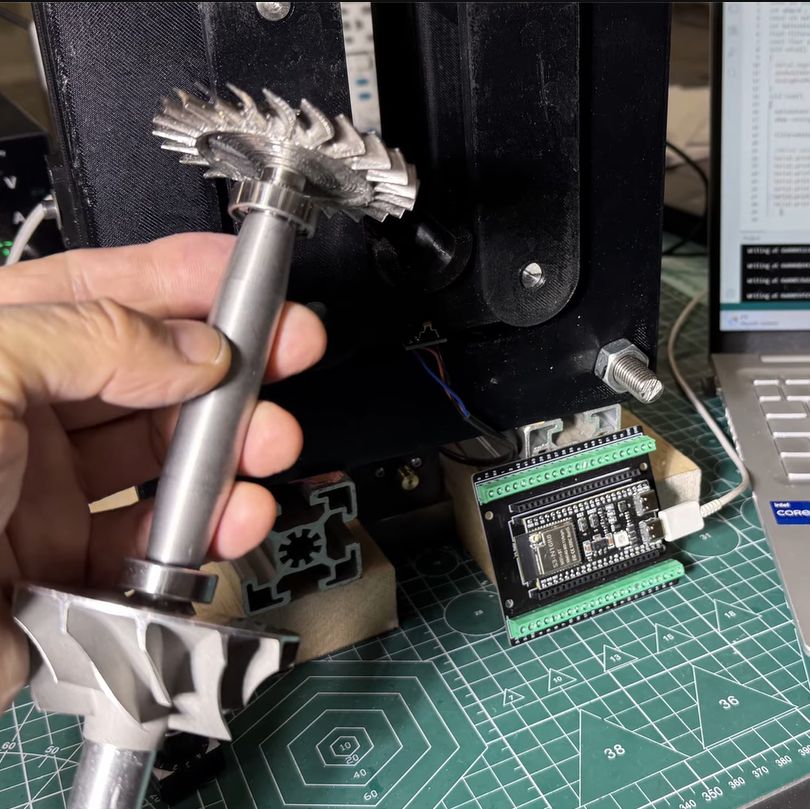
Although jet engines are theoretically quite simple devices, in reality they tread a fine line between working as intended and vaporizing into a cloud of lethal shrapnel. The main reason for this is the high rotational speed of the rotors, with any imbalance due to poor manufacturing or damage leading to undesirable outcomes. It’s for this reason that [AlfMart CNC Garage] on YouTube decided to spend some quality time building a balancer for his DIY RC turbine project and making sure it can prevent such a disaster scenario.
In the previous part of the series the turbine disc was machined out of inconel alloy, as the part will be subjected to significant heat as well when operating. To make sure that the disc is perfectly balanced, a dynamic balancing machine is required. The design that was settled on after a few failed attempts uses an ADXL335 accelerometer and Hall sensor hooked up to an ESP32, which is said to measure imbalance down to ~1 mg at 4,000 RPM.
A big part of the dynamic balancing machine is the isolation of external vibrations using a bearing-supported free-floating structure. With that taken care of, this made measuring the vibrations caused by an imbalanced rotor much easier to distinguish. The ESP32 is here basically just to read out the sensors and output the waveforms to a connected PC via serial, with the real work being a slow and methodical data interpretation and balancing by hand.
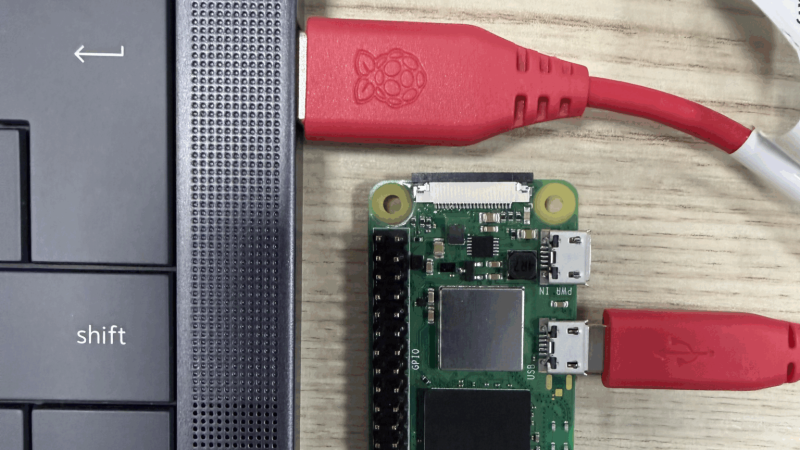
Setting up access to a headless Raspberry Pi is one of those tasks that should take a few minutes, but for some reason always seems to take much longer. The most common method is to configure Wi-Fi access and an SSH service on the Pi before starting it, which can go wrong in many different ways. This author, for example, recently spent a few hours failing to set up a headless Pi on a network secured with Protected EAP, and was eventually driven to using SSH over Bluetooth. This could thankfully soon be a thing of the past, as [Paul Oberosler] developed a package for SSH over USB, which is included in the latest versions of Raspberry Pi OS.
The idea behind rpi-usb-gadget is that a Raspberry Pi in gadget mode can be plugged into a host machine, which recognizes it as a network adapter. The Pi itself is presented as a host on that network, and the host machine can then SSH into it. Additionally, using Internet Connection Sharing (ICS), the Pi can use the host machine’s internet access. Gadget mode can be enabled and configured from the Raspberry Pi Imager. Setting up ICS is less plug-and-play, since an extra driver needs to be installed on Windows machines. Enabling gadget mode only lets the selected USB port work as a power input and USB network port, not as a host port for other peripherals.
An older way to get USB terminal access is using OTG mode, which we’ve seen used to simplify the configuration of a Pi as a simultaneous AP and client. If you want to set up headless access to Raspberry Pi desktop, we have a guide for that.
It’s fair to say that there are many people in our community who just love to dunk on Microsoft Windows. It’s an easy win, after all, the dominant player in the PC operating system market has a long history of dunking on free software, and let’s face it, today’s Windows doesn’t offer a good experience. But what might the future hold? [Mason] has an unexpected prediction: that Microsoft will eventually move towards offering a Windows-themed Linux distro instead of a descendant of today’s Windows.
The very idea is sure to cause mirth, but on a little sober reflection, it’s not such a crazy one. Windows 11 is slow and unfriendly, and increasingly it’s losing the position once enjoyed by its ancestors. The desktop (or laptop) PC is no longer the default computing experience, and what to do about that must be a big headache for the Redmond company. Even gaming, once a stronghold for Windows, is being lost to competitors such as Valve’s Steam OS, so it wouldn’t be outlandish for them to wonder whether the old embrace-and-extend strategy could be tried on the Linux desktop.
We do not possess a working crystal ball here at Hackaday, so we’ll hold off hailing a Microsoft desktop Linux. But we have to admit it’s not an impossible future, having seen Apple reinvent their OS in the past using BSD, and even Microsoft bring out a cloud Linux distro. If you can’t wait, you’ll have to make do with a Windows skin, WINE, and the .NET runtime on your current Linux box.
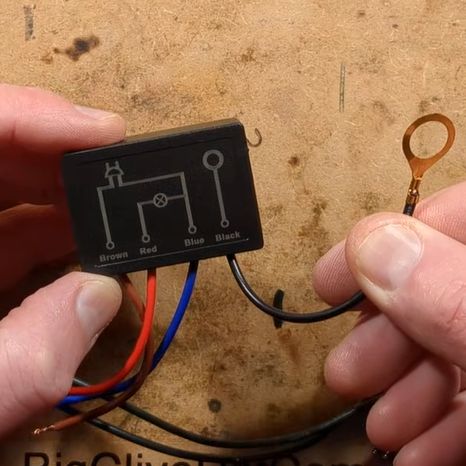
In [Big Clive]’s recent grab bag of tat ordered from Chinese commerce platforms, there were two touch light control boxes that can turn any ungrounded conductive surface into a mains load dimmer control. Of course, the primary reason for the purchase was a teardown, and a teardown we got.
These unassuming little boxes are built around the Tontek TT6061A, listed as a ‘touch dimmer’, which uses a triac to control the output current. There are four levels, ranging from off to full brightness, before the next touch event turns the output off again.
With the output off, [Clive] measured 0.7 W power usage. After popping open the plastic enclosure, the circuitry turned out to largely follow the recommended application circuit from the datasheet — as can be seen in the above screenshot — with apparently a few cost optimizations, in the form of omitted diodes and a capacitor.
The problem with these devices is that they are only really suitable for dimming low-power resistive loads like incandescent lights, with LED lights likely requiring the unpopulated capacitor spot on the PCB to be populated to tweak the chip’s triac timing, among other changes. There are also the slight issues with no real concern with them radiating EMI, and the exciting possibility of getting shocked at mains voltage without at least a class-Y capacitor installed.
Perhaps using a capacitive touch controller instead that works through plastic, for example, isn’t such a crazy alternative here, especially since they’re not really much more expensive and less likely to shock you. Want to create your own triac designs? We have just the post to get you started.
Before the modern Internet existed, there were still plenty of ways of connecting with other computer users “online”, although many of them might seem completely foreign to those of us in the modern era. One of those systems was the Bulletin Board System, or BBS, which would have been a single computer, often in someone’s home, connected to a single phone line. People accessing the BBS would log in if the line wasn’t busy, leave messages, and quickly log out since the system could only support one user at a time. While perhaps a rose-tinted view, this was a more wholesome and less angsty time than the modern algorithm-driven Internet, and it turns out these systems are making a bit of a comeback as a result.
The video by [The Retro Shack] sets up a lot of this history for context, then, towards the end, uses a modern FPGA-based recreation called the Commodore 64 Ultimate to access a BBS called The Old Net, a modern recreation of what these 80s-era BBS systems were like. This involves using a modern networking card that allows the C64 to connect to Wi-Fi access points to get online instead of an old phone modem, and then using a terminal program called CCGMS to connect to the BBS itself. Once there, users can access mail, share files, and even play a few games.
While the video is a very basic illustration of how these BBS systems worked and how to access one, it is notable in that it’s part of a trend of rejecting more modern technology and systems in favor of older ones, where the users had more control. A retro machine like a C64 or Atari is not required either; modern operating systems can access these with the right terminal program, too. A more in-depth guide to the BBS can be found here for those looking to explore, and we’ve also seen other modern BBS systems recently.
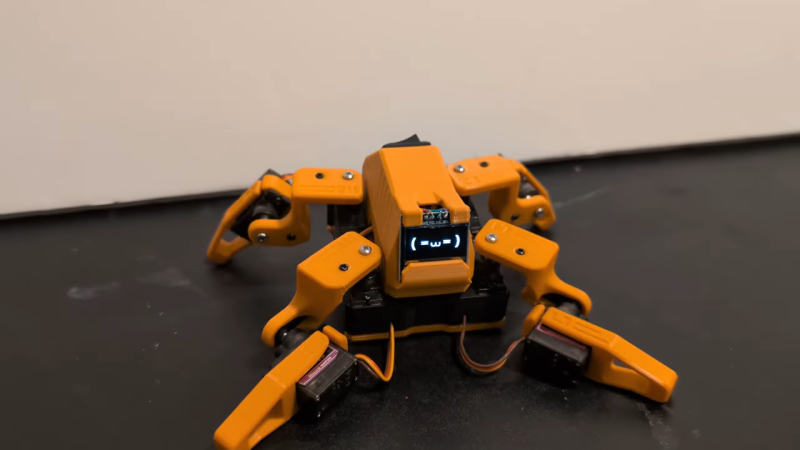
This little fellow is named Sesame. A quadruped robot, it’s built out of 3D-printed components. Each leg features a pair of MG90S hobby servos, one of which rotates the leg around the vertical axis, while the other moves the foot. The ESP32 microcontroller controls all eight servos, enabling remote control of Sesame via its built-in wireless connectivity. Sesame also gets a 128×64 OLED display, which it uses to display a range of emotions.
Mechanically, the Sesame design isn’t particularly sophisticated. Where it shines is that even with such a limited range of motion, between its four legs and its little screen, this robot can display a great deal of emotion. [Dorian] shows this off in the project video, in which Sesame scampers around a desktop with all the joy and verve of a new puppy. It’s also very cheap; [Dorian] estimates you can build your own Sesame for about $60. Files are on GitHub for the curious.
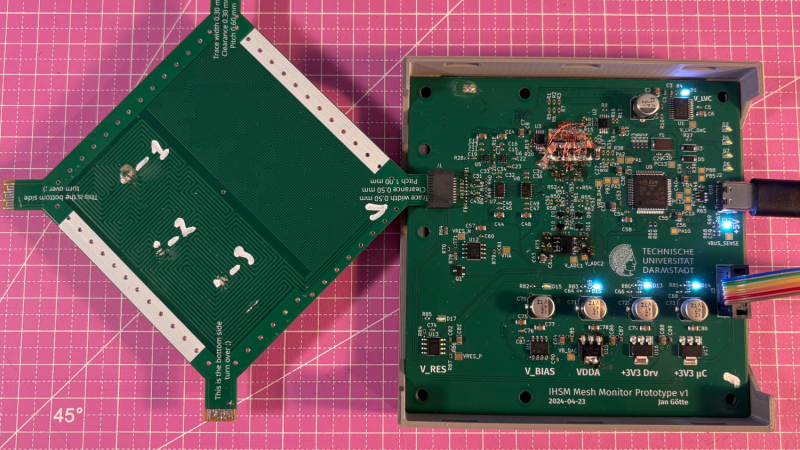
For certain high-security devices, such as card readers, ATMs, and hardware security modules, normal physical security isn’t enough – they need to wipe out their sensitive data if someone starts drilling through the case. Such devices, therefore, often integrate circuit meshes into their cases and regularly monitor them for changes that could indicate damage. To improve the sensitivity and accuracy of such countermeasures, [Jan Sebastian Götte] and [Björn Scheuermann] recently designed a time-domain reflectometer to monitor meshes (pre-print paper).
Many meshes are made from flexible circuit boards with winding traces built into the case, so cutting or drilling into the case breaks a trace. The problem is that most common ways to detect broken traces, such as by resistance or capacitance measurements, aren’t easy to implement with both high sensitivity and low error rates. Instead, this system uses time-domain reflectometry: it sends a sharp pulse into the mesh, then times the returning echoes to create a mesh fingerprint. When the circuit is damaged, it creates an additional echo, which is detected by classifier software. If enough subsequent measurements find a significant fingerprint change, it triggers a data wipe.
The most novel aspect of this design is its affordability. An STM32G4-series microcontroller manages the timing, pulse generation, and measurement, thanks to its two fast ADCs and a high-resolution timer with sub-200 picosecond resolution. For a pulse-shaping amplifier, [Jan] and [Björn] used the high-speed amplifiers in an HDMI redriver chip, which would normally compensate for cable and connector losses. Despite its inexpensive design, the circuit was sensitive enough to detect when oscilloscope probes contacted the trace, pick up temperature changes, and even discern the tiny variations between different copies of the same mesh.
It’s not absolutely impossible for an attacker to bypass this system, nor was it intended to be, but overcoming it would take a great deal of skill and some custom equipment, such as a non-conductive drill bit. If you’re interested in seeing such a system in the real world, check out this teardown of a payment terminal. One of the same authors also previously wrote a KiCad plugin to generate anti-tamper meshes.
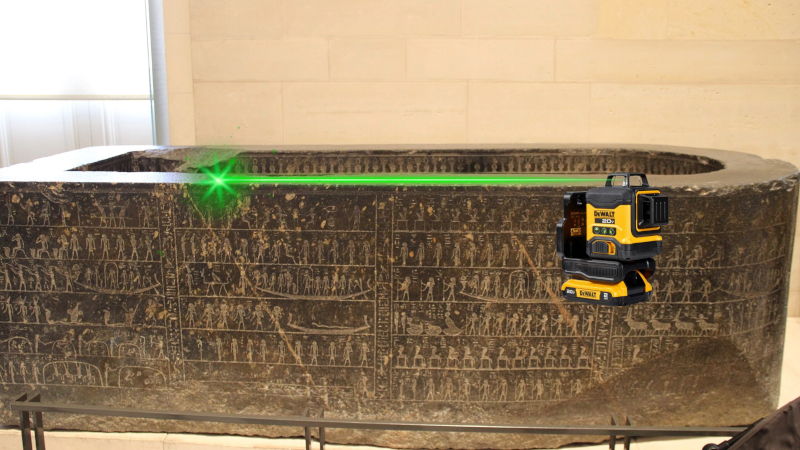
Making a truly flat surface is a modern engineering feat, and not a small one. Even making something straight without reference tools that are already straight is a challenge. However, the ancient Egyptians apparently made very straight, very flat stone work. How did they do it? Probably not alien-supplied CNC machines. [IntoTheMap] explains why it is important and how they may have done it in a recent video you can see below.
The first step is to define flatness, and modern mechanical engineers have taken care of that. If you use 3D printers, you know how hard it is to even get your bed and nozzle “flat” with respect to each other. You’ll almost always have at least a 100 micron variation in the bed distances. The video shows how different levels of flatness require different measurement techniques.
The Great Pyramid’s casing stones have joints measuring 0.5 mm, which is incredible to achieve on such large stones with no modern tools. A stone box in the Pyramid of Seostris II is especially well done and extremely flat, although we can make things flatter today.
The main problem with creating a flat surface is that to do a good job, you need some flat things to start with. However, there is a method from the 19th century that uses three plates and multiple lapping steps to create three very flat plates. In modern times, we use a blue material to indicate raised areas, much as a dentist makes you chomp on a piece of paper to place a crown. There are traces of red ochre on Egyptian stonework that probably served the same purpose.
Lapping large pieces is still a challenge, but moving giant stones at scale appears to have been a solved problem for the Egyptians. Was this the method they used? We don’t know, of course. But it certainly makes sense.
We live in a golden age for MIDI controllers. [rheslip]’s contribution to the milieu is a twisty take on the format, in that it’s covered in an array of knobs. Thus the name—Twisty 2.
The controller can be built using the Raspberry Pi Pico or Pico 2. It’s set up to read a 4×4 array of clickable encoders, plus two bonus control knobs to make 18 in total, which are read via a 74HC4067 analog mux chip. There’s also an SK6812 RGB LED for each encoder, and an OLED display for showing status information. MIDI output is via USB, or, if you purchased the W variant of the Pi Pico/Pico 2, it can operate wirelessly over Bluetooth MIDI instead. The controller is set up to send MIDI CC messages, program changes, or note on/off messages depending on its configuration. Flipping through different modes is handled with the bottom set of encoders and the OLED display.
Few musicians we’ve ever met have told us they learned how to play the encoders, and yet. The cool thing about building your own MIDI controller is you can tune it to suit whatever method of performance strikes your fancy. If the name of this build alone has you inspired, you could always whip up a MIDI controller out of a Twister mat.
Attributed to Picasso was the notion that when art critics get together they talk about content, style, trend, and meaning; but that when painters get together they talk about where to get the best turpentine. We can extend that sentiment into the digital age by saying that when philosophers get together they talk about ideas, theory, and meaning; but when hackers get together they talk about where to get the best tweezers.
In this video [nanofix] runs us through his collection of tweezers talking about what he likes and doesn’t like for each. If you’re just getting into microsoldering this video will have some tips about where you should start, and if you’ve been soldering tiny stuff for a while you might find some ideas for a helpful new bit of kit, or two.
If you’re interested in tweezers and novel applications you might want to check out “smart” tweezers, which can read capacitance and resistance values on the fly. Or read about a suction based SMD tool, which can securely hold SMD components with less risk of them flying across the bench and disappearing forever into the carpet on the floor.
Al and I were talking about the IBM 9020 FAA Air Traffic Control computer system on the podcast. It’s a strange machine, made up of a bunch of IBM System 360 mainframes connected together to a common memory unit, with all sorts of custom peripherals to support keeping track of airplanes in the sky. Absolutely go read the in-depth article on that machine if it sparks your curiosity.
It got me thinking about how strange computers were in the early days, and how boringly similar they’ve all become. Just looking at the word sizes of old machines is a great example. Over the last, say, 40 years, things that do computing have had 4, 8, 16, 32, or even 64-bit words. You noticed the powers-of-two trend going on here, right? Basically starting with the lowly Intel 4004, it’s been round numbers ever since.
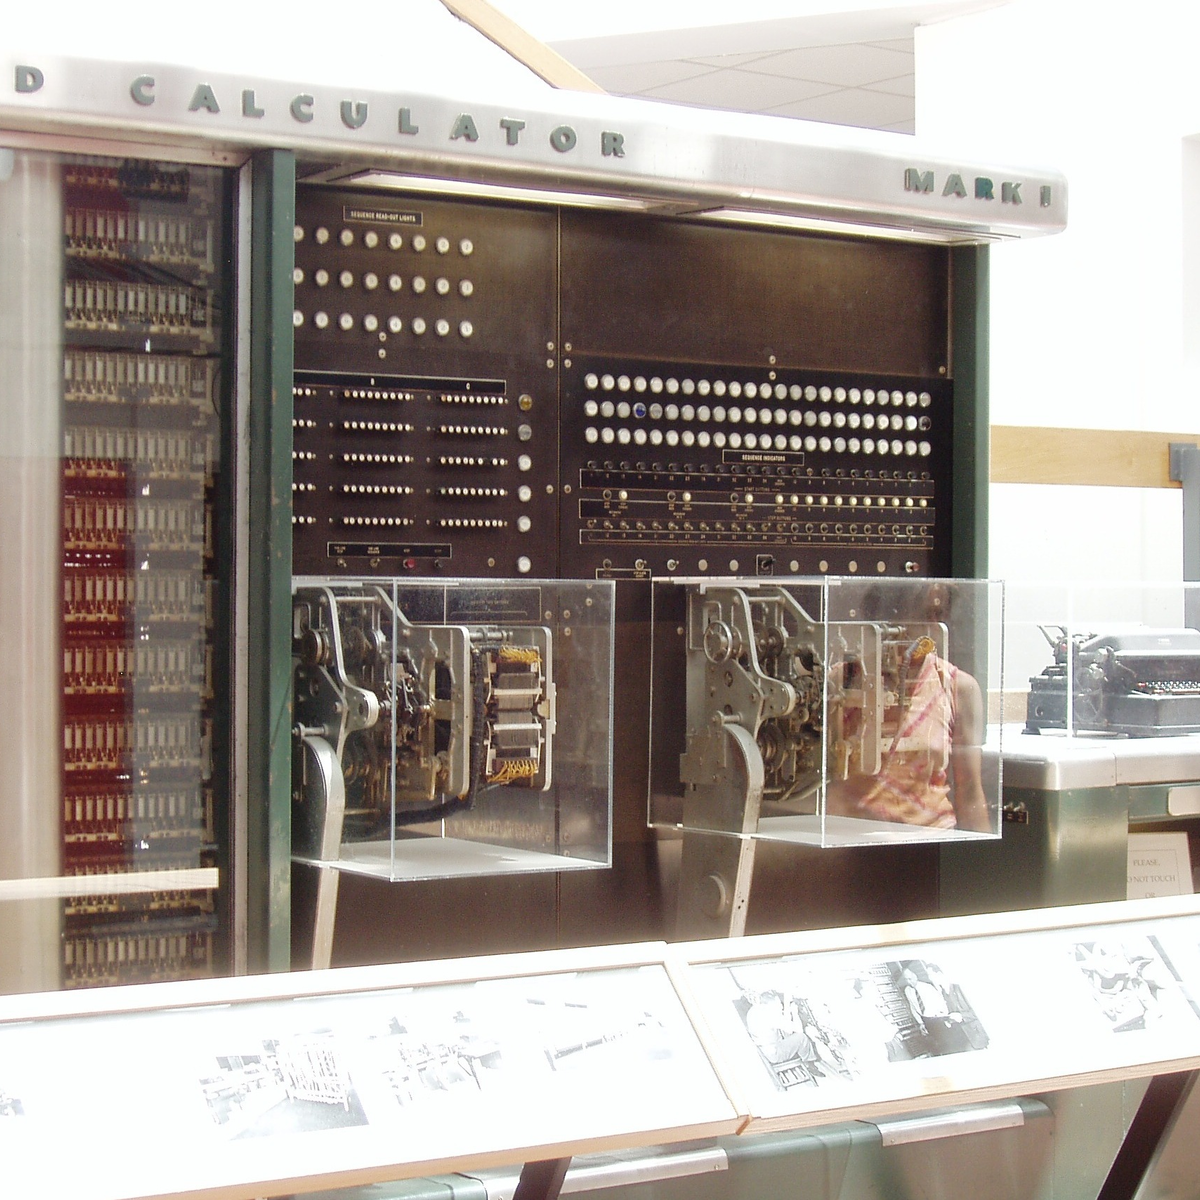
Harvard Mark I, by [Topory]On the other side of the timeline, though, you get strange beasts. The classic PDP-8 had 12-bit words, while its predecessors the PDP-6 and PDP-1 had 36 bits and 18 bits respectively. (Factors of six?) There’s a string of military guidance computers that had 27-bit words, while the Apollo Guidance computer ran 15-bit words. UNIVAC III had 25-bit words, putting the 23-bit Harvard Mark I to shame.
I wasn’t there, but it gives you the feeling that each computer is a unique, almost hand-crafted machine. Some must have made their odd architectural choices to suit particular functions, others because some designer had a clever idea. I’m not a computer historian, but I’m sure that the word lengths must tell a number of interesting stories.
On the whole, though, it gives the impression of a time when each computer was it’s own unique machine, before the convergence of everything to roughly the same architectural ideas. A much more hackery time, for lack of a better word. We still see echoes of this in the people who make their own “retro” computers these days, either virtually, on a breadboard, or emulated in the fabric of an FPGA. It’s not just nostalgia, though, but a return to a time when there was more creative freedom: a time before 64 bits took over.
This article is part of the Hackaday.com newsletter, delivered every seven days for each of the last 200+ weeks. It also includes our favorite articles from the last seven days that you can see on the web version of the newsletter.
Want this type of article to hit your inbox every Friday morning? You should sign up!

 Before the refrigerator became a normal part of any kitchen, those with enough money to throw around could get an icebox, which used melting ice to cool food and drinks in a second compartment. As refrigerators became available for sale in the 1920s, this created somewhat awkward transition models, like the 1924 Frigidaire B-9 that [David Allen] recently got offered for a restoration. This was part of the restoration of a 1926 house, which foresaw putting this venerable unit back into operation.


 As detailed by [Ali Clarkson], one method involves creating loops out of bike spokes, with a custom jig and some brazing. Then a length of rope is passed through the hub and a special hitch is used to keep it in place. Two loops are made in the ends of this length of rope and passed through the spoke ends made earlier. Finally everything is brought up to tension and trued much like a normal wheelset. The front wheel ended up weighing around 700g, a rather impressive feat for a 24 inch downhill wheel.


![[nanofix] and his assortment of tweezers](https://hackaday.com/wp-content/uploads/2026/01/nanofix-tweezers-banner.jpg?w=800)