Reading view

There are new articles available, click to refresh the page.

Balancing a Turbine Rotor to 1 mg With a DIY Dynamic Balancer

Although jet engines are theoretically quite simple devices, in reality they tread a fine line between working as intended and vaporizing into a cloud of lethal shrapnel. The main reason for this is the high rotational speed of the rotors, with any imbalance due to poor manufacturing or damage leading to undesirable outcomes. It’s for this reason that [AlfMart CNC Garage] on YouTube decided to spend some quality time building a balancer for his DIY RC turbine project and making sure it can prevent such a disaster scenario.

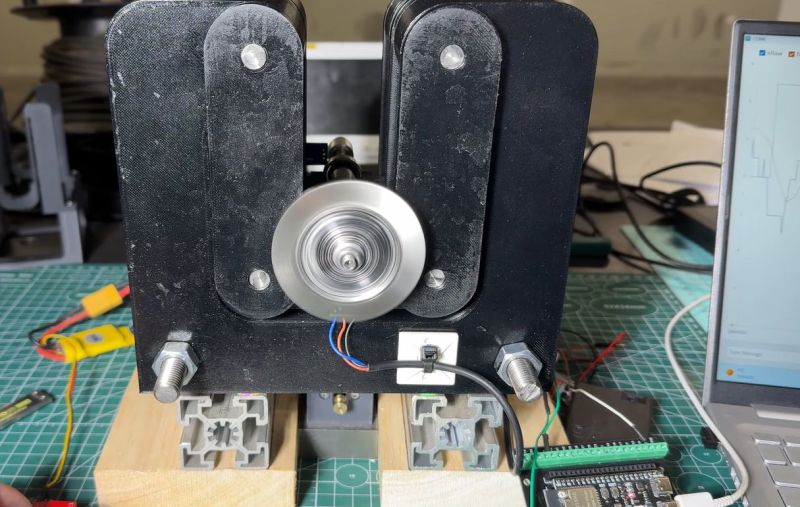
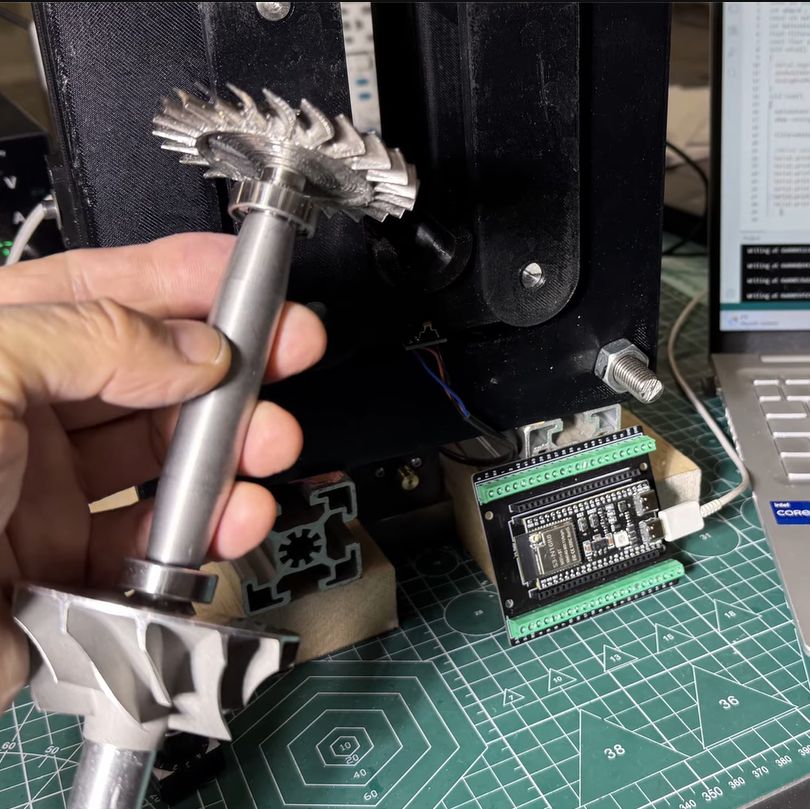
In the previous part of the series the turbine disc was machined out of inconel alloy, as the part will be subjected to significant heat as well when operating. To make sure that the disc is perfectly balanced, a dynamic balancing machine is required. The design that was settled on after a few failed attempts uses an ADXL335 accelerometer and Hall sensor hooked up to an ESP32, which is said to measure imbalance down to ~1 mg at 4,000 RPM.

A big part of the dynamic balancing machine is the isolation of external vibrations using a bearing-supported free-floating structure. With that taken care of, this made measuring the vibrations caused by an imbalanced rotor much easier to distinguish. The ESP32 is here basically just to read out the sensors and output the waveforms to a connected PC via serial, with the real work being a slow and methodical data interpretation and balancing by hand.

SSH over USB on a Raspberry Pi

The edge of a laptop is shown with a USB cable plugged into it. the other end of the cable is plugged into a Raspberry Pi Zero.

Setting up access to a headless Raspberry Pi is one of those tasks that should take a few minutes, but for some reason always seems to take much longer. The most common method is to configure Wi-Fi access and an SSH service on the Pi before starting it, which can go wrong in many different ways. This author, for example, recently spent a few hours failing to set up a headless Pi on a network secured with Protected EAP, and was eventually driven to using SSH over Bluetooth. This could thankfully soon be a thing of the past, as [Paul Oberosler] developed a package for SSH over USB, which is included in the latest versions of Raspberry Pi OS.

The idea behind rpi-usb-gadget is that a Raspberry Pi in gadget mode can be plugged into a host machine, which recognizes it as a network adapter. The Pi itself is presented as a host on that network, and the host machine can then SSH into it. Additionally, using Internet Connection Sharing (ICS), the Pi can use the host machine’s internet access. Gadget mode can be enabled and configured from the Raspberry Pi Imager. Setting up ICS is less plug-and-play, since an extra driver needs to be installed on Windows machines. Enabling gadget mode only lets the selected USB port work as a power input and USB network port, not as a host port for other peripherals.

An older way to get USB terminal access is using OTG mode, which we’ve seen used to simplify the configuration of a Pi as a simultaneous AP and client. If you want to set up headless access to Raspberry Pi desktop, we have a guide for that.

Thanks to [Gregg Levine] for the tip!

This Unlikely Microsoft Prediction Might Just Hit The Mark

It’s fair to say that there are many people in our community who just love to dunk on Microsoft Windows. It’s an easy win, after all, the dominant player in the PC operating system market has a long history of dunking on free software, and let’s face it, today’s Windows doesn’t offer a good experience. But what might the future hold? [Mason] has an unexpected prediction: that Microsoft will eventually move towards offering a Windows-themed Linux distro instead of a descendant of today’s Windows.

The very idea is sure to cause mirth, but on a little sober reflection, it’s not such a crazy one. Windows 11 is slow and unfriendly, and increasingly it’s losing the position once enjoyed by its ancestors. The desktop (or laptop) PC is no longer the default computing experience, and what to do about that must be a big headache for the Redmond company. Even gaming, once a stronghold for Windows, is being lost to competitors such as Valve’s Steam OS, so it wouldn’t be outlandish for them to wonder whether the old embrace-and-extend strategy could be tried on the Linux desktop.

We do not possess a working crystal ball here at Hackaday, so we’ll hold off hailing a Microsoft desktop Linux. But we have to admit it’s not an impossible future, having seen Apple reinvent their OS in the past using BSD, and even Microsoft bring out a cloud Linux distro. If you can’t wait, you’ll have to make do with a Windows skin, WINE, and the .NET runtime on your current Linux box.

Inside a Sketchy Mains Voltage Touch Control Dimmer

In [Big Clive]’s recent grab bag of tat ordered from Chinese commerce platforms, there were two touch light control boxes that can turn any ungrounded conductive surface into a mains load dimmer control. Of course, the primary reason for the purchase was a teardown, and a teardown we got.

These unassuming little boxes are built around the Tontek TT6061A, listed as a ‘touch dimmer’, which uses a triac to control the output current. There are four levels, ranging from off to full brightness, before the next touch event turns the output off again.

With the output off, [Clive] measured 0.7 W power usage. After popping open the plastic enclosure, the circuitry turned out to largely follow the recommended application circuit from the datasheet — as can be seen in the above screenshot — with apparently a few cost optimizations, in the form of omitted diodes and a capacitor.

The problem with these devices is that they are only really suitable for dimming low-power resistive loads like incandescent lights, with LED lights likely requiring the unpopulated capacitor spot on the PCB to be populated to tweak the chip’s triac timing, among other changes. There are also the slight issues with no real concern with them radiating EMI, and the exciting possibility of getting shocked at mains voltage without at least a class-Y capacitor installed.

Perhaps using a capacitive touch controller instead that works through plastic, for example, isn’t such a crazy alternative here, especially since they’re not really much more expensive and less likely to shock you. Want to create your own triac designs? We have just the post to get you started.

Commodore 64 Helps Revive the BBS Days

Before the modern Internet existed, there were still plenty of ways of connecting with other computer users “online”, although many of them might seem completely foreign to those of us in the modern era. One of those systems was the Bulletin Board System, or BBS, which would have been a single computer, often in someone’s home, connected to a single phone line. People accessing the BBS would log in if the line wasn’t busy, leave messages, and quickly log out since the system could only support one user at a time. While perhaps a rose-tinted view, this was a more wholesome and less angsty time than the modern algorithm-driven Internet, and it turns out these systems are making a bit of a comeback as a result.

The video by [The Retro Shack] sets up a lot of this history for context, then, towards the end, uses a modern FPGA-based recreation called the Commodore 64 Ultimate to access a BBS called The Old Net, a modern recreation of what these 80s-era BBS systems were like. This involves using a modern networking card that allows the C64 to connect to Wi-Fi access points to get online instead of an old phone modem, and then using a terminal program called CCGMS to connect to the BBS itself. Once there, users can access mail, share files, and even play a few games.

While the video is a very basic illustration of how these BBS systems worked and how to access one, it is notable in that it’s part of a trend of rejecting more modern technology and systems in favor of older ones, where the users had more control. A retro machine like a C64 or Atari is not required either; modern operating systems can access these with the right terminal program, too. A more in-depth guide to the BBS can be found here for those looking to explore, and we’ve also seen other modern BBS systems recently.

Thanks to [Charlie] for the tip!

Building A Little Quadruped Robot

By: Lewin Day

Robots don’t have to be large and imposing to be impressive. As this tiny quadruped from [Dorian Todd] demonstrates, some simple electronics and a few servos can create something altogether charming on their own.

This little fellow is named Sesame. A quadruped robot, it’s built out of 3D-printed components. Each leg features a pair of MG90S hobby servos, one of which rotates the leg around the vertical axis, while the other moves the foot. The ESP32 microcontroller controls all eight servos, enabling remote control of Sesame via its built-in wireless connectivity. Sesame also gets a 128×64 OLED display, which it uses to display a range of emotions.

Mechanically, the Sesame design isn’t particularly sophisticated. Where it shines is that even with such a limited range of motion, between its four legs and its little screen, this robot can display a great deal of emotion. [Dorian] shows this off in the project video, in which Sesame scampers around a desktop with all the joy and verve of a new puppy. It’s also very cheap; [Dorian] estimates you can build your own Sesame for about $60. Files are on GitHub for the curious.

If you prefer your quadrupeds built for performance over charm, you might consider an alternative build. Video after the break.

Tamper Detection with Time-Domain Reflectometry

A pair of printed circuit boards are shown against a pink background. The right circuit board is plugged into a USB cable, and has several LED indicators on. The left board is plugged into the other at 45-degree angle, and has no visible components.

For certain high-security devices, such as card readers, ATMs, and hardware security modules, normal physical security isn’t enough – they need to wipe out their sensitive data if someone starts drilling through the case. Such devices, therefore, often integrate circuit meshes into their cases and regularly monitor them for changes that could indicate damage. To improve the sensitivity and accuracy of such countermeasures, [Jan Sebastian Götte] and [Björn Scheuermann] recently designed a time-domain reflectometer to monitor meshes (pre-print paper).

Many meshes are made from flexible circuit boards with winding traces built into the case, so cutting or drilling into the case breaks a trace. The problem is that most common ways to detect broken traces, such as by resistance or capacitance measurements, aren’t easy to implement with both high sensitivity and low error rates. Instead, this system uses time-domain reflectometry: it sends a sharp pulse into the mesh, then times the returning echoes to create a mesh fingerprint. When the circuit is damaged, it creates an additional echo, which is detected by classifier software. If enough subsequent measurements find a significant fingerprint change, it triggers a data wipe.

The most novel aspect of this design is its affordability. An STM32G4-series microcontroller manages the timing, pulse generation, and measurement, thanks to its two fast ADCs and a high-resolution timer with sub-200 picosecond resolution. For a pulse-shaping amplifier, [Jan] and [Björn] used the high-speed amplifiers in an HDMI redriver chip, which would normally compensate for cable and connector losses. Despite its inexpensive design, the circuit was sensitive enough to detect when oscilloscope probes contacted the trace, pick up temperature changes, and even discern the tiny variations between different copies of the same mesh.

It’s not absolutely impossible for an attacker to bypass this system, nor was it intended to be, but overcoming it would take a great deal of skill and some custom equipment, such as a non-conductive drill bit. If you’re interested in seeing such a system in the real world, check out this teardown of a payment terminal. One of the same authors also previously wrote a KiCad plugin to generate anti-tamper meshes.

Thanks to [mark999] for the tip!

Ancient Egyptian Flatness

Making a truly flat surface is a modern engineering feat, and not a small one. Even making something straight without reference tools that are already straight is a challenge. However, the ancient Egyptians apparently made very straight, very flat stone work. How did they do it? Probably not alien-supplied CNC machines. [IntoTheMap] explains why it is important and how they may have done it in a recent video you can see below.

The first step is to define flatness, and modern mechanical engineers have taken care of that. If you use 3D printers, you know how hard it is to even get your bed and nozzle “flat” with respect to each other. You’ll almost always have at least a 100 micron variation in the bed distances. The video shows how different levels of flatness require different measurement techniques.

The Great Pyramid’s casing stones have joints measuring 0.5 mm, which is incredible to achieve on such large stones with no modern tools. A stone box in the Pyramid of Seostris II is especially well done and extremely flat, although we can make things flatter today.

The main problem with creating a flat surface is that to do a good job, you need some flat things to start with. However, there is a method from the 19th century that uses three plates and multiple lapping steps to create three very flat plates. In modern times, we use a blue material to indicate raised areas, much as a dentist makes you chomp on a piece of paper to place a crown. There are traces of red ochre on Egyptian stonework that probably served the same purpose.

Lapping large pieces is still a challenge, but moving giant stones at scale appears to have been a solved problem for the Egyptians. Was this the method they used? We don’t know, of course. But it certainly makes sense.

It would be a long time before modern people could make things as flat. While we can do even better now, we also have better measuring tools.

Wireless MIDI Controller Has Lots Of Knobs

By: Lewin Day

We live in a golden age for MIDI controllers. [rheslip]’s contribution to the milieu is a twisty take on the format, in that it’s covered in an array of knobs. Thus the name—Twisty 2. 

The controller can be built using the Raspberry Pi Pico or Pico 2. It’s set up to read a 4×4 array of clickable encoders, plus two bonus control knobs to make 18 in total, which are read via a 74HC4067 analog mux chip. There’s also an SK6812 RGB LED for each encoder, and an OLED display for showing status information. MIDI output is via USB, or, if you purchased the W variant of the Pi Pico/Pico 2, it can operate wirelessly over Bluetooth MIDI instead. The controller is set up to send MIDI CC messages, program changes, or note on/off messages depending on its configuration. Flipping through different modes is handled with the bottom set of encoders and the OLED display.

Few musicians we’ve ever met have told us they learned how to play the encoders, and yet. The cool thing about building your own MIDI controller is you can tune it to suit whatever method of performance strikes your fancy. If the name of this build alone has you inspired, you could always whip up a MIDI controller out of a Twister mat.

Reviewing Tweezers for Microsoldering and SMD Work

[nanofix] and his assortment of tweezers

Attributed to Picasso was the notion that when art critics get together they talk about content, style, trend, and meaning; but that when painters get together they talk about where to get the best turpentine. We can extend that sentiment into the digital age by saying that when philosophers get together they talk about ideas, theory, and meaning; but when hackers get together they talk about where to get the best tweezers.

In this video [nanofix] runs us through his collection of tweezers talking about what he likes and doesn’t like for each. If you’re just getting into microsoldering this video will have some tips about where you should start, and if you’ve been soldering tiny stuff for a while you might find some ideas for a helpful new bit of kit, or two.

If you’re interested in tweezers and novel applications you might want to check out “smart” tweezers, which can read capacitance and resistance values on the fly. Or read about a suction based SMD tool, which can securely hold SMD components with less risk of them flying across the bench and disappearing forever into the carpet on the floor.

Crazy Old Machines

Al and I were talking about the IBM 9020 FAA Air Traffic Control computer system on the podcast. It’s a strange machine, made up of a bunch of IBM System 360 mainframes connected together to a common memory unit, with all sorts of custom peripherals to support keeping track of airplanes in the sky. Absolutely go read the in-depth article on that machine if it sparks your curiosity.

It got me thinking about how strange computers were in the early days, and how boringly similar they’ve all become. Just looking at the word sizes of old machines is a great example. Over the last, say, 40 years, things that do computing have had 4, 8, 16, 32, or even 64-bit words. You noticed the powers-of-two trend going on here, right? Basically starting with the lowly Intel 4004, it’s been round numbers ever since.

Harvard Mark I, by [Topory]
On the other side of the timeline, though, you get strange beasts. The classic PDP-8 had 12-bit words, while its predecessors the PDP-6 and PDP-1 had 36 bits and 18 bits respectively. (Factors of six?) There’s a string of military guidance computers that had 27-bit words, while the Apollo Guidance computer ran 15-bit words. UNIVAC III had 25-bit words, putting the 23-bit Harvard Mark I to shame.

I wasn’t there, but it gives you the feeling that each computer is a unique, almost hand-crafted machine. Some must have made their odd architectural choices to suit particular functions, others because some designer had a clever idea. I’m not a computer historian, but I’m sure that the word lengths must tell a number of interesting stories.

On the whole, though, it gives the impression of a time when each computer was it’s own unique machine, before the convergence of everything to roughly the same architectural ideas. A much more hackery time, for lack of a better word. We still see echoes of this in the people who make their own “retro” computers these days, either virtually, on a breadboard, or emulated in the fabric of an FPGA. It’s not just nostalgia, though, but a return to a time when there was more creative freedom: a time before 64 bits took over.

This article is part of the Hackaday.com newsletter, delivered every seven days for each of the last 200+ weeks. It also includes our favorite articles from the last seven days that you can see on the web version of the newsletter. Want this type of article to hit your inbox every Friday morning? You should sign up!

Isolated AC/DC Power Supply and Testing Station for 230 V Devices

When you’re testing or debugging some mains-powered gear, plugging it directly into the outlet can often be an exciting proposition. If such excitement is not really your thing, you can opt for an isolation transformer and other types of safeties. In the case of [Michał Słomkowski], he opted to take a few steps further by modding a vintage East-German isolating variac with a broken amp meter into an isolated AC/DC power supply and testing station.

The core is formed by the isolated variable transformer, to which a configurable DC output section, a current limiter and digital voltage and current read-outs were added. This enables a variable AC output of 0 – 330 VAC and 0 – 450 VDC on their respective terminals, with the incandescent light bulb providing an optional current limiter.

In its final configuration [Michał] has been using the device for the past four years now for a range of tasks, including the simulating of various undesirable mains power conditions, varying the speed of an old Soviet-era drill, powering vacuum tube devices, capacitor reforming and of course running 100-120 VAC devices from e.g. the US.

As far as feature set goes, we have to admit that it is an impressive device, indeed. Although some parts of it are clearly playing it fast and loose with best practices, with [Michał] admitting to not being an electrician, it was clearly engineered well enough to survive a few years of use, something which cannot be said for even professional laboratory equipment these days.

Environmental Monitoring on the Cheap

If there is one thing we took from [azwankhairul345’s] environmental monitor project, it is this: sensors and computing power for such a project are a solved problem. What’s left is how to package it. The solution, in this case, was using recycled plastic containers, and it looks surprisingly effective.

A Raspberry Pi Pico W has the processing capability and connectivity for a project like this. A large power bank battery provides the power. Off-the-shelf sensors for magnetic field (to measure anemometer spins), air quality, temperature, and humidity are easy to acquire. The plastic tub that protects everything also has PVC pipe and plastic covers for the sensors. Those covers look suspiciously like the tops of drink bottles.

We noted that the battery bank inside the instrument doesn’t have a provision for recharging. That means the device will go about two days before needing some sort of maintenance. Depending on your needs, this could be workable, or you might have to come up with an alternative power supply.

This probably won’t perform as well as a Hoffman box-style container, and we’ve seen those crop up, too. There are a number of ways of sealing things against the elements.

Beer Keg Plumbing for a Liquid Rocket

By: Ian Bos

When you think of a high performance liquid rocket, what do you think of? Beer kegs? No? Well, when [Ryan] from the YouTube channel “Project KegRocket” saw a beer keg, the first thing he and his friends saw was a pressurized rocket body.

You wouldn’t be crazy if the first thing you thought of was something designed by a massive company or university. Liquid rockets are far from simple to develop, with Keg Rocket being no exception. Liquid oxygen and alcohol is the oxidizer/fuel mixture of choice. Liquid oxygen in particular is a problem with its cryogenic temperatures and tendency to do what rocket fuel does best, burn. This problem causes a large amount of work to simply connect the pipes. Traditional O-rings have no chance at surviving, along with most other non-metallic solutions.

Even with all these problems, the group creating the piece of art is more than capable, having experience creating similar rockets in the past. As of currently, the pumping has been pressure and leak checked. We will be watching this project closely for updates and an eventual launch.

For more rocketry science, be sure to check out aerospike engines for the most efficient engines around. If you want efficiency in your pizzas and beer kegs, check out this keg pizza oven instead!

Polymer Skins That Change Color and Texture When Exposed to Water

Researchers at Stanford University recently came up with an interesting way (Phys.org summary) to create patterns and colors that emerge when a polymer is exposed to water. Although the paper itself is sadly paywalled with no preprint available, it’s fairly easily summarized and illustrated with details from the Supplementary Data section. The polymer used is poly(3,4-ethylenedioxythiophene) polystyrene sulfonate (PEDOT:PSS), which when exposed to an electron beam (electron-beam lithography) undergoes certain changes that become apparent when said water is added.

The polymer is hygroscopic, but the electron beam modifies the extent to which a specific area swells up, thus making it possible to create patterns that depend on the amount of electron beam exposure. In order to ‘colorize’ the polymer, complex cavities are created that modify the angular distribution of light, as illustrated in the top image from the Supplemental Data docx file.

By varying the concentration of IPA versus water, the intermediate swelling states can be controlled. Although this sounds pretty advanced, if you look at the supplementary videos that are already sped up a lot, you can see that it is a very slow process. Compared to an octopus and kin whose ability to alter their own skin texture and coloring is legendary and directly controlled by their nervous system, this isn’t quite in the same ballpark yet, even if it’s pretty cool to watch.

Lead Acid Battery Upgraded to Lithium Iron Phosphate

Lithium batteries have taken over as the primary battery chemistry from applications ranging from consumer electronics to electric vehicles and all kinds of other things in between. But the standard lithium ion battery has a few downsides, namely issues operating at temperature extremes. Lead acid solves some of these problems but has much lower energy density, and if you want to split the difference with your own battery you’ll need to build your own lithium iron phosphate (LiFePO4) pack.

[Well Done Tips] is building this specific type of battery because the lead acid battery in his electric ATV is on the decline. He’s using cylindrical cells that resemble an 18650 battery but are much larger. Beyond the size, though, many of the design principles from building 18650 battery packs are similar, with the exception that these have screw terminals so that bus bars can be easily attached and don’t require spot welding.

With the pack assembled using 3D printed parts, a battery management system is installed with the balance wires cleverly routed through the prints and attached to the bus bars. The only problem [Well Done Tips] had was not realizing that LiFePO4 batteries’ voltages settle a bit after being fully charged, which meant that he didn’t properly calculate the final voltage of his pack and had to add a cell, bringing his original 15S1P battery up to 16S1P and the correct 54V at full charge.

LiFePO4 has a few other upsides compared to lithium ion as well, including that it delivers almost full power until it’s at about 20% charge. It’s not quite as energy dense but compared to the lead-acid battery he was using is a huge improvement, and is one of the reasons we’ve seen them taking over various other EV conversions as well.

PLA Mold To Plaster Bust, No Silicone Needed

[Denny] removing a plaster bust from a microwave-softened mold

3D printing is wonderful, but sometimes you just don’t want to look at a plastic peice. Beethoven’s bust wouldn’t look quite right in front of your secret door if it was bright orange PLA, after all. [Denny] over at “Shake the Future” on YouTube is taking a break from metal casting to show off a quick-and-easy plaster casting method— but don’t worry, he still uses a microwave.

Most people, when they’re casting something non-metallic from a 3D print are going to reach for castable silicone and create a mold, first. It works for chocolate just as easily as it does plaster, and it does work well. The problem is that it’s an extra step and extra materials, and who can afford the time and money that takes these days?

[Denny]’s proposal is simple: make the mold out of PLA. He’s using a resin slicer to get the negative shape for the mold, and exporting the STL to slice in PrusaSlicer, but Blender, Meshmixer and we’re pretty sure Cura should all work as well. [Denny] takes care when arranging his print to avoid needing supports inside the mold, but that’s not strictly necessary as long as you’re willing to clean them out. After that, it’s just a matter of mixing up the plaster, pouring it into the PLA, mold, and waiting.

Waiting, but not too long. Rather than let the plaster fully set up, [Denny] only waits about an hour. The mold is still quite ‘wet’ at this point, but that’s a good thing. When [Denny] tosses it in his beloved microwave, the moisture remaining in the plaster gets everything hot, softening the PLA so it can be easily cut with scissors and peeled off.

Yeah, this technique is single-use as presented, which might be one advantage to silicone, if you need multiple copies of a cast. Reusing silicone molds is often doable with a little forethought. On the other hand, by removing the plaster half-cured, smoothing out layer lines becomes a simple matter of buffing with a wet rag, which is certainly an advantage to this technique.

Some of you may be going “well, duh,” so check out [Denny]’s cast-iron benchy if his plasterwork doesn’t impress. We’ve long been impressed with the microwave crucibles shown off on “Shake the Future”, but it’s great to have options. Maybe metal is the material, or perhaps plain plastic is perfect– but if not, perchance Plaster of Paris can play a part in your play.

Wired to Wireless: ESP32 Gives Your USB Keyboard Bluetooth

ESP32 BTE Keyboard

Few things rival the usability and speed of a full-sized keyboard for text input. For decades, though, keyboards were mostly wired, which can limit where you use your favorite one. To address this, [KoStard]’s latest project uses an ESP32 to bridge a USB keyboard to BLE devices.

The ESP32-S3 packs a ton of fantastic functionality into its small size and low price—including USB-OTG support, which is key here. Taking advantage of this, [KoStard] programmed an ESP32-S3 to host a keyboard over its USB port while connecting via BLE to devices like cellphones.

There are some slick tricks baked in, too: you can pair with up to three devices and switch between them using a key combo. Some of you might be wondering how you can just plug a microcontroller into a keyboard and have it work. The truth is, it doesn’t without extra hardware. Both the keyboard and ESP32-S3 need power. The simplest fix is a powered USB hub: it can be battery-powered for a truly mobile setup, or use a wired 5V supply so you never have to charge batteries.

We love seeing a simple, affordable microcontroller extend the usefulness of gear you already have. Let us know in the comments about other hacks you’ve used to connect keyboards to devices never designed for them.

Hackaday Podcast Episode 354: Firearms, Sky Driving, and Dumpster Diving

Hackaday Editors Elliot Williams and Al Williams took a break to talk about their favorite hacks last week. You can drop in to hear about articulated mirrors, triacs, and even continuous 3D-printing modifications.

Flying on an airplane this weekend? Maybe wait until you get back to read about how the air traffic control works. Back home, you can order a pizza on a Wii or run classic Basic games on a calculator.

For the can’t miss articles, the guys talked about very low Earth orbit satellites and talked about readers who dumpster dive.

Check out the links below if you want to follow along, and don’t be shy. Tell us what you think about this episode in the comments!

As always, this episode is available in DRM-free MP3.

Where to Follow Hackaday Podcast

Episode 354 Show Notes:

What’s that Sound?

  • Congratulations to [Spybob42], who guessed last week’s sound. Come back next week to take your shot at a coveted Hackaday Podcast T-Shirt.

News

Interesting Hacks of the Week:

Quick Hacks:

Can’t-Miss Articles:

The Defunct Scooter Company, and the Default Key

Äike were an Estonian scooter company, which sadly went bust last year. [Rasmus Moorats] has one, and since the app and cloud service the scooter depends on have lost functionality, he decided to reverse engineer it. Along the way he achieved his goal, but found a vulnerability that unlocks all Äike scooters.

The write-up is a tale of app and Bluetooth reverse engineering, ending with the startling revelation of a hardcoded key that’s simply “ffffffffffffffff”. From that he can unlock and interact with any Äike scooter, except for a subset that were used as hire scooters and didn’t have Bluetooth. Perhaps of more legitimate use is the reverse engineering of the scooter functionality.

What do you do when you find a vulnerability in a product whose manufacturer has gone? He reported to the vendor of the IoT module inside the scooter, who responded that the key was a default value that should have been changed by the Äike developers. Good luck, should you own one of these machines.

Meanwhile, scooter hacking is very much a thing for other manufacturers too.

❌