Before the modern Internet existed, there were still plenty of ways of connecting with other computer users “online”, although many of them might seem completely foreign to those of us in the modern era. One of those systems was the Bulletin Board System, or BBS, which would have been a single computer, often in someone’s home, connected to a single phone line. People accessing the BBS would log in if the line wasn’t busy, leave messages, and quickly log out since the system could only support one user at a time. While perhaps a rose-tinted view, this was a more wholesome and less angsty time than the modern algorithm-driven Internet, and it turns out these systems are making a bit of a comeback as a result.
The video by [The Retro Shack] sets up a lot of this history for context, then, towards the end, uses a modern FPGA-based recreation called the Commodore 64 Ultimate to access a BBS called The Old Net, a modern recreation of what these 80s-era BBS systems were like. This involves using a modern networking card that allows the C64 to connect to Wi-Fi access points to get online instead of an old phone modem, and then using a terminal program called CCGMS to connect to the BBS itself. Once there, users can access mail, share files, and even play a few games.
While the video is a very basic illustration of how these BBS systems worked and how to access one, it is notable in that it’s part of a trend of rejecting more modern technology and systems in favor of older ones, where the users had more control. A retro machine like a C64 or Atari is not required either; modern operating systems can access these with the right terminal program, too. A more in-depth guide to the BBS can be found here for those looking to explore, and we’ve also seen other modern BBS systems recently.
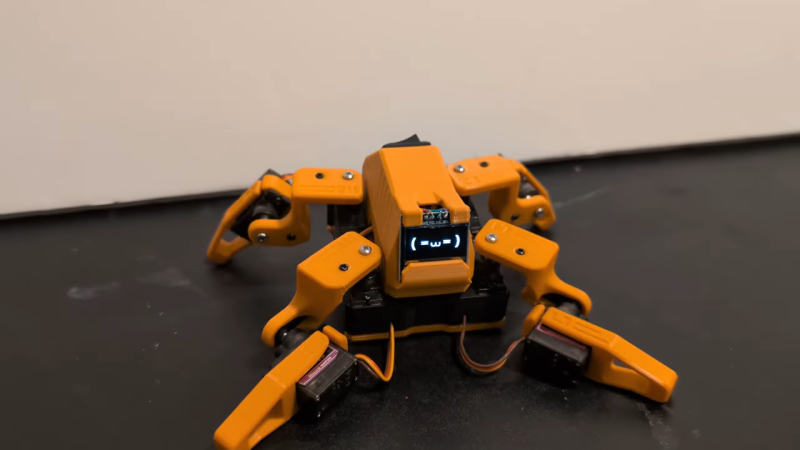
This little fellow is named Sesame. A quadruped robot, it’s built out of 3D-printed components. Each leg features a pair of MG90S hobby servos, one of which rotates the leg around the vertical axis, while the other moves the foot. The ESP32 microcontroller controls all eight servos, enabling remote control of Sesame via its built-in wireless connectivity. Sesame also gets a 128×64 OLED display, which it uses to display a range of emotions.
Mechanically, the Sesame design isn’t particularly sophisticated. Where it shines is that even with such a limited range of motion, between its four legs and its little screen, this robot can display a great deal of emotion. [Dorian] shows this off in the project video, in which Sesame scampers around a desktop with all the joy and verve of a new puppy. It’s also very cheap; [Dorian] estimates you can build your own Sesame for about $60. Files are on GitHub for the curious.
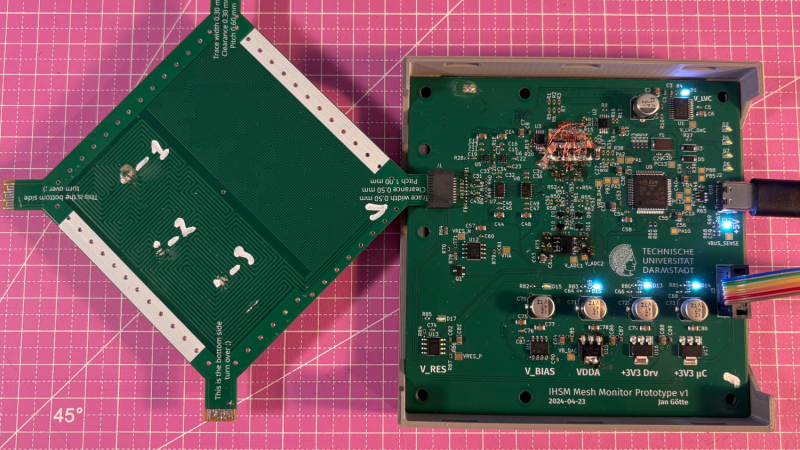
For certain high-security devices, such as card readers, ATMs, and hardware security modules, normal physical security isn’t enough – they need to wipe out their sensitive data if someone starts drilling through the case. Such devices, therefore, often integrate circuit meshes into their cases and regularly monitor them for changes that could indicate damage. To improve the sensitivity and accuracy of such countermeasures, [Jan Sebastian Götte] and [Björn Scheuermann] recently designed a time-domain reflectometer to monitor meshes (pre-print paper).
Many meshes are made from flexible circuit boards with winding traces built into the case, so cutting or drilling into the case breaks a trace. The problem is that most common ways to detect broken traces, such as by resistance or capacitance measurements, aren’t easy to implement with both high sensitivity and low error rates. Instead, this system uses time-domain reflectometry: it sends a sharp pulse into the mesh, then times the returning echoes to create a mesh fingerprint. When the circuit is damaged, it creates an additional echo, which is detected by classifier software. If enough subsequent measurements find a significant fingerprint change, it triggers a data wipe.
The most novel aspect of this design is its affordability. An STM32G4-series microcontroller manages the timing, pulse generation, and measurement, thanks to its two fast ADCs and a high-resolution timer with sub-200 picosecond resolution. For a pulse-shaping amplifier, [Jan] and [Björn] used the high-speed amplifiers in an HDMI redriver chip, which would normally compensate for cable and connector losses. Despite its inexpensive design, the circuit was sensitive enough to detect when oscilloscope probes contacted the trace, pick up temperature changes, and even discern the tiny variations between different copies of the same mesh.
It’s not absolutely impossible for an attacker to bypass this system, nor was it intended to be, but overcoming it would take a great deal of skill and some custom equipment, such as a non-conductive drill bit. If you’re interested in seeing such a system in the real world, check out this teardown of a payment terminal. One of the same authors also previously wrote a KiCad plugin to generate anti-tamper meshes.
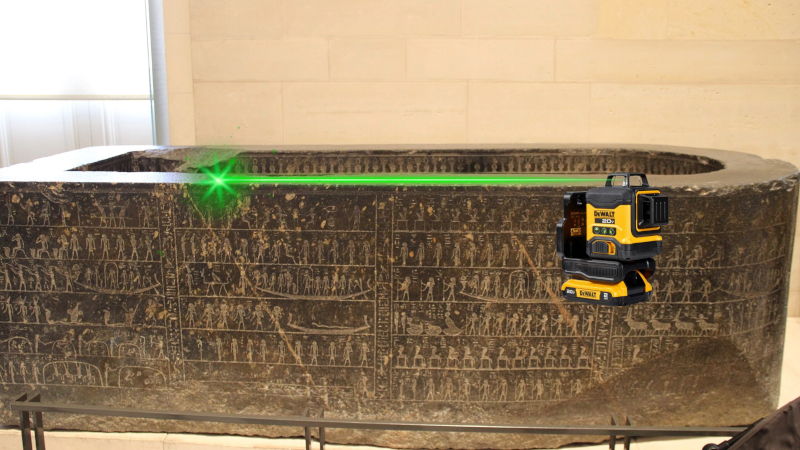
Making a truly flat surface is a modern engineering feat, and not a small one. Even making something straight without reference tools that are already straight is a challenge. However, the ancient Egyptians apparently made very straight, very flat stone work. How did they do it? Probably not alien-supplied CNC machines. [IntoTheMap] explains why it is important and how they may have done it in a recent video you can see below.
The first step is to define flatness, and modern mechanical engineers have taken care of that. If you use 3D printers, you know how hard it is to even get your bed and nozzle “flat” with respect to each other. You’ll almost always have at least a 100 micron variation in the bed distances. The video shows how different levels of flatness require different measurement techniques.
The Great Pyramid’s casing stones have joints measuring 0.5 mm, which is incredible to achieve on such large stones with no modern tools. A stone box in the Pyramid of Seostris II is especially well done and extremely flat, although we can make things flatter today.
The main problem with creating a flat surface is that to do a good job, you need some flat things to start with. However, there is a method from the 19th century that uses three plates and multiple lapping steps to create three very flat plates. In modern times, we use a blue material to indicate raised areas, much as a dentist makes you chomp on a piece of paper to place a crown. There are traces of red ochre on Egyptian stonework that probably served the same purpose.
Lapping large pieces is still a challenge, but moving giant stones at scale appears to have been a solved problem for the Egyptians. Was this the method they used? We don’t know, of course. But it certainly makes sense.
We live in a golden age for MIDI controllers. [rheslip]’s contribution to the milieu is a twisty take on the format, in that it’s covered in an array of knobs. Thus the name—Twisty 2.
The controller can be built using the Raspberry Pi Pico or Pico 2. It’s set up to read a 4×4 array of clickable encoders, plus two bonus control knobs to make 18 in total, which are read via a 74HC4067 analog mux chip. There’s also an SK6812 RGB LED for each encoder, and an OLED display for showing status information. MIDI output is via USB, or, if you purchased the W variant of the Pi Pico/Pico 2, it can operate wirelessly over Bluetooth MIDI instead. The controller is set up to send MIDI CC messages, program changes, or note on/off messages depending on its configuration. Flipping through different modes is handled with the bottom set of encoders and the OLED display.
Few musicians we’ve ever met have told us they learned how to play the encoders, and yet. The cool thing about building your own MIDI controller is you can tune it to suit whatever method of performance strikes your fancy. If the name of this build alone has you inspired, you could always whip up a MIDI controller out of a Twister mat.
Attributed to Picasso was the notion that when art critics get together they talk about content, style, trend, and meaning; but that when painters get together they talk about where to get the best turpentine. We can extend that sentiment into the digital age by saying that when philosophers get together they talk about ideas, theory, and meaning; but when hackers get together they talk about where to get the best tweezers.
In this video [nanofix] runs us through his collection of tweezers talking about what he likes and doesn’t like for each. If you’re just getting into microsoldering this video will have some tips about where you should start, and if you’ve been soldering tiny stuff for a while you might find some ideas for a helpful new bit of kit, or two.
If you’re interested in tweezers and novel applications you might want to check out “smart” tweezers, which can read capacitance and resistance values on the fly. Or read about a suction based SMD tool, which can securely hold SMD components with less risk of them flying across the bench and disappearing forever into the carpet on the floor.
Al and I were talking about the IBM 9020 FAA Air Traffic Control computer system on the podcast. It’s a strange machine, made up of a bunch of IBM System 360 mainframes connected together to a common memory unit, with all sorts of custom peripherals to support keeping track of airplanes in the sky. Absolutely go read the in-depth article on that machine if it sparks your curiosity.
It got me thinking about how strange computers were in the early days, and how boringly similar they’ve all become. Just looking at the word sizes of old machines is a great example. Over the last, say, 40 years, things that do computing have had 4, 8, 16, 32, or even 64-bit words. You noticed the powers-of-two trend going on here, right? Basically starting with the lowly Intel 4004, it’s been round numbers ever since.
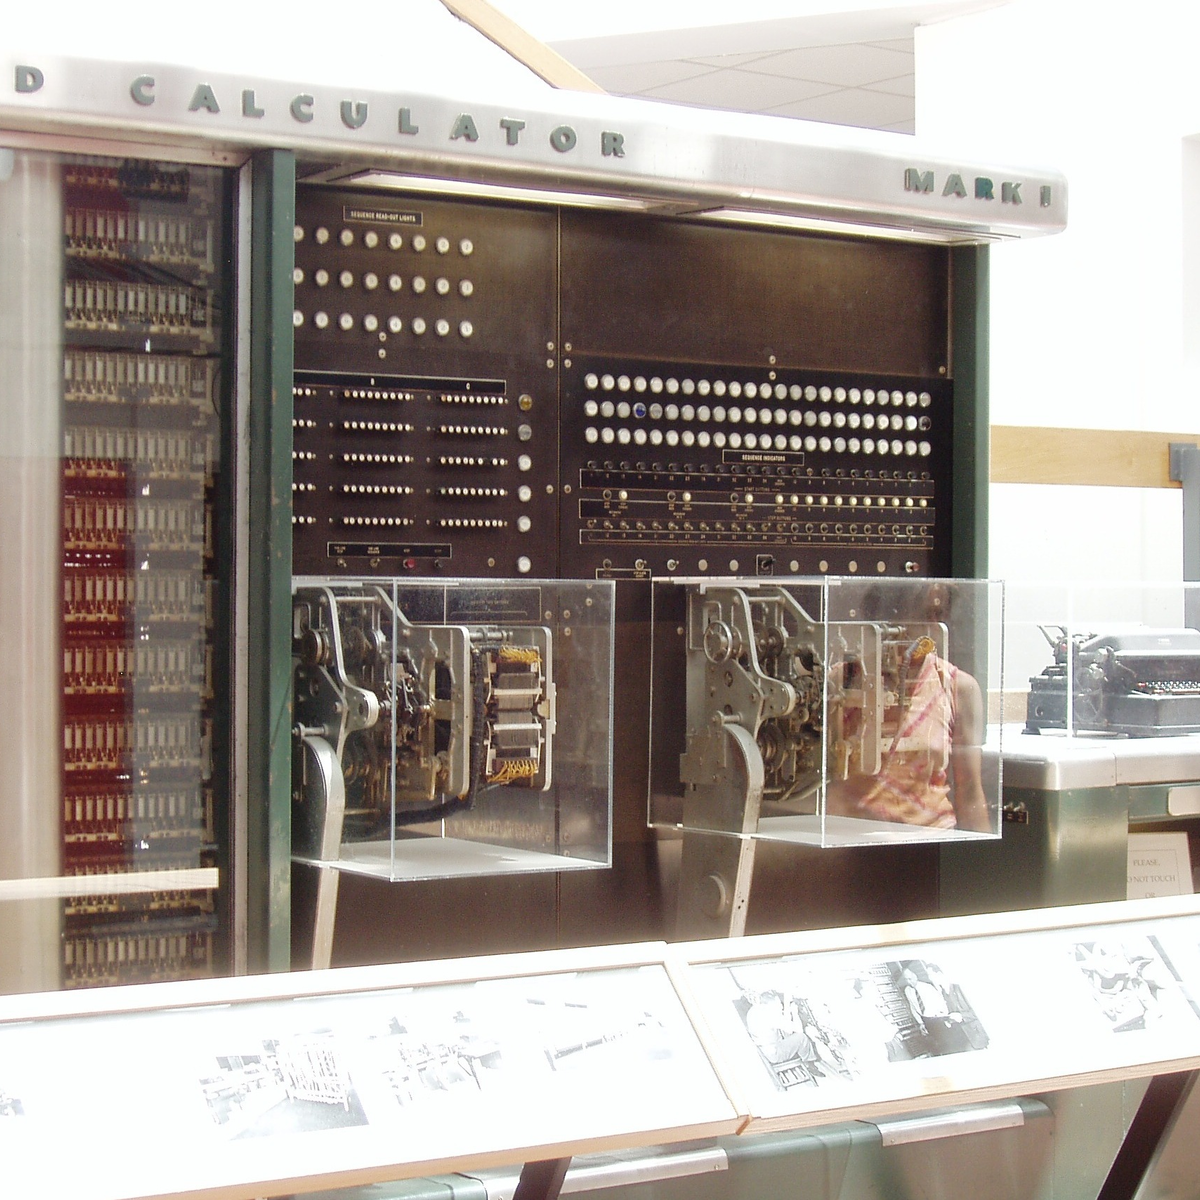
Harvard Mark I, by [Topory]On the other side of the timeline, though, you get strange beasts. The classic PDP-8 had 12-bit words, while its predecessors the PDP-6 and PDP-1 had 36 bits and 18 bits respectively. (Factors of six?) There’s a string of military guidance computers that had 27-bit words, while the Apollo Guidance computer ran 15-bit words. UNIVAC III had 25-bit words, putting the 23-bit Harvard Mark I to shame.
I wasn’t there, but it gives you the feeling that each computer is a unique, almost hand-crafted machine. Some must have made their odd architectural choices to suit particular functions, others because some designer had a clever idea. I’m not a computer historian, but I’m sure that the word lengths must tell a number of interesting stories.
On the whole, though, it gives the impression of a time when each computer was it’s own unique machine, before the convergence of everything to roughly the same architectural ideas. A much more hackery time, for lack of a better word. We still see echoes of this in the people who make their own “retro” computers these days, either virtually, on a breadboard, or emulated in the fabric of an FPGA. It’s not just nostalgia, though, but a return to a time when there was more creative freedom: a time before 64 bits took over.
This article is part of the Hackaday.com newsletter, delivered every seven days for each of the last 200+ weeks. It also includes our favorite articles from the last seven days that you can see on the web version of the newsletter.
Want this type of article to hit your inbox every Friday morning? You should sign up!
When you’re testing or debugging some mains-powered gear, plugging it directly into the outlet can often be an exciting proposition. If such excitement is not really your thing, you can opt for an isolation transformer and other types of safeties. In the case of [Michał Słomkowski], he opted to take a few steps further by modding a vintage East-German isolating variac with a broken amp meter into an isolated AC/DC power supply and testing station.
The core is formed by the isolated variable transformer, to which a configurable DC output section, a current limiter and digital voltage and current read-outs were added. This enables a variable AC output of 0 – 330 VAC and 0 – 450 VDC on their respective terminals, with the incandescent light bulb providing an optional current limiter.
In its final configuration [Michał] has been using the device for the past four years now for a range of tasks, including the simulating of various undesirable mains power conditions, varying the speed of an old Soviet-era drill, powering vacuum tube devices, capacitor reforming and of course running 100-120 VAC devices from e.g. the US.
As far as feature set goes, we have to admit that it is an impressive device, indeed. Although some parts of it are clearly playing it fast and loose with best practices, with [Michał] admitting to not being an electrician, it was clearly engineered well enough to survive a few years of use, something which cannot be said for even professional laboratory equipment these days.
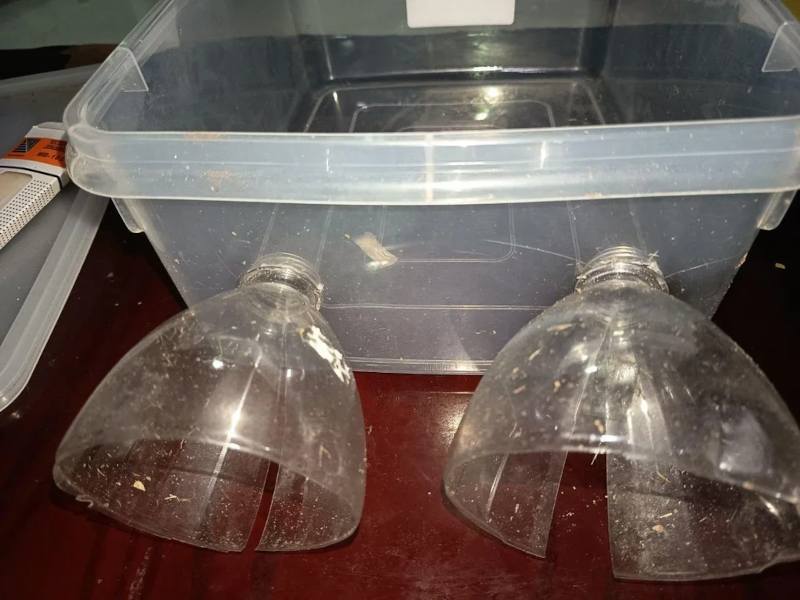
If there is one thing we took from [azwankhairul345’s] environmental monitor project, it is this: sensors and computing power for such a project are a solved problem. What’s left is how to package it. The solution, in this case, was using recycled plastic containers, and it looks surprisingly effective.
A Raspberry Pi Pico W has the processing capability and connectivity for a project like this. A large power bank battery provides the power. Off-the-shelf sensors for magnetic field (to measure anemometer spins), air quality, temperature, and humidity are easy to acquire. The plastic tub that protects everything also has PVC pipe and plastic covers for the sensors. Those covers look suspiciously like the tops of drink bottles.
We noted that the battery bank inside the instrument doesn’t have a provision for recharging. That means the device will go about two days before needing some sort of maintenance. Depending on your needs, this could be workable, or you might have to come up with an alternative power supply.
This probably won’t perform as well as a Hoffman box-style container, and we’ve seen those crop up, too. There are a number of ways of sealing things against the elements.
When you think of a high performance liquid rocket, what do you think of? Beer kegs? No? Well, when [Ryan] from the YouTube channel “Project KegRocket” saw a beer keg, the first thing he and his friends saw was a pressurized rocket body.
You wouldn’t be crazy if the first thing you thought of was something designed by a massive company or university. Liquid rockets are far from simple to develop, with Keg Rocket being no exception. Liquid oxygen and alcohol is the oxidizer/fuel mixture of choice. Liquid oxygen in particular is a problem with its cryogenic temperatures and tendency to do what rocket fuel does best, burn. This problem causes a large amount of work to simply connect the pipes. Traditional O-rings have no chance at surviving, along with most other non-metallic solutions.
Even with all these problems, the group creating the piece of art is more than capable, having experience creating similar rockets in the past. As of currently, the pumping has been pressure and leak checked. We will be watching this project closely for updates and an eventual launch.
For more rocketry science, be sure to check out aerospike engines for the most efficient engines around. If you want efficiency in your pizzas and beer kegs, check out this keg pizza oven instead!
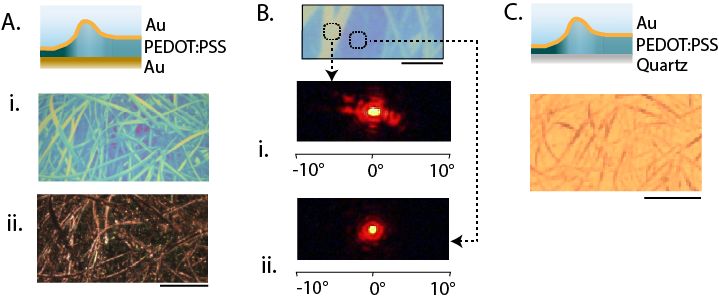
Researchers at Stanford University recently came up with an interesting way (Phys.org summary) to create patterns and colors that emerge when a polymer is exposed to water. Although the paper itself is sadly paywalled with no preprint available, it’s fairly easily summarized and illustrated with details from the Supplementary Data section. The polymer used is poly(3,4-ethylenedioxythiophene) polystyrene sulfonate (PEDOT:PSS), which when exposed to an electron beam (electron-beam lithography) undergoes certain changes that become apparent when said water is added.
The polymer is hygroscopic, but the electron beam modifies the extent to which a specific area swells up, thus making it possible to create patterns that depend on the amount of electron beam exposure. In order to ‘colorize’ the polymer, complex cavities are created that modify the angular distribution of light, as illustrated in the top image from the Supplemental Data docx file.
By varying the concentration of IPA versus water, the intermediate swelling states can be controlled. Although this sounds pretty advanced, if you look at the supplementary videos that are already sped up a lot, you can see that it is a very slow process. Compared to an octopus and kin whose ability to alter their own skin texture and coloring is legendary and directly controlled by their nervous system, this isn’t quite in the same ballpark yet, even if it’s pretty cool to watch.
Lithium batteries have taken over as the primary battery chemistry from applications ranging from consumer electronics to electric vehicles and all kinds of other things in between. But the standard lithium ion battery has a few downsides, namely issues operating at temperature extremes. Lead acid solves some of these problems but has much lower energy density, and if you want to split the difference with your own battery you’ll need to build your own lithium iron phosphate (LiFePO4) pack.
[Well Done Tips] is building this specific type of battery because the lead acid battery in his electric ATV is on the decline. He’s using cylindrical cells that resemble an 18650 battery but are much larger. Beyond the size, though, many of the design principles from building 18650 battery packs are similar, with the exception that these have screw terminals so that bus bars can be easily attached and don’t require spot welding.
With the pack assembled using 3D printed parts, a battery management system is installed with the balance wires cleverly routed through the prints and attached to the bus bars. The only problem [Well Done Tips] had was not realizing that LiFePO4 batteries’ voltages settle a bit after being fully charged, which meant that he didn’t properly calculate the final voltage of his pack and had to add a cell, bringing his original 15S1P battery up to 16S1P and the correct 54V at full charge.
3D printing is wonderful, but sometimes you just don’t want to look at a plastic peice. Beethoven’s bust wouldn’t look quite right in front of your secret door if it was bright orange PLA, after all. [Denny] over at “Shake the Future” on YouTube is taking a break from metal casting to show off a quick-and-easy plaster casting method— but don’t worry, he still uses a microwave.
Most people, when they’re casting something non-metallic from a 3D print are going to reach for castable silicone and create a mold, first. It works for chocolate just as easily as it does plaster, and it does work well. The problem is that it’s an extra step and extra materials, and who can afford the time and money that takes these days?
[Denny]’s proposal is simple: make the mold out of PLA. He’s using a resin slicer to get the negative shape for the mold, and exporting the STL to slice in PrusaSlicer, but Blender, Meshmixer and we’re pretty sure Cura should all work as well. [Denny] takes care when arranging his print to avoid needing supports inside the mold, but that’s not strictly necessary as long as you’re willing to clean them out. After that, it’s just a matter of mixing up the plaster, pouring it into the PLA, mold, and waiting.
Waiting, but not too long. Rather than let the plaster fully set up, [Denny] only waits about an hour. The mold is still quite ‘wet’ at this point, but that’s a good thing. When [Denny] tosses it in his beloved microwave, the moisture remaining in the plaster gets everything hot, softening the PLA so it can be easily cut with scissors and peeled off.
Yeah, this technique is single-use as presented, which might be one advantage to silicone, if you need multiple copies of a cast. Reusing silicone molds is often doable with a little forethought. On the other hand, by removing the plaster half-cured, smoothing out layer lines becomes a simple matter of buffing with a wet rag, which is certainly an advantage to this technique.
Some of you may be going “well, duh,” so check out [Denny]’s cast-iron benchy if his plasterwork doesn’t impress. We’ve long been impressed with the microwave crucibles shown off on “Shake the Future”, but it’s great to have options. Maybe metal is the material, or perhaps plain plastic is perfect– but if not, perchance Plaster of Paris can play a part in your play.
Few things rival the usability and speed of a full-sized keyboard for text input. For decades, though, keyboards were mostly wired, which can limit where you use your favorite one. To address this, [KoStard]’s latest project uses an ESP32 to bridge a USB keyboard to BLE devices.
The ESP32-S3 packs a ton of fantastic functionality into its small size and low price—including USB-OTG support, which is key here. Taking advantage of this, [KoStard] programmed an ESP32-S3 to host a keyboard over its USB port while connecting via BLE to devices like cellphones.
There are some slick tricks baked in, too: you can pair with up to three devices and switch between them using a key combo. Some of you might be wondering how you can just plug a microcontroller into a keyboard and have it work. The truth is, it doesn’t without extra hardware. Both the keyboard and ESP32-S3 need power. The simplest fix is a powered USB hub: it can be battery-powered for a truly mobile setup, or use a wired 5V supply so you never have to charge batteries.
We love seeing a simple, affordable microcontroller extend the usefulness of gear you already have. Let us know in the comments about other hacks you’ve used to connect keyboards to devices never designed for them.
Hackaday Editors Elliot Williams and Al Williams took a break to talk about their favorite hacks last week. You can drop in to hear about articulated mirrors, triacs, and even continuous 3D-printing modifications.
Flying on an airplane this weekend? Maybe wait until you get back to read about how the air traffic control works. Back home, you can order a pizza on a Wii or run classic Basic games on a calculator.
For the can’t miss articles, the guys talked about very low Earth orbit satellites and talked about readers who dumpster dive.
Check out the links below if you want to follow along, and don’t be shy. Tell us what you think about this episode in the comments!
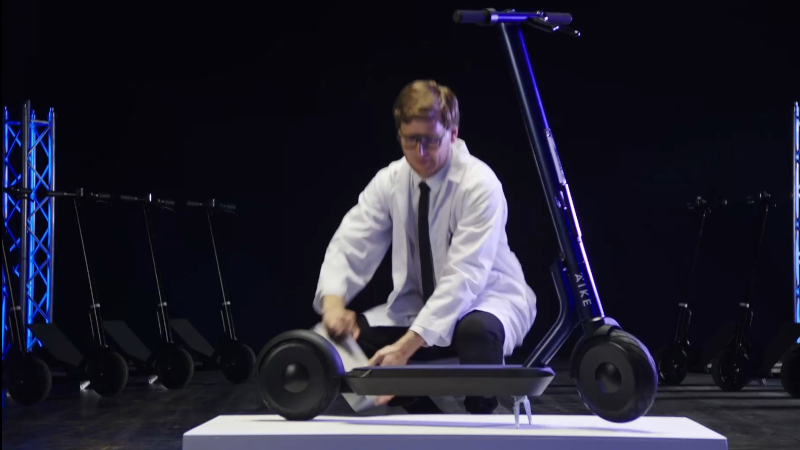
Äike were an Estonian scooter company, which sadly went bust last year. [Rasmus Moorats] has one, and since the app and cloud service the scooter depends on have lost functionality, he decided to reverse engineer it. Along the way he achieved his goal, but found a vulnerability that unlocks all Äike scooters.
The write-up is a tale of app and Bluetooth reverse engineering, ending with the startling revelation of a hardcoded key that’s simply “ffffffffffffffff”. From that he can unlock and interact with any Äike scooter, except for a subset that were used as hire scooters and didn’t have Bluetooth. Perhaps of more legitimate use is the reverse engineering of the scooter functionality.
What do you do when you find a vulnerability in a product whose manufacturer has gone? He reported to the vendor of the IoT module inside the scooter, who responded that the key was a default value that should have been changed by the Äike developers. Good luck, should you own one of these machines.
We miss the slide rule. It isn’t so much that we liked getting an inexact answer using a physical moving object. But to successfully use a slide rule, you need to be able to roughly estimate the order of magnitude of your result. The slide rule’s computation of 2.2 divided by 8 is the same as it is for 22/8 or 220/0.08. You have to interpret the answer based on your sense of where the true answer lies. If you’ve ever had some kid at a fast food place enter the wrong numbers into a register and then hand you a ridiculous amount of change, you know what we mean.
Recent press reports highlighted a paper from Nvidia that claimed a data center consuming a gigawatt of power could require half a million tons of copper. If you aren’t an expert on datacenter power distribution and copper, you could take that number at face value. But as [Adam Button] reports, you should probably be suspicious of this number. It is almost certainly a typo. We wouldn’t be surprised if you click on the link and find it fixed, but it caused a big news splash before anyone noticed.
Thought Process
Best estimates of the total copper on the entire planet are about 6.3 billion metric tons. We’ve actually only found a fraction of that and mined even less. Of the 700 million metric tons of copper we actually have in circulation, there is a demand for about 28 million tons a year (some of which is met with recycling, so even less new copper is produced annually).
Simple math tells us that a single data center could, in a year, consume 1.7% of the global copper output. While that could be true, it seems suspicious on its face.
Digging further in, you’ll find the paper mentions 200kg per megawatt. So a gigawatt should be 200,000kg, which is, actually, only 200 metric tons. That’s a far cry from 500,000 tons. We suspect they were rounding up from the 440,000 pounds in 200 metric tons to “up to a half a million pounds,” and then flipped pounds to tons.
Glass Houses
We get it. We are infamous for making typos. It is inevitable with any sort of writing at scale and on a tight schedule. After all, the Lincoln Memorial has a typo set in stone, and Webster’s dictionary misprinted an editor’s note that “D or d” could stand for density, and coined a new word: dord.
So we aren’t here to shame Nvidia. People in glass houses, and all that. But it is amazing that so much of the press took the numbers without any critical thinking about whether they made sense.
Innumeracy
We’ve noticed many people glaze over numbers and take them at face value. The same goes for charts. We once saw a chart that was basically a straight line except for one point, which was way out of line. No one bothered to ask for a long time. Finally, someone spoke up and asked. Turns out it was a major issue, but no one wanted to be the one to ask “the dumb question.”
You don’t have to look far to find examples of innumeracy: a phrase coined by [Douglas Hofstadter] and made famous by [John Allen Paulos]. One of our favorites is when a hamburger chain rolled out a “1/3 pound hamburger,” which flopped because customers thought that since three is less than four, they were getting more meat with a “1/4 pound hamburger” at the competitor’s restaurant.
This is all part of the same issue. If you are an electronics or computer person, you probably have a good command of math. You may just not realize how much better your math is than the average person’s.
Even so, people who should know better still make mistakes with units and scale. NASA has had at least one famous case of unit issues losing an unmanned probe. In another famous incident, an Air Canada flight ran out of fuel in 1983. Why?
The plane’s fuel sensors were inoperative, so the ground crew manually checked the fuel load with a dipstick. The dipstick read in centimeters. The navigation computer expected fuel to be in kg. Unfortunately, the fuel’s datasheet posted density in pounds/liter. This incorrect conversion happened twice.
Unsurprisingly, the plane was out of fuel and had to glide to an emergency landing on a racetrack that had once been a Royal Canadian Air Force training base. Luckily, Captain Pearson was an experienced glider pilot. With reduced control and few instruments, the Captain brought the 767 down as if it were a huge glider with 61 people onboard. Although the landing gear collapsed and caused some damage, no one on the plane or the ground were seriously hurt.
What’s the Answer?
Sadly, math answers are much easier to get than social answers. Kids routinely complain that they’ll never need math once they leave school. (OK, not kids like we were, but normal kids.) But we all know that is simply not true. Even if your job doesn’t directly involve math, understanding your own finances, making decisions about purchases, or even evaluating political positions often requires that you can see through math nonsense, both intentional and unintentional.
[Antoine de Saint-Exupéry] was a French author, and his 1948 book Citadelle has an interesting passage that may hold part of the answer. If you translate the French directly, it is a bit wordy, but the quote is commonly paraphrased: “If you want to build a ship, don’t herd people together to collect wood and don’t assign them tasks and work, but rather teach them to long for the endless immensity of the sea.”
We learned math because we understood it was the key to building radios, or rockets, or computer games, or whatever it was that you longed to build. We need to teach kids math in a way that makes them anxious to learn the math that will enable their dreams.
How do we do that? We don’t know. Great teachers help. Inspiring technology like moon landings helps. What do you think? Tell us in the comments. Now with 285% more comment goodness. Honest.
We still think slide rules made you better at math. Just like not having GPS made you better at navigation.
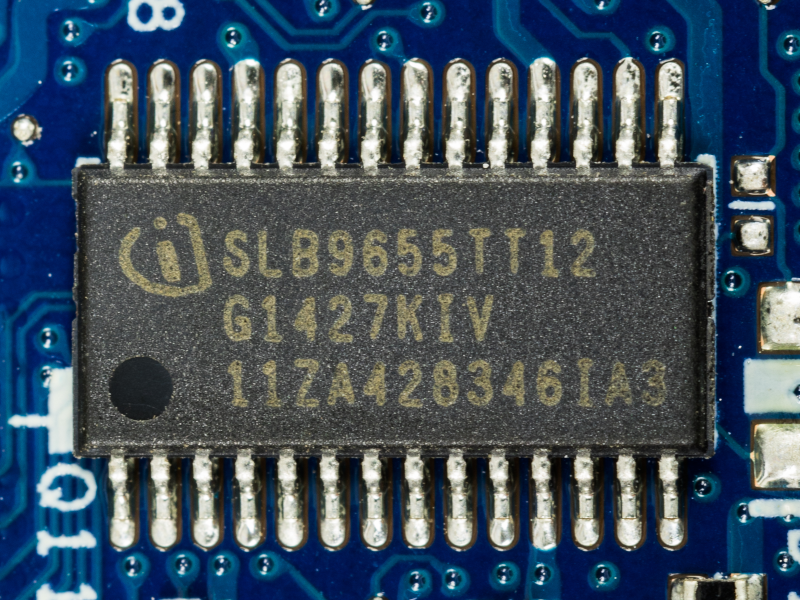
Today’s PCs are locked up with Trusted Platform Module (TPM) devices so much so that modern Windows versions insist on having a recent TPM to even install. These have become so prevalent that even larger embedded boards now have TPM and, of course, if you are repurposing consumer hardware, you’ll have to deal with it, too. [Sigma Star] has just the primer for you. It explains what TPM does, how it applies to embedded devices, and where the pitfalls are.
The TPM is sometimes a chip or sometimes secure firmware that is difficult to tamper with. They provide secret storage and can store boot signatures to detect if something has changed how a computer starts up. The TPM can also “sign off” that the system configuration is the same to a remote entity. This allows, for example, a network to prevent a hacked or rogue computer from communicating with other computers.
Embedded systems, usually, aren’t like PCs. A weather station at a remote location may have strangers poking at it without anyone noticing. Also, that remote computer might be expected to be working for many more years than a typical laptop or desktop computer.
This leads to a variety of security concerns that TPM 2.0 attempts to mitigate. For example, it is unreasonable to think a typical attacker might connect a logic analyzer to your PC, but for an embedded system, it is easier to imagine. There is a session-based encryption to protect against someone simply snooping traffic off the communication bus. According to the post, not all implementations use this encryption, however.
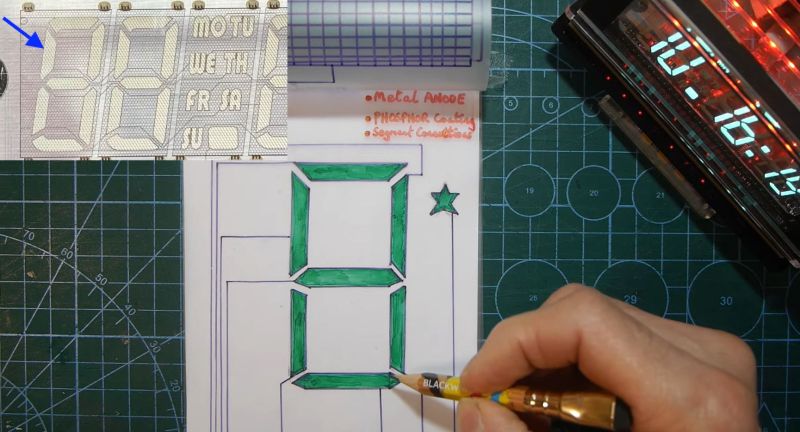
After having been sent a vacuum fluorescent display (VFD) based clock for a review, [Anthony Francis-Jones] took the opportunity to explain how these types of displays work.
Although VFDs are generally praised for their very pleasant appearance, they’re also relatively low-power compared to the similar cathode ray tubes. The tungsten wire cathode with its oxide coating produces the electrons whenever the relatively low supply voltage is applied, with a positively charged grid between it and the phosphors on the anode side inducing the accelerating force.
Although a few different digit control configurations exist, all VFDs follow this basic layout. The reason why they’re also called ‘cold cathode’ displays is because the cathode doesn’t heat up nearly as hot as those of a typical vacuum tube, at a mere 650 °C. Since this temperature is confined to the very fine cathode mesh, this is not noticeable outside of the glass envelope.
While LCDs and OLED displays have basically eradicated the VFD market, these phosphor-based displays still readily beat out LCDs when it comes to viewing angles, lack of polarization filter, brightness and low temperature performance, as LC displays become extremely sluggish in cold weather. Perhaps their biggest flaw is the need for a vacuum to work, inside very much breakable glass, as this is usually how VFDs die.
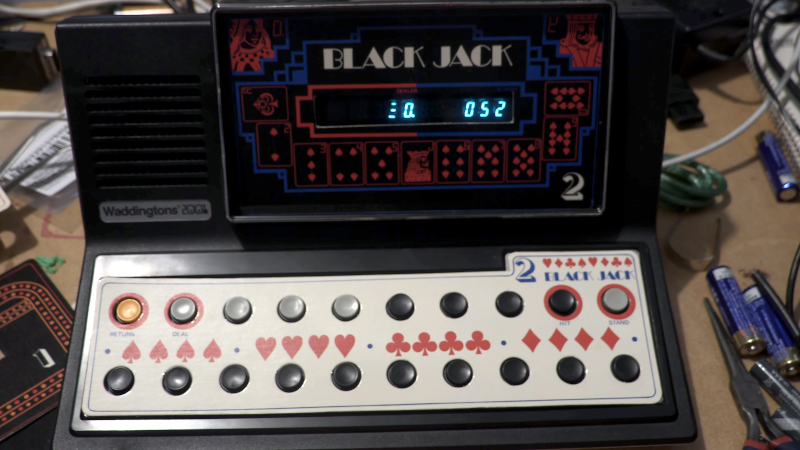
What happens when a traditional board game company decides to break into electronic gaming? Well, if it were a UK gaming company in 1978, the result would be a Waddingtons 2001 The Game Machine that you can see in the video from [Re:Enthused] below.
The “deluxe console model” had four complete games: a shooting gallery, blackjack, Code Hunter, and Grand Prix. But when you were done having fun, no worries. The machine was also a basic calculator with a very strange keyboard. We couldn’t find an original retail price on these, but we’ve read it probably sold for £20 to £40, which, in 1978, was more than it sounds like today.
Like a board game, there were paper score sheets. The main console had die-cut panels to decorate the very tiny screen (which looks like a very simple vacuum fluorescent display) and provide labels for the buttons. While it isn’t very impressive today, it was quite the thing in 1978.
This would be a fun machine to clone and quite easy, given the current state of the art in most hacker labs. A 3D-printed case, color laser-printed overlays, and just about any processor you have lying around would make this a weekend project.
It is easy to forget how wowed people were by games like this when they were new. Then again, we don’t remember any of those games having a calculator.
As a side note, Waddingtons was most famous for their special production of Monopoly games at the request of MI9 during World War II. The games contained silk maps, money, and other aids to help prisoners of war escape.


![[nanofix] and his assortment of tweezers](https://hackaday.com/wp-content/uploads/2026/01/nanofix-tweezers-banner.jpg?w=800)


![[Denny] removing a plaster bust from a microwave-softened mold](https://hackaday.com/wp-content/uploads/2026/01/pla-mold-feat.jpg?w=800)