3D printers are built for additive manufacturing. However, at heart, they are really just simple CNC motion platforms, and can be readily repurposed to other tasks. As [Arseniy] demonstrates, it’s not that hard to take a cheap 3D printer and turn it into a viable wood engraver.
The first attempt involved a simple experiment—heating the 3D printer nozzle, and moving it into contact with a piece of wood to see if it could successfully leave a mark. This worked well, producing results very similar to a cheap laser engraving machine. From there, [Arseniy] set about fixing the wood with some simple 3D-printed clamps so it wouldn’t move during more complex burning/engraving tasks. He also figured out a neat trick to simply calibrate the right Z height for wood burning by using the built in calibration routines. Further experiments involved developing a tool for creating quality G-Code for these engraving tasks, and even using the same techniques on leather with great success.
If you need to mark some patterns on wood and you already have a 3D printer, this could be a great way to go. [Arseniy] used it to great effect in the production of a plywood dance pad. We’ve featured some other great engraver builds over the years, too, including this innovative laser-based project. Video after the break.
This is a multipart series with five parts done and more to come. The PIC12F683 is an 8-pin flash-based, 8-bit microcontroller from Microchip. [Andrew] picked the PIC12F683 for decapsulation because back in 2011 it was the first microcontroller he broke read-protection on and he wanted to go back and revisit this chip, given particularly that his resources and skills had advanced in the intervening period.
The five videos are a tour de force. He begins by taking a package cross section, then decapsulating and delayering. He collects high-resolution photos as he goes along. In the process, he takes some time to explain the dangers of working with acid and the risk mitigations he has in place. Then he does what he calls a “floorplan analysis” which takes stock of the entire chip before taking a close look at the SRAM implementation.
This week’s Hackaday Podcast sees Elliot Williams joined by Jenny List for an all-European take on the week, and have we got some hacks for you!
In the news this week is NASA’s Maven Mars Orbiter, which may sadly have been lost. A sad day for study of the red planet, but at the same time a chance to look back at what has been a long and successful mission.
In the hacks of the week, we have a lo-fi camera, a very refined Commodore 64 laptop, and a MIDI slapophone to entertain you, as well as taking a detailed look at neutrino detectors. Then CYMK printing with laser cut stencils draws our attention, as well as the arrival of stable GPIB support for Linux. Finally both staffers let loose; Elliot with an epic rant about spreadsheets, and Jenny enthusiastically describing the Haiku operating system.
Check out the links below if you want to follow along, and as always, tell us what you think about this episode in the comments!
The Kodak Charmera is a tiny keychain camera produced by licencing out the name of the famous film manufacturer, and it’s the current must-have cool trinket among photo nerds. Inside is a tiny sensor and a fixed-focus M7 lens, and unlike many toy cameras it has better quality than its tiny package might lead you to expect. There will always be those who wish to push the envelope though, and [微攝 Macrodeon] is here to fit a lens mount for full-size lenses (Chinese language, subtitle translation available).
The hack involves cracking the camera open and separating the lens mount from the sensor. This is something we’re familiar with from other cameras, and it’s a fiddly process which requires a lot of care. A C-mount is then glued to the front, from which all manner of other lenses can be attached using a range of adapters. The focus requires a bit of effort to set up and we’re guessing that every lens becomes extreme telephoto due to the tiny sensor, but we’re sure hours of fun could be had.
As one might expect, it all starts with a Server Side Request Forgery (SSRF). That’s a flaw where sending traffic to a server can manipulate something on the server side to send a request somewhere else. The trick here is that a webhook worker can be primed to point at localhost by sending a request directly to a system API.
One of the systems that powers a PostHog install is the Clickhouse database server. This project had a problem in how it sanitized SQL requests, namely attempting to escape a single quote via a backslash symbol. In many SQL servers, a backslash would properly escape a single quote, but Clickhouse and other Postgresql servers don’t support that, and treat a backslash as a regular character. And with this, a read-only SQL API is vulnerable to SQL injection.
These vulnerabilities together just allow for injecting an SQL string to create and run a shell command from within the database, giving an RCE and remote shell. The vulnerabilities were reported through ZDI, and things were fixed earlier this year.
FreePBX
Speaking of SQL injections, FreePBX recently fixed a handful of SQL injections and an authentication bypass, and researchers at horizon3.ai have the scoop. None of these particular issues are vulnerable without either questionable configuration changes, or access to a valid PHP session ID token. The weakness here seems to be a very similar single quote injection.
Another fun SQL injection in FreePBX requires the authorization type swapped to webserver. But with that setting in place, an injected authentication header with only a valid user name is enough to pull off an SQL injection. The attack chosen for demonstration was to add a new user to the users table. This same authentication header spoof can be used to upload arbitrary files to the system, leading to an easy webshell.
Google Project Zero’s Refresh
We’ve often covered Google’s Project Zero on this column, as their work is usually quite impressive. As their blog now points out, the homepage design left something to be desired. That’s changed now, with a sleek and modern new look! And no, that’s not actually newsworthy here; stop typing those angry comments. The real news is the trio of new posts that came with the refresh.
The most recent is coverage of a VirtualBox VM excape via the NAT network driver. It’s covering a 2017 vulnerability, so not precisely still relevant, but still worth a look. The key here is a bit of code that changes the length of the data structure based on the length of the IP header. Memory manipulation from an untrusted value. The key to exploitation is to manipulate memory to control some of the memory where packets are stored. Then use IP fragmentation packets to interleave that malicious data together and trigger the memory management flaw.
The second post is on Windows exploitation through race conditions and path lookups. This one isn’t an exploit, but an examination of techniques that you could use to slow the Windows kernel down, when doing a path lookup, to exploit a race condition. The winner seems to be a combination of nested directories, with shadow directories and symbolic links. This combination can cost the kernel a whopping three minutes just to parse a path. Probably enough time.
The third entry is on an image-based malware campaign against Samsung Android phones. Malicious DNG files get processed by the Quram image processing library on Samsung devices. DNG images are a non-proprietary replacement for .raw image files, and the DNG format even includes features like embedding lens correction code right in the file format. This correction code is in the form of opcodes, that are handled very much like a script or small program on the host device. The Quram library didn’t handle those programs safely, allowing them to write outside of the allocated memory for the image.
Bits and Bytes
The E-note domain and servers have been seized by law enforcement. It’s believed that $70 million worth of ransomware and cryptocurrency theft has passed through this exchange service, as part of a money laundering operation. A Russian national has been named as the man behind the service, and an indictment has been made, but it seems that no actual arrests have been made.
And lastly, on a personal note: Thank you to all the readers of this column over the last six years, and to the Hackaday editors for making it happen. I’ve found myself in the position of having four active careers at once, and with the birth of my son in November, I have four children as well. Something has to give, and it’s not going to be any of the kids, so it’s time for me to move on from a couple of those careers. This Week in Security has been a blast, ever since the first installment back in May of 2019. With any luck, another writer will pick up the mantle early next year. (Editor’s note: We’re working on it, but we’ll miss you!)
As the saying goes — when life gives you lemons, you make lemonade. When life gives you a two-ton surplus industrial robot arm, if you’re [Brian Brocken], you apparently make a massive 3D printer.
The arm in question is an ABB IRB6400, a serious machine that can sling 100 to 200 kilograms depending on configuration. Compared to that, the beefiest 3D printhead is effectively weightless, and the Creality Sprite unit he’s using isn’t all that beefy. Getting the new hardware attached uses (ironically) a 3D printed mount, which is an easy enough hack. The hard work, as you might imagine, is in software.
As it turns out, there’s no profile in Klipper for this bad boy. It’s 26-year-old controller doesn’t even speak G-code, requiring [Brian] to feed the arm controller the “ABB RAPID” dialect it expects line-by-line, while simultaneously feeding G-code to the RAMPS board controlling the extruder. If you happen to have the same arm, he’s selling the software that does this. Getting that synchronized reliably was the biggest challenge [Brian] faced. Unfortunately that means things are slowed down compared to what the arm would otherwise be able to do, with a lot of stop-and-start on complex models, which compromises print quality. Check the build page above for more pictures, or the video embedded below.
[Brian] hopes to fix that by making better use of the ABB arm’s controller, since it does have enough memory for a small buffer, if not a full print. Still, even if it’s rough right now, it does print, which is not something the engineers at ABB probably ever planned for back before Y2K. [Brian]’s last use of the arm, carving a DeLorean out of styrofoam, might be closer to the original design brief.
Typically, lamps provide a stationary source of light to illuminate a given area and help us see what we’re doing. However, they can also be a little more artistic and eye-catching, like this windmill lamp from [Huy Vector].
It’s somewhat of a charming desk toy, constructed out of copper wire soldered into the form of a traditional windmill. At its base, lives a simple motor speed controller, while up top, a brushed DC gearmotor is responsible for turning the blades. As you might imagine, it’s a little tricky to get power to flow to the LED filaments installed on those blades while they happen to be rotating. That’s where the build gets tricky, using the output shaft of the motor’s gear drive and a custom slip ring to pass power to the LEDs. That power comes courtesy of a pair of 16340 lithium-ion cells, which can be juiced up with the aid of a USB-C charger board.
We’ve often said that some technological advancements seemed like alien technology for their time. Sometimes we look back and think something would be easy until we realize they didn’t have the tools we have today. One of the biggest examples of this is how, in the 1950s, engineers created a color image that still plays on a black-and-white set, with the color sets also able to receive the old signals. [Electromagnetic Videos] tells the tale. The video below simulates various video artifacts, so you not only learn about the details of NTSC video, but also see some of the discussed effects in real time.
Creating a black-and-white signal was already a big deal, with the video and sync presented in an analog AM signal with the sound superimposed with FM. People had demonstrated color earlier, but it wasn’t practical for several reasons. Sending, for example, separate red, blue, and green signals would require wider channels and more complex receivers, and would be incompatible with older sets.
The trick, at least for the NTSC standard, was to add a roughly 3.58 MHz sine wave and use its phase to identify color. The amplitude of the sine wave gave the color’s brightness. The video explains why it is not exactly 3.58 MHz but 3.579545 MHz. This made it nearly invisible on older TVs, and new black-and-white sets incorporate a trap to filter that frequency out anyway. So you can identify any color by providing a phase angle and amplitude.
The final part of the puzzle is to filter the color signal, which makes it appear fuzzy, while retaining the sharp black-and-white image that your eye processes as a perfectly good image. If you can make the black-and-white signal line up with the color signal, you get a nice image. In older sets, this was done with a short delay line, although newer TVs used comb filters. Some TV systems, like PAL, relied on longer delays and had correspondingly beefier delay lines.
There are plenty of more details. Watch the video. We love how, back then, engineers worried about backward compatibility. Like stereo records, for example. Even though NTSC (sometimes jokingly called “never twice the same color”) has been dead for a while, we still like to look back at it.
It seems like a fair assessment to state that the many ‘AI’ features that Microsoft added to Windows 11 are at least somewhat controversial. Unsurprisingly, this has led many to wonder about disabling or outright removing these features, with [zoicware]’s ‘Remove Windows AI’ project on GitHub trying to automate this process as much as reasonably possible.
All you need to use it is your Windows 11-afflicted system running at least 25H2 and the PowerShell script. The script is naturally run with Administrator privileges as it has to do some manipulating of the Windows Registry and prevent Windows Update from undoing many of the changes. There is also a GUI for those who prefer to just flick a few switches in a UI instead of running console commands.
Among the things that can be disabled automatically are the disabling of Copilot, Recall, AI Actions, and other integrations in applications like Edge, Paint, etc. The reinstallation of removed packages is inhibited by a custom package. For the ‘features’ that cannot be disabled automatically, there is a list of where to toggle those to ‘off’.
Naturally, since Windows 11 is a moving target, it can be rough to keep a script like this up to date, but it seems to be a good start at least for anyone who finds themselves stuck on Windows 11 with no love for Microsoft’s ‘AI’ adventures. For the other features, there are also Winaero Tweaker and Open-Shell, with the latter in particular bringing back the much more usable Windows 2000-style start menu, free of ads and other nonsense.
The theory behind hydropower is very simple: water obeys gravity and imparts the gained kinetic energy onto a turbine, which subsequently drives a generator. The devil here is, of course, in all the details, as [FarmCraft101] on YouTube is in the process of finding out as he adds a small hydro plant to his farm dam. After previously doing all the digging and laying of pipe, in this installment, the goal is to build and test the turbine and generator section so that it can be installed.
The turbine section is 3D-printed and slides onto the metal shaft, which then protrudes from the back where it connects to a 230VAC, three-phase generator. This keeps it quite modular and easy to maintain, which, as it turns out, is a very good idea. After a lot of time spent on the lathe, cutting metal, and tapping threads, the assembled bulk of the system is finally installed for its first test run.
After all that work, the good news is that the 3D-printed turbine seems to work fine and holds up, producing a solid 440 RPM. This put it over the predicted 300 RPM, but that’s where the good news ends. Although the generator produces 28 watts, it’s officially rated for 3 kW at 300 RPM. Obviously, with the small size of this AliExpress-special, the expectation was closer to 750 watts, so that required a bit of investigation. As it turns out, at 300 RPM it only produces 9 watts, so obviously the generator was a dud despite cashing out $230 for it.
Hopefully, all it takes to fix this is to order a new generator to get this hydropower setup up and running. Fortunately, it seems that he’ll be getting his money back from the dud generator, so hopefully in the next video we’ll see the system cranking out something closer to a kilowatt of power.
These days, you get a fantastic camera with the purchase of just about any modern smartphone. [Abe] missed some of the charm of earlier, lower-quality digital cameras, though, and wanted to recreate that experience. The way forward was obvious. He built a nostalgic digital video camera from scratch!
[Abe] figured he could build the entire project around analog gear, and then simply find a way to store the video digitally, thus creating the effect he was looking for. To that end, the build is based around a small analog video camera that’s intended for use with FPV drones. It runs on 5 to 20 volts and outputs a simple composite video signal. This makes it easy to display its output on a small LCD screen, originally intended to be used with an automotive reversing camera. These were both paired with a mini video recorder module from RunCam, which can capture composite video and store it on a microSD card in 640 x 480 resolution.
These parts were quickly lashed together, with the camera sending its output to the RunCam video recorder module, which then passed it on to the screen. Everything worked as expected, so [Abe] moved on to implementing an on-screen display using the MAX7456 chip, which is built specifically for this purpose. It overlays text on the video feed to the screen as commanded by an RP2040 microcontroller. Once that was all working, [Abe] just had to provide a battery power supply and wrap everything up in a nice retro-styled case. Then, at the last minute, the separate camera and recorder modules were replaced by a TurboWing module that combined both into one.
The result is a nifty-looking camera that produces grainy, slurry, old-school digital video. If you love 640 x 480 as a resolution, you’ll dig this. It’s got strong 90s camcorder vibes, and that’s a very good thing.
The Amiga 600 was in its day the machine nobody really wanted — a final attempt to flog the almost original spec 68000 platform from 1985, in 1992. Sure it had a PCMCIA slot nobody used, and an IDE interface for a laptop hard drive, but it served only to really annoy anyone who’d bought one when a few months later the higher-spec 1200 appeared. It’s had a rehabilitation in recent years though as a retrocomputer, and [LinuxJedi] has a 600 motherboard in need of some attention.
As expected for a machine of its age it can use replacement electrolytic capacitors, and its reset capacitor had bitten the dust. But there’s more to that with one of these machines, as capacitor leakage can damage the filter circuitry surrounding its video encoder chip. Since both video and audio flow through this circuit, there was no composite video to be seen.
The hack comes in removing the original chip rather than attempt the difficult task of replacing the filter, and replacing it with a different Sony chip in the same series. It’s nicely done with a connector in the original footprint, and a small daughterboard. The A600 lives again, but this time it won’t be a disappointment to anyone.
If you want to wallow in some Amiga history as well as read a rant about what went wrong, we have you covered.
When you start an STM32 MCU with its default configuration, its CPU will tick along at a leisurely number of cycles on the order of 8 to 16 MHz, using the high-speed internal (HSI) clock source as a safe default to bootstrap from. After this phase, we are free to go wild with the system clock, as well as the various clock sources that are available beyond the HSI.
Increasing the system clock doesn’t just affect the CPU either, but also affects the MCU’s internal buses via its prescalers and with it the peripherals like timers on that bus. Hence it’s essential to understand the clock fabric of the target MCU. This article will focus on the general case of increasing the system clock on an STM32F103 MCU from the default to the maximum rated clock speed using the relevant registers, taking into account aspects like Flash wait states and the APB and AHB prescalers.
Although the Dhrystone benchmark is rather old-fashioned now, it’ll be used to demonstrate the difference that a faster CPU makes, as well as how complex accurately benchmarking is. Plus it’s just interesting to get an idea of how a lowly Cortex-M3 based MCU compares to a once top-of-the line Intel Pentium 90 CPU.
Stitching The Clock Fabric
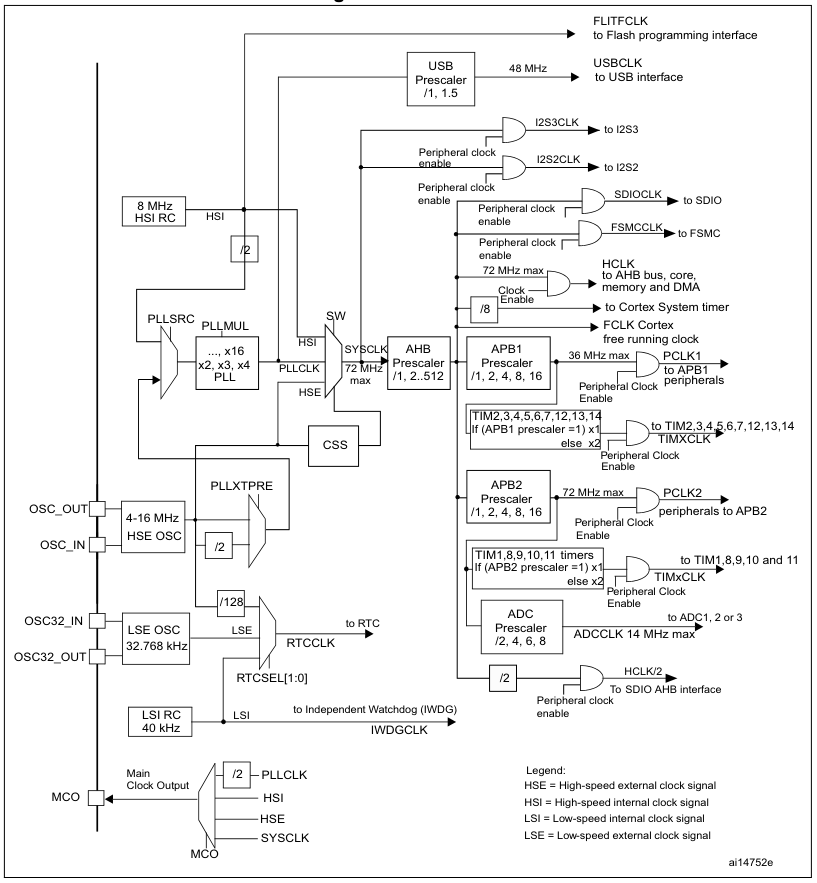
The F103’s clock tree isn’t identical to that of other families of STM32 MCUs, but the basic concepts remain the same. See the below graphic from Reference Manual 0008 for the clock tree of STM32F10x MCUs:
The clock tree of the STM32F10x MCUs. (Source: RM0008)
We can see the HSI clocked at 8 MHz, which feeds into the clock input switch (SW), from where it can provide the 8 MHz system clock without further fuss. Our other options are to use the HSE, which is fed in via its respective oscillator pins and from there is wired to the same switch as the HSI. If we want to get a higher clock speed than what the HSI or HSE can provide directly, we need to use the Phase Locked Loop (PLL) to generate a higher clock speed.
For this we need to first configure the PLL, enable it and select it as the input source for the clock switch. Before we can throw the switch, however, we also need to make sure that the prescalers for the buses (APB1, APB2, AHB) are set correctly. As we can see in the clock tree diagram, we have maximum speeds for each bus and fixed scaling numbers for each prescaler.
This pattern continues with individual peripherals, some of which also have their own prescaler – like USB and the ADC – but this is just something to keep in mind for when using these peripherals. If we’re just trying to crank the CPU core up to its maximum speed and still want to use the UART, all we need is to get the PLL configuration right, along with the AHB and APB prescalers so that the UART peripheral can be interacted with.
Plugging In Numbers
Before we start happily punching numbers on our keyboard to make the MCU go faster, there’s one tedious detail that we have take care of first: appeasing the Flash memory so that it can keep up. This involves configuring the right number of wait states, the use of prefetching and similar options. For this we open our copy of RM0008 to page 60 to ogle at the FLASH_ACR register and its options.
In this Flash access control register for the F103 and kin we get to enable or disable the prefetch buffer and the latency. Fortunately, for the latency the RM tells us exactly how many wait states we have to set here depending on our target system clock speed. For the 72 MHz that the F103 is rated for, we have to set two wait states.
Scrolling up a bit to page 58 and doing the unspeakable thing of reading the documentation, we can see that the prefetch buffer is turned on after reset by default and is best left enabled. As for the half cycle option, this is related to ‘power optimization’, which means that you will not touch this unless you know what you are doing and are sure that you need to change this.
Next we wish to use the HSE via the PLL to get the most accurate and fastest system clock speed, which first requires enable the HSE and waiting for RCC_CR_HSERDY to change to 1 as indicate that it is ready for use.
Up next is configuring the PLL, starting with setting the PLL source to HSE:
RCC->CFGR |= RCC_CFGR_PLLSRC;
Now we can configure the AHB and APB prescalers. These take the new system clock and divide it by the set number. For the F103, the 36 MHz-limited APB1 needs to be set to 2, while AHB and APB2 can run at the full 72 MHz, ergo 1.
Continuing configuring of the PLL and assuming that it is currently disabled, we can now mash in its multiplier number. Unlike other STM32 families, the F1’s PLL is rather simple, with just a single multiplication factor. Since we’re using the HSE, we need to know the board that we are using and the speed that this HSE oscillates at. Taking the common ‘Blue Pill’ STM32F103 board as example, this features an 8 MHz HSE input, meaning that we have to multiply this by 9 to get the target of 72 MHz.
RCC->CFGR |= 7 << RCC_CFGR_PLLMULL_Pos;
The target PLLMUL register starts at 0x02 for a multiplier of x4, ergo we need to subtract two from our target multiplier. With that done we can enable the PLL and wait for it to stabilize:
RCC->CR |= RCC_CR_PLLON;
while (!(RCC->CR & RCC_CR_PLLRDY)) {
    // Timeout handling.
}
Next we throw the big switch to use the PLL’s output as the system clock source and wait for the switch to complete:
We should be up and running now, leaving us just to update the global CMSIS SystemCoreClock variable with the new clock speed of 72 MHz.
Benchmarking
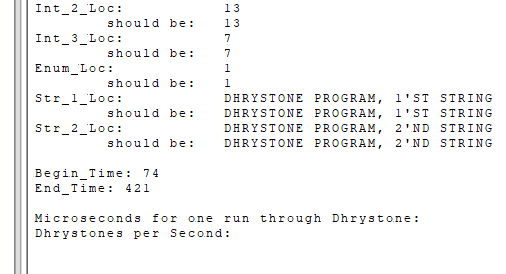
These certainly are Dhrystone results. (Credit: Maya Posch)
Running Dhrystone on our F103 seems like a bit of a challenge as the benchmark was created for your typical desktop and server systems. To achieve this, I took the original pre-ANSI C code for Dhrystone 2.1 and adapted it to a Nodate project. The dhrystone.cpp file contains the benchmark itself, with no significant modifications other than to set up the MCU and the UART as standard output target. The number of runs is also hardcoded to be 100 million so that it doesn’t have to be punched in every time.
After compiling the benchmark and flashing it to the STM32F103 board, it seemed to take a few eternities for it to complete with so many runs. When the board’s single LED finally started doing its leisurely blinking routine to indicate completion, it turned out that 347 seconds had expired, or roughly 5.78 minutes. As can be seen in the start time, this wasn’t the first attempt, after a 10 million run completed too quickly according to the benchmark’s criteria. C’est la vie.
Annoyingly, the printf-lite implementation that I use with Nodate didn’t seem to like the 32-bit float values and were absent in the final output, so I had to do the calculations for the Dhrystones Per Second (DPS) and related MIPS (DPS / 1757) myself. Since the times() implementation’s ticks equal seconds, this was at least fairly easily, giving the following numbers:
DPS: ~288,184.438
MIPS: ~164.021
To see whether these numbers are at all plausible, I consulted a few lists of Dhrystone benchmark results, including one for DPS and one for MIPS. Taking into account the noise created by running it on an OS versus bare metal, my use of -Og optimization level and other differences, the placement at the level of about a Pentium 100 doesn’t seem too farfetched.
There is an official ARM Dhrystone benchmarking guide (AN273), which cites a DPS of 40,600.9 for a Cortex-M MCU running at 18.5 MHz. This would be 158,014 DPS if extrapolated linearly, but obviously not the exact board, MCU or compile flags are used, so ‘rough ballpark’ seems to be the term of the day here.
Perhaps the most interesting finding is that a lowly STM32F103 MCU can keep up with a once high-end Pentium CPU of the early 1990s, at least within the limited integer-only Dhrystone benchmark. Next target will probably be to run the more modern and extensive CoreMark on the F103 and other STM32 MCUs, to give a more holistic perspective.
The build uses yoga mats as the raw material to create each individual square of the hopscotch board. The squares all feature simple break-beam light sensors that detect when a foot lands in the given space. These sensors are monitored by a Raspberry Pi Pico in each square. In turn, the Pico lights up addressable NeoPixel LED strips in response to the current position of the player.
It’s a simple little project which makes a classic game just a little more fun. It’s also a great learning project if you’re trying to get to grips with things like microcontrollers and addressable LEDs in an educational context. We’d love to see the project taken a step further, perhaps with wirelessly-networked squares that can communicate and track the overall game state, or enable more advanced forms of play.
Meanwhile, if you’re working on updating traditional playground games with new technology, don’t hesitate to let us know!
Cartridge-based consoles have often been celebrated for their robust and reliable media. You put a simple ROM chip in a tough plastic housing, make sure the contacts are fit for purpose, and you should have a game cart that lasts for many decades.
When it comes to the Nintendo 3DS, though, there are some concerns that its carts aren’t up to snuff. Certain engineering choices were made that could mean these carts have a very limited lifespan, which could now be causing failures in the wild. It may not be the only Nintendo console to suffer this fate, either, thanks to the way modern cart-based consoles differ from their forebearers.
Lost Memory
Carts for early gaming systems tended to use mask ROMs, like this NES Tetris cartridge. Credit: public domain
To understand why modern cartridges are at risk, we should first understand why retro consoles don’t have the same problem. It all comes down to how cartridges store their data. Old-school consoles, like the Sega Mega Drive or the Super Nintendo, stored their games on mask ROMs. These are read-only chips that literally have their data hard-baked in at the lithography stage during the chip’s production. There is no way to change the contents of the ROM—hence the name. You simply fire in addresses via the chip’s address pins, and it spits out the relevant data on the data pins.
By virtue of being a very simple integrated circuit, mask ROMs tend to last a very long time. They don’t require an electrical charge to retain their data, as it’s all hard-etched into the silicon inside. Indeed, there are a million old game carts from the 1980s that are still perfectly functional today as proof. Eventually, they may fail, like any other integrated circuit, but if treated properly, by and large, they can be expected to survive for many decades without issue. Game carts with battery-backed save chips will still lose that storage over time, unless the battery is regularly replaced, but this is a side issue. The mask ROM that stores the game itself is generally very reliable as long as it’s not abused.
The problem for modern cart-based consoles is that mask ROM fell out of favor compared to other rewriteable methods of storing data. To a certain degree, it comes down to economics. You could spin up a custom mask ROM design for a new game, and have many copies produced by a chip foundry, and install those in your carts. However, it’s far easier to simply design a writeable cart in various capacities, and have all your company’s games released on those formats instead. You can use standard off-the-shelf parts that are produced in the millions, if not billions, and you have the flexibility to rewrite carts or update them in the event there’s a bug or something that needs to be corrected. In contrast, if you’d relied on mask ROMs, you’d have to trash your production run and start again if the data needs to be changed by even a single bit.
Where most early game carts relied on mask ROMs that last for ages, it’s believed the Nintendo 3DS may rely on a form of flash memory that isn’t as resiliant. Credit: Kungfuman, CC BY-SA 3.0
This has become a particular issue for some Nintendo systems. Up to the Nintendo DS, it was still common for cartridges to be built with bespoke mask ROMs; only certain titles that needed greater storage used writeable chips like EPROMs. However, when the Nintendo 3DS came along in 2011, norms had shifted. Carts were produced using a product called XtraROM from Macronix. Flip through the marketing materials as one forum user did in 2021, and you won’t find out a whole lot of real technical detail. However, on the basis of probabilities and datasheets in the wild, XtraROM appears to be a technology based on NAND Flash storage.
Exact details of the technology used in Nintendo carts are unclear to a degree, though, as datasheets for those part numbers are not readily available. Carts would often also contain a small amount of user-rewriteable memory for game saves, but the main game data tended to be stored in XtraROM chips. It also appears from certain Nintendo leaks that the 3DS may have certain built-in commands used to refresh this storage regularly, to keep it healthy over time.
If you’re a video game archivist, or just someone that wants their old Pokemon carts to still work in 2030, this is a bad thing. It’s all because of the way Flash memories work. Data is stored as electrical charges that are trapped in a floating gate transistor. Over time, those charges tend to leak out. This isn’t a problem in regular use, because Flash memory devices have controllers that continually refresh the charges as long as they’re powered. However, if you leave such a device unpowered for long enough, then that process can’t take place, and data loss is the eventual result. This has become a particular problem with modern solid-state drives, which can lose data in just years or even months when left unplugged, particularly in warmer environments where charge loss occurs at a faster rate.
There isn’t a lot of hardcore technical information available on precisely what Macronix put into the XtraROM chips used in modern Nintendo carts. It’s believed the technology may be flash based, which would suggest it’s may be at risk of bit rot over time. Credit: Macronix, via screenshotMacronix marketing materials are relatively vague, but do note that XtraROM relies on “charge trapping technology.” Credit: Macronix
If they are indeed based on flash technology, Nintendo 3DS cartridges could be subject to the same phenomena of data loss after long periods without power. The same problem could affect the Nintendo Switch, too, which uses XtraROM chips from the same family. Fine details are hard to come by due to it being a proprietary product, but Macronix has claimed that its XtraROM-based products should offer 20 years of reliable storage at temperatures up to 85 C. However, these products haven’t existed that long. Those results are from accelerated aging tests that are run at higher temperatures to try and back-calculate what would happen at lower temperatures over longer periods of time. Their results don’t always map one-to-one on what happens in the real world. In any case, the fact that Macronix is quoting that 20-year figure suggests that XtraROM is perhaps a particularly long-lived flash technology. You’d expect a more robust mask ROM to outlast even the best EEPROMs that claim longevity figures in centuries.
Fears around widespread cartridge failures float around social media and gaming websites every now and again. It’s believed to be a particular issue with a certain Fire Emblem title, too. However, what we don’t have is a clear idea of the scale of the problem, or if it’s actually happening in the wild just yet. There are many people complaining on the Internet that they’ve grabbed an old cartridge that has failed to boot, but that can happen for a wide range of reasons. Without dumping the cart, it’s hard to definitively put this down to bit rot of the flash storage inside. There are other failures that can happen, for example, like bad solder joints.
There are hints that flash rot really could be affecting some Nintendo 3DS cartridges in the real world, though. A particularly interesting case from a forum concerned a copy of Mario & Luigi Paper Jam Bros. that completely failed to run. After some investigation, the owner decided to see if the 3DS’s cartridge refresh routine could possibly bring the cart back to life. This led them to develop a tool for “fixing” 3DS carts, with files shared on Github. It works in a simple fashion—using the 3DS’s built-in cartridge refresh routines when errors are detected in a given area of data.
This copy of Mario & Luigi Paper Jam Bros. was reportedly resurrected by using the 3DS’s built in cartridge refresh routines. It’s a very anecdotal piece of evidence that NAND flash rot could be affecting these carts. It also suggests that it can be guarded against by regularly plugging in carts so the console can run the refresh routines that keep them alive.
YouTube commenters report success using the tool to refresh their own carts. Credit: via screenshot
Ultimately, if you’re precious about your 3DS or Switch games, it probably pays to boot them up and run them once in a while. The same may go for games on the Sony PSVita, too. Even if the stated 20-year lifetime of these carts is legitimate, it’s helpful to juice up the flash every once in a while. Plus, at the very worst, you’ve spent some time playing your cherished games, so it’s hardly a waste of time.
We’d still love to see the issue investigated further. The best way would be to see some dumps and checksums of sealed 3DS games from over 10 years ago, but that’s perhaps unlikely given the value of these rare items. In the meantime, the best way forward is perhaps the cautious one—if you’re worried about data loss on your flash-based cartridges, boot them up just in case. Happy gaming out there!
Once upon a time, transmutation of the elements was a really big deal. Alchemists drove their patrons near to bankruptcy chasing the philosopher’s stone to no avail, but at least we got chemistry out of it. Nowadays, anyone with a neutron source can do some spicy transmutation. Or, if you happen to have a twelve meter sphere of liquid scintillator two kilometers underground, you can just wait a few years and let neutrinos do it for you. That’s what apparently happened at SNO+, the experiment formally known as Sudbury Neutrino Observatory, as announced recently.
The scinillator already lights up when struck by neutrinos, much as the heavy water in the original SNO experiment did. It will also light up, with a different energy peak, if a nitrogen-13 atom happens to decay. Except there’s no nitrogen-13 in that tank — it has a half life of about 10 minutes. So whenever a the characteristic scintillation of a neutrino event is followed shortly by a N-13 decay flash, the logical conclusion is that some of the carbon-13 in the liquid scintillator has been transmuted to that particular isotope of nitrogen.
That’s not unexpected; it’s an interaction that’s accounted for in the models. We’ve just never seen it before, because, well. Neutrinos. They’re called “ghost particles” for a reason. Their interaction cross-section is absurdly low, so they are able to pass through matter completely unimpeded most of the time. That’s why the SNO was built 2 KM underground in Sudbury’s Creighton Mine: the neutrinos could reach it, but very few cosmic rays and no surface-level radiation can. “Most of the time” is key here, though: with enough liquid scintillator — SNO+ has 780 tonnes of the stuff — eventually you’re bound to have some collisions.
Capturing this interaction was made even more difficult considering that it requires C-13, not the regular C-12 that the vast majority of the carbon in the scintillator fluid is made of. The abundance of carbon-13 is about 1%, which should hold for the stuff in SNO+ as well since no effort was made to enrich the detector. It’s no wonder that this discovery has taken a few years since SNO+ started in 2022 to gain statistical significance.
Modern hospitals use a lot of computers. Architecturally speaking, they’re pretty typical machines—running the same CPUs and operating systems as any other PCs out there. However, they do tend to have some quirks when it comes to accessories and peripherals, as [tzukima] explores in a recent video.
The video starts by looking at typical power cables used with hospital computers and related equipment. In particular, [tzukima] talks about the common NEMA 5-15P to IEC-320-C13 style cable, which less sophisticated users might refer to as a kettle cord. In hospital-grade form, these cables are often constructed with translucent plug housings, with large cylindrical grips that make them easier to grip.
Digging further through business supply catalogs lead [tzukima] to discover further products aimed at hospital and medical users. In particular, there are a wide range of keyboards and mice that are designed for use in these environments. The most typical examples are regular peripherals that have simply been encased in silicone to make them easier to wash and disinfect where hygiene is paramount. Others, like the SealShield keyboard and mouse, use more advanced internally-sealed electronics to achieve their washable nature and IP68 ratings. These are peripherals that you can just throw in a dishwasher if you’re so inclined.
Over the years there have been a few CPUs designed to directly run a high-level programming language, the most common approach being to build a physical manifestation of a portable code virtual machine. An example might be the experimental Java processors which implemented the JVM. Similarly, in 1976 Itty Bitty Computers released an implementation of Tiny BASIC which used a simple virtual machine, and to celebrate 50 years of Tiny BASIC, [Zoltan Pekic] designed a CPU that mirrors that VM.
The CPU was created within a Digilent Anvyl board, and the VHDL file is freely available. The microcode mapping ROM was generated by a microcode compiler, also written by [Zoltan]. The original design could execute all of the 40 instructions included in the reference implementation of Tiny BASIC; later iterations extended it a bit more. To benchmark its performance, [Zoltan] set the clock rate on the development board equal to those of various other retrocomputers, then compared the times each took to calculate the prime numbers under 1000 using the same Tiny BASIC program. The BASIC CPU outperformed all of them except for Digital Microsystems’ HEX29.
The next step was to add a number of performance optimizations, including a GOTO cache and better use of parallel operations. [Zoltan] then wrote a “Hello World” demo, which can be seen below, and extended the dialect of Tiny BASIC with FOR loops, INPUT statements, multiple LET statements, the modulo operator, and more. Finally, he also extended the CPU from 16-bit to 32-bit to be able to run an additional benchmark, on which it once again outperformed retrocomputers with comparable clock speeds.
Researchers have been able to make the semiconductor germanium superconductive for the first time by incorporating gallium into its crystal lattice through the process of molecular-beam epitaxy (MBE). MBE is the same process which is used in the manufacture of semiconductor devices such as diodes and MOSFETs and it involves carefully growing crystal lattice in layers atop a substrate.
When the germanium is doped with gallium the crystalline structure, though weakened, is preserved. This allows for the structure to become superconducting when its temperature is reduced to 3.5 Kelvin. Read all about it in the team’s paper here (PDF).
It is of course wonderful that our material science capabilities continue to advance, but the breakthrough we’re really looking forward to is room-temperature superconductors, and we’re not there yet. If you’re interested in progress in superconductors you might like to read about Floquet Majorana Fermions which we covered earlier this year.
The jet pack is one of those pre-war sci-fi dreams that the cold light of rational consideration reveals to be a terrible idea. Who wants to cook their legs with hot exhaust while careening out of control? Nobody. Yet it’s such an iconic idea, we can’t get away from it. What if there was a better environment, one where your jetpack dreams could come true? [CPSdrone] has found one: the world’s oceans, and have taken that revelation to build the world’s fastest underwater jetpack.
Underwater? Yeah, water drag is worse than air drag. But there are two big advantages: one, humans are fairly buoyant, so you don’t need fight gravity with rocket thrust, and two, the high density of water makes small, electric props a reasonable proposition. The electric ducted fans on this “jetpack” each produce about 110 pounds of thrust, or just over 490 N. The first advantage is helped further by the buoyancy provided by the air-filled “hull” of the jetpack. That’s necessary because while the motors might be rated for submersion, but the rest of the electronics aren’t.
Alas, wearing the device on the back is considerably less hydrodynamic than hanging on behind in the standard ‘water scooter’ configuration. While they’re able to go faster than a swimming human, the ESCs weren’t able to handle the motors full power so we can’t tell you if this device would allow [CPSdrone] to outrun a shark with those 220 lbf on tap, which was the design goal. Apparently they’re working on it.
From the testing done on-screen, it’s safe to say that they’d at least need to hang on behind to get their desired speed goals, and abandon their jet pack dreams just as we landlubbers were forced to do long ago. Well, some of us, anyway.