You can buy a wide range of RC car tires off the shelf. Still, sometimes it can be hard to find exactly what you’re looking for, particularly if you want weird sizes, strange treads, or something that is very specifically scale-accurate. In any of these cases, you might like to make your own tires. [Build It Better] shows us how to do just that!
Making your own tires is fairly straightforward once you know how. You start out by producing a 3D model of your desired tire. You then create a two-piece negative mold of the tire, which can then be printed out on a 3D printer; [Build It Better] provides several designs online. From there, it’s simply a matter of filling the tire molds with silicone rubber, degassing, and waiting for them to set. All you have to do then is demold the parts, do a little trimming and post-processing, and you’ve got a fresh set of boots for your favorite RC machine.
[Build It Better] does a great job of demonstrating the process, including the basic steps required to get satisfactory results. We’ve featured some other great molding tutorials before, too. Video after the break.
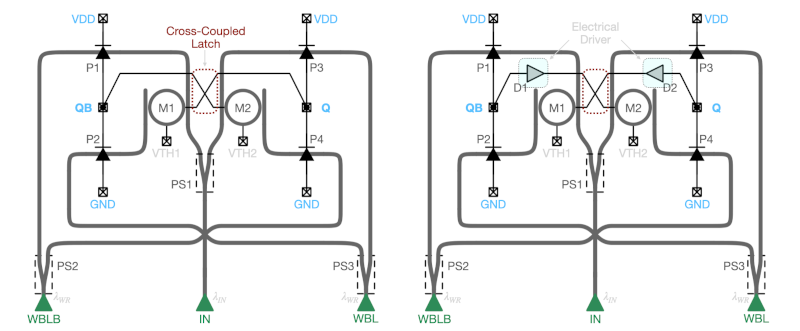
Look inside a science fiction computer, and you’ll probably see tubes and cubes that emit light. Of course, it’s for effect, but the truth is, people do think light computing may be the final frontier of classical computing power. Engineers at the University of Southern California Information Sciences Institute and the University of Wisconsin-Madison are showing off a workable photonic latch — a memory element that uses light.
The device uses a commercial process (GlobalFoundries (GF) Fotonix Silicon Photonics platform) and, like a DRAM, regenerates periodically to prevent loss of the memory contents.
On the device, you’ll find a combination of tiny photodiodes, micro-ring resonators, and optical waveguides. Simulations show the memory element can operate at 20 GHz and might even be readable at 50 or 60 GHz.
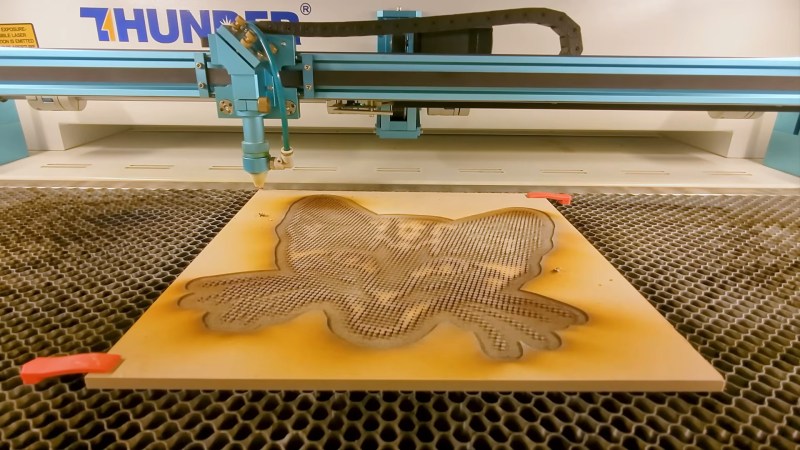
This is one of those fun hacks that come about from finding a product and going “I wonder if I could…” — in this case, artist/YouTuber [Wesley Treat] found out his favourite vendor makes spray cans in CYMK colours– that is the Cyan, Yellow, Magenta and blacK required for subtractive printing. Which got him wondering: can I make full-colour prints with this paint?
The MDF-based print, with naive half-tone dots.
His answer was “yes”, and the process to do so is fairly simple. First, split the image into colour channels, generate a half-tone pattern for each one, and carve it out of MDF on the laser. Then spray the MDF with the appropriate colour spray paint. Press the page against each block in turn, and voila! A full colour print block print, albeit at very low DPI compared to your average inkjet.
Now, you might be wondering, why half-tone instead of mixing? Well, it turns out that these CYMK paints are too opaque for that to work in a block-printing process. At least with a naive spray technique; [Weseley] does admit a very fine mist might be able to make that work. The second question is why not just hook the rattle cans into a CNC machine for a paint-based mega inkjet? That’s a great question and we hope someone tries it, but [Weseley] evidently likes block-printing so he tried that first.
The Mylar stencil print, with a more artistic half-tone pattern.
Laser-ablating enough MDF away to make decent print blocks took too long for [Weseley]’s tastes, however, so he switched to using mylar stencils. Instead of spraying a block and pressing onto it, the paint is sprayed through the stencil. The 10 mil Mylar not only cuts faster, but can support finer detail. Though the resulting prints loose some of the artistic flair the inconsistencies block printing brings, it probably looks better.
If you prefer to skip the manual paint-can-handling, perhaps we can interest you in a spray-can plotter. If you do like manually flinging paint, perhaps you could try this dot-painting spray can attachment, for a more self-directed half-tone.
Synthesizing sounds from scratch is all well and good, you just use a bit of maths. However, the latest build from [Daisy] eschews such boring concepts as additive or subtractive synthesis, instead going for a sample-based approach.
This build is based around the Daisy Seed microcontroller platform. It was actually inspired by an earlier project to create a ribbon synth, which we covered previously. In this case, the ribbon potentiometer has been repurposed, being used to control the playback position of a lengthy recorded sample. In this build, the Daisy Seed is running its audio playback system at a rate of 48,000 samples per second. It’s capable of storing up to 192,000 samples in memory, so it has a total of 4 seconds of sample storage. The Daisy Seed uses an analog-to-digital input to record two seconds of audio into the sample buffer. It can then be replayed by placing a finger on the ribbon at various points. Playback is via granular synthesis, where small sections of the overall sample buffer are used to synthesize a new tone. The video explains how the granular synthesis algorithm is implemented using the Plugdata framework. Design files are available for those eager to replicate the build.
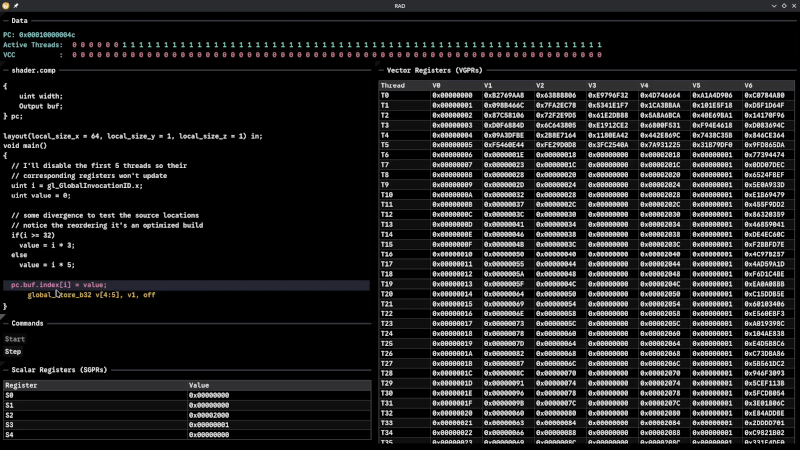
Although Robert F. Kennedy gets the credit for popularizing it, George Bernard Shaw said: “Some men see things as they are and say, ‘Why?’ I dream of things that never were and say, ‘Why not?'” Well, [Hadz] didn’t wonder why there weren’t many GPU debuggers. Instead, [Hadz] decided to create one.
It wasn’t the first; he found some blog posts by [Marcell Kiss] that helped, and that led to a series of experiments you’ll enjoy reading about. Plus, don’t miss the video below that shows off a live demo.
It seems that if you don’t have an AMD GPU, this may not be directly useful. But it is still a fascinating peek under the covers of a modern graphics card. Ever wonder how to interact with a video card without using something like Vulkan? This post will tell you how.
Writing a debugger is usually a tricky business anyway. Working with the strange GPU architecture makes it even stranger. Traps let you gain control, but implementing features like breakpoints and single-stepping isn’t simple.
We’ve used things like CUDA and OpenCL, but we haven’t been this far down in the weeds. At least, not yet. CUDA, of course, is specific to NVIDIA cards, isn’t it?
I love first builds! They say so much about a person, because you see what’s paramount to them in a keyboard. You can almost feel their frustration at other keyboards come through their design choices. And the Lobo by [no-restarts] is no exception to any of this.
There’s just something about this Corne-like object with its custom case and highly-tappable and variously tilted keycaps. The list of reasons for being begins innocently enough with [no-restarts] wanting a picture of their dog on the case.
Image by [no-restarts] via redditFrom there, things get really personal. You may notice the thumb cluster is slightly different — [no-restarts] doesn’t like the thumb tuck required by the Corne to reach the innermost keys. I really dig the homing bumps on the middle thumb keys. Another difference is the splayed layout, as [no-restarts] is especially prone to pinky splay. Finally, there are a pair of OLEDs hiding on the inner sides of the case, which are designed to be visible when tented.
Overall, [no-restarts] is happy with it, but has some ideas for revision. Yep, that sounds about right. The Lobo is all hand-wired, and there’s a PCB with hot swap sockets in its future. If you’re interested in the case files, GitHub is your friend.
Image by [kurisutofujp] via redditEssentially, this thing is made for using while you wander around the office (or the Metaverse). You can hold it in mid-air, secured in your Gargoyle-ness with a pair of straps, your fingers wrapped around to hit the alphas.
But you don’t have to use it that way, see. You can stand it up on the desk if you don’t want to type in mid-air. It can also be opened sort of halfway and used like a SafeType vertical keyboard.
If none of this excites you, GrabShell can also be laid flat on the desk. The distance between the two halves in this configuration is quite generous, and frankly, I’m a bit jealous.
So let’s talk about the generous thumbing-around area. As you’ll see in the video below, the left has a joystick and a toggle switch that flips it from arrow keys to mouse cursor. There’s a serious-looking scroll wheel beneath that. All three of these can be pushed in for additional inputs.
The right side of the thumb panel has a sweet-looking trackball that’s housed in a really cool-looking way. Another cool thing: there’s a frigging I2C port on the top, just exposed and hanging out because reasons.
Switch-wise, the board is a mix of hot-swappable Gateron G Pro browns and low-profile Gaterons under double-shot ABS keycaps. I think it sounds nice in the video below; others say it sounds cheap and hollow. To each their own.
The Centerfold: ZMK Dongle Repackaged As Vintage Computer
Image by me using images by [mharzhyall] via redditIt’s just so cute, that’s why it’s here. The buttons, they do nothing, but that’s okay — they might could do something in the future.
This is a ZMK dongle, like I said in the subheading, and [mharzhyall] put a new case around it. Basically it lets you connect keyboards wirelessly.
Do you rock a sweet set of peripherals on a screamin’ desk pad? Send me a picture along with your handle and all the gory details, and you could be featured here!
Historical Clackers: the Edland Typewriter Was a Total Flop
Produced between 1891 and 1893 by the Liberty Mfg. Company, the machine was conceived by Joseph Laurentius Edland of Brooklyn, NY. All seemed lost until 1964, when a handful of Edlands were found languishing in a warehouse in Galway, NY.
Although only made for two years, there were three different versions developed. The one pictured here is the second, with a metal base and embossed index, whereas the first had a wood base and flat index.
The third version, the Typewheel Edland, had a typewheel for a print element à la the Blick. Edlands cost a semi-reasonable $5 at the outset, but eventually doubled in price.
So, why the absolute failure? It was no better or worse a machine than its contemporaries, but perhaps just wasn’t well-marketed. Another theory is that the Edland failed because they were made of pot metal. Seems reasonable. Want to know how to use one? RTFM (PDF).
Finally, a Keyboard with a Mechanical Watch Movement
Wait, what? Why though? Well, it ticks along as you type, is that cool? It might be fun to see if you can keep up a certain number of keystrokes per second. Okay, I’m warming up to this idea pretty quickly, can you tell?
The Nama keyboard, dubbed after the scientific term for the mammoth, is appropriately named. It can weigh up to an astonishing 19.4 lbs (8.8 kg) depending on the case material. (Consider that a Model M, a proper bludgeoning device in its own right, weighs just 5 lbs (2.2 kg).)
This Nama has a tourbillion movement, the granddaddy of them all. Image by Wuque Studio via Notebook Check
Nama comes from Wuque Studio, and was built as an ode to their manufacturing capabilities. Now this is starting to make more sense. They are the Banana Republic to vendor Chilkey’s Old Navy, who are the brand behind the ND75, if that rings any bells.
Now the Nama looks like your basic mechanical keyboard on the surface, but five years of design decisions went into this line. You can get it with an aluminium case (14.5 lbs / 6.6 kg) or a brass CNC’d case (18.95 lbs / 8.6 kg), which of course is what makes it so heavy.
But yeah, the defining feature is definitely the watch movement. You bet your Backspace it’s fully functional except as a watch, and it doubles as a volume control knob, so you don’t have to settle for touching it with just your eyeballs.
Yeah, so the astute among you will have noticed that there are no numbers or hands on the watch movement, which would be, what, tacky? I don’t know anymore. At any rate, it’s protected by a piece of sapphire glass, which should keep Cheetos dust and such out of there.
Oh, you want to know the cost? $749 for the bare-bones with no movement, and $1299 for the brass-bottomed boy with the tourbillion. That’s… actually not that bad for a tourbillion movement.
When the Tamagotchi first launched all those decades ago, it took the world by storm. It was just a bunch of simple animations on a monochrome LCD, but it had heart, and people responded to that. Modern technology is capable of so much more, so [CiferTech] set out to build a virtual pet that can sniff out WiFi networks.
The build employs an ESP32-S3, perhaps the world’s favorite microcontroller that has WiFi baked right in from the factory. It’s paired with a 240×240 TFT LCD that delivers bright, vivid colors to show the digital pet living inside. Addressable WS2812B LEDs and a simple sound engine provide further feedback on the pet’s status.
The pet has various behaviors coded in, like hunting, exploring, and resting, and moods such as “happy,” “curious,” and “bored.” For a bit of environmental reactivity, [CiferTech] also made the local WiFi environment play a role. Nearby networks can influence the “hunger, happiness, and health” of the pet.
Although metal alloys is not among the most exciting topics for most people, the moment you add the word ‘radioactive’, it does tend to get their attention. So too with the once fairly common Mag-Thor alloys that combine magnesium with thorium, along with other elements, including zinc and aluminium. Its primary use is in aerospace engineering, as these alloys provide useful properties such as heat resistance, high strength and creep resistance that are very welcome in e.g. jet engines.
Most commonly found in the thorium-232 isotope form, there are no stable forms of this element. That said, Th-232 has a half-life of about 14 billion years, making it only very weakly radioactive. Like uranium-238 and uranium-235 it has the unique property of not having stable isotopes and yet still being abundantly around since the formation of the Earth. Thorium is about three times as abundant as uranium and thus rather hard to avoid contact with.
This raises the question of whether thorium alloys are such a big deal, and whether they justify removing something like historical artefacts from museums due to radiation risks, as has happened on a few occasions.
Since the (probably machine-generated) article that inspired these questions didn’t bother to include any useful details or references, it’s time to do a bit of a dive ourselves. This starts with the element thorium and its isotopes.
Obviously the problem with thorium here is not so much with the metal itself or its elementary properties, but rather the fact that a small fraction will decay into radium-228 via alpha decay. This has a half-life measured in years before rapidly passing through actinium-228 to become thorium-228, with a half-life of 1.9 years.
The subsequent decay chain is pretty rapid, taking it through very short-lived isotopes of radon-220, polonium-216 and so on until it becomes stable lead-208. Virtually all of this occurs via alpha decay. Of note is again that the initial isotope here – Th-232 – has a half-life of 14 billion years, or roughly the estimated age of the Universe. This makes it by far the most stable unstable isotope, with U-238 having a half-life of only about 4.463 billion years. Effectively, for most intents and purposes it might as well be a stable isotope.
Thorium is found in most rocks and soil, at around 6 ppm, with several minerals like thorite and monazite containing significantly higher levels.
This raises the question of how dangerous Th-232 truly is, such as when you start concentrating it in some fashion. How much radiation exposure do you experience once you take e.g. thorium ore and wear it around, or concentrate it into pure Th-232 and combine it with magnesium into a metal alloy that people regularly spend time around?
Negative Vibes
One persistent fad in the ‘alternative health’ community is that of negative ions and kin, with many shops selling items like bracelets and similar body-worn items that are supposed to generate these chi-balancing vibes via special ions. Interestingly, some of these are sold with thorium or uranium isotopes embedded in them.
Since these items are worn directly against the skin for extended periods of time, they form an excellent test case of the potential harm of such direct exposure to a significant amount of these isotopes.
According to the fact sheet on on the NRC website, as performed by Oak Ridge National Laboratory (ORNL), these items contain sometimes quite significant quantities of the radioactive material that range from Th-232 to U-238 and even Ra-226, some at more than 0.05% by weight to the point where they would have required a radioactive material license. The estimated local skin equivalent radiation dose was said to be more than the IAEA limit of 50 mSv annually. Despite this, these items require no special disposal methods and you are free to keep using them, albeit with some precautions.
Another study showed an annual exposure of 1.22 mSv, which with the assumed validity of the linear no-threshold (LNT) model would lead one to expect to see some kind of negative health effects. So far these have remained absent despite the popularity of these bracelets and the close contact.
TIG Welding
Thoriated tungsten TIG welding electrodes, with red band. (Credit: Weldguru.com)
Outside of accidental exposure in the case of weird bracelets, there is a common use case for thorium, with thoriated tungsten welding electrodes. These are used with DC TIG welding, and contain around 1% (yellow band) to around 2% (red band) of thorium oxide (ThO2). Although an alternative exists with cerium oxide (CeO2) in ceriated tungsten electrodes, thoriated tungsten remains popular due to the long lifespan and good performance with common applications.
Although it’s noted that thoriated tungsten electrodes are radioactive due to the small percentage of thorium within the ThO2, it is such a small amount that no special precautions seem to be warranted. Much like with the thorium oxide found in the aforementioned bracelets and kin, you’ll probably be fine if you don’t try eating it.
Since thorium is also not a heavy metal, unlike uranium, it is in that regard significantly safer, as is its oxide form which does not have the pyrophoric proclivity of the metal form.
Alloys
Compressor of a J-79 jet engine with Mag-Thor alloy sections (Credit: T.P. Kuipers et al., Ministerie van Defensie, Bundeswehr
This brings us back to the thorium-metal alloys which started the whole journey. A number of missiles and jet engines have used or currently use Mag-Thor alloys, which has led to for example the Dutch and German defense ministries investigating the radiation exposure from the J-79 jet engines, as found in F-104G Starfighter and F-4 Phantom aircraft.
The reason for this investigation was, as stated, the expected radiation dose when these engines and their respective aircraft are being worked on, handled for disposal, or displayed in a museum or collection. Here we also see the amount of thorium added to the used alloy, at up to 4% by weight, with an average of 1.7%. This means that the overwhelming majority of metal in these alloys is magnesium.
Part of the study was the measured dose at various distances from the components examined, along with a potential cumulative dose. Even in the most conservative scenario the dose came to about 1.2 µSv/hour, or less than 1 mSv/year, since it was probably assumed that people generally do not live 24/7 around these objects.
Realistically, a much bigger potential health risk involving thorium would be something along the lines of incandescent gas lantern mantles, which leads to significant higher exposure to the general public. Not to mention the hazards of the radioactive potassium-40 in something like bananas.
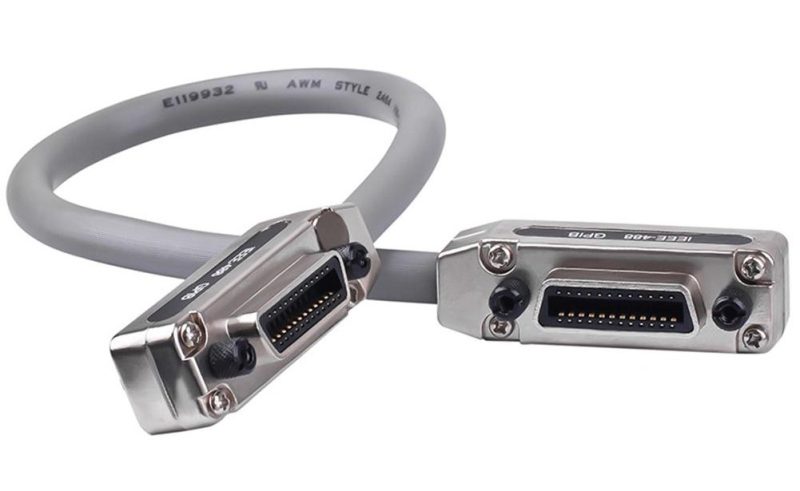
Recently, [Greg Kroah-Hartman] proclaimed the joyous news on the Linux Kernel Mailing List that stable General Purpose Interface Bus (GPIB) support has finally been merged into the 6.19 Linux kernel.
The GPIB is a short-range 8-bit, multi-master interface bus that was standardized as IEEE 488. It first saw use on HP laboratory equipment in the 1970s, but was soon after also used by microcomputers like the Commodore PET, Commodore 64 and others. Although not high-speed with just 8 MB/s, nor with galvanic isolation requirements, it’s an uncomplicated bus design that can be implemented without much of a blip on the BOM costs.
The IEEE 488 standard consists of multiple elements, with 488.1 defining the physical interface and 488.2 the electrical protocol. Over the decades a communication protocol was also developed, in the form of SCPI and its standardized way of communicating with a wide range of devices using a simple human-readable protocol.
Although the physical side of IEEE 488 has changed over the years, with Ethernet becoming a major alternative to the short GPIB cables and large connectors, the electrical protocol and SCPI alike are still very much relevant today. This latest addition to the Linux kernel should make it much easier to use both old and new equipment equipped with this bus.
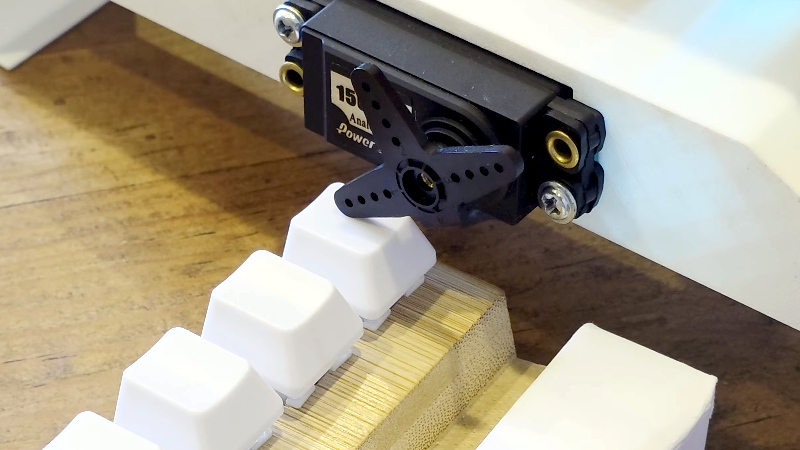
Remote control is a wonder of the age, we press a button, and something happens as if by magic. But what happens if there is no remote control, and instead a real physical button must be pressed? [What Up TK Here], who regular Hackaday readers might just recognize, had just this problem, and made a remote control button presser.
It’s a 3D printed frame which we’re told is designed for a specific item, on top of which is mounted a hobby servo. Rotating the servo brings the lever down on the button, and the job is done. At the user end there’s a button in a printed enclosure that’s definitely not a knock-off of a well-known franchise from a notoriously litigious console company.
This is all good, but the interest for other projects lies in how it works. It’s using a pair of ESP32 microcontrollers, and instead of connecting to an existing WiFi network it’s using ESP-NOW for simplicity and low latency. This is a good application for the protocol, but as we’ve seen, it’s useful for a lot more than just button pressing.
What might a laptop version of the Commodore 64 have looked like if one had been released by the late 1980s? This is the question that [Kevin Noki] tried to recently answer with a custom C64 laptop build.
While technically you could argue that Commodore’s SX-64 could be construed as a ‘portable’ system, its bulky format ensured that it was only portable in the sense that a 1980s CRT-based oscilloscope is also portable. Sadly, this turned out to be the last real attempt by Commodore to make a portable non-PC compatible system, with the ill-fated Commodore LCD project never making it out of development. We can, however, glean from this some design hints of what Commodore’s designers had in mind.
Interestingly, [Kevin] decided to instead use the Macintosh Portable as inspiration, with adaptations to make it look more like a breadbin C64. One could have argued that the C64C’s design would have worked better. Regardless, an enclosure was 3D printed, with parts glued together and metal dowels added for support.
For the guts, a custom keyboard with a new PCB and FDM printed keycaps was used, with a Raspberry Pi Pico as keyboard controller. We would here cue the jokes about how the keyboard controller is more powerful than a C64, but the real brains of this laptop come in the form of a Raspberry Pi 5 SBC for running the Vice C64 emulator, which blows a C64 even further out of the water.
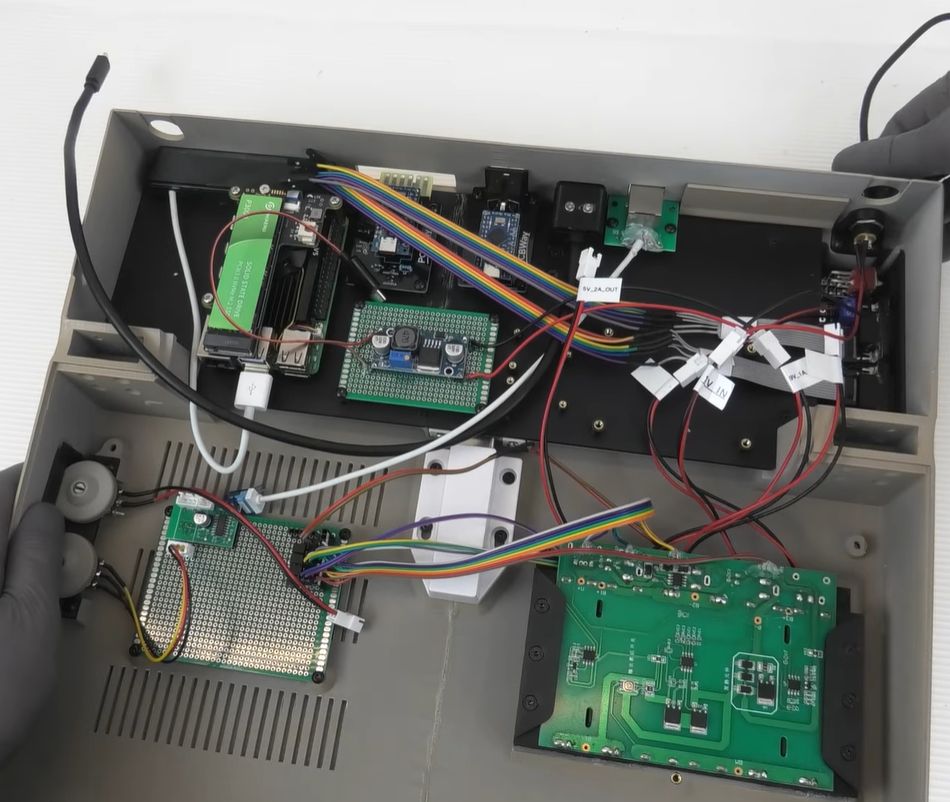
This choice also means there’s no direct compatibility with genuine C64 peripherals, but a workaround involving many adaptors and more MCUs was implemented. Sadly, cartridge compatibility was sacrificed due to these complications. The resulting innards can be glimpsed in the above screenshot to give some idea of what the end result looks like.
Of course, this isn’t the first time a Commodore 64 laptop has been created; [Ben Heck] used a C64C mainboard and an original keyboard back in 2009. This meant direct compatibility with all peripherals, including cartridges. Hopefully, now that Commodore as a company has been revived, it will pick up on ideas like these, as an FPGA-based C64 or C128 laptop would be pretty rad.
[Sam Ben-Yaakov] has another lecture online that dives deep into the physics of electronic processes. This time, the subject is magnetic transformers. You probably know that the ratio of current in the primary and secondary is the same (ideally) as the ratio of the turns in each winding. But do you know why? You will after watching the video.
Actually, you will after watching the first two minutes of the video. If you make it to the 44-minute mark, you’ll learn more about Faraday’s law, conservation of energy, and Lenz’s law.
One of our favorite things about the Internet is that you can find great lectures like these online, both from university programs and from individuals like [Dr. Ben-Yaakov]. There was a time when you would have had to enroll in a college to get the kind of education you can just browse through now.
Too much math and technical detail for you? We get it. You don’t need to understand all of this to use a transformer. But if you want to understand the math and the physics behind the things we do, nothing is stopping you. Even if you need to brush up on math, there are plenty of similar lectures to learn about that online, too.
Want a university class that is more practical? We hear you. Prefer simulation to math or solder? We hear you, too.
Ever wanted to just plug something in and conveniently read the hostname and IP addresses of a headless board like a Raspberry Pi? Chances are, a free USB port is more accessible than digging up a monitor and keyboard, and that’s where [C4KEW4LK]’s rpi_usb_ip_display comes in. Plug it into a free USB port, and a few moments later, read the built-in display. Handy!
The device is an RP2350 board and a 1.47″ Waveshare LCD, with a simple 3D-printed enclosure. It displays hostname, WiFi interface, Ethernet interface, and whatever others it can identify. There isn’t even a button to push; just plug it in and let it run.
Here’s how it works: once plugged in, the board identifies itself as a USB keyboard and a USB serial port. Then it launches a terminal with Ctrl-Alt-T, and from there it types and runs commands to do the following:
Find the serial port that the RP2350 board just created.
Get the parsed outputs of hostname, ip -o -4 addr show dev wlan0, ip -o -4 addr show dev eth0, and ip -o -4 addr show to gather up data on active interfaces.
Send that information out the serial port to the RP2350 board.
Display the information on the LCD.
Update periodically.
The only catch is that the host system must be able to respond to launching a new terminal with Ctrl-Alt-T, which typically means the host must have someone logged in.
It’s a pretty nifty little tool, and its operation might remind you, in concept, of how BadUSB attacks happen: a piece of hardware, once plugged into a host, identifies itself to the host as something other than what it appears to be. Then it proceeds to input and execute actions. But in this case, it’s not at all malicious, just convenient and awfully cute.
Neopixels and other forms of addressable LEDs have taken the maker world by storm. They make it trivial to add a ton of controllable, glowing LEDs to any project. [Arnov Sharma] has made a great tribute to the WS2812B LED by building the NeoPixel Giant Edition.
The build is simply a recreation of the standard 5mm x 5mm WS2812B, only scaled up to 150 mm x 150 mm. It uses a WS2811 chip inside to make it behave in the same way from a logical perspective, and this controller is hooked up to nine standard RGB LEDs switched with MOSFETs to ensure they can deliver the requisite light output. The components are all assembled on a white PCB in much the same layout as the tiny parts of a WS2812B, which is then installed inside a 3D-printed housing made in white PLA. Large metal terminals were added to the housing, just like a WS2812B, and the lens was then created using a large dose of clear epoxy.
The result is a fully functional, addressable LED that is approximately 30 times larger than the original. You can even daisy-chain them, just like the real thing. We’ve covered all kinds of projects using addressable LEDs over the years, from glowing cubes to fancy nature installations. If you’ve got your own glowable project that the world needs to see, make sure you notify the tips line!
[Chris Borge] has made (and revised) many of his own tools using a combination of 3D printing and common hardware, and recently decided to try metal casting. Having created his own tapping arm, he tries his hand at aluminum casting to create a much more compact version out of metal. His video (embedded below) really shows off the whole process, and [Chris] freely shares his learning experiences in casting his first metal tool.
The result looks great and is considerably smaller in stature than the 3D-printed version. However, the workflow of casting metal parts is very different. The parts are much stronger, but there is a lot of preparation and post-processing involved.
Metal casting deals with molten metal, but the process is otherwise very accessible, and many resources are available to help anyone with a healthy interest.
The key to making good castings is mold preparation. [Chris] uses green sand (a mixture of fine sand and bentonite clay – one source of the latter is ground-up kitty litter) packed tightly around 3D printed parts inside a frame. The packed sand holds its shape while still allowing the original forms to be removed and channels to be cut, creating a two-part mold.
His first-time castings have a rough surface texture, but are perfectly serviceable. After some CNC operations to smooth some faces and drill some holes, the surface imperfections are nothing filing, filler, and paint can’t handle.
To cast molten metal, there really isn’t any way around needing a forge. Or is there? We have seen some enterprising hackers repurpose microwave ovens for this purpose. One can also use a low-temperature alloy like Rose’s Metal, or eschew molten liquid altogether and do cold casting, which uses a mixture of resin and metal powder instead.
The design files for [Chris]’s tapping arm are available from links in the video description, and he also helpfully provides links to videos and resources he found useful. Watch it in the video, embedded just below.
Tetrodotoxin (TTX) is best known as the neurotoxin of the puffer fish, though it also appears in a range of other marine species. You might remember it from an episode of The Simpsons involving a poorly prepared dish at a sushi restaurant. Indeed, it’s a potent thing, as ingesting even tiny amounts can lead to death in short order.
Given its fatal reputation, it might be the last thing you’d expect to be used in a therapeutic context. And yet, tetrodotoxin is proving potentially valuable as a treatment option for dealing with cancer-related pain. It’s a dangerous thing to play with, but it could yet hold promise where other pain relievers simply can’t deliver.
Poison, or…?
A license to prepare fugu (pufferfish) issued by Tokyo authorities. Credit: Nesnad, CC BY SA 3.0
Humans have been aware of the toxicity of the puffer fish and its eggs for thousands of years. It was much later that tetrodotoxin itself was chemically isolated, thanks to the work of Dr. Yoshizumi Tahara in 1909.
Its method of action was proven in 1964, with tetrodotoxin found to bind to and block voltage-gated sodium channels in nerve cell membranes, essentially stopping the nerves from conducting signals as normal. It thus has the effect of inducing paralysis, up to the point where an afflicted individual suffers respiratory failure, and subsequently, death.
Tetrodotoxin is most closely associated with pufferfish, though it’s also present in other deadly species, like the blue-ringed octopus. Thankfully, nobody is crazy enough to try to eat those. Credit: NPS, public domain
It doesn’t take a large dose of tetrodotoxin to kill, either—the median lethal dose in mice is a mere 334 μg per kilogram when ingested. The lethality of tetrodotoxin was historically a prime driver behind Japanese efforts to specially license chefs who wished to prepare and serve pufferfish. Consuming pufferfish that has been inadequately prepared can lead to symptoms in 30 minutes or less, with death following in mere hours as the toxin makes it impossible for the sufferer to breathe. Notably, though, with the correct life support measures, particularly for the airway, or with a sub-fatal dose, it’s possible for a patient to make a full recovery in mere days, without any lingering effects.
The effects that tetrodotoxin has on the nervous system are precisely what may lend it therapeutic benefit, however. By blocking sodium channels in sensory neurons that deal with pain signals, the toxin could act as a potent method of pain relief. Researchers have recently explored whether it could have particular application for dealing with neuropathic pain caused by cancer or chemotherapy treatments. This pain isn’t always easy to manage with traditional pain relief methods, and can even linger after cancer recovery and when chemotherapy has ceased.
Tetrodotoxin is able to block voltage-gated sodium channels, which is the basis of both its pain-relieving abilities and its capacity to paralyze and kill. Credit: research paper
The challenge of using a toxin for pain relief is obvious—there’s always a risk that the negative effects of the toxin will outweigh the supposed therapeutic benefit. In the case of tetrodotoxin, it all comes down to dosage. The levels given to patients in research studies have been on the order of 30 micrograms, well under the multi-milligram dose that would typically cause severe symptoms or death in an adult human. The hope would be to find a level at which tetrodotoxin reduces pain with a minimum of adverse effects, particularly where symptoms like paralysis and respiratory failure are on the table.
A review of various studies worldwide was published in 2023, and highlights that tetrodotoxin pain relief does come with some typical adverse effects, even at tiny clinical doses. The most typical reported symptoms involved nausea, oral numbness, dizziness, and tingling sensations. In many cases, these effects were mild and well-tolerated. A small number of patients in research trials exhibited more serious symptoms, however, such as loss of muscle control, pain, or hypertension. At the same time, the treatment did show positive results — with many patients reporting pain relief for days or even weeks after just a few days of tetrodotoxin injections.
While tetrodotoxin has been studied as a pain reliever for several decades now, it has yet to become a mainstream treatment. There have been no large-scale studies that involved treating more than 200 patients, and no research group or pharmaceutical company has pushed hard to bring a tetrodotoxin-based product to market. Research continues, with a 2025 paper even exploring the use of ultra-low nanogram-scale doses in a topical setting. For now, though, commercial application remains a far-off fantasy. Today, the toxin remains the preserve of pufferfish and a range of other deadly species. Don’t expect to see it in a hospital ward any time soon, despite the promise it shows thus far.
Featured image: “Puffer Fish DSC01257.JPG” by Brocken Inaglory. Actually, not one of the poisonous ones, but it looked cool.
Keychain cameras are rarely good. However, in the case of Walmart’s current offering, it might be worse than it’s supposed to be. [FoxTailWhipz] bought the Vivitar-branded device and set about investigating its claim that it could deliver high-resolution photos.
The Vivatar Retro Keychain Camera costs $12.88, and wears “FULL HD” and “14MP” branding on the packaging. It’s actually built by Sakar International, a company that manufactures products for other brands to license. Outside of the branding, though, [FoxTailWhipz] figured the resolution claims were likely misleading. Taking photos quickly showed this was the case, as whatever setting was used, the photos would always come out at 640 x 480, or roughly 0.3 megapixels. He thus decided a teardown would be the best way to determine what was going on inside. You can see it all in the video below.
Pulling the device apart was easy, revealing that the screen and battery are simply attached to the PCB with double-sided tape. With the board removed from the case, the sensor and lens module are visible, with the model number printed on the flex cable. The sensor datasheet tells you what you need to know. It’s a 2-megapixel sensor, capable of resolutions up to 1632 x 1212. The camera firmware itself seems to not even use the full resolution, since it only outputs images at 640 x 480.
It’s not that surprising that an ultra-cheap keychain camera doesn’t meet the outrageous specs on the box. At the same time, it’s sad to see major retailers selling products that can’t do what they say on the tin. We see this problem a lot, in everything from network cables to oscilloscopes.
We noted that Excel turned 40 this year. That makes it seem old, and today, if you say “spreadsheet,” there’s a good chance you are talking about an Excel spreadsheet, and if not, at least a program that can read and produce Excel-compatible sheets. But we remember a time when there was no Excel. But there were still spreadsheets. How far back do they go?
Definitions
Like many things, exactly what constitutes a spreadsheet can be a little fuzzy. However, in general, a spreadsheet looks like a grid and allows you to type numbers, text, and formulas into the cells. Formulas can refer to other cells in the grid. Nearly all spreadsheets are smart enough to sort formulas based on which ones depend on others.
For example, if you have cell A1 as Voltage, and B1 as Resistance, you might have two formulas: In A2 you write “=A1/B1” which gives current. In B2 you might have “=A1*A2” which gives power. A smart spreadsheet will realize that you can’t compute B2 before you compute A2. Not all spreadsheets have been that smart.
There are other nuances that many, but not all, spreadsheets share. Many let you name cells, so you can simply type =VOLTS*CURRENT. Nearly all will let you specify absolute or relative references, too. With a relative reference, you might compute cell D1=A1*B1. If you copy this to row two, it will wind up D2=A2*B2. However, if you mark some of the cells absolute, that won’t be true. For example, copying D1=A1*$B$1 to row two will result in D2=A2*$B$1.
Not all spreadsheets mark rows and columns the same way, but the letter/number format is nearly universal in modern programs. Many programs still support RC references, too, where R4C2 is row four, column two. In that nomenclature, R[-1]C[2] is a relative reference (one row back, two rows to the right). But the real idea is that you can refer to a cell, not exactly how you refer to it.
So, How Old Are They?
LANPAR was probably the first spreadsheet program, and it was available for the GE400. The name “LANPAR” was LANguage for Programming Arrays at Random, but was also a fusion of the authors’ names. Want to guess the year? 1969. Two Harvard graduates developed it to solve a problem for the Canadian phone company’s budget worksheets, which took six to twenty-four months to change in Fortran. The video below shows a bit of the history behind LANPAR.
LANPAR might not be totally recognizable as a modern spreadsheet, but it did have cell references and proper order of calculations. In fact, they had a patent on the idea, although the patent was originally rejected, won on appeal, and later deemed unenforceable by the courts.
There were earlier, noninteractive, spreadsheet-like programs, too. Richard Mattessich wrote a 1961 paper describing FORTRAN IV methods to work with columns or rows of numbers. That generated a language called BCL (Business Computer Language). Others over the years included Autoplan, Autotab, and several other batch-oriented replacements for paper-based calculations.
Spreadsheets Get Personal
Back in the late 1970s, people like us speculated that “one day, every home would have a computer!” We just didn’t know what people would do with them outside of the business context where the computer lived at the time. We imagined people scaling up and down cooking recipes, for example. Exactly how do you make soup for nine people when the recipe is written for four? We also thought they might balance their checkbook or do math homework.
The truth is, two programs drove massive sales of small computers: WordStar, a word-processing program, and VisiCalc. Originally for the Apple ][, Visicalc by Dan Bricklin and Bob Frankston put desktop computers on the map, especially for businesses. VisiCalc was also available on CP/M, Atari computers, and the Commodore PET.
You’d recognize VisiCalc as a spreadsheet, but it did have some limitations. For one, it did not follow the natural order of operations. Instead, it would start at the top, work down a column, and then go to the next column. It would then repeat the process until no further change occurred.
However, it did automatically recalculate when you made changes, had relative and absolute references, and was generally interactive. You could copy ranges, and the program doesn’t look too different from a modern spreadsheet.
Sincere Flattery
Of course, once you have VisiCalc, you are going to invite imitators. SuperCalc paired with WordStar became very popular among the CP/M crowd. Then came the first of the big shots: Lotus 1-2-3. In 1982, this was a must-have application for the new IBM PC.
There were other contenders, each with its own claims to fame. Innovative Software’s SMART suite, for example, was among the first spreadsheets that let you have formulas that crossed “tabs.” It could also recalculate repeatedly until meeting some criteria, for example, recalculate until cell X20 is less than zero.
Probably the first spreadsheet that could handle multiple sheets to form a “3D spreadsheet” was BoeingCalc. Yes, Boeing like the aircraft. They had a product that ran on PCs or IBM 4300 mainframes. It used virtual memory and could accommodate truly gigantic sheets for its day. It was also pricey, didn’t provide graphics out of the box, and was slow. The Infoworld’s standard spreadsheet took 42.9 seconds to recalculate, versus 7.9 for the leading competitor at the time. Quatro Pro from Borland was also capable of large spreadsheets and provided tabs. It was used more widely, too.
Then Came Microsoft
Of course, the real measure of success in software is when the lawsuits start. In 1987, Lotus sued two spreadsheet companies that made very similar products (TWIN and VP Planner). Not to be outdone, VisiCalc’s company (Software Arts) sued Lotus. Lotus won, but it was a pyrrhic victory as Microsoft took all the money off the table, anyway.
Before the lawsuits, in 1985, Microsoft rolled out Excel for the Mac. By 1987, they also ported it to the fledgling Windows operating system. Of course, Windows exploded — make your own joke — and by the time Lotus 1-2-3 could roll out Windows versions, they were too late. By 2013, Lotus 1-2-3, seemingly unstoppable a few years earlier, fell to the wayside.
There are dozens of other spreadsheet products that have come and gone, and a few that still survive, such as OpenOffice and its forks. Quattro Pro remains available (as part of WordPerfect). You can find plenty of spreadsheet action in any of the software or web-based “office suites.”
Today and the Future
While Excel is 40, it isn’t even close to the oldest of the spreadsheets. But it certainly has kept the throne as the most common spreadsheet program for a number of years.
Many of the “power uses” of spreadsheets, at least in engineering and science, have been replaced by things like Jupyter Notebooks that let you freely mix calculations with text and graphics along with code in languages like Python, for example.
If you want something more traditional that will still let you hack some code, try Grist. We have to confess that we’ve abused spreadsheets for DSP and computer simulation. What’s the worst thing you’ve done with a spreadsheet?
If you have ever thought, “I wish I could have a mass spectrometer at home,” then we aren’t very surprised you are reading Hackaday. [Thomas Scherrer] somehow acquired a broken Brucker Microflex LT Mass Spectrometer, and while it was clearly not working, it promised to be a fun teardown, as you can see in the first part of the video below.
Inside are lasers and definitely some high voltages floating around. This appears to be an industrial unit, but it has a great design for service. Many of the panels are removable without tools.
The construction is interesting in that it looks like a rack, but instead of rack mounting, everything is mounted on shelves. The tall unit isn’t just for effect. The device has a tall column where it measures the sample under test. The measurement is a time of flight so the column has to be fairly long to get results.
The large fiber laser inside produces a 100 kW pulse, which sounds amazing, but it only lasts for 2.5 ns. There’s also a “smaller” 10W laser in the unit.
There are also vacuum pumps and other wizardry inside. Check out the video and get a glimpse into something you aren’t likely to have a chance to tear into yourself. There are many ways to do mass spectrometry, and some of them are things you could build yourself. We’ve seen it done more than once.
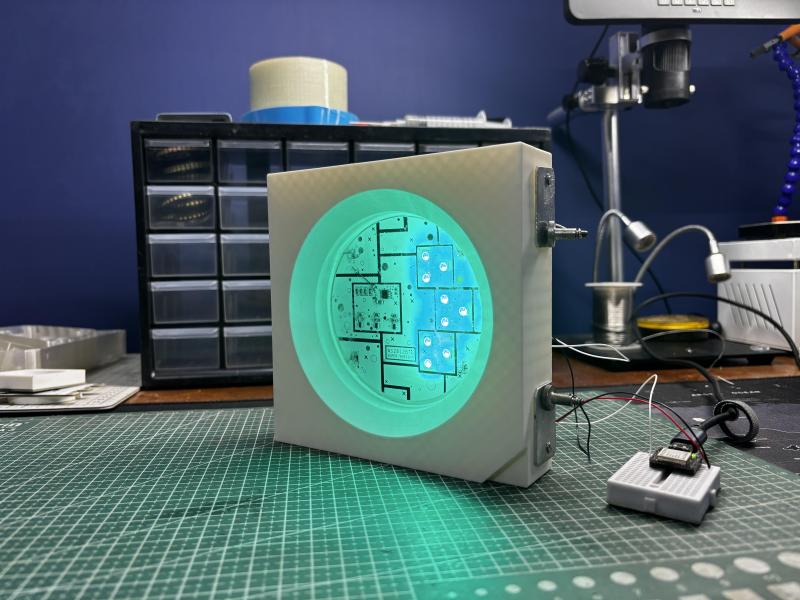
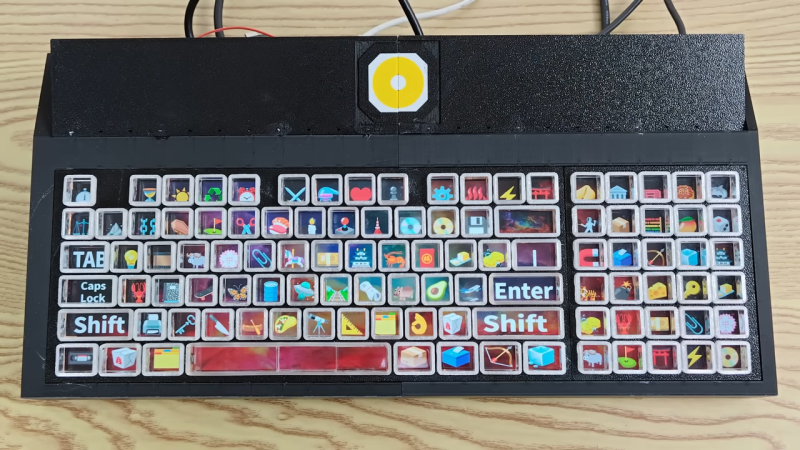
Most keyboards are factory-set for a specific layout, and most users never change from the standard layout for their home locale. As a multilingual person, [Inkbox] wanted a more flexible keyboard. In particular, one with the ability to change its layout both visually and logically, on the fly. Thus was born the all-screen keyboard, which can swap layouts on demand. Have a look at the video below to see the board in action.
The concept is simple enough: It’s a keyboard with transparent keys and a screen underneath. The screen displays the labels for the keys, while the transparent plastic keys provide the physical haptic interface for the typist. The device uses a Raspberry Pi to drive the screen. [Inkbox] then designed a plastic frame and transparent keys, which are fitted with magnets, which in turn are read by Hall effect sensors under the display. This eliminates the need for traditional key switches, which would block light from the screen below.
Unfortunately for [Inkbox], the prototype was very expensive (about $1,400 USD) and not particularly functional as a keyboard. However, a major redesign tackled some of these issues. Version two had a smaller screen with a different aspect ratio. It also jettisoned the Hall effect sensors and uses plastic keys capacitively operating a traditional touch screen. Some design files for the keyboard are available on Github for the curious.
An all-screen keyboard is very cool, if very complicated to implement. There are other ways to change your layout that aren’t quite as fancy, of course. You can always just make custom keycaps and remap layouts on a regular mechanical keyboard if desired. Still, you have to admire the work that went into making this thing a reality.


![A three-panel shot of a Apple ][-inspired ZMK dongle.](https://hackaday.com/wp-content/uploads/2025/12/ZMK-dongle-centerfold.png)