Reading view

There are new articles available, click to refresh the page.

Why LLMs are Less Intelligent than Crows

The basic concept of human intelligence entails self-awareness alongside the ability to reason and apply logic to one’s actions and daily life. Despite the very fuzzy definition of ‘human intelligence‘, and despite many aspects of said human intelligence (HI) also being observed among other animals, like crows and orcas, humans over the ages have always known that their brains are more special than those of other animals.

Currently the Cattell-Horn-Carroll (CHC) theory of intelligence is the most widely accepted model, defining distinct types of abilities that range from memory and processing speed to reasoning ability. While admittedly not perfect, it gives us a baseline to work with when we think of the term ‘intelligence’, whether biological or artificial.

This raises the question of how in the context of artificial intelligence (AI) the CHC model translate to the technologies which we see in use today. When can we expect to subject an artificial intelligence entity to an IQ test and have it handily outperform a human on all metrics?

Types Of Intelligence

While the basic CHC model contains ten items, the full model is even more expansive, as can be seen in the graphic below. Most important are the overarching categories and the reasoning for the individual items in them, as detailed in the 2014 paper by Flanagan and McGrew. Of these, reasoning (Gf, for fluid intelligence), acquired knowledge and memory (long and short term) are arguably the most relevant when it comes to ‘general intelligence’.

Current and expanded CHC theory of cognitive abilities. Source: Flanagan & McGrew (1997).

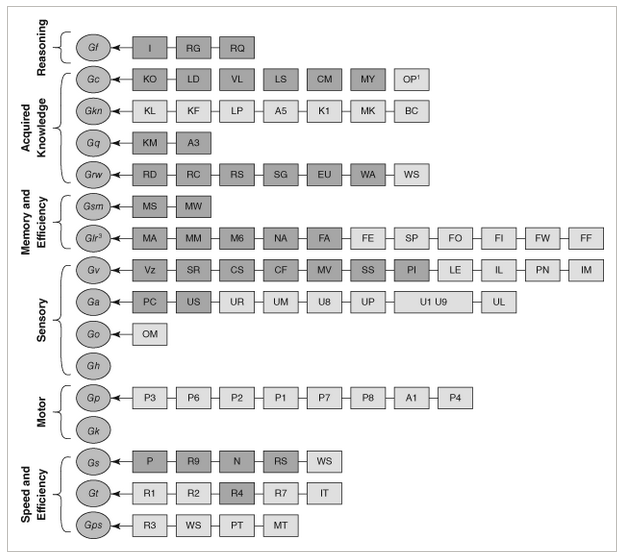
Fluid intelligence (Gf), or reasoning, entails the ability to discover the nature of the problem or construction, to use a provided context to fill in the subsequent steps, and to handle abstract concepts like mathematics. Crystallized intelligence (Gc) can be condensed to ‘basic skills’ and general knowledge, including the ability to communicate with others using a natural language.

The basic memory abilities pertain to short-term (Gsm) and long-term recall (Glr) abilities, in particular attention span, working memory and the ability to recall long-term memories and associations within these memories.

Beyond these basic types of intelligence and abilities we can see that many more are defined, but these mostly expand on these basic four, such as visual memory (Gv), various visual tasks, speed of memory operations, reaction time, reading and writing skills and various domain specific knowledge abilities. Thus it makes sense to initially limit evaluating both HI and AI within this constrained framework.

Are Humans Intelligent?

North American Common Raven (Corvus corax principalis) in flight at Muir Beach in Northern California (Credit: Copetersen)

It’s generally considered a foregone conclusion that because humans as a species possesses intelligence, ergo facto every human being possesses HI. However, within the CHC model there is a lot of wriggle room to tone down this simplification. A big part of IQ tests is to test these these specific forms of intelligence and skills, after all, creating a mosaic that’s then boringly reduced to a much less meaningful number.

The main discovery over the past decades is that the human brain is far less exceptional than we had assumed. For example crows and their fellow corvids easily keep up with humans in a range of skills and abilities. As far as fluid intelligence is concerned, they clearly display inductive and sequential reasoning, as they can solve puzzles and create tools on the spot. Similarly, corvids regularly display the ability to count and estimate volumes, demonstrating quantitative reasoning. They have regularly demonstrated understanding water volume, density of objects and the relation between these.

In Japanese parks, crows have been spotted manipulating the public faucets for drinking and bathing, adjusting the flow to either a trickle or a strong flow depending on what they want. Corvids score high on the Gf part of the CHC model, though it should be said that the Japanese crow in the article did not turn the faucet back off again, which might just be because they do not care if it keeps running.

When it comes to crystallized intelligence (Gc) and the memory-related Gsm and Glr abilities, corvids score pretty high as well. They have been reported to remember human faces, to learn from other crows by observing them, and are excellent at mimicking the sounds that other birds make. There is evidence that corvids and other avian dinosaur species (‘birds’) are capable of learning to understand human language, and even communicating with humans using these learned words.

The key here is whether the animal understands the meaning of the vocalization and what vocalizing it is meant to achieve when interacting with a human. Both parrots and crows show signs of being able to learn significant vocabularies of hundreds of words and conceivably a basic understanding of their meaning, or at least what they achieve when uttered, especially when it comes to food.

Whether non-human animals are capable of complex human speech remains a highly controversial topic, of course, though we are breathlessly awaiting the day that the first crow looks up at a human and tells the hairless monkey what they really think of them and their species as a whole.

The Bears

The bear-proof garbage bins at Yosemite National Park. (Credit: detourtravelblog)

Meanwhile there’s a veritable war of intellects going on in US National Parks between humans and bears, involving keeping the latter out of food lockers and trash bins while the humans begin to struggle the moment the bear-proof mechanism requires more than two hand motions. This sometimes escalates to the point where bears are culled when they defeat mechanisms using brute force.

Over the decades bears have learned that human food is easier to obtain and fills much better than all-natural food sources, yet humans are no longer willing to share. The result is an arms race where bears are more than happy to use any means necessary to obtain tasty food. Ergo we can put the Gf, Gc and memory-related scores for bears also at a level that suggests highly capable intellects, with a clear ability to learn, remember, and defeat obstacles through intellect. Sadly, the bear body doesn’t lend itself well to creating and using tools like a corvid can.

Despite the flaws of the CHC model and the weaknesses inherent in the associated IQ test scores, it does provide some rough idea of how these assessed capabilities are distributed across a population, leading to a distinct Bell curve for IQ scores among humans and conceivably for other species if we could test them. Effectively this means that there is likely significant overlap between the less intelligent humans and smarter non-human animals.

Although H. sapiens is undeniably an intelligent species, the reality is that it wasn’t some gods-gifted power, but rather an evolutionary quirk that it shares with many other lifeforms. This does however make it infinitely more likely that we can replicate it with a machine and/or computer system.

Making Machines Intelligent

Artificial Intelligence Projects for the Commodore 64, by Timothy J. O'Malley
Artificial Intelligence Projects for the Commodore 64, by Timothy J. O’Malley

The conclusion we have thus reached after assessing HI is that if we want to make machines intelligent, they need to acquire at least the Gf, Gc, Gsm and Glr capabilities, and at a level that puts them above that of a human toddler, or a raven if you wish.

Exactly how to do this has been the subject of much research and study the past millennia, with automatons (‘robots’) being one way to pour human intellect into a form that alleviates manual labor. Of course, this is effectively merely on par with creating tools, not an independent form of intelligence. For that we need to make machines capable of learning.

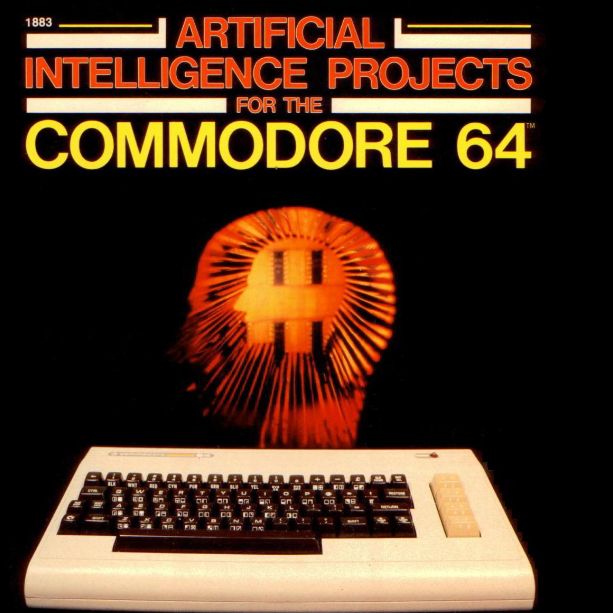
So far this has proved very difficult. What we are capable of so far is to condense existing knowledge that has been annotated by humans into a statistical model, with large language models (LLMs) as the pinnacle of the current AI hype bubble. These are effectively massively scaled up language models following the same basic architecture as those that hobbyists were playing with back in the 1980s on their home computers.

With that knowledge in mind, it’s not so surprising that LLMs do not even really register on the CHC model. In terms of Gf there’s not even a blip of reasoning, especially not inductively, but then you would not expect this from a statistical model.

As far as Gc is concerned, here the fundamental flaw of a statistical model is what it does not know. It cannot know what it doesn’t know, nor does it understand anything about what is stored in the weights of the statistical model. This is because it’s a statistical model that’s just as fixed in its functioning as an industrial robot. Chalk up another hard fail here.

Finally, although the context window of LLMs can be considered to be some kind of short-term memory, it is very limited in its functionality. Immediate recall of a series of elements may work depending on the front-end, but cognitive operations invariably fail, even very basic ones such as adding two numbers. This makes Gsm iffy at best, and more realistically a complete fail.

Finally, Glr should be a lot easier, as LLMs are statistical models that can compress immense amounts of data for easy recall. But this associative memory is an artefact of human annotation of training data, and is fixed at the time of training the model. After that, it does not remember outside of its context window, and its ability to associate text is limited to the previous statistical analysis of which words are most likely to occur in a sequence. This fact alone makes the entire Glr ability set a complete fail as well.

Piecemeal Abilities

Although an LLM is not intelligent by any measure and has no capacity to ever achieve intelligence, as a tool it’s still exceedingly useful. Technologies such as artificial neurons and large language models have enabled feats such as machine vision that can identify objects in a scene with an accuracy depending on the training data, and by training an LLM on very specific data sets the resulting model can be a helpful statistical tool, as it’s a statistical model.

These are all small fragments of what an intelligent creature is capable of, condensed into tool form. Much like hand tools, computers and robots, these are all tools that we humans have crafted to make certain tasks easier or possible. Like a corvid bending some wire into shape to open a lock or timing the dropping of nuts with a traffic light to safely scoop up fresh car-crushed nuts, the only intelligence so far is still found in our biological brains.

All of which may change as soon as we figure out a way to replicate abstract aspects such as reasoning and understanding, but that’s still a whole kettle of theoretical fish at this point in time, and the subject of future articles.


Cheap 10x10cm Hotplate Punches Above Its Weight

For less than $30 USD, you can get a 10×10 centimeter hotplate with 350 Watts of power. Sounds mighty fine to us, so surely there must be a catch? Maybe not, as [Stefan Nikolaj]’s review of this AliExpress hotplate details, it seems to be just fine enough.

At this price, you’d expect some shoddy electronics inside, or maybe outright fiery design decisions, in the vein of other reviews for similar cheap heat-producing tech that we’ve seen over the years. Nope – the control circuitry seems to be more than well-built for our standards, with isolation and separation where it matters, the input being fused away, and the chassis firmly earthed. [Stefan] highlights just two possible problem areas: a wire nut that could potentially be dodgy, and lack of a thermal fuse. Both can be remedied easily enough after you get one of these, and for the price, it’s a no-brainer. Apart from the review, there’s also general usage recommendations from [Stefan] in the end of the blog post.

While we’re happy to see folks designing their own PCB hotplates or modifying old waffle irons, the availability of cheap turn-key options like this means there’s less of a reason to go the DIY route. Now, if you’re in the market for even more build volume, you can get one of the classic reflow ovens, and maybe do a controller upgrade while you’re at it.

Ask Hackaday: Solutions, or Distractions?

The “Long Dark” is upon us, at least for those who live north of the equator, and while it’s all pre-holiday bustle, pretty lights, and the magical first snow of the season now, soon the harsh reality of slushy feet, filthy cars, and not seeing the sun for weeks on end will set in. And when it does, it pays to have something to occupy idle mind and hands alike, a project that’s complicated enough to make completing even part of it feel like an accomplishment.

But this time of year, when daylight lasts barely as long as a good night’s sleep, you’ve got to pick your projects carefully, lest your winter project remain incomplete when the weather finally warms and thoughts turn to other matters. For me, at least, that means being realistic about inevitabilities such as competition from the day job, family stuff, and the dreaded “scope creep.”

It’s that last one that I’m particularly concerned with this year, because it has the greatest potential to delay this project into spring or even — forbid it! — summer. And that means I need to be on the ball about what the project actually is, and to avoid the temptation to fall into any rabbit holes that, while potentially interesting and perhaps even profitable, will only make it harder to get things done.

Pushing My Buttons

For my winter project this year, I chose something I’ve been itching to try for a while: an auto-starter for my generator. Currently, my solar PV system automatically charges its battery bank when the state of charge (SOC) drops below 50%, which it does with alarming frequency during these short, dark days. But rather than relying on shore power, I want my generator to kick on to top off the batteries, then turn itself off when the charge is complete.

Primer assembly for the generator auto-start. The silver part is the regulator; the solenoid pushes the primer button when it fires. All the parts needed to be custom-made.

In concept, it’s a simple project, since the inverter panel I chose has dry contacts that can trigger based on SOC. It seems like a pretty easy job, just a microcontroller to sense when the inverter is calling for a charge and some relays to kick the generator on. It’s a little — OK, a lot — more complicated than that when you think about it, since you have to make sure the generator actually cranks over, you’ve got to include fail-safes so the generator doesn’t just keep cranking endlessly if it doesn’t catch, and you have to make everything work robustly in an electrically and mechanically noisy environment.

However, in my case, the most challenging aspect is dealing with the mechatronics of the project. My generator is fueled by propane, which means there’s a low-pressure regulator that needs to be primed before cranking the starter. When cranking the generator manually, you just push the primer button a few times to get enough propane into the fuel intake and turn the key. Automating this process, though, is another matter, one that will surely require custom parts, and the easiest path to that would be 3D printing.

But, up until a couple of weeks ago, I didn’t own a 3D printer. I know, it’s hard to believe someone who writes for Hackaday for a living wouldn’t own one of the essential bits of hacker kit, but there it is. To be fair to myself, I did dip my toe into additive manufacturing about six or seven years ago, but that printer was pretty awful and never really turned out great prints. It seemed like this project, with its potential need for many custom parts, was the perfect excuse to finally get a “big boy” printer.

Pick Your Project

And that’s where I came upon the first potential rabbit hole: should I buy an out-of-the-box solution, or should I take on a side-quest project? I was sorely tempted to take the latter course by getting one of those used Enders returned to Amazon, having heard that they’re about half the price of new and often need very little work to get them going. But then again, sometimes these printers have gone through a lot in the short time they were in a customer’s hands, to the point where they need quite a bit of work to get them back in good order.

While I like the idea of a cheap printer, and I wouldn’t mind tinkering with one to get it going again, I decided against the return route. I really didn’t like my odds, given that our Editor in Chief, Elliot Williams, says that of the two returned printers he’s purchased, one worked basically out of the box, while the other needed more work to get in shape. I wanted to unbox the printer and start making parts right away, to get this project going. So, I took the plunge and bought a Bambu P1S on a pre-Black Friday sale that was much less than list price, but much more than what I would have paid for a returned Ender.

Now, I’m not going to turn this into a printer review — that’s not really the point of this article. What I want to get across is that I decided to buy a solution rather than take on a new hobby. I got the Bambu up and running in about an hour and was cranking out prototype parts for my project later that afternoon. Yes, I might have had the same experience with a returned printer at about half the price of the Bambu, but I felt like the perceived value of a new printer was worth the premium price, at least in this case.

I think this is a pretty common choice that hackers face up and down the equipment spectrum. Take machine tools, for instance. Those of us who dream of one day owning a shop full of metalworking tools often trawl through Facebook Marketplace in search of a nice old South Bend lathe or a beautiful Bridgeport milling machine, available for a song compared to what such a machine would cost new. But with the difficulty and expense of getting it home and the potential for serious mechanical problems like worn ways or broken gears that need to be sorted before putting the machine to use, the value proposition could start to shift back toward buying a brand new machine. Expensive, yes, but at least you stand a chance of making parts sooner.

Your Turn

Don’t get me wrong; I’d love to find a nice old lathe to lovingly restore, and I just may do that someday. It’s like buying a rusty old classic car; you’re not doing it to end up with a daily driver, but rather for the joy of restoring a fine piece of engineering to its former glory. In projects like that, the journey is the point, not the destination. But if I need to make parts right away, a new lathe — or mill, or CNC router, or 3D printer — seems like the smarter choice.

I’ll turn things over to you at this point. Have you come up against this kind of decision before? If so, which path did you choose? Has anyone had a satisfying out-of-the-box experience with returned printers? Was I unnecessarily pessimistic about my chances in that market? What about your experience with large machine tools, like lathes and mills? Is it possible to buy used and not have the machine itself become the project? Sound off in the comments below.

Failed 3D Printed Part Brings Down Small Plane

Back in March, a small aircraft in the UK lost engine power while coming in for a landing and crashed. The aircraft was a total loss, but thankfully, the pilot suffered only minor injuries. According to the recently released report by the Air Accidents Investigation Branch, we now know a failed 3D printed part is to blame.

The part in question is a plastic air induction elbow — a curved duct that forms part of the engine’s air intake system. The collapsed part you see in the image above had an air filter attached to its front (towards the left in the image), which had detached and fallen off. Heat from the engine caused the part to soften and collapse, which in turn greatly reduced intake airflow, and therefore available power.

Serious injury was avoided, but the aircraft was destroyed.

While the cause of the incident is evident enough, there are still some unknowns regarding the part itself. The fact that it was 3D printed isn’t an issue. Additive manufacturing is used effectively in the aviation industry all the time, and it seems the owner of the aircraft purchased the part at an airshow in the USA with no reason to believe anything was awry. So what happened?

The part in question is normally made from laminated fiberglass and epoxy, with a glass transition of 84° C. Glass transition is the temperature at which a material begins to soften, and is usually far below the material’s actual melting point.

When a part is heated at or beyond its glass transition, it doesn’t melt but is no longer “solid” in the normal sense, and may not even be able to support its own weight. It’s the reason some folks pack parts in powdered salt to support them before annealing.

The printed part the owner purchased and installed was understood to be made from CF-ABS, or ABS with carbon fiber. ABS has a glass transition of around 100° C, which should have been plenty for this application. However, the investigation tested two samples taken from the failed part and measured the glass temperature at 52.8°C and 54.0°C, respectively. That’s a far cry from what was expected, and led to part failure from the heat of the engine.

The actual composition of the part in question has not been confirmed, but it sure seems likely that whatever it was made from, it wasn’t ABS. The Light Aircraft Association (LAA) plans to circulate an alert to inspectors regarding 3D printed parts, and the possibility they aren’t made from what they claim to be.

A Musically-Reactive LED Christmas Tree

By: Lewin Day

Regular Christmas trees don’t emit light, nor do they react to music. If you want both things in a holiday decoration, consider this build from [dbmaking]. 

An ESP32-D1 mini runs the show here. It’s hooked up to a strip of WS2812B addressable LEDs. The LED strip is placed on a wooden frame resembling the shape of a traditional Christmas tree. Ping-pong balls are then stacked inside the wooden frame such that they act as a light diffuser for the LEDs behind. The microcontroller is also hooked up to an INMP441 omnidirectional MEMS microphone module. This allows the ESP32 to detect sound and flash the LEDs in time, creating a colorful display that reacts to music. This is achieved by using the WLED web installer to set the display up in a sound reactive mode.

It’s a fun build, and we’d love to tinker around with coding more advanced visualizer effects for a build like this. We’ve seen builds that go the other way, too, by toning down excessive blinkiness in Christmas decorations.


Putting KDE On Raspberry Pi OS Simpler Than Expected

Raspberry Pi boards are no longer constrained – these days, you can get a quad-core board with 8 or 16GB of RAM to go around, equip it with a heatsink, and get a decently comfortable shop/desk/kitchen computer with GPIOs, cameras, speedy networking, maybe even NVMe, and all the wireless you’d expect.

Raspberry OS, however, remains lightweight with its pre-installed LXDE environment – and, in many cases, it feels quite constrained. In case you ever idly wondered about giving your speedy Pi a better UI, [Luc]/[lucstechblog] wants to remind you that setting up KDE on your Raspberry OS install is dead simple and requires only about a dozen commandline steps.

[Luc] walks you through these dozen steps, from installation to switching the default DE, and the few hangups you might expect after the switch; if you want to free up some disk space afterwards, [Luc] shows how to get rid of the original LXDE packages. Got the latest Trixie-based Pi OS? There’s an update post detailing the few necessary changes, as well as talking about others’ experiences with the switch.

All in all, [Luc] demonstrates that KDE will have a fair bit of graphical and UX advantages, while operating only a little slower, and if you weren’t really using your powerful Pi to the fullest, it’s a worthwhile visual and usability upgrade. For the regular desktop users, KDE has recently released their own distro, and our own [Jenny] has taken a look at it.

MagQuest: Measuring Earth’s Magnetic Field with Space-Based Quantum Sensors

Recently the MagQuest competition on improving the measuring of the Earth’s magnetic field announced that the contestants in the final phase have now moved on to launching their satellites within the near future. The goal here is to create a much improved World Magnetic Model (WMM), which is used by the World Geodetic System (WGS). The WGS is an integral part of cartography, geodesy and satellite-based navigation, which includes every sat nav, smartphone and similar with built-in GNSS capabilities.

Although in this age of sat navs and similar it can seem quaint to see anyone bother with using the Earth’s magnetic field with a compass, there is a very good reason why e.g. your Android smartphone has an API for estimating the Earth’s magnetic field at the current location. After your sat nav or smartphone uses its magnetometer, the measurements are then corrected so that ‘north’ really is ‘north’. Since this uses the WMM, it’s pertinent that this model is kept as up to date as possible, with serious shifts in 2019 necessitating an early update outside of the usual five-year cycle.

Goal of the MagQuest competition is thus to find a method that enables much faster, even real-time updates. The three candidate satellites feature three different types of magnetometers: a scalar-vector magnetometer (COSMO), a nitrogen-vacancy (NV) quantum sensor, and the Io-1 satellite containing both a vector fluxgate and atomic scalar magnetometer.

The NV quantum magnetometer is quite possibly the most interesting one, featuring a new, quantum-level approach for magnetic sensing. This effectively uses a flaw in a diamond’s carbon matrix to create a quantum spin state that interacts with magnetic fields and can subsequently be read out. The advantage of this method is its extreme sensitivity, which makes it an interesting sensor for many other applications where measuring the Earth’s magnetic field is essential.

Making Glasses That Detect Smartglasses

[NullPxl]’s Ban-Rays concept is a wearable that detects when one is in the presence of camera-bearing smartglasses, such as Meta’s line of Ray-Bans. A project in progress, it’s currently focused on how to reliably perform detection without resorting to using a camera itself. Right now, it plays a well-known audio cue whenever it gets a hit.

Once software is nailed down, the device aims to be small enough to fit into glasses.

Currently, [NullPxl] is exploring two main methods of detection. The first takes advantage of the fact that image sensors in cameras act as tiny reflectors for IR. That means camera-toting smartglasses have an identifying feature, which can be sensed and measured. You can see a sample such reflection in the header image, up above.

As mentioned, Ban-Rays eschews the idea of using a camera to perform this. [NullPxl] understandably feels that putting a camera on glasses in order to detect glasses with cameras doesn’t hold much water, conceptually.

The alternate approach is to project IR in a variety of wavelengths while sensing reflections with a photodiode. Initial tests show that scanning a pair of Meta smartglasses in this way does indeed look different from regular eyeglasses, but probably not enough to be conclusive on its own at the moment. That brings us to the second method being used: wireless activity.

Characterizing a device by its wireless activity turned out to be trickier than expected. At first, [NullPxl] aimed to simply watch for BLE (Bluetooth Low-Energy) advertisements coming from smartglasses, but these only seem to happen during pairing and power-up, and sometimes when the glasses are removed from the storage case. Clearly a bit more is going to be needed, but since these devices rely heavily on wireless communications there might yet be some way to actively query or otherwise characterize their activity.

This kind of project is something that is getting some interest. Here’s another smartglasses detector that seems to depend entirely on sniffing OUIs (Organizationally Unique Identifiers); an approach [NullPxl] suspects isn’t scalable due to address randomization in BLE. Clearly, a reliable approach is still in the works.

The increasing numbers of smartglasses raises questions about the impact of normalizing tech companies turning people into always-on recording devices. Of course, the average person is already being subtly recorded by a staggering number of hidden cameras. But at least it’s fairly obvious when an individual is recording you with a personal device like their phone. That may not be the case for much longer.

G4 iMac Becomes a Monitor with a MagSafe Secret

A computer monitor which was formerly an iMac G4 with a hemispherical white base sits on a table. The table and wall are likely white, but pink light is washing the scene making them and the monitor base appear pink. An iPhone sits above a piece of rounded plastic jutting out from the monitor base.

The G4 iMac is one of the more popular computers in the restomodding scene given its charm and unparalleled ergonomics. Most modern machines that people squeeze in don’t have a disc drive anymore though, so [EasternBloc Engineering] has fitted a retractable MagSafe charger into the drive bay of the machine.

In this example, the iMac has become simply a monitor, instead of an entire all-in-one computer, and the original 15″ display has been replaced with a lightweight 22″ monitor on a 3D printed VESA mount. The narrow confines of the iMac neck meant [EasternBloc Engineering] had to sever the connectors from the HDMI and power cable before reconnecting them once they were fed through.

The really novel part of this restomod is the engineering of the retractable MagSafe charger mount that pops out of the drive bay. [EasternBloc Engineering] started by looking at repurposing an original disc drive, but quickly turned to a bespoke 3D printed solution. Using a LEGO motor and gears for the drive, the system can stick its tongue out at you in a more modern way. A straight in-and-out mechanism like on an original disc drive would’ve been easier to implement, but we appreciate the extra time for angling the phone that respects the ergonomics of the machine. We hope the files will become available soon for this part of the mod since electromechanical components are more interesting than the VESA mount.

We’ve taken a look at how to implement MagSafe (or Qi2) into your own projects and also a few different G4 iMac restomods whether you prefer Apple Silicon or a PC-based approach.

A Deep Drive Deep Dive Into a Twin-Rotor Motor

Compromise is key to keeping a team humming along. Say one person wants an inrunner electric motor, and the other prefers outrunner. What to do? Well, if you work at [Deep Drive], the compromise position is a dual-rotor setup that they claim can be up to 20% more efficient than standard designs. In a recent video, [Ziroth] provides a deep dive into Deep Drive’s Twin-Rotor Motor. 

This is specifically a radial flux permanent magnet motor, like most used in electric vehicles today — and don’t let talk of inrunners and outrunners fool you, that’s the size of motor we’re talking about here. This has been done before with axial flux motors, but it’s a new concept for team radial. As the names imply, the difference is the direction the magnetic field is orientated: axial flux motors have all the magnetism oriented along the axis, which leads to the short wide profile that inspired the nickname “pancake motors”. For various reasons, you’re more likely to see those on a PCB than in an electric car.

In a radial flux motor, the flux goes out the radius, so the coils and magnets are aligned around the shaft of the motor.  Usually, the coils are held by an iron armature that directs their magnetic flux inwards (or outwards) at the permanent magnets in the rotor, but not here. By deleting the metal armature from their design and putting magnets on both sides of the stator coil, Deep Drive claims to have built a motor that is lighter and provides more torque, while also being more energy-efficient.

Of course you can’t use magnet wire if your coil is self-supporting, so instead they’re using hefty chunks of copper that could moonlight as busbars. In spite of needing magnets on both inner and outer rotors, the company says they require no more rare-earths than their competitors. We’re not sure if that is true for the copper content, though. To make the torque, those windings are beefy.

Still, its inspiring to see engineers continue to innovate in a space that many would have written off as fully-optimized. We look forward to seeing these motors in upcoming electric cars, but more than that, hope they sell a smaller unit for an air compressor so after going on a Deep Drive deep dive we can inflate our rubber raft with their twin rotor motor boater bloater. If it works as well as advertised, we might have to become twin-rotor motor boater bloater gloaters!

Thanks to [Keith Olson] for the tip.

Keebin’ with Kristina: the One with the C64 Keyboard

Illustrated Kristina with an IBM Model M keyboard floating between her hands.

[Jean] wrote into the tips line (the system works!) to let all of us know about his hacked and hand-wired C64 keyboard, a thing of beauty in its chocolate-brown and 9u space bar-havin’ glory.

A C64 keyboard without the surrounding C64.
Image by [Jean] via GitHub
This Arduino Pro Micro-based brain transplant began as a sketch, and [Jean] reports it now has proper code in QMK. But how is a person supposed to use it in 2025, almost 2026, especially as a programmer or just plain serious computer user?

The big news here is that [Jean] added support for missing characters using the left and right Shift keys, and even added mouse controls and Function keys that are accessed on a layer via the Shift Lock key. You can see the key maps over on GitHub.

I’ll admit, [Jean]’s project has got me eyeing that C64 I picked up for $12 at a thrift store which I doubt still works as intended. But don’t worry, I will test it first.

Fortunately, it looks like [Jean] has thought of everything when it comes to reproducing this hack, including the requisite C64-to-Arduino pinout. So, what are you waiting for?

ArcBoard MK20 Proves That Nothing Is Ever Finished

I find it so satisfying that [crazymittens-r] is never quite satisfied with his ArcBoard, which is now in its 20th revision.

The right half of a split keyboard with integrated mouse control out the wazoo.
Image by [crazymittens-r] via reddit
When asked ‘WTF am I looking at?’, [crazymittens-r] responded thusly: ‘my interpretation of how you might use a keyboard and trackball without moving your hands.’ Well, there you have it.

This is one of those times where the longer you look, the crazier it gets. Notice the thumb trackball, d-pad thingy, and the green glowy bit, all of which move. Then there are those wheels up by the YHN column.

A bit of background: [crazymittens-r] needed something to help him keep on working, and you know I can relate to that 100%. There’s even a pair of pedals that go with it, and you’ll see those in the gallery.

You may remember previous ArcBoards, and if not, know this: it’s actually gotten a lot smaller since mk. 19 which I featured here in May 2024. It still looks pretty bonkers in the best possible way, though, and I’m here for it.

Via reddit

The Centerfold: KaSe

Image by [harrael] via reddit
So I have become fond of finding fuller-figured centerfolds for you such as KaSe by [harrael]. As the top commenter put it, KaSe gives off nice Esrille NISSE vibes. Boy howdy. And I think that’s probably just enough thumb keys for me.

[harrael] had noble goals for this project, namely learning more about ESP32-S3s, USB/BLE HID, and firmware design, but the most admirable of all is sharing it with the rest of us. (So, if you can’t afford a NISSE…)

Do you rock a sweet set of peripherals on a screamin’ desk pad? Send me a picture along with your handle and all the gory details, and you could be featured here!

Historical Clackers: Typewriter Tom’s Typewriter Throng

I’m going to take a brief detour from the normal parade of old typewriters to feature Typewriter Tom, who has so many machines lying around that Hollywood regularly comes knocking to borrow his clacking stock.

Image via The Atlanta-Journal Constitution

And how many is that? Around 1,000 — or six storage units full. Tom received a call once. The caller needed six working IBM Selectrics ASAP. Of course, Tom could deliver, though he admits he’s probably the one person in all of Georgia who could.

Another thing Tom delivers is creativity in the form of machines he sells to artists and students. He also co-founded the Atlanta Typewriter Club, who have been known to hold typewriter petting zoo events where people can come and — you guessed it — put their hands on a typewriter or two.

Go for the story and stay for the lovely pictures, or do things the other way around if you prefer. But Typewriter Tom deserves a visit from you, even if he already got one from Tom Hanks once.

Finally, PropType AR Can Turn Anything Into a Keyboard

Yes, literally anything with enough real estate can now become a keyboard, or at least it would seem from TechExplore and the short video embedded below. Watch as various drinking vessels and other things become (split!) keyboards, provided you have your AR goggles handy to make the magic happen.

A split keyboard is projected onto a water bottle.
Image by [PropType] via YouTube
While this setup would be immensely helpful to have around given the right circumstances, the chances that you’re going to have your AR goggles on you while running or running around the mall seem somewhat slim.

But the point here is that for augmented reality users, typing is notoriously difficult and causes something known as ‘gorilla arm’ from extended use. So in all seriousness, this is pretty cool from a problem-solving standpoint.

So how does it work? Basically you set the keyboard up first using the PropType editing tool to customize layouts and apply various effects, like the one you’ll see in the video. Be sure to stick around for the demo of the editing tool, which is cool in and of itself. I particularly like the layout on the soda can, although it might be difficult to actually use without spilling.


Got a hot tip that has like, anything to do with keyboards? Help me out by sending in a link or two. Don’t want all the Hackaday scribes to see it? Feel free to email me directly.

Super Simple Deadbuggable Bluetooth Chip

We’re all used to Bluetooth chips coming in QFN and BGA formats, at a minimum of 30-40 pins, sometimes even a hundred. What about ten pins, with 1.27 mm pitch? [deqing] from Hackaday.io shows us a chip from WCH, CH571K, in what’s essentially a SO-10 package (ESSOP10). This chip has a RISC-V core, requires only three components to run, and can work Bluetooth through a simple wire antenna.

This chip is a RISC-V MCU with a Bluetooth peripheral built in, and comes from the CH57x family of WCH chips that resemble the nRF series we’re all used to. You get a fair few peripherals: UART, SPI, and ADC, and of course, Bluetooth 4 with Low Energy support to communicate with a smart device of your choice. For extra hacker cred, [deqing] deadbugs it, gluing all components and a 2.54 mm header for FTDI comms onto the chip, and shows us a demo using webBluetooth to toggle an LED through a button in the browser.

You need not be afraid of SDKs with this one. There’s Arduino IDE support (currently done through a fork of arduino_core_ch32) and a fair few external tools, including at least two programming tools, one official and one third-party. The chip is under a dollar on LCSC, even less if you buy multiple, so it’s worth throwing a few into your shopping cart. What could you do with it once received? Well, you could retrofit your smoke alarms with Bluetooth, create your own tire pressure monitors, or just build a smartphone-connected business card!

PCB Design Review: TinySparrow, A Module For CAN Hacking, v2

A year ago, I’ve design reviewed an MCU module for CAN hacking, called TinySparrow. Modules are plenty cool, and even more so when they’re intended for remaking car ECUs. For a while now, every car has heavily depended on a computer to control the operation of everything inside it – the engine and its infrastructure, the lights, and  Sadly, ECUs are quite non-hackable, so building your own ECUs only makes sense – which is why it’s heartwarming to see modules intended to make this easier on the budding ECU designer!

Last time we saw this module, it was quite a bit simpler. We talked about fixing a number of things – the linear regulator, the unprotected CAN transceiver, and the pinout; we also made the board cheaper to produce by reducing the layer count and instead pushing the clearance/track width limits. This time, we’re seeing TinySparrow v2 , redesigned accounting for the feedback and upgraded with a new MCU – it’s quite a bit more powerful!

For a start, it’s got ESD diodes, a switching-linear regulator chain for clean but efficient power supply, and most importantly, an upgraded MCU, now with USB and one more CAN channel for a total of two! There’s a lot more GPIOs to go around, too, so the PCB now uses all four of its sides for breakout out power, programming, and GPIO pads. Only a tiny bit bigger than its v1, this module packs a fair bit of punch.

Let’s revisit the design, and try to find anything still left to improve – there’s a few noteworthy things I found.

Protection Almost Perfect

It took me a bit to try and find the ESD diodes mentioned in the README – I didn’t notice that they’re basically the only thing on the bottom layer. This is fine – protection elements like ESD diodes can be on a different layer, and as they’re SOT-23, they’re easy to solder on post-factum. This is quite a nice placement choice, in my opinion – you can basically solder this board with cheaper single-side assembly, use ESD-less boards for your bench testing, and then simply solder the few bottom side components onto “production” versions!

There is but one hiccup with the way they’re placed. ESD diode appnotes will tell you – there’s some extra considerations you can try and put into ESD diode layout. This design pulls connector tracks directly to the CAN ICs on top layer, and directly to diodes on the bottom one. Instead, you should try and route the signal “through” the ESD diodes – letting track inductance play in your favour, and not impeding the ESD diode’s impact.

Fortunately, by lightly rerouting 3.3V CAN transceiver power inputs and a few surrounding signals, we can put CAN+ and CAN- signals through vias under the package, so that the signal flows “in series” with ESD diode pads. Similarly, the ESD diodes get vias to ground, shared with transceiver ground vias, but oh well. It’s not perfect, but to my eye, it’s better than before, as far as ESD protection is concerned.

About the only problem I can see with the reroute, is having to reshuffle USB signals, putting them closer together. However, as long as they’re intra-pair length-matched, they’ll do just fine.

Vias Fit Inside Pads, But Maybe Don’t?

This is not the only change to consider as far as signal routing goes, but it’s the most major one. The next issue I see, is vias – specifically, vias inside component pads.

I’ve had a few run-ins with via-in-pad related problems. Previously, I’ve failed to assemble some boards specifically because of via-in-pad related problems, with solder paste wicking through the board and onto the opposite side. For 0402 components I used, this made a number of boards essentially non-solderable depending on how lucky I got reflowing them, and I had to run a new board revision to get the yield up.

This board’s files have a fair few hints about getting assembled by JLCPCB, and JLC can definitely do plugged vias, preventing any sorts of solder flowing through the board. If the designer or someone else takes the board elsewhere, however, that might no longer apply, which would be disappointing. Also, you might have to pay extra for plugging holes – just like with the previous review, let’s see if we can avoid it. Most problematic areas are around the transceivers, still – especially given the board files now have a custom rule for 0.5mm via-to-via distances. This is not a constraint I’ve seen actually stressed by JLCPCB, but I don’t mind – with just a little bit more signal shuffling, every newly moved via landed within the 0.5mm target area.

Pinout Considerations, Again

The VDC pin now has GND pins to match, and in general, there’s a lot more GND pins to go around – which is great! It’s pretty surprising to me that the VDC pin is duplicated and its trace goes across the board on an inner layer. This is supposed to be an at least somewhat unfiltered and unprotected car power rail, after all, and I don’t think that’d help things like noise integrity. Maybe this helps with testing because all the core signals are brought to the same corner, but to my eye, it has bad vibes.

The module could perhaps use a key pin – there’s zero omissions in the outer dual-row, which leaves for a possibility of inserting this module rotated 180 degrees by accident, likely obliterating at least something on the module. If these modules are ever meant to be swapped during testing, i.e. using machined headers, I’d try and remove one of the pins from the equation – there’s a NC pin in one of the corners already, thankfully.

There’s a pair of 3.3 V signals and GND signals on the opposite sides of each other. This is geometrically satisfying pinout-wise, and, it would short-circuit the module’s onboard regulator if the module’s ever rotated inserted 180 degrees. This is generally harmless with modern modules, but it could very well make the switching or the linear regulator heat up to finger-burning temperatures – last thing you need when trying to remove a module inserted incorrectly!

Thankfully, at the top, there’s a few unconnected pads, so perhaps GND and NC could swap places, making sure that 3.3 V lands on NC once rotated 180 degrees. The VDC pads could perhaps use the same consideration, but I’m comfortable leaving those as homework.

Moving Forward

It’s a joy to see how much the TinySparrow module has grown in its v2. From vastly improved layout to higher consideration given to design rules, nicer silkscreen, and a way more powerful MCU while at it, it’s that much more of a viable heart for a somewhat modern car, and it’d be quite nice to see some boards utilizing it in the future. I hope this review can help!

As usual, if you would like a design review for your board, submit a tip to us with [design review] in the title, linking to your board files. KiCad design files strongly preferred, both repository-stored files (GitHub/GitLab/etc) and shady Google Drive/Dropbox/etc .zip links are accepted.

The EFF Nails It: What’s Wrong With UK Digital ID

It sometimes seems as though we are in a constant tussle over privacy between governments and the governed, with each year bringing fresh attempts to extend surveillance, and consequent battles. For Brits the big news at the moment comes in a new digital ID scheme, something that will be required for anyone wishing to work in the country, as well as for certain government services. It’s something that has attracted a lot of opposition, and now the EFF have produced an analysis  of why they think it won’t work.

From the perspective of a British writer it would be easy to write screeds about the flaws in the scheme, the way it over-reaches, and about the historical distrust of Brits for their government’s bureaucracy. With the parliamentary petition opposing it approaching three million signatures, there’s no shortage of people who don’t support it. Perhaps the most obvious thing for most of us is how unnecessary it is for its stated aim of preventing illegal immigrants from seeking employment, it neglects that we already have to show proof of right to work before being hired, and that if crooked employers ignore that they will surely also ignore the digital ID.

If you’re reading this elsewhere in the world from where this is being written then it’s still of relevance, because governments like to point to other countries to justify these measures. Follow the EFF on this matter, and take note.


Art: British Passport SVG by Swapnil1101, Public Domain

LED Hourglass is a Great Learning Project

By: Lewin Day

An hourglass tells you what it is in the name — a glass that you use to measure an hour of time passing by. [EDISON SCIENCE CORNER] has built a digital project that mimics such a thing, with little beads of light emulating falling sand in the timekeepers of old.

The build is designed around the Arduino platform, and can be constructed with an Arduino Uno, Nano, or Pro Mini if so desired. The microcontroller board is hooked up with an ADXL335 three-axis accelerometer, which is used for tracking the orientation and movement of the digital hourglass. These movements are used to influence the movement of emulated grains of sand, displayed on a pair of 8×8 LED matrixes driven by a MAX7219 driver IC. Power is courtesy of a 3.7 V lithium-ion cell, with a charge/boost module included for good measure. Everything is wrapped up in a vaguely hourglass-shaped 3D printed enclosure.

The operation is simple. When the hourglass is turned, the simulated grains of sand move as if responding to gravity. The movement is a little janky — no surprise given the limited resolution of the 8×8 displays. You also probably wouldn’t use such a device as a timer when more elegant solutions exist. However, that’s not to say builds like this don’t have a purpose. They’re actually a great way to get to grips with a microcontroller platform, as well as to learn about interfacing external hardware and working with LED matrixes. You can pick up a great deal of basic skills building something like this.

Would you believe this isn’t the first digital hourglass we’ve featured on the site?

RP2350 Done Framework Style

Ever want a microcontroller addon for your laptops? You could do worse than match one of the new and powerful microcontrollers on the block to one of the most addon-friendly laptops, in the way the Framework RP2350 laptop card does it. Plug it in, and you get a heap of USB-connected IO coming out of the side of your laptop – what’s not to love?

The card utilizes the Framework module board space to the fullest extent possible, leaving IO expansion on SMD pads you could marry to a male or female header, your choice. With about seventeen GPIOs, power, and ground, there’s really no limit on what you could add to the side connector – maybe it’d be a logic analyzer buffer, or a breadboard cable, or a flash chip reader, maybe, even an addon to turn it into a pirate version of a Bus Pirate? There’s a fair few RP2350 peripherals available on the side header GPIOs, so sky’s the limit.

Naturally, the card is fully open-source, and even has two versions with two different USB-C plug connectors, we guess, depending on which one is better liked by your PCBA process. Want one? Just send off the files! Last time we saw an addon adding GPIOs to your laptop, it was a Pi Zero put into the optical bay of a Thinkpad, also with an expansion header available on the side – pairing yet another legendary board with a legendary laptop.

The Engineering That Makes A Road Cat’s Eye Self-Cleaning

Although most people manage to navigate roads without major issues during the day, at night we become very reliant on the remaining navigational clues. The painted marks on the asphalt may not be as obvious in the glare of headlights, not to mention scuffed up and/or covered by snow and hidden by fog. This is where cat’s eyes are a great example of British ingenuity. A common sight in the UK and elsewhere in Europe, they use retroreflectors embedded in the road. Best of all, they are highly durable and self-cleaning, as [Mike Fernie] details in a recent video on these amazing devices.

Invented in the 1930s by [Percy Shaw], cat’s eyes feature a sturdy body that can take the abuse of being driven over by heavy trucks, along with a rubber dome that deforms to both protect the reflectors and wipe them clean using any water that’s pooled in the area below them. They also provide an auditory clue to the driver when they pass the center line, which can be very useful for night-time driving when attention may be slipping.

In the video the cat-squishing cleaning process is demonstrated using an old cat’s eyes unit that seems to have seen at least a few decades to road life, but still works and cleans up like a charm. Different color cat’s eyes are used to indicate different sections of the road, and modern designs include solar-powered LEDs as well as various sensors to monitor road conditions. Despite these innovations, it’s hard to beat the simplicity of [Percy]’s original design.

Build Yourself A Graphing Weather Display

By: Lewin Day

These days, Internet connectivity is ubiquitous, so you can look up live weather data on just about any device around you. Regardless, [Jozerworx] wanted a simple, clean, independent weather display, and came up with this simple design. 

The build is based on the Lilygo T5 EPD devboard, which combines an ESP32-S3 microcontroller with a nice 4.7-inch e-paper display. This display has the benefit that it only uses power when it’s being updated, making it particularly suitable to run off a battery for extended periods of time. Meanwhile, the ESP32 and its inbuilt Wi-Fi connectivity allow it to query the internet for updated weather forecasts. Weather data is sourced via the OpenWeather API, which [Jozerworx] notes comes with the caveat of requiring an API key. It’s a little fussy, but if you want good weather data, there are few easier ways to get it. The display shows a forecast for the next five days, while also showing graphs of ambient temperature and humidity along with useful information like the sunset and sunrise schedule.

Files are on Github for those eager to learn more. [Jozerworx] also notes that getting started with the display is particularly easy with the inclusion of a setup mode. This allows the display to act as a Wi-Fi access point with a web page that you use enter your home Wi-Fi connection details.

We’ve featured a great many charming weather displays over the years, too. If you’re working to plot, chart, or even predict the weather—don’t hesitate to show us your cool projects over on the tipsline!

ESP32 EPaper Weather Station

One Lucky 3DS Gets A Switch-Style Dock

The Nintendo Switch dock set a new bar for handheld docking user experience – just plug your console in to charge it, output image to your monitor, and keep it working with any USB peripherals of your choice. What if a 3DS is more your jam? [KOUZEX] shows off a Switch-style dock design for his gorgeous yellow 3DS, with Switch Pro controller support, and this dock wasn’t just a 3D printing job – there’s a fair bit of electronics to show, too.

While the 3DS looks stock at a glance, it has already been upgraded internally – there’s a USB-C capture card built in, half-ticking the “monitor output” requirement, and a Raspberry Pi board turns that output into HDMI. Building a charging dock is also pretty simple, with just two contacts on the side that desire 5V. Now, the pro controller support was a fair bit harder – requiring an internal modchip for emulating buttons, and trying out receiver boards for the Switch controller until a well-functioning one was found.

The build video is quite satisfying to watch, from assembling some QFNs onto tiny OSHPark boards using a hotplate and soldering them into the 3DS, to planning out, building, and dremeling some prints to create a true slide-console-into-dock experience, same way the Switch pulled it off. It even has the same USB-C and HDMI arrangement as the Switch dock, too! Want a simpler dock for your 3DS? Don’t forget that you can build a charger dock for yours with just a 3D print and a few wires.

Trace Line Clock Does It With Magnets

We love a good clock project, and [byeh_ in] has one with a design concept we don’t believe we have seen before. The Trace Line Clock has smooth lines and a clean presentation, with no sockets or visible mechanical fixtures.

Reading the clock is quite straightforward once one knows what is going on. At its heart, the unmarked face is much like any other analog clock face, and on the inside is a pretty normal clock movement. The inner recessed track on the face represents hours, and the outer is minutes. The blue line connects the two, drawing a constantly changing line.

Sped-up footage shows how the line moves.

To make the blue segment move without breaking the lines of the clock, [byeh_ in] uses magnets. The inside end moves around the inner ring with the hour hand, while the rest of the blue segment follows the minute hand. Since the length between these two points is not constant, [byeh_ in] cleverly designed one of the magnets to be floating. By keeping the magnet captive in a channel on the underside of the blue segment, the whole thing moves smoothly, no matter how the two ‘hands’ align.

Speaking of smooth, it’s important for the parts to move together with minimal friction. To achieve this [byeh_ in] uses something we think is under-utilized in 3D printed parts: candle wax. Wax is non-greasy, sticks well to 3D printed parts simply by rubbing, slides easily, and doesn’t make a mess. Directions and 3D models are available should you wish to try making your own.

We’re always delighted by the amazingly different ways people can re-imagine a clock. From clocks with hands but void of a face to clocks made out of clocks, we love to see ’em so if you’ve got a favorite, drop us a tip!

❌