If you are shopping for back-to-school (or work) lunch supplies, check out my recommendations for the best lunch-packing products that we have loved using over the years. To enjoy a good mid-day meal at school or work, you need lunch supplies that’ll keep your meals at the right temperature and won’t leak. After having packed...
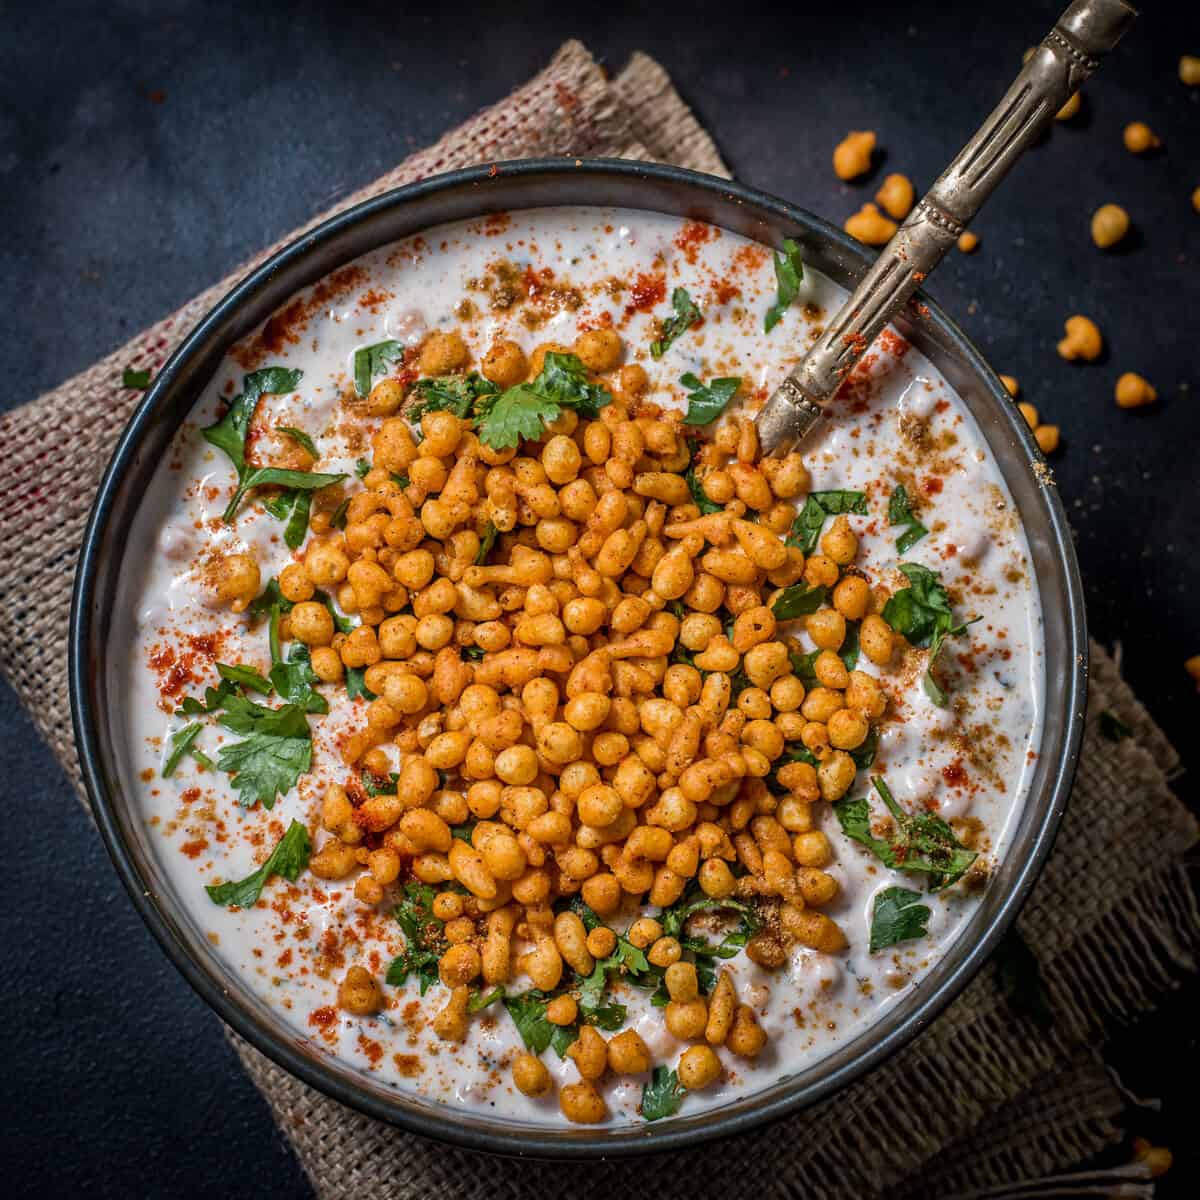
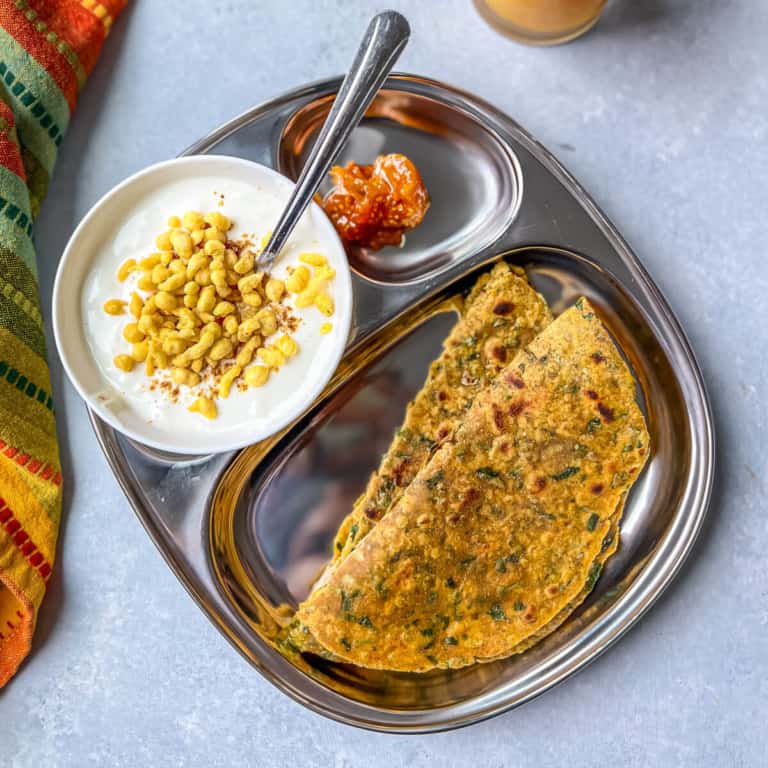
Boondi raita is a cooling side dish that combines crispy boondi (chickpea flour balls) with lightly spiced, creamy yogurt. It’s the perfect complement to biryanis and curries, adding a touch of warmth and flavor to round off your meal beautifully. What is boondi? The term “boondi” comes from “boond,” the Hindi word for droplet, aptly...
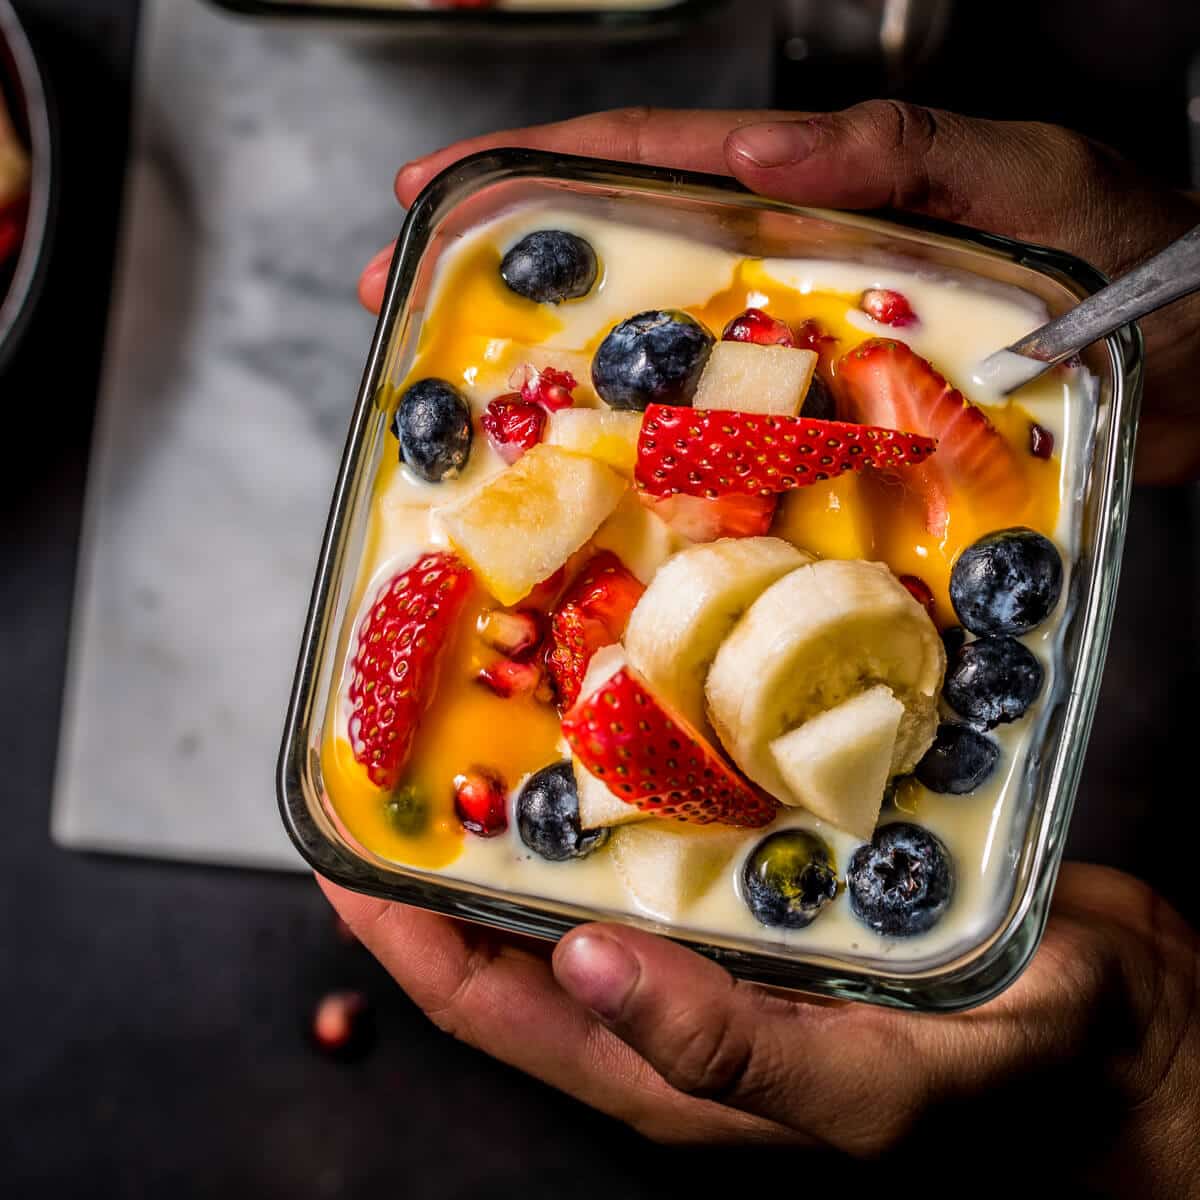
Indulge in this cooling Indian fruit custard, made with a rich, creamy custard sauce and fresh seasonal fruits. Whether you prefer the convenience of an Instant Pot or the traditional stovetop method, this dessert is easy to make. Enjoy this refreshing dessert during summer – it is perfect for potlucks and large gatherings or as...
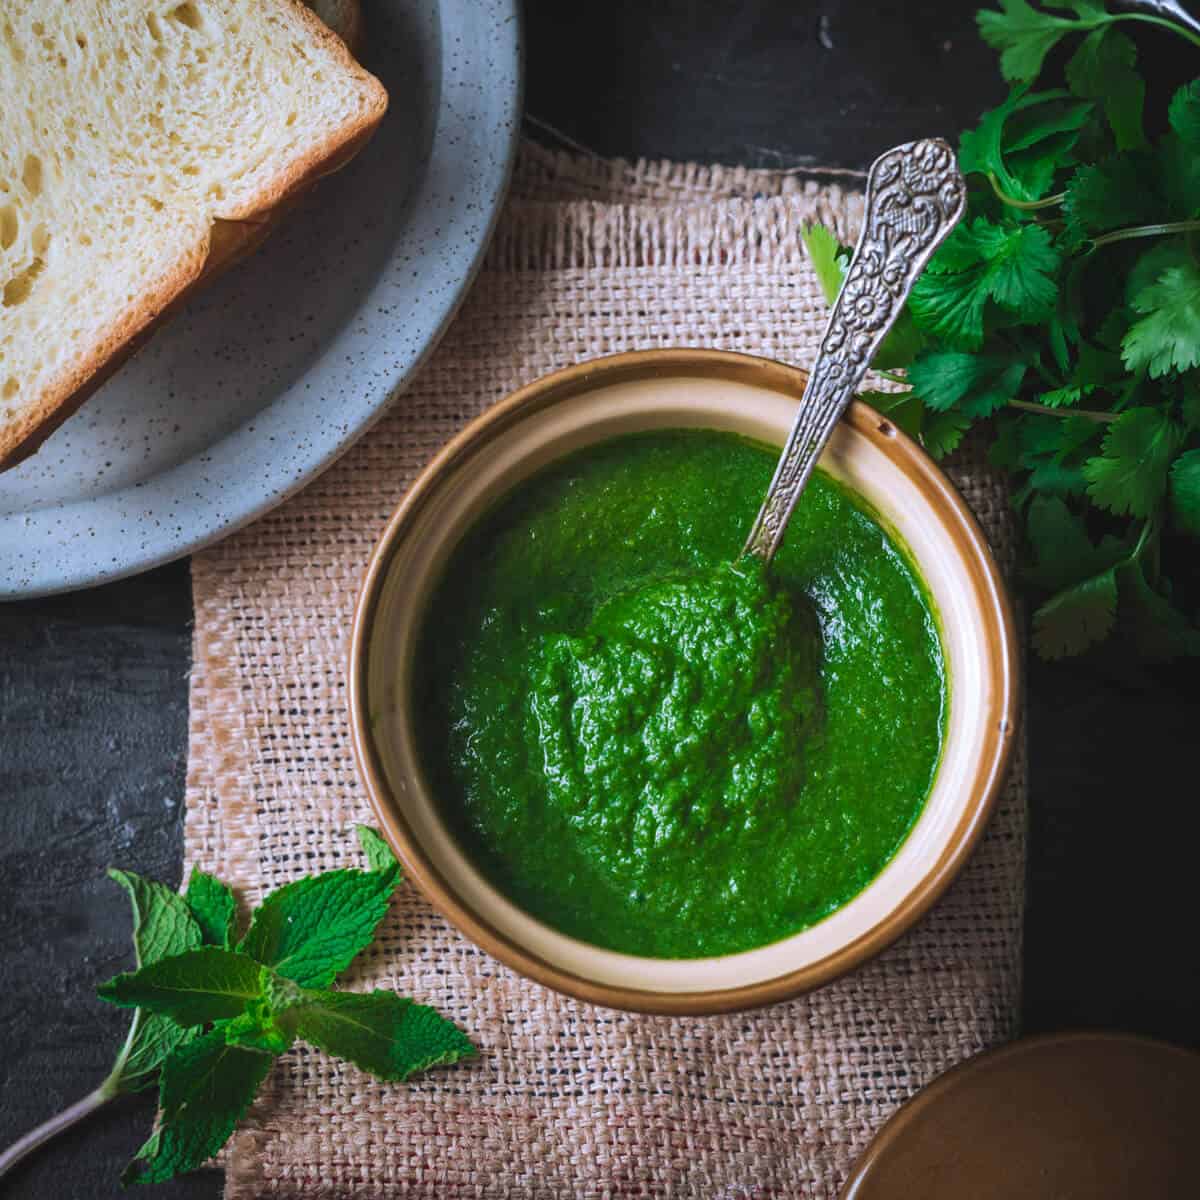
Coriander mint chutney is this tangy green chutney that most Indian snacks can’t do without. This dipping sauce made from fresh cilantro and mint leaves comes together in less than 10 minutes! All about coriander mint chutney Imagine a sauce that captures the essence of Indian cuisine in every spoonful—that’s coriander mint chutney. It’s a...
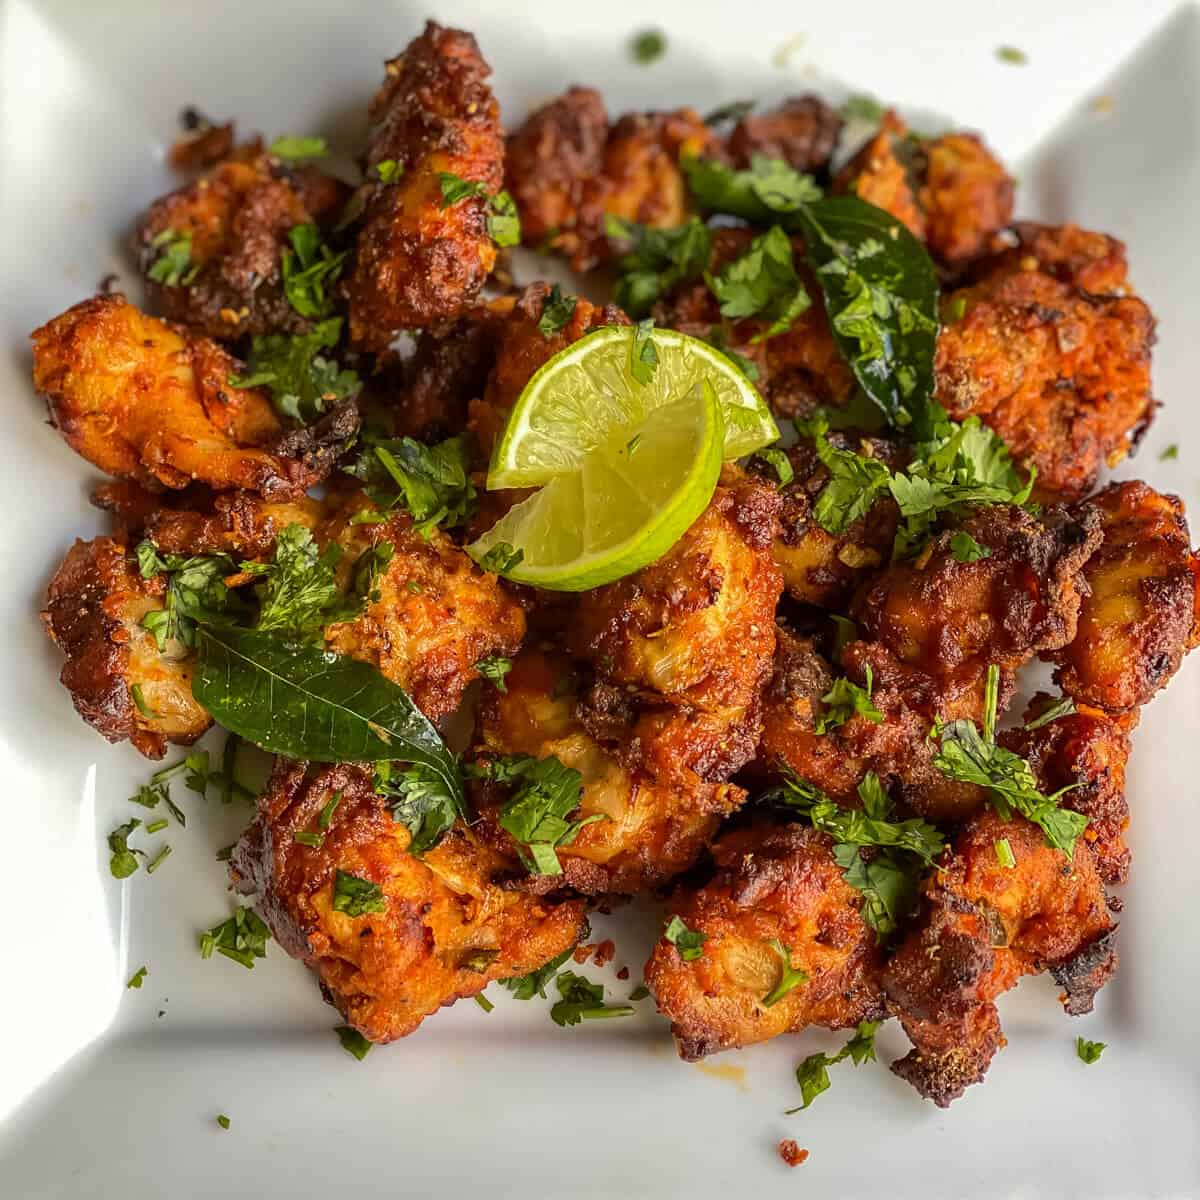
Restaurant-Style Air Fryer Chicken 65 is a must-try chicken starter in my book! It’s crispy and spicy on the outside while being delightfully succulent inside. This healthier twist on the classic Indian appetizer is irresistibly delicious – watch it gobbled up before your eyes in no time! Chicken 65 – the story behind its name...
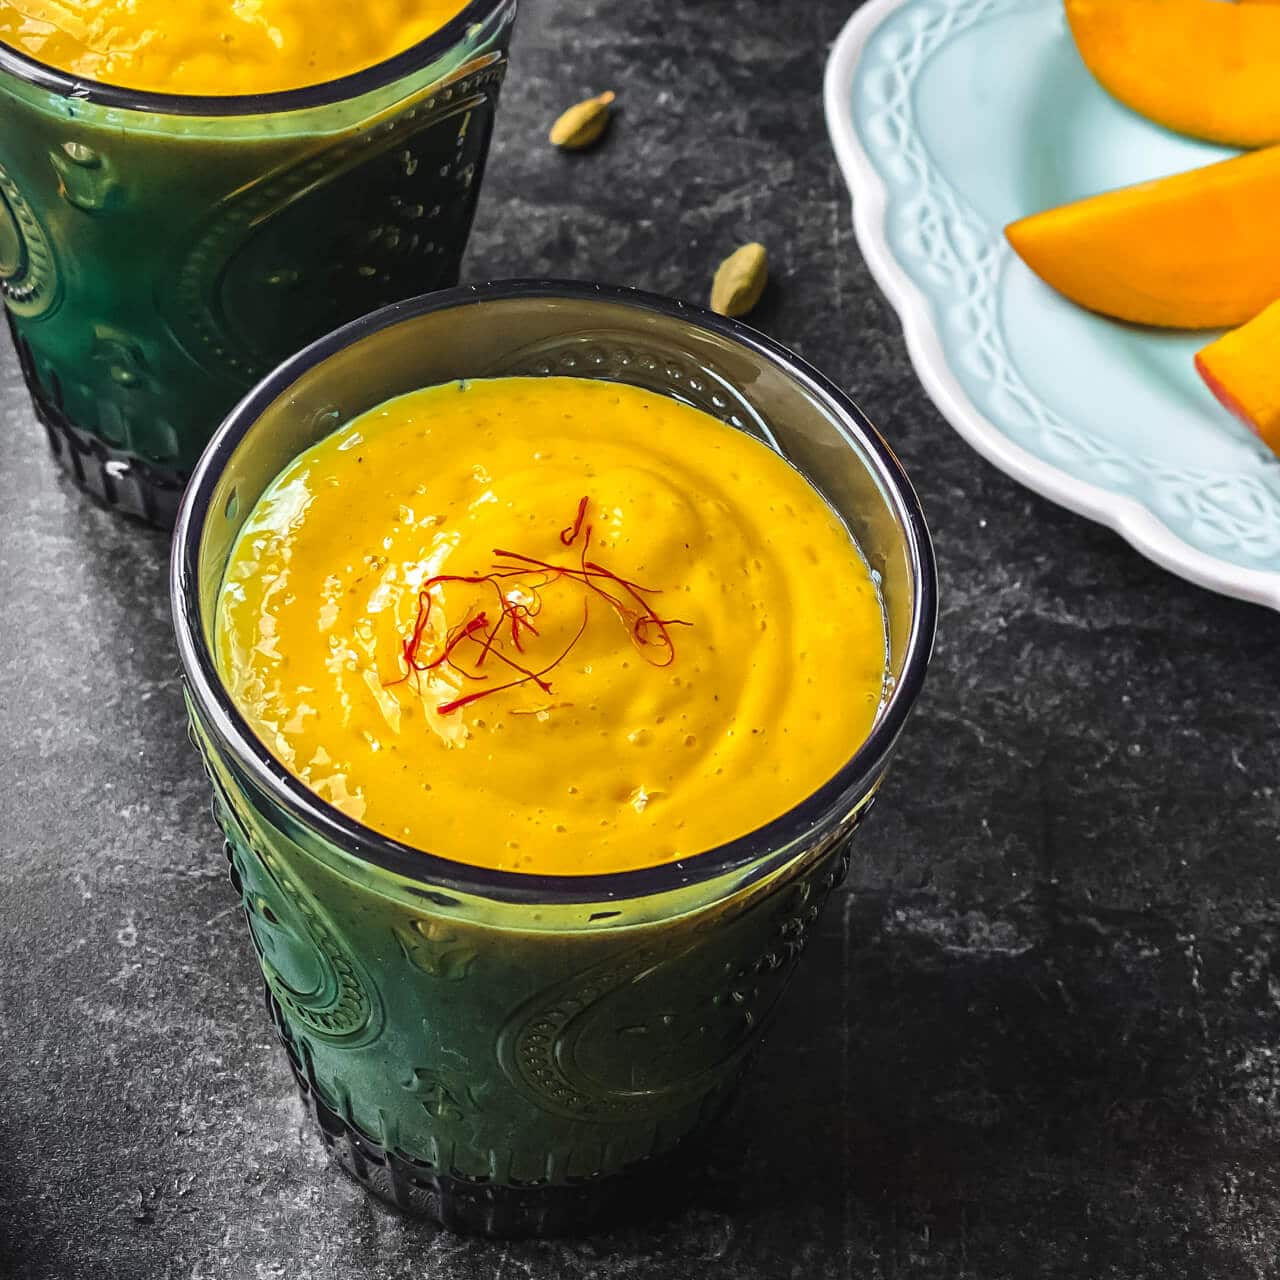
Have you tried mango lassi? This creamy and refreshing yogurt-based drink is a staple in most Indian restaurants. This authentic recipe reveals the secrets to the best mango lassi, ensuring you can enjoy this beloved yogurt drink right at home. It is perfect for soothing your palate after a spicy meal or as a perfect...
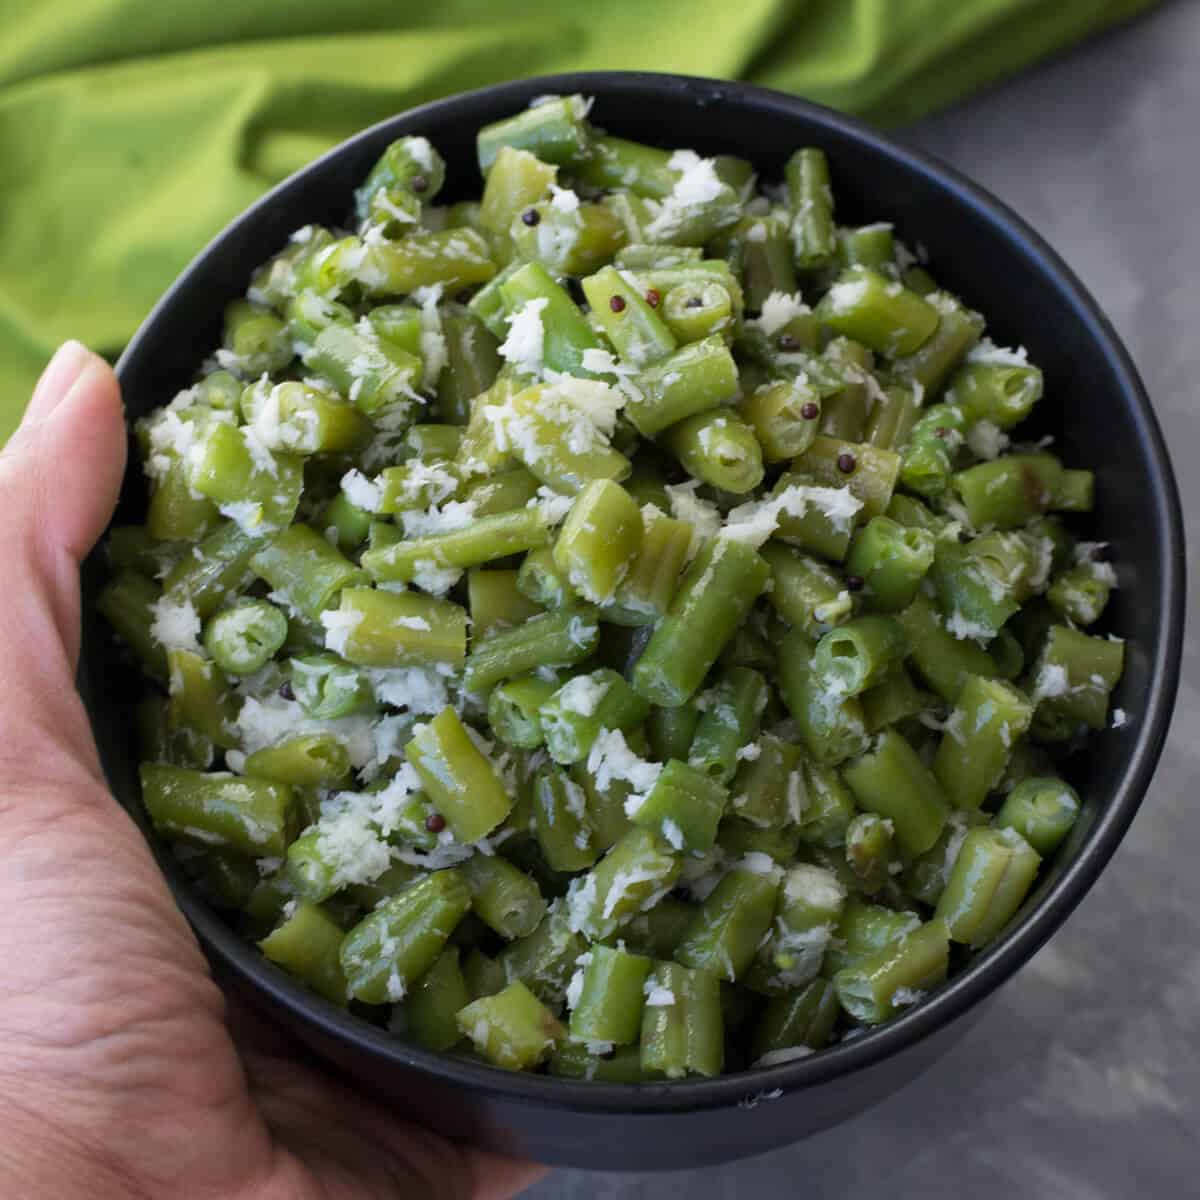
Beans poriyal is traditionally made over the stovetop, but this Instant-Pot version will blow your mind – because it pressure cooks in zero minutes. Pair it with rice and your favorite curry for a complete meal.
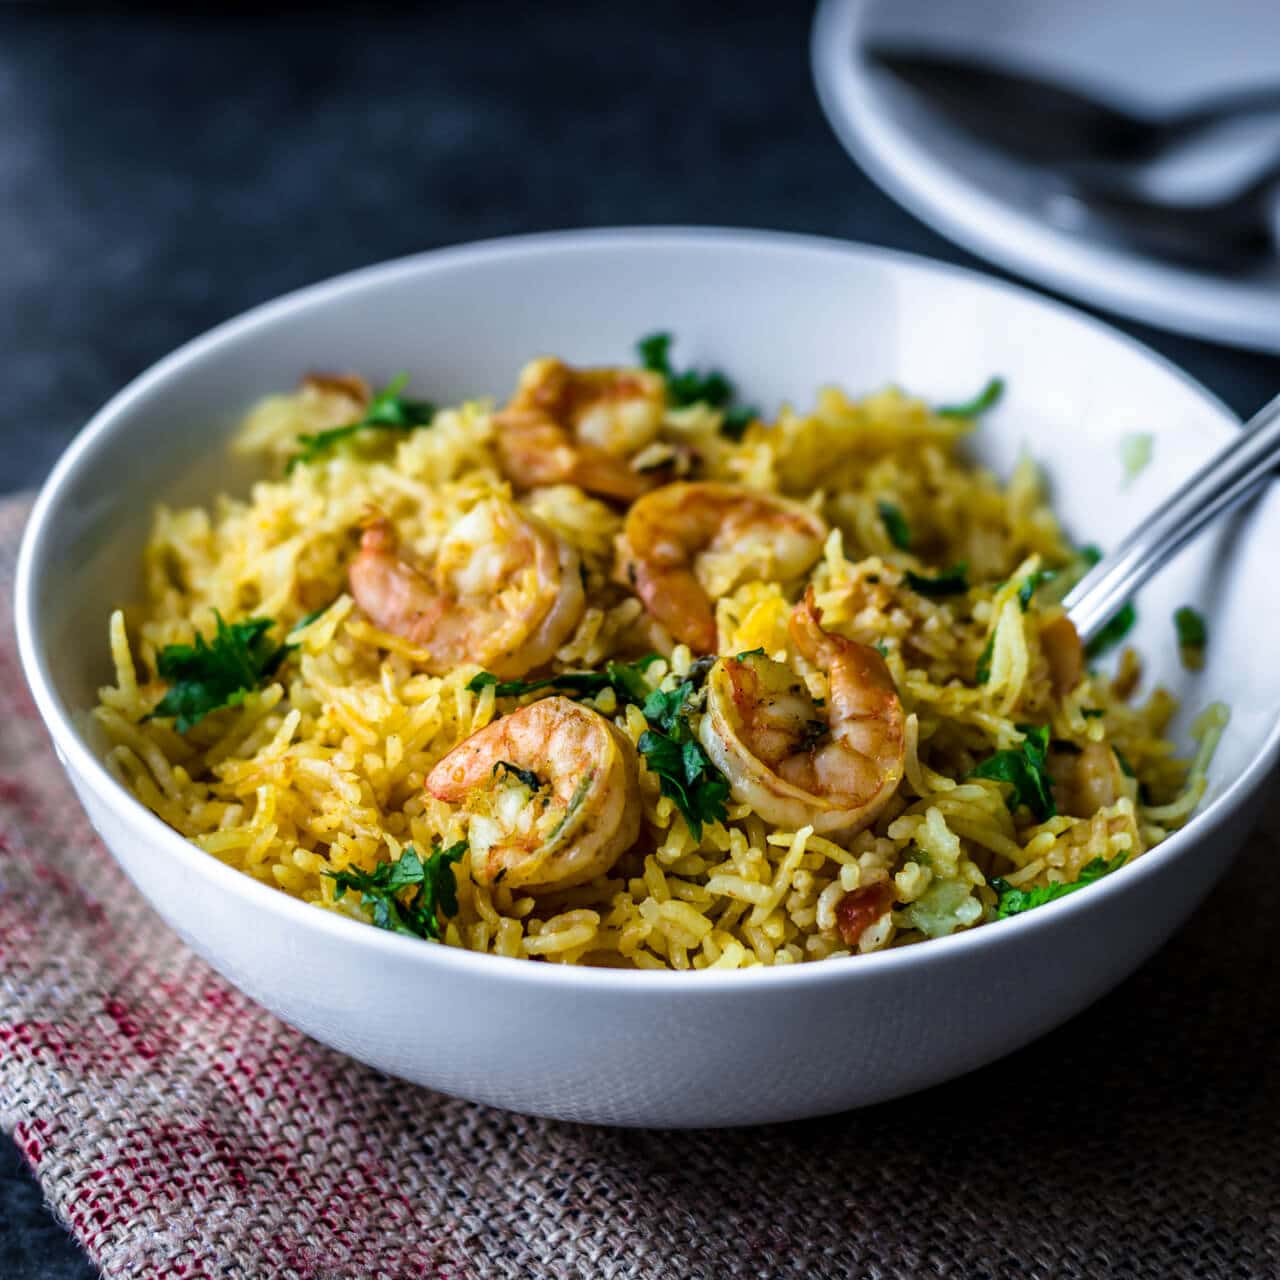
In one of my previous posts Yeti ajadina or Shrimp in a dry gravy I posted a link which highlighted the difference between Shrimp and Prawn. This recipe can be made using either. I made this a long time ago and didn't get a chance to post it and it is almost lunch time and as I am typing this it is making me really hungry..Though the recipe is my mom's, I have changed the technique a little bit to suit my style..
There are so many things you can do with chicken, but lately, we’ve been loving this simple and traditional North Indian-style chicken curry. Made with everyday pantry ingredients, this quick and easy Indian curry chicken recipe is one more reason you’ll love cooking in your Instant Pot. Chicken curry, though it finds its origins in...
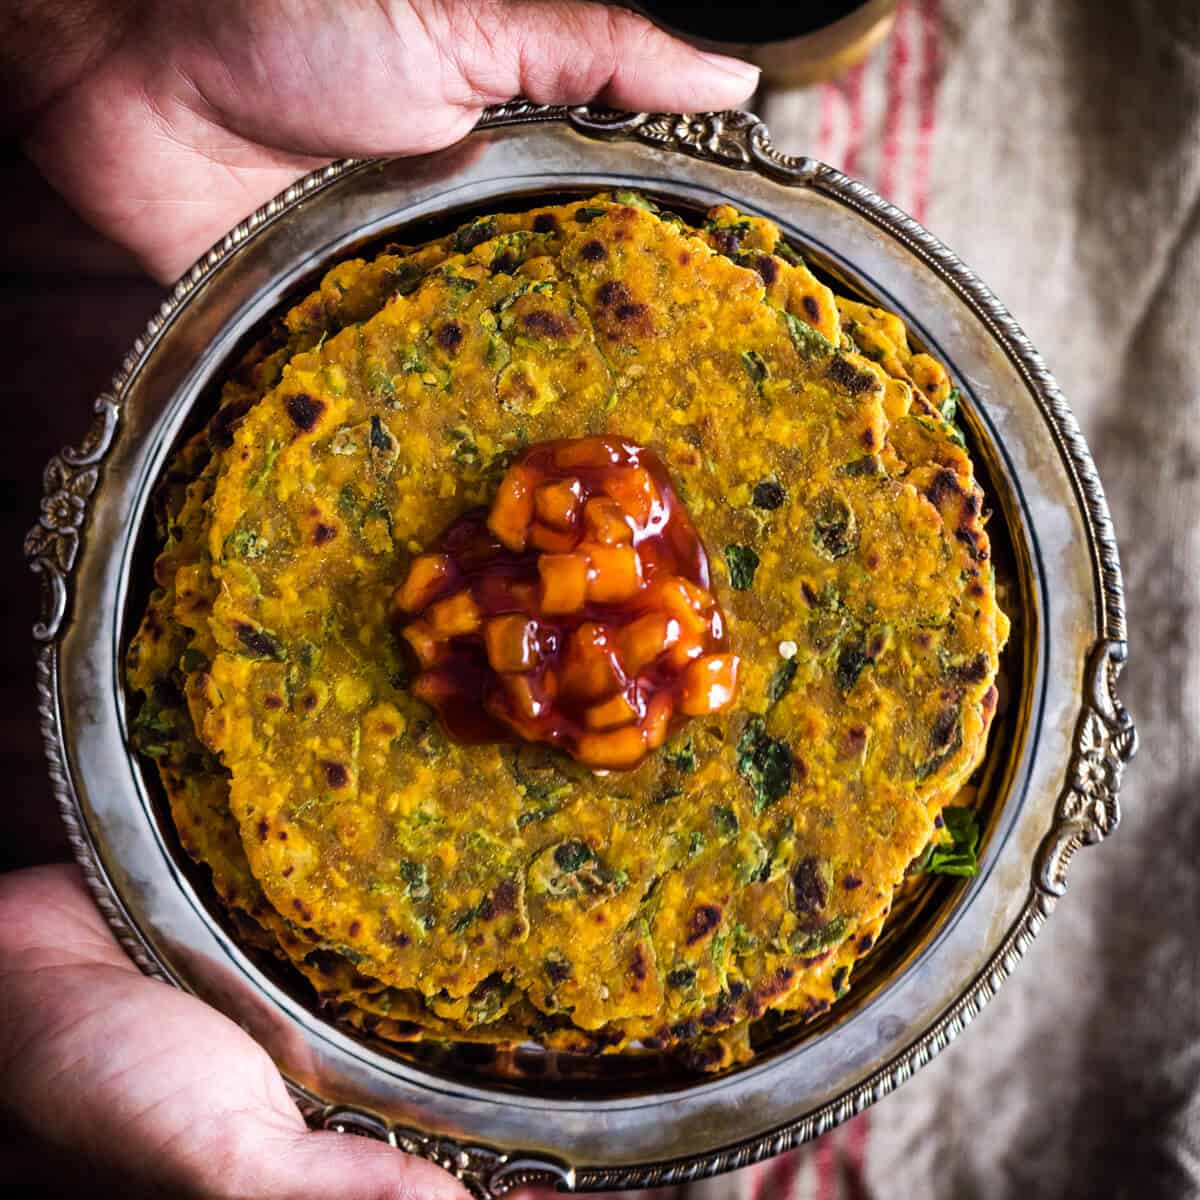
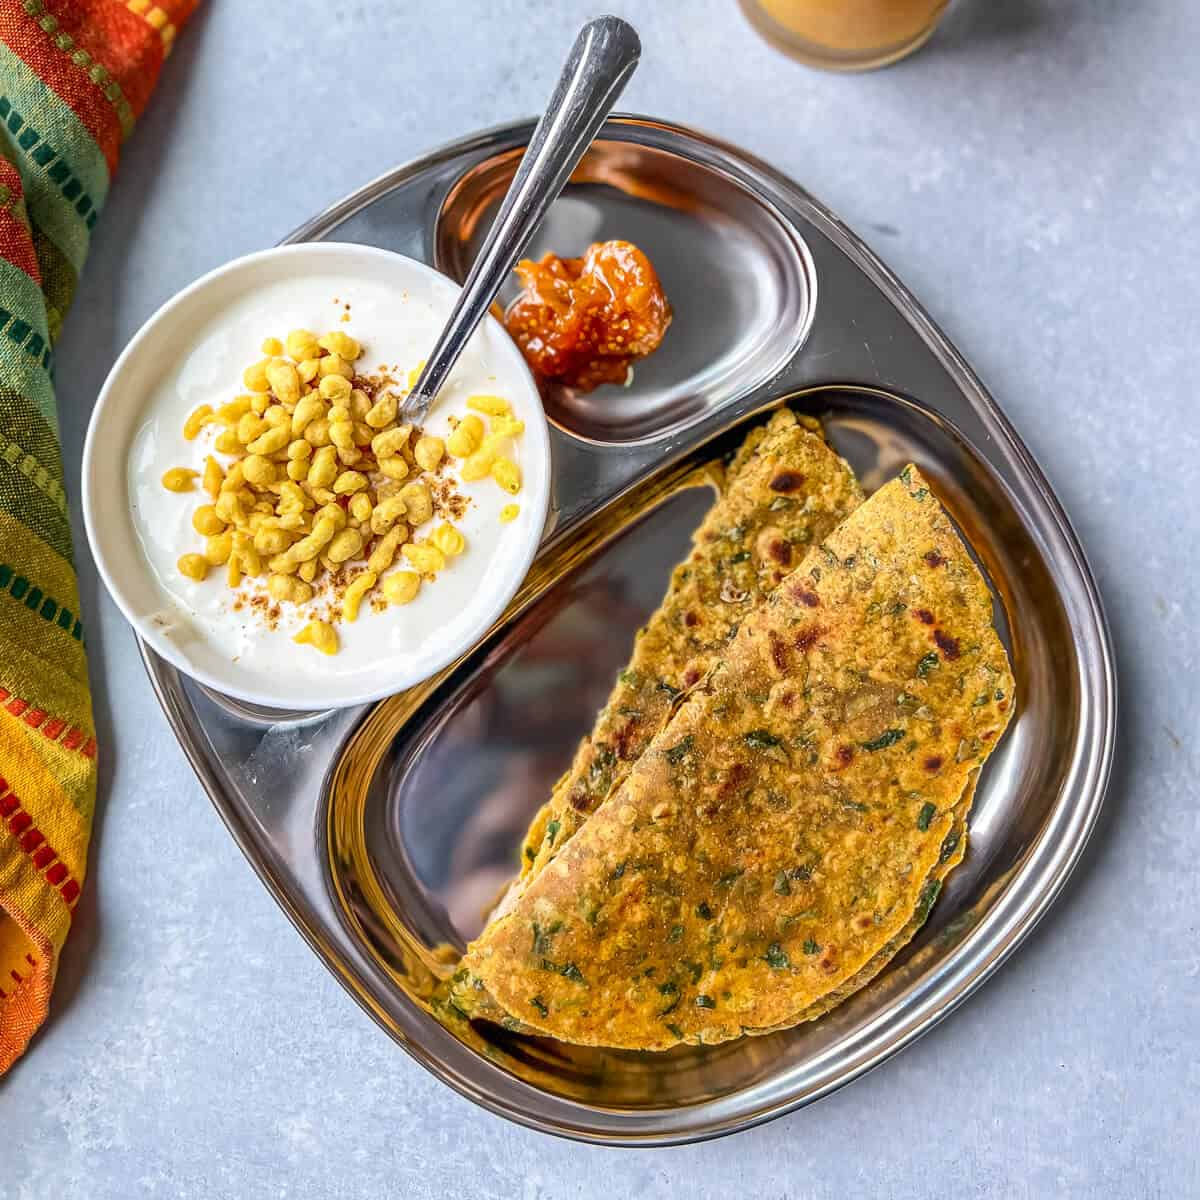
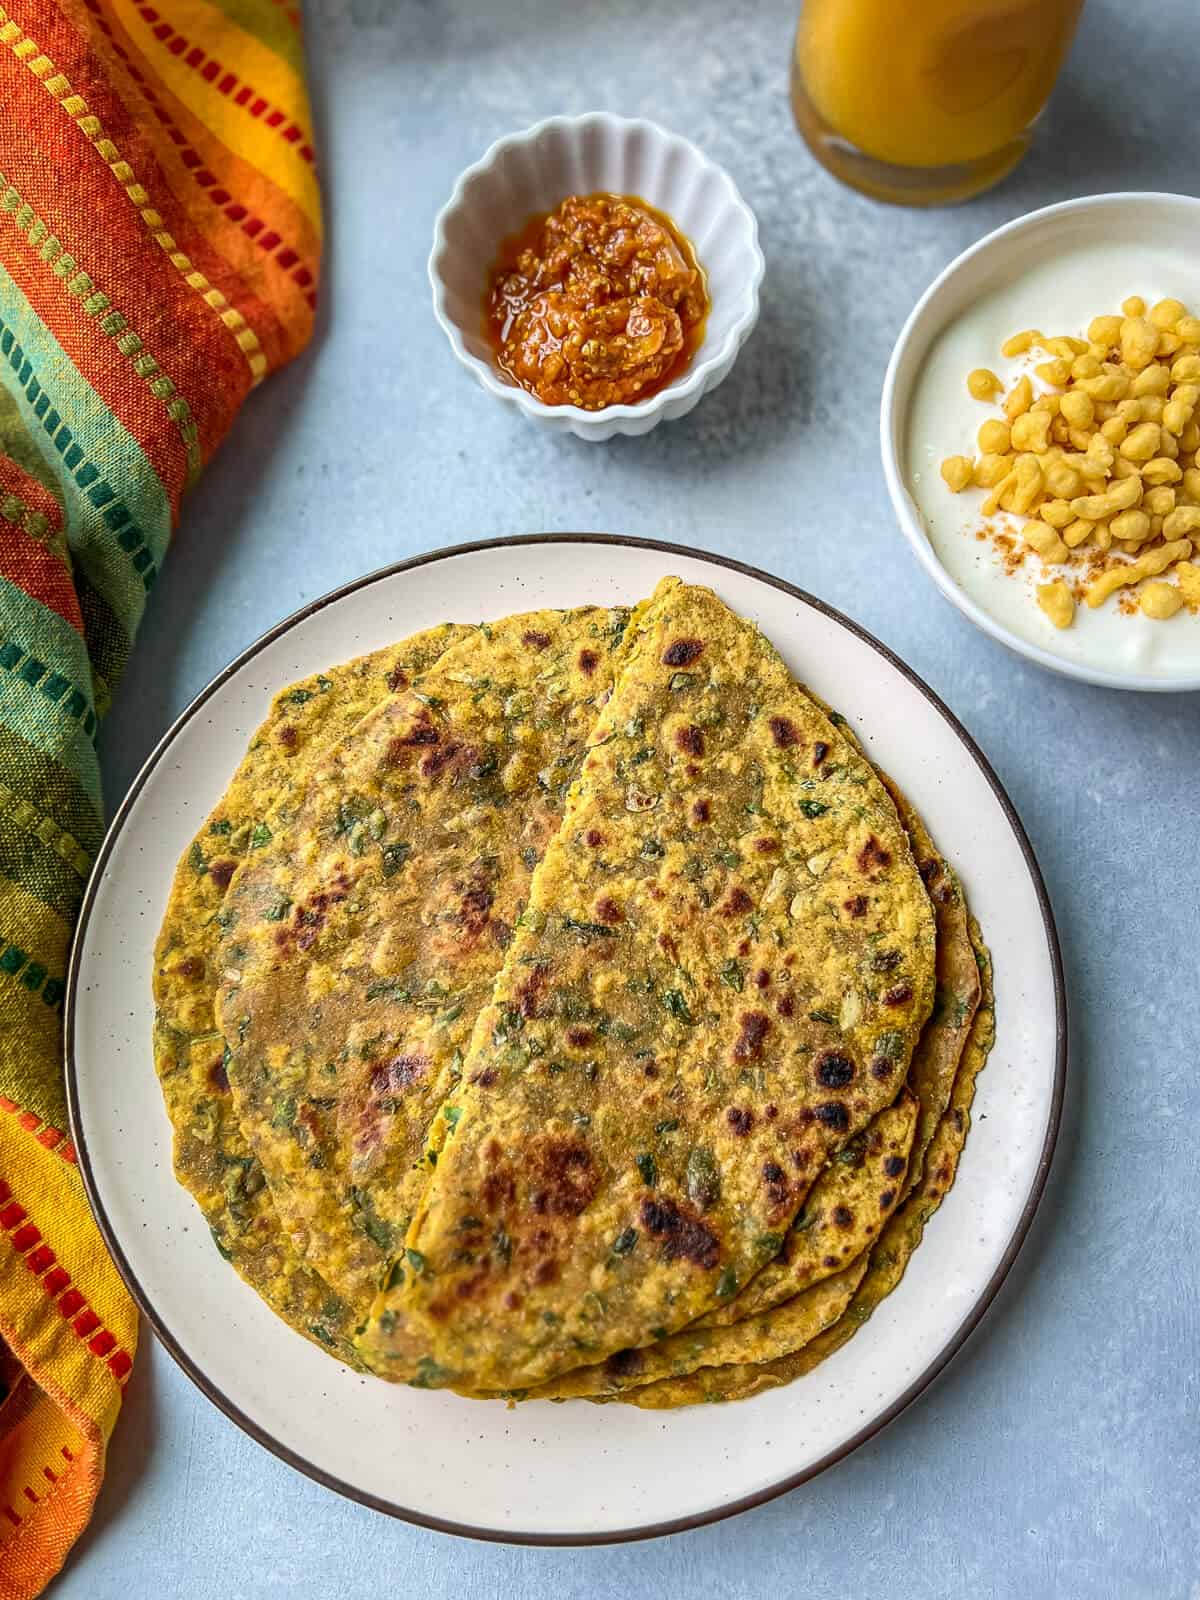
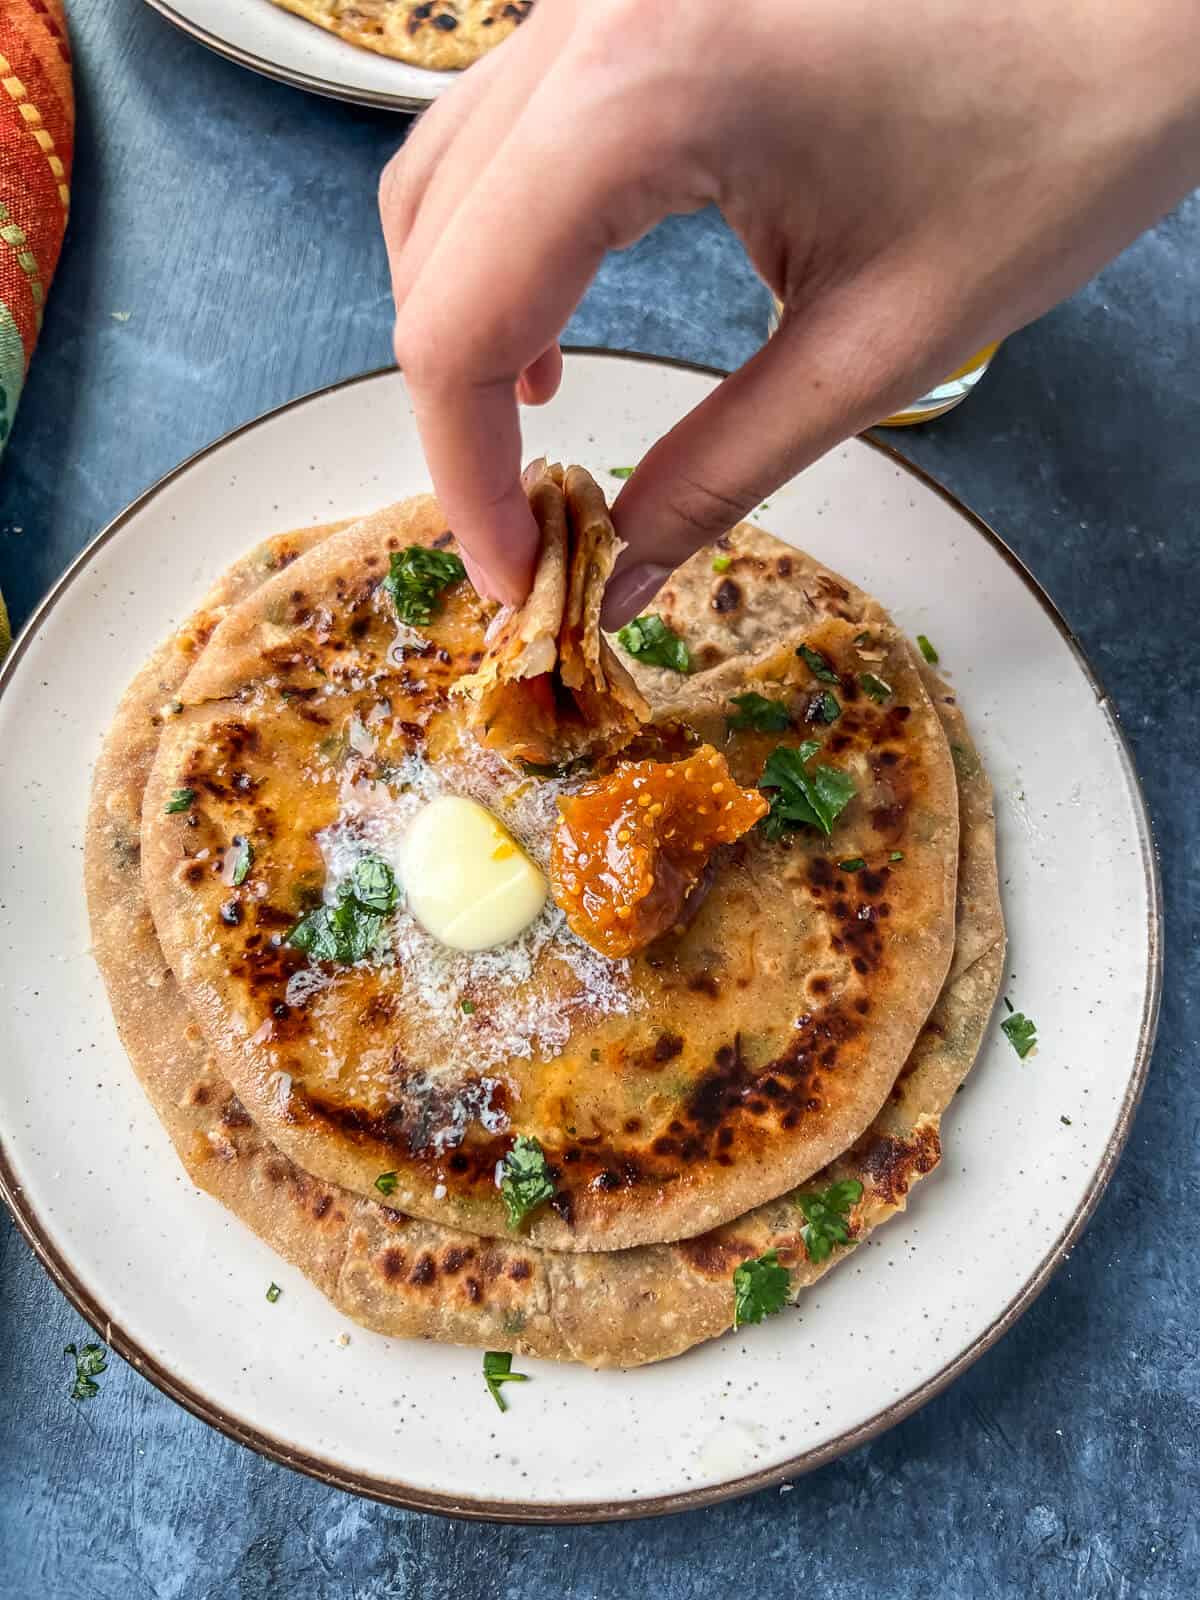
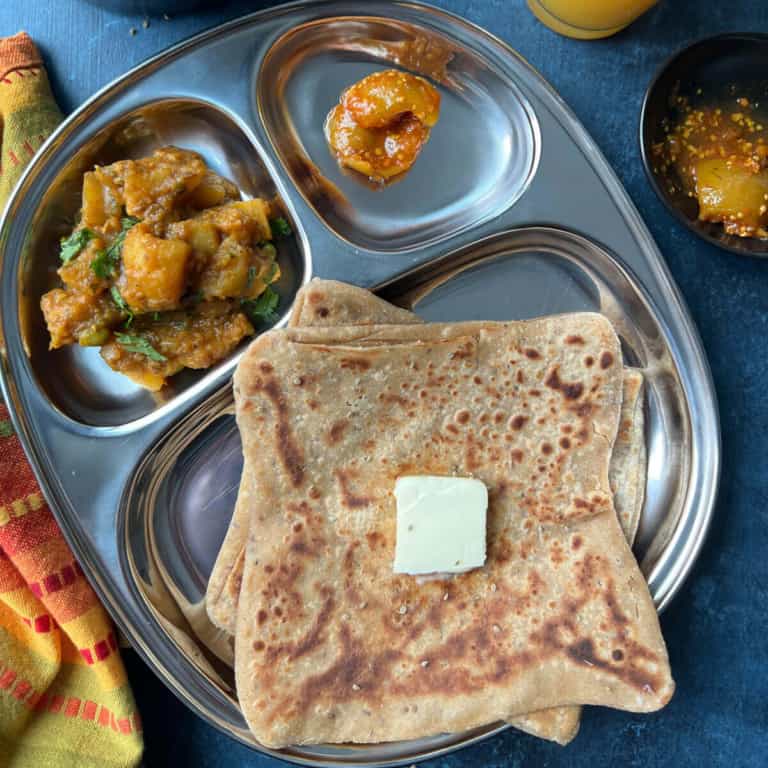
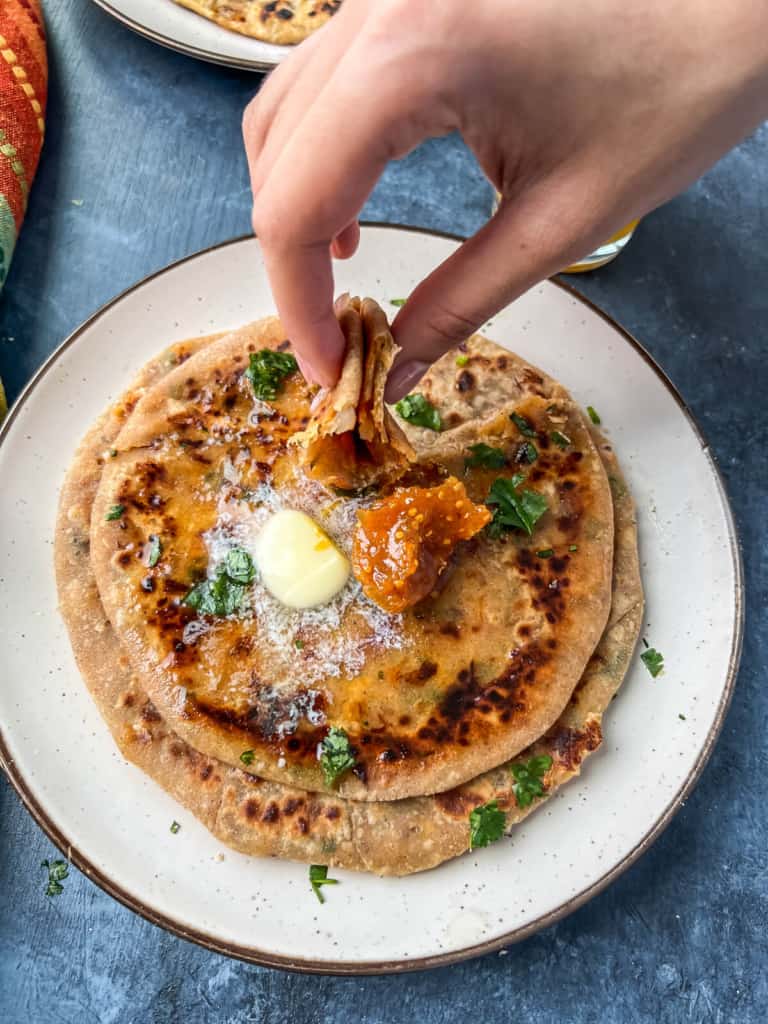
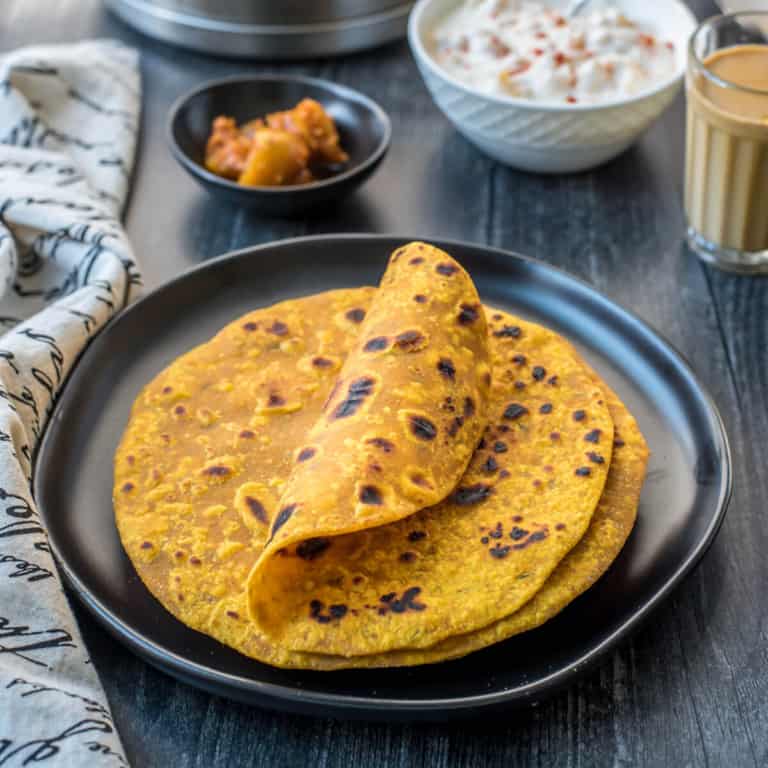
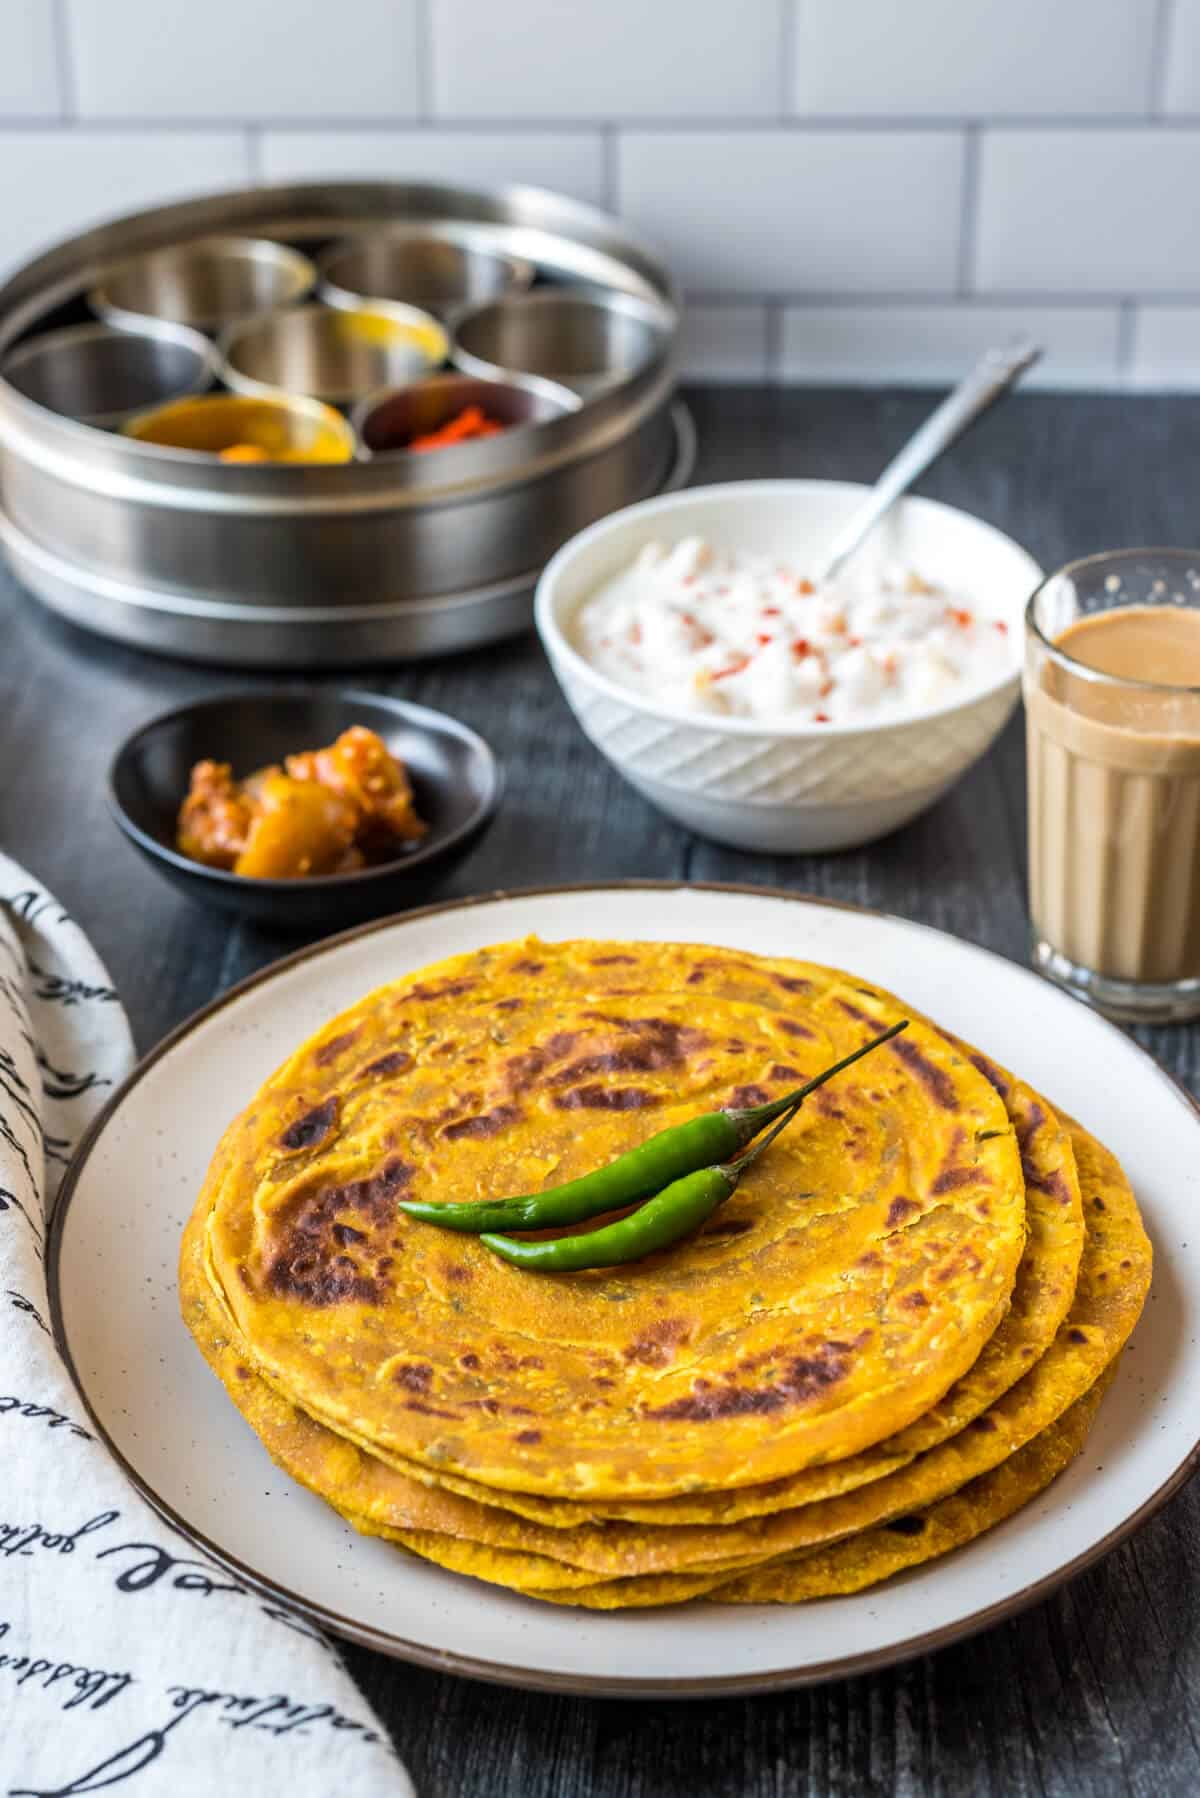
Methi na thepla combines fresh fenugreek leaves, whole wheat flour, and aromatic spices to make this delicious spiced Indian flatbread recipe. Ideal for a nutritious breakfast or snack, convenient for travel, or as a tasty inclusion in lunch boxes, the Gujarati methi thepla hits the spot every time – thanks to its unique flavor and...
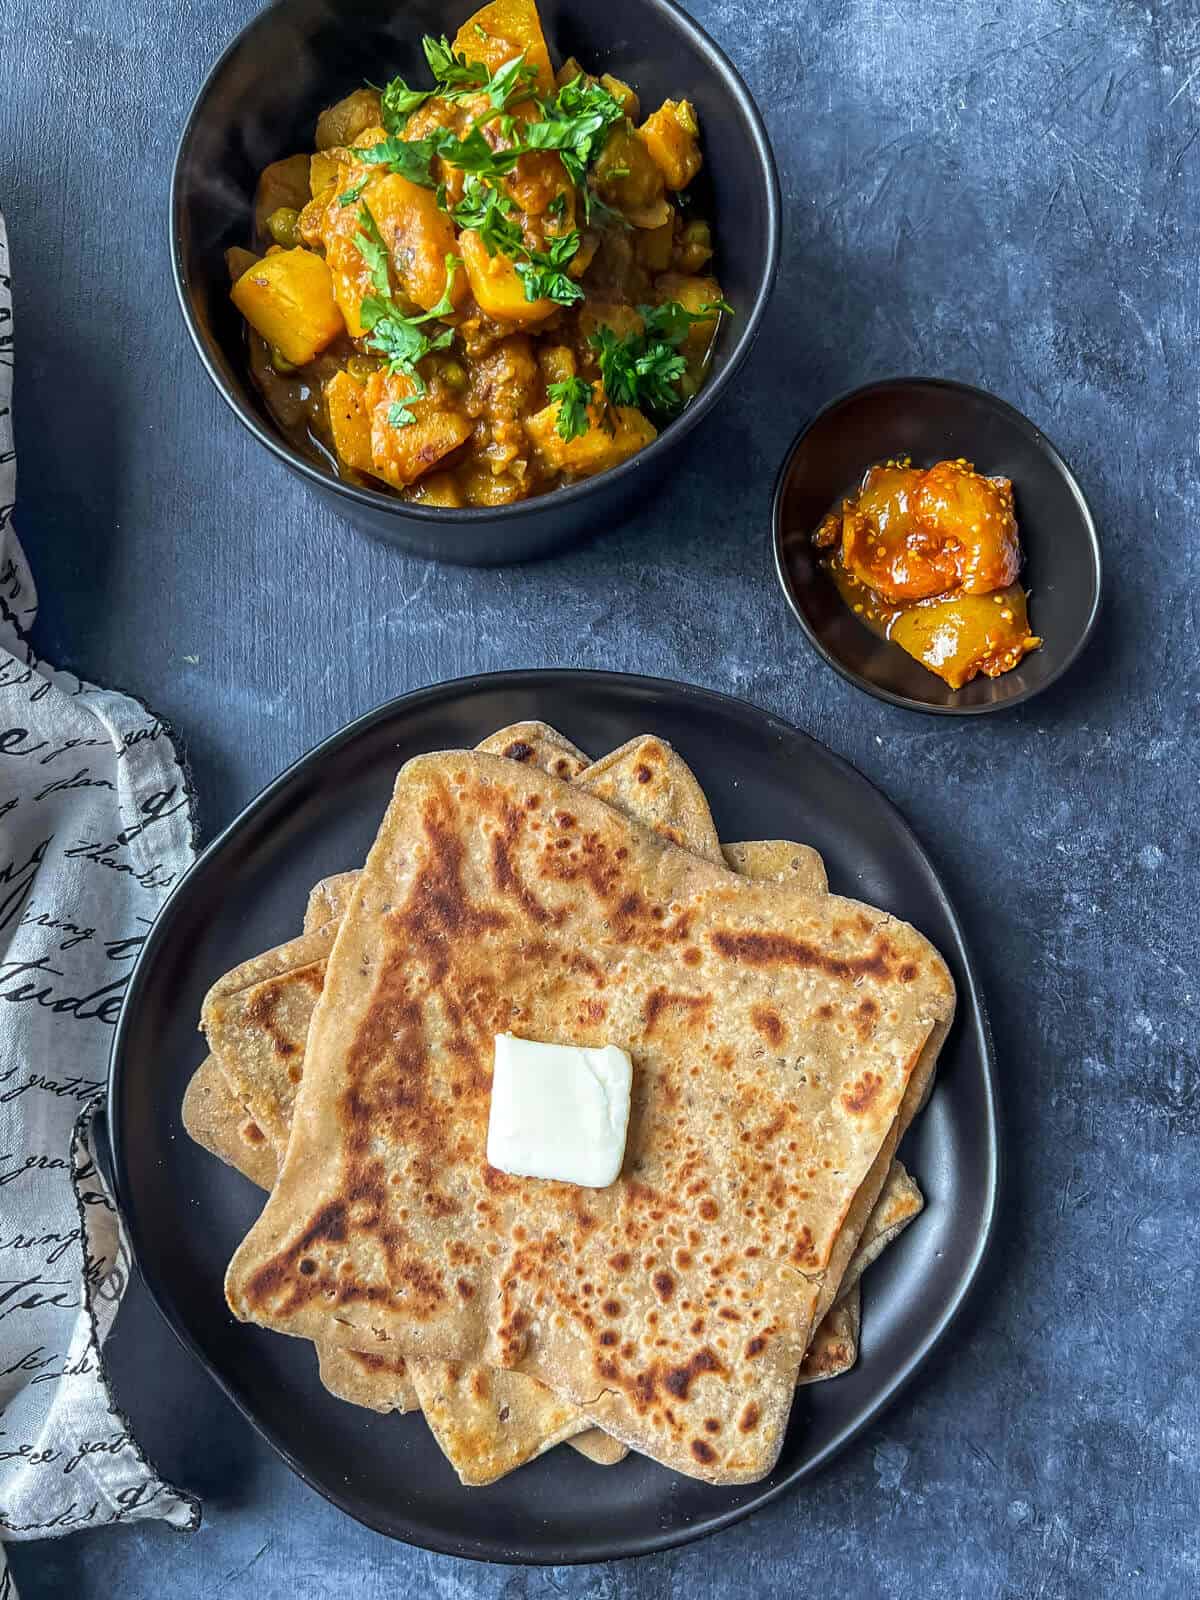
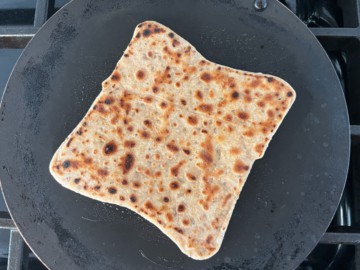
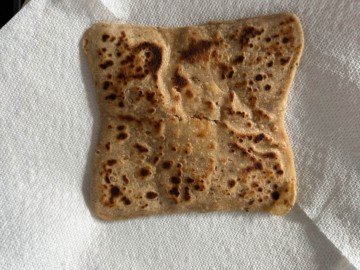
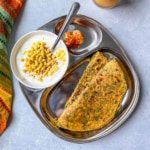
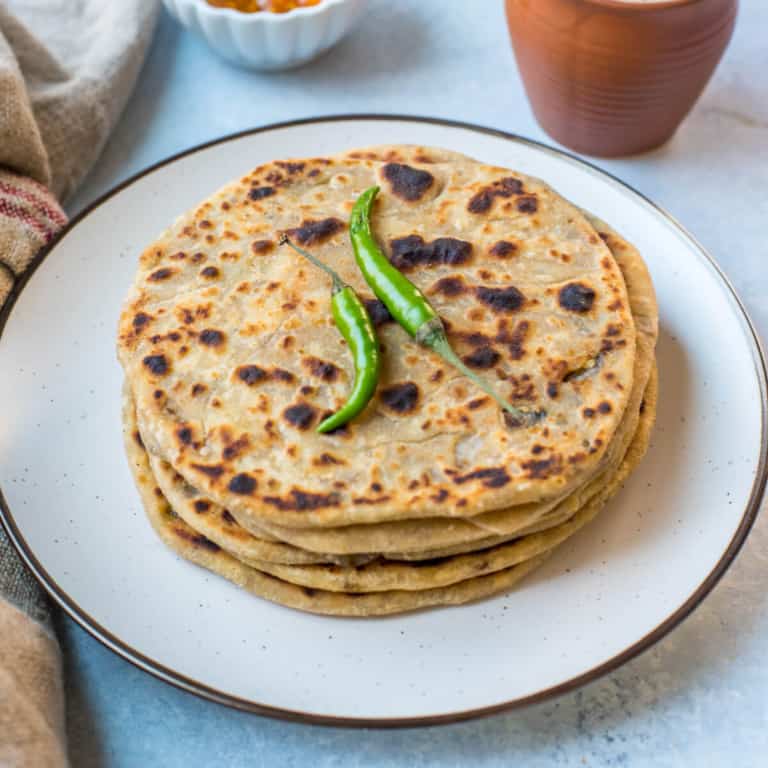
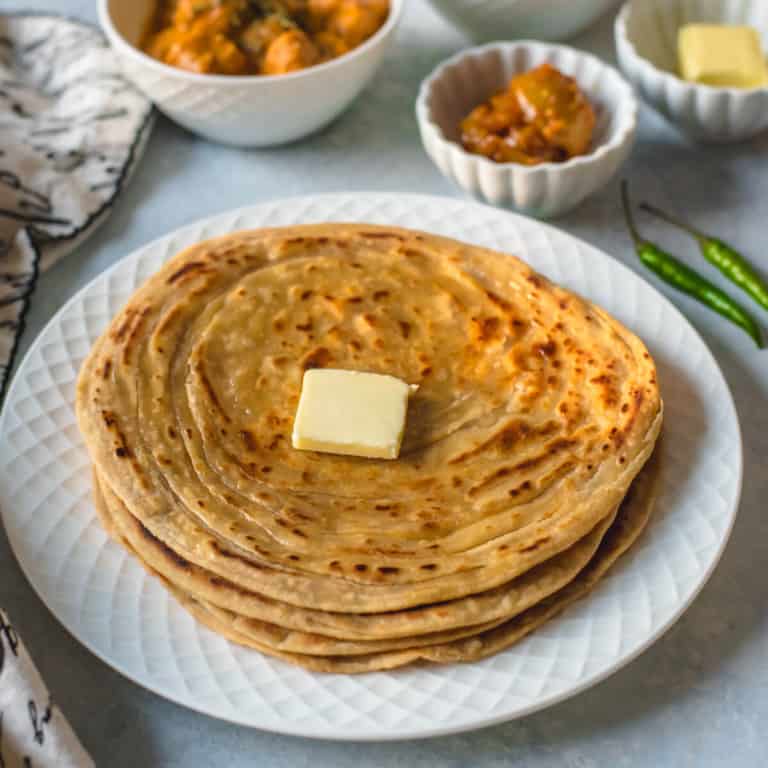
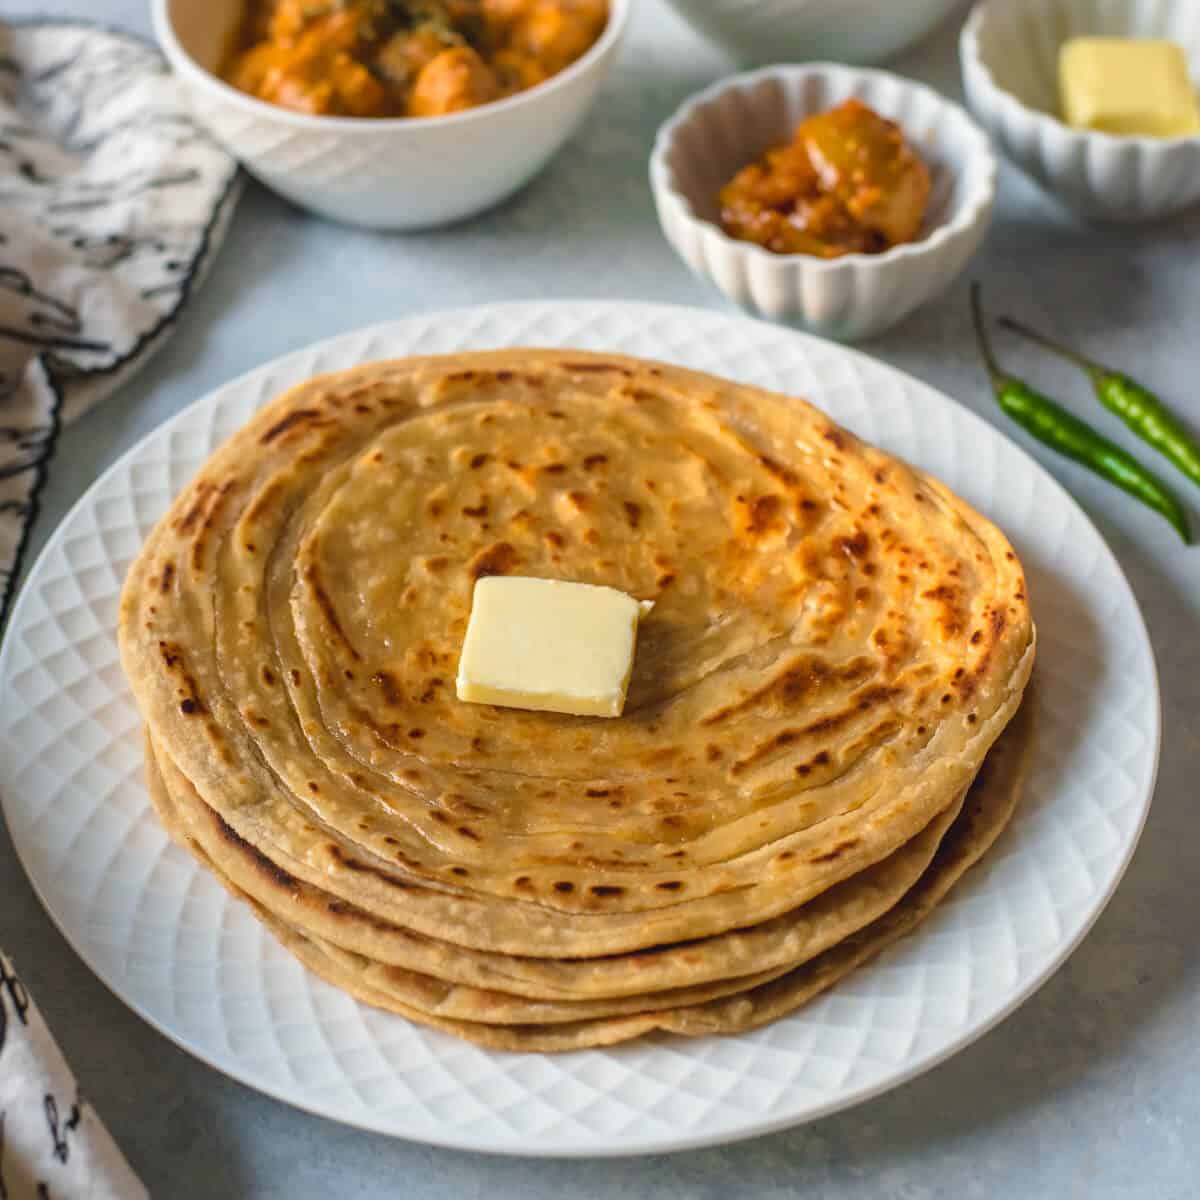
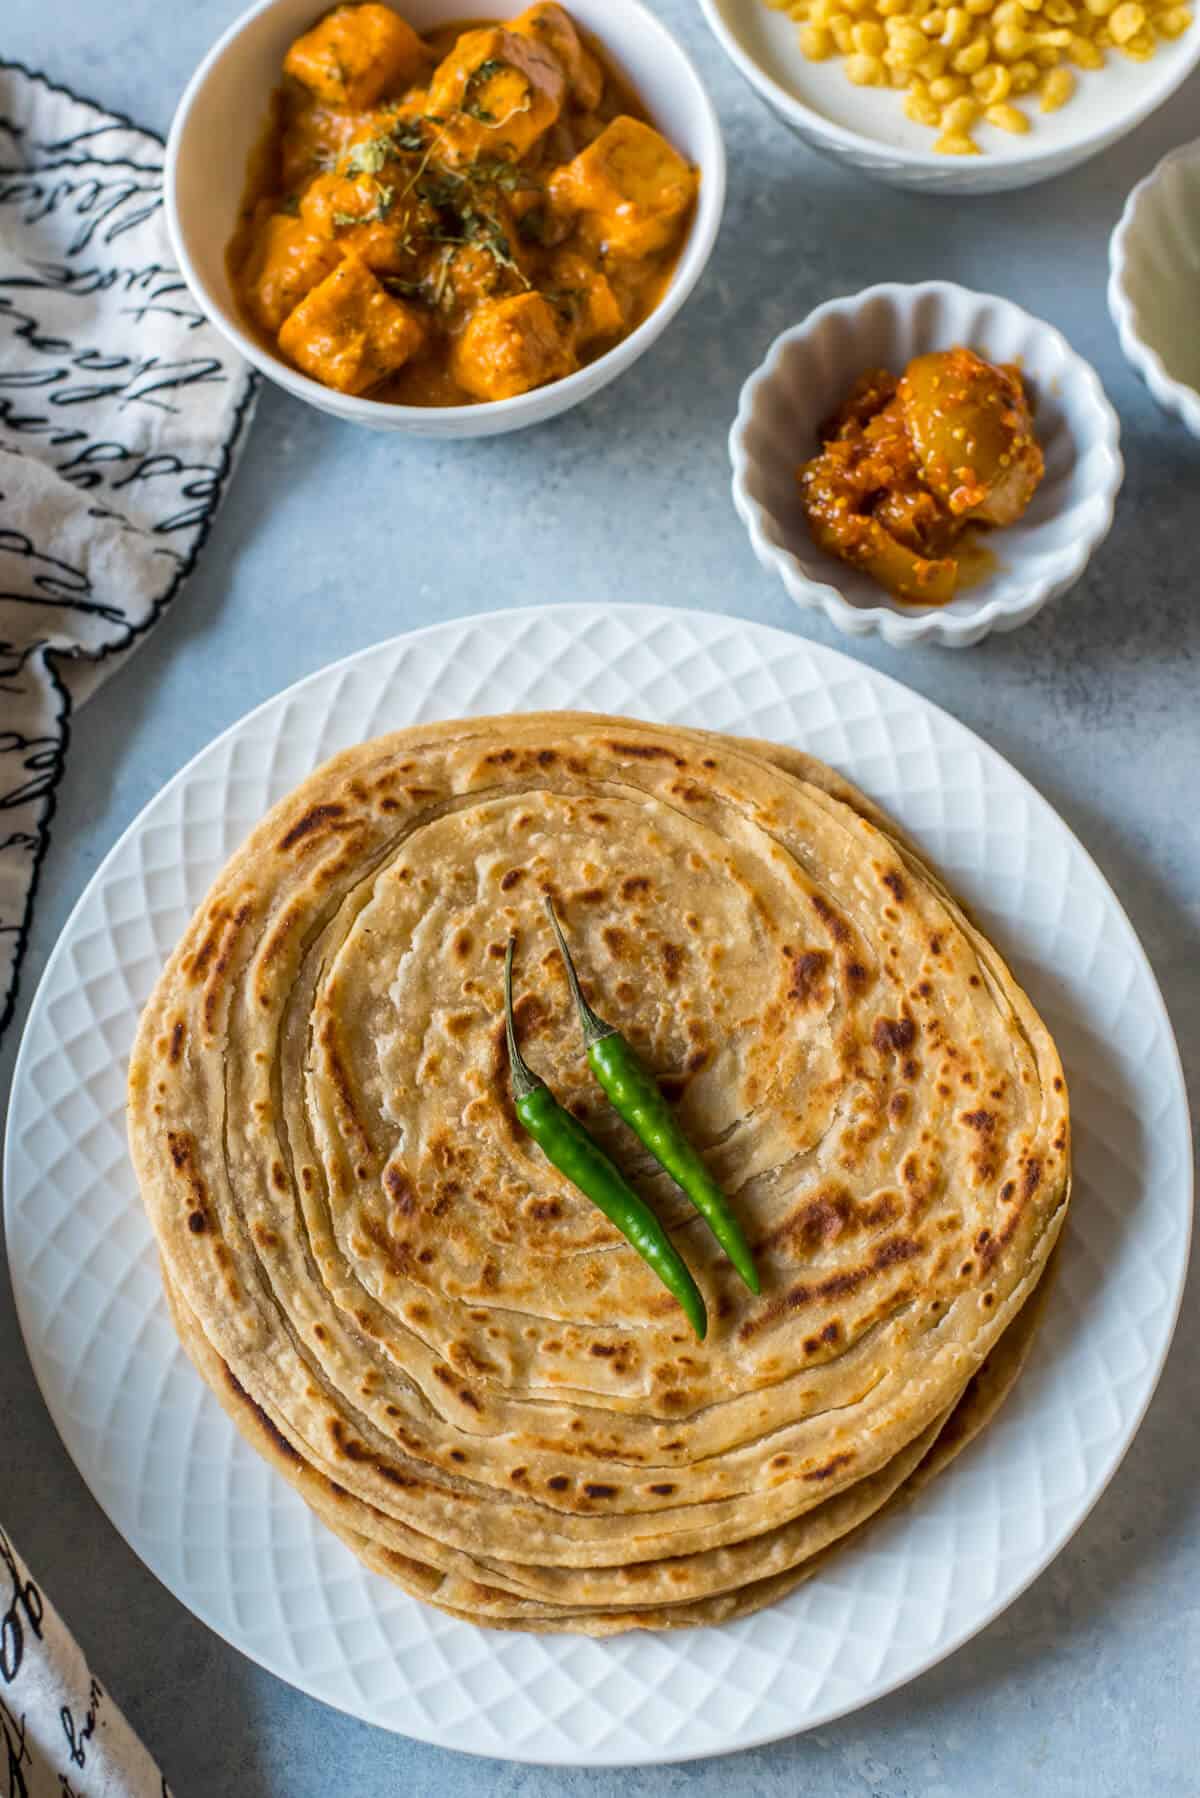
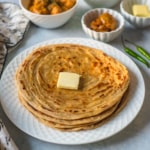
Ajwain paratha/roti – This fragrant Indian flatbread made with carom seeds and whole wheat flour is an excellent option when you are in the mood for something different. This aromatic paratha is perfect for dunking in your curries or serving for breakfast or snacks, along with pickle and raita.
Ajwain Paratha
This flavorful ajwain paratha is great for when you are in the mood to make something else other than the usual paratha or roti.
Ajwain (carom seeds) have a fragrant and deliciously distinct flavor that makes this paratha unique and irresistible. It goes well with curries and Indian vegetable side dishes, but you can serve it with a side of pickle, homemade yogurt, or a dollop of butter as well.
Not only is Ajwain known for its flavor, but it is also popular because of its health benefits. That’s one more reason to try this ajwain paratha recipe
Alternate names: In Indian homes, this paratha also goes by ajwain roti, ajwain ka paratha, namak ajwain paratha, carom seeds flatbread, etc.
Carom seeds (ajwain) health benefits
Ajwain is a small seed-like fruit with a strong, slightly bitter, pungent taste with an aroma similar to thyme. It is also called carom seed or bishops weed.
Ajwain seeds contain a small amount of oil (called ajwain oil) that contains thymol which is often used to treat digestive issues. Here’s a few of the health benefits of ajwain –
It helps relieve indigestion, bloating, and gas.
Has antifungal and antibacterial properties.
Lowers blood pressure.
The anti-inflammatory properties of ajwain help with pain relief tied to arthritis, tooth, etc.
Fun fact: In most Indian households, including mine, if anyone complains of abdominal discomfort, the first thing we do is drink a concoction of roasted ajwain seeds boiled in water. It always helps with any digestive issues.
Paratha vs. roti
Though roti and paratha have the same ingredients and are both unleavened, there is one distinct factor that differentiates them….layers!
Parathas, when rolled, are slathered with ghee and then folded. This rolling-out process is quite different from roti. This also makes the parathas flaky, layered, and high in calories.
Reasons to love this recipe
Ajwain ka paratha keeps you satiated for a long time thanks to the filling whole wheat flour base.
Can prep ahead – great for meal planning. Since this paratha recipe keeps for up to 5 days in the refrigerator, you can easily make them during your weekly meal prep time and eat on them all week.
Tastes delicious – The ajwain added in the dough results in an absolutely delicious paratha you will want to eat with everything.
Needs only a few ingredients – Made with 6 pantry-staple ingredients, this simple laccha paratha quickly comes together any day of the week.
Here’s what you need to make the recipe
Ingredients notes/swaps
Whole Wheat Flour – I prefer either Aashirwad whole wheat atta or Sujata chakki atta.
Carom seed (ajwain seed) – the star of this dish is used to add flavor and fragrance.
Salt – a small amount of salt is added to the dough to provide flavor.
Oil – I used avocado oil, but you can use another neutral flavored oil like vegetable oil.
Water – You will need enough water to form a soft dough, which should be at room temperature or warm for the best results.
Ghee – This is used during the rolling of the dough, as you smear each layer with melted ghee to create the signature flaky layers.
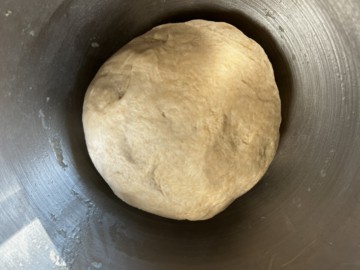
Knead the paratha dough until it is smooth, soft, and pliable.
To fix hard dough, sprinkle a spoonful of water and knead. Add more water as needed until the dough is neither hard nor sticky.
Sticky dough? Sprinkle a spoonful of dough and knead. Add more flour as needed until the dough is not sticky.
Rest the dough to allow time for the gluten to form. This makes it easier to roll out the dough and yields softer parathas.
Make sure to dust off the dry flour from the parathas before frying, or it dries up and turns hard.
Before storing it in an air-tight container or while packing it for lunch, let the paratha cool down for 5-6 minutes to prevent it from being soggy.
Note:Don’t forget to turn on your exhaust fan when making parathas, or else your smoke alarm may go off.
Recipe modifications
Replace ghee with oil for a vegan version.
Ajwain stuffing – Instead of adding carom seeds or ajwain to the dough, sprinkle them once you first rolled out the dough into a circular shape and brush ghee on top. You can continue to fold and roll as outlined in the recipe.
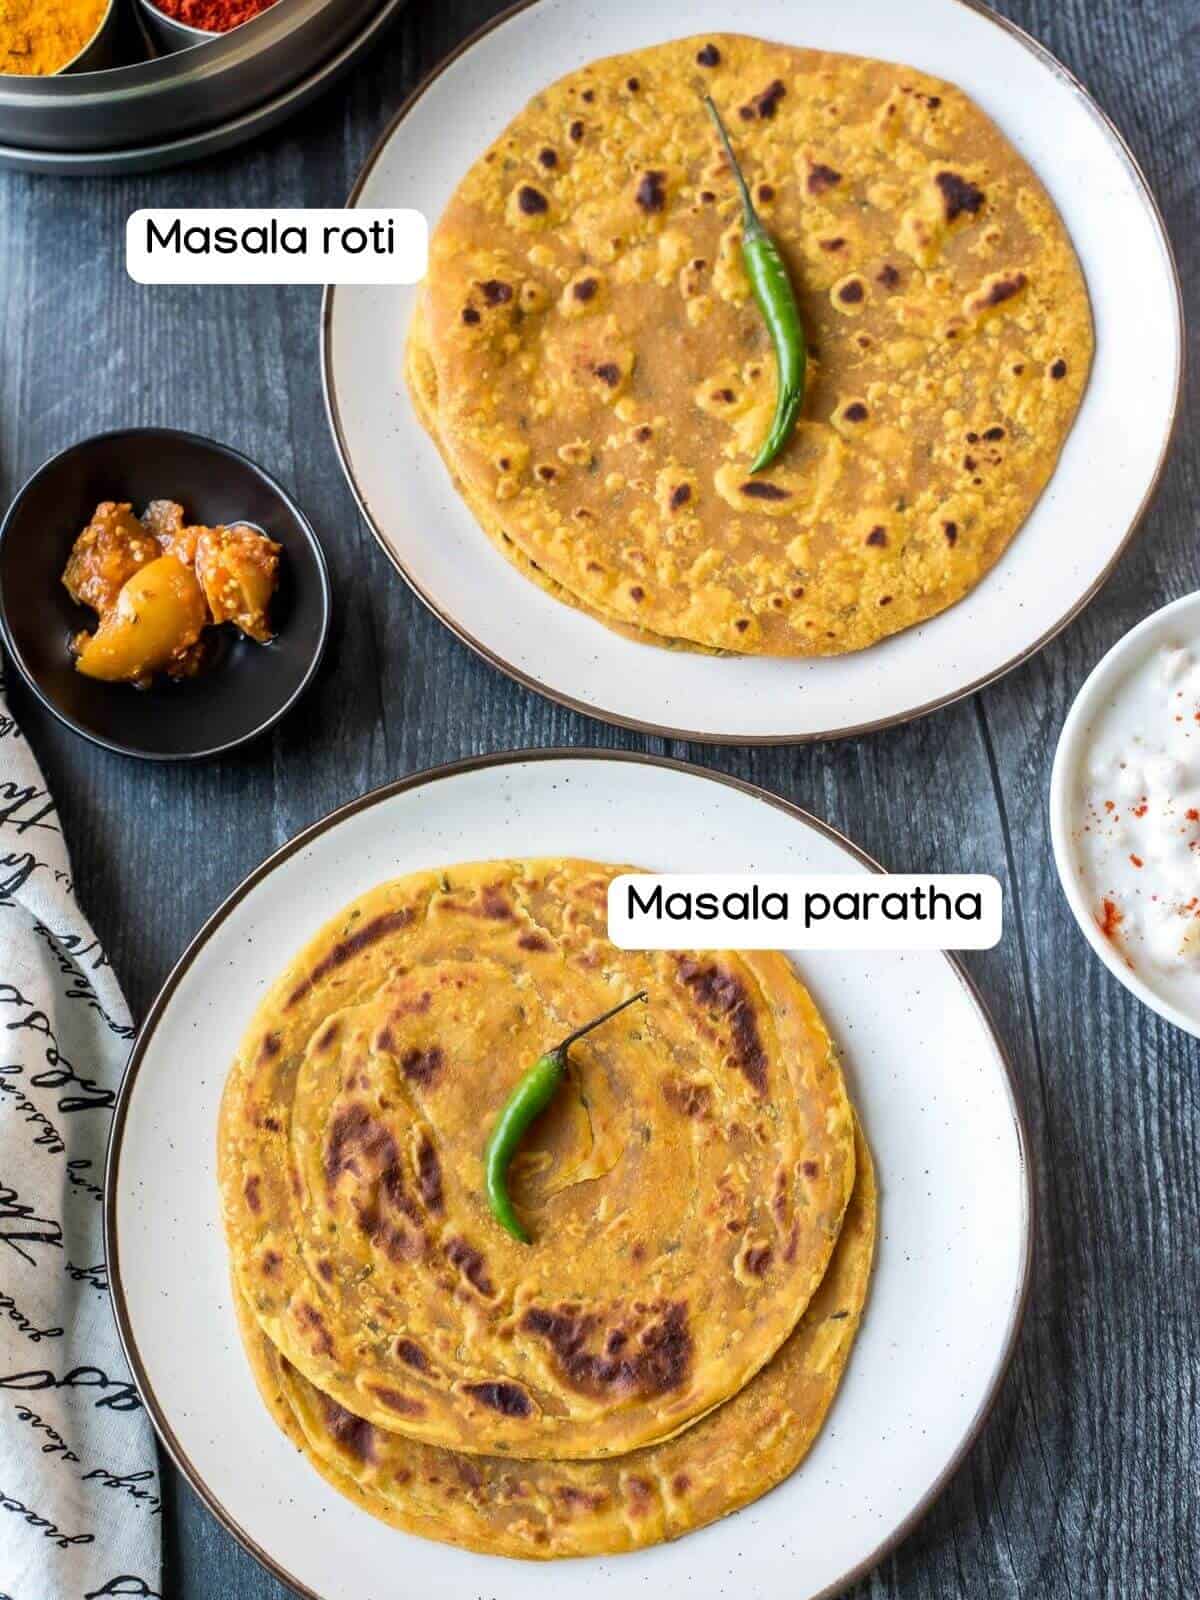
Spice it up – Make masala paratha by adding 1/2 teaspoon of these spice powders – red chili powder, coriander, and cumin powder while making the dough.
Ajwain kali mirch paratha – add about 0.5 teaspoons of freshly ground pepper while making the dough to make this variation.
Ajwain mirch paratha – to make this add 1-2 finely chopped green chilies while making the paratha dough.
How to prep ahead
The dough stays in the refrigerator in an air-tight container for up to 3 days. Frozen for a month. Bring the dough to room temperature before rolling out the parathas.
Storage tips
Refrigerator – When cooled and placed in an air-tight container, ajwain parathas last for 4-5 days. Freezer – Paratha keep for 2-3 months when frozen. I recommend separating them with parchment paper, or they’ll stick together. Reheat – For refrigerated parathas, reheat in a microwave (15-20 seconds) or reheat in a tava / skillet kept over medium heat. If parathas are frozen, use a tava/skillet to reheat for best results.
Serve it with
You can serve these crispy and flaky parathas with either ginger tea or masala chai with a side of pickle, raitas, or homemade yogurt for breakfast or brunch. You can also make them part of your main course, accompanied by
Spinach and Tomato Dal (Dal Palak) – a comforting, creamy, and mildly spiced dal that is perfect for scooping up with Ajwain Paratha.
Aloo Palak – healthy, hearty, and so simple to make, this potato and spinach curry is the perfect vegan side dish.
Finger-licking Kadai Paneer – with big chunks of paneer and a spicy masala sauce, this quick vegetarian curry is perfect for the midweek!
Restaurant-Style Instant Pot Chicken Tikka Masala – an iconic curry that everyone loves and goes so well with both rice and paratha. Grab this recipe to find out how quickly and easily it can be made in the instant pot!
Frequently asked questions
Can I make this recipe vegan?
Yes, replace ghee with avocado or any neutral oil.
Can I pack ajwain paratha for school/work lunch?
Let the paratha cool down for at least 5-6 minutes to prevent it from being soggy.
Other easy paratha recipes to try
If you enjoyed this fragrant ajwain paratha, you must try a few of my other paratha recipes, as well as some of my other Indian flatbreads. Here are a few of my favorites:
Onion paratha – Filled with onions and aromatic spices, this stuffed paratha recipe packs a punch.
Masala Paratha – a thin, flavorful, and flaky flatbread filled with delicious masala spices.
Paneer paratha – Another Indian flatbread, but this one is stuffed with yummy cottage cheese and is great any time of day – it also freezes really well!
Aloo Paratha – An Indian flatbread that is stuffed with potatoes!
Laccha Paratha – Flaky and crisp, this layered paratha with golden brown spots comes together with five simple ingredients.
The recipe below shares step-by-step pictures on how to make a square paratha. Want to learn how to make this ajwain paratha in a circular or triangular shape? Check out this plain paratha post, where I share how to make round, square and triangle parathas.
Ajwain paratha – This fragrant Indian flatbread made with carom seeds and whole wheat flour is an excellent option when you are in the mood for something different. Serve it with curries or dal or for breakfast / snacks along with pickle and raita.
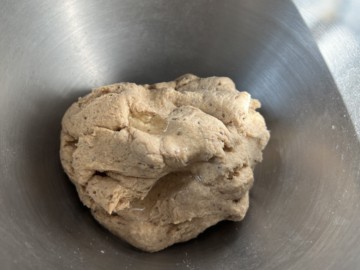
Add the remaining water, one tablespoon at a time, and continue kneading until the dough comes together like a ball.
Add 1/4th teaspoon oil to the dough and knead till the oil is absorbed.
2 tablespoons oil (avocado or vegetable)
If the dough is sticky, sprinkle approximately 1/4 teaspoon wheat flour (or more if needed) on the dough and knead again to form a dough that is not sticky. The dough should be supple and soft.
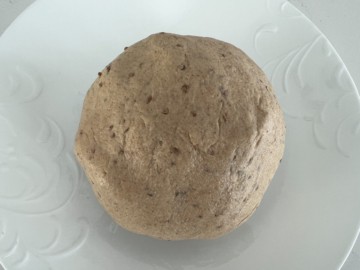
Cover the dough and set aside for 15-20 minutes.
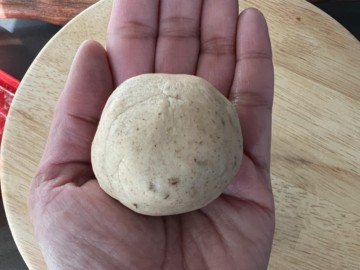
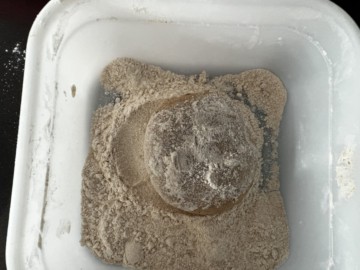
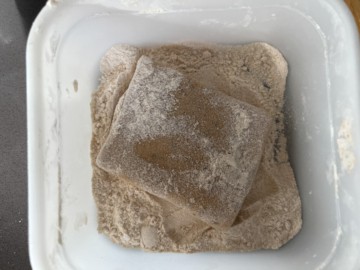
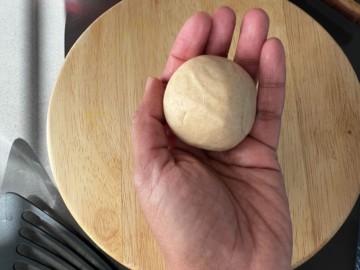
Pull a small piece approximately the size of a golf ball from the dough. Place the piece between the palms of your hands and shape them into a ball. Flatten the ball and cover both sides with flour.
Flatten the ball and cover both sides with flour.
Making rotis
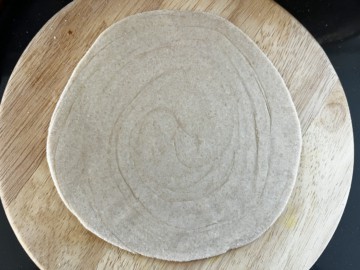
Roll out the flattened ball into a circular shape (approximately 7-8 inches in diameter).
Making parathas (to cook rotis, scroll down)
Note: The steps below show you how to make square parathas. To make round and triangle parathas, check the plain parathas post.
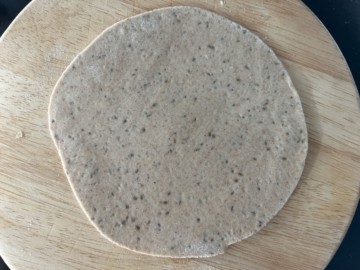
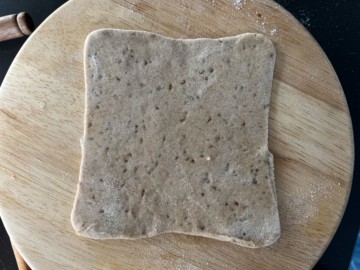
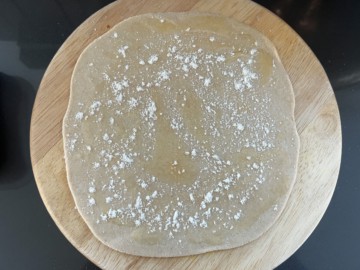
Roll out the flattened ball into a circular shape (approximately 6 inches in diameter).
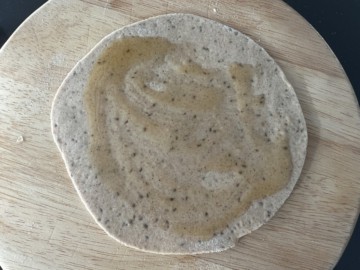
Brush the surface of the rolled-out dough with ghee.
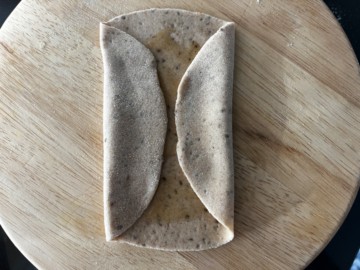
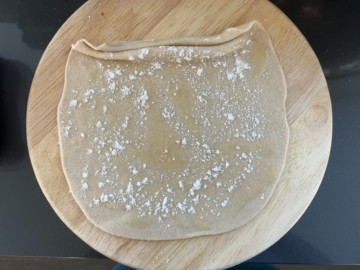
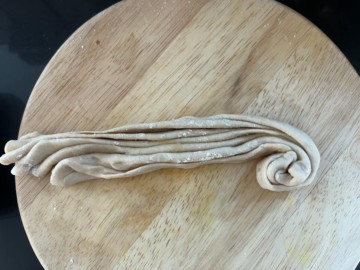
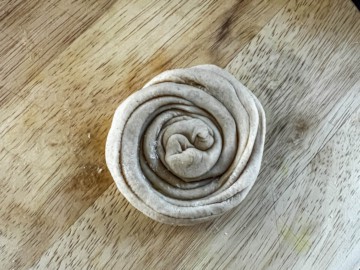
Take 1/3 portion of the rolled dough from the left side and fold it towards the middle. Now fold 1/3 portion from the left till the folds overlap slightly. Brush it with ghee.
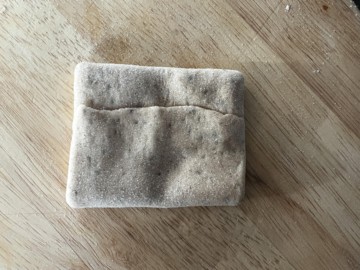
Now fold the top and bottom portion of the rolled dough towards the middle creating a square.
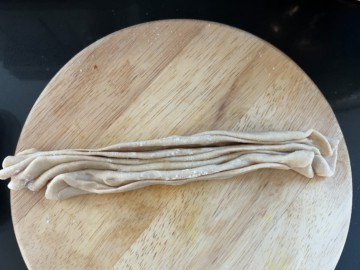
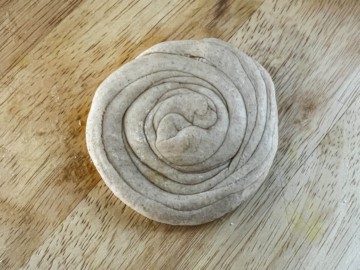
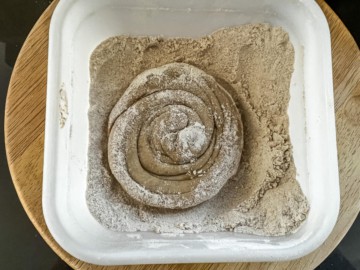
Dip the square shaped paratha in flour and use the rolling pin to roll it evenly into a square shape paratha using as little pressure as possible.
Cooking paratha / roti
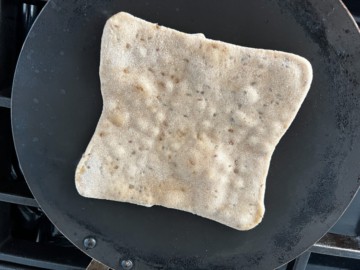
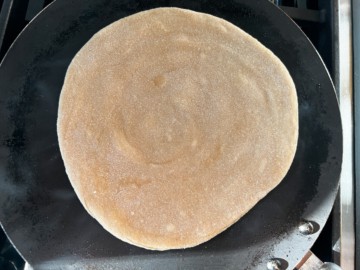
Heat a pan / tawa over medium-high heat.
Dust off excess flour from the paratha / roti by placing it on your palm of one hand and then flip it onto the palm of your other hand. Repeat this process 3-4 times.
1/4 cup whole wheat flour
Place the paratha/roti in the hot pan. Cook until small bumps form on the surface (approximately 1-2 minutes).
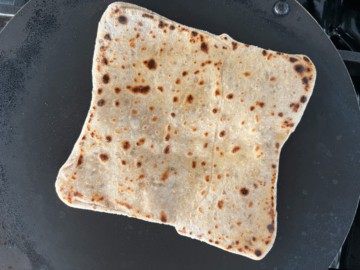
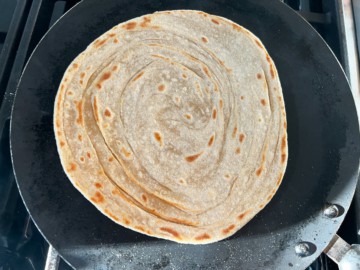
Flip the paratha/roti onto the other side. Cook for 30-40 seconds or so until you see brown spots. Smear it with ghee and flip it.
Cook for 20-30 seconds, then brush the side facing up with ghee. Use a spatula to press down the paratha so that it evenly cooks.
Melted ghee (as needed)
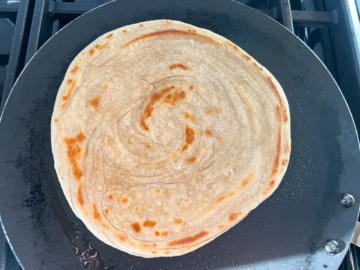
Flip it and cook it for another 15-20 seconds while pressing the paratha/roti down with the spatula.
Transfer the paratha/roti to a plate. Repeat this process for the rest of the dough.
Serve it hot with tea or your favorite vegetable dish.
Notes
To fasten up the process, roll out the next paratha as one cooks in the pan.
Make sure to dust off the excess flour from the paratha before you cook it. This prevents the paratha from getting hard.
Before storing it in an air-tight container, let the paratha cool down for at least 5-6 minutes to avoid making it soggy.
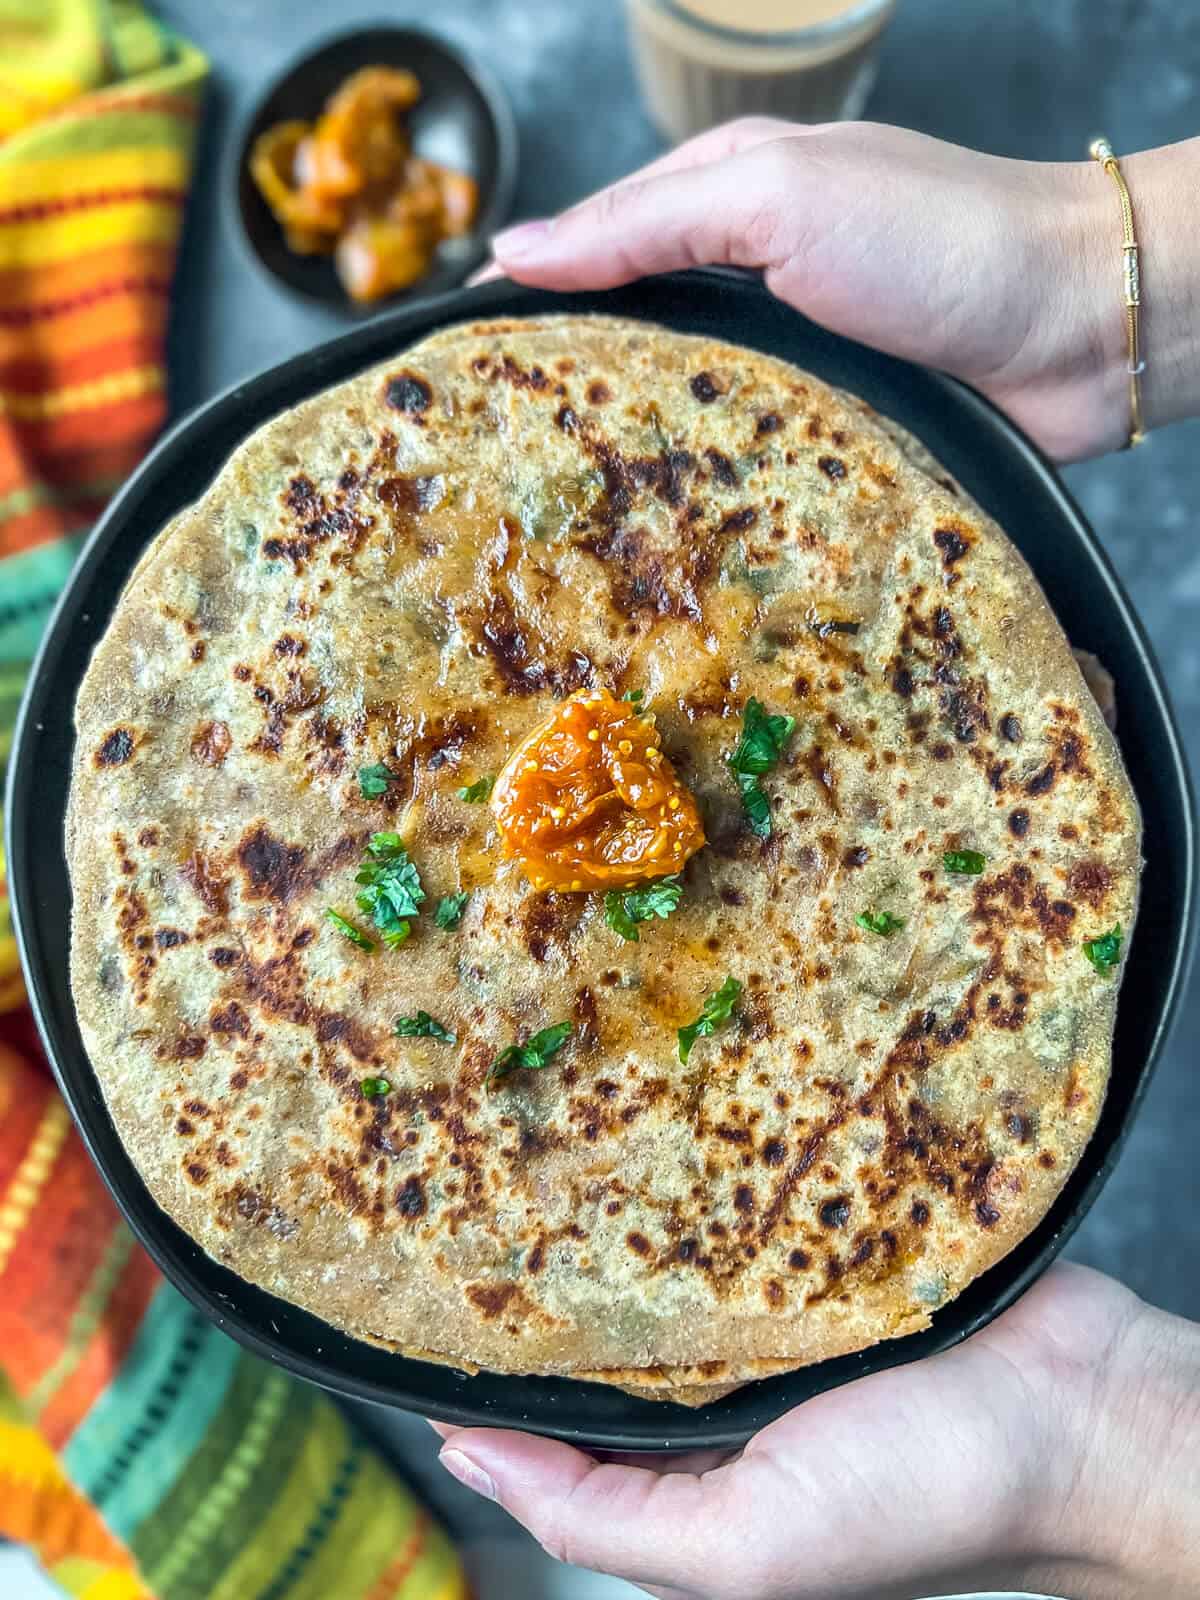
This flavorful methi paratha or methi roti makes the perfect savory breakfast, snack, or lunch accompaniment. The fragrant methi leaves make these healthy parathas a gastronomic experience that you won’t soon forget.
Punjabi Methi Paratha
Paratha is a very popular North Indian flatbread that features flaky, ghee-slathered layers and a crispy texture. Growing up in a South Indian family meant I always had my Mother’s homemade idlis in my school lunch, but I would swap my North Indian friends for their parathas if I had the opportunity.
Whether it is the standard plain paratha, or a flavorful and failproof aloo paratha, these flaky Indian flatbreads are one of my favorite things to eat for breakfast, snack time, or even a school or work lunch.
This recipe for methi paratha is a savory, flavorful, and delicious variation that includes freshly chopped methi leaves, garlic, and spices. Serve it with butter and a side of pickle for a simple breakfast or alongside a creamy paneer curry for a complete meal.
What is methi roti / paratha made of?
Methi roti (or methi paratha) is made using a basic plain paratha base, which includes whole wheat flour, water, salt, oil (avocado or vegetable), and melted ghee. In addition to the basic dough, freshly chopped methi leaves, garlic, and spices are added to give a delicious and savory flavor.
Reasons to love this recipe
These soft Indian flatbreads are made with whole wheat flour, meaning they are a healthy choice for everyday meals.
Long shelf life – it won’t go bad without refrigeration for 2-3 days, making it perfect for travel.
Easily adapted to be vegan – swap the ghee for oil.
Perfect for any time of the day. Enjoy it for breakfast or pack it for lunch, along with raita and/or a cup of piping hot masala tea.
Benefits of fenugreek leaves
Fenugreek (pronounced feh·nyu·greek) leaves have a slightly bitter taste and are similar to fennel or celery leaves in flavor. The Hindi word for fenugreek is methi, and this is what it is referred to in India, where it is commonly used in a variety of dishes.
Fenugreek greens have long been used in traditional medicine, and they contain a host of health benefits. Here are a few of the many benefits that methi has to offer:
Beneficial for diabetes – The amino acids in fenugreek stimulate insulin secretion and increases insulin sensitivity. This helps to regulate glucose levels.
It helps control cholesterol by increasing good cholesterol and reducing the release of bad cholesterol.
Weight management – Fenugreek leaves are high in fiber, which keeps you satiated and helps control cravings.
High in antioxidants which helps prevent cell damage.
Fenugreek, in addition to its Hindi word methi, is known by a variety of names throughout the world. This includes bird’s foot, Greek clover, alhova, fenogreco, chandrika, woo lu bar, bockshornklee, Greek hay, and many others.
How to clean methi leaves
Fresh fenugreek leaves tend to have mud in the roots. The easiest way to clean them is to remove the roots and pluck the leaves from the stems. Then clean the leaves and rinse them several times until the water runs clear. This will take care of any remaining mud.
Methi paratha vs. methi thepla
If you’re familiar with methi thepla, you may be thinking that this methi paratha recipe sounds very similar and perhaps could even be the same. While it is true that the two are similar, they are different in several ways.
The key difference is that methi thepla always uses yogurt, while this ingredient is only optional when making methi parathas.
Paratha is only made with whole wheat flour, whereas thepla is made using besan (Bengal gram flour) or bajra (millet).
Methi thepla also calls for more ingredients, including sesame seeds, fennel seeds, and ginger.
The dough for methi paratha is made with water which yields a soft dough, while thepla has a firm dough made with plain curd or yogurt.
Methi paratha or fenugreek paratha recipe is also known by the following names:
Methi ke paratha
Methi ka paratha
Methi chapati
Punjabi methi paratha
Kasoori methi paratha
Methi roti
Here’s what you need to make the recipe
Ingredient notes/swaps
Chopped fenugreek leaves or methi leaves – I recommend finding fresh methi leaves, but frozen will work too. Remember to account for the excess moisture and reduce the water used in the recipe.
Whole wheat flour – I prefer either Aashirwad whole wheat atta or Sujata chakki atta.
Garlic – This compliments the fenugreek flavor perfectly.
Spices – You will need Kashmiri red chili powder, turmeric powder, carom seeds (ajwain), and dry mango powder (amchur).
Salt – A small amount of salt is added to the dough to provide flavor.
Oil – You will need about two tablespoons of oil. I prefer avocado oil, but you can use a neutral-flavored oil of your choice.
Water– This needs to be at room temperature and will be added to the paratha dough as needed. Remember to reduce the amount if using frozen methi leaves.
For Rolling Out:
Additional whole wheat flour – To reduce sticking during rolling.
Ghee – This should be melted and will be brushed on each paratha to create flaky, delicious layers.
Knead the dough until it is smooth, soft, and pliable.
To fix hard dough, Sprinkle a spoonful of water and knead. Add more water as needed until the dough is neither hard nor sticky.
Sticky dough? Sprinkle a spoonful of dough and knead. Add more flour as needed until the dough is not sticky.
Rest the dough to allow time for the gluten to form. This makes it easier to roll out the dough and yields softer parathas.
Make sure to dust off the dry flour from the parathas before frying, or it dries up and turns hard.
Before storing it in an air-tight container or while packing it for lunch, let the paratha cool down for 5-6 minutes to prevent it from being soggy.
Pro tips for methi parathas
Fresh methi tends to have mud in its roots. Make sure to chop the roots and discard them immediately. Pluck the leaves from the stems. Clean and rinse the leaves a couple of times to get rid of mud residue.
Note: Don’t forget to turn your exhaust fan on when making parathas, or else your smoke alarm may go off.
Serve it with
Like all parathas, this fenugreek version pairs well with raitas, yogurt, or Indian pickle. It also tastes delicious with paneer curries, thanks to the buttery flavor. Here are a few of my favorite dishes to serve with methi paratha:
Onion raita – Make it with ingredients that you have at home and in less than 5 minutes!
Mint raita – This refreshing yogurt-based dip made from mint is a worthy accompaniment to delicious biryanis, parathas, and more.
Boondi raita – Made by soaking crispy chickpea flour balls in spice-infused creamy yogurt. Perfect for serving with biryanis or with parathas and a side dish.
Cucumber raita – This delicious, cooling Indian raita is made of grated cucumber combined with creamy yogurt, and cilantro and tempered with curry leaves. This yogurt dip is a perfect way to wrap up a spicy Indian meal.
Frequently asked questions
Are thepla and methi paratha the same?
While thepla and methi paratha may seem very similar, there are significant differences that make them very distinct. While methi is made only with whole wheat flour, thepla can be made with besan (Bengal gram flour) or bajra (millet). Parathas also use a much softer dough made with water, while thepla has a firm dough made with yogurt. Methi thepla also calls for more ingredients, such as sesame seeds, ginger, and fennel seeds.
What does methi taste like?
Methi (also known as fenugreek leaves) has a subtle bitterness and a similar taste to that of fennel or celery leaves. Methi leaves are not as bitter as the seed and add a fragrant and fresh flavor to a variety of dishes.
Is methi paratha healthy?
Since methi paratha is made with whole wheat flour, it is more nutrient-dense than other flatbreads, such as naan, which are typically made with refined flour. When paired with raita or paneer curries, it makes a delicious and filling healthy meal.
Add 1 cup of water and use your fingers or a stand mixer to combine the ingredients into a dough.
Add water, one tablespoon at a time, and continue kneading until the dough comes together like a ball.
Add 1/4th teaspoon oil to the dough and knead till the oil is absorbed.
2 tablespoons oil (avocado or vegetable)
If the dough is sticky, sprinkle approximately 1 teaspoon wheat flour (or more if needed) on the dough and knead again to form a dough that is not sticky. The dough should be supple and soft.
Cover the dough and set aside for 15-20 minutes.
Make methi rotis
Pull a small piece approximately the size of a golf ball from the dough. Place the piece between the palms of your hands and shape them into a ball.
1/4 cup whole wheat flour
Flatten the ball and cover both sides with flour.
Roll out the flattened ball into a circular shape (approximately 7-8 inches in diameter).
Heat a pan / tawa over medium-high heat.
Dust off excess flour from the paratha by placing it on your palm of one hand and then flip it on the palm of your other hand. Repeat this process 3-4 times.
Place the paratha in the hot pan. Cook the paratha until small bumps form on the surface (approximately 1-2 minutes).
Flip the paratha onto the other side. Cook for 30-40 seconds or so until you see brown spots. Smear it with ghee and flip it.
1/4 Melted ghee (as needed)
Cook for 20-30 seconds, then brush the side facing up with ghee. Use a spatula to press down the paratha so that it evenly cooks.
Flip it and cook it for another 15-20 seconds while pressing the paratha down with the spatula.
Transfer the paratha to a plate. Repeat this process for the rest of the dough.
Serve it hot with pickle or raita.
Notes
To fasten up the process, roll out the next paratha as one cooks in the pan.
Make sure to dust off the excess flour from the paratha before you cook it. This prevents the paratha from getting hard.
Before storing it in an air-tight container, let the paratha cool down for at least 5-6 minutes to avoid making it soggy.
The best way to prepare this methi ka paratha in advance is to make the dough ahead of time. Follow the steps for making the dough as listed in the instructions, and when it is time to allow the dough to rest, store it in either the refrigerator or the freezer.
Refrigerated dough stays keeps in an air-tight container for up to 3 days.
The frozen dough keeps for a month.
Make sure to bring the dough to room temperature before rolling out the parathas.
Storage tips
Refrigerator – When cooled and placed in an air-tight container, the rolled paratha lasts for 4-5 days.
Freezer – If you would like to freeze these for longer storage, they will keep for 2-3 months. Separate them with parchment paper when freezing, or they’ll stick together.
Reheat – For refrigerated parathas, reheat in a microwave (15-20 seconds) or reheat in a tava / skillet kept over medium heat. If parathas are frozen, use a tava/skillet to reheat for best results.
Variations to try
Kasuri methi paratha – Use dried fenugreek leaves (kasoori methi) instead of fresh ones. They are more potent than fresh so use 1/2 the amount of fresh.
You can also use frozen methi leaves – make sure to account for the moisture in the leaves and reduce the amount of water used.
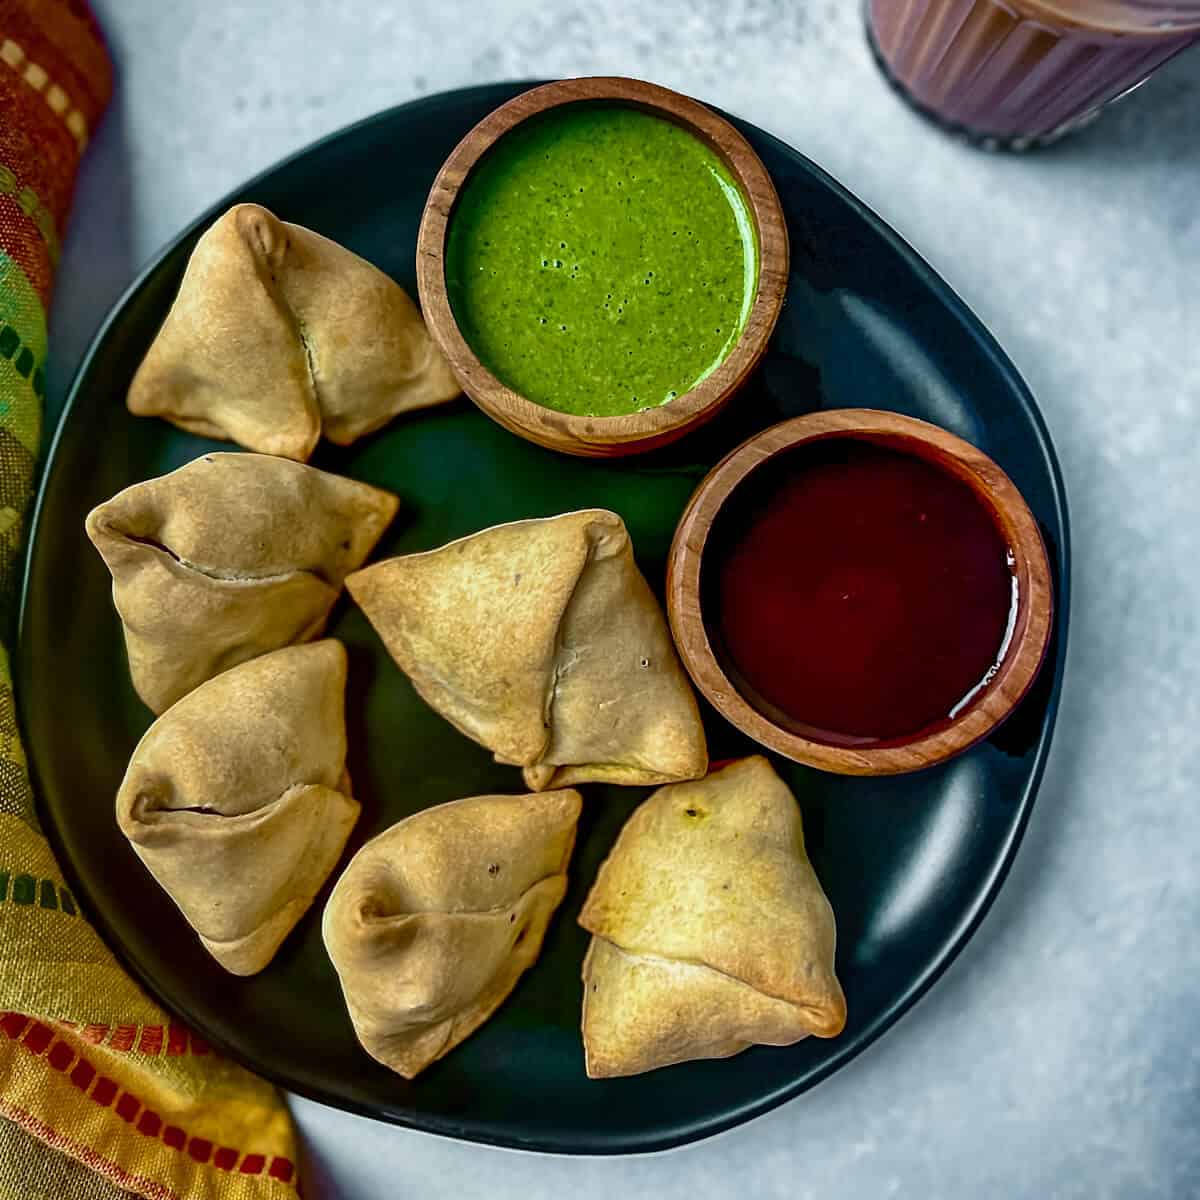
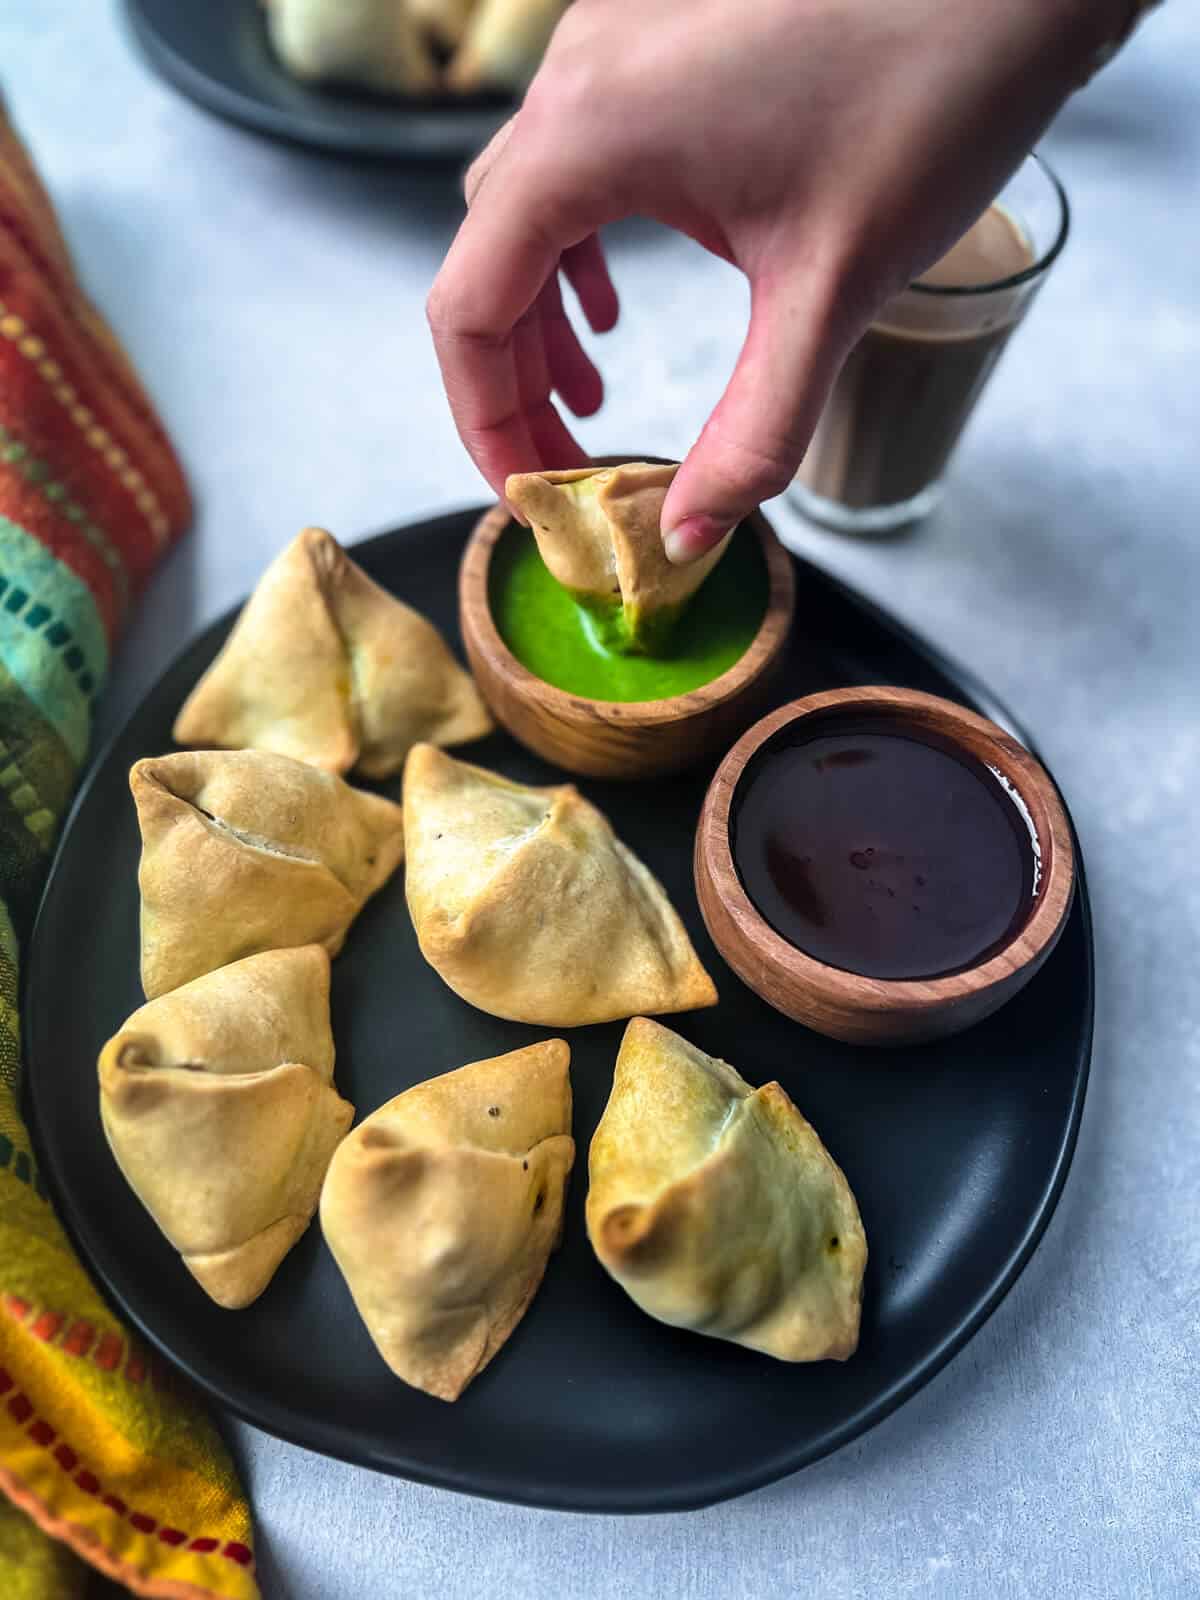
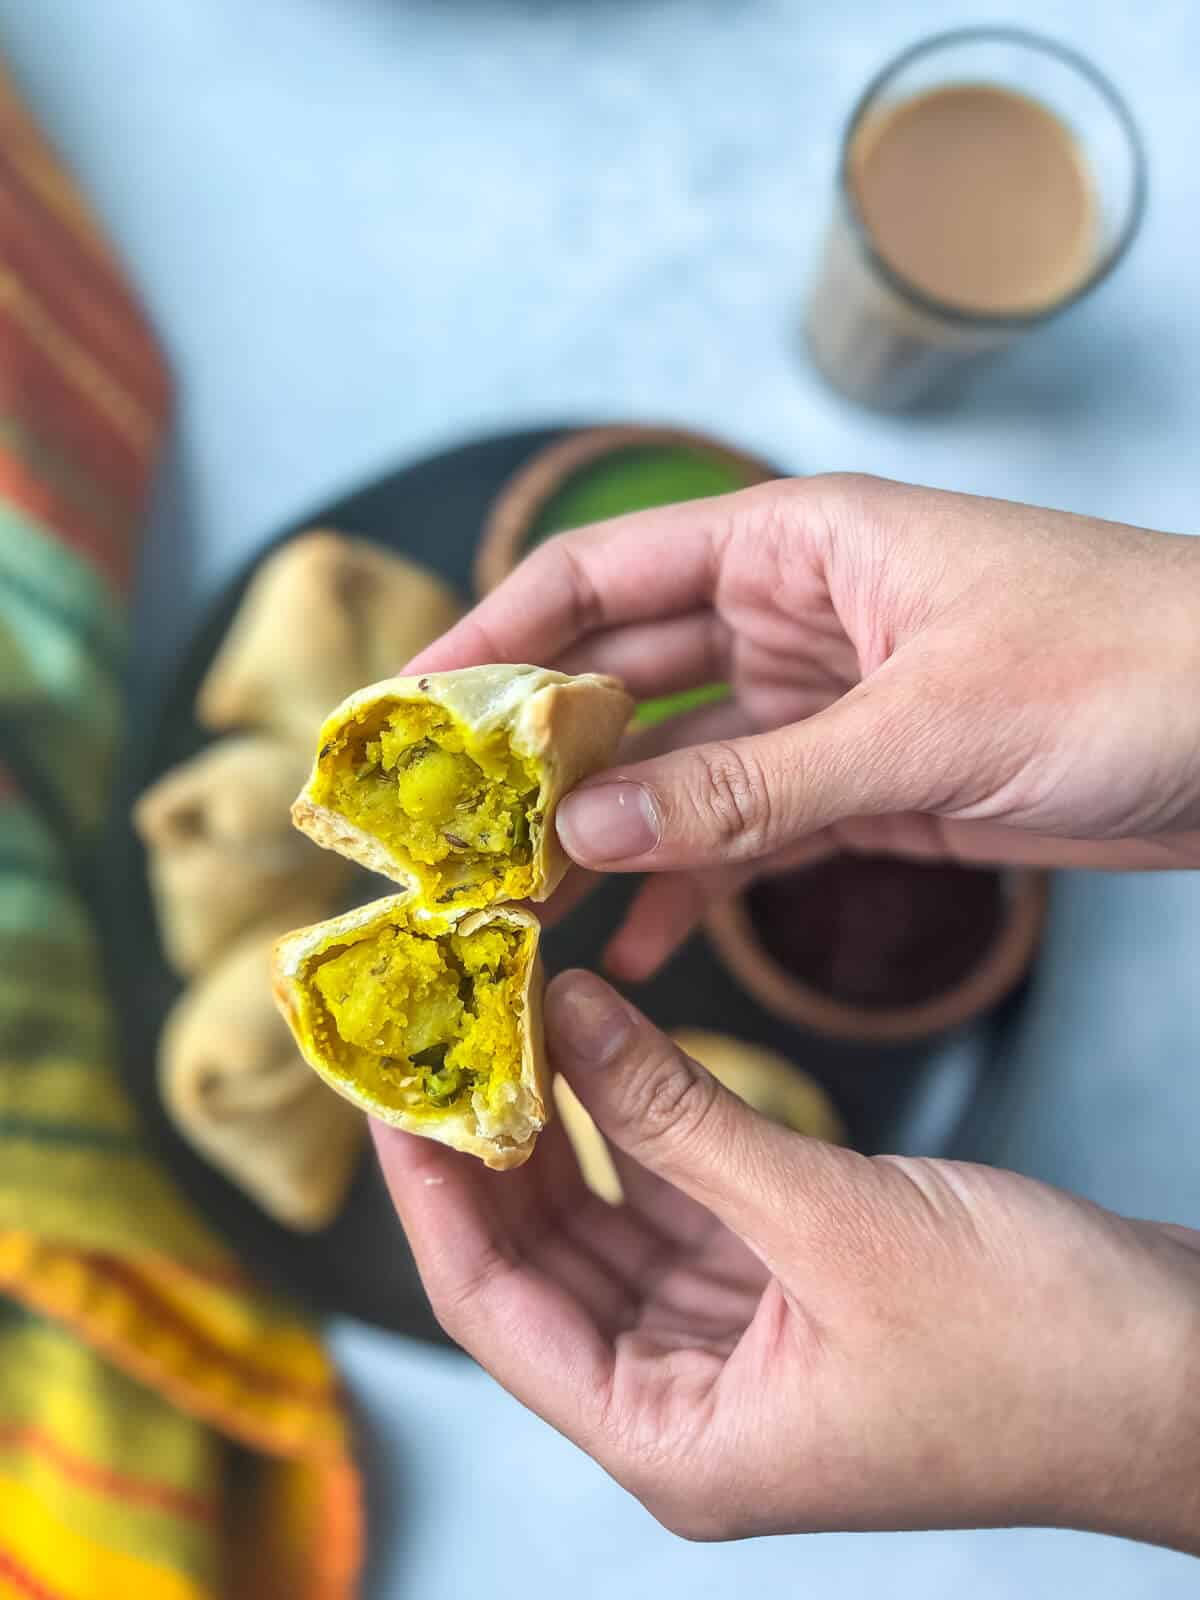
Love Indian samosas but hate deep-frying? Try this air fryer samosa recipe. With a crispy exterior and a delicious spiced potato filling, this air fried vegetable samosa recipe tastes and looks just like the deep-fried ones.
Air fryer Vegetable Samosa
What is samosa?
The classic samosa is triangular in shape and consists of a flaky pastry filled with a savory stuffing – often containing potatoes, peas, and spices, although meat may be included.
The pastry is then deep-fried in oil, drained, and served to hungry customers. It’s a popular street food with many variations based on the region it is made.
Apart from India and other countries in Southeast Asia, it is popular in North and East Africa, many Arab countries, Portugal, and Brazil, although it is known by various names.
Origin story
While most Indians believe Samosa (pronounced suh·mo·suh) originated from India, shockingly, it is not. Its roots have been traced back to the Persians all the way to the 9th or 10th century when it was referred to as sanbusaj .
Some references in old Arab cookery books also call these minced meat-filled triangles sanbusak, sanbusaq, and sanbusaj (all derived from the Persian word sanbosag). These snacks were carried by merchants when they ventured out for trading.
Eventually, as these merchants traveled to Southeast Asia, the samosas made their way into India, then known assamsas, named because of their pyramid-like shape.
They became popular in India during the 13th or 14th century thanks to the chefs in the royal kitchens in Delhi. These chefs, who originally came from the Middle East and Central Asia, made samosas containing meat, ghee, onions, and other ingredients.
As the food traveled across India, the original became more of a guiding post as each region added its own special touches. As a result, the classic Indian samosas have become incredibly diverse.
The quintessential samosa, sometimes called potato samosa or vegetable samosa contains a spiced stuffing filled with potatoes and green peas. It’s wrapped in a dough made from all-purpose flour mixed with butter or ghee and deep-fried until crispy. This form is a traditional Indian style and is the most popular worldwide.
If you want to learn more, check out this fascinating article on the history of samosa.
You may know samosa by some of its alternative names and, of course, variations, including:
Aloo samosa or potato samosa – where it is stuffed with potatoes and sometimes peas.
Punjabi samosa – regional variation from Punjab.
Vegetable samosa
Chicken samosa
Chamuças – Portuguese version made with chicken
Lukhmi (Hyderabad) is made with minced meat – far crustier than the traditional samosa.
Shingara (Bengal region) – the filling is made with potatoes, peas, and cauliflower (during the winter) and potatoes and peanuts (rest of the time)
Somsa – popular in Kazakhstan. It is typically baked and has a crumblier crust.
Sambusas (Africa) – filled with spiced meat (chicken/beef).
Sambusak (Arab countries) – filled with feta cheese, onions, minced chicken, meat, and spinach.
Air Fried Samosas
About this recipe
Having grown up in Mumbai (Bombay), I have probably consumed samosas every single week of my life. They were made fresh by street food vendors whose stalls you could find at every corner of the city and, of course, the college cafeterias.
Those piping-hot vegetable samosas were definitely hard to miss and even harder to resist.
When paired with hot masala chai, these roadside snacks tasted just divine.
I always wanted to make samosa at home, but to be honest, deep-frying is not my thing. I hate the mess it causes, and then I have to deal with a large vat of oil.
Having been obsessed with my air fryer lately, I thought this would be a good recipe to adapt. It just took a little bit of tinkering with the temperature, and I was able to nail the recipe.
The result was a crispy samosa with a flaky crust and a delicious savory potato filling without deep-frying. How satisfying!
I can’t wait for you to try this recipe and air fry samosas! These homemade samosas will be much healthier and tastier than the ones you find in Indian restaurants in the US.
Reasons to love this recipe
Tastes just like the deep-fried version without all the calories.
If you hate deep frying as I do, you’ll love making it in the air fryer – No mess and no fuss.
Perfect for a crowd – Great for parties as you can prep ahead.
It’s easy to reuse any leftover filling in sandwiches or bread rolls.
Here’s what you need to make the recipe
Tools
You’ll need an air fryer to make this recipe. Here are the two that I recommend
Oven-style (Ninja Dual Heat Air Fryer – 1800W)– The oven-style ones usually take more space but what’s unique about this Ninja one is that it flips vertically for easy storage on the countertop. Most importantly, it is perfect for families of 4 or more.
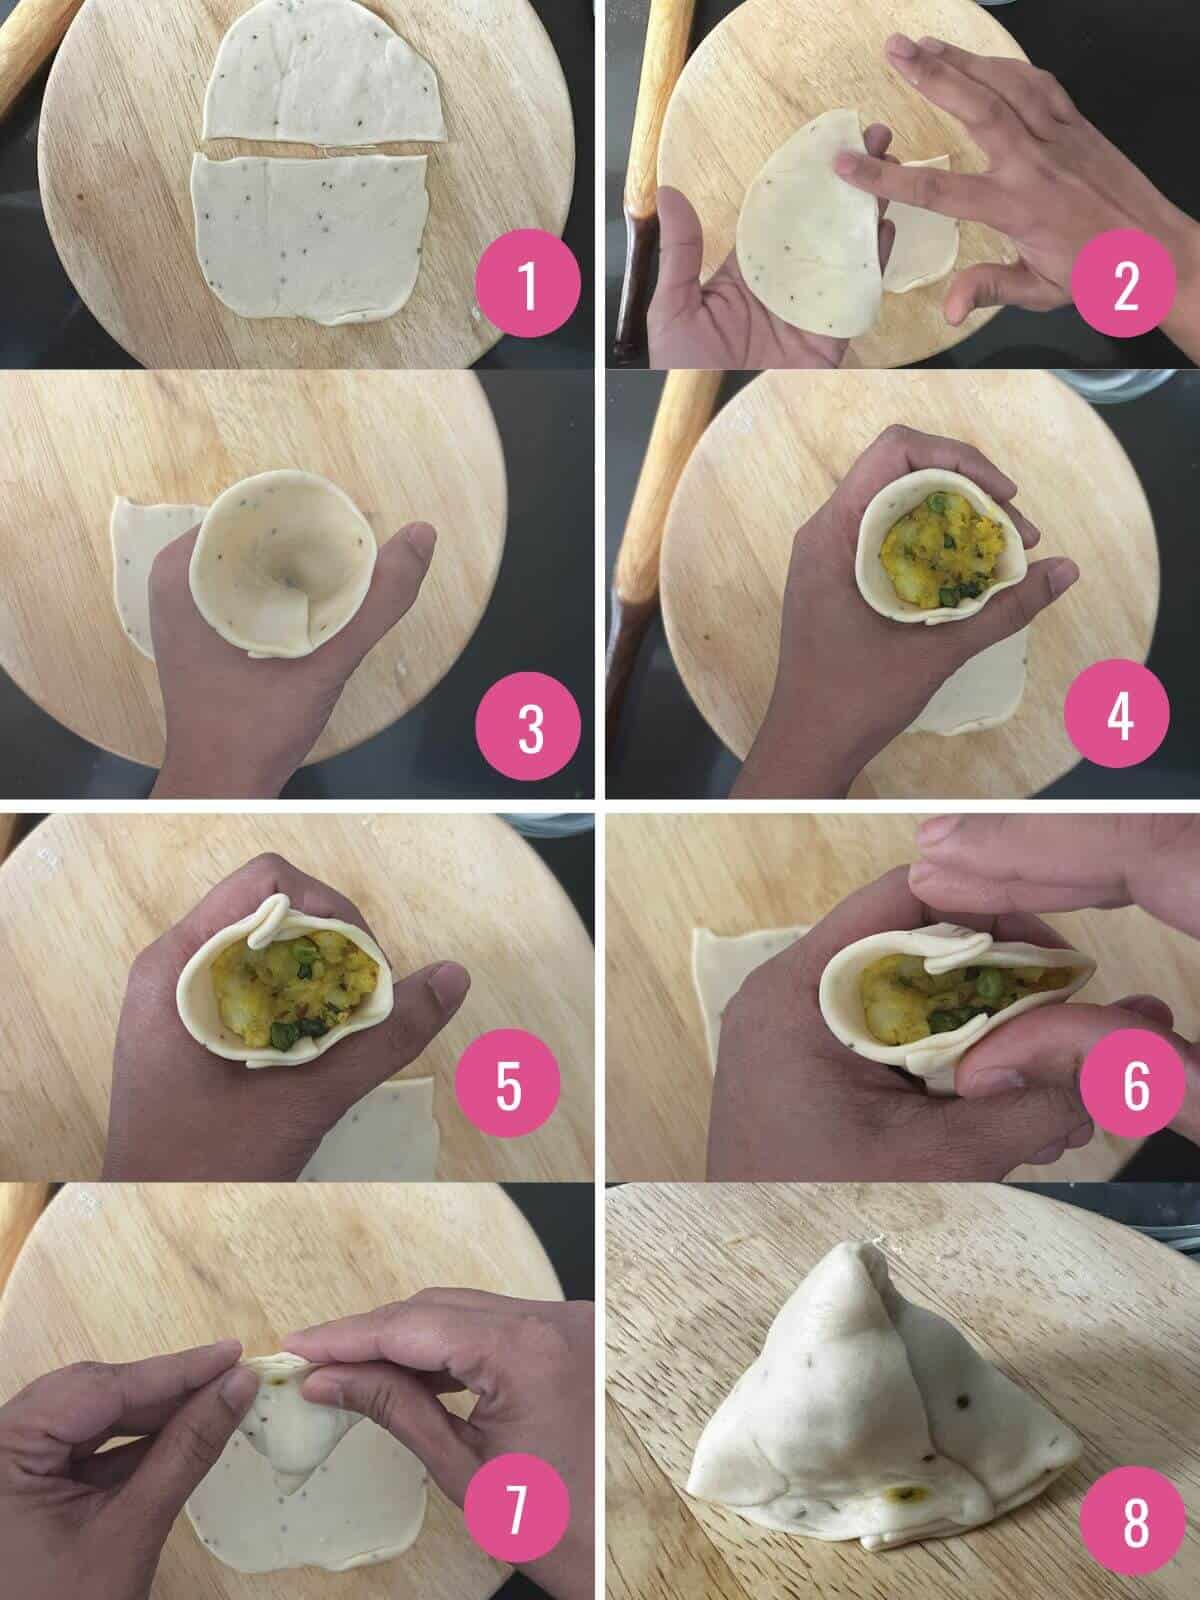
Full instructions are included in the recipe card, but here is the summarized version of how to fold the pastry for veggie samosas:
Divide the dough into golf ball portions and roll it into a ball. Flatten the ball and roll it into an oval sheet, then cut it in half horizontally.
Dab the cut straight edge with water.
Shape the rolled samosa pastry into a cone making sure one edge overlaps the other.
Fill the cone with stuffing until it is 3/4ths full.
Pinch the circular side in the center, creating an overlapping edge. Dab the edges with water.
Press the opposite edges together to seal them.
Place the samosa on a cutting board or flat surface, and press it gently to flatten the base enough that the samosa can stay upright.
Brush with oil, repeat with remaining dough, then cook and enjoy.
How to fold samosa
TIPS
Tips for a crispy crust
Use ghee to make the stuffing and the dough for the best-tasting samosas.
For a crispy pastry – Mix the ghee with flour, salt, and carom seeds until it resembles bread crumbs. Add water as needed to make a pliable but firm dough.
No overcrowding – For best results, always arrange the samosas in a single layer and cook in batches if needed.
More tips..
Don’t roll the dough too thin – If the pastry is too thin, it will tear when you put in the filling. Make sure they are evenly rolled too.
Use oil to roll the dough (if needed) – do not use flour because it will stick to the pastry, making it impossible to dust it off.
Let the stuffing cool completely because the steam from the potato filling will cause the samosas to not crisp.
You can also make these samosas from store-bought puff pastry sheets, but I haven’t tried them yet.
Dipping sauce for samosas
The best way to savor these delicious samosas is with chutneys. Here are my favorite ones.
Don’t have the chutneys handy? Serve it with ketchup instead.
Frequently asked questions
Can you air fry frozen samosas?
Yes, you can make frozen samosa in an air fryer, although the temperature and time depend on the particular brand and size. For Haldiram frozen cocktail or mini samosas (you can find them in Indian grocery stores), air fry at 400ºF for 10 minutes.
Do you defrost frozen samosas before air frying?
It is best to leave the samosas frozen and add them to the air fryer straight from the freezer. This will give them the best chance to crisp up and have a similar texture to that of deep-fried samosas.
How do you keep samosas crispy for a long time?
If you want to keep your samosas crispy, brush ghee or oil on the outside before air frying. This small amount of oil will help them to crisp. Once they are done, keep them in the open air, and do not store them in a covered container until completely cooled. Any condensation will prevent them from staying crispy.
Can I reheat samosas in an air fryer?
Yes. Samosas will reheat much better in an air fryer compared to a microwave. Just add them to an air fryer that has been preheated to 350ºF and cook them for 2-4 minutes or until crisp. Serve with your favorite chutney.
Why is my samosa not crispy?
If your samosas are not crispy, it may mean that the fat (ghee) was not incorporated into the dough properly and/or the dough was not stiff. Next time, work the dough until very stiff. Make sure to brush the outsides of your prepared samosas with ghee or oil.
Can I use whole wheat flour instead?
Yes, you can use whole wheat flour to make the samosa dough. Just know that the samosas won’t be as flaky as those made with all-purpose flour.
Love Punjabi samosas but hate deep-frying? Try this air fryer samosa recipe. With a crispy exterior and a delicious potato filling, this air fryer vegetable samosa recipe tastes just just like deep-fried!
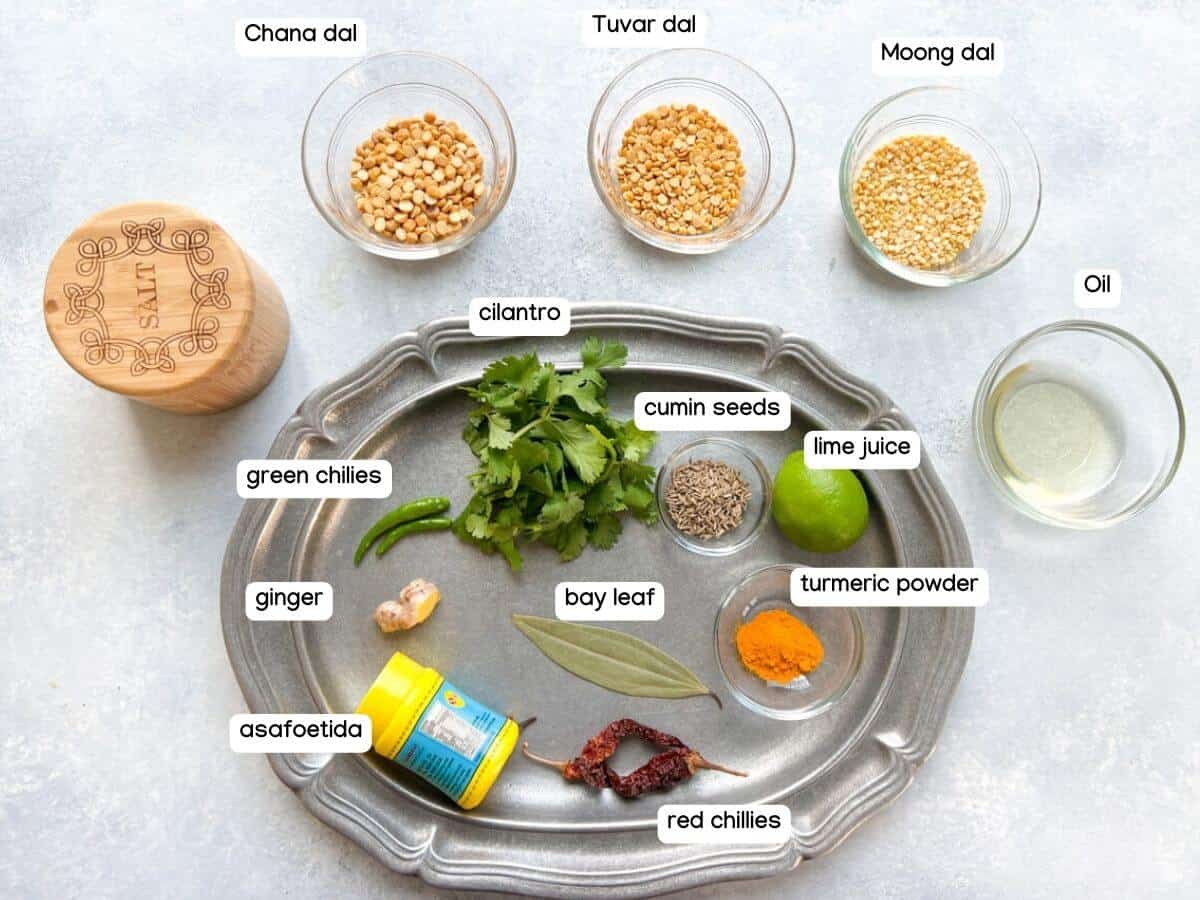
Combine flour, carom seeds, salt, and ghee in a medium-sized bowl.
2 cups all purpose flour, 1/4 cup ghee, 1/2 teaspoon carom seeds (ajwain), 1/2 teaspoon salt
Rub the ghee into the flour using your fingers until it is combined and resembles breadcrumbs.
Add water in small increments, a tablespoon at a time and knead till the dough is stiff and pliable.
1/4 cup cold water
Let the dough rest for at least 30 minutes.
Boiling potatoes
Add 1.5 cups of water to the steel insert of the Instant Pot. Place a trivet over it.
1.5 cups water
Add the diced potatoes in a steamer basket. Place the steamer basket over the trivet.
4 medium-sized potatoes, diced
Close the lid and set the vent to sealing position.
Pressure cook on high for 5 minutes. When the cooking cycle is complete, wait for 5 minutes and then release pressure by moving the vent to the venting position. [Note: the potatoes are done if they can be easily mashed]
Carefully remove the steamer basket and set it aside.
Making the stuffing
Add oil to a wok kept over medium heat.
2 tbsp olive oil
Once the oil is hot, add cumin seeds. When they start to sizzle, add asafoetida, green chilies and ginger. Sauté them for about 10 seconds.
1 teaspoon cumin seeds, 1/8 teaspoon asafoetida, 1/2 teaspoon carom seeds (ajwain), 1-2 Indian or Thai green chilies (Bird's eye), 1 inch piece ginger, grated
Add steamed potatoes and peas, fennel seeds, cumin powder, coriander powder, dry mango powder, ground black pepper, garam masala (if using) and salt.
1/4 cup green peas, 1 teaspoon fennel seeds (saunf), 1 teaspoon cumin powder, 1 teaspoon coriander powder, 1/2 teaspoon dry mango powder (amchur), 1/2 teaspoon turmeric powder, 1/2 teaspoon ground black pepper, 1 teaspoon salt, 1/2 teaspoon garam masala
Cook for about 3-4 minutes to allow the potatoes to absorb the spices. Mash the potatoes as it cooks. Note: You don't have to completely mash it just enough so that there aren't any pointy edges.
Add the chopped cilantro and mix well. Let the stuffing cool completely.
1/4 cup chopped cilantro
Making the samosa
Take a small portion of the dough (roughly the size of a golf ball). Place the portion between the palms of your hands and shape them into a ball. Note: Make sure the remaining dough is covered with a clean, damp cloth so it doesn't dry out.
Flatten the ball and roll it into an oval shape (approx 7 inches long X 5 inches wide)
Cut the rolled sheet into half.
Dab the edges with water.
Shape the sheet into a cone making sure one edge overlaps the other.
Hold the cone between your thumb and the rest of the fingers as shown in the picture below.
Carefully put the stuffing in the cone till it is 3/4th full.
Pinch the circular side right in the center to create an overlapping edge.
Dab the inside edges of the cone with water. Press the opposite edges of the samosa together to seal them.
Press along the edges to seal it tight.
Place the samosa on a flat surface and press it gently to flatten the base such that the samosa can stay upright.
Brush the samosa with oil till it is completely coated. Line the air fryer tray with parchment paper. Arrange the samosas on the tray without overcrowding them.
Repeat the process with the rest of the dough.
Air frying the rolls
Set the air fryer at 375°F. Let it preheat for about 5 minutes.
Place the tray in the air fryer. Cook it for 10 minutes at 375°F.
Brush the samosas with oil and cook them again for 10 minutes.
Depending on the air-fryer, the samosas may need additional time to turn golden brown. Increase the temperature to 400°F and cook for another 3-4 minutes. Note: The time for the samosas to brown may vary depending on the air fryer, so adjust the cooking times accordingly.
Transfer the samosas to a plate – don't overcrowd. Note: Thesamosas will continue to brown as it cools down.
Serve hot with green chutney, tamarind chutney or ketchup.
It can be stuffed with other fillings such as shredded chicken, lamb, etc.
Skip the green peas.
For a vegan version, skip ghee and use oil such as avocado, sunflower, or any vegetable oil will do.
Instead of using store-bought coriander and cumin powder, you can use crushed cumin and coriander seeds. Make sure to dry roast them till they are aromatic and then crush them using a mortar and pestle to a coarse powder.
How to prep ahead
Whole samosas: Fill the samosas but don’t air fry them. Place them on a baking sheet and flash-freeze them for about two hours. Transfer them to an air-tight container and freeze them for about a month. No need to thaw them before air frying.
Filling: Alternatively, you could make the filling, refrigerate it for 2-3 days or freeze them for a month.
Dough: The dough can be made in advance and refrigerated for up to 3-4 days. Let it come to room temperature before rolling it.
Storage tips
If you have any leftover air-fried samosas, you can store them in an airtight container in the fridge for 3-5 days. For the best quality and crispiest results, allow them to cool to room temperature before transferring them to the container. Any warmth will become condensation and cause them to become soggy.
When you’re ready to reheat, preheat your air fryer to 350ºF and cook them for 2-4 minutes or until crisp and heated through.
Repurposing leftover samosas
Use any leftover potato filling in sandwiches orbread rolls.
Make aloo samosa chaat – To do so, break the cispy samosas into half and serve it in a bowl or plate of channa masala topped with sweetened yogurt, chopped onions, bhujia and drizzle with cilantro and tamarind chutney.
Other easy appetizer recipes to try
These air fryer samosas are one of my favorite appetizers to make. Here are a few more easy air fryer recipes for you to try :
Air fryer chicken 65 – This healthier version of the classic Indian-style appetizer is so good that it will disappear in seconds!
Air fryer onion pakoda
Air fryer chicken tikka
Juicy air fryer chicken wings – Juicy on the inside, crispy on the outside; these air fryer chicken wings are finger-licking good!
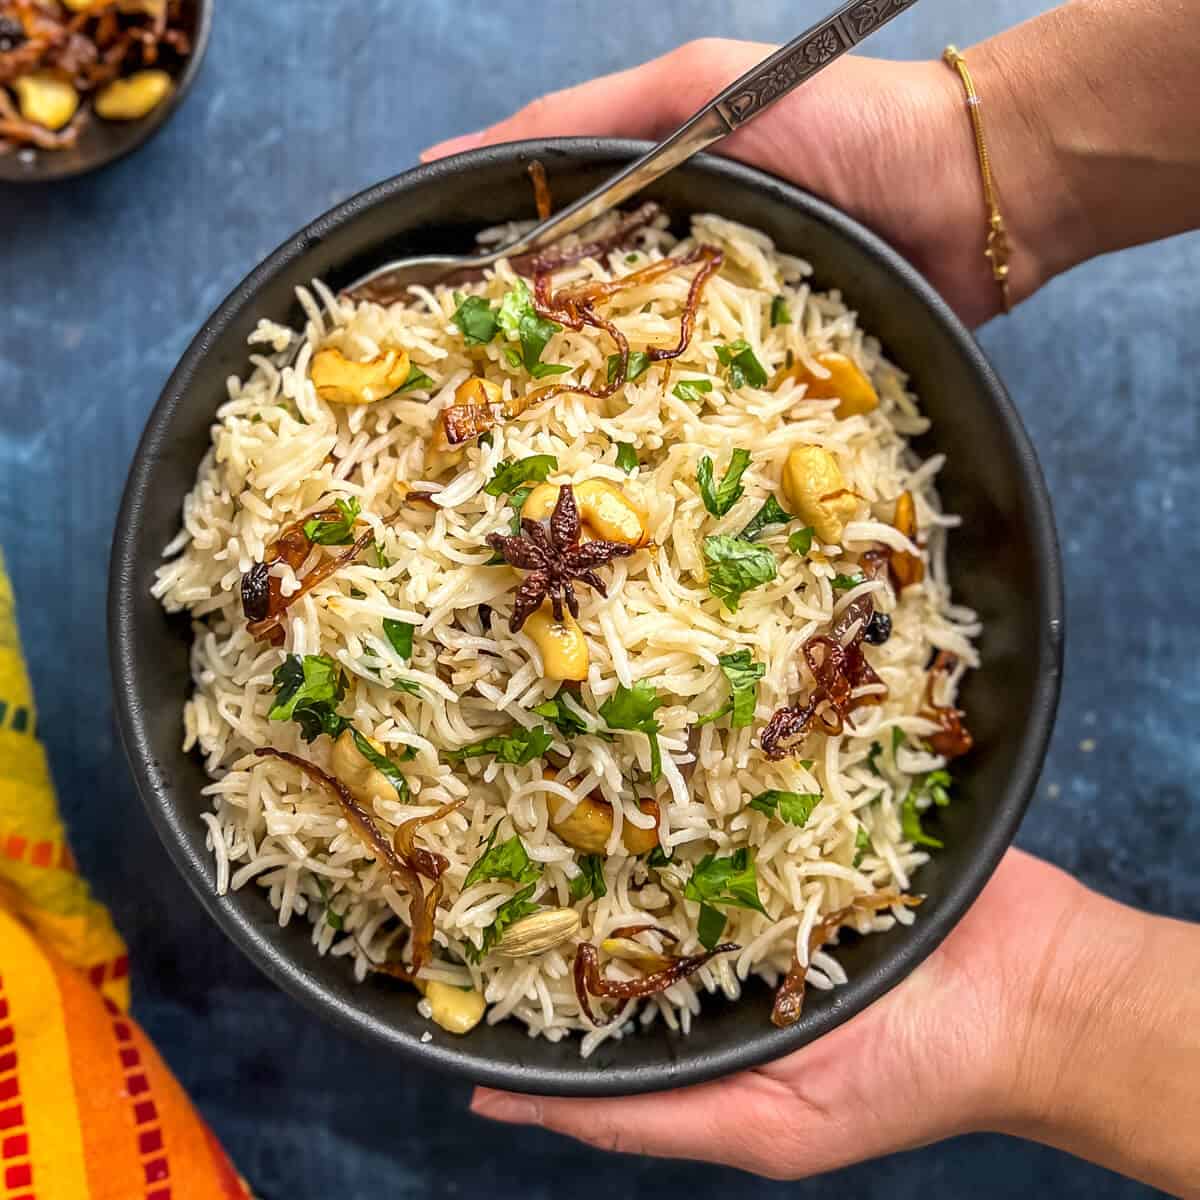
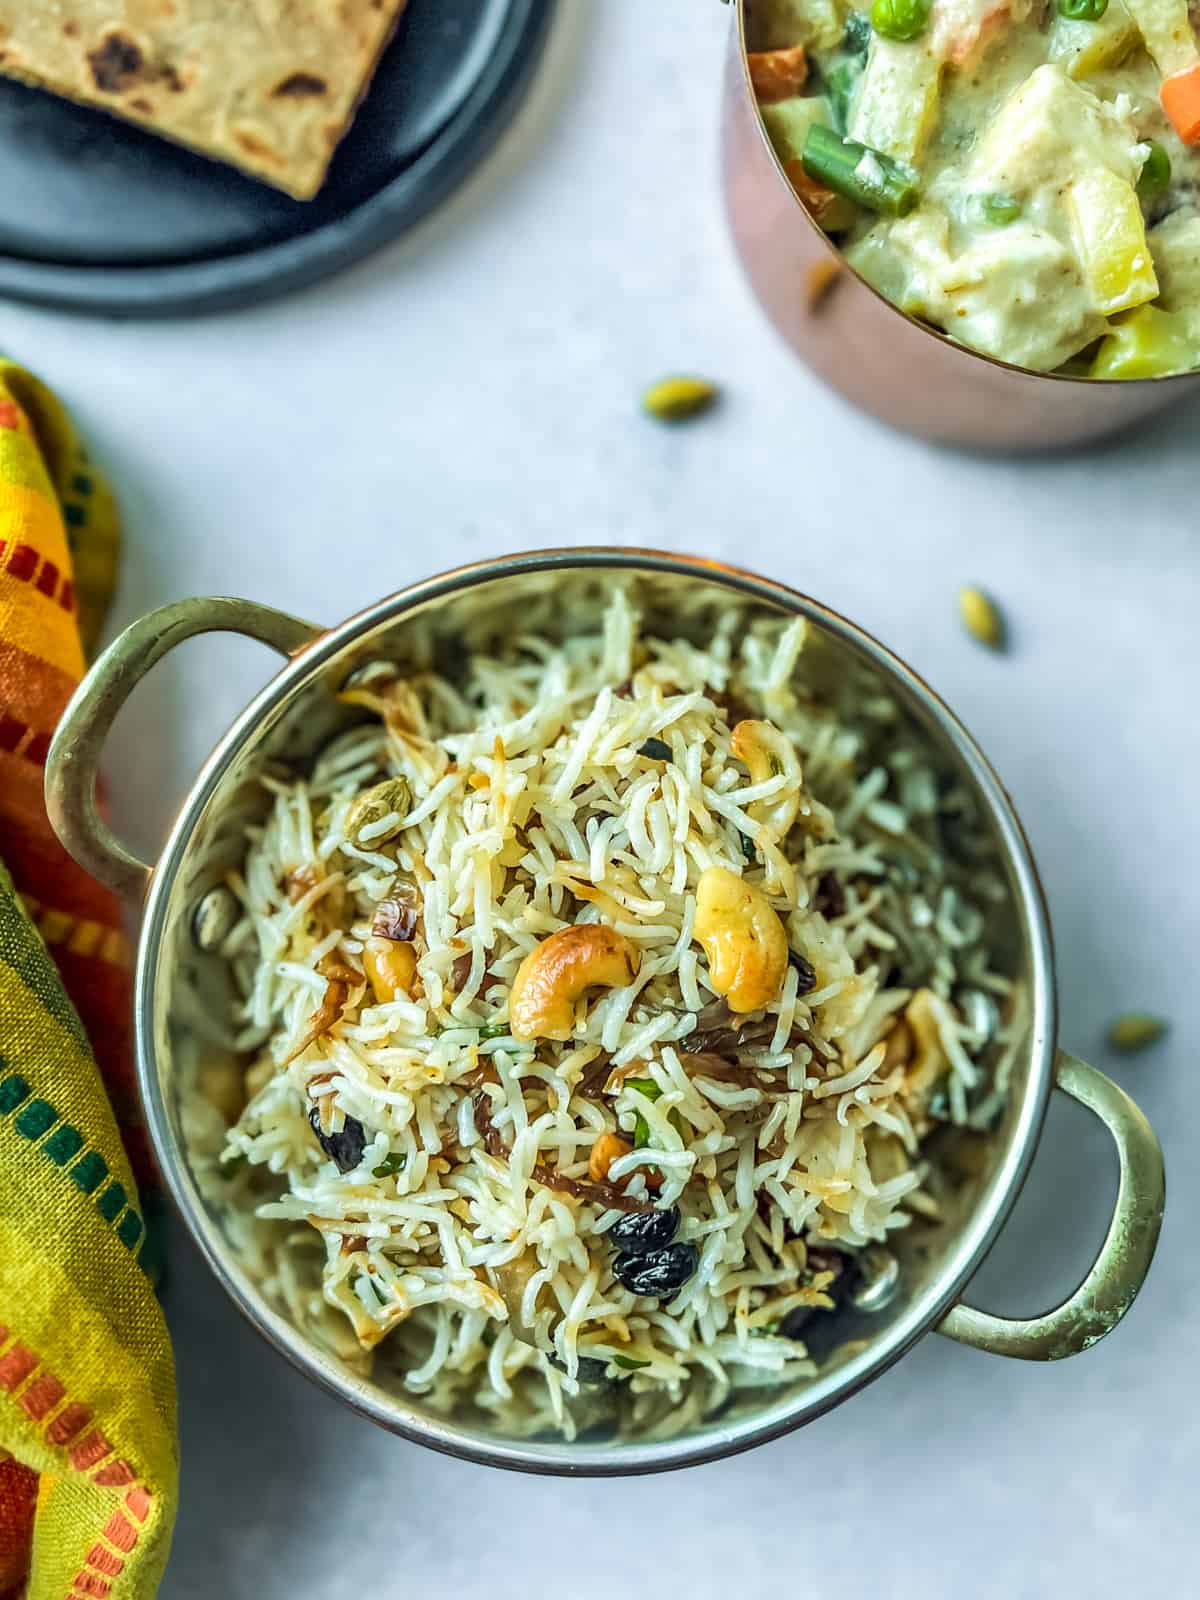
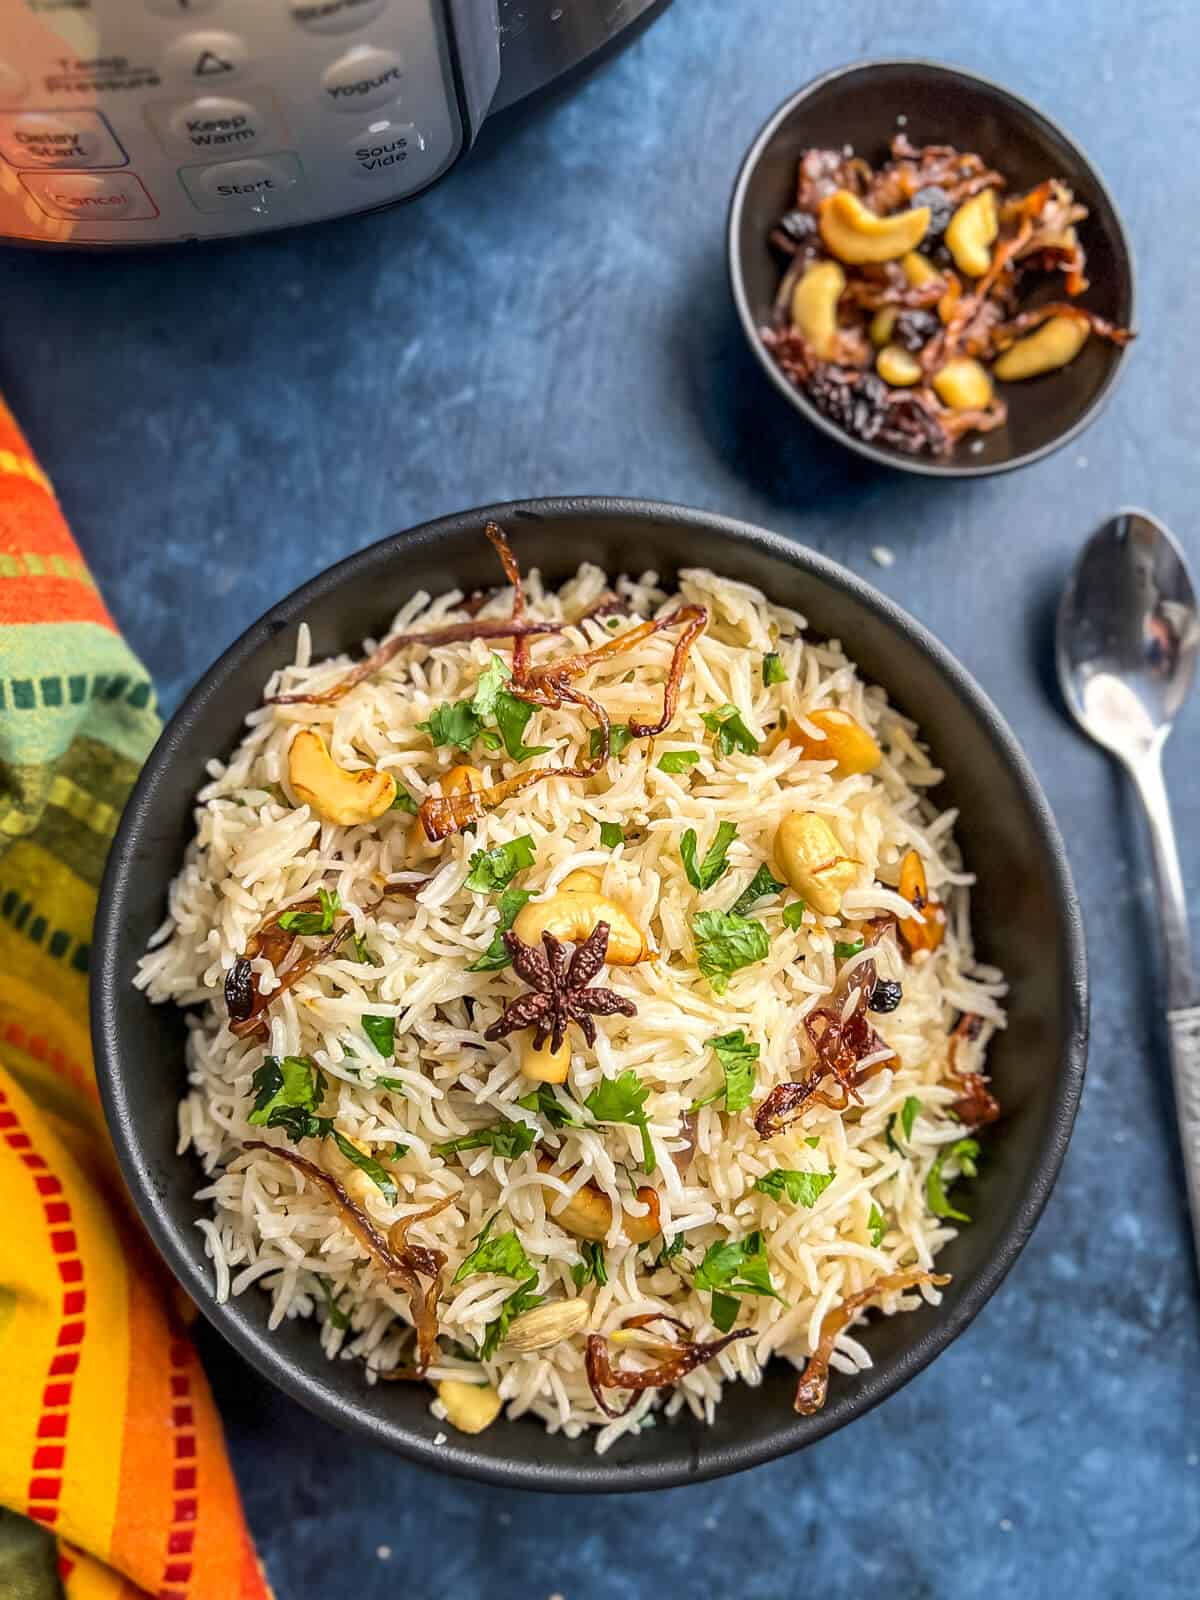
This one-pot, restaurant-style, easy ghee rice (ney choru) recipe is a keeper. Learn how to dish up this aromatic south Indian dish in under 30 minutes using an Instant Pot or over the stovetop.
While this lightly spiced-up side dish is typically made for special occasions (entertaining, weddings, etc.), it is easy enough to make every night of the week. This simple ghee rice recipe pairs really well with kormas, dals, and curries.
Instant Pot Ghee rice (Neyi Choru)
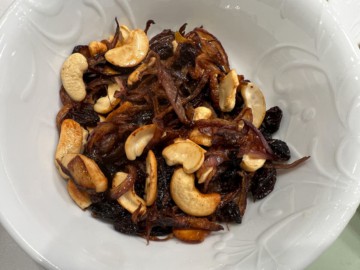
If you haven’t had ghee rice before, here’s how I would describe it – Basmati rice cooked in ghee and served with tempered aromatic spices, cashews and raisins, and caramelized onions. While it has similarities to cumin or jeera rice, ghee rice has a mildly sweet taste due to the addition of dry fruits and a hint of sugar.
Growing up, ghee rice was reserved for when guests were over. It was served as a side dish to Kori gassi, masala egg, fish fry, and other Mangalorean dishes that mom would make. It is typically served in restaurants with kormas (both chicken and vegetarian), chicken curry, and egg curry.
Since I come from the Tulunad region in Karnataka, we call it ‘Neyita nuppu‘, where ‘Neyi’ stands for ghee and ‘nuppu’ means rice. This dish is also popular in Kerala and Tamilnadu and is popular as Malabar neyi choru (choru = rice).
Alternate names include Kerala ghee rice, Nei choru, Ghee fried rice, nei sadam, and ghee bhat.
Reasons to love this recipe
This restaurant-style recipe uses just one dish – easily made in a pressure cooker (stovetop or electric) or a wok.
Kid-friendly – appeals to kids because it is mildly spiced and has a hint of sweetness.
A perfect accompaniment to Indian curries – This rice dish’s savory and sweet flavor balances the heat in any spicy curry.
It cooks in under 30 minutes – perfect for entertaining as well as for a weeknight meal.
Great way to repurpose leftover rice – mix leftover rice with a tempering of nuts and fried onions.
Here’s what you need to make the recipe
Tools
You’ll need the following tools to make the recipe
Basmati rice – This aromatic rice is perfect for this recipe. You can pick any Indian or Pakistani Basmati rice variety. Royal or Tilda Basmati brands are the ones I recommend.
Store-bought or homemade desi ghee – This popular ingredient in Indian cuisine adds the most delicious flavor and buttery texture to this ghee rice recipe.
Cashewnuts – These add a crunchiness to the dish. I recommend using unroasted and unsalted. These will be sauteed in ghee until they are golden brown.
Raisins – For a touch of sweetness, raisins are an essential ingredient in Neychoru.
Sliced onions – You will need one medium onion, thinly sliced.
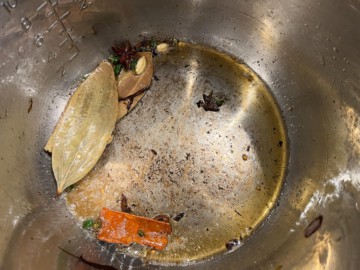
Whole spices – Including green chilies, a cinnamon stick, cloves, green cardamoms, star anise, fennel seeds, and Indian bay leaf.
Salt
Sugar – An optional ingredient, but a small amount adds a nice sweetness.
Cups of water – As needed, depending on the cooking method (see the recipe card for details).
Coriander leaves (cilantro) – For garnishing, along with raisins, cashews, and fried onions.
Wash / Soak the rice – Rinse the rice in a few changes of cold water to remove dirt and extra starch (which makes it easier to digest). If time permits, soak the rice. Soaking elongates the grains and makes them less brittle.
Let the rice rest – Once cooked, let the rice rest – this allows the steam to redistribute, and all the layers of the rice are evenly cooked.
Avoid a clumpy mess – If not serving immediately, remove the inner pot from the Instant Pot to prevent the rice from drying out and sticking to the bottom.
Neyita nuppu (Ghee rice)
Serve it with
This perfect ghee rice recipe pairs well with any curry of your choice. Here are a few of my favorites:
Kori gassi (Mangalorean chicken curry) – This fiery red chicken curry combines the mild sweetness of coconut with a medley of spices to create a complexly flavored curry that is a treat to your senses.
This restaurant-style, easy ghee recipe is a keeper! Learn how to dish up this aromatic south Indian dish in under 30 minutes using an Instant Pot or over the stovetop.
Add rice to a colander. Wash the rice by gently rubbing them with your fingers to dislodge any dirt and starch.
1 cup Basmati rice, water as needed
Transfer the rice to a medium saucepan and soak it in 3 cups water for 30 minutes.
Instant Pot cooking:
Drain the rice and set aside.
Select Sauté and set the time to 30 minutes. Set the temperature to medium. When the display reads "Hot", add 2 tablespoons of ghee.
4 tablespoons ghee, divided
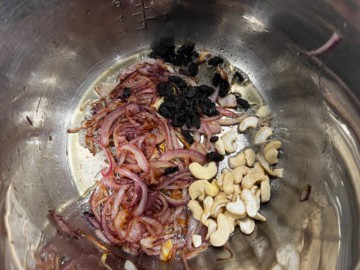
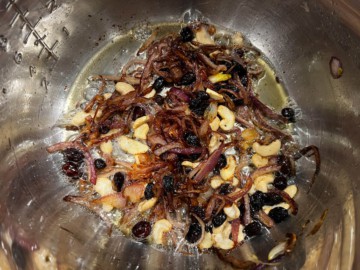
Once the ghee is hot, add the onions and fry them till the edges start browning. Add cashews and raisins to the fried onions.
2 cups thinly sliced onions
Fry till the cashews turn golden brown and the raisins start to plump up.
1/4 cup cashews, 2 tablespoons raisins
Use a slotted spoon and transfer the onions along with raisins and cashews to a plate.
Add 2 tablespoons of ghee to the inner pot. When it heats up, add green chilies and the whole spices – cinnamon stick, bay leaves, cloves, green cardamom, and star anise seed.
1-2 green chilies, 1 cinnamon stick, 2 cloves, 3-4 green cardamom, 1 star anise, 1-2 Indian bay leaves
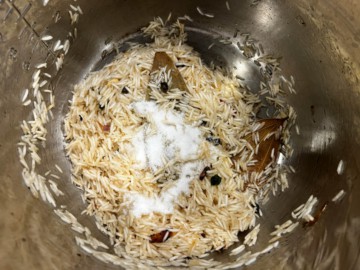
Fry the spices for about 10-15 seconds, and then add rice. Saute the rice for about 1-2 minutes before adding salt, sugar, fennel seeds (if using)
Press the “Warm / Cancel” button and then select “Pressure Cook.” or "Manual" depending on your model.
Adjust the time to 3 minutes and set the pressure selection at low. Cover the Instant Pot lid and lock it. Make sure the vent is at sealing position.
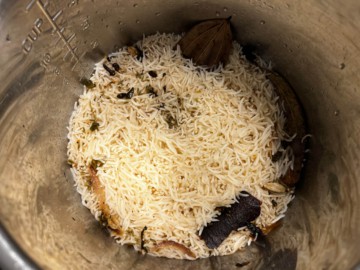
Once the cooking cycle completes, the Instant Pot will switch to the Warm cycle. Wait for 10 minutes and then carefully release pressure. Open the lid and let the steam escape.
Resting the rice
Cover the Instant Pot and let the rice rest undisturbed for 5 minutes. Fluff the rice gently with a fork.
Sprinkle chopped cilantro and top with cashews, fried onions and raisins.
1/4 cup finely chopped cilantro
Serve hot with veg korma or a curry of your choice.
Notes
Stovetop cooking:
Drain the rice and set it aside.
Place a wok/kadhai over medium heat and add 2 tablespoons of ghee.
Once the ghee is hot, add cashews and fry them till they are golden brown. Add raisins and fry them till they plump up.
Use a slotted spoon and transfer the raisins and cashews to a plate.
Add two more tablespoons of oil to the wok/kadhai. Once the ghee heats up, add the onions and fry till it turns golden brown. Use a slotted spoon and transfer the fried onions to the same plate.
Add green chilies and the whole spices – cinnamon stick, bay leaves, cloves, green cardamom, and star anise seed.
Fry the spices for about 10-15 seconds, then add rice.
Saute the rice for about 1-2 minutes before adding salt, sugar, and 2 cups water.
In approximately 6-8 minutes, the water will start to boil and evaporate from the surface. When craters appear, cover the saucepan with a tight-fitting lid and turn down the heat to the lowest setting and cook for another 5 minutes and turn off the heat.
Open the lid and let the steam escape.
Resting the rice: Cover the saucepan and let the rice rest undisturbed for 5 minutes – this allows the steam coming out of the rice to redistribute and allows all the layers of the rice to cook evenly.
Wait for 5 minutes, and then fluff the rice gently with a fork.
Sprinkle chopped coriander leaves and top with cashews, fried onions, and raisins. Serve immediately.
While neyichoru or neyitha nuppu is a popular South Indian dish, I am sure there are regional variations to this dish across India. Here are a few different ways you can create your own twist to this easy ghee rice recipe.
Coconut ghee rice – to make South Indian coconut rice, reduce the water by 1/2 cup and replace it with 1/2 cup of coconut milk.
Jeera ghee rice – Add cumin seeds to the tempering along with the spices. Once the cumin seeds start to sizzle, add rice and continue cooking.
Types of rice – Instead of Basmati rice, you can use jeerakasala rice / kaima rice or jeera / seeraga samba rice – no soaking required.
Spices – You can add additional spices to the tempering, such as a strand of javitri (mace) for a teaspoon of black peppercorns to make it more peppery and spicy.
Lime juice – Finish off the rice with a tablespoon of lime juice for a nice tangy twist.
Ginger garlic paste – Add it with the onions and saute till the raw taste disappears.
Veggie ghee rice – add grated carrots and green peas to this rice.
How to prep ahead
You can cook Basmati rice up to 3 days ahead of time. Make sure to cool it completely before storing it in an airtight container. When ready to serve, add the tempered nuts and fried onions.
To save time, you could use store-bought fried onions in place of homemade fried onions.
Storage tips
Reheating leftover rice – Add a tablespoon of water for every cup of leftover rice. Mix well and pressure cook for zero minutes. When the cooking cycle is complete, move the valve to ‘venting’ to release pressure immediately.
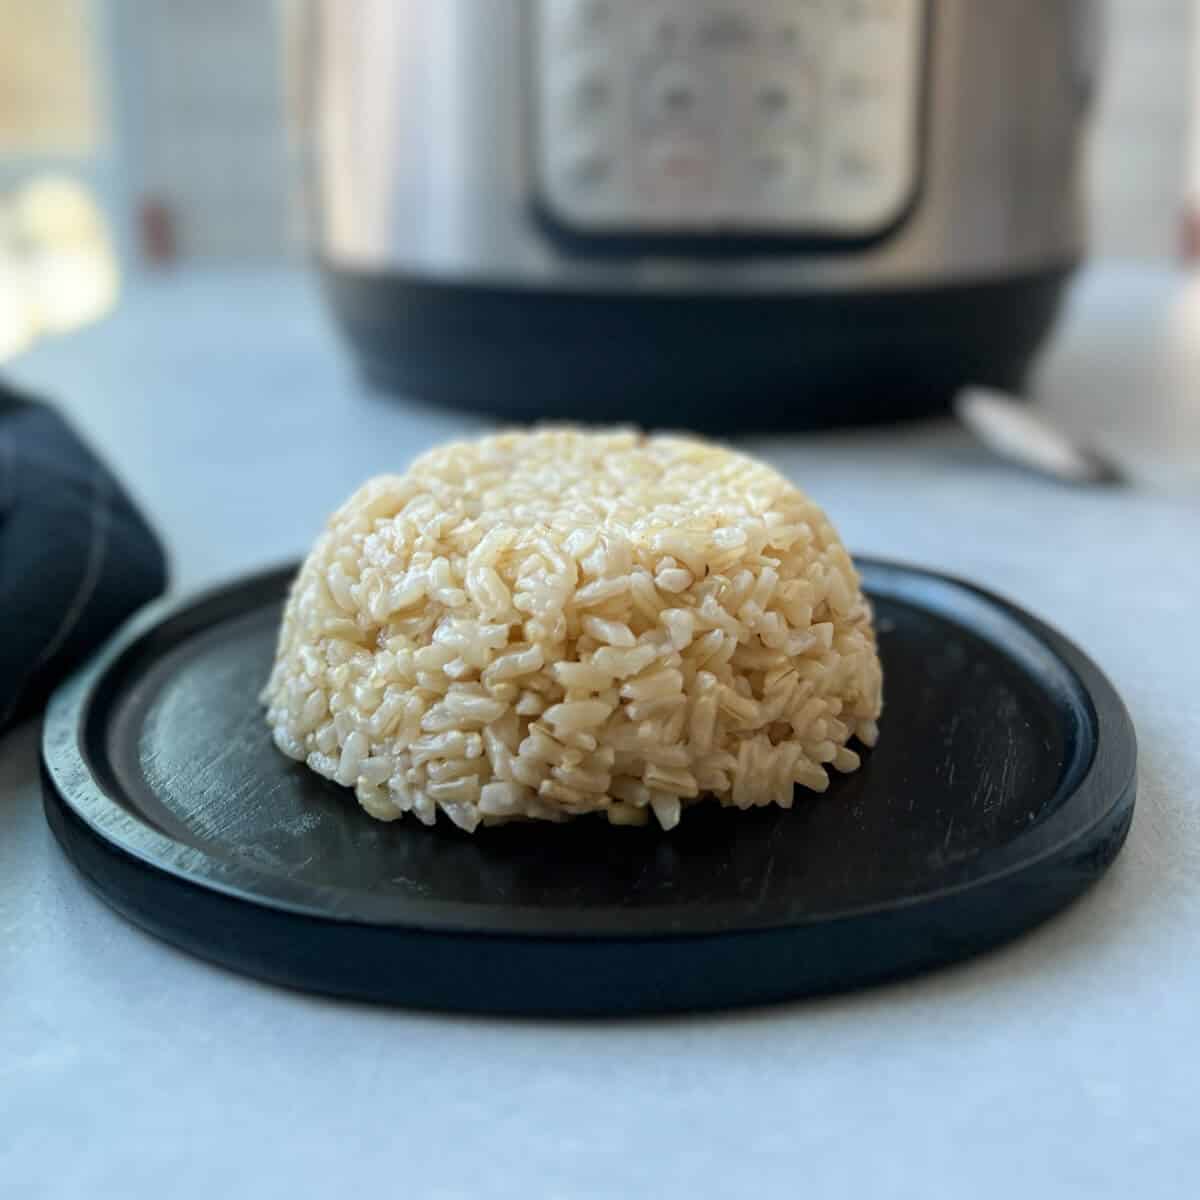
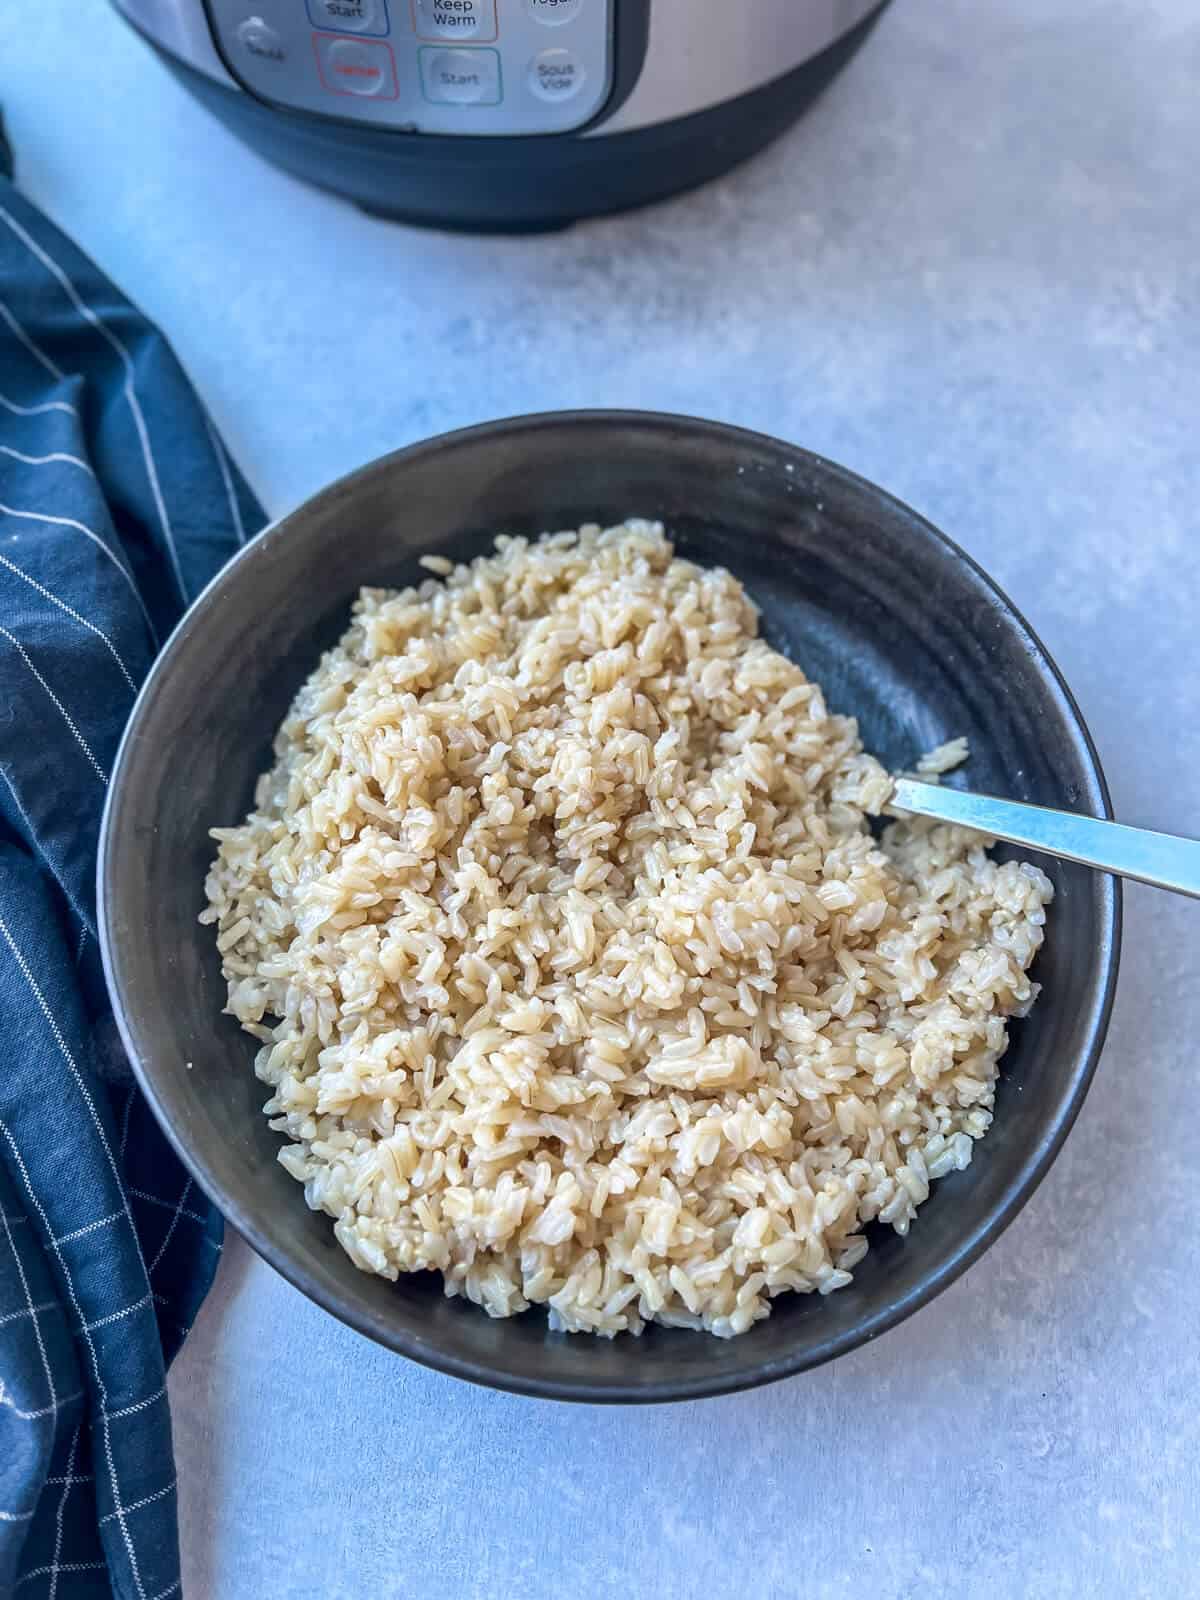
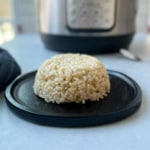
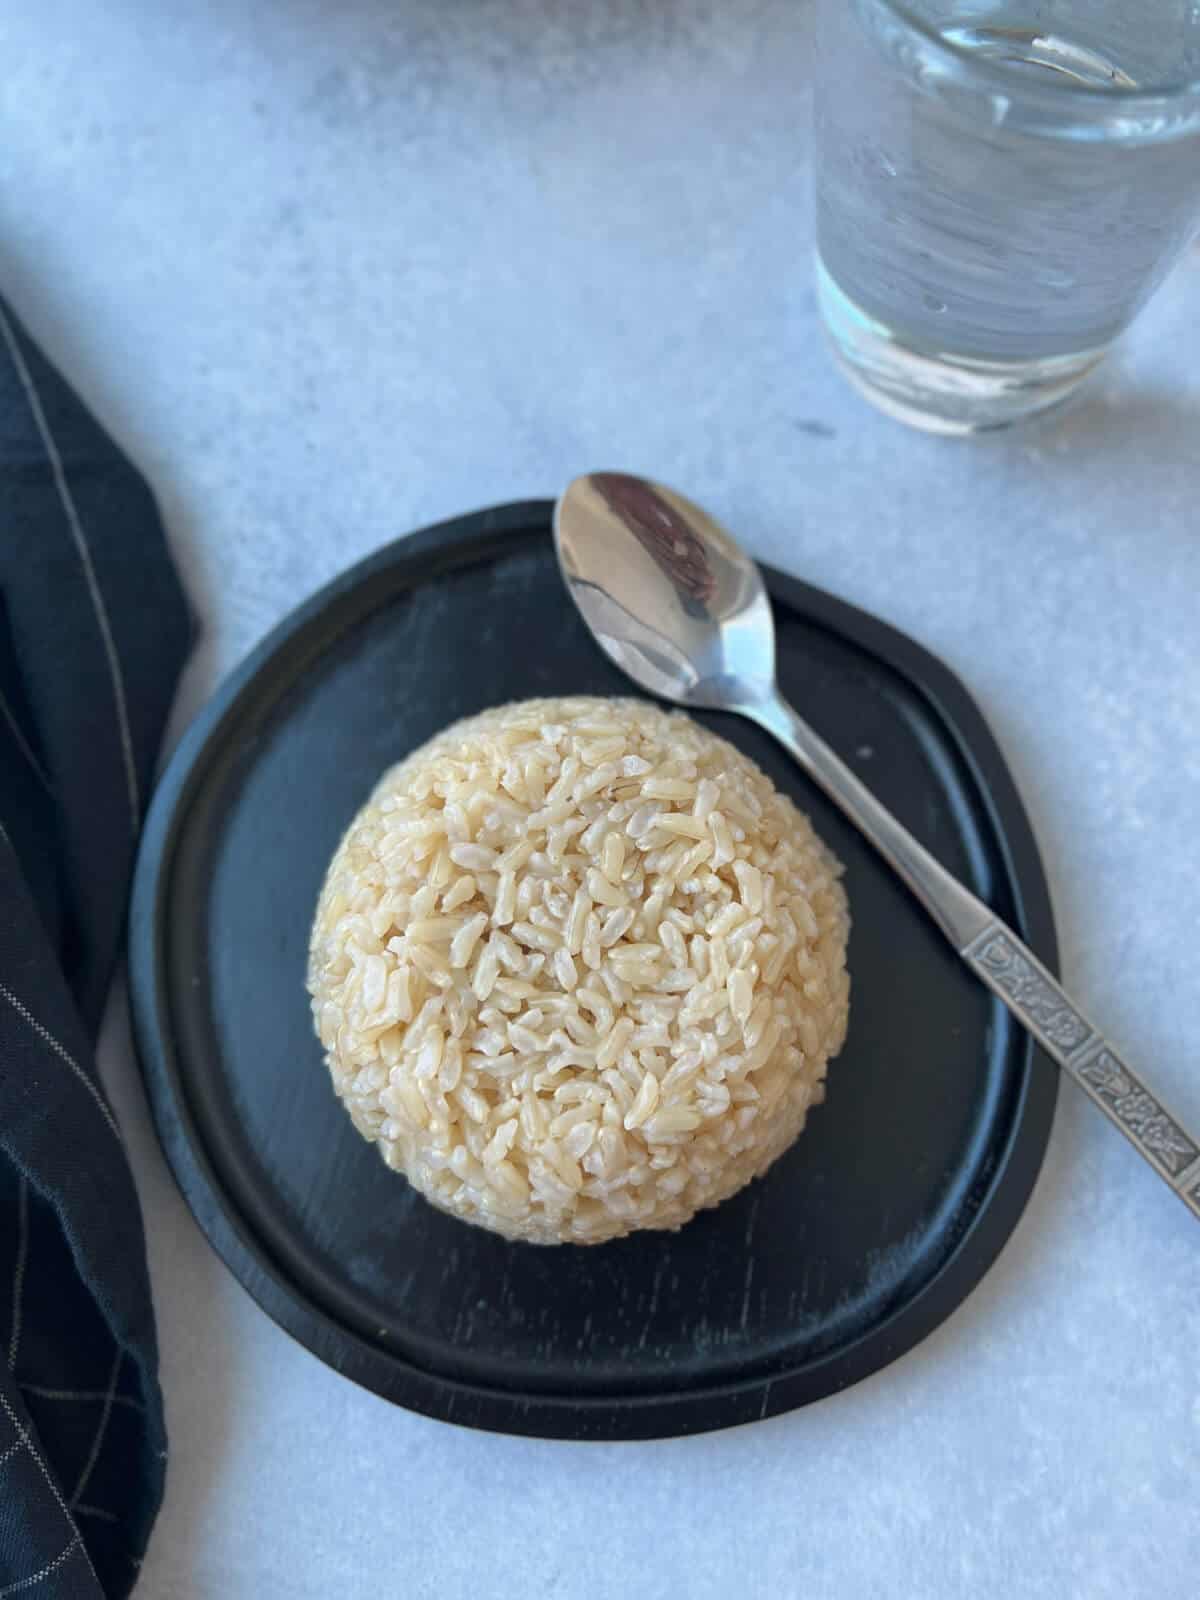
This easy recipe for Instant Pot Brown Basmati rice yields perfectly cooked, fluffy rice every time! This fragrant/aromatic rice can easily be prepared using the pot-in-pot method, making mealtime a breeze.
Brown Basmati Rice Instant Pot
As a South Indian, I am very passionate about rice. I don’t think a single day has passed that I haven’t had rice in some form or another. Whether it’s a delicious dessert like my rice kheer recipe or a simple rice side dish, I feel like eating rice is in my DNA.
But when you consume rice daily, it is best to eat a type with a good nutrition profile.
That’s why I love Brown Basmati rice.
Not only is brown Basmati rice good for you, but it’s also very delicious. It has a nutty aroma and fluffy texture and is easy to make using my favorite appliance: the Instant Pot! This magical device prepares meals in less than half the time of traditional stovetop or rice cooker methods.
This rice recipe is no exception – it cooks up quickly in the Instant Pot with little hands-on time and yields perfect rice every time. And thanks to the saute function, it can be toasted with a bit of ghee for improved texture and flavor. You can’t do that in your typical rice cooker!
What is brown Basmati rice?
Basmati rice is an aromatic and delicious variety of rice widely consumed and prized for its texture. Basmati rice does not tend to clump together like some starchier varieties, so it is often served at Indian restaurants.
Brown basmati rice is the whole-grain version, which has both the germ and bran left intact. This leaves it with a brown color and a lovely nutty taste. Like all brown rice, brown Basmati tends to be slightly chewier than its refined version.
Brown Basmati Rice
Brown vs. White Basmati rice
While brown Basmati rice is a whole-grain, white Basmati rice is made by removing the nutritious bran layer(also called the husk) and the germ, leaving just the starchy white portion behind. This process is also sometimes called “polishing,” and it results in rice that is less substantial and more subtle in both flavor and texture.
Brown rice is higher in dietary fiber and vitamins, while white rice tends to be more digestible. Whether you select brown or white rice for your dish is a matter of flavor and preference.
Why this recipe works
It’s an easy way to make Basmati rice without having to watch a pot on the stove.
You can easily make pot-in-pot Basmati rice by using a trivet and pairing it with your favorite Instant Pot curries and dals.
No soaking is necessary – meaning you can get nutty and fluffy rice without all the extra prep work.
A healthy alternative to polished rice varieties, meaning it is perfect for everyday dinners.
Here’s what you need to make the recipe
Ingredient notes/swaps
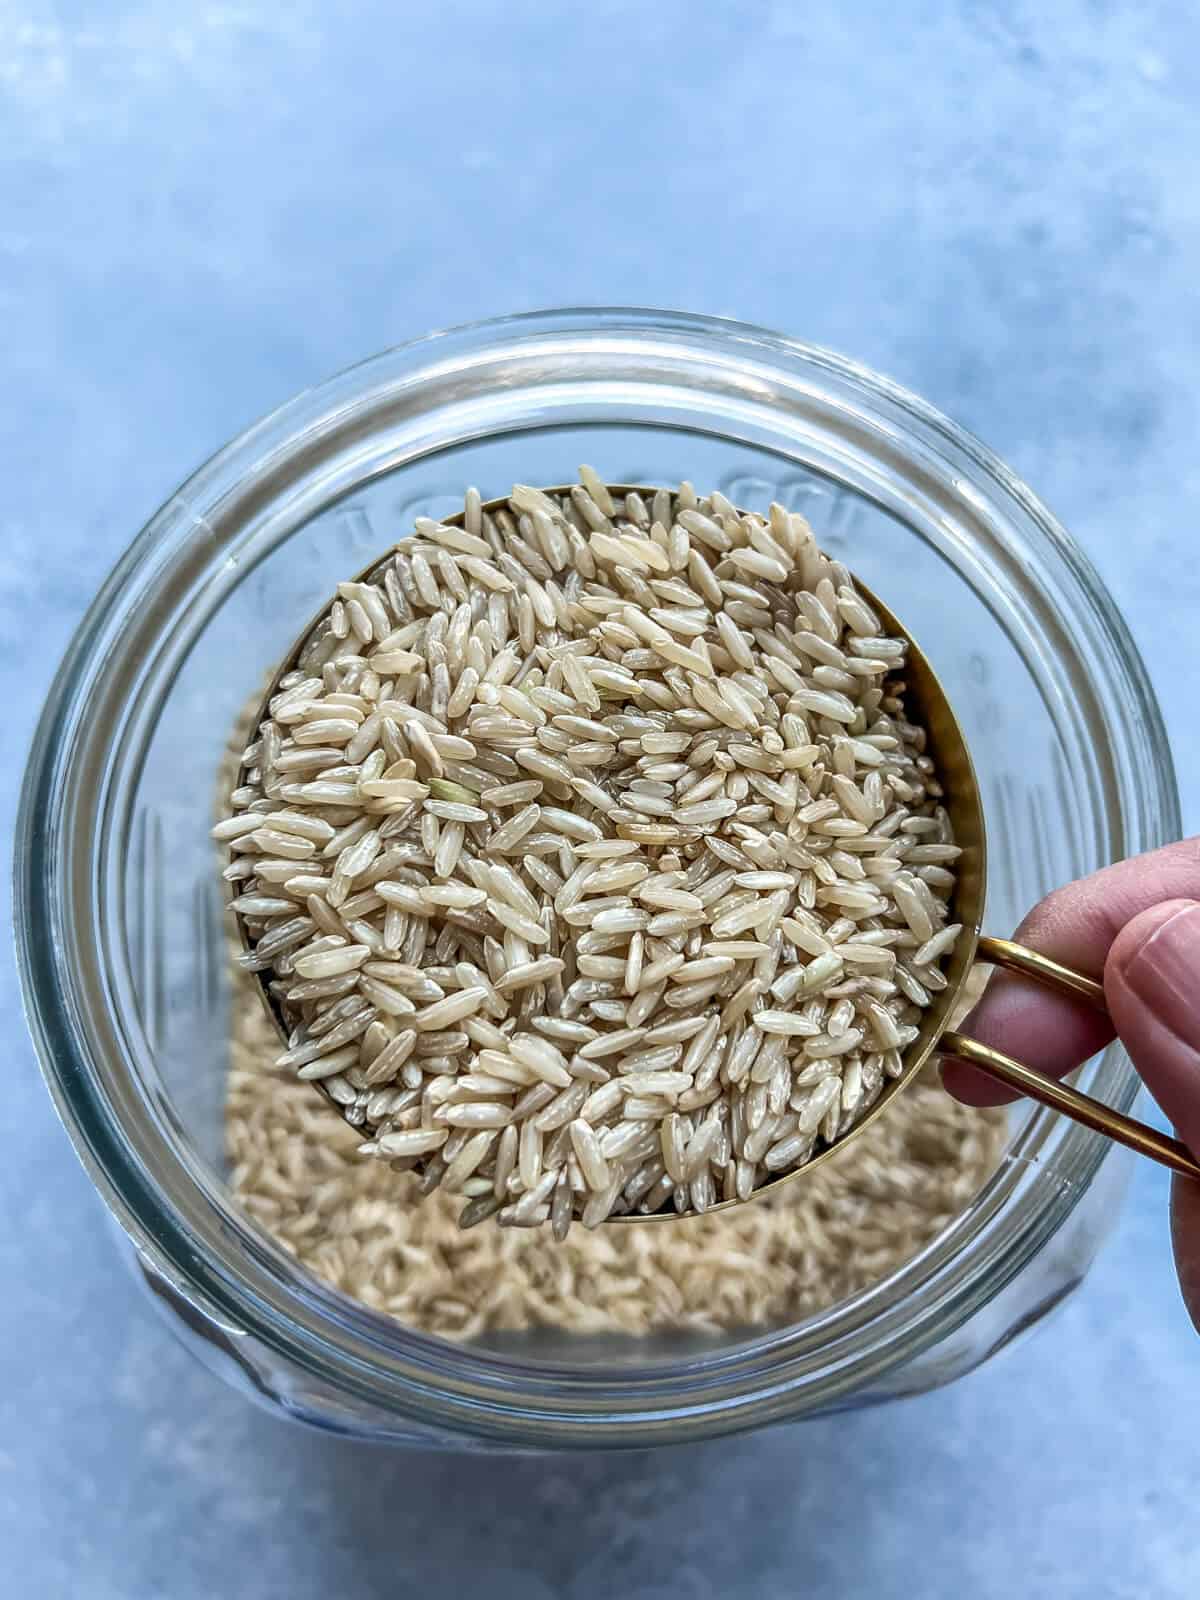
Brown Basmati Rice – Tilda and Royal are the brands that I recommend. You could also use organic brown Basmati rice if you prefer.
Storebought orhomemade ghee– This adds a nice nutty flavor to the rice and improves the texture. You can use butter or olive oil for a vegan version.
Salt – A touch of salt helps bring out the natural flavors of the rice.
Cups of water – Use the following 1:1.25 rice-to-water ratio i.e, for every cup of rice, use 1.25 cups of water.
While this article, the complete guide: Pot in Pot Indian cooking, goes in depth about this cooking technique, here’s a quick guide, Brown Basmati rice can be cooked pot-in-pot with any curries that have a cooking time between 25-35 minutes.
Scalable recipe: You can easily double or triple the recipe without changing the cooking time.
The cooking times between various brands will vary. You may have to try a few different cooking times between 15-22 minutes to get the right texture you want.
Wash / Soak the rice – Rinse the rice in a few changes of cold water to remove dirt and excess starch (which makes it easier to digest). If time permits, soak the rice. Soaking elongates the grains and makes them less brittle.
Let the rice rest – Once cooked, let the rice rest – this allows the steam to redistribute, and all the layers of the rice are evenly cooked. That is why it is important to wait 10 minutes before releasing pressure.
Add ghee (optional step) – After the rice is done, add a tablespoon of ghee. Once it melts, fluff the rice with a fork. Adding ghee amplifies the nutty flavor of Basmati rice and makes it even more fragrant. The result is a restaurant-style buttery Basmati rice that doesn’t dry out.
Avoid a clumpy mess – If not serving immediately, remove the inner pot from the Instant Pot to prevent the rice from drying out and sticking to the bottom.
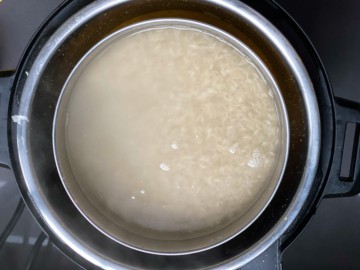
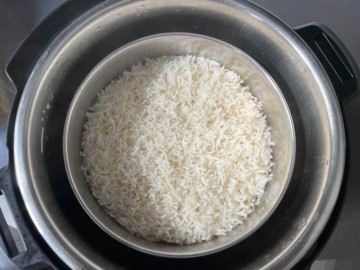
Rinse the brown rice using a strainer till the water runs clear.
1 cup Brown Basmati Rice
Select the Saute program in the Instant Pot and set it to Normal.
Add one tablespoon of ghee or oil in the inner steel pot.
1 tablespoon ghee or olive oil
Drain the rice and add it to the inner pot.
Saute the rice for about 30 seconds. Press cancel.
Add water along with salt to the inner pot. Mix well.
1/2 teaspoon salt, 1.25 cups water
Close the lid and set the steam valve to sealing. Pressure cook for 20 minutes (soft rice) under high pressure. If soaked, cook for 15 minutes.
When the cooking cycle is complete, wait for 10 minutes before moving the valve to 'venting' to release pressure.
Open the lid and let the steam escape.
Wait a minute or two, and then fluff the rice gently with a fork. Serve with your favorite curry.
Notes
This recipe was tested in an Instant Pot Duo – 6 quart. To make this in an 8-quart Instant Pot, make at least 2 cups of brown rice since 8-quart needs at least 2 cups of water to come to pressure.
I used a standard measuring cup for the recipe, not the rice cup that came with Instant Pot.
If not serving immediately, remove the inner pot from the Instant Pot to prevent the rice from drying out and sticking to the bottom.
Reheating leftover rice – Add a tablespoon of water for every cup of leftover rice. Mix well and pressure cook for zero minutes. When the cooking cycle is complete, move the valve to ‘venting’ to release pressure immediately.
Using stock and butter – To add richness and flavor to your rice, try using veggie or chicken stock instead of water and unsalted butter instead of ghee or olive oil.
Vegan – If you want to make brown Basmati rice in the Instant Pot but prefer it to be vegan, try olive oil in place of the ghee.
Herbs – Feel free to experiment with the addition of herbs and other seasonings. A favorite of mine is cilantro lime rice, which is perfect for pairing with a variety of dishes.
How to prep ahead
Rice is best when eaten fresh, but you can prepare brown Basmati rice in advance if you would like. Just follow the cooking instructions for the recipe, let the rice cool down completely and then transfer the cooked rice to an airtight container and store it in the fridge. Reheat according to the instructions below.
Storage tips
Refrigerator: Up to 3 days in an air-tight container.
Reheating leftover rice – Add a tablespoon of water for every cup of leftover rice. Mix well and pressure cook for zero minutes. When the cooking cycle is complete, move the valve to ‘venting’ to release pressure immediately.
Freezer: Store it for a month in an air-tight, freezer-safe container.
Serve it with
This brown Basmati rice can be used as a substitute for white Basmati rice. You can also use the pot-in-pot method so you can cook the rice at the same time as your main dish. Here are a few of my favorite Instant Pot curries:
Langarwali dal – a creamy mixed lentil curry that cooks effortlessly in the Instant Pot.
Instant Pot Sukha Kala Chana – While it is often served as prasad (religious offering) it makes for an easy side dish on busy weeknights.
Punjabi Rajma Masala – This Dahba-style recipe is flavorful and delicious. The combination of rajma and chawal (rice) makes this dish special.
Frequently asked questions
Should I soak Brown Basmati rice before cooking?
While it is not essential, soaking Basmati rice reduces the cooking time and softens the grains. This helps them absorb more water and be less sticky when cooked.
How do I make the rice fluffy?
Soak Basmati rice for 30 minutes. You can do a few things to make rice fluffy – Saute in ghee or oil or add ghee once the rice is cooked. Once the rice is cooked, use a fork to fluff the rice. This helps redistribute the steam and makes the grain fluffy and separate. Lastly, let the rice rest for a few minutes before serving.
Is Brown Basmati rice the same as brown rice?
Brown Basmati rice is not the exact same as your typical “brown rice”. The standard brown rice available in supermarkets is short or medium-grain rice, while brown Basmati rice is long-grain rice. This makes for distinct differences in texture as well as flavor. Standard brown rice also tends to be a bit sticker than the Basmati variety.
What is healthier, Brown Basmati rice or Brown Jasmine rice?
Both brown Basmati and brown Jasmine are good choices when it comes to rice. They are both whole grains and are easy to incorporate into your favorite meals. Basmati rice, however, is much lower on the glycemic index, making it a better choice for those who are avoiding blood sugar spikes.
What is the healthiest rice to eat?
Any regular brown rice is a good choice since it will be whole-grain and high in fiber and vitamins. Some brown rice varieties are better than others, but brown Basmati is at the top of the list for the healthiest rice. Because of its low glycemic index, it’s gentle on the blood sugar and contains more complex carbohydrates than any other variety.
Other rice recipes to try
If you enjoyed making this fragrant brown Basmati rice in the Instant Pot, I highly recommend you try one of my many rice recipes. Here are a few of my most popular:
Instant Pot Basmati rice – Using the Instant Pot makes for perfectly cooked rice in less than half the time of a rice cooker.
Jeera rice (cumin rice) – This aromatic and flavorful rice pairs well with a variety of dishes but is delicious enough to stand on its own.
Instant Pot Red rice – Learn how to cook plump and nutty Kerala matta rice in a fraction of the time with the Instant Pot.
Instant Pot brown rice – Master the process of making brown rice in the Instant Pot and get perfect results every time!
Instant Pot Brown Basmati Rice
Troubleshooting rice
If you follow this recipe, you shouldn’t run into these problems. But sometimes, we eyeball ingredients instead of measuring them, and things can go wrong if our estimates are inaccurate. Here’s how we can fix most issues –
Undercooked rice – hard and chewy
Reasons
Not enough water.
The sealing ring was not inserted properly.
Cooked for an insufficient amount of time.
Solution – Check if the sealing is properly inserted. Add two tablespoons of water for every cup of rice and cook again for two more minutes. Immediately release pressure.
Clumpy rice
Reason – Rice has not been rinsed properly.
Solution – Rinse properly next time. Sorry, no fix!
Cooked rice with leftover water
Reason – Added more water than needed.
Solution – Use a strainer to drain the excess water. Saute on low heat till the water is absorbed.
This flaky and savory cheese paratha is perfect for any meal of the day and is kid-friendly, thanks to its cheesy flavor. Serve it with raita, pickle, tomato ketchup, or a delicious paneer curry for a complete meal.
Easy Cheese Paratha
If you’ve never had a traditional North Indian paratha, I promise you that you are in for a real treat. That’s because these flaky and buttery Indian flatbreads are a delicious, satisfying, and hearty option for just about any meal.
This easy cheese paratha recipe is an excellent stuffed paratha recipe for beginners. It is much easier to roll and cook a paratha stuffed with melty cheese when compared to something a little more difficult, like the potatoes in my aloo paratha recipe.
Not only do you get the flaky texture of a plain paratha, but you also have a melty and cheesy center that will win over the pickiest of eaters.
When served with some creamy raita or a delicious paneer curry this simple dish easily becomes a meal – perfect for breakfast, lunch, or dinner. And while these are best warm, my kids don’t mind taking the leftovers in their lunch.
What is cheese paratha made of?
Cheese paratha, simply put, is a whole wheat bread stuffed with spiced cheese filling. The stuffing is made with mozzarella cheese for a delicious, stretchy center, but you can substitute half of the cheese for cheddar cheese or make my drool-worthy recipe for paneer paratha.
The paratha dough is made with whole wheat flour, then rolled and filled with cheese stuffing. The dough is then folded around the stuffing and rolled again. The rolled paratha is then shallow fried in ghee in a hot tawa or frying pan till golden brown spots appear. Talk about delicious!
Alternate names: In restaurant menus, you may find this paratha listed as chili cheese paratha or onion cheese paratha.
Onion cheese paratha
Reasons to love this recipe
It’s picky-eater-approved and kid-friendly.
Versatile – This cheese paratha recipe can be served for breakfast, lunch, or dinner.
Made with whole wheat flour – it is a healthier everyday option when compared to naan bread.
Although it’s best when served warm, it still tastes great when served cold, meaning it is perfect for adding to kids’ lunch boxes.
Here’s what you need to make the recipe
Ingredient notes
For the Dough:
Whole wheat flour – I prefer either Aashirwad whole wheat atta or Sujata chakki atta.
Avocado oil – The flavor works well with mozzarella cheese, but you could use any neutral-tasting vegetable oil.
Carom seeds – Also known as ajwain, these add a subtle flavor to the base of the paratha before the cheese stuffing is added.
Salt – A small amount of salt is added to the dough to provide flavor.
Water – You will need enough water to form a soft dough, and it should be at room temperature for the best results.
For the Cheese Stuffing:
Mozzarella cheese – I recommend using freshly grated mozzarella cheese, as it provides the best texture and gives that perfect melty cheese pull. You can substitute half of the cheese for cheddar cheese.
Onions – finely chopped, just like the green chillies. You can skip it but make sure to add more cheese so that you have enough filling for the parathas.
Spices and seasonings – You will need chaat masala, jeera (cumin seeds), and salt.
Aromatics – finely chopped cilantro and green chilies.
Storebought or homemadeghee – Traditionally used for frying the paratha and gives a delicious flavor.
Combine wheat flour, salt, a tablespoon of oil, carom seeds with 1 cup of water and start kneading. Add remaining water in small increments and continue to knead till the dough comes together as a ball.
Add the remaining oil to the dough and knead till the oil is absorbed.
If the dough is sticky, sprinkle approximately 1/4 teaspoon wheat flour (or more if needed) on the dough and knead again to form a dough that is not sticky. The dough should be supple and soft.
Cover the dough and set aside for 15-20 minutes.
Make the stuffing
Mix all the ingredients for the stuffing – onions, cheese, chaat masala, chili powder, cilantro leaves, jeera, green chilies, and salt- until they are combined. [Note: Don't prepare the stuffing in advance. Prepare it just before you are ready to roll the parathas. It is because the onions will start to lose water.]
1/2 teaspoon salt, 3 cups / 12 oz grated mozzarela cheese, 1 cup finely chopped onions, 1 teaspoon chaat masala, 1/2 teaspoon chili powder, 1/4 cup cilantro, 1 teaspoon jeera, 2 green chilies, 1/2 teaspoon salt
Rolling out the parathas
Divide dough into twelve equal portions and roll into balls.
Flatten the ball and cover both sides with flour.
Roll into a circular disc about 4 inches in diameter.
Place 2-3 tablespoonfuls of the stuffing in the center.
Grab the edges and pleat them and bring them together in the center.
Pinch them together to seal them.
Flatten the ball and cover both sides with flour.
Use your rolling pin to roll into a flat, round shape delicately. Dust flour on the base to prevent the dough from sticking while rolling.
Dust off excess flour from the paratha by placing it on the palm of one hand and then flip it on the palm of your other hand. Repeat this process 3-4 times.
Cooking the paratha
Place a tawa/frying pan on gas on medium heat. Once heated, carefully place the paratha on the tawa.
1/2 cup ghee for frying
Cook until small bubbles form on the top.
Turn it over and cook the other side for about 20 seconds. Add ghee to the side facing up.
Flip and cook for about 10 seconds. Use a spatula to press the edges so that they evenly cook. Now add ghee to the side facing up, flip and cook for another 10-15 seconds.
Skip the green chilies to make it kid-friendly. You can add a tiny bit of ground black pepper instead.
Different types of cheese – Replace 1/2 of mozzarella cheese with cheddar cheese in this recipe. You can replace mozzarella cheese with paneer (Indian cottage cheese), as in this paneer paratha recipe.
Skip onions – make sure to increase the amount of cheese so that you have enough stuffing for the dough.
Italian twist – Replace Indian spices/spice powders with a teaspoon of garlic powder, oregano each, and 1/2 teaspoon chili flakes.
Spice variations:Use dry mango powder instead of chaat masala to give it a tangy twist. You can also add 0.5 to 1 teaspoon of garam masala for some warmth.
Chili cheese paratha – Increase the amount of green chili for a spicy kick.
How to prep ahead
The dough stays in the refrigerator in an air-tight container for up to 3 days. Frozen for a month. Bring the dough to room temperature before rolling out the parathas.
You can make the cheese stuffing (don’t add the onions) up to 3 days in advance. You can chop onions and store them separately.
Storage tips
Refrigerator – You can store your parathas for 3-4 days in the refrigerator. For best results, store them in an airtight container and between sheets of parchment to prevent sticking (optional).
Freezer – These will keep well in the freezer for 2-3 months. Separate them with parchment paper when freezing, or they’ll stick together.
Reheat – For refrigerated parathas, reheat in a microwave (15-20 seconds) or reheat in a tava / skillet kept over medium heat. If parathas are frozen, use a tava/skillet to reheat for best results.
Serve it with
These delicious and flaky cheese parathas can be eaten on their own or served with raitas, yogurt, or pickle. They also pair very well with paneer curries. Here are a few of my favorites:
Boondi raita – This delicious recipe is made by soaking crispy chickpea flour balls in spice-infused creamy yogurt.
Onion raita – Made with ingredients you have at home and in less than 5 minutes. It is the perfect way to finish off a delicious Indian meal.
Kadai paneer – This restaurant-style recipe is made with freshly ground spices, chunks of paneer, and a blend of onions, peppers, and a spicy masala sauce.
Paneer makhani – Also known as paneer butter masala, this popular restaurant dish can easily be made at home.
Methi Malai Matar – An unforgettable vegetarian dish made with fresh fenugreek leaves, green peas, and soft chunks of paneer.
This savory and spicy Punjabi onion paratha is perfect for breakfast, lunch, or a delicious after-school snack. Filled with onions and aromatic spices, this stuffed paratha recipe definitely packs a punch.
Onion paratha / pyaaz ka paratha
Paratha is a popular breakfast food and accompaniment that is traditional to North Indian cuisine. Onion paratha (pronounced uh·nyn pr·aa·thuh) is a variation of the popular and common plain paratha.
I had never tried a stuffed paratha until a friend made me an onion-stuffed paratha one day. Onions, green chilies, and spice powders were combined together in the stuffing to create a savory and spicy paratha that made it irresistible.
No wonder I was floored with the very first bite.
While you can make this stuffed onion flatbread with any onion you have on hand, I like it especially well when made with finely chopped spring onions.
Since onion paratha is so savory, it works just as well for lunch or an after-school snack as it does for breakfast. And since it is made with whole wheat flour, it’s very satisfying all on its own.
Fun fact: Onions are called pyaaz or pyaz in Hindi and kanda in Marathi. That’s why this recipe goes by alternate names, such as pyaz ka paratha, kanda paratha, and pyaaz parantha. Other names include stuffed onion flatbread, onion roti, onion paratha or parotta, and onion parantha.
A quick note on parathas
While parathas use the same ingredients as rotis, they differ in their external appearance because of how the dough is rolled out. Parathas are thicker with crispy exteriors, while rotis are thinner and softer.
Parathas are made two ways – layered and stuffed. To make layered ones, divided portions of the dough are rolled into a circular shape. They are then folded and rolled again to create layers. This kind of paratha, when cooked, becomes crispy and flaky.
To make stuffed parathas like this stuffed aloo paratha or paneer paratha, the dough is rolled out to a circular shape and then stuffed with veggies and folded together to resemble a pleated dough ball. The ball is then rolled out to a circular shape and cooked till brown spots appear on both sides.
Want to learn how to make parathas in different shapes? In this plain paratha post, I share how to make it 3 ways – round, triangle, and square-shaped.
Reasons to love this recipe
This savory Indian flatbread is perfect for any time of the day. Enjoy it for breakfast or pack it for lunch, along with raita and/or green chutney.
Easy enough to serve on an everyday basis but unique enough to make for guests or special occasions.
It’s made with whole wheat flour, meaning it’s a healthy option when compared to restaurant-style bread like naan.
Here’s what you need to make the recipe
Ingredient notes/swaps
Whole wheat flour – I prefer either Aashirwad whole wheat atta or Sujata chakki atta.
Water – You will need enough water to form a soft dough. It should be at room temperature for the best results.
Salt – a small amount of salt is added to the dough to provide flavor.
Carom seeds – Also known as ajwain, these can easily be found at your local Indian grocery or online.
Oil – I recommend avocado oil, but you can use another neutral-flavored oil like sunflower oil.
For Stuffing:
Finely chopped onions – You can use white, yellow, or red onions. Spring or green onions work too.
Seasoning: you will need black salt, garam masala, fresh chopped cilantro (coriander leaves), jeera (cumin seeds), green chilies, salt, and dry mango powder (amchur powder). Note: you can also use a teaspoon of red chili powder instead of green chilies.
For frying:
Ghee – It is traditional to fry onion paratha in ghee, but if you would like them to be vegan, you can use oil.
Knead the dough until it is smooth, soft, and pliable.
To fix hard dough, sprinkle a spoonful of water and knead. Add more water as needed until the dough is neither hard nor sticky.
Sticky dough? Sprinkle a spoonful of dough and knead. Add more flour as needed until the dough is not sticky.
Rest the dough to allow time for the gluten to form. This makes it easier to roll out the dough and yields softer parathas.
Make sure to dust off the dry flour from the parathas before frying, or it dries up and turns hard.
Before storing it in an air-tight container or while packing it for lunch, let the paratha cool down for 5-6 minutes to prevent it from being soggy.
Pro tips for onion parathas
Chop the onions and green chilies finely, or they’ll tear the paratha while rolling.
Onions lose water when mixed with salt, so make the parathas immediately once the stuffing is prepared.
Note: Don’t forget to turn your exhaust fan on when making parathas, or else your smoke alarm may go off.
Variations to try
Make the dough without the ajwain (carom seeds).
For spring onion parathas, substitute regular yellow, white, or red onions with finely chopped green onions.
Onion paneer or onion cheese paratha: Add a tablespoon of grated cheese or paneer along with the onions in each paratha to make onion paneer paratha.
Use cooked stuffing: While this recipe uses raw onions, you can also use cooked onion stuffing. To do so, saute the onions along with spices in a tablespoon of oil until the onions have softened. Completely cool the onions before stuffing.
How to prep ahead
The best way to prepare this paratha in advance is to make the dough ahead of time. Follow the steps for making the dough as listed in the instructions, and when it is time to allow the dough to rest, store it in either the refrigerator or the freezer.
Refrigerated dough stays keeps in an air-tight container for up to 3 days.
The frozen dough keeps for a month.
Bring the dough to room temperature before rolling out the parathas.
Another prep step you can do in advance is to chop the onions. They can be chopped and stored in an airtight container for up to 3 days. Just make sure to chop them very finely, as otherwise, they may tear the paratha dough.
Storage tips
Refrigerator – You can store your cooked onion parathas for up to 2 days, but it is not recommended to store them for longer than that.
Freezer – Store your parathas in the freezer for 2-3 months. Separate them with parchment paper when freezing, or they’ll stick together.
Reheat – For refrigerated parathas, reheat in a microwave (15-20 seconds) or reheat in a tava / skillet kept over medium heat. If parathas are frozen, use a tava/skillet to reheat for the best results.
Serve it with
This delicious paratha pairs well with a variety of raitas or lime/mango pickles, as well as paneer-based curries. Here are a few of my favorite serving suggestions:
Onion raita – Make it with ingredients that you have at home and in less than 5 minutes. It is the perfect way to finish off a delicious Indian meal.
Boondi raita – Made by soaking crispy chickpea flour balls in spice-infused creamy yogurt. Perfect for serving with biryanis or with parathas and a side dish.
Matar paneer – A restaurant-style dish that is creamy, delicious, and easy to make at home.
Paneer butter masala – This take-out classic can easily be made at home in less than 40 minutes.
Combine wheat flour, salt, a tablespoon of oil, carom seeds with 1 cup of water and start kneading. Add remaining water in small increments as needed and continue to knead till the dough comes together as a ball.
Add the remaining oil to the dough and knead till the oil is absorbed.
If the dough is sticky, sprinkle approximately 1 teaspoon wheat flour (or more if needed) on the dough and knead again to form a dough that is not sticky. The dough should be supple and soft.
Cover the dough and set aside for 15-20 minutes.
Make the stuffing
Mix all the ingredients for the stuffing – onions, black salt, garam masala, coriander leaves, jeera, green chilies, dry mango powder, and salt till they are well combined.
2.5 cups finely chopped onions, 1 teaspoon black salt, 1 teaspoon garam masala, 1/4 cup cilantro, 1 teaspoon jeera, 2 green chilies, 1/2 teaspoon dry mango powder, 1/2 teaspoon salt
Rolling out the parathas
Pull a small piece approximately the size of a golf ball from the dough. Place the piece between the palms of your hands and shape them into a ball.
Flatten the ball and cover both sides with flour.
Roll into a circular disc about 6 inches in diameter.
Place about 1.5 tablespoonfuls of the stuffing in the center. Sprinkle flour over it to absorb any moisture.
Grab the edges and pleat them and bring them together in the center.
Pinch them together to seal them and flatten them using your palm.
Flatten the ball and cover both sides with flour.
Use your rolling pin to roll into a flat, round shape. Do this delicately – dusting flour as needed to help with this process.
Dust off excess flour from the paratha by placing it on your palm of one hand and then flip it on the palm of your other hand. Repeat this process 3-4 times.
Cooking the paratha
Place a tawa/frying pan on gas on medium heat. Once heated, carefully place the paratha on the tawa.
Place the paratha in the hot pan. Cook the paratha until small bumps form on the surface (approximately 1-2 minutes).
Flip the paratha onto the other side. Cook for 30-40 seconds or so until you see brown spots. Smear it with ghee and flip it.
Cook for 20-30 seconds, then brush the side facing up with ghee. Use a spatula to press down the paratha so that it evenly cooks.
Flip it and cook it for another 15-20 seconds while pressing the paratha down with the spatula.
Transfer the paratha to a plate lined with paper towels. Repeat this process for the rest of the dough.
Master making lachha or lachedar paratha with this easy recipe. Flaky and crisp, this layered paratha comes together with five simple ingredients. Perfect for breakfast, a snack, or served alongside dals, curries, and more, this buttery Indian flatbread satisfies everyone!
Lachha paratha recipe
Paratha 101
Paratha is one of the most common flatbreads that originated in the Punjab region of northern India.
Nothing says comfort food quite like a warm paratha. Often served as breakfast, this filling unleavened flatbread made with whole wheat flour pairs well with just about everything.
If you have never made paratha before, they are similar to roti with a few key differences. While they both consist of roughly the same ingredients, paratha is rolled and folded to create layers which also results in a crispy, flaky flatbread with golden brown spots.
There are two main types of paratha, layered and stuffed. Layered parathas have spices or fillings added while making the dough, whereas stuffed parathas such as aloo paratha or paneer paratha have stuffings filled in during the rolling process.
Looking for a recipe for plain paratha? Learn how to make it 3 ways – round, triangle, and square-shaped.
What is lachha paratha?
Lachha paratha, pronounced laa·chuh pr·aa·thuh, also may be called lachedar paratha or paratwala paratha. Some other spellings of lacha include laccha, lacha, or laccha, but they all refer to the same whole wheat, multi-layered, unleavened bread.
This variation of paratha gets its name from the unique layers or rings you can see in the rolled-out dough. To achieve these distinctive rings, the soft dough is rolled flat, like a roti, then coated in ghee or oil and pleated like a fan. The pleated dough is then rolled into a coil, flattened, and rolled again into a flat disk before being lightly fried.
Reasons to love this recipe
Fresh and flaky, there are so many reasons to love this buttery flatbread. Some of the main reasons we love this laccha paratha recipe would be because it is
Vegan-friendly – With a simple swap from ghee to avocado oil, you can easily make this layered and flaky paratha a vegan flatbread.
Freezer friendly – Both the dough and the cooked lachha paratha store well in the freezer for future meals.
Versatile – Spice this simple paratha dough with a masala blend or season with ajwain seeds for a different flavor, depending upon how you serve them.
Needs only a few ingredients – Made with 5 pantry-staple ingredients, this simple laccha paratha quickly comes together any day of the week.
Here’s what you need to make lachha parathas
Ingredients
Whole wheat flour– Used both in the dough for the paratha and to help roll out the dough later.
Salt– optional, but really enhances the flavor of this paratha.
Oil– Avocado or vegetable oil work best.
Water– At room temperature.
Melted ghee – Substitute with avocado oil to make this paratha vegan.
Knead the dough until it is smooth, soft, and pliable.
To fix hard dough, Sprinkle a spoonful of water and knead. Add more water as needed until the dough is neither hard nor sticky.
Sticky dough? Sprinkle a spoonful of dough and knead. Add more flour as needed until the dough is not sticky.
Rest the dough to allow time for the gluten to form. This makes it easier to roll out the dough and yields softer parathas.
Make sure to dust off the dry flour from the parathas before frying, or it dries up and turns hard.
Before storing it in an air-tight container or while packing it for lunch, let the paratha cool down for 5-6 minutes to prevent it from being soggy.
Note: Don’t forget to turn your exhaust fan on when making parathas, or else your smoke alarm may go off.
Variations to try
Spice it up – Make masala paratha by adding 1/2 teaspoon of these spice powders – chili powder, coriander, and cumin powder while making the dough.
Ajwain paratha – Ajwain or carom seeds aid digestion. Add 1/2 tablespoon of ajwain (carom) seeds for every cup of whole wheat flour while making the dough and make the paratha as usual.
For a vegan version, use oil instead of ghee.
How to prep ahead
The best way to prepare this lachha paratha in advance is to make the dough ahead of time. Follow the steps for making the dough as listed in the instructions, and when it is time to allow the dough to rest, store it in either the refrigerator or the freezer.
Refrigerated dough stays keeps in an air-tight container for up to 3 days.
The frozen dough keeps for a month.
Bring the lachha paratha dough to room temperature before rolling out the parathas.
Storage tips
Refrigerator – When cooled and placed in an air-tight container, the rolled paratha lasts for 4-5 days.
Freezer – Parathas keep for 2-3 months when frozen. I recommend separating them with parchment paper when freezing, or they’ll stick together.
Reheat – For refrigerated parathas, reheat in a microwave (15-20 seconds) or reheat in a tava / skillet kept over medium heat. If parathas are frozen, use a tava/skillet to reheat for best results.
Serve it with
This flaky and savory flatbread can be paired with curries to make a meal or savored for breakfast with butter on top with a side of pickle. Serve laccha paratha hot with some of your favorite Indian curries, such as
What is the difference between paratha and laccha paratha?
Paratha is the general term for an unleavened flatbread made with whole wheat. Laccha paratha refers to a specific type of paratha made from layering the dough during the rolling process.
What state is famous for laccha paratha?
Laccha paratha comes from the Indian state of Punjab.
Is laccha paratha made of maida / all-purpose flour?
The homemade version is made from whole wheat flour, but sometimes the store-bought frozen ones or the restaurant ones can be a mix of whole wheat flour or all-purpose flour.
Is Malabar parotta and Laccha paratha the same?
Malabar paratha is the South Indian variation of the laccha paratha, originating in the Northern part of India. Malabar parotta, or Kerala parotta, is made from maida (all-purpose flour), thus making it softer, whereas lacha paratha is traditionally made from whole wheat flour or atta.
Combine wheat flour, salt, oil with 1 cup of water in a large bowl and start kneading. Add water in small increments and continue to knead till the dough comes together as a ball.
Add 1/4th teaspoon oil to the dough and knead till the oil is absorbed.
If the dough is sticky, sprinkle approximately 1/4 teaspoon wheat flour (or more if needed) on the dough and knead again to form a dough that is not sticky. The dough should be supple and soft.
Cover the dough and set aside for 15-20 minutes.
Making parathas
Pull a small piece approximately the size of a golf ball from the dough. Place the piece between the palms of your hands and shape them into a ball. Flatten the ball and cover both sides with flour.
Roll out the flattened ball into a circular shape (approximately 6 inches in diameter).
Rolling parathas
Smear the surface of the rolled-out dough with ghee.
Sprinkle some flour evenly then begin to pleat the paratha.
Pleat the rolled out paratha into a fan.
Roll the fan inward into a coil.
Once you reach the end, pull the edge and tuck it under the coil.
Flatten the coil until it looks like a disc.
Dip the flattened disc in the flour.
Roll out the flattened ball evenly into a circular shape (approximately 7-8 inches in diameter). Dust more flour as needed to help with the rolling.
Cooking paratha
Heat a pan / tawa over medium-high heat.
Dust off excess flour from the paratha by placing it on your palm of one hand and then flip it on the palm of your other hand. Repeat this process 3-4 times.
Place the paratha in the hot pan. Cook the paratha until small bumps form on the surface (approximately 1-2 minutes).
Flip the paratha onto the other side. Cook for 30-40 seconds or so until you see brown spots. Smear it with ghee and flip it.
Cook for 20-30 seconds, then brush the side facing up with ghee. Use a spatula to press down the paratha so that it evenly cooks.
Flip it and cook it for another 15-20 seconds while pressing the paratha down with the spatula.
Transfer the paratha to a plate lined with paper towels. Repeat this process for the rest of the dough.
Serve it hot with dal, vegetable or chicken curry.
Notes
To fasten up the process, roll out the next paratha as one cooks in the pan.
Make sure to dust off the excess flour from the paratha before you cook it. This prevents the paratha from getting hard.
Before storing it in an air-tight container, let the paratha cool down a bit so as not to make it soggy.
This Gujarati Trevti Dal recipe is a delicious and creamy mixed lentil dish that is simple to prepare. A versatile Indian recipe that is a combination of three dals can easily be made vegan and gluten-free. All you need is 30 minutes!
Gujarati Trevti Dal
“Trevti”, a Gujarati word means three; that’s why in this Trevti dal recipe, three different dals (lentils) are used. The blend of dals in this recipe creates a perfect balance of flavor and texture, rendering a creamy texture.
A popular dal from Gujarati cuisine, trevti dal is also known as chevti dal or yellow dal and typically has no onion or garlic. This makes for a simple recipe that can easily be prepared for lunch or dinner and can be served as a soup or with rice.
This mixed lentil dish is a mildly flavored dal, making it perfect for small children who may not like things very spicy quite yet. It can be made by either using the stovetop pressure cooker method or the Instant Pot method, and both ways of preparing trevti dal are quick, easy, and mainly hands-off.
Reasons to love this recipe
This Gujarati dal recipe is ready in just 30 minutes.
Vegan-friendly and plant-based, making it a healthy and inexpensive option.
High in protein and nutrient dense.
Needs only a few ingredients – it is a no-onion-garlic dal recipe.
Here’s what you need to make the recipe
Ingredient notes/swaps
Chana dal – Also known as split Bengal gram, these are split chickpeas (garbanzo) that is very popular in Indian cuisine.
Tuvar dal – Also known as toor dal, this is a split pigeon pea that is yellow in color.
Moong dal – This is a split and skinned version of green gram (also known as moong or mung). Once the skin is removed, the color is yellow instead of green. It can be substituted with urad dal.
Oil – I recommend using avocado or sunflower oil for its neutral flavor and high smoke point. It is also excellent for cooking vegan dishes (such as this one).
Aromatics and spices – You will need a variety of aromatics and spices to flavor this dish, but the list is relatively short. Included are cumin seeds, asafoetida (hing), cloves (laung), bay leaf, turmeric powder, fresh ginger, Kashmiri red chilies, green chilies, and salt to taste.
Lime – You will need some lime juice for finishing, and I highly recommend using freshly squeezed juice.
Cilantro/Coriander – Adding some finely chopped coriander leaves (cilantro) to the dish as a garnish adds a beautiful color and flavor.
Dal will thicken as it cools down, so dilute it as needed.
In this recipe, you can substitute moong dal with urad dal.
To make this dish gluten-free, use gluten-free asafoetida.
Variations to try
For a dose of green, add spinach.
Temper with ghee for a flavorful twist.
You can also add the tempering at the end right before serving.
Add curry leaves during tempering to amp up the flavor of this dal.
Finish off with tempering instead of starting with it.
Add onions and garlic – saute the chopped onions and garlic after adding the spices. Cook till the onions soften.
Prep ahead and storage tips
Refrigerator: Stores well in the refrigerator for up to 3 days.
Freezer: If you want to prep ahead, you could always make a double batch and stash it in the freezer for up to a month. Thaw overnight in the refrigerator before use.
Reheat: You can reheat trevti dal either in the microwave or stovetop. The dal thickens in the refrigerator, so you may have to add water to get it to the consistency you desire before you reheat it.
Serve it with
While this recipe for Trevtil dal can be served on its own, there are many options for what to serve with this mixed lentil dish. Here are a few of my favorites:
Homemade rotis (chapati) – My foolproof method will show you how to make soft rotis every single time.
Basmati rice – Whether you use the stovetop method or the Instant Pot method, basmati rice is always delicious when served with dal.
Jeera rice – One whiff of this aromatic, fluffy basmati rice tempered with cumin seeds is enough to get your taste buds tingling.
Jasmine rice – This fragrant rice is a good pairing with your favorite dals and curries.
Aloo bhaji – This classic Indian dish of spiced potatoes is perfect for serving with Trevati Dal.
Chevti Dal
Other simple dal recipes to try
Gujarati dal – a treasured recipe that has been adapted to cook in the Instant Pot. Best of all? You can cook your rice simultaneously, thanks to the pot-in-pot method.
Moong dal khichdi – This one-pot, 5-ingredient meal is easy on your stomach and is perfect for all ages.
Dal palak (Spinach and Tomato Dal) – This hearty, vegetarian spinach dahl cooks up in one pot for a comforting meal you can easily pair with fresh rice or roti.
This Gujarati Trevti Dal recipe is a delicious and creamy mixed lentil dish that is simple to prepare. A versatile Indian recipe that is a combination of three dals can easily be made vegan and gluten-free. All you need is 30 minutes!
Add oil to the steel insert of the Instant Pot and press the Saute function and set it to “medium” and wait till the display reads “Hot.” Add cumin seeds and as they begin to sizzle add asafoetida.
2 tablespoons avocado oil, 1 teaspoon cumin seeds, 1/8 a pinch of asafoetida
After 10 seconds, add cloves, bay leaf, ginger, Kashmiri red chili, and green chilies. Saute for about 30 seconds till the raw taste of ginger disappears.
1 inch ginger, 2 Kashmiri red chilies, 2 cloves (laung), 2 Indian or Thai green chilies (Bird's eye), 1 bay leaf
Wash the dals and add them to the steel insert along turmeric powder and salt with 2.5 cups of water.
1/4 cup chana dal, 1/4 cup tuvar dal, 1/4 cup moong dal, 1/2 teaspoon turmeric powder, salt to taste
[Optional Step] – You can cook Basmati rice along with dal. Place a trivet over the dal.
Place the bowl with rice and water over the trivet. For 1 cup of Basmati rice, add 1.25 cups of water.
Press the “Warm / Cancel” button and then select “Pressure Cook.” Adjust the time to 10 minutes and set the pressure selection to high.
Cover the Instant Pot lid and lock it. Make sure the vent is at sealing position.
Once the cooking cycle is complete allow the pressure to release naturally.
Carefully remove the rice using tongs.
Dilute the dal if required. Add lime juice and cilantro. Mix well.
Heat a tablespoon of oil in a pressure cooker. Add cumin seeds and as they begin to sizzle add asafoetida.
After 10 seconds, add cloves, bay leaf, ginger, Kashmiri red chili, and green chilies. Saute for about 30 seconds till the raw taste of ginger disappears.
Wash the dals and add them to the steel insert along with turmeric powder and salt with 2.5 cups of water.
Close the cooker and wait till the vent goes off 4 times [ Note: Every cooker works differently and mine takes that long to get the dal nicely cooked]
Shut the gas off and allow to cool naturally.
Open cooker and mix well and then garnish it with lime juice and coriander leaves.
Flavorful and flaky, this masala paratha recipe makes a hearty breakfast, filling lunch, or satiating snack. With variations for both paratha and roti, this spiced Indian flatbread is sure to hit the spot.
Masala roti recipe
I love whipping up a batch of masala paratha when I am running out of groceries since the dough base is made with pantry-staple ingredients that I typically have on hand. Often made as comfort food, this spiced paratha makes an excellent snack or hearty breakfast.
This simple and flavorful masala paratha recipe is a variation of a traditional paratha. Unlike other forms of paratha, the spices are mixed with whole wheat flour before coming making a dough.
Alternate names: Gujarati masala roti, spicy roti, spiced paratha
What is paratha?
If you have never had paratha, it is an unleavened flatbread traditionally made with whole wheat flour, salt, water, and ghee. Unlike rotis which are soft, parathas are crispy with flaky layers and golden brown spots.
Most commonly compared to a roti in Indian cuisine, this simple flatbread pairs well with everything from raitas to curries and more.
Paratha comes in many varieties, but the two most common include stuffed and layered. Stuffed paratha, like paneer paratha, tucks the filling into the dough during the rolling process. Layered parathas like this masala paratha recipe have spices or fillings added while making the dough.
Looking for a recipe for plain parathas? Learn how to make it 3 ways – round, triangle, and square-shaped.
Reasons to make this recipe
Keeps you satiated for a long time thanks to the filling whole wheat flour base.
Versatile – Feel free to change up the blend of spices used in the dough for a variety of flavors your family will adore.
Can prep ahead – great for meal planning. Since this paratha recipe keeps for up to 5 days in the refrigerator, you can easily make them during your weekly meal prep time and eat on them all week.
Tastes delicious – The variety of spices used in the dough results in an absolutely delicious paratha you will want to eat with everything.
Lasts for 3-4 days without refrigeration – Makes it perfect for long-distance travels or road trips, camping, etc.
Here’s what you need to make masala paratha
Ingredients
Whole wheat flour – Used in both the paratha dough and for rolling out the paratha
Carom seeds (ajwain) and Fennel seeds (saunf) aid digestion.
Spice powders, including Kashmiri red chili powder, turmeric powder, dry mango powder, and salt
Oil – Avocado or vegetable oil works well in the dough.
Water – Room temperature binds the dough together.
Ghee – Brushed onto the rolled-out paratha dough before cooking.
General tips while making parathas / Indian flatbreads
Knead the dough until it is smooth, soft, and pliable.
To fix hard dough, sprinkle a spoonful of water and knead. Add more water as needed until the dough is neither hard nor sticky.
Sticky dough? Sprinkle a spoonful of dough and knead. Add more flour as needed until the dough is not sticky.
Rest the dough to allow time for the gluten to form. This makes it easier to roll out the dough and yields softer parathas.
Make sure to dust off the dry flour from the rolled dough before frying, or it dries up and turns hard.
Before storing it in an air-tight container or while packing it for lunch, let the paratha cool down for 5-6 minutes to prevent it from being soggy.
Note: Don’t forget to turn your exhaust fan on when making parathas, or else your smoke alarm may go off.
Variations
If you are looking for more ways to make this masala paratha recipe, here are some of my favorite variations to try.
Fill with spice/ spice powders – Add all the spices and spice powders to a bowl and combine them. Instead of adding the spices to the dough, sprinkle them once you first rolled the dough into a circular shape and brushed ghee on top. You can continue to fold and roll as outlined in the recipe.
Add other flours – You can substitute 50% of the wheat flour with other flours, such as Bengal gram flour (besan), bajra flour (millet flour)
Mix up the spice powders – Add a teaspoon of cumin powder, and coriander powder along with the dry ingredients for an interesting twist. You can also add a teaspoon of garam masala powder or 1/2 teaspoon of chaat masala to mix it up.
Spicy paratha – If you crave a little more heat to this paratha recipe, increase the amount of chili powder, and add 1/2 teaspoon of garam masala.
Boost the flavor up a notch! Add grated ginger (1 teaspoon) and minced garlic (1 tablespoon) for more flavor.
Add herbs and leafy greens to the dough – Try fresh or dried methi leaves (kasoori methi), finely chopped spinach, cilantro/coriander leaves, and mint leaves to mix it up.
Cheesy masala roti – add 1/2 cup grated mozzarella cheese while making the dough for a delicious twist that your kids will love.
Masala roti vs Masala paratha
Masala roti and paratha use the same ingredients, and the dough is made the same way. The only difference is how they are rolled into circles. Parathas are rolled into a disc and then folded and then rolled again, whereas rotis are rolled only once.
You can see the difference below in how they turn out when cooked – parathas are flakier compared to rotis.
Masala Paratha and Masala Roti
How to prep ahead
The best way to prepare this paratha in advance is to make the dough ahead of time. Follow the steps for making the dough as listed in the instructions, and when it is time to allow the dough to rest, store it in either the refrigerator or the freezer.
Refrigerated dough stays keeps in an air-tight container for up to 3 days.
The frozen dough keeps for a month.
Bring the dough to room temperature before rolling out parathas or roti.
Storage tips
Once your masala paratha or roti has been cooled down completely, it can be left unrefrigerated for 3-4 days in an air-tight container. You can also store the leftover paratha in the refrigerator or freezer for longer storage.
Refrigerator – When cooled and placed in an air-tight container, the paratha lasts for 4-5 days.
Freezer – Paratha keep for 2-3 months when frozen. I recommend separating them with parchment paper when freezing, or they’ll stick together.
Reheat – For refrigerated parathas, reheat in a microwave (15-20 seconds) or reheat in a tava / skillet kept over medium heat. If parathas are frozen, use a tava/skillet to reheat for best results.
Serve it with
You can serve masala paratha hot or at room temperature. They taste great when served with
Paratha is a simple unleavened bread made with whole wheat flour (atta), water, salt, and oil or ghee. Some variations of paratha include stuffings, layers, or in the case of this recipe, spices.
What do you eat with paratha?
Paratha makes a delicious breakfast, snack, or lunch option. It pairs well with raitas, chutneys, curries, and more! This masala paratha recipe also tasted great with a warm cup of tea.
Learn how to make a soft and flaky masala paratha or roti with this easy to follow recipe. Perfect for a hearty breakfast or snack, this spiced flatbread is sure to hit the spot.
Add the remaining water, one tablespoon at a time, and continue kneading until the dough comes together like a ball.
Add 1/4th teaspoon oil to the dough and knead till the oil is absorbed.
If the dough is sticky, sprinkle approximately 1/4 teaspoon wheat flour (or more if needed) on the dough and knead again to form a dough that is not sticky. The dough should be supple and soft.
Cover the dough and set aside for 15-20 minutes.
Pull a small piece approximately the size of a golf ball from the dough. Place the piece between the palms of your hands and shape them into a ball.
Flatten the ball and cover both sides with flour.
Making rotis
Roll out the flattened ball into a circular shape (approximately 7-8 inches in diameter).
Making parathas (to cook rotis, scroll down)
Note: The steps below show you how to make round parathas. To make square and triangle parathas, check the plain parathas post.
Roll out the flattened ball into a circular shape (approximately 6 inches in diameter).
Brush the surface of the rolled-out dough with ghee.
Sprinkle some flour evenly on the rolled-out dough with ghee.
Start from one end of the circle and roll towards the other until it resembles a log.
Roll the log inward into a coil. Once you reach the end, pull the edge and tuck it under the coil.
Flatten the coil until it looks like a disc.
Dip the flattened disc in the flour.
Roll out the flattened ball evenly into a circular shape (approximately 7-8 inches in diameter). Dust more flour as needed to help with the rolling.
Cooking masala paratha / roti
Heat a pan / tawa over medium-high heat.
Dust off excess flour from the paratha / roti by placing it on your palm of one hand and then flip it onto the palm of your other hand. Repeat this process 3-4 times.
Place the paratha/roti in the hot pan. Cook until small bumps form on the surface (approximately 1-2 minutes).
Flip the paratha/roti onto the other side. Cook for 30-40 seconds or so until you see brown spots. Smear it with ghee and flip it.
Cook for 20-30 seconds, then brush the side facing up with ghee. Use a spatula to press down the paratha so that it evenly cooks.
Flip it and cook it for another 15-20 seconds while pressing the paratha/roti down with the spatula.
Transfer the paratha/roti to a plate. Repeat this process for the rest of the dough.
Serve it hot with tea or your favorite vegetable dish.
Notes
To fasten up the process, roll out the next paratha as one cooks in the pan.
Make sure to dust off the excess flour from the paratha before you cook it. This prevents the paratha from getting hard.
Before storing it in an air-tight container, let the paratha cool down a bit so as not to make it soggy.