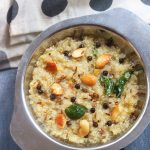
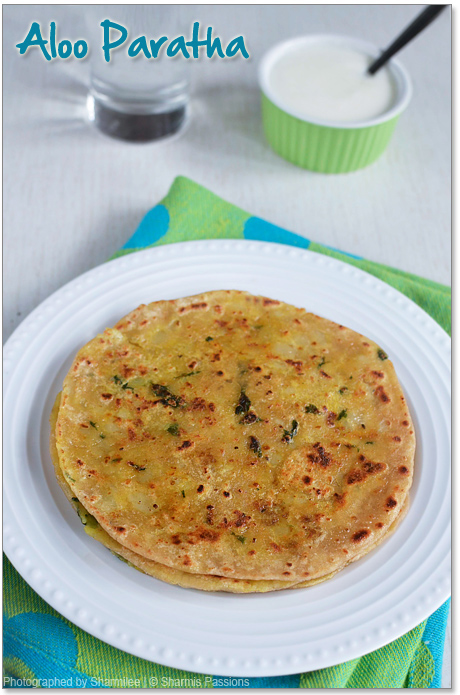
❌

Reading view

There are new articles available, click to refresh the page.

Aloo Paratha Recipe

Aloo Paratha is a popular Indian flat bread made by wheat flour, potatoes, spices and herbs. Aloo Paratha is from Punjabi Cuisine also called as Aloo ka Paratha, Alu Paratha. It is very simple and easy to make yet tastes delicious. Aloo Paratha is a lovely & appetizing flat bread loved by millions In India and relished any time - breakfast, lunch or dinner. Learn How to make Aloo Paratha with step by step pictures.

aloo paratha in a white plate

Aloo Paratha is my younger ones most favorite so I make it at least once a month. He always says 'amma your aloo paratha is the best' whenever he tastes it outside especially in restaurants. and that is the best compliment I have received form him.

[feast_advanced_jump_to]

About Aloo Paratha

Aloo Paratha is a popular Indian flat bread originated from Punjabi Cuisine. 'Aloo' in Hindi means potatoes and 'Paratha' is flatbread so Aloo Paratha simply translates to a flatbread made with potato stuffing. Aloo Paratha makes a super filling breakfast.

First a dough is prepared using wheat flour, salt and water just like our chapati dough. Potato filling is made by mashing cooked potatoes and then cooking it along with spices and herbs. This potato filling is stuffed inside the dough and rolled to a slightly thin disc then toasted in tawa with lots of ghee until both the sides have golden brown spots.

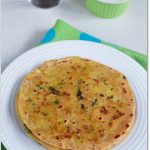
Aloo Paratha can be served with pickle and curd. Aloo Paratha toasted in ghee is the best breakfast option. It may look like the rolling is hard but I tell you it comes by practice. As we are mashing the potatoes until smooth rolling becomes easier and the filling doesn't come out.

aloo paratha in a white plate

Aloo Paratha Ingredients

  • Wheat Flour - Wheat flour or chapati flour is used to make the paratha dough.
  • Potatoes - Potatoes are pressure cooked until soft, then mashed well and used.
  • Cumin seeds - Cumin seeds are spluttered for tempering.
  • Turmeric powder - Turmeric powder adds flavor and color to the potato stuffing.
  • Coriander leaves - Coriander leaves adds great flavor so do not miss it.

Similar Recipes

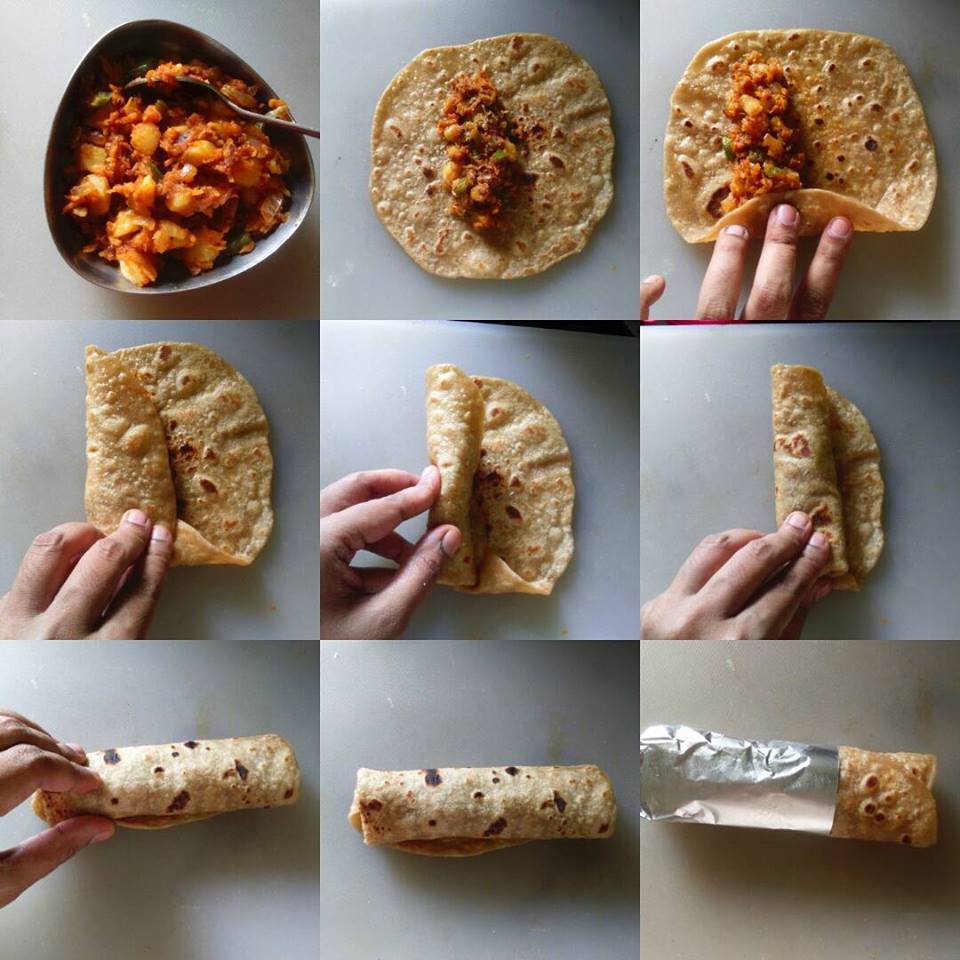
How to make Aloo Paratha Recipe Step by Step

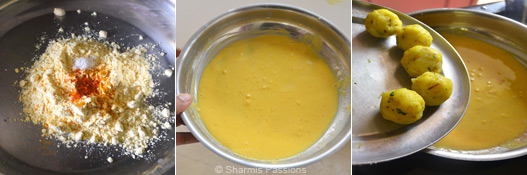
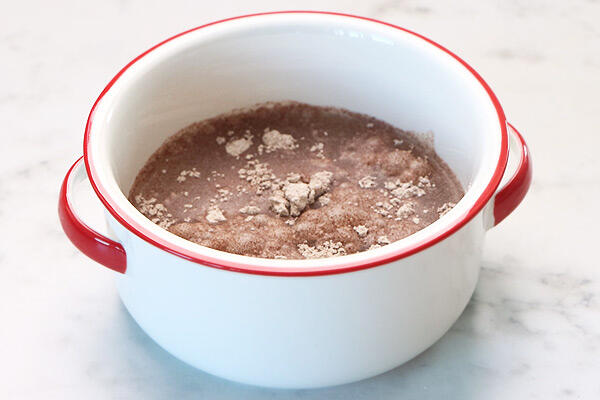
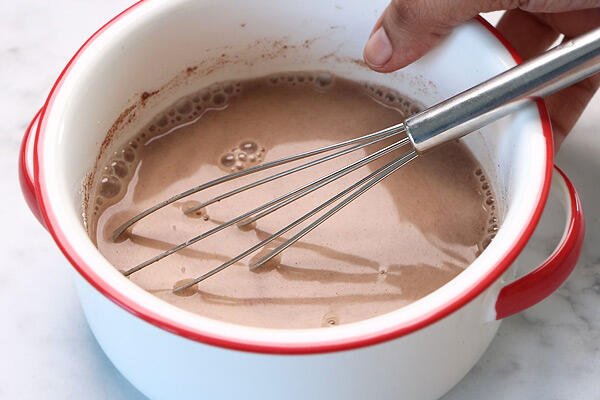
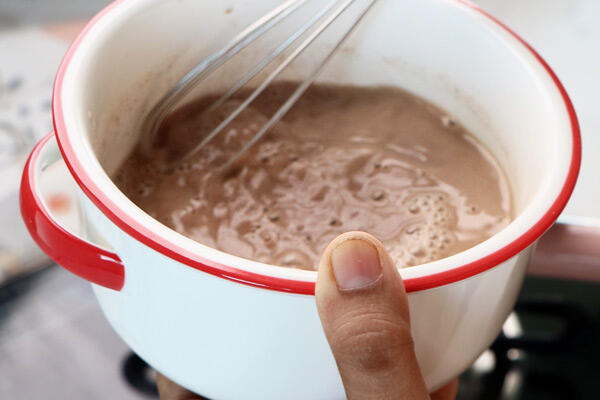
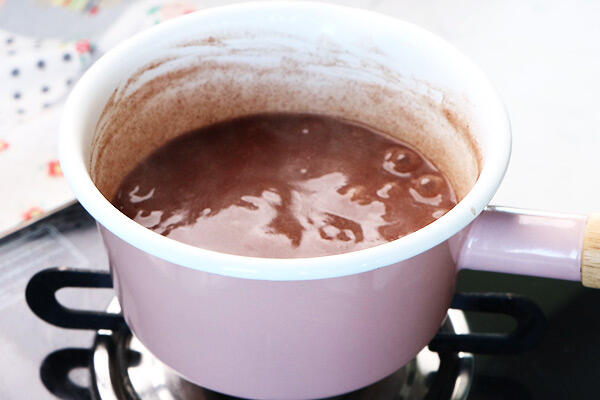
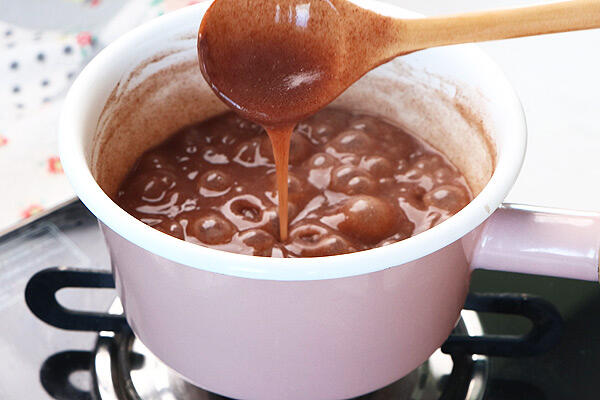
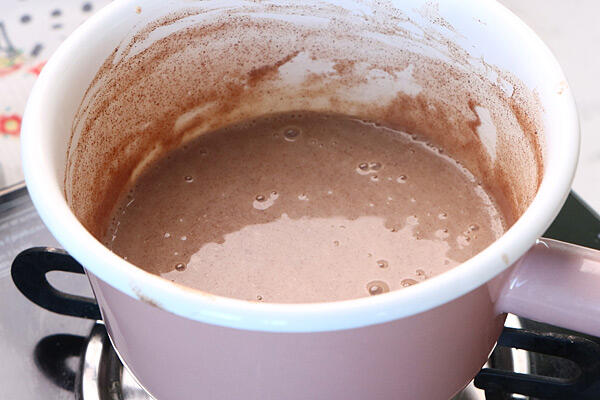
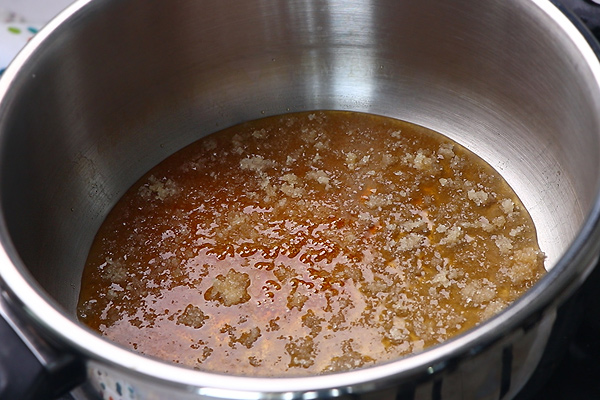
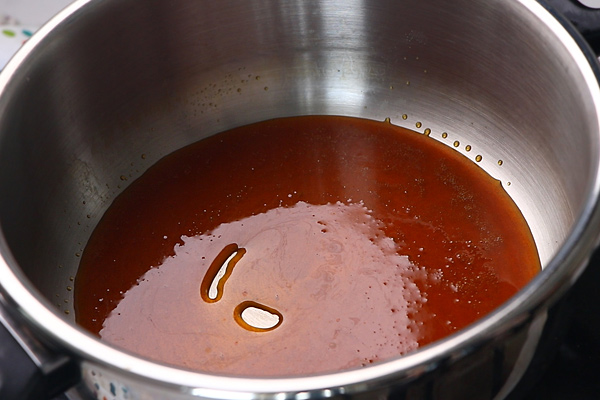
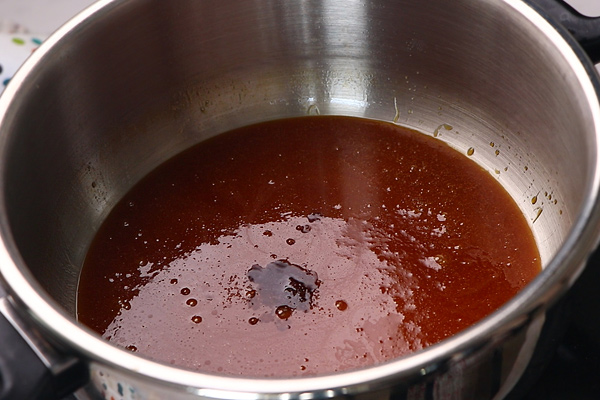
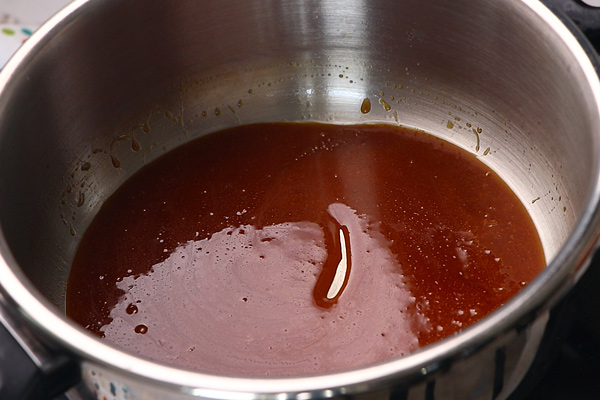
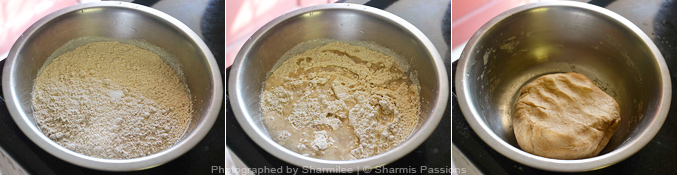
1.In a wide mixing bowl add wheat flour, salt and first give a quick mix for salt to be even. Then add water little by little, gather to form a soft pliable dough. Once it is gathered to a mass add oil and knead it once.T he dough should not be too tight or too loose, it should be non sticky at this stage. Allow it to rest for a while until we prepare the stuffing.

how to make aloo paratha  step1

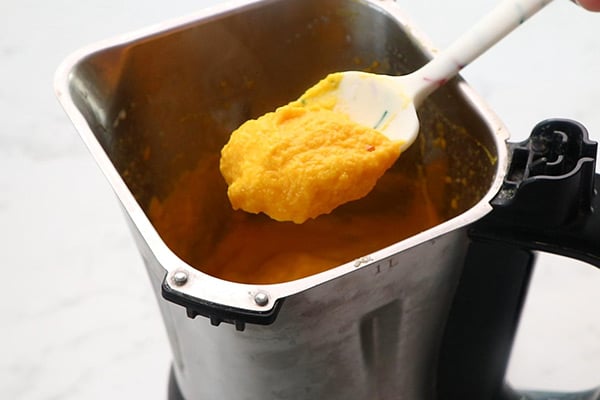
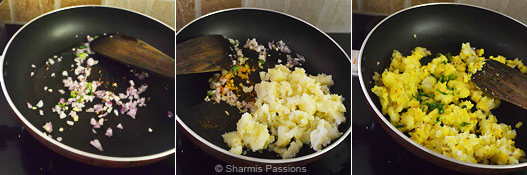
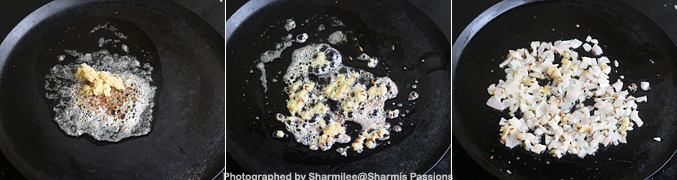
2.Cut potatoes into half and pressure cook them until soft for 5-6 whistles. Peel of the skin, mash it well,add turmeric powder and mix it well and set aside. Heat oil in a pan add cumin seeds let it splutter.

how to make aloo paratha  step2

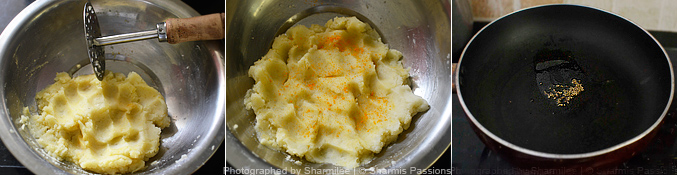
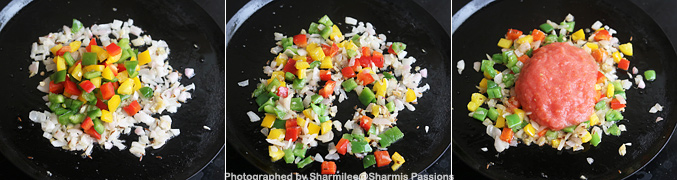
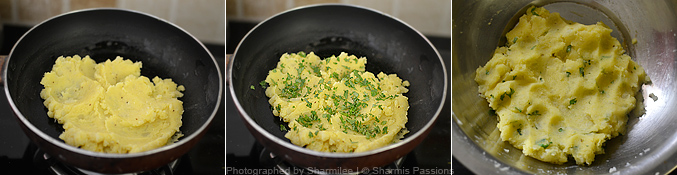
3.Then add mashed potatoes, saute for 2 minutes then add required salt and give a quick stir. Finally add chopped coriander leaves, give a quick stir and switch it off.

how to make aloo paratha  step3

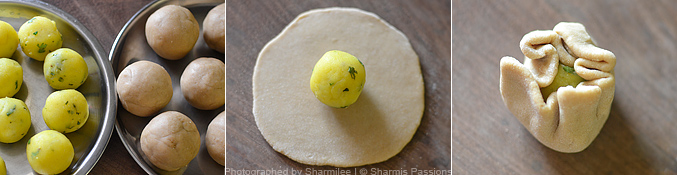
4.Make small balls with the mixture and keep aside. Divide the chapathi dough into equal parts and roll into smooth balls bigger than the aloo balls. Flour the surface and roll the chapathi dough slightly thicker.Then place the aloo ball in the center and gather the dough from all sides.

how to make aloo paratha  step4

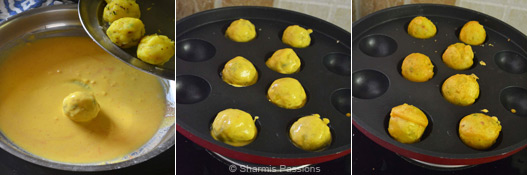
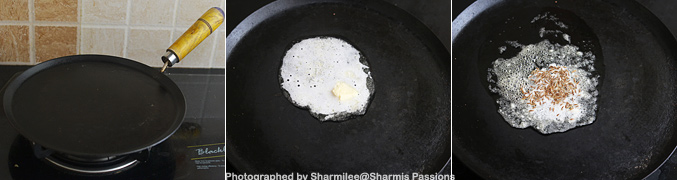
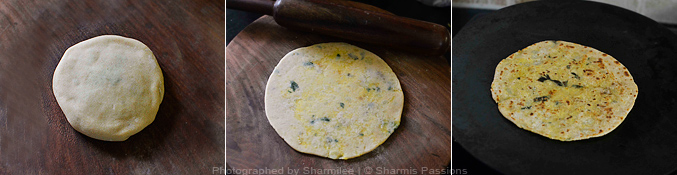
5.Seal it well, flip to other side and start rolling to a slightly thinner paratha. Dust flour when needed. Heat dosa tawa and carefully place the parathas, drizzle oil and cook until the parathas have golden brown spots here and there.

how to make aloo paratha  step5

Brush it with ghee while serving and serve it hot!

Expert Tips

  • After stuffing the aloo balls and sealing it up, you can slightly flatten it with your palms before rolling.
  • You can also add red chili powder along with turmeric powder.
  • You can even apply ghee for toasting the parathas.
  • I make my parathas a bit thinner, Roll it thin or slightly thick as per your liking. It goes well with any curd based raita either onion raita or pickle raita.

Serving & Storage

Aloo Paratha is great to serve with curd and pickle. You can store the wheat flour and potato stuffing in fridge for 2 days. Make parathas when you want to serve. Aloo Paratha tastes great when served hot!

aloo paratha in a white plate

If you have any more questions about this Aloo Paratha Recipe do mail me at sharmispassions@gmail.com. In addition, follow me on Instagram,Β Facebook,Β PinterestΒ ,YoutubeΒ andΒ TwitterΒ .

Tried this Aloo Paratha Recipe? Do let me know how you liked it. Also tag us on Instagram @sharmispassions and hash tag it on #sharmispassions.

πŸ“– Recipe Card

8489759748 7bf02a61ca o
Print

Aloo Paratha Recipe

Aloo Paratha is a popular Indian flat bread made by wheat flour, potatoes, spices and herbs. Aloo Paratha is from Punjabi Cuisine also called as Aloo ka Paratha, Alu Paratha. It is very simple and easy to make yet tastes delicious. Aloo Paratha is a lovely & appetizing flat bread loved by millions In India and relished any time - breakfast, lunch or dinner. Learn How to make Aloo Paratha with step by step pictures.
Course Breakfast, dinner, Lunch, Main Course
Cuisine Indian
Keyword 30 mins recipes, Aloo Recipes, bread, chapati, chapati recipes, flat bread recipes, flatbread recipes, North Indian, paratha recipes, Paratha', Potato, Potato Recipes, recipes, roti, roti recipes
Prep Time 10 minutes
Cook Time 30 minutes
Total Time 40 minutes
Servings 2 people
Calories 419kcal
Author Sharmilee J

Ingredients

For the Chapathi Dough :

  • 1 cup wheat flour
  • 1 teaspoon oil
  • salt to taste
  • water as required

For the Aloo Stuffing :

  • 1 teaspoon oil
  • Β½ teaspoon cumin seeds
  • 2 large potatoes
  • 2 tablespoon coriander leaves
  • ΒΌ teaspoon turmeric powder

Instructions

  • In a wide mixing bowl add wheat flour, salt and first give a quick mix for salt to be even. Then add water little by little, gather to form a soft pliable dough. Once it is gathered to a mass add oil and knead it once.T he dough should not be too tight or too loose, it should be non sticky at this stage. Allow it to rest for a while until we prepare the stuffing.
  • Cut potatoes into half and pressure cook them until soft for 5-6 whistles. Peel of the skin, mash it well,add turmeric powder and mix it well and set aside. Heat oil in a pan add cumin seeds let it splutter.
  • Then add mashed potatoes, saute for 2 minutes then add required salt and give a quick stir. Finally add chopped coriander leaves, give a quick stir and switch it off.
  • Make small balls with the mixture and keep aside. Divide the chapathi dough into equal parts and roll into smooth balls bigger than the aloo balls. Flour the surface and roll the chappathi dough slightly thicker.Then place the aloo ball in the center and gather the dough from all sides.
  • Seal it well, flip to other side and start rolling to a slightly thinner paratha. Dust flour when needed. Heat dosa tawa and carefully place the parathas, drizzle oil and cook until the parathas have golden brown spots here and there.
  • Brush it with ghee while serving and serve it hot!

Notes

  • After stuffing the aloo balls and sealing it up, you can slightly flatten it with your palms before rolling.
  • You can also add red chili powder along with turmeric powder.
  • You can even apply ghee for toasting the parathas.
  • I make my parathas a bit thinner, Roll it thin or slightly thick as per your liking. It goes well with any curd based raita either onion raita or pickle raita.

Nutrition

Serving: 50g | Calories: 419kcal | Carbohydrates: 86g | Protein: 11g | Fat: 3g | Saturated Fat: 0.3g | Polyunsaturated Fat: 1g | Monounsaturated Fat: 1g | Trans Fat: 0.01g | Sodium: 1954mg | Potassium: 985mg | Fiber: 7g | Sugar: 2g | Vitamin A: 44IU | Vitamin C: 42mg | Calcium: 46mg | Iron: 5mg

The post Aloo Paratha Recipe appeared first on Sharmis Passions.

Paneer Tikka Masala Recipe

Paneer Tikka Masala is a spicy, super flavorful and tastes delicious just like in restaurants. Paneer Tikka gravy is made by marinating paneer with hung curd, herbs, spices grilling it then cooking it in onion, tomato based gravy. Paneer Tikka Masala is a great combo with roti, naan, chapati and rice meal and is liked by all for its taste. Learn to make Paneer Tikka Masala with step by step pictures.

paneer tikka masala in a serving bowl

Paneer Tikka Masala is my constant order in restaurants after Paneer Butter Masala. this Paneer Tikka Masala tastes close to the restaurant style gravy. This is one of the top popular orders in restaurants. When I want to have spicy gravy then this paneer tikka masala tops the list.

[feast_advanced_jump_to]

About Paneer Tikka Masala

Paneer Tikka Masala is a popular North Indian side dish. Paneer Tikka Masala is made first marinating paneer with hung curd, spices and herbs then grilling it until char grilled. This chargrilled paneer cubes are cooked in a onion tomato based gravy and it tastes so delicious.

Traditionally tikkas are made in a Tandoor clay oven which cooks food with heat generated by wood fire which gives it a smoky flavor. We cannot get the exact taste at home but sure can match up to the taste by using an oven or charcoal grilling.

I have recently tried paneer tikkas in oven and thoroughly enjoyed it. I felt the flavor is the best in these tikkas which will be missing in stove top method. But for paneer tikka masala stove top method works good. For the individual tikkas grilling option is better than the stove top so check out for my 'paneer tikka in oven' post.

paneer tikka masala in a serving bowl

Similar Recipes

Paneer Tikka Masala Ingredients

  • Paneer - Choose firm fresh paneer. You can choose to use either homemade or store bought paneer.
  • Hung curd - Hang curd in a cheese cloth until all the water drips off to get thick hung curd.
  • Spice powders - Turmeric powder, RedΒ chilli powder, Garam masala powder, Chat masala powder and Pepper powders are used here.
  • Ginger garlic paste - Ginger garlic paste adds flavor to the gravy.
  • Onion, Tomato - Onion tomato forms the base for this gravy.
  • Herbs - Coriander leaves and kasoori methi are the herbs used here.

How to make Paneer Tikka Masala Step by Step

1.If you don't have thick yogurt then hang Β½ cup curd in a muslin cloth and keep aside for 30 minutes, Your hung curd is ready. Mix all the ingredients listed under 'For the paneer tikka marination' so the paneer is coated well with the hung curd spice mixture. Marinate it for an hour. Then toast the marinated paneer.

paneer tikka masala step1

2.Toast it until golden brown, drain in tissue and set aside. Heat oil add jeera allow it to crackle. Add ginger garlic paste and onion, sautΓ© till slightly browned.

paneer tikka masala step2

3.Then add the tomato puree, add chili, garam masala, coriander powders and required salt and mix well. Sprinkle little water and bring to a boil.

paneer tikka masala step3

4.Once the raw smell of tomato leaves and the gravy becomes thick add fresh cream, then toasted paneer.

paneer tikka masala step4

5.Add little water if its too thick, simmer it for minutes until oil separates. Then add dried kasoori methi and coriander leaves, give a quick stir and switch off.

paneer tikka masala step5

Paneer tikka masala is ready! Enjoy hot with phulkas / naan or rotis!

Paneer Tikka Stove Top Method

First mix hung curd with masala powders, kasoori methis, lemon juice, salt to a fine paste then add paneer, tomato and capsicum to the fine paste and marinate for an hour.

paneer tikka


In a dosa tawa drizzle oil - then toast the marinated paneer along with capsicum and tomatoes in a tawa until golden brown. Turn over to toast evenly. Then drain in a tissue paper and keep aside.

paneer tikka made in pan

Prick them alternatively in a tooth pick and enjoy your stove top paneer tikkas. So those who don't have an oven , you can try this method, works great.

paneer tikka

Expert Tips

  • Toasting - You can even toast the marinated paneer when the gravy is about to complete may be you can start roasting them in parallel when the tomato puree gets cooked. Make sure to turn over to toast it evenly on all sides.
  • Cooking consistency - Make sure oil separates and raw smell of tomatoes leaves before adding the cream.
  • Variation - For a low fat version add ΒΌ cup milk and a tablespoon of cream.
  • Replacement - You can skip tomatoes if you dont like them and add different color capsicums for the tikkas. You can use skewers too for making the tikkas in oven.

Serving and Storage

Paneer Tikka Masala goes well with phulka, chapati, roti, naan, plain basmati rice, jeera rice, pulao etc. Paneer Tikka Masala keeps well in fridge for 2 days.

paneer tikka masala in a serving bowl

If you have any more questions about this Paneer Tikka Masala RecipeΒ do mail me at sharmispassions@gmail.com. In addition, follow me on Instagram,Β Facebook,Β PinterestΒ ,YoutubeΒ andΒ TwitterΒ .

Tried this Paneer Tikka Masala Recipe? Do let me know how you liked it. Also tag us on Instagram @sharmispassions and hash tag it on #sharmispassions.

πŸ“– Recipe Card

8011595645 6b1579a9af o
Print

Paneer Tikka Masala Recipe

Paneer Tikka Masala is a spicy, super flavorful and tastes delicious just like in restaurants. Paneer Tikka gravy is made by marinating paneer with hung curd, herbs, spices grilling it then cooking it in onion, tomato based gravy. Paneer Tikka Masala is a great combo with roti, naan, chapati & rice meal and is liked by all for its taste. Learn to make Paneer Tikka Masala with step by step pictures.
Course Side Dish
Cuisine Indian
Keyword easy paneer recipes, Gravy, gravy recipes, lunch recipes, masala recipes, paneer dishes, paneer recipes, restaurant style recipes, roti sidedish, Side Dish
Prep Time 20 minutes
Cook Time 20 minutes
Total Time 40 minutes
Servings 2 people
Calories 416kcal
Author Sharmilee J

Ingredients

  • 1 medium sized onion (cubed)
  • 1 medium sized tomato (cubed)
  • 1 medium sized capsicum (cubed)

For the marinade:

For tikka masala:

Instructions

  • If you don't have thick yogurt then hang Β½ cup curd in a muslin cloth and keep aside for 30 minutes, Your hung curd is ready. Mix all the ingredients listed under 'For the paneer tikka marination' so the paneer is coated well with the hung curd spice mixture. Marinate it for an hour. Then toast the marinated paneer.
  • Toast it until golden brown, drain in tissue and set aside. Heat oil add jeera allow it to crackle. Add ginger garlic paste and onion, sautΓ© till slightly browned.
  • Then add the tomato puree, add chili, garam masala, coriander powders and required salt and mix well. Sprinkle little water and bring to a boil.
  • Once the raw smell of tomato leaves and the gravy becomes thick add fresh cream, then toasted paneer.
  • Add little water if its too thick, simmer it for minutes until oil separates. Then add dried kasoori methi and coriander leaves, give a quick stir and switch off.
  • Paneer tikka masala is ready! Enjoy hot with phulkas / naan or rotis!

Notes

  • Toasting - You can even toast the marinated paneer when the gravy is about to complete may be you can start roasting them in parallel when the tomato puree gets cooked. Make sure to turn over to toast it evenly on all sides.
  • Cooking consistency - Make sure oil separates and raw smell of tomatoes leaves before adding the cream.
  • Variation - For a low fat version add ΒΌ cup milk and a tablespoon of cream.
  • Replacement - You can skip tomatoes if you dont like them and add different color capsicums for the tikkas. You can use skewers too for making the tikkas in oven.

Nutrition

Serving: 100g | Calories: 416kcal | Carbohydrates: 34g | Protein: 9g | Fat: 30g | Saturated Fat: 11g | Polyunsaturated Fat: 5g | Monounsaturated Fat: 12g | Trans Fat: 0.1g | Cholesterol: 42mg | Sodium: 146mg | Potassium: 1160mg | Fiber: 9g | Sugar: 18g | Vitamin A: 4251IU | Vitamin C: 109mg | Calcium: 183mg | Iron: 5mg

The post Paneer Tikka Masala Recipe appeared first on Sharmis Passions.

Lemon Kiwi Popsicle Recipe

Lemon Kiwi Popsicle is a refreshing ice bar made by freezing lemonade and sliced kiwi in popsicle molds. This feels light, tangy and cooling, especially during summer days when the heat feels too much. It is one of those no cook recipes that can be done anytime without much planning.

lemon kiwi popsicle served

This popsicle has mild sweetness with strong lemon taste and soft fruity bite from kiwi inside. It feels bit different from store bought ice bars as it tastes more fresh and natural. It is a nice option when something refreshing is needed fast at home. The taste feels clean and not heavy, so you don't feel over sweet after eating it.

[feast_advanced_jump_to]

About Lemon Kiwi Popsicle

Lemon Kiwi Popsicle is ice bar lemonade with kiwi slices. Lemon gives refreshing taste while kiwi adds slight tanginess and soft texture once it gets frozen. Both together gives a nice balance in flavor. This combination just works well and does not overpower each other too much.

I love lemon flavour in anything so wanted to try this.Also this is the first time I am buying kiwi fruit so used it for popsicles. Lemon and kiwi compliment each other so the popsicle is a bit tangy so adjust with sweetness according to your taste.

The texture of this is icy and smooth with small kiwi pieces in between. When you bite it, first lemon taste hits strong and then kiwi flavor slowly comes after. The look is also tempting with yellow base and green kiwi slices visible inside. This recipe is very simple and easy to make at home without much effort also.

You can just adjust the sugar level or even use orange juice instead of lemon if you want some different taste. You can also add mint leaves for extra fresh feeling if liked. Flavors can be mixed and tried depending on taste. Even kids enjoy trying different fruits along with kiwi sometimes. It feels nice to have something homemade instead of buying ice bars outside.

I make this during summer afternoons at home. It is quick to prepare and kids also enjoy adding kiwi slices into the moulds by themselves.Β 

lemon kiwi popsicle served

Lemon Kiwi Popsicle Ingredients

  • Lemon juice - I just used for the base taste. You can use orange juice also if lemon feels too sharp.
  • Water - I added water to balance the lemon juice and keep it light. You can reduce little water if you want more strong lemon taste.
  • Sugar - I add it for sweetness so the sour taste gets balanced well. You can add more or less depending on how sour the lemons are that time.
  • Kiwi - I have just used sliced kiwi for filling inside the popsicle. It adds nice fruity taste and gives soft bite while eating.

Similar Recipes

How to make Lemon Kiwi Popsicle Step by Step

1.Extract lemon juice and take it in a mixing bowl. Add sugar to it.

how to make lemon kiwi popsicle step1

2.Add water to it. Mix well until sugar completely dissolves.

how to make lemon kiwi popsicle step2

3.Now lemon juice is ready. Trim the edges of kiwi, peel the skin.

how to make lemon kiwi popsicle step3

4.Then slice it.Take your popsicle mould - fill it up almost ΒΎth of the mold with lemon juice. Then add 2 kiwi slices in each of the mould.

how to make lemon kiwi popsicle step4

5.Close with lid and freeze for at least 8 hours. Then show the bottom part of the popsicle mould in running tap water and then remove the popsicles carefully. Serve immediately!

how to make lemon kiwi popsicle step5

Serve immediately.

lemon kiwi popsicle served

Expert Tips

  • Sugar - I always taste the lemon juice before freezing. I add sugar slowly so it does not turn too sour later.
  • Kiwi slicing - I slice the kiwi thin so it freezes well and looks nice inside mould. Thick slices may feel little hard while biting.
  • Freezing time - I freeze it without opening in between. If I disturb it, the popsicle shape may not come proper.
  • Removing popsicle - I show the mould under running tap water for few seconds only. If I keep longer, it melts fast.
  • Flavor option - I sometimes replace lemon juice with orange juice for mild sweet taste. It comes good that way also.

Serving and Storage

Serve chilled immediately after removing from the mould. This goes well as an afternoon cooling snack or after lunch or dinner. Store leftover popsicles in freezer covered properly. It tastes best when finished within 3 to 4 days.

FAQS

1.Can I skip sugar fully?

Yes you can skip it, but the popsicle will taste very sour. Little sweetness makes it more enjoyable.

2.Can store bought lemon juice be used?

Fresh lemon juice tastes best, bottled ones sometimes gives slight bitter taste.

3.Can I add more kiwi slices?

Yes you can add more if you like more fruity bite in every popsicle.

4.Can this be made in paper cups?

Yes paper cups works fine, just cover top with foil and insert stick carefully.

5.Is this suitable for kids?

Yes it is light and safe, just reduce lemon little to suit kids taste.

lemon kiwi popsicle served

If you have any more questions about this Lemon Kiwi Popsicle Recipe do mail me at sharmispassions@gmail.com. In addition, follow me on Instagram, Facebook,Β  Pinterest, Youtube andΒ TwitterΒ .

Tried this Lemon Kiwi Popsicle Recipe ? Do let me know how you liked it. Also tag us on Instagram @sharmispassions and hash tag it on #sharmispassions.

πŸ“– Recipe Card

LemonKiwiPopsicle2
Print

Lemon Kiwi Popsicle Recipe

Lemon Kiwi Popsicle is a refreshing ice bar made by freezing lemonade and sliced kiwi in popsicle molds. This feels light, tangy and cooling, especially during summer days when the heat feels too much. It is one of those no cook recipes that can be done anytime without much planning.
Course Dessert
Cuisine Indian
Keyword dessert recipes, ice cream recipes, icecreams, lemon recipes, popsicles
Prep Time 15 minutes
Freezing Time 8 hours
Total Time 8 hours 15 minutes
Servings 2 popsciles
Calories 127kcal
Author Sharmilee J

Ingredients

  • ΒΌ cup lemon juice
  • 2 cups water
  • 2 teaspoon sugar
  • 2 slices kiwi

Instructions

  • Extract lemon juice and take it in a mixing bowl. Add sugar to it.
  • Add water to it. Mix well until sugar completely dissolves. Now lemon juice is ready.
  • Trim the edges of kiwi, peel the skin. Then slice it.
  • Take your popsicle mould - fill it up almost ΒΎth of the mold with lemon juice.
  • Then add 2 kiwi slices in each of the mould.
  • Close with lid and freeze for at least 8 hours.
  • Then show the bottom part of the popsicle mould in running tap water and then remove the popsicles carefully. Serve Lemon Kiwi Popsicle immediately!

Notes

  • Sugar - I always taste the lemon juice before freezing. I add sugar slowly so it does not turn too sour later.
  • Kiwi slicing - I slice the kiwi thin so it freezes well and looks nice inside mould. Thick slices may feel little hard while biting.
  • Freezing time - I freeze it without opening in between. If I disturb it, the popsicle shape may not come proper.
  • Removing popsicle - I show the mould under running tap water for few seconds only. If I keep longer, it melts fast.
  • Flavor option - I sometimes replace lemon juice with orange juice for mild sweet taste. It comes good that way also.

Nutrition

Serving: 75g | Calories: 127kcal | Carbohydrates: 31g | Protein: 2g | Fat: 1g | Saturated Fat: 0.1g | Polyunsaturated Fat: 1g | Monounsaturated Fat: 0.1g | Sodium: 21mg | Potassium: 388mg | Fiber: 5g | Sugar: 21g | Vitamin A: 158IU | Vitamin C: 146mg | Calcium: 72mg | Iron: 0.5mg

The post Lemon Kiwi Popsicle Recipe appeared first on Sharmis Passions.

Quinoa Kara Pongal Recipe

Quinoa Kara Pongal is a healthy, mild spicy pongal made by cooking Β quinoa and dal and tempered with ghee & spices. Quinoa Kara Pongal is very filling and saves your appetite for long hours. How to make Quinoa Kara Pongal is presented in this post with step by step pictures.bisi bele bath recipe

Easy Quinoa Ven Pongal , cooked quinoa and dal mashed together then tempered with jeera,pepper corns,curry leaves,cashews with a dose of ghee.Most of the south indian household prepare ven pongal as a part of breakfast atleast once a month, we usually make it with rice or millet for a change tried it quinoa, its a perfect choice I would say.Do try this and let me know how you liked it.

More quinoa recipes hereΒ 

bisi bele bath recipe

If you have any more questions about this quinoa kara pongal do mail me at sharmispassions@gmail.com. In addition, follow me on Instagram,Β Facebook,Β PinterestΒ ,YoutubeΒ andΒ TwitterΒ .

Tried this quinoa kara pongal ? Do let me know how you liked it. Also tag us on Instagram @sharmispassions and hash tag it on #sharmispassions.

πŸ“– Recipe Card

QuinoaVenPongal1
Print

Quinoa Kara Pongal Recipe

Quinoa kara pongal is a healthy, mild spicy pongal made by cooking Β quinoa and dal and tempered with ghee & spices. Quinoa Kara Pongal is very filling and saves your appetite for long hours. How to make Quinoa Kara Pongal is presented in this post with step by step pictures.
Course Breakfast, Main Course
Cuisine Indian
Keyword 30 mins recipes, 30 mins rice recipes, pongal, pongal recipes, quinoa recipes, recipes, veg recipes
Prep Time 10 minutes
Cook Time 15 minutes
Total Time 25 minutes
Servings 2
Calories 236kcal
Author Sharmilee J

Ingredients

  • ΒΌ cup quinoa
  • 2 tablespoon moong dal
  • 1 cup water
  • salt to taste

To temper:

  • 1 tablespoon ghee
  • 1 teaspoon oil
  • ΒΌ teaspoon jeera
  • ΒΌ teaspoon pepper corns
  • a small sprig curry leaves
  • 1 small green chilli
  • 5 nos cashews broken

Instructions

  • Rinse quinoa first and set aside.
  • Dry roast dal until golden then add quinoa to it. Add water.
  • Cook covered in low flame until mushy. Quinoa should have tails coming out which shows its perfectly cooked. Mash it well. If its too dry add little hot water.
  • In a kadai add ghee + oilΒ  then add the tempering finally add cashews and fry until golden.
  • Transfer the tempering to pongal along with required salt. Mix well and serve Quinoa Kara Pongal hot.

Nutrition

Serving: 125g | Calories: 236kcal | Carbohydrates: 25g | Protein: 7g | Fat: 12g | Saturated Fat: 5g | Polyunsaturated Fat: 2g | Monounsaturated Fat: 4g | Trans Fat: 0.01g | Cholesterol: 19mg | Sodium: 87mg | Potassium: 148mg | Fiber: 4g | Sugar: 1g | Vitamin A: 38IU | Vitamin C: 3mg | Calcium: 25mg | Iron: 2mg

How to make Quinoa Kara Pongal

  1. Rinse quinoa first and set aside.Dry roast dal until golden then add quinoa to it.Add water.
    How to make bisi bele bath recipe - Step1
  2. Cook covered in low flame until mushy.Quinoa should have tails coming out which shows its perfectly cooked. Mash it well.If its too dry add little hot water.
    How to make bisi bele bath recipe - Step2
  3. In a kadai add ghee + oilΒ  then add the tempering finally add cashews and fry until golden.Transfer the tempering to pongal along with required salt.Mix well and serve hot.
    How to make bisi bele bath recipe - Step3

Serve hot with a drizzle of ghee!

bisi bele bath recipe

Hot hot quinoa kara pongal ready!

bisi bele bath recipe

The post Quinoa Kara Pongal Recipe appeared first on Sharmis Passions.

Carrot Kheer Recipe (Carrot Payasam)

Carrot Kheer is a yummy, creamy dessert made by simmering cooked carrot puree with milk, sweetening with sugar, flavoring with cardamom powder, saffron and & garnishing with chopped nuts. Carrot Kheer is made on special occasions and is quite easy to make. Recipe includes step by step pictures and video.

carrot kheer served with nuts and saffron as garnish

Carrot Kheer is our family favourite, both kids are fond of it. This version of carrot kheer is loved by all ages as it is creamy and tasty. Carrot Kheer made creamy and rich using this recipe will be an instant hit at parties and get together etc. Do try this recipe and let me know how you liked it.

[feast_advanced_jump_to]

About Carrot Kheer

Carrot Kheer is a rich creamy dessert that you can make for festivals or any special occasions. Kheer is payasam so payasam made with carrot as main ingredient is called carrot kheer. Carrot Payasam as it is popularly known in South India is one of the unique kheer recipes that you can make from our usual rice kheer.

There are many ways this Carrot Kheer can be made - Some versions involve just sauteing carrots in ghee and simmering in milk. But this recipe I have shared is more smooth and will sure be kids favorite. As carrots are cooked and pureed, the kheer becomes smooth and creamy.

Cardamom powder, saffron goes well with carrots and milk so do not skip it. If your kids are not fond of carrot in sabzi form then try this recipe for them and I am sure they will love it and ask for more. Mittu loves this kheer since her childhood now gugu has added on this to his favorites too.

This is a creamy and rich dessert that you can make it as a part of meals or as an after meal dessert. If you get Delhi red carrots you can use that too. Carrots are a rich source of Vitamin A which is very good for our eyes so try to include carrots in your diet on a regular basis.

carrot kheer served with nuts and saffron as garnish

Carrot Kheer Video

Carrot Kheer Ingredients

  • Carrot - Choose fresh carrots. I used ooty carrots you can use Delhi red carrots too. Use fresh carrots.
  • Milk - Use full fat milk. I used farm fresh milk.
  • Ghee - used for sautΓ©ing carrots before cooking.
  • Sugar - I have used regular white sugar but you can use jaggery too. You can even replace sugar with condensed milk too.
  • Flavoring - Cardamom powder and saffron is the best flavoring for this kheer.
  • Garnish - I have used pistachio, you can ghee fry nuts and add it too.
ingredients needed to make carrot kheer

Why you will love this recipe?

  • Easy and quick to make
  • Creamy and rich dessert
  • Healthy and tasty
  • Creamy and smooth
  • Can be made with kitchen staples

How to make Carrot Kheer Step by Step

1.Take 4 medium sized carrots. Trim both the edges, remove the skin and rinse it well.

remove skin and rinse

2.Chop it roughly and keep it ready.

chop roughly

3.To a pressure cooker heat 1 tablespoon ghee add chopped carrots saute for 3 minutes.

saute in ghee

4.Add around 8 whole cashews, Β½ cup milk and Β½ water. Pressure cook for 3 whistles.

add cashews, milk, water

5.Check if carrot is cooked.

cooked until soft

6.Cool down and puree it slightly coarse.

puree it

7.To a sauce pan boil 3 and Β½ cups milk, simmer for few minutes.

boil milk

8.Add cooked carrot puree.

add carrot puree

8.Add ΒΎ cup sugar.

add sugar

9.Add around 10 strands saffron.

add saffron

10.Mix it well and let it boil for 15 minutes.

boil well

11.Then add ΒΌ teaspoon cardamom powder and chopped pistachios. I added little here and reserved the remaining while serving.

add cardamom powder, nuts

12.Mix it well and switch off.

switch off

Carrot Kheer is ready!

Expert Tips

  • Carrots - Choose fresh carrots. Trim the edges, remove the skin, rinse well and chop it roughly.
  • Grinding - You can grind it to a coarse mixture too if you like it that way.
  • Milk - Boil milk well, simmer for few minutes only then add carrot paste.
  • Cashews - Instead of cashews you can add almonds while grinding too but blanch it remove the skin then grind it along with carrots.
  • Replacement - You can replace sugar with Β½ cup condensed milk for a rich kheer.
  • Nuts - You can add ghee fried cashews or other nuts too. This kheer tastes good on its own but if you prefer you can add raw chopped nuts as garnish.

Serving & Storage

Enjoy Carrot Kheer as a dessert after meal hot or cold as per your preference. Refrigerate for later use, keeps well for a day in room temperature and in fridge for 2-3 days.

FAQS

1.Which carrots are best for carrot kheer?

Orange carrots or Red carrots both are suitable for making this kheer. Choose the one based on availability.

2.Can I use jaggery instead of sugar?

Yes, jaggery can be used. Add it after the milk is cooked and slightly cooled to prevent curdling.

3.Do I need to cook carrots before adding milk?

Yes. SautΓ©ing in ghee and pressure-cooking carrots helps soften them and removes the raw taste.

4. How long does carrot kheer stay fresh?

It stays good for up to 2 days when refrigerated in an airtight container.

5. Can carrot kheer be served cold?

Yes. It tastes great both warm and chilled.

carrot kheer served with nuts and saffron as garnish

If you have any more questions about this Carrot Kheer Recipe do mail me at sharmispassions@gmail.com. In addition, follow me on Instagram, Facebook,Β  Pinterest, Youtube andΒ TwitterΒ .

Tried this Carrot Kheer Recipe? Do let me know how you liked it. Also tag us on Instagram @sharmispassions and hash tag it on #sharmispassions.

πŸ“– Recipe Card

Print

Carrot Kheer Recipe | Carrot Payasam Recipe

Carrot Kheer is a yummy, creamy dessert made by simmering cooked carrot puree with milk, sweetening with sugar, flavoring with cardamom powder, saffron and & garnishing with chopped nuts. Carrot Kheer is made on special occasions and is quite easy to make. Recipe includes step by step pictures and video.
Course Dessert
Cuisine Indian
Keyword 30 mins recipes, carrot recipes, rice kheer recipes, veg recipes, vegetable
Prep Time 10 minutes
Cook Time 25 minutes
Total Time 35 minutes
Servings 3 cups
Calories 490kcal
Author Sharmilee J

Ingredients

  • 4 medium sized carrots
  • 4 cups milk
  • ΒΎ cup sugar
  • 8 whole cashews
  • 1 tablespoon ghee
  • 10 strands saffron
  • ΒΌ teaspoon cardamom powder
  • chopped nuts to garnish

Instructions

  • Take 4 medium sized carrots. Trim both the edges, remove the skin and rinse it well.
  • Chop it roughly and keep it ready.
  • To a pressure cooker heat 1 tablespoon ghee add chopped carrots saute for 3 minutes.
  • Add around 8 whole cashews, Β½ cup milk and Β½ water. Pressure cook for 3 whistles.
  • Check if carrot is cooked.
  • Cool down and puree it slightly coarse.
  • To a sauce pan boil 3 and Β½ cups milk, simmer for few minutes.
  • Add cooked carrot puree.
  • Add ΒΎ cup sugar.
  • Add around 10 strands saffron.
  • Mix it well and let it boil for 15 minutes.
  • Then add ΒΌ teaspoon cardamom powder and chopped nuts.
  • Mix it well and switch off.
  • Carrot Kheer is ready!

Video

Notes

  • Carrots - Choose fresh carrots. Trim the edges, remove the skin, rinse well and chop it roughly.
  • Grinding - You can grind it to a coarse mixture too if you like it that way.
  • Milk - Boil milk well, simmer for few minutes only then add carrot paste.
  • Cashews - Instead of cashews you can add almonds while grinding too but blanch it remove the skin then grind it along with carrots.
  • Replacement - You can replace sugar with Β½ cup condensed milk for a rich kheer.
  • Nuts - You can add ghee fried cashews or other nuts too. This kheer tastes good on its own but if you prefer you can add raw chopped nuts as garnish.

Nutrition

Serving: 100g | Calories: 490kcal | Carbohydrates: 76g | Protein: 12g | Fat: 17g | Saturated Fat: 9g | Polyunsaturated Fat: 1g | Monounsaturated Fat: 4g | Cholesterol: 52mg | Sodium: 186mg | Potassium: 826mg | Fiber: 3g | Sugar: 70g | Vitamin A: 14132IU | Vitamin C: 8mg | Calcium: 433mg | Iron: 1mg

The post Carrot Kheer Recipe (Carrot Payasam) appeared first on Sharmis Passions.

Eggless Vanilla Cake Recipe

This Eggless Vanilla Cake is fluffy, moist, soft and incredibly delicious. If you are looking for an easy perfect eggless vanilla sponge cake then you are at the right place. This cake is easy to make and tastes so good that you can have it as such or use it for layering cakes. Learn to make Eggless Vanilla Cake with step by step pictures.

eggless vanilla sponge cake

I've always been looking out for a basic eggless vanilla cake and this cake has been my keeper for almost a decade now. Every year for most of our family birthday celebrations I make this cake as all of us love it so much. I have tried many eggless versions of vanilla cake and finally sticking to this one since many years because of the perfect texture of the cake and ease of making.

[feast_advanced_jump_to]

About Eggless Vanilla Cake

Eggless Vanilla Cake is made using a blend of flour, sugar, oil, yogurt, baking powder, soda and vanilla. Eggless Vanilla Sponge Cake is a simple and basic baking recipe that could be prepared for special occasions.

This Classis Eggless Vanilla Cake is fool proof that even beginners in baking can try. This is a perfect cake for tea time or for any celebration. This cake recipe is a basic classic one that can be made with kitchen staple ingredients.

This cake comes out so moist with the addition of oil and yogurt, it does not dry up even after 2 days. But I bet it would not last that long yes experience speaks. I had few cake fails in my initial days of baking but this cake was a hit at my first trial itself. Since then it is my keeper when I want to make eggless vanilla cake.

I have tried the same recipe with wheat flour and it comes out good. So you can substitute with wheat flour for a healthy variation. The combination of yogurt and oil gives the cake a very moist and soft texture.

eggless vanilla sponge cake

Similar Recipes

Eggless Vanilla Cake Ingredients

  • Flour - Use all purpose flour or maida that is fine. You can try with half and half of flour with wheat flour too.
  • Oil - Use flavorless, odorless oil which works best for this recipe.
  • Yogurt - Yogurt with oil gives moist and soft cake.
  • Sugar - White granulated sugar is best, however you can use castor sugar too.
  • Rising agents - Baking powder and baking soda are used.
  • Vanilla extract - Vanilla essence or extract is the main flavoring here.

How to make Eggless Vanilla Sponge Cake Step by Step

1.Sieve maida twice and keep aside. Cream sugar and curd until sugar completely dissolves completely. Add baking powder, baking soda to the creamed mixture and mix well.

eggless vanilla sponge cake step1

2.Leave aside for 5 minutes and you can see the bubbles appearing. Now add vanilla extract, cooking oil and mix well.

eggless vanilla sponge cake step2

3.Next slowly add maida in portions at a time and blend with wet ingredients. Beat well with a whisk until creamy and thick. Preheat oven to 200 DEG C for 10 minutes. Meanwhile grease a butter paper, lay it in the cake tin or loaf pan and pour the batter to the tin and keep it ready.

eggless vanilla sponge cake step3

4.Bake in preheated oven at 200 DEG C for 10 minutes, then reduce temperature to 180 DEG C and bake it for 30-35 minutes or till a fork inserted into the center of the cake comes out clean. Just brush the top of the cake with 1 tablespoon milk, 10 minutes before the ending time to get a nice polishing glaze. Allow the cake to cool down for 10 minutes, then invert and remove the butter paper. Then cut/slice them into pieces and enjoy.

eggless vanilla sponge cake step4

Have updated the pics with stepwise. I baked this cake in a round cake tin for hubby's bday as this is his favorite cake. You can use a loaf pan and bake the cake too.

Updated : I tried a readymade icing on the cake this time when I baked it, refrigerated overnight and then cut it the next day. The slices were firm and clean. The above pic is after I cut it the next day and other pics were cut just waiting for an hour - Uploaded this pic to show the texture difference. Taste wise no difference at all both were soft and yummy. So I suggest to cut into slices allowing it cool down completely leaving at least 3-4 hours to get firm neat slices.

eggless vanilla sponge cake

Expert Tips

  • Curd - Use curd at room temperature. Do not try to reduce oil and curd.
  • Batter - Also after the batter is ready, don't allow the batter to sit for more than the preheating time as baking soda reacts faster. I have a reader who gave me this tip as her cake went hard as she kept the batter for 30 minutes after mixing.
  • Checking - And while inserting fork or toothpick try checking in the center if its cooked completely or not. If suppose even after the specified time, the center of the cake isn't cooked and is slightly sticky?! don't worry just cover the top of the cake with butter paper and bake it for 5more minutes, it will be perfect.
  • Butter paper - The butter paper covering on top will avoid more browning on top at the same time the center will be cooked perfectly.
  • Sugar - You can use icing sugar too, I used normal sugar only. I felt ΒΎ cup of sugar was enough but the original recipe called for 1 cup. If you have a very sweet tooth then use 1 cup of sugar.

Serving & Storage

This vanilla cake can be served along with a cup of coffee or tea. You can serve it as such or use it as a base for desserts. Store the cake in an air tight container and it keeps well at room temperature for up to 2 to 3 days. The cake can be stored in fridge up to a week.

eggless vanilla sponge cake

If you have any more questions about this Eggless Vanilla Sponge Cake Recipe do mail me at sharmispassions@gmail.com. In addition, follow me on Instagram, Facebook,Β  Pinterest, Youtube andΒ TwitterΒ .

Tried this Eggless Vanilla Sponge Cake Recipe? Do let me know how you liked it. Also tag us on Instagram @sharmispassions and hash tag it on #sharmispassions.

πŸ“– Recipe Card

egglessvanillaspongecake
Print

Eggless Vanilla Cake Recipe

This Eggless Vanilla Cake is fluffy, moist, soft and incredibly delicious. If you are looking for an easy perfect eggless vanilla sponge cake then you are at the right place. This cake is easy to make and tastes so good that you can have it as such or use it for layering cakes. Learn to make Eggless Vanilla Cake with step by step pictures.
Course Baking
Cuisine American, French, Indian, Italian
Keyword Baking, baking recipes, cake, Cake Recipes, eggless, vanilla recipes
Prep Time 10 minutes
Cook Time 50 minutes
Total Time 1 hour
Servings 8 pieces
Calories 303kcal
Author Sharmilee J

Ingredients

  • 1 Β½ cups maida
  • 1 cup plain yogurt
  • ΒΎ cup granulated sugar
  • Β½ teaspoon baking soda
  • 1 ΒΌ teaspoon baking powder
  • Β½ cup cooking oil
  • 1 Β½ teaspoon vanilla essence
  • 1 tablespoon milk (just for brushing the top)

Instructions

  • Sieve maida twice and keep aside. Cream sugar and curd until sugar completely dissolves completely. Add baking powder, baking soda to the creamed mixture and mix well.
  • Leave aside for 5 minutes and you can see the bubbles appearing. Now add vanilla extract, cooking oil and mix well.
  • Next slowly add maida in portions at a time and blend with wet ingredients. Beat well with a whisk until creamy and thick. Preheat oven to 200 DEG C for 10 minutes. Meanwhile grease a butter paper, lay it in the cake tin or loaf pan and pour the batter to the tin and keep it ready.
  • Bake in preheated oven at 200 DEG C for 10 minutes, then reduce temperature to 180 DEG C and bake it for 30-35 minutes or till a fork inserted into the center of the cake comes out clean. Just brush the top of the cake with 1 tablespoon milk, 10 minutes before the ending time to get a nice polishing glaze. Allow the cake to cool down for 10 minutes, then invert and remove the butter paper. Then cut/slice them into pieces and enjoy.

Notes

  • Curd - Use curd at room temperature. Do not try to reduce oil and curd.
  • Batter - Also after the batter is ready, don't allow the batter to sit for more than the preheating time as baking soda reacts faster. I have a reader who gave me this tip as her cake went hard as she kept the batter for 30 minutes after mixing.
  • Checking - And while inserting fork or toothpick try checking in the center if its cooked completely or not. If suppose even after the specified time, the center of the cake isn't cooked and is slightly sticky?! don't worry just cover the top of the cake with butter paper and bake it for 5more minutes, it will be perfect.
  • Butter paper - The butter paper covering on top will avoid more browning on top at the same time the center will be cooked perfectly.
  • Sugar - You can use icing sugar too, I used normal sugar only. I felt ΒΎ cup of sugar was enough but the original recipe called for 1 cup. If you have a very sweet tooth then use 1 cup of sugar.

Nutrition

Serving: 30g | Calories: 303kcal | Carbohydrates: 37g | Protein: 4g | Fat: 16g | Saturated Fat: 2g | Polyunsaturated Fat: 4g | Monounsaturated Fat: 9g | Trans Fat: 0.1g | Cholesterol: 4mg | Sodium: 150mg | Potassium: 75mg | Fiber: 1g | Sugar: 20g | Vitamin A: 34IU | Vitamin C: 0.2mg | Calcium: 80mg | Iron: 0.3mg

The post Eggless Vanilla Cake Recipe appeared first on Sharmis Passions.

Jam Biscuits Recipe

Jam Biscuits are delicious soft cookies made by baking a blend of flour, butter, flavors & custard powder with yogurt. Jam Biscuits are kids favorite and a good choice of biscuit for special occasions. Learn to make Jam Biscuits with instructions given here.

eggless jam biscuits

I baked these biscuits recently and these biscuits were a instant hit at home. I had valentines day in mind so planned for this post in advanceΒ  I love jim jam biscuits and this one was no exception to it. I am sure this is a kid pleaser as my lil one enjoyed it to the core. Though she first licked only the jam, later she liked the taste of the biscuits too.

[feast_advanced_jump_to]

About Jam Biscuits

Jam Biscuits are melt in the mouth type of biscuits made using flour, custard powder, sugar, yogurt and jam. These look super tempting that kids would love it. The addition of custard powder in these biscuits gives it a unique flavor and taste.

Jam Biscuits can be made easily at home with the instructions given here. If you follow the exact measurements and method I am sure even beginners in baking can nail these biscuits as it is so easy without any complicated steps.

eggless jam biscuits

Similar Recipes

Jam Biscuits Ingredients

  • Flour - You can use all purpose flour or wheat flour.
  • Custard Powder, Corn flour - Custard powder and corn flour adds texture and flavor to the biscuits.
  • Jam - I have used mixed fruit jam, you can use jam of your choice.
  • Curd, Butter - Curd and butter adds fat source.
  • Sugar - Use white granulated sugar.
  • Vanilla extract - Use good quality vanilla extract.

How to make Jam Biscuits

  1. Mix maida, cornflour and custard powder, keep aside.Soft butter, add sugar to it and cream well. Then add curd, vanilla essence and beat well until creamy.
  2. Then add custard powder mixture to the butter sugar mixture and make it to soft dough. If your dough is sticky add little maida to make it a soft pliable dough.
  3. Roll the dough on a flat surface using chapathi roller for about 5mm thickness. Then cut out shapes using cookie cutter. Collect the remaining dough and repeat the process.
  4. Preheat oven to 180 DEG C for 10mins. Meanwhile make a small dent in the middle of all the biscuits using a small round lid and apply a very thin layer of jam in it. Arrange it in a baking tray with aluminum foil lined. Bake it for 12-15 minutes at 180 DEG C. Allow it to cool and store them in airtight container.
eggless jam biscuits

Expert Tips

  • As I reduced the butter and replaced it with curd, the biscuits slightly puffed up, oozing out jam. So in the next batch I applied a very thin layer of jam.So dont add more jam it will surely ooze out.
  • Though the butter is reduced, the crispness is perfect. The only difference I found with reducing butter was that the biscuits started to soften after 3 days. I'm sure it will stay crispy for more time when the original mentioned quantity of butter is added.
  • I used mixed fruit jam, you can use your favorite flavor of jam. But mixed fruit went well with the custard powder flavor.
eggless jam biscuits

If you have any more questions about this Jam Biscuits Recipe do mail me at sharmispassions@gmail.com. In addition, follow me on Instagram, Facebook,Β  Pinterest, Youtube andΒ TwitterΒ .

Tried this Jam Biscuits Recipe? Do let me know how you liked it. Also tag us on Instagram @sharmispassions and hash tag it on #sharmispassions.

πŸ“– Recipe Card

egglessjambiscuits123
Print

Jam Biscuits Recipe

Jam Biscuits are delicious soft cookies made by baking a blend of flour, butter, flavors & custard powder with yogurt. Jam Biscuits are kids favorite and a good choice of biscuit for special occasions. Learn to make Jam Biscuits with instructions given here.
Course Baking
Cuisine American, French, Indian, Italian, Mediterranean, Mexican
Keyword Baking, baking recipes, biscuit recipes, snack recipes
Prep Time 15 minutes
Cook Time 30 minutes
Servings 25 Cookies
Calories 41kcal
Author Sharmilee J

Ingredients

  • 1 cup all purpose flour / maida
  • ΒΎ cup custard powder
  • ΒΌ cup thick curd
  • 2 tablespoon butter
  • Β½ cup powdered sugar
  • 1 tablespoon corn flour
  • Β½ teaspoon vanilla extract
  • mixed fruit jam as needed

Instructions

  • Mix maida, corn flour and custard powder, keep aside.
  • Soft butter, add sugar to it and cream well.
  • Then add curd, vanilla essence and beat well until creamy.
  • Then add custard powder mixture to the butter sugar mixture and make it to soft dough. If your dough is sticky add little maida to make it a soft pliable dough.
  • Roll the dough on a flat surface using chapathi roller for about 5mm thickness.
  • Then cut out shapes using cookie cutter. Collect the remaining dough and repeat the process.
  • Preheat oven to 180 deg C for 10mins.
  • Meanwhile make a small dent in the middle of all the biscuits using a small round lid and apply a very thin layer of jam in it.
  • Arrange it in a baking tray with aluminum foil lined.
  • Bake it for 12-15mins at 180 deg C.
  • Allow it to cool and store Jam Biscuits in airtight container. Enjoy Jam Biscuits!

Notes

  • As I reduced the butter and replaced it with curd, the biscuits slightly puffed up, oozing out jam. So in the next batch I applied a very thin layer of jam. So don't add more jam it will surely ooze out.
  • Though the butter is reduced, the crispness is perfect. The only difference I found with reducing butter was that the biscuits started to soften after 3 days.Β 
  • I used mixed fruit jam, you can use your favorite flavor of jam. But mixed fruit went well with the custard powder flavor.

Nutrition

Serving: 20g | Calories: 41kcal | Carbohydrates: 7g | Protein: 1g | Fat: 1g | Saturated Fat: 1g | Polyunsaturated Fat: 0.1g | Monounsaturated Fat: 0.3g | Trans Fat: 0.04g | Cholesterol: 4mg | Sodium: 10mg | Potassium: 13mg | Fiber: 0.1g | Sugar: 2g | Vitamin A: 32IU | Vitamin C: 0.01mg | Calcium: 5mg | Iron: 0.2mg

Β 

The post Jam Biscuits Recipe appeared first on Sharmis Passions.

Vada Pav Recipe

Vada Pav is a popular Indian street food with a deep fried potato fritter wrapped inside a pav bun sandwiched between red and green chutneys and accompanied by fried green chili. Vada Pav is popularly known as Batata Vada Pav or Mumbai Vada Pav. Learn to make Vada Pav with step by step pictures.

vada pav served

The first time I had vada pavs was during our college tour to Mumbai as my friend suggested to taste it and I just loved it. This is a famous chat item in North and it is my most favorite.

[feast_advanced_jump_to]

About Vada Pav

Vada Pav is a Mumbai classic street food which has deep fried potato fritters sandwiched between a pav bun with red chutney and green chutney. The potato fritters can be either deep fried or tawa fried just like I did. Vada here refers to the potato fritters and Pav is Pav bun.

Vada Pav is spicy and packed with flavors and textures. I just love the potato fritters as such so make a little extra to much it separately. The garlic chutney is the highlight here so do not miss, it is super flavorful and spicy.

This is very famous chat in north India especially Mumbai and Kolkata. If you don't get pav buns go ahead with normal buns.

vada pav served

Similar Recipes

Vada Pav Ingredients

  • Pav Bun - Pav buns are used traditionally for vada pav but you can use regular buns too.
  • Potato Fritters - Boiled potato is mashed and cooked along with onion, green chili and made into small balls.
  • Besan batter - A batter is made using gram flour, rice flour, turmeric powder, red chili powder.
  • Red Chutney - Garlic along with red chilies, coconut, tamarind and salt are grind to make a chutney.
  • Green Chutney - Green chutney is made using mint leaves and coriander leaves.
vadapavchutneys
Vada

How to make Vada Pav Step by Step

For the vadas

1.Heat oil, add mustard seeds and jeera, allow it to crackle. Add green chillies, ginger garlic paste and saute for mins.Add onions and saute till it turns lightly browned. Then add mashed potatoes, turmeric powder, required salt and mix well. Add chopped coriander leaves,mix well and switch off. Allow it to cool and make small balls and keep it ready.

vada pav step1

For the vada coating

Mix besan flour, rice flour, salt, turmeric, chilli powder, baking soda.Add little water to form a paste like we do for bajjis and bondas.

vada pav step2

Now take the balls and dip it to the flour paste and deep fry it till golden brown (I didnt deep fry them instead toasted them in a paniyaram pan)

vada pav step3

For the vada pav assembling

Take the buns slit it into halves taking care one end is still connected to the other bun.Apply the green chutney on one side , red chutney on another side. Keep the prepared vadas in between as shown and enjoy your vada pavs!

vada pav step4

Enjoy Vada Pav!

Expert Tips

  • Make ahead - This sure needs time but when you are ready with the chutneys then making vadas and assembling them as vada pavs is easy.
  • Assembling - Usually the vadas are nothing but our aloo bondas. The chutney combination and assembling it as vada pav gives a unique taste.
  • Toasting - I chose to toast in paniyaram pan, instead you can deep fry them as the orginal recipe says.

Serving and Storage

You can make the potato fritters, batter, chutneys ready well ahead of time. Then at the time of serving fry the potato fritters, assemble and serve. Serve it with fried green chili the best combo.

vada pav served

If you have any more questions about this Vada Pav Recipe do mail me at sharmispassions@gmail.com. In addition, follow me on Instagram,Β Facebook,Β PinterestΒ ,YoutubeΒ andΒ TwitterΒ .

Tried this Vada Pav Recipe? Do let me know how you liked it. Also tag us on Instagram @sharmispassions and hash tag it on #sharmispassions.

πŸ“– Recipe Card

vadapav3
Print

Vada Pav Recipe

Vada Pav is a popular Indian street food with a deep fried potato fritter wrapped inside a pav bun sandwiched between red and green chutneys and accompanied by fried green chili. Vada Pav is popularly known as Batata Vada Pav or Mumbai Vada Pav. Learn to make Vada Pav with step by step pictures.
Course Snack
Cuisine Indian
Keyword Aloo Recipes, chaat, chaat recipes, North Indian, Potato, Potato Recipes, snack recipes
Prep Time 20 minutes
Cook Time 30 minutes
Total Time 50 minutes
Servings 2 people
Calories 506kcal
Author Sharmilee J

Ingredients

  • 4 pav buns
  • 2 tablespoon red chutney see recipe below
  • 2 tablespoon green chutney as required

For the vadas :

  • 2 boiled potatoes medium sized
  • Β½ teaspoon cumin seeds
  • Β½ teaspoon green chillies chopped finely
  • Β½ teaspoon mustard seeds
  • 1 teaspoon ginger garlic paste
  • 1 onion medium sized chopped finely
  • Β½ teaspoon turmeric powder
  • 2 teaspoon coriander leaves
  • 2 teaspoon oil

For vada outer coating:

  • ΒΌ cup besan flour
  • 1 tablespoon rice flour
  • Β½ teaspoon chilli powder
  • salt to taste
  • a pinch baking soda
  • oil to toast / deep fry

Red Garlic chutney:

  • 5 tablespoon coconut
  • 1 red chillies
  • 4 garlic chopped finely
  • 1 teaspoon tamarind
  • salt to taste

Instructions

For the vadas:

  • Heat oil, add mustard seeds and jeera, allow it to crackle.
  • Add green chillies, ginger garlic paste and saute for mins.
  • Add onions and saute till it turns lightly browned. Then add mashed potatoes, turmeric powder, required salt and mix well.
  • Add chopped coriander leaves,mix well and switch off. Allow it to cool and make small balls and keep it ready.

For the vada coating:

  • Mix besan flour, rice flour, salt, turmeric, chilli powder, baking soda. Add little water to form a paste like we do for bajjis and bondas.
  • Now take the balls and dip it to the flour paste and deep fry it till golden brown (I didnt deep fry them instead toasted them in a paniyaram pan)

Red Chutney

  • Dry roast coconut and tamarind till lightly browned. Grind together with all other ingredients. Do not add water its slighly pastey and dry.
  • For the vada pav assembling:
  • Take the buns slit it into halves taking care one end is still connected to the other bun.
  • Apply the green chutney on one side , red chutney on another side. Keep the prepared vadas in between as shown and enjoy your Vada Pavs!

Notes

  • This sure needs time but when you are ready with the chutneys then making vadas and assembling them as vada pavs is easy.
  • Usually the vadas are nothing but our aloo bondas.
  • The chutney combination and assembling it as vada pav gives a unique taste. I chose to toast in paniyaram pan
  • You can make the chutneys ready the before day itself and refrigerate them.
    The red garlic chutney is fiery hot which makes a apt combination for this vada pav.

Nutrition

Serving: 75g | Calories: 506kcal | Carbohydrates: 57g | Protein: 12g | Fat: 27g | Saturated Fat: 7g | Polyunsaturated Fat: 5g | Monounsaturated Fat: 11g | Trans Fat: 0.1g | Cholesterol: 20mg | Sodium: 1344mg | Potassium: 410mg | Fiber: 5g | Sugar: 16g | Vitamin A: 483IU | Vitamin C: 40mg | Calcium: 47mg | Iron: 2mg

The post Vada Pav Recipe appeared first on Sharmis Passions.

Matka Kulfi Recipe

Matka Kulfi is a creamy dessert made by simmering milk till thick and then freezing it in small clay pots. Kulfi icecream set in earthen clay pots called as matka kulfi or pot kulfi is mostly made during summer time or you want something chilled to serve. The taste is rich, creamy and mildly sweet.

matka kulfi served

This kulfi recipe is special as it is set in the earthen matka pots which gives slight earthy flavor. The milk is cooked slowly so it becomes thick and creamy by itself. Nuts and cardamom flavor comes nicely in every bite. It tastes good after a spicy lunch or dinner, also simple to make with very basic ingredients at home.

[feast_advanced_jump_to]

About Matka Kulfi

Matka kulfi is a frozen sweet made using reduced milk and nuts. This method gives natural taste and rich texture to the kulfi, instead of using cream or condensed milk, the thickness comes only from slow cooking the milk. It does not need any fancy cream or machines at all.

The texture of matka kulfi is rich and creamy, not icy or watery. Nuts like almonds and pista adds small bites in between. The cardamom and saffron in this adds mild aroma which blends with milk. The sweetness stays balanced and does not overpower.

This kulfi is usually set in clay pots which is called matka. The earthen pot helps in slow freezing and also adds traditional touch to the dessert. You can also use steel cups or moulds, but matka gives that old style feeling which many people likes. It is one dessert that always gives comfort.

I make this during summer holidays or weekends when. It feels nice to make kulfi from scratch instead of buying from shop. Kids enjoy opening the matka and scooping the kulfi slowly.

matka kulfi served

Matka Kulfi Ingredients

  • Milk - I added full cream milk for rich taste, low fat milk will not give same creamy result, so try to avoid it.
  • Sugar - I added for sweetness, it balances the nut flavors well. You can reduce little if you like mild sweetness.
  • Almonds - I have used almonds for nutty taste and slight bite. You can soak and peel them or grind directly also.
  • Pistachios - I added pista for flavor and light green bits in kulfi. Cashews can be used if pista is not there.
  • Cardamom - I used this for mild aroma and traditional taste. Cardamom powder also can be used instead.
  • Saffron - I added few strands for flavor and light color. If saffron is less, color will be very pale only.

Why This Recipe Works

  • It is a traditional recipe made with simple ingredients only.
  • The slow cooking gives natural thickness without adding cream.
  • This recipe gives creamy texture without becoming icy.
  • The nut powder adds flavor and makes kulfi more rich.
  • You can freeze it in matka or cups easily based on what you have.

Similar Recipes

How to make Matka Kulfi Step by Step

1.Grind together sugar, almonds, pistachios, saffron and cardamom together to a slightly coarse mixture, Set aside. Boil milk in a pan.

how to make matka kulfi step1

2.Simmer for 20Β minutes till milk reduces. Stir in between to avoid burning at the bottom. Now add nuts sugar mixture.

how to make matka kulfi step2

3.Scrap the sides and keep cooking till the mixture is thick and creamy like shown below. Keep cooking. till it coats the ladle. It takes atleast 15 minutes. Cool down completely.

how to make matka kulfi step3

4.Rinse the clay pots then pour the mixture into the pots. Freeze it overnight or at least for 6-8 hours. I poured half of the mixture into kulfi moulds for mittus sake and only half of it in pots.

how to make matka kulfi step4

Serve chilled!

matka kulfi served

Expert Tips

  • Milk reducing - Make sure to simmer the milk slowly and stir often. Try not to skip this step or milk may burn at bottom.
  • Nut grinding - I grind the nuts slightly coarse, very fine paste will not give bite in kulfi.
  • Thickness - I cook the milk till the mixture coats the ladle well. If it is thin, kulfi will not set properly.
  • Freezing time - I freeze it overnight for best result. Minimum 6 to 8 hours is needed.
  • Matka preparation - I just rinse the clay pots well before using. This removes dust and keeps kulfi clean.

Serving and Storage

Serve it chilled topped with chopped nuts on top if you like little extra crunch. This goes well after lunch or dinner as dessert. Store leftover kulfi covered in freezer and use within 2 to 3 days only.

FAQS

1.Can I use condensed milk?

Yes you can, but taste will be rich and add it by tasting or it will become sweeter.

2.Is matka compulsory for this kulfi?

No, you can use steel cups or moulds also, matka just adds extra flavor.

3.Why my kulfi is not creamy?

Milk may not have reduced enough. Try cooking little more next time.

4.Can I add corn flour for thickening?

Yes you can add little corn flour mixed in milk, but it is optional.

5.How long can I store this kulfi?

It stays good for 2 to 3 days in freezer when stored properly.

matka kulfi served

If you have any more questions about thisΒ Matka Kulfi RecipeΒ do mail me at sharmispassions@gmail.com. In addition, follow me onΒ Instagram,Β Facebook,Β PinterestΒ ,YoutubeΒ andΒ TwitterΒ .

Tried thisΒ Matka Kulfi Recipe? Do let me know how you liked it. Also tag us on Instagram @sharmispassions and hash tag it on #sharmispassions.

πŸ“– Recipe Card

MatkaKulfi3
Print

Matka Kulfi Recipe

Matka Kulfi is a creamy dessert made by simmering milk till thick and then freezing it in small clay pots. Kulfi ice cream set in earthen clay pots called as matka kulfi or pot kulfi is mostly made during summer time or you want something chilled to serve. The taste is rich, creamy and mildly sweet.
Course Dessert
Cuisine Indian
Keyword dessert recipes, ice cream recipes, icecreams, kulfi recipes, milk recipes, nuts recipes
Prep Time 15 minutes
Cook Time 30 minutes
Freezing Time 8 hours
Total Time 45 minutes
Servings 2 kulfis
Calories 318kcal
Author Sharmilee J

Ingredients

  • 2 cups full cream milk
  • ΒΌ cup heaped sugar
  • 10 nos almonds
  • 10 nos pista
  • Β½ no cardamom
  • a pinch of saffron

Instructions

  • Grind together sugar, almonds, pistachios, saffron and cardamom together to a slightly coarse mixture, set aside.
  • Boil milk in a pan. Simmer for 15 mins till milk reduces. Stir in between to avoid burning at the bottom.
  • Now add nuts sugar mixture. Scrap the sides and keep cooking till the mixture is thick and creamy. Keep cooking. till it coats the ladle.
  • Cool down completely.
  • Rinse the clay pots then pour it in the pots. Freeze it overnight or at least for 6-8 hours.
  • Enjoy tasty Matka kulfi!

Nutrition

Serving: 125g | Calories: 318kcal | Carbohydrates: 43g | Protein: 10g | Fat: 13g | Saturated Fat: 5g | Polyunsaturated Fat: 2g | Monounsaturated Fat: 4g | Cholesterol: 29mg | Sodium: 93mg | Potassium: 457mg | Fiber: 1g | Sugar: 42g | Vitamin A: 416IU | Vitamin C: 0.3mg | Calcium: 320mg | Iron: 0.4mg

The post Matka Kulfi Recipe appeared first on Sharmis Passions.

Ragi Malt Recipe | Ragi Porridge Recipe

Ragi Malt is a healthy and nutritious drink made using fingermillet flour as main ingredient. It is very popular in India for babies, kids, and adults because it's rich in calcium, iron, fiber, and protein. Post includes ragi malt (ragi sweet porridge) and ragi porridge (salt version) with step by step pictures and video.

ragi malt and ragi porridge served

Ragi Malt or Ragi Java or Ragi Porridge is a healthy breakfast as it is very nutritious and filling. Ragi porridge can be made 2 ways either sweet or salt as per your liking and preference. I like sweet the most but have the salt version once in a while too. Ragi malt has been part of Indian households for generations and is quite popular for its health benefits, easy digestibility, and cooling properties.

[feast_advanced_jump_to]

About Ragi Malt

Ragi Malt is nothing sweet ragi porridge made with ragi flour, water, milk, sugar and cardamom powder. It is topped with nuts of your choice making it an ideal healthy breakfast. Ragi is the one of the first grains introduced to babies as it is easy to digest. It can be prepared in both sweet and savory forms, making it suitable for all age groups starting from infants to the elders.

Malt is the cereal grain that has been soaked and dried. Here finger millet is the grain that is soaked, sprouted then dried to make ragi flour or powder and the porridge made with this flour is referred to as 'Ragi Malt'.

Ragi Porridge is a nutritious healthy drink which can be substituted for our regular breakfast and it keeps you full till lunch time. Ragi or finger millet is a super grain which is packed with nutrition. I used homemade ragi flour, you can use store bought flour too.

Ragi Malt can be prepared in a tasty way by following this method without any lumps easy and quick to make. It takes just 10-15 minutes to make this porridge. You can use ragi flour or sprouted ragi flour for this porridge.I always have a batch of homemade ragi flour at home.

Ragi Porridge has become a tradition in our family. I am trying to include porridge for mittu and gugu regularly so that they are always in touch with the porridge taste. Mittu prefers to have multigrain porridge.

I hated porridges during my childhood days and now I just love them. I have tasted this ragi porridge in my friends house as its their custom to have ragi porridge every sunday. Ever since I tasted with my friend I started liking it, even now I just love all types of porridges.

ragi malt served

Ragi Malt Video

Similar Recipes

Ragi Malt Health Benefits

  • Ragi is rich in iron
  • It is rich in fiber and a nutritious whole grain
  • Helps in healthy weight loss
  • Ragi is good for a gluten free diet
  • Good for diabetics

Ragi Malt 2 Ways

I have shared 2 ways to make this porridge as some prefer sweet and few prefer salt version.

  • Ragi Malt (Sweet Porridge)
  • Ragi Porridge (Salt)

Ragi Malt Ingredients

  • Ragi flour - I used homemade finger millet flour. You can use store bought flour too either regular ragi flour or sprouted flour.
  • Water - I always cook the porridge in water then mix it with milk.
  • Milk - Use boiled milk as we add it at the final stage.
  • Sweetener - I have used cane sugar. You can add jaggery powder or jaggery syrup or brown sugar or even white sugar.
  • Flavoring - Cardamom powder is the best flavoring for this porridge.
  • Water - I always cook the porridge in water then mix it with milk.
  • Buttermilk - Use thick homemade buttermilk.
  • Salt - Add salt to taste for the salt version.
ingredients needed to make ragi malt and ragi porridge

How to make Ragi Malt Step by Step

Ragi Porridge Sweet

  1. To a bowl add Β½ cup ragi flour. Now add 1 cup water to it.
water is added to ragi flour

2.Whisk it well without any lumps then set it aside.

ragi slurry is made by mixing it well

3.Add 2 cups water to a pan. Let it boil.

water is boiled

4.Once water starts to boil - whisk the ragi flour slurry.

ragi slurry is being mixed

5.Add the ragi flour slurry. Just rinse with little water and add it, if there are sediments.

ragi slurry being added

6.Whisk it well first to avoid lumps.

porridge is whisked well

7.Now switch to a spatula and keep stirring and cooking in low medium flame.

ragi porridge is being cooked

8.The mixture will start to thicken but keep stirring continuously.

the consistency will be thin at this stage

9.Keep cooking until it turns thick and shiny.

ragi porridge is being cooked

10.You can see how thick it is. It thickens more after cooling down so switch it off accordingly.

porridge turn shiny and thick

11.Transfer half of the porridge to a bowl for salt version.

half of the porridge is transferred to another bowl

12.To the remaining porridge in the pan - add 2 tablespoon sugar, 1 cup milk and ΒΌ teaspoon cardamom powder.

milk, sugar and cardamom powder is added

13.Whisk it well and switch off.

ragi porridge is ready after mixing

14.Ragi malt or ragi sweet porridge is ready to serve.

the consistency should be thick

15.Serve ragi malt hot or warm!

ragi malt is ready

Ragi Porridge or Ragi Malt is ready to drink!

ragi malt and ragi porridge served

Ragi Porridge Salt

1.With the reserved ragi porridge we can prepare ragi salt porridge. Let the mixture cool down for 15 minutes at least.

ragi porridge being cooled

2.Add salt to taste and Β½ cup thick buttermilk to it.

salt and buttermilk is added

3.Whisk it well until smooth.

whisked well to make salt porridge

4.Ragi porridge salt version is ready

consistency of ragi salt porridge is slightly thick

5. Serve it warm or chilled.

ragi salt porridge is ready

Serve immediately.

ragi salt porridge served

Tempering Suggestion

You can serve it as such or make the tempering and serve it.

1.Heat 1 teaspoon oil in a tadka pan and add ΒΌ teaspoon mustard seeds, 1 small red chilli broken and ΒΌ teaspoon cumin seeds, a pinch hing along with few curry leaves - let it crackle. Now transfer it to the porridge.

temper the items

2.Add tempering and salt.

tempering items added

3.Mix it well. Serve as such or you can strain and serve it too.

mix it well

Ragi porridge is ready!

Expert Tips

  • Ragi flour - You can use homemade flour or store bought flour. Either regular ragi flour or sprouted can be used.
  • Cooking - Cook in low flame and keep stirring to avoid lumps.
  • Sweetener - Adjust sweetness according to your taste. You can add any sweetener : jaggery powder or jaggery syrup or cane sugar etc.
  • Consistency - The consistency is purely your preference. If you want it a bit thin then add little more milk or buttermilk. If you want it thick then this will be perfect.
  • Tempering - After the tempering ingredients are added you can either have the porridge as such or strain it and then serve.

Serving & Storing

You can serve the porridge sweet or salt. We prefer the ragi porridge warm but you can serve it hot too. You can even temper the porridge and serve.

You can make the ragi porridge cooked in water and store in fridge for 2 days and make the porridge as and when needed. It will become thick you will need to whisk or blend it while making the porridge.

FAQS

1.Why is my porridge watery and not becoming thick?

If more water is added it may take little longer to get thick while cooking. So keep stirring to make the porridge thick.

2.What type of ragi / fingermillet flour to use?

You can use regular ragi flour or sprouted ragi flour to make this porridge.

3.How long should I cook the porridge?

Do not go with the exact timing as it may differ depending upon the flour variety and amount of water used. Cook the porridge until thick and shiny,

4.My porridge turns lumpy, How should I fix it?

If you leave the porridge unattended without stirring then it may become lumpy. If the cooked porridge turns lumps, mash it well with a laddle then mix with milk, sugar and finally strain using a big holed strainer to strain the lumps.

5.Is this porridge suitable for babies and kids?

Yes it is suitable for babies from 1 year and older kids too.

ragi porridge with tempering

If you have any more questions about this Ragi Malt RecipeΒ do mail me at sharmispassions@gmail.com. In addition, follow me on Instagram,Β Facebook,Β PinterestΒ ,YoutubeΒ andΒ TwitterΒ .

Tried this Ragi Malt Recipe? Do let me know how you liked it. Also tag us on Instagram @sharmispassions and hash tag it on #sharmispassions.

πŸ“– Recipe Card

Print

Ragi Malt Recipe | Ragi Porridge Recipe

Ragi Malt is a healthy and nutritious drink made by cooking ragi in water to a porridge consistency then mixing it with milk, sugar and cardamom powder. In this post I have shared ragi malt (ragi sweet porridge) and ragi porridge(salt version) with step by step pictures and video.
Course Breakfast
Cuisine Indian
Keyword 30 mins recipes, drink recipes, Healthy tea time drink, millet recipes, Nutritional Beverage, Nutritional Drink, ragi recipes
Prep Time 10 minutes
Cook Time 10 minutes
Total Time 20 minutes
Servings 2
Calories 186kcal
Author Sharmilee J

Ingredients

  • Β½ cup ragi flour (finger millet flour)
  • 3 cups water

Ragi Malt Sweet

Ragi Porridge Salt

  • salt to taste
  • Β½ cup buttermilk

Instructions

Ragi Malt Sweet

  • To a bowl add Β½ cup ragi flour. Now add 1 cup water to it.
  • Whisk it well without any lumps then set it aside.
  • Add 2 cups water to a pan. Let it boil.
  • Once water starts to boil - whisk the ragi flour slurry.
  • Add the ragi flour slurry. Just rinse with little water if there are sediments.
  • Whisk it well first to avoid lumps.
  • Now switch to a spatula and keep stirring and cooking in low medium flame.
  • The mixture will start to thicken but keep stirring continuously.
  • Keep cooking until it turns thick and shiny.
  • You can see how thick it is. It thickens more after cooling down so switch it off accordingly.
  • Transfer half of the porridge to a bowl for salt version.
  • To the remaining porridge in the pan - add 2 tablespoon sugar, 1 cup milk and ΒΌ teaspoon cardamom powder.
  • Whisk it well and switch off.
  • Ragi malt or ragi sweet porridge is ready to serve.
  • Serve ragi malt hot or warm!

Ragi Porridge Salt

  • With the reserved ragi porridge we can prepare ragi salt porridge. Let the mixture cool down.
  • Add salt to taste and Β½ cup thick buttermilk to it.
  • Whisk it well until smooth.
  • Ragi porridge salt version is ready
  • Serve it warm or chilled.
  • Heat 1 teaspoon oil in a tadka pan and add ΒΌ teaspoon mustard seeds, 1 small red chilli broken and ΒΌ teaspoon cumin seeds, a pinch hing along with few curry leaves - let it crackle. Now transfer it to the porridge.
  • Add tempering and salt.
  • Mix it well. Serve as such or you can strain and serve it too.
  • Ragi porridge is ready!

Video

Notes

  • Ragi flour - You can use homemade flour or store bought flour. Either regular ragi flour or sprouted can be used.
  • Cooking - Cook in low flame and keep stirring to avoid lumps.
  • Sweetener - Adjust sweetness according to your taste. You can add any sweetener : jaggery powder or jaggery syrup or cane sugar etc.
  • Consistency - The consistency is purely your preference. If you want it a bit thin then add little more milk or buttermilk. If you want it thick then this will be perfect.
  • Tempering - After the tempering ingredients are added you can either have the porridge as such or strain it and then serve.

Nutrition

Serving: 200ml | Calories: 186kcal | Carbohydrates: 37g | Protein: 4g | Fat: 2g | Saturated Fat: 1g | Polyunsaturated Fat: 0.2g | Monounsaturated Fat: 1g | Cholesterol: 7mg | Sodium: 32mg | Potassium: 212mg | Sugar: 16g | Vitamin A: 99IU | Calcium: 185mg | Iron: 1mg

The post Ragi Malt Recipe | Ragi Porridge Recipe appeared first on Sharmis Passions.

Tawa Paneer Recipe (Tawa Paneer Masala)

Tawa Paneer is a spicy and masala rich side dish made on a flat tawa using paneer with onion, tomato and capsicum base. It has a great taste with slight roasted flavor which makes it little different from regular paneer gravies. The dish is mostly semi dry and pairs well with roti, naan or even with plain rice.

tawa paneer served with roti

This is quite often made for weekend lunch or dinner when something quick is needed at home. The masala coats the paneer nicely and gives a street style touch to the dish which everyone likes. It is filling yet satisfying and suits well for both family meals and small get togethers.

[feast_advanced_jump_to]

About Tawa Paneer

Tawa Paneer Masala is a popular North Indian style paneer recipe where everything is cooked directly on a tawa itself. Cooking on tawa gives a slightly smoky and intense flavor to the dish which you don't get in kadai cooking. It is commonly served as a side dish or sometimes used as stuffing for rolls and wraps.

This is usually cooked on tawa but you can use a Β kadai or frying pan too if you don't have a tawa. I have used my roti pan which has a flat base, you can use a tawa which has concave base too.

The texture of this dish is semi dry with soft paneer cubes covered in thick masala. Onion and tomato forms the base while capsicum adds slight crunch in between. The spices give warmth and heat but it does not overpower the paneer taste.

This is flexible and easy to adjust as per taste. It can be made more spicy, less spicy or even turned into a gravy by adding more tomato and little water. Butter adds richness but oil can also be used if butter is not there. It tastes good even after reheating also which makes it useful for busy days.

Tawa Paneer Masala is one of the popular dishes in restaurants too. I usually made on weekends or when guests come home suddenly. It does not need long cooking time and still feels special on the plate.Β 

tawa paneer served with roti

Tawa Paneer Ingredients

  • Paneer - It stays soft and absorbs masala well. Fresh or store bought paneer both works fine for this dish.
  • Onion and Tomato - I used for making the masala base, onion gives slight sweetness and tomato adds tanginess to balance. Chopped tomato can be used instead of puree.
  • Capsicum - I added for mild crunch and flavor in the dish. Colored or green capsicum can be used based on what is available at home.
  • Ginger garlic paste - I just added this for base flavor and aroma. I used freshly crushed ginger and garlic also can be added instead of paste if you want.
  • Spice powders - I just add some for spice and depth, I used red chilli powder, roasted jeera powder and garam masala. Spice level can be adjusted as per taste and preference of people at home.
  • Kasoori methi - I just used for aroma and slight bitterness. Try not to skip this if possible.
  • Coriander leaves - I added this for freshness and mild flavor. It also gives nice finish to the dish.
  • Butter - I just used for tempering, it gives richness and tawa style taste. You can use oil also but butter tastes better.
  • Jeera - I added jeera for tempering, it gives light crunch and flavor in the beginning.

Why This Recipe Works

  • This recipe is quick and does not need complicated steps.
  • Cooking on tawa gives smoky and street style flavor.
  • Paneer stays soft while masala turns thick and coating.
  • It works well as side dish, starter or roll filling.
  • Spice and texture can be adjusted very easily.

Similar Recipes

How to make Tawa Paneer Masala Step by Step

1.You first need a tawa for making this, dosa tawa will be fine. I used flat bottomed dosa tawa. Heat butter when it starts to melt, add jeera let it crackle.

how to make tawa paneer masala step1

2.Add ginger garlic paste, saute for Β a minute then add chopped onion, saute till it becomes transparent.

how to make tawa paneer masala step2

3.Add chopped capsicum, saute for 2 minutes. Then add tomato puree.

how to make tawa paneer masala step3

4.Give a quick mix, then add red chilli, roasted jeera and garam masala powders along with required salt.

how to make tawa paneer masala step4

5.Cook until raw smell of tomatoes leave. It will become dry in few minutes.

how to make tawa paneer masala step5

6.Sprinkle little water then add paneer and toss it so that the masala coats the paneer well.

how to make tawa paneer masala step6

7.Add crushed kasoori methi and chopped coriander leaves and switch off.

how to make tawa paneer masala step7

Serve hot with rotis with a lemon wedge.

tawa paneer served with roti

Expert Tips

  • Paneer - I make sure the paneer is soft, I usually soak it in warm water for few minutes if it feels little hard.
  • Masala cooking - I cook the tomato puree well till the raw smell goes, try not to skip this step or the taste will go little off.
  • Flame control - I keep the flame in medium while cooking on tawa, high flame may burn the masala very quickly.
  • Water adding - I add only little water if needed, too much water will spoil the semi dry texture of the dish.
  • Kasoori methi use - I crush it between my hands before adding, it releases more flavor and aroma nicely.

Serving and Storage

Serve it hot with roti, naan or phulka straight from tawa. This also taste good with jeera rice or plain rice and dal. It can be used as stuffing for rolls also. Store leftovers in fridge and reheat on tawa with little water. Freshly made always taste better.

FAQS

1.Can I make this without capsicum?

Yes capsicum can be skipped, the dish will still taste good with onion and tomato base.

2.Can I make it more gravy like?

Yes add more tomato puree and little water to make gravy version.

3.Is butter necessary?

Butter gives best flavor but oil can be used if needed.

4.Can spice level be reduced?

Yes reduce chilli powder and garam masala for mild taste.

5.Can this be made in advance?

It can be made few hours earlier, but reheat properly before serving.

tawa paneer served with roti

If you have any more questions about this Tawa Paneer Recipe do mail me at sharmispassions@gmail.com. In addition, follow me on Instagram, Facebook,Β  Pinterest, Youtube andΒ TwitterΒ .

Tried this Tawa Paneer Masala Recipe? Do let me know how you liked it. Also tag us on Instagram @sharmispassions and hash tag it on #sharmispassions.

πŸ“– Recipe Card

TawaPaneerMasala5
Print

Tawa Paneer Recipe | Tawa Paneer Masala Recipe

Tawa Paneer is a spicy and masala rich side dish made on a flat tawa using paneer with onion, tomato and capsicum base. It has a great taste with slight roasted flavor which makes it little different from regular paneer gravies. The dish is mostly semi dry and pairs well with roti, naan or even with plain rice.
Course Side Dish
Cuisine Indian
Keyword 30 mins recipes, Dinner recipe, easy paneer recipes, indian paneer recipes, lunch recipes, masala recipes, meals, paneer dishes, paneer recipes, roti sidedish, Side Dish, starter
Prep Time 15 minutes
Cook Time 15 minutes
Total Time 30 minutes
Servings 2 people
Calories 390kcal
Author Sharmilee J

Ingredients

To temper:

  • 1 heaped teaspoon butter
  • 1 teaspoon jeera

Instructions

  • You first need a tawa for making this, dosa tawa will be fine. I used flat bottomed dosa tawa. Heat butter when it starts to melt, add jeera let it crackle.
  • Add ginger garlic paste, sautΓ© for Β a minute then add chopped onion, sautΓ© till it becomes transparent.
  • Add chopped capsicum, sautΓ© for 2mins.Then add tomato puree.
  • Give a quick mix, then add red chilli, roasted jeera and garam masala powders along with required salt.
  • Cook until raw smell of tomatoes leave. It willΒ become dry in few mins.
  • Sprinkle little water then add paneer and toss it so that the masala coats the paneer well.
  • Add crushed kasoori methi and chopped coriander leaves and switch off. Enjoy Tawa Paneer!

Notes

  • Paneer - I make sure the paneer is soft, I usually soak it in warm water for few minutes if it feels little hard.
  • Masala cooking - I cook the tomato puree well till the raw smell goes, try not to skip this step or the taste will go little off.
  • Flame control - I keep the flame in medium while cooking on tawa, high flame may burn the masala very quickly.
  • Water adding - I add only little water if needed, too much water will spoil the semi dry texture of the dish.
  • Kasoori methi use - I crush it between my hands before adding, it releases more flavor and aroma nicely.

Nutrition

Serving: 100g | Calories: 390kcal | Carbohydrates: 12g | Protein: 18g | Fat: 31g | Saturated Fat: 18g | Polyunsaturated Fat: 0.3g | Monounsaturated Fat: 1g | Trans Fat: 0.1g | Cholesterol: 80mg | Sodium: 84mg | Potassium: 397mg | Fiber: 3g | Sugar: 4g | Vitamin A: 1525IU | Vitamin C: 39mg | Calcium: 583mg | Iron: 3mg

The post Tawa Paneer Recipe (Tawa Paneer Masala) appeared first on Sharmis Passions.

Rasmalai Recipe

Rasmalai is a popular Indian dessert made using cottage cheese balls, milk, sugar, nuts, cardamom and saffron. It is quick to make when your homemade rasgullas are ready. Sweet and juicy rasgullas soaked in sweetened thick milk is super addictive and can be made at home easily. Learn to make delicious rasmalai at home with step by step pictures.

rasmalai in terracotta bowl

Rasmalai is a rich Indian delicacy, rasgullas in sweetened thickened milk with the flavor of cardamom and saffron topped with nuts, It is a yum combo!! You can use store bought rasgullas to make rasmalai quickly. Rasmalai is widely served in weddings, parties and is a popular order in restaurants too.

[feast_advanced_jump_to]

About Rasamalai

'Ras' in Hindi means juicy and 'Malai' means cream so Rasmalai translates to juicy and creamy. Rasmalai is a popular rich Indian dessert made using cottage cheese balls soaked in sweetened thick milk called rabri topped with nuts and flavored with saffron and cardamom. It is super addictive as it tastes incredibly delicious.

I've become a great fan of rasmalai since I tasted it from a popular hotel here in Coimbatore named Annapoorna GowriShankar. Homemade ones are best if prepared in the right consistency. I buy rasgullas from stores and make rasmalai. Occasionally I make homemade rasgullas too as mittu is fond of that sweet.

Rasgullas can be flattenned and added as such. I have seen rasmalai as balls and in discs so you can make it the way you want. I would prefer small balls instead of discs as it looks more appealing.

rasmalai in terracotta bowl

Rasmalai Ingredients

  • Rasgulla - You can use store bought mini rasgullas or use homemade too. Make sure to use mini rasgullas for best results.
  • Milk -Β Use full cream milk either farm fresh or packaged milk.
  • SugarΒ - White granulated sugar is the best to use for rasmalai.
  • Condensed milk - Condensed milk adds richness to rasmalai.
  • NutsΒ - Cashews, pistachios and almonds are used.
  • FlavoringΒ - Cardamom powder and saffron is used for flavoring the milk.

Similar Recipes

How to make Rasmalai Step by Step

1.Take a pan - add condensed milk to it, along with 1 cup milk and whisk it well. Now add remaining milk and let it boil in medium flame for 5 minutes. Keep stirring. Crush saffron strands and add it. The color of milk will change to slightly yellow color, after saffron is added. Let it boil until thick at least for 15 minutes.

how to make rasmalai step1

2.Then add chopped nuts, cardamom powder give a quick mix and let it boil. Now take your rasgullas. I used store bought rasgullas this time.

how to make rasmalai step2

3.Take lemon squeezer and squeeze the excess sugar syrup from the rasgullas. Be gentle else the rasgullas will crumble. Now add the rasgullas to the milk and let it simmer for 5-7 minutes in low flame. Switch off.

how to make rasmalai step3

Cool down for few mins, then refrigerate for at least an hour. Serve chilled!

Expert Tips

  • Flavor - Don't use saffron more, it will be over powerful and will spoil the taste.
  • Add ons - The addition of condensed milk not only makes the rasmalai rich but extra tasty and gives a unique flavour to it.
  • Syrup - You can also use the sugar syrup that comes with the rasgullas and add it to the rabri instead of sugar.
  • Resting time - Allow at least 30 minutes sitting and refrigerating time before serving to taste best.
  • Quick option - You can also use store bought rasgullas, tinned ones are easy to reach.

Serving & Storage

Rasmalai is best when served chilled. Refrigerate & it keeps well for 2-3 days.

rasmalai in a bowl

If you have any more questions about this Rasmalai RecipeΒ do mail me at sharmispassions@gmail.com. In addition, follow me on Instagram,Β Facebook,Β PinterestΒ ,YoutubeΒ andΒ TwitterΒ .

Tried this Rasmalai Recipe? Do let me know how you liked it. Also tag us on Instagram @sharmispassions and hash tag it on #sharmispassions.

πŸ“– Recipe Card

15532135656 480f1c7f1a o
Print

Rasmalai Recipe

Rasmalai is a popular Indian dessert made using cottage cheese balls, milk, sugar, nuts, cardamom and saffron. It is quick to make when your homemade rasgullas are ready. Sweet and juicy rasgullas soaked in sweetened thick milk is super addictive and can be made at home easily. Learn to make delicious rasmalai at home with step by step pictures.
Course sweets
Cuisine Indian
Keyword dessert recipes, diwali dishes, diwali food, diwali mithai, diwali recipes, diwali sweets, diwali sweets recipes, easy diwali recipes, Festival, milk recipes, sweet recipes, virtual diwali party
Prep Time 10 minutes
Cook Time 20 minutes
Total Time 30 minutes
Servings 4 people
Calories 413kcal
Author Sharmilee J

Ingredients

  • 20 small rasgullas
  • 3 cups milk
  • 3 tablespoon condensed milk
  • β…“ cup sugar
  • 3 tablespoon nuts chopped
  • 10 small strands saffron
  • ΒΌ teaspoon cardamom powder

Instructions

  • Take a pan - add condensed milk to it, along with 1 cup milk and whisk it well. Now add remaining milk and let it boil in medium flame for 5 minutes. Keep stirring. Crush saffron strands and add it. The color of milk will change to slightly yellow color, after saffron is added. Let it boil until thick at least for 15 minutes.
  • Then add chopped nuts, cardamom powder give a quick mix and let it boil. Now take your rasgullas. I used store bought rasgullas this time.
  • Take lemon squeezer and squeeze the excess sugar syrup from the rasgullas. Be gentle else the rasgullas will crumble. Now add the rasgullas to the milk and let it simmer for 5-7 minutes in low flame. Switch off.
  • Cool down for few mins, then refrigerate for at least an hour. Serve chilled!

Notes

  • Rasgulla - You can use store bought mini rasgullas or use homemade too. Make sure to use mini rasgullas for best results.
  • Milk -Β Use full cream milk either farm fresh or packaged milk.
  • SugarΒ - White granulated sugar is the best to use for rasmalai.
  • Condensed milk - Condensed milk adds richness to rasmalai.
  • NutsΒ - Cashews, pistachios and almonds are used.
  • FlavoringΒ - Cardamom powder and saffron is used for flavoring the milk.

Nutrition

Serving: 100g | Calories: 413kcal | Carbohydrates: 58g | Protein: 11g | Fat: 16g | Saturated Fat: 7g | Polyunsaturated Fat: 1g | Monounsaturated Fat: 6g | Cholesterol: 40mg | Sodium: 120mg | Potassium: 501mg | Fiber: 1g | Sugar: 56g | Vitamin A: 450IU | Vitamin C: 1mg | Calcium: 364mg | Iron: 0.4mg

The post Rasmalai Recipe appeared first on Sharmis Passions.

Kati Roll Recipe

Kati Roll is a popular Indian street food made by wrapping a filling inside an Indian flat bread like roti, paratha etc. The filling could be mixed vegetable, egg or chicken or paneer or even mushroom etc. Kati Roll is a street food delicacy originated form Kolkata, West Bengal. Learn to make Kati Roll at home with step by step pictures.

kati roll in a white plate

Rolls or Wraps or Frankies I like them very much. They are perfect for on the go snacks or breakfast for kids. I always make kati roll with chapati itself, use leftover vegetable curry or make paneer, mushroom filling and kids love it.

[feast_advanced_jump_to]

About Kati Roll

Kati Roll is an Indian street food originated from Kolka , West Bengal. The term ' Kati' translates to stick in Bengali which refers to the method of making this dish with roasted kebabs in a stick or skewer.

The outer wrap can be made thick like paratha or made thin like chapati too. It depends on how you like it. Classic Kati roll use thick paratha with generous amount of filling that even if you have one you will be full.

kati roll in a white plate

Kati Roll Ingredients

  • Flour - You can use maida or wheat flour. Traditionally maida is used to make kati roll for a healthy alternate I have used more of wheat flour and less of maida.
  • Mixed vegetables - Onion, capsicum and carrots are added. You can add corn, paneer mushroom etc.
  • Ginger garlic paste - Adding ginger garlic paste adds flavor to the filling.
  • Tomato sauce - Adding tomato sauce or ketchup gives it a tangy flavor.
  • Spice powder - Turmeric, red chili powder and garam masala powders are added.
  • Lemon juice - Adding lemon juice adds a tangy taste.

Kati Roll Filling

The filling variations are endless, you can use leftover vegetable curry or paneer bhurji or just sautΓ© vegetables and add it. You can even add oven roasted vegetables along with green chutney which makes a perfect filling. You can even add sprouts or lentils or legumes as filling for a healthy variation.

Similar Recipes

6465386157 86c12f6d12 z

How to make Kati Roll Step by Step

To make paratha / roti

  1. Mix salt, wheat flour and maida. Add milk, water slowly to form a soft dough.
  2. Keep covered and let it rest till the stuffing is done

To make filling

  1. Heat oil, temper cumin seeds, add onions and sautΓ© until transparent. Add ginger garlic paste and sautΓ© for a minute then add the vegetables, sautΓ© for few minutes or until cooked. Make sure the veggies are cooked yet crunchy.
  2. Add turmeric, red chili powder and garam masala powder mix well. Finally add tomato sauce, lemon juice along with coriander leaves and switch off.

To make it as a wrap

  1. Pinch a lemon sized ball from the dough and flatten it like we do for chapathis. Dust flour if needed.
  2. Then heat a dosa pan,once it is hot place the prepared parathas and cook on both sides.Likewise prepare all the parathas and keep aside.
  3. At the time of serving, add little oil and toast the prepared parathas . Then spread Β½ tablespoon of green chutney, add a heaped tablespoon of stuffing(either paneer bhurji/veg stuffing).
  4. Then gently seal it from the bottom then close it tightly from the both the sides(left & right) to form a roll as shown in the pic(Rolling this way avoids stuffing from dropping out)
  5. Then wrap the lower part of the parathas with butter paper/silver foil and enjoy ur kati rolls.
20302437515 ac5bf03d71 o

I love paneer bhurji in wraps and rolls. So reserved little for this sake itself and made these rolls. You can keep the stuffing in middle and close from oth the sides and prick a tooth pick in the middle and serve but wrapping in the above said method avoids filling from coming out and its easy to hold too. The recipe is the same for paneer bhurji too just filling differs and you can find paneer bhurji recipe here.

These are mildly spicy making it perfect for kids. You can also serve with home made white butter.

6465386151 cd72292626 z

Enjoy Kati roll hot!

kati roll in a white plate

Expert Tips

  • Stuffing - The stuffing idea is endless, you can even make chicken vegetable stuffing. You can make paneer tikka kati roll.
  • Store ahead - You can make the stuffing and parathas ready the previous night and just assemble the wrap, there you go with your yummy, filling on the go wraps for breakfast. It is a perfect evening snack for kids.
  • Serving - Serve with tomato sauce or can be had as such itself also. The thickness of each parathas can be slightly thicker also.

Serving & Storage

Serve kati roll with green chutney or mayonnaise. Kati rolls taste great on its own too. You can knead the chapati dough make the filling ready and keep. Make parathas and stuff and serve it hot when you want.

kati roll in a white plate

If you have any more questions about this Kati Roll Recipe do mail me at sharmispassions@gmail.com. In addition, follow me on Instagram,Β Facebook,Β PinterestΒ ,YoutubeΒ andΒ TwitterΒ .

Tried this Kati Roll Recipe? Do let me know how you liked it. Also tag us on Instagram @sharmispassions and hash tag it on #sharmispassions.

πŸ“– Recipe Card

6465386163 d83aa96fdb z
Print

Kati Roll Recipe

Kati Roll is a popular Indian street food made by wrapping a filling inside an Indian flat bread like roti, paratha etc. The filling could be mixed vegetable, egg or chicken or paneer or even mushroom etc. Kati Roll is a street food delicacy originated form Kolkata, West Bengal. Learn to make Kati Roll at home with step by step pictures.
Course Breakfast, dinner, Snack
Cuisine Indian
Keyword chapati, chapati recipes, flat bread recipes, recipes, roll recipes, roti, roti recipes, street food, veg recipes, vegetable, wrap recipes
Prep Time 20 minutes
Cook Time 20 minutes
Total Time 40 minutes
Servings 4 rolls
Calories 188kcal
Author Sharmilee J

Ingredients

For parathas:

For the stuffing:

Instructions

To make paratha / roti

  • Mix salt, wheat flour and maida. Add milk, water slowly to form a soft dough.
  • Keep covered and let it rest till the stuffing is done

To make filling

  • Heat oil, temper cumin seeds, add onions and saute until transparent. Add ginger garlic paste and sautΓ© for a minute then add the vegetables, saute for few minutes or until cooked. Make sure the veggies are cooked yet crunchy.
  • Add turmeric, red chili powder and garam masala powder mix well. Finally add lemon juice along with coriander leaves and switch off.

To make it as a wrap

  • Pinch a lemon sized ball from the dough and flatten it like we do for chapathis. Dust flour if needed.
  • Then heat a dosa pan,once it is hot place the prepared parathas and cook on both sides.Likewise prepare all the parathas and keep aside.
  • At the time of serving, add little oil and toast the prepared parathas . Then spread Β½ tablespoon of green chutney, add a heaped tablespoon of stuffing(either paneer bhurji/veg stuffing).
  • Then gently seal it from the bottom then close it tightly from the both the sides(left & right) to form a roll as shown in the pic(Rolling this way avoids stuffing from dropping out)
  • Then wrap the lower part of the parathas with butter paper/silver foil and enjoy ur kati rolls.

Notes

  • Stuffing - The stuffing idea is endless, you can even make chicken vegetable stuffing. You can make paneer tikka kati roll.
  • Store ahead - You can make the stuffing and parathas ready the previous night and just assemble the wrap, there you go with your yummy, filling on the go wraps for breakfast. It is a perfect evening snack for kids.
  • Serving - Serve with tomato sauce or can be had as such itself also. The thickness of each parathas can be slightly thicker also.

Nutrition

Serving: 60g | Calories: 188kcal | Carbohydrates: 33g | Protein: 6g | Fat: 5g | Saturated Fat: 1g | Polyunsaturated Fat: 1g | Monounsaturated Fat: 2g | Trans Fat: 0.02g | Cholesterol: 0.1mg | Sodium: 848mg | Potassium: 210mg | Fiber: 5g | Sugar: 2g | Vitamin A: 1431IU | Vitamin C: 6mg | Calcium: 25mg | Iron: 1mg

The post Kati Roll Recipe appeared first on Sharmis Passions.

Sandwich Chutney Recipe

Sandwich Chutney is a fresh and tasty green spread made using coriander, mint and coconut. It is mostly used in sandwiches, chaat and can be used as a side for many snacks. This chutney is very easy to prepare and can be made in few minutes without much effort. It does not need any cooking which makes it more easy.

sandwich chutney served with bread

The taste is fresh, little spicy and slightly tangy. Coconut gives mild sweetness and also balances the sharp taste of mint. This chutney makes even plain bread or toast taste good. I feel it adds a refreshing taste to simple sandwiches. It helps save time during mornings.

[feast_advanced_jump_to]

About Sandwich Chutney

Sandwich Chutney is a popular green chutney used mainly in Indian street style sandwiches. It is little different from regular green chutney because coconut is added here. Coconut makes the chutney thick and smooth which is perfect for spreading. This texture makes sandwich taste more better.

This recipe has a thick but still smooth texture. You can add water little by little, if it becomes too watery then it will soak the bread and make it soggy. Mint and coriander gives a nice green color and fresh kind of smell. That fresh aroma comes out while grinding itself. You can also use this in chapati or kati roll.

This chutney is very flexible and can be used in many ways. You can spread it on bread, use it in chaat or even serve with cutlets. Lemon juice adds light tang and keeps the chutney fresh for some time. Sugar is added just little to balance all flavors. It does not make chutney sweet at all.

I usually make this chutney fresh and store it in fridge for busy days. This is one chutney I make very often at home. Sometimes I make it even twice in a week.

sandwich chutney served with bread

Sandwich Chutney Ingredients

  • Coriander leaves - I have used for main flavor and green color. It gives freshness to the chutney.Β 
  • Mint leaves - I added for cooling taste and strong aroma. It makes the chutney fresh. You can reduce mint if you don't like strong flavor.
  • Grated coconut - I have used for thickness and mild sweetness. Frozen coconut also works fine if fresh is not there.
  • Green chilli - I used one long variety for spice. It adds heat but not too much. You can just add more or less as per taste.
  • Sugar - I added little to balance spice and tang. It does not make chutney sweet. You can skip if you want.
  • Lemon juice - I used for slight tang and freshness. It also keeps the green color. You can use vinegar also.

Similar Recipes

How to make Sandwich Chutney Step by Step

1.Clean coriander and mint leaves, rinse it with water at least for 2 times, Set aside. In a mixer jar, add coriander leaves, mint leaves, coconut, green chilli.

how to make sandwich chutney step1

2.Add lemon juice, then add salt

how to make sandwich chutney step2

3.Then add sugar and little water and grind it s fine paste to a spreadable consistency.

how to make sandwich chutney step3

Serve with bread sandwiches.

sandwich chutney served with bread

Expert Tips

  • Water control - I always add water little by little while grinding. Try not to add more at once or chutney will become watery.
  • Grinding texture - I grind it to smooth paste so it spreads easily on bread. If it is coarse, spreading will be tough.
  • Fresh leaves - I usually use fresh coriander and mint leaves. Old leaves may give bitter taste sometimes.
  • Spice balance - I adjust green chilli based on who is eating at home. For kids I add less.
  • Storage - I store the chutney in clean airtight container. Since coconut is added, I finish it within one or two days.

Serving and Storage

This is used for sandwiches, toast, cutlets and chaat items. Serve it fresh for best taste. Store leftover chutney in fridge and use within one or two days only. Do not keep outside for long time.

FAQS

1.Can I skip coconut?

You can skip it, but chutney will be thin and taste little different.

2.How long can I store?

It stays good for one or two days in fridge.

3.Can I use this chutney for chaat?

Yes it works very well for chaat and snacks.

4.Is sugar needed in this chutney?

It is added just to balance taste, you can skip.

5.Can kids eat this chutney?

Yes kids can eat, just reduce green chilli.

sandwich chutney served with bread

If you have any more questions about thisΒ Sandwich Chutney RecipeΒ do mail me at sharmispassions@gmail.com. In addition, follow me onΒ Instagram,Β Facebook,Β PinterestΒ ,YoutubeΒ andΒ TwitterΒ .

Tried thisΒ Sandwich Chutney Recipe? Do let me know how you liked it. Also tag us on Instagram @sharmispassions and hash tag it on #sharmispassions.

πŸ“– Recipe Card

SandwichChutney4
Print

Sandwich Chutney Recipe

Sandwich Chutney is a fresh and tasty green spread made using coriander, mint and coconut. It is mostly used in sandwiches, chaat and can be used as a side for many snacks. This chutney is very easy to prepare and can be made in few minutes without much effort. It does not need any cooking which makes it more easy.
Course Breakfast, Snack
Cuisine Indian
Keyword 30 mins recipes, chutney recipes, sandwich, sandwich recipes, veg recipes, vegetable
Prep Time 10 minutes
Cook Time 10 minutes
Total Time 20 minutes
Servings 2
Calories 155kcal
Author Sharmilee J

Ingredients

  • 1 cup loosely packed coriander leaves
  • ΒΌ cup loosely packed mint leaves
  • ΒΌ cup loosely packed coconut grated
  • 1 no green chilli long variety
  • ΒΌ teaspoon sugar
  • salt to taste
  • 1 teaspoon lemon juice
  • 2 to 3 tablespoon water

Instructions

  • Clean coriander and mint leaves, rinse it with water at least for 2 times, set aside.
  • In a mixer jar, add coriander leaves, mint leaves, coconut, green chilli.
  • Add lemon juice, then add salt.
  • Then add sugar and little water and grind it to a fine paste of spreadable consistency. Sandwich Chutney ready!

Notes

  • Water control - I always add water little by little while grinding. Try not to add more at once or chutney will become watery.
  • Grinding texture - I grind it to smooth paste so it spreads easily on bread. If it is coarse, spreading will be tough.
  • Fresh leaves - I usually use fresh coriander and mint leaves. Old leaves may give bitter taste sometimes.
  • Spice balance - I adjust green chilli based on who is eating at home. For kids I add less.
  • Storage - I store the chutney in clean airtight container. Since coconut is added, I finish it within one or two days.

Nutrition

Serving: 20g | Calories: 155kcal | Carbohydrates: 14g | Protein: 5g | Fat: 11g | Saturated Fat: 9g | Polyunsaturated Fat: 0.3g | Monounsaturated Fat: 1g | Sodium: 72mg | Potassium: 892mg | Fiber: 8g | Sugar: 3g | Vitamin A: 9239IU | Vitamin C: 43mg | Calcium: 156mg | Iron: 4mg

The post Sandwich Chutney Recipe appeared first on Sharmis Passions.

Baked Sweet Potato Fries Recipe

Sweet Potato Fries are a simple crispy spicy snack made with sweet potato, spices baked in oven. It is a healthier version of regular fries and can be enjoyed without much guilt also. These fries are usually made for evening tea time, small snack or even light dinner.

baked sweet potato fries served with ketchup

The outside becomes lightly crisp while inside stays soft and sweet. The spice coating gives nice balance to the natural sweetness of sweet potatoes. It tastes too good with mayonnaise or tomato sauce on side. This is one snack which feels simple but still very satisfying to eat at home.

[feast_advanced_jump_to]

About Sweet Potato Fries

Sweet Potato Fries are made using fresh sweet potatoes cut into long sticks and baked with few basic spices. Unlike deep fried fries, these are baked so they feel lighter and less oily on eating. Sweet Potato itself has natural sweetness which makes these fries taste different from normal potato fries.

The texture depends lot on how evenly you cut the sweet potato sticks. If pieces are uneven then some fries cook fast and some stay under done. Pepper, chilli flakes and garlic adds spice and flavor but does not overpower the taste much. Olive oil helps in baking and also gives that slight crisp which makes it nice to eat.

Sweet potato is also known for its health benefits and is more filling. It is rich in fiber and gives good energy for the body. When baked properly, fries turn golden brown on edges and stay soft inside part. Compared to regular fries, this feels more light and less heavy. That makes it a good snack option even for kids also.

I usually make this on weekends when I want something snacky but not deep fried. It is easy to prepare and needs very less effort. I make this often when sweet potato is already there at home.

baked sweet potato fries served with ketchup

Sweet Potato Fries Ingredients

  • Sweet Potato - Used for making the fries, it gives soft texture inside. You can use medium ones also if that is what you have.
  • Pepper powder - I added this for mild heat and flavor. Freshly ground pepper gives better taste always. You can reduce it if kids are eating.
  • Chilli flakes - I have used this for slight spice and color. You can just add more or less as per your taste.
  • Crushed garlic - I crushed it with my garlic press. It adds strong flavor and aroma. You can use garlic paste also.
  • Olive oil - I have used this for coating the fries. It helps in even baking and slight crisp. You can use any cooking oil too.

Why This Recipe Works

  • It is easy to make and needs very less preparation work.
  • Baking makes it lighter than deep fried fries.
  • Sweet potato gives natural sweetness and soft bite inside.
  • The spices balance sweet and spicy flavor very well.
  • It can be served as snack or side dish easily anytime.

Similar Recipes

How to make Sweet Potato Fries

1.Trim the edges, peel off the skin and chop them lengthwise like we do it for french fries.

how to make sweet potato fries step1

2.Rinse it well, then drain water and let it dry for few minutes. You can even dab using a cloth or tissue.Then add required salt, pepper powder and chilli flakes.

how to make sweet potato fries step2

3.Add crushed garlic or garlic paste. I used my garlic press. Preheat oven at 200 deg C.

how to make sweet potato fries step3

4.Add oil, toss it well so that is is evenly coated

how to make sweet potato fries step4

5.On a baking tray with aluminium foil, spread them. Bake in preheated oven at 200 deg C for 15-20 minutes or until golden browned. Toss in between for even baking.

how to make sweet potato fries step5

Serve it as such or with ketchup.

baked sweet potato fries served with ketchup

Expert Tips

  • Cutting - I cut sweet potato into even sized sticks so it bakes evenly. Uneven pieces will cook faster and some may stay under cooked and some may get burnt.
  • Drying - I dry the sweet potato properly after washing. Try not to skip this step or fries may turn little soggy while baking.
  • Tossing - I just toss the fries once in between baking time. This helps in browning evenly on all sides.
  • Oven temperature - I bake it at 200 degree C. And just make sure that the oven is preheated before putting tray inside.
  • Spice level - You can just adjust the pepper and chilli flakes based on taste and who is eating at home.

Serving and Storage

Serve it hot with mayonnaise, ketchup or any dip you like at home. This goes well with evening tea time or as small starter snack. It taste best when it is fresh and hot only. Leftovers can be stored in the fridge and reheat it in oven or on tawa before serving again. But I don't recommend storing the fried ones.

FAQS

1.Can I fry this?

Yes you can deep fry them, but baking feels more light and healthier.

2.Why my fries are not crispy?

They may not be dried well or oven may not be hot enough.

3.Can I add other spices?

Yes you can add paprika, oregano or mixed herbs also.

4.Can I make this in air fryer?

Yes it works well in air fryer too. You can adjust the timing.

5.Is this good for kids?

Yes, just reduce spice level for kids eating.

baked sweet potato fries served with ketchup

If you have any more questions about this Sweet Potato Fries Recipe do mail me at sharmispassions@gmail.com. In addition, follow me on Instagram, Facebook,Β  Pinterest, Youtube andΒ TwitterΒ .

Tried this Sweet Potato Fries Recipe? Do let me know how you liked it. Also tag us on Instagram @sharmispassions and hash tag it on #sharmispassions.

πŸ“– Recipe Card

SweetPotatoFries1
Print

Baked Sweet Potato Fries Recipe

Sweet Potato Fries are a simple crispy spicy snack made with sweet potato, spices baked in oven. It is a healthier version of regular fries and can be enjoyed without much guilt also. These fries are usually made for evening tea time, small snack or even light dinner.
Course Snack
Cuisine American, French, Indian, Italian
Keyword Baking, baking recipes, easy potato fry, how to make potato fry, Potato, potato fry, potato fry recipe, Potato Recipes, snack recipes, starter
Prep Time 10 minutes
Cook Time 20 minutes
Total Time 25 minutes
Servings 2 people
Calories 36kcal
Author Sharmilee J

Ingredients

Instructions

  • Trim the edges, peel off the skin and chop the Sweet Potato lengthwise like we do it for French fries.
  • Rinse it well, then drain water and let it dry for few mins. You can even dab using a cloth or tissue. Then add required salt, pepper powder and chilli flakes.
  • Add crushed garlic or garlic paste. I used my garlic press.
  • Preheat oven at 200 deg C.
  • Add oil, toss it well so that is is evenly coated.
  • On a baking tray with aluminium foil, spread them.
  • Bake in preheated oven at 200 deg C for 15-20 minutes or until golden browned. Toss in between for even baking.
  • Enjoy Sweet Potato Fries!

Notes

  • Cutting - I cut sweet potato into even sized sticks so it bakes evenly. Uneven pieces will cook faster and some may stay under cooked and some may get burnt.
  • Drying - I dry the sweet potato properly after washing. Try not to skip this step or fries may turn little soggy while baking.
  • Tossing - I just toss the fries once in between baking time. This helps in browning evenly on all sides.
  • Oven temperature - I bake it at 200 degree C. And just make sure that the oven is preheated before putting tray inside.
  • Spice level - You can just adjust the pepper and chilli flakes based on taste and who is eating at home.

Nutrition

Serving: 100g | Calories: 36kcal | Carbohydrates: 1g | Protein: 0.2g | Fat: 4g | Saturated Fat: 1g | Polyunsaturated Fat: 0.4g | Monounsaturated Fat: 3g | Sodium: 9mg | Potassium: 21mg | Fiber: 0.3g | Sugar: 0.1g | Vitamin A: 221IU | Vitamin C: 0.5mg | Calcium: 6mg | Iron: 0.2mg

The post Baked Sweet Potato Fries Recipe appeared first on Sharmis Passions.

Caramel Popcorn Recipe

Caramel Popcorn is a delicious, crispy snack made by tossing prepared popcorn in caramel sauce. Caramel Popcorn is a sweet twist to our regular popcorn and is one of the popular popcorn varieties. This popcorn at home is a bliss for movie, TV time & get together. Recipe includes 2 ways of making caramel popcorn with step by step pictures and video.

caramel popcorn served

Caramel Popcorn is an all-time favourite snack for all ages that could be made at home easily. This recipe does not use corn syrup, just the basic kitchen staples and your delicious caramel popcorn is ready in minutes. I have given here 2 versions one using oven and other without using oven - Choose your favourite and enjoy!

[feast_advanced_jump_to]

About Caramel Popcorn

Caramel Popcorn is caramel glazed popcorns that is beautifully textured, sweet, crispy and crunchy snack ideal for movie time, parties and sweet nothings. This recipe I have shared here stays crisp for weeks and is the best partner for your movie nights.

As this recipes makes caramel corn lasts for weeks it is best to make ahead and store. I personally love both the versions but the one that is baked stays crisp for weeks and also does not turn sticky. So if you are planning to store then I would recommend the baked version, for instant snacking you can try the non baked version.

Caramel Popcorn can be made with & without corn syrup. Considering the fact of accessibility of corn syrup at stores and for the convenience of making it at home, I have given Caramel Popcorn recipe without corn syrup here

Caramel Popcorn or simply Caramel Corn is my son's most favorite. I love caramel popcorn since my childhood days as my mother used to buy me a pack of these whenever we pass by the popcorn shop.

After I started to try homemade popcorn, I never look back buying them outside as the kids are fully satisfied with it. I often make it for their snack box or for our movie time at home.

caramel popcorn served

Caramel Popcorn Video

Caramel is an evolution of sugar by heating it into a molten and crystal form that tastes like confectionery. Caramel is widely used as topping or flavouring for desserts, puddings & custard. Caramel Popcorn hence will add a sweet twist to the conventional popcorn that you will not just stop with one!

Caramel Popcorn - 2 versions

I have shared 2 versions of caramel popcorn here. Confused on which one to try? Planning to store for a longer time try the baked version, Looking for instant snack then try the instant version.

  • Baked - This version uses brown sugar also it is baked to make it more crispier and last long.
  • Instant - This version uses regular granulated white sugar and can be made for instant snacking.
caramel popcorn served

Caramel Popcorn Ingredients

  • Popcorn Kernels - Make sure to buy popcorn kernels and not the regular corn kernels from the store as all the varieties of corn kernels do not pop. Use good quality ones.
  • Brown Sugar - Using brown sugar gives a intense caramel flavor. 2 portions of sugar for one portion of kernel is the right ratio for sweetness.
  • Butter - Use fresh homemade butter if available else you can use the store bought ones.
  • Salt - A pinch of salt is added for taste.
  • Oil - Use regular cooking oil for popcorn- however ensure they do not impact the flavour of the popcorn as oils like coconut oil, groundnut oil will radiate its flavour into the food it is added to.
  • Vanilla extract - added for flavor.
  • Baking soda - is added for even thin coating of caramel on the popcorn. When added it foams up, increases in volume so easier to coat evenly.
ingredients needed to make caramel popcorn

How to make Caramel Popcorn Step by Step

Making popcorn

1.Heat 2 tablespoon flavourless oil in a pan. Take a thick bottomed pan with lid. Swirl the pan so that oil coats on all sides.

add oil

2.Once oil is heated add 1-2 popcorn kernels to check. Make sure to buy popcorn kernels and not normal corn kernels.

add popcorn kernels

3.It will pop up in few seconds.This is the right temperature we need.

it is popped

4.Now add Β½ cup popcorn kernels. Give a quick stir.

add corn kernels

5.Cover it with a lid. The lid should have a vent else close with lid partially for the vapour to escape. Keep flame in low medium.

close with lid

6.It will start popping. Now lift the pan from flame and shake it for 2 seconds then place in flame.Repeat this in intervals for all the seeds to pop evenly.

starts popping

7.Let the kernels pop completely. Once the popping sound is stopped, you can switch off flame. Immediately open the lid once popping stops else the water droplets may drop into the popcorn making it soggy.

popped fully

8.Open and give a quick mix. Remove from flame. Give a quick stir - Check to see if all the seeds are completely popped.

popcorn ready

9.Transfer to a bowl and set aside.

transfer to a bowl

Using oven - Baked version

1. Heat 2 tablespoon butter let it melt then add Β½ cup brown sugar.

add butter, brown sugar

2.Give a quick mix.

mix it

3.Add 2 tablespoon water.

add water

4.Mix well until it starts to bubble. Now add ΒΌ teaspoon vanilla essence, a pinch salt and β…› teaspoon baking soda.

add salt, soda, vanilla

6.Give a quick mix. It will become frothy like this.

becomes frothy

7.Add prepared popcorn.

add popcorn

8.Mix well until evenly coated - Switch off. Preheat oven at 120 DEG C for 10 minutes.

mix well

9.Spread it over a baking tray with parchment paper.

spread on tray

10.Bake in preheated oven at 120 deg C for 20-25 minutes or until crisp turning after 10 minutes in between. After it is baked separate the popcorn if it is stuck.

baked caramel popcorn

Instant Version - Without using oven

1.I cleaned the same pan and kept it on the flame. Make sure the pan is dry and clean. Now add Β½ cup granulated white sugar.

add sugar

2.Do not disturb for few seconds until the edges start to brown. Keep stirring with a ladle. It will start to change color. Keep stirring and cooking in low flame.

let it melt

3.Keep stirring until the sugar melts completely. It forms a thick sauce and is dark golden in color this is perfect.

sugar melts and turns dark

4.Now add 1 tablespoon butter. Keep stirring it becomes frothy,

add butter

5.Let it melt completely. Add ΒΌ teaspoon vanilla essence and a pinch of salt.

add vanilla, salt

6.Give a quick mix.

mix it

7.Add popcorn to it.

add popcorn

8.Mix well until evenly coated. Switch off.

mix well

9.Transfer to a tray and let it cool down a bit. When it becomes warm break the pieces. Cool down then store.

Enjoy snacking!

caramel popcorn served

Expert Tips

  • Cooking popcorn - Cook covered as the kernels will pop outside the container otherwise. Make sure to open only when the popping stops. Shake in between to pop all the corn kernels evenly.
  • Cookware to use - While cooking covered take care not to burn, use a heavy bottomed pan or non-stick pan.
  • Caramel sauce - Make sure not to burn the sauce, when it turns to golden brown switch and immediately add it else it will harden then you can't mix it.
  • Storing - Store in a clean dry airtight container. It may turn slightly sticky especially the one with white sugar after a day but it is normal, you can store in fridge if you want to avoid stickiness.
  • Variations - Flavour with strawberry, chocolate, butterscotch, blueberry or any flavour of your choice instead of vanilla. Toss it with seasonings like cheese powder, oregano, spice powders based on your preferences to have a tangy taste.

Serving & Storage

Caramel Popcorn keeps good forabout a week. Pop the corn fresh every time you need it so as to consume fresh and flavourful. Β 

Caramel Popcorn is ideal to be served in DIY tubs, big containers so that everyone pounce on it centrally.

FAQS

1.Can I skip baking soda?

Yes you can skip baking soda but the texture will change accordingly. For perfect gourmet tasting caramel popcorn baking soda is a must.

2.Can I use the regular corn?

No only popcorns pop - sweet corn or other varieties of corn does not pop. Popcorn are special variety of corn allowed to mature so that they develop hard skin enclosing moisture which pops out when roasted / heated.

3.Can I use any type of sugar?

Yes - you can use all varieties of sugar - white, brown, cane, country sugar. Just the time varies for each type to get caramelized.

4.Can we store the leftover?

Yes, very much. It keeps good for about a week in a closed air tight container.

5.Which version of caramel popcorn should I try?

Both taste equally good. If you are looking for an instant snacking option then try non baked version, if you want to store for a longer time then try the baked version.

caramel popcorn served

If you have any more questions about this Caramel Popcorn Recipe do mail me at sharmispassions@gmail.com. In addition, follow me on Instagram, Facebook,Β  Pinterest, Youtube andΒ TwitterΒ .

Tried this Caramel Popcorn Recipe? Do let me know how you liked it. Also tag us on Instagram @sharmispassions and hash tag it on #sharmispassions.

πŸ“– Recipe Card

Print

Caramel Popcorn Recipe

Course Snack
Cuisine American, French, Indian, Italian, Japanese, Mediterranean, Mexican
Keyword 30 mins recipes, butter recipes, corn recipes, popcorn recipes, sweet recipes, vanilla recipes
Prep Time 5 minutes
Cook Time 10 minutes
Total Time 15 minutes
Servings 1 bowl
Calories 303kcal
Author Sharmilee J

Ingredients

For making popcorn

  • ΒΌ cup corn kernels
  • 2 tablespoon oil
  • 2 tablespoon water

Baked Version

  • ΒΌ cup corn kernels
  • Β½ cup brown sugar
  • 2 tablespoon butter
  • ΒΌ teaspoon vanilla extract
  • 1 tiny pinch salt
  • β…› teaspoon baking soda

Instant Version

Instructions

Making popcorn

  • Heat 2 tablespoon flavourless oil in a pan. Take a thick bottomed pan with lid. I used my pressure cooker.
  • Swirl the pan so that oil coats on all sides.
  • Once oil is heated add 1-2 popcorn kernels to check.Make sure to buy popcorn kernels and not normal corn kernels.
  • It will pop up in few seconds.This is the right temperature we need.
  • Now add Β½ cup popcorn kernels. Give a quick stir.
  • Cover it with a lid. The lid should have a vent else close with lid partially for the vapour to escape. Keep flame in low medium.
  • It will start popping.Now lift the pan from flame and shake it for 2 seconds then place in flame.Repeat this in intervals for all the seeds to pop evenly.
  • Let the kernels pop completely. Once the popping sound is stopped, you can switch off flame. Immediately open the lid once popping stops else the water droplets may drop into the popcorn making it soggy.
  • Open and give a quick mix. Remove from flame. Give a quick stir - Check to see if all the seeds are completely popped. Transfer to a bowl and set aside.

Baked Version

  • Heat 2 tablespoon butter let it melt then add Β½ cup brown sugar.
  • Give a quick mix. Add 2 tablespoon water.
  • Mix well until it starts to bubble. Now add ΒΌ teaspoon vanilla essence, a pinch salt and β…› teaspoon baking soda.
  • Give a quick mix. It will become frothy like this. Add prepared popcorn.
  • Mix well until evenly coated - Switch off. Preheat oven at 120 DEG C for 10 minutes. Spread it on a baking sheet.
  • Bake in preheated oven at 120 deg C for 20-25 minutes or until crisp turning after 10 minutes in between. After it is baked separate the popcorn if it is stuck.

Instant Version

  • Make sure the pan is dry and clean. Now add Β½ cup granulated white sugar.
  • Do not disturb for few seconds until the edges start to brown. Keep stirring with a laddle.It will start to change color. Keep stirring and cooking in low flame. The color changes from light shade to dark color.
  • Keep stirring until the sugar melts completely. It forms a thick sauce and is dark golden in color this is perfect.
  • Now add 1 tablespoon butter. Keep stirring it becomes frothy. Let it melt completely. Add ΒΌ teaspoon vanilla essence and a pinch of salt.
  • Give a quick mix. Add popcorn to it. Mix well until evenly coated. Switch off.
  • Transfer to a tray and let it cool down a bit. When it becomes warm break the pieces. Cool down then store.

Video

Notes

  • Cooking popcorn - Cook covered as the kernels will pop outside the container otherwise. Make sure to open only when the popping stops. Shake in between to pop all the corn kernels evenly.
  • Cookware to use - While cooking covered take care not to burn, use a heavy bottomed pan or non-stick pan.
  • Caramel sauce - Make sure not to burn the sauce, when it turns to golden brown switch and immediately add it else it will harden then you can't mix it.
  • Storing - Store in a clean dry airtight container. It may turn slightly sticky especially the one with white sugar after a day but it is normal, you can store in fridge if you want to avoid stickiness.
  • Variations - Flavour with strawberry, chocolate, butterscotch, blueberry or any flavour of your choice instead of vanilla. Toss it with seasonings like cheese powder, oregano, spice powders based on your preferences to have a tangy taste.

Nutrition

Serving: 75g | Calories: 303kcal | Carbohydrates: 36g | Protein: 1g | Fat: 18g | Saturated Fat: 4g | Polyunsaturated Fat: 4g | Monounsaturated Fat: 10g | Trans Fat: 0.2g | Cholesterol: 11mg | Sodium: 75mg | Potassium: 30mg | Fiber: 0.4g | Sugar: 34g | Vitamin A: 134IU | Vitamin C: 0.3mg | Calcium: 3mg | Iron: 0.1mg

The post Caramel Popcorn Recipe appeared first on Sharmis Passions.

Pista Ice Cream Recipe

Pista Ice Cream is a creamy and tasty dessert made using fresh cream, pistachios and little pista essence. It is usually made at home on weekends or when you want some easy frozen sweet. This ice cream has mild sweetness and rich pista flavor which feels very nice after meals. It is a good option when you want something cold but not too heavy.

pista ice cream served with chopped. pista nut

The texture is smooth and creamy, and nutty taste comes well in every bite. Homemade pista ice cream feels more light compared to store bought ones. I usually make this after weekend lunch and keep it in freezer to eat later. It is very simple to make and no cooking is needed.

[feast_advanced_jump_to]

About Pista Ice Cream

Pista Ice Cream has that mild taste and rich feel. It is made by just mixing whipped fresh cream with condensed milk and pistachios. Pista Ice Cream with easily available ingredients and made without using ice cream maker.Yes this is also one of the no churn icecream recipes.

The soft green color and pista smell makes it look very tempting. Eating homemade ice cream feels more fresh and safe without any added stuff. I usually make this for family gatherings or summer weekends. It feels good to prepare ice cream without much work.Β 

The ice cream texture is creamy and little grainy because of pistachio bits mixed in it. Chopped pistachios gives slight crunch while eating which feels nice. Pista essence helps to bring out the strong pista flavor and also adds light green shade. It tastes rich but still not too heavy to eat.

This recipe is very easy and does not need ice cream machine. Just whisking, mixing and freezing is enough for this. Anyone can make this at home with very basic ingredients. It is good choice when you want quick homemade dessert. It always comes out good if cream is whipped properly and not beaten too much.

pista ice cream scooped

Pista Ice Cream Ingredients

  • Fresh cream - I have used full fat fresh cream for creamy texture. It gives body and smoothness to the ice cream. You can use whipping cream also if that is available.
  • Condensed milk - I have used condensed milk for sweetness and thickness. It helps ice cream stay soft. You can reduce amount if you like less sweet.
  • Pistachios - I have used pistachios both powdered and chopped. Powder gives flavor and chopped gives light crunch. You can mix with almonds also.
  • Pista essence - I added this for strong pista flavor and nice color. If you don't like essence, you can add little more pistachio powder.

Why This Recipe Works

  • It is very easy and does not need ice cream machine.
  • This recipe uses few basic ingredients only.
  • The texture comes creamy and smooth.
  • The pista flavor is mild and not overpowering.
  • You can make it ahead and store in freezer.

Similar Recipes

pista ice cream served with chopped. pista nut

How to make Pista Ice Cream Step by Step

1.In a dry mixer jar, take pistachios grind to a coarse mixture,set aside. Get ready with all your ingredients.

how to make pista ice cream step1

2.In a mixing bowl, take fresh cream beat for 3 seconds or until thick and creamy using a electric beater.Now add condensed milk.

how to make pista ice cream step2

3.Whisk it for even mixing just for 2 seconds. Now add coarse pistachio mixture, then add chopped pistachios.

how to make pista ice cream step3

4.Add pista essence. Mix well using a spatula.

how to make pista ice cream step4

5.Pour into freezer safe container. Freeze it at least for 8 hours. Scoop and serve.

how to make pista ice cream step5

ServeΒ chilled with chopped pistachios.

pista ice cream served with chopped. pista nut

Expert Tips

  • Whipping cream - I whisk the cream only for few seconds until thick. Try not to overbeat or it may turn into butter.
  • Mixing - I mix condensed milk gently so cream does not lose air. Slow mixing works best.
  • Pistachio grind - I grind pistachios coarse, not very fine. This gives better taste and texture.
  • Freezing - I freeze it for minimum 8 hours so it sets properly. Overnight freezing works best.
  • Scooping - I take ice cream out few minutes before scooping, it becomes easy to serve.

Serving and Storage

Serve it as scoops in a bowl or cone. This goes well after lunch or dinner. Store leftover ice cream in airtight freezer safe container. It stays good for few days in freezer. Always keep covered to avoid ice crystals.

FAQS

1.Can I use store bought cream?

Yes you can use store bought fresh cream or whipping cream.

2.Can I skip pista essence?

Yes you can skip it and add more pistachios instead.

3.Is condensed milk compulsory?

It helps with sweetness and texture, but amount can be adjusted.

4.Can I add in nuts?

Yes you can just add in almonds or cashews if you like.

5.Why ice cream became hard?

Cream may be over whipped or less condensed milk used.

pista ice cream served with chopped. pista nut

If you have any more questions about this Pista Ice Cream Recipe do mail me at sharmispassions@gmail.com. In addition, follow me on Instagram, Facebook,Β  Pinterest, Youtube andΒ TwitterΒ .

Tried this Pista Ice Cream Recipe? Do let me know how you liked it. Also tag us on Instagram @sharmispassions and hash tag it on #sharmispassions.

πŸ“– Recipe Card

PistaIcecream2
Print

Pista Ice Cream Recipe

Pista Ice Cream is a creamy and tasty dessert made using fresh cream, pistachios and little pista essence. It is usually made at home on weekends or when you want some easy frozen sweet. This ice cream has mild sweetness and rich pista flavor which feels very nice after meals. It is a good option when you want something cold but not too heavy.
Course Dessert
Cuisine Indian
Keyword dessert recipes, fresh cream recipe, ice cream recipes, icecreams, milk recipes, nuts recipes
Prep Time 15 minutes
Freezing Time 8 hours
Total Time 8 hours 15 minutes
Servings 2 scoops
Calories 555kcal
Author Sharmilee J

Ingredients

  • 1 cup full fat fresh cream
  • ΒΎ cup condensed milk If you are using store bought then Β½ cup is enough
  • 1 teaspoon pista essence
  • 1.5 tablespoon pistachios
  • 2 teaspoon pistachios chopped

Instructions

  • In a dry mixer jar, take pistachios grind to a coarse mixture, set aside. Get ready with all your ingredients.
  • Β In a mixing bowl, take fresh cream whisk for 3 seconds or until thick and creamy. Now add condensed milk.
  • Whisk it for even mixing just for 2 seconds. Now add coarse pistachio mixture, then add chopped pistachios.
  • Add pista essence. Mix well using a spatula.
  • Pour into freezer safe container. Freeze it at least for 8 hours.
  • Scoop and serve Pista Ice Cream immediately!

Notes

  • Whipping cream - I whisk the cream only for few seconds until thick. Try not to overbeat or it may turn into butter.
  • Mixing - I mix condensed milk gently so cream does not lose air. Slow mixing works best.
  • Pistachio grind - I grind pistachios coarse, not very fine. This gives better taste and texture.
  • Freezing - I freeze it for minimum 8 hours so it sets properly. Overnight freezing works best.
  • Scooping - I take ice cream out few minutes before scooping, it becomes easy to serve.

Nutrition

Serving: 100g | Calories: 555kcal | Carbohydrates: 45g | Protein: 9g | Fat: 39g | Saturated Fat: 23g | Polyunsaturated Fat: 2g | Monounsaturated Fat: 10g | Cholesterol: 116mg | Sodium: 119mg | Potassium: 411mg | Fiber: 1g | Sugar: 44g | Vitamin A: 1392IU | Vitamin C: 3mg | Calcium: 275mg | Iron: 0.4mg

The post Pista Ice Cream Recipe appeared first on Sharmis Passions.

Karupatti Paal Recipe (Palm Jaggery Milk)

Karupatti Paal is a warm , flavorful drink made using milk, palm jaggery and a tiny pinch of dry ginger powder. It is usually made as healthy option instead of milk with sugar. This drink is very simple but still feels special because of the flavor and taste. It is often made fresh and served hot. Recipe included with step by step pictures and video.

karupatti paal served in clay tumblers

The recipe has mild and natural sweetness, not too strong. Palm jaggery gives nice flavor and light brown color to the milk. When served hot, it feels very calming to drink. I usually make this in morning or evening when I want something warm. It is very comforting and refreshing especially on tiring days.

[feast_advanced_jump_to]

About Karupatti Paal

Karupatti Paal is a traditional drink made in many South Indian homes. In this recipe, instead of sugar, palm jaggery is used which gives natural sweetness and simple taste. The milk slowly takes in the palm jaggery flavor and changes color little bit. Palm jaggery is rich in iron and consuming it regularly increases hemoglobin.

This palm jaggery milk is easy and simple to make but follow the steps and tips correctly else milk will curdle if palm jaggery milk is heated. It feels good for throat and helps in digestion also. This drink is often given during cold time. It gives warm feeling inside. You can also have it on normal days.

The drink is smooth and light, so it is easy to drink. Dry ginger powder adds light heat and nice flavor which balances the sweetness. I usually make this fresh and serve it immediately. It feels like a small comfort drink after a long tiring day. I don't prefer storing it as fresh one taste much better, also reheating is not recommended for this drink.

Palm Jaggery is a better alternate to white sugar as it is less processed. It helps to give instant energy and is easy to digest. When mixed with milk, it becomes simple and healthy drink. It does not feel heavy even after drinking and feels like small comfort drink. I usually prefer this over sugar milk.

karupatti paal served in clay tumblers

Karupatti Paal Video

Why This Recipe Works

  • It is very easy and gets ready in few minutes.
  • This drink uses natural sweetener instead of sugar.
  • The flavor is mild and comforting.
  • It is light and easy to digest.
  • You can adjust sweetness as per liking.

Similar Recipes

Karupatti Paal Ingredients

  • Milk - I have used fresh milk for this drink. It gives creaminess and smooth base. You can also use toned milk.
  • Karupatti - I added karupatti. or palm jaggery for sweetness. This also adds flavor and natural color. You can adjust it according to your taste.
  • Dry ginger powder - I added for aroma and mild spice. It helps in digestion also. If you use sukku karupatti, you can skip this.
ingredients needed to make karupatti paal

How to make Karupatti Paal Step by Step

1.To a sauce pan add 1 cup fresh milk.

add milk

2.Let it come to a rolling boil.

boil it

3.Simmer for 2 minutes.

mix well

4.Switch off and remove from flame.

simmer

5.Now add 1 heaped tablespoon palm jaggery to it. Increase if you like it more sweet, may be you can add 1 and Β½ tablespoon.

add palm jaggery,

6.Then add β…› teaspoon dry ginger powder.

add dry ginger powder

7.Mix well until palm jaggery dissolves completely.

mix well

8.Transfer to a strainer and strain it to remove impurities. Discard the remains in the strainer.

strain

9.Pour into serving glass and serve hot!

pour and serve

Expert Tips

  • Adding jaggery - I always switch off the flame, remove from flame then add palm jaggery. Try not to add it to boiling milk as milk may curdle.
  • Straining - I usually strain the milk after adding jaggery, as sometimes small dirt or residue may be there. This gives smooth drink.
  • Dry ginger amount - I add only tβ…› teaspoon or a tiny pinch of dry ginger powder. If you add more, it will be too strong and overpowering.
  • Serving - I always serve this hot, it taste good when warm also.
  • Sweetness check - I taste once before serving and adjust jaggery if needed, as sweetness may change each time.

Serving and Storage

Serve it hot in a cup or small mug as soon as it is ready. This goes well as morning drink or as evening comfort drink after long day. Do not store leftovers as milk may spoil and taste also changes. It is best made fresh and consumed immediately.

FAQS

1.Can I add powdered palm jaggery?

Yes you can use powdered jaggery, but make sure to strain well as impurities may be there.

2.Can I skip dry ginger powder?

Yes you can skip it if you don't like the flavor or heat from it. Instead you can even add cardamom powder if you like the flavor.

3.Can I reheat karupatti paal?

No, do not reheat after adding palm jaggery as milk may curdle.

4.Is this drink good for kids?

Yes it is mild and healthy for kids, just adjust sweetness accordingly.

5.Can I adjust sweetness?

Yes you can add more or less palm jaggery as per your liking.

karupatti paal served in clay tumblers

If you have any more questions about this Karupatti Paal Recipe do mail me at sharmispassions@gmail.com. In addition, follow me on Instagram, Facebook,Β  Pinterest, Youtube andΒ TwitterΒ .

Tried this Karupatti Paal Recipe? Do let me know how you liked it. Also tag us on Instagram @sharmispassions and hash tag it on #sharmispassions.

πŸ“– Recipe Card

Print

Karupatti Paal Recipe | Palm Jaggery Milk Recipe

Karupatti Paal is a warm , flavorful drink made using milk, palm jaggery and a tiny pinch of dry ginger powder. It is usually made as healthy option instead of milk with sugar. This drink is very simple but still feels special because of the flavor and taste. It is often made fresh and served hot. Recipe included with step by step pictures and video.
Course Drinks
Cuisine Indian
Keyword drink recipes, Healthy tea time drink, milk recipes, Nutritional Beverage, Nutritional Drink
Prep Time 5 minutes
Cook Time 5 minutes
Total Time 10 minutes
Servings 2
Calories 94kcal
Author Sharmilee J

Ingredients

  • 1 cup milk
  • 1 tablespoon palm jaggery
  • β…› teaspoon dry ginger powder

Instructions

  • To a sauce pan add 1 cup fresh milk.
  • Let it come to a rolling boil.
  • Simmer for 2 minutes.
  • Switch off and remove from flame.
  • Now add 1 heaped tablespoon palm jaggery to it. Increase if you like it more sweet, may be you can add 1 and Β½ tablespoon.
  • Then add β…› teaspoon dry ginger powder.
  • Mix well until palm jaggery dissolves completely.
  • Transfer to a strainer and strain it to remove impurities. Discard the remains in the strainer.
  • Pour into serving glass and serve hot!

Video

Notes

  • Adding jaggery - I always switch off the flame, remove from flame then add palm jaggery. Try not to add it to boiling milk as milk may curdle.
  • Straining - I usually strain the milk after adding jaggery, as sometimes small dirt or residue may be there. This gives smooth drink.
  • Dry ginger amount - I add only tβ…› teaspoon or a tiny pinch of dry ginger powder. If you add more, it will be too strong and overpowering.
  • Serving - I always serve this hot, it taste good when warm also.
  • Sweetness check - I taste once before serving and adjust jaggery if needed, as sweetness may change each time.

Nutrition

Serving: 250ml | Calories: 94kcal | Carbohydrates: 11g | Protein: 4g | Fat: 4g | Saturated Fat: 2g | Polyunsaturated Fat: 0.1g | Monounsaturated Fat: 1g | Cholesterol: 15mg | Sodium: 59mg | Potassium: 185mg | Fiber: 0.02g | Sugar: 10g | Vitamin A: 198IU | Calcium: 150mg | Iron: 0.03mg

The post Karupatti Paal Recipe (Palm Jaggery Milk) appeared first on Sharmis Passions.

Ice Cream Recipe | No Churn Ice Cream

Ice Cream is a delicious dessert made a mix of fresh cream, condensed milk and vanilla extract. This is a no churn ice cream, so there is no need of any machine or mixer jar to use. It is very easy to make at home with just few basic ingredients only. It feels very refreshing and gives nice cooling feel when a scoop is served.

ice cream served with sprinkles

This homemade ice cream tastes very creamy, mildly sweet and delicious which feels perfect on hot days. It is best for summer season or anytime when you want a quick dessert without much hard work. I usually make this ice cream when kids ask for something cold or when I feel like eating dessert after lunch time.

[feast_advanced_jump_to]

About Ice Cream

This no churn ice cream is made using fresh cream which is beaten lightly just to make it fluffy and airy in texture. Beating the cream helps in giving soft and creamy texture to the ice cream later. Condensed milk adds sweetness and also helps in making the ice cream smooth without ice crystals forming.

Vanilla extract gives a mild flavor which is loved by all. It is not too strong but gives pleasant smell and tastes great overall. Since there is no churning involved, the method is very easy but still the final result comes really good in taste. Once it is frozen properly, it scoops easily and melts slowly in mouth which feels very nice.

This recipe is very flexible and you can add chocolate chips, nuts or chopped fruits if you like to try. But even plain vanilla ice cream itself tastes very good and suits all age group. It is a good basic recipe which you can use for making many other ice cream flavors. Everyone at home can enjoy it fresh and always ask for second scoop happily.

I mostly make this on weekends and freeze it overnight for best result. It feels nice and satisfying to make ice cream at home without using any machine.

ice crean just scooped

Ice Cream Ingredients

  • Fresh cream - I have used fresh cream for this recipe. It gives creamy texture and volume. You can use whipping cream also if that is what you have.
  • Condensed milk - I have used condensed milk for sweetness and smoothness. If using store bought, less quantity is enough.Β 
  • Vanilla extract - I added for mild flavor and nice aroma. You can add any other flavor also if you want.

Why This Recipe Works

  • It uses only three simple ingredients.
  • No machine or churning needed at all.
  • The texture comes creamy and smooth.
  • It is easy to customize with flavors or add-ons.
  • Anyone can make this at home easily.

Similar Recipes

How to make Ice cream step by step

1.Get ready with all your ingredients. In a mixing bowl, take fresh cream.

34056229686 1b1388bc84 o

2.Beat it using an electric beater until soft peaks just few seconds is enough.Now add sweetened condensed milk.

34056229186 187c3475bb o

3.Whisk it for mixing just for 2 seconds.

34056228726 2fd1fb30e6 o

4.Now add vanilla essence,mix it.Pour into freezer safe container.

34056228266 279ae93634 o

5.Freeze it atleast for 8 hours. Scoop and serve!

34096962305 0021858ed2 o

ServeΒ chilled!

ice cream served with sprinkles

Expert Tips

  • Beating cream - I beat the cream only for few seconds till soft peaks. Try not to over beat as it may turn into butter.
  • Mixing - I mix the condensed milk gently so air is not lost. Just few seconds of mixing is enough.
  • Freezing time - I freeze it for at least 8 hours so it sets well. Overnight freezing works best.
  • Flavoring - I usually keep it plain vanilla, but sometimes add nuts or chocolate chips.
  • Scooping - I take it out few minutes before scooping, then it becomes easy to scoop.

Serving and Storage

Serve this ice cream chilled. It tastes good after lunch or dinner time. Store it in freezer in an airtight container so it doesn't catch smell. Try to use it within few days for best taste and soft texture.

FAQS

1.Can I make without electric beater?

Yes you can just whisk it by hand, but it will take some time and little extra effort.

2.Can I reduce condensed milk?

Yes you can reduce it if you want less sweet ice cream.

3.Can I add other flavors?

Yes you can add chocolate, mango or strawberry flavor easily as you like.

4.Why did my cream turn grainy?

It means the cream is over beaten, so beat only till soft peaks come.

5.Can kids have this ice cream?

Yes it is mild in taste and safe for kids to eat.

ice cream served with sprinkles

If you have any more questions about this Ice Cream Recipe do mail me at sharmispassions@gmail.com. In addition, follow me on Instagram, Facebook,Β  Pinterest, Youtube andΒ TwitterΒ .

Tried this Β Ice Cream Recipe? Do let me know how you liked it. Also tag us on Instagram @sharmispassions and hash tag it on #sharmispassions.

πŸ“– Recipe Card

VanillaIcecream2
Print

Ice Cream Recipe | No Churn Ice Cream

Ice Cream is a delicious dessert made a mix of fresh cream, condensed milk and vanilla extract. This is a no churn ice cream, so there is no need of any machine or mixer jar to use. It is very easy to make at home with just few basic ingredients only. It feels very refreshing and gives nice cooling feel when a scoop is served.
Course Dessert
Cuisine Indian
Keyword dessert recipes, fresh cream recipe, ice cream recipes, icecreams, milk recipes, vanilla recipes
Prep Time 30 minutes
Freezing Time 8 hours
Total Time 8 hours 30 minutes
Servings 3 scoops
Calories 519kcal
Author Sharmilee J

Ingredients

Instructions

  • Get ready with all your ingredients. In a mixing bowl, take fresh cream.
  • Beat it using an electric beater until soft peaks just few seconds is enough. Now add sweetened condensed milk.
  • Whisk it for even mixing just for 2 seconds.
  • Now add vanilla essence, mix it. Pour into freezer safe container.
  • Freeze it at least for 8 hours.
  • Scoop and serve Vanilla Ice Cream!

Notes

  • Beating cream - I beat the cream only for few seconds till soft peaks. Try not to over beat as it may turn into butter.
  • Mixing - I mix the condensed milk gently so air is not lost. Just few seconds of mixing is enough.
  • Freezing time - I freeze it for at least 8 hours so it sets well. Overnight freezing works best.
  • Flavoring - I usually keep it plain vanilla, but sometimes add nuts or chocolate chips.
  • Scooping - I take it out few minutes before scooping, then it becomes easy to scoop.

Nutrition

Serving: 100g | Calories: 519kcal | Carbohydrates: 44g | Protein: 8g | Fat: 35g | Saturated Fat: 22g | Polyunsaturated Fat: 2g | Monounsaturated Fat: 9g | Cholesterol: 116mg | Sodium: 119mg | Potassium: 361mg | Sugar: 44g | Vitamin A: 1370IU | Vitamin C: 2mg | Calcium: 270mg | Iron: 0.2mg

The post Ice Cream Recipe | No Churn Ice Cream appeared first on Sharmis Passions.

Cheese Toast Recipe

Cheese Toast is a very easy breakfast made using bread, butter and cheese. It is mild in taste, soft inside and crisp on the outside. This is usually made on busy mornings or sometimes on lazy weekends for breakfast at home. It takes very less time and no special preparation is needed.

cheese toast served with tomato ketchup

This cheese toast feels light but still good for a quick satisfying meal. Melted cheese on warm buttered bread gives that comfort taste. It taste good even without any side dish. You can serve it with ketchup or any dip if needed too. It is that one basic breakfast option that mostly never fails.

[feast_advanced_jump_to]

About Cheese Toast

Cheese Toast is a simple recipe where bread slices are buttered, toasted and then topped with grated cheese. It can be made on dosa tawa or in a toaster. Both works fine. Making it on tawa gives better control and also a nice crisp base. It is also easy to flip and check while cooking.

The texture comes soft and crisp together. Bread turns golden and crisp at bottom while the cheese melts soft on top. Oregano and chilli flakes adds light flavor and aroma. It does not make it too spicy or strong. Even kids usually like this mild taste. It is quick, comforting and everyone at home likes it.

This recipe is just quite flexible to make at home. You can easily customize the bread, cheese or seasoning based on what you have. Even with small changes the taste comes out good. It works well even if you are short on ingredients. No need to follow anything exact. It suits anytime of the day.

I usually make cheese toast on weekends for a relaxed breakfast. Sometimes I make it even for evening snack when I don't want to cook much.Β This Cheese Toast is mittus favorite so make it for once in a while usually she loves bread in any form like mother like daughter.

This Cheese Toast Recipe is very easy to make and am sure it will be a hit with kids.You can serve this as a snack or appetiser.

cheese toast served with tomato ketchup

Cheese Toast Ingredients

  • Wheat bread - I have used wheat bread as that is what I had in hand. It gives slightly firm texture and holds butter well. White bread also works well.
  • Butter - I spread soft butter for easy spreading. It helps to toast the bread evenly and gives rich taste.
  • Cheese - I grate and used for that cheesy pull, you can add processed or mozarella cheese.
  • Oregano - I added for mild flavor and light aroma. It gives simple seasoning without overpowering the toast.
  • Chilli flakes - I added little chilli flakes for slight spice. This is optional and can be reduced for kids.

Why This Recipe Works

  • It needs very less ingredients and effort.
  • It gets ready in just few minutes.
  • The bread becomes crisp and has a cheesy pull.
  • The flavor stays mild and balanced.
  • It suits for breakfast, snack or even light dinner.

Similar Recipes

How to make Cheese Toast Step by Step

1.Take butter at room temperature. Add oregano, salt and chilli flakes to it.

how to make cheese toast step1

2.Mix it. Now get ready with the butter spread, cheese and bread slices

how to make cheese toast step2

3.Spread the butter on both the sides on each bread. Heat dosa tawa, place the bread slices carefully. I toasted 2 slices at a time.

how to make cheese toast step3

4.Toast till slightly golden, then sprinkle cheese op top to cover up,simmer the flame then cook covered for few seconds.

how to make cheese toast step4

5.Cook till cheese melts by then the bottom must have become crisp. Remove from tawa, sprinkle a pinch of chilli flakes, oregano then cut and serve.

how to make cheese toast step5

Serve hot.

cheese toast served with tomato ketchup

Expert Tips

  • Butter mix - I always mix butter with oregano, chilli flakes and little salt before spreading. This helps the flavor spread evenly and bread gets taste in every bite. Sometimes I mix directly without measuring also
  • Toasting - I toast the bread only till it is slightly golden. If you toast it too much, it may burn later when cheese melts on top. So better not to over toast it.
  • Cheese melting - I keep it on low flame and cover the pan so cheese melts slowly and evenly.
  • Cheese choice - I have used mozzarella since it melts well and gives good stretch also. But any melting cheese works fine, based on what you have.
  • Extra flavor - Sometimes I add little crushed garlic to the butter for extra taste. It gives nice smell and makes the toast more tasty.

Serving and Storage

Serve cheese toast hot straight from tawa. It taste best when cheese is still melted and soft. You can cut into halves or triangles before serving. This is best eaten fresh and should not be stored, as it turns soggy once cooled down. If needed, reheat on tawa for few seconds, not more.

FAQS

1.Can I use white bread?

Yes, white bread works well and gives softer bite.

2.Can I make in toaster?

Yes, you can toast bread first, add cheese and toast again till cheese melts.

3.Can I skip chilli flakes?

Yes, you can skip it if you want very mild taste.

4.Which cheese is better?

Mozzarella melts best but processed cheese also works.

5.Can I add garlic?

Yes, crushed garlic in butter gives nice extra flavor.

cheese toast served with tomato ketchup

If you have any more questions about thisΒ Cheese Toast RecipeΒ do mail me at sharmispassions@gmail.com. In addition, follow me onΒ Instagram,Β Facebook,Β PinterestΒ ,YoutubeΒ andΒ TwitterΒ .

Tried thisΒ Cheese Toast RecipeΒ ? Do let me know how you liked it. Also tag us on Instagram @sharmispassions and hash tag it on #sharmispassions.

πŸ“– Recipe Card

CheeseToast4
Print

Cheese Toast Recipe

Cheese Toast is a very easy breakfast made using bread, butter and cheese. It is mild in taste, soft inside and crisp on the outside. This is usually made on busy mornings or sometimes on lazy weekends for breakfast at home. It takes very less time and no special preparation is needed.
Course Breakfast, Snack
Cuisine American, French, Indian, Italian, Mediterranean
Keyword 30 mins recipes, bread, bread recipes, cheese recipes, recipes, snack recipes
Prep Time 10 minutes
Cook Time 5 minutes
Total Time 15 minutes
Servings 2
Calories 230kcal
Author Sharmilee J

Ingredients

  • 4 slices wheat bread
  • 2 tablespoon butter
  • 4 tablespoon cheese grated
  • ΒΌ teaspoon oregano plus extra to sprinkle
  • Β½ teaspoon chilli flakes plus extra to sprinkle
  • salt to taste

Instructions

  • Take butter at room temperature. Add oregano, salt and chilli flakes to it.
  • Mix it. Now get ready with the butter spread, cheese and bread slices.
  • Spread the butter on both the sides on each bread.
  • Heat dosa tawa, place the bread slices carefully. I toasted 2 slices at a time.
  • Toast till slightly golden, then sprinkle cheese on top to cover up, simmer the flame then cook covered for few seconds.
  • Cook till cheese melts by then the bottom must have become crisp. Remove from tawa, cut and serve. Enjoy Cheese Toast!

Notes

  • Butter mix - I always mix butter with oregano, chilli flakes and little salt before spreading. This helps the flavor spread evenly and bread gets taste in every bite. Sometimes I mix directly without measuring also
  • Toasting - I toast the bread only till it is slightly golden. If you toast it too much, it may burn later when cheese melts on top. So better not to over toast it.
  • Cheese melting - I keep it on low flame and cover the pan so cheese melts slowly and evenly.
  • Cheese choice - I have used mozzarella since it melts well and gives good stretch also. But any melting cheese works fine, based on what you have.
  • Extra flavor - Sometimes I add little crushed garlic to the butter for extra taste. It gives nice smell and makes the toast more tasty.

Nutrition

Serving: 75g | Calories: 230kcal | Carbohydrates: 2g | Protein: 7g | Fat: 22g | Saturated Fat: 13g | Polyunsaturated Fat: 1g | Monounsaturated Fat: 5g | Trans Fat: 0.5g | Cholesterol: 60mg | Sodium: 303mg | Potassium: 43mg | Fiber: 0.4g | Sugar: 0.2g | Vitamin A: 803IU | Vitamin C: 0.01mg | Calcium: 221mg | Iron: 0.3mg

The post Cheese Toast Recipe appeared first on Sharmis Passions.

❌