Danmuji also known as Radish Pickle or Chicken-mu is a popular Korean Side dish made with Radish, vinegar, sugar and salt. The pickle itself is crunchy, slightly sweet sour which pairs well with Korean Fried Chicken, kimbap or jajangmyeon. Korean Radish Pickle (Danmuji) I still remember eating danmuji, also known as chicken-mu, with my Korean...
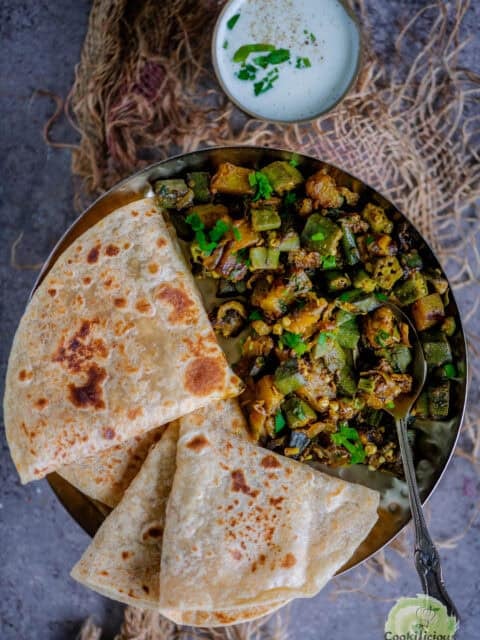
Here's a cozy, restaurant-style Indian stir-fry made with tender potatoes and crisp okra, tossed in warm, aromatic spices until everything is perfectly flavorful. Aloo Bhindi is naturally vegan and gluten-free and comes together in about 45 minutes, making it a go-to weeknight recipe. It's simple, comforting, and incredibly versatile - serve it with roti, dal […]
If you grew up eating thepla on road trips or with a hot cup of chai, this methi thepla recipe will bring back that same comfort warmly wrapped in love.
Methi Thepla is one of those things everyone has eaten somewhere, at a friend’s house, during a trip, or packed lovingly by someone’s mom. But if you’ve never tried making it at home, this is your sign to change that!
This is a surprisingly easy recipe and you only need a few ingredients to make pillow-y soft and flavorful theplas. If you’ve enjoyed dishes like Kasuri Methi Parathas or Aloo Paratha before, this recipe will feel instantly familiar. Theplas are lighter, stay soft for hours, are travel-friendly, and have that comforting, earthy flavour that makes you want to reach for just one more.
Flours: A mix of whole wheat flour and besan makes theplas soft, and helps it stay tender for hours.
Fresh Methi (Fenugreek Leaves): The hero of the recipe. It adds aroma, flavour, and a slight pleasant bitterness that makes thepla what it is.
Spices: Turmeric, red chilli powder, coriander powder, and cumin seeds add warmth and colour without making the thepla heavy.
Yogurt: Adds moisture and softness, keeping the thepla pliable even after cooling.
Oil: Helps bind the dough and keeps the thepla soft. You’ll use a little more while cooking.
Ginger & Green Chilli: Bring freshness and a gentle kick that balances the methi beautifully.
Salt & Sugar: Sugar is optional but helps round out the methi’s bitterness.
How to Reduce Bitterness from Methi
Fresh methi can sometimes taste a little sharp because of its natural alkaloids, but you can mellow that bitterness easily. The most effective way is to chop the leaves, sprinkle a little salt, mix, and let them sit for 10-15 minutes – they’ll release water, and squeezing this out removes most of the bitterness without affecting the flavour.
Using tender, younger leaves also makes a big difference, since they’re naturally milder. These small steps help you keep all the nutrition methi is loved for like iron, fibre, folate, and antioxidants, while making thepla soft, flavourful, and perfectly balanced.
Frequently Asked Questions
What is the difference between thepla and paratha?
Thepla is a softer, lighter Gujarati flatbread made with whole wheat flour, yogurt, and spices mixed directly into the dough. Parathas are usually stuffed and richer, often made with more ghee or oil.
Why do my theplas become hard after cooling?
This usually happens when the dough is too stiff or the theplas are cooked on low heat for too long. Make the dough soft, let it rest, and always cook on medium heat. A light brush of oil after cooking keeps them soft for hours.
Can I substitute fresh methi with kasuri methi?
Yes, you can. Use about 2 to 3 tablespoons of kasuri methi for every cup of fresh methi. The flavour will be slightly different but still delicious, and perfect for days when fresh methi isn’t available.
Can methi thepla be made gluten-free?
You can try a gluten-free version using a mix of jowar or bajra flour with a little besan for binding. Just note that gluten-free dough is more delicate, so pat the theplas by hand instead of rolling.
Richa’s Top Tips
Chop the methi finely: Big pieces can tear the dough and make rolling difficult. A fine chop distributes flavour evenly and keeps thepla smooth.
Don’t add all the yogurt at once: Add little by little while kneading. Thepla dough should be soft but not sticky.
Give the dough 10–15 minutes of rest: This small pause makes the dough more elastic, which means easier rolling and softer thepla.
Cook on medium heat: Low heat dries out the thepla, and high heat burns it. Medium heat gives you those perfect golden spots.
Press gently while cooking: Use a spatula to lightly press the edges so the thepla cooks evenly without turning crisp.
Brush with oil after cooking: A tiny bit of oil keeps them soft for hours, especially helpful if you’re packing them for lunchboxes and travel.
Storage Tips
At room temperature: Methi theplas stay soft for up to 8–10 hours, which makes them great for travel or busy days. Just cool them completely before packing so they don’t turn soggy.
In the fridge: Store cooled theplas in an airtight container or wrap them in foil. They stay good for 3–4 days. Reheat on a tawa with a few drops of oil or ghee to bring back that fresh softness.
In the freezer: Freeze them between parchment sheets in an airtight box for up to 1 month. Warm them on a hot tawa (no need to thaw fully) for perfect results.
Travel-friendly tip: Brush each thepla with a tiny amount of oil after cooking. This keeps them soft longer and prevents drying out in lunchboxes or while travelling.
Serving Ideas
Methi Thepla is one of the most versatile items from the Gujarati cuisine and makes for a wonderful base to any meal. Here are some delicious ways to enjoy it:
With Mango Chutney: the classic Gujarati combo that’s sweet, tangy, and unbeatable.
With Aloo Sabzi: a simple, homely potato sabzi makes this a complete meal.
With Masala Dahi: mix curd with roasted jeera, chilli powder, and salt for a quick side.
As a wrap: stuff with cooked chicken, paneer, or veggies for a quick lunch roll.
Customisation Ideas
Boost the flavour with herbs: Add chopped coriander or a handful of fresh dill (suva). Dill pairs surprisingly well with methi and gives the thepla a lighter, fresher taste.
Make it higher-protein: Mix in 2–3 tablespoons of roasted besan or soya flour. It gives theplas a nutty flavour and keeps you full longer.
Add veggies for softness: Grated zucchini, lauki, or carrots make the dough softer and keep the theplas moist for hours. Great for travel days.
Spice it up: Stir in crushed black pepper, ajwain, or a pinch of saunf. Each one adds a different aroma without overpowering the methi.
Make a multi-grain version: Swap a small portion of wheat flour with ragi, jowar, or bajra flour. These add fibre and make the theplas more nutritious while still keeping them soft if mixed in small amounts.
Let this be your next lunch fix, and make extras so you can have some the next day as well & I hope this recipe becomes a regular at your breakfast table. If you make it, I’d love to see how it turns out, don’t forget to tag me on Instagram @my_foodstory!
1tablespoonghee or groundnut oil or any neutral cooking oil
Instructions
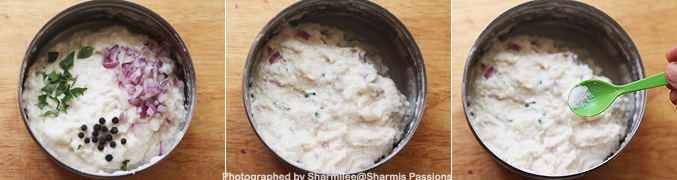
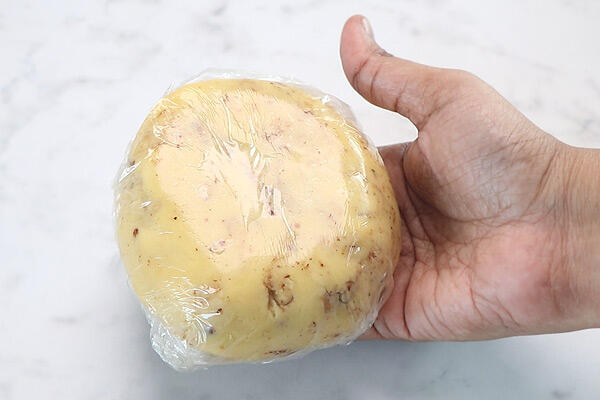
Add all the ingredients except water to a wide bowl or plate. Give a good toss to incorporate all the ingredients. Add water 2-3 tablespoons at a time and start kneading the dough, alternating between your palms and knuckles. Knead for 2-3 minutes till you get a soft, pliable dough. Keep the dough covered with a kitchen towel so it does not dry out.
1 ½ cups methi leaves, 2 cups whole wheat flour, ¼ cup gram flour, 1 tablespoon ginger garlic paste, 2 green chillies, ½ teaspoon turmeric powder, 1 tablespoon coriander powder, ½ teaspoon cumin powder, 1 teaspoon red chilli powder, 1 ½ tablespoons sesame seeds, 1 teaspoon salt, ¼ teaspoon sugar, ½ teaspoon ajwain, ¼ teaspoon asafoetida, 2 tablespoons mustard oil, ½ cup + ⅛ cup water
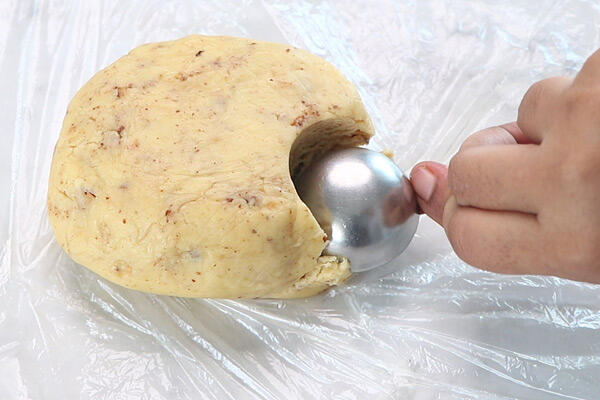
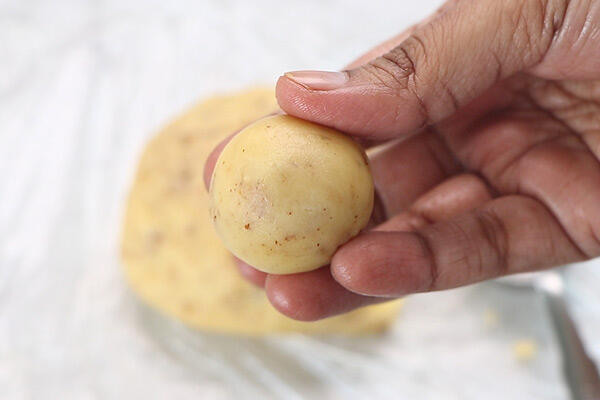
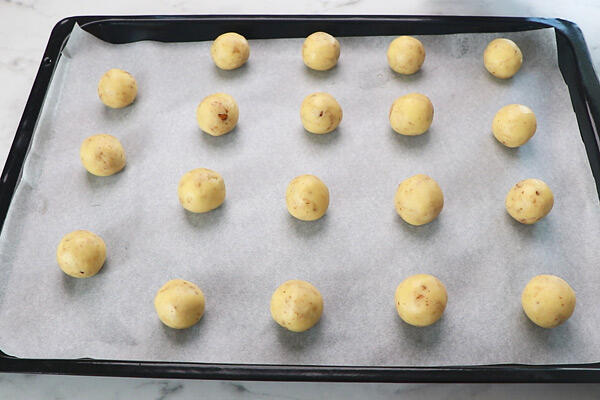
Heat a tava, take a large lemon sized piece (approx. 2-3 tablespoons) of dough and smoothen into a ball between your palms. Place on a rolling board or kitchen counter and using a rolling pin, gently roll into a thepla/roti. If thepla feels sticky while rolling, dust with dry flour. Evenly roll till its approx. 5 – 5.5 inches in diameter.
Heat tawa on medium. Place the thepla in the centre of the tawa & cook on medium. Once tiny bubbles appear on the surface, flip the thepla, apply a few drops of ghee or oil & flip again and apply ghee on the other side. Fry on low until golden spots appear on both the sides. Transfer to a plate, repeat the same for making rest of the theplas. Stack them one on top of the other so they stay soft & do not dry out. Serve hot.
1 tablespoon ghee or groundnut oil or any neutral cooking oil
Notes
While kneading, water required may vary slightly, as it depends on the wheat flour that you use. The dough has to be soft & pliable.
Mustard oil is used as it adds an authentic flavour to the theplas.
If you’ve seen a green antidote for diabetes recipe in your social media feed lately, you’re not alone. Viral ads promise a 13 second green drink that “kills parasites, repairs the pancreas and stabilizes blood sugar” all without medication or lifestyle changes.
If you spend any time on social media, you may have seen videos or ads talking about a “green antidote for diabetes” usually described as a powerful drink that can help manage blood sugar or support the pancreas.
As someone who loves exploring food, wellness trends, and simple home recipes, I was curious too. So instead of ignoring it or believing everything at face value, I decided to take a balanced look at what this phrase really means and how we can turn the idea into something practical and safe.
In this post, I’ll walk you through:
What people usually mean when they say “green antidote for diabetes”
What we do know about food and blood sugar
A simple, diabetes friendly green drink recipe you can actually enjoy as part of a healthy routine
Note: This article is for general information only and is not medical advice. If you’re living with diabetes or any medical condition, please talk to your doctor or dietitian before making dietary changes.
What Is the Green Antidote for Diabetes That’s Going Viral?
If you click on those attention grabbing videos, you’ll usually see something like:
Tap to receive the recipe now the green antidote you can make at home for under ten dollars
A bizarre green antidote made at home that locks your blood sugar levels
A 13-second green antidote that kills the parasite that causes diabetes and repairs the pancreas
But when you follow the link, most of the time:
You never get a clear, free recipe
You’re pushed into a long sales video for supplements, drops or pills
The ingredients are often vague or hidden behind a paywall
In other words, green antidote for diabetics is not a recognized medical drink or a documented recipe. Most of the times It’s a marketing hook used to sell products not a simple kitchen remedy backed by credible science.
Why Quick-Fix Antidote Claims Can be A Red Flag
Here’s where we step away from the hype and look at what major diabetes organizations actually say.
1. There’s no single food or drink that cures diabetes
Type 2 diabetes is a chronic metabolic condition, and type 1 is an autoimmune condition. Managing it usually involves:
A balanced eating pattern
Regular movement
Weight management (if recommended)
And often, medication or insulin, as prescribed by medical doctor.
No reputable guideline says a single drink can repair your pancreas in seconds or replace medical care.
2. Real nutrition advice looks much less dramatic (and more sustainable)
Organizations like the American Diabetes Association, CDC, and major medical centers recommend focusing on: American Diabetes Association
Non starchy vegetables (spinach, broccoli, cucumber, salad greens, etc.)
High fiber carbs like whole grains, beans, lentils, and whole fruit
Lean or plant-based protein
Healthy fats in sensible portions
Minimizing sugary drinks, refined carbs and ultra-processed foods
Not as exciting as a “secret antidote”, but far more evidence-based.
Is There Any Safe Green Recipe for People with Diabetes?
Short answer: You can absolutely enjoy green drinks, smoothies or soups as part of a diabetes-friendly eating pattern they just aren’t an antidote or cure.
The goal with any recipe for someone living with diabetes is to:
Keep added sugar and fast-acting carbs low
Include fiber, which helps slow the rise in blood sugar
Add a bit of protein and/or healthy fat for better satisfaction
Fit into your overall carbohydrate and calorie goals for the day
With that in mind, here’s a simple green recipe you can safely share in your blog post clearly framed as a supportive option, not a miracle cure.
Diabetes Friendly Green Smoothie (Not an Antidote, Just a Nourishing Drink)
Ingredients (1 serving)
Cucumber, chopped
Coriander
3–4 fresh mint leaves
Juice of ½ lemon
Ginger
Celery
200–250 ml water or unsweetened coconut water (adjust for thickness)
Black Salt
Method
Cucumber, Celery, Cilantro leaves, mint , ginger and lemon juice to a blender.
Pour in water or unsweetened coconut water.
Blend until completely smooth. Add more liquid if you prefer a thinner drink.
Taste and adjust: More lemon for brightness
Serve immediately. If you let it sit for a few minutes, chia/flax will thicken it slightly.
Why this works better than the viral “antidote” idea
Non-starchy greens + cucumber → Very low in carbohydrates, high in vitamins and fiber. American Diabetes Association
How to Use Green Drinks Like This (Without Expecting Miracles)
To keep your post practical and safe, you can add a small how to use mini guide:
Enjoy this smoothie as part of a meal, not on an empty stomach instead of food, especially if you take insulin or medications that can cause low blood sugar.
Pair it with a protein-rich option (tofu scramble, paneer, eggs, Greek yogurt, lentil patties etc. depending on your audience and diet).
Encourage them to discuss any dietary changes with their doctor or dietitian, especially if they’re on glucose lowering medication.
The phrase “green antidote for diabetics” sounds dramatic, and that’s probably why it spreads so quickly online. Instead of chasing secret formulas, I prefer to take the useful part of the idea more greens, more fiber, fewer sugary drinks – and turn it into a simple, realistic recipe you can enjoy.
If you try this green drink, I’d love to know how you liked it and how you served it:
With breakfast?
As a mid-morning drink?
Tweaked with your favourite herbs?
FAQ: Green Antidote For Diabetes
Can the “green antidote” cure diabetes?
No. There is no single drink, juice or smoothie that can cure diabetes. This green drink is meant to be a nutrient-rich recipe idea, not a medical treatment. Diabetes care should always follow your doctor’s or specialist’s guidance.
Are green drinks good for people with diabetes?
Green drinks can be a nice way to add: Leafy greens, Herbs Low-calorie vegetables to your diet. The key is to keep added sugar low, watch portion sizes, and fit it into your overall eating plan. If you add fruits, keep them in small amounts and consider the total carbohydrate content.
Which green vegetables are usually better for blood sugar–friendly recipes?
In general, non-starchy vegetables work well, such as: Spinach, Kale, Lettuce, Cucumber, Coriander/cilantro, Mint Celery. They are naturally lower in carbohydrates and calories, making them easier to fit into a diabetes-friendly eating pattern.
Can I drink this green recipe every day?
That depends on: Your overall diet, Your blood sugar patterns Your healthcare provider’s advice. For many people, a small green drink without added sugar can be a regular part of a balanced diet. But if you live with diabetes, it’s always safer to check with your doctor or dietitian, especially if you’re also adjusting medications or other meals.
If You like this recipe and made it Please rate the recipe. It helps us to reach more people. For the Latest updates Subscribe to Rekha’s Whatsapp. You can follow me onInstagram, Facebook, Youtube, Pinterestfor more food inspirations.
Diabetes Friendly Green Smoothie (Not an Antidote, Just a Nourishing Drink)
Ingredients
1Cucumberchopped
50gm Coriander
10gm fresh mint leaves
1/2tsplemon Juice
5gm Ginger
3stalks Celery
200–250 ml water or unsweetened coconut wateradjust for thickness
Black Salt to taste
Instructions
Cucumber, Celery, Cilantro leaves, mint , ginger and lemon juice to a blender.
Pour in water or unsweetened coconut water.
Blend until completely smooth. Add more liquid if you prefer a thinner drink.
Taste and adjust: More lemon for brightness
Serve immediately. If you let it sit for a few minutes, chia/flax will thicken it slightly.
Notes
Why this works better than the viral “antidote” ideaNon-starchy greens + cucumber → Very low in carbohydrates, high in vitamins and fiber. American Diabetes Association
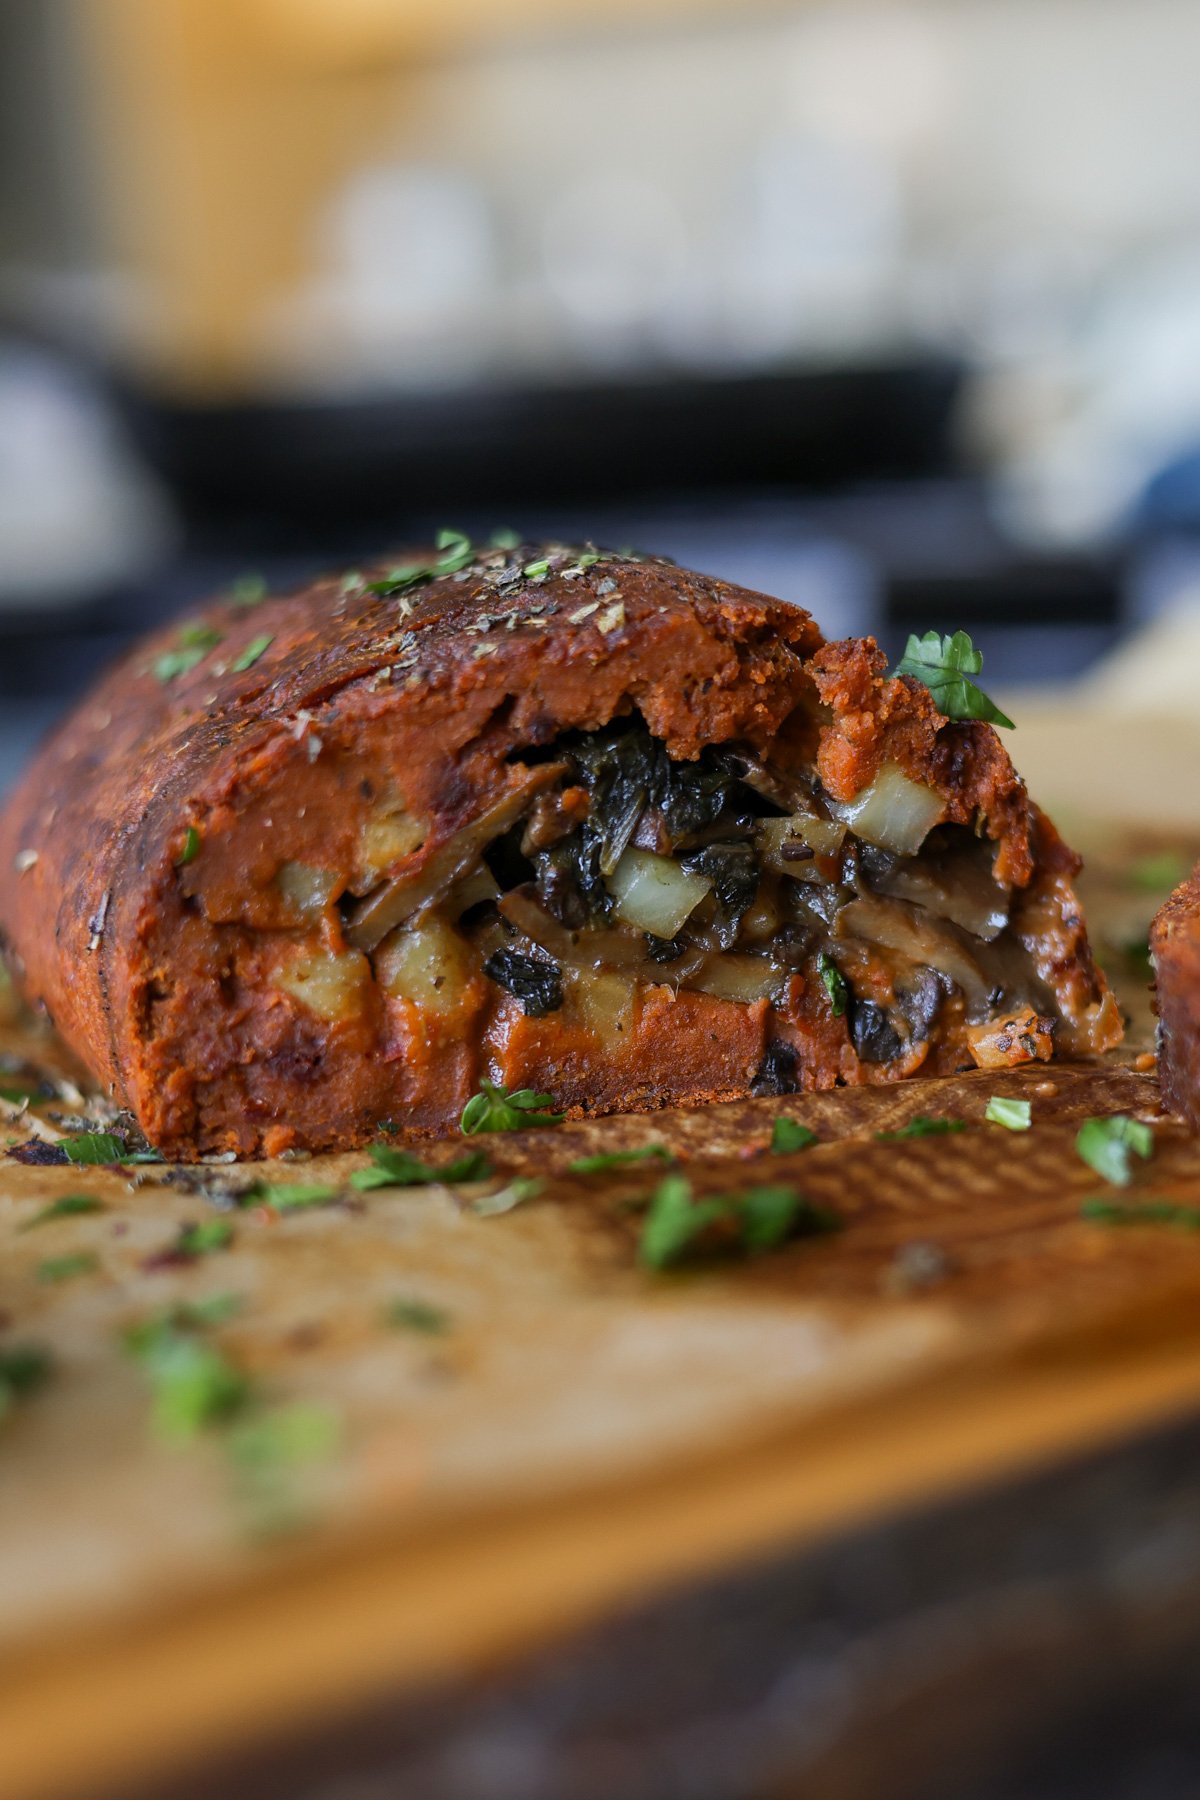
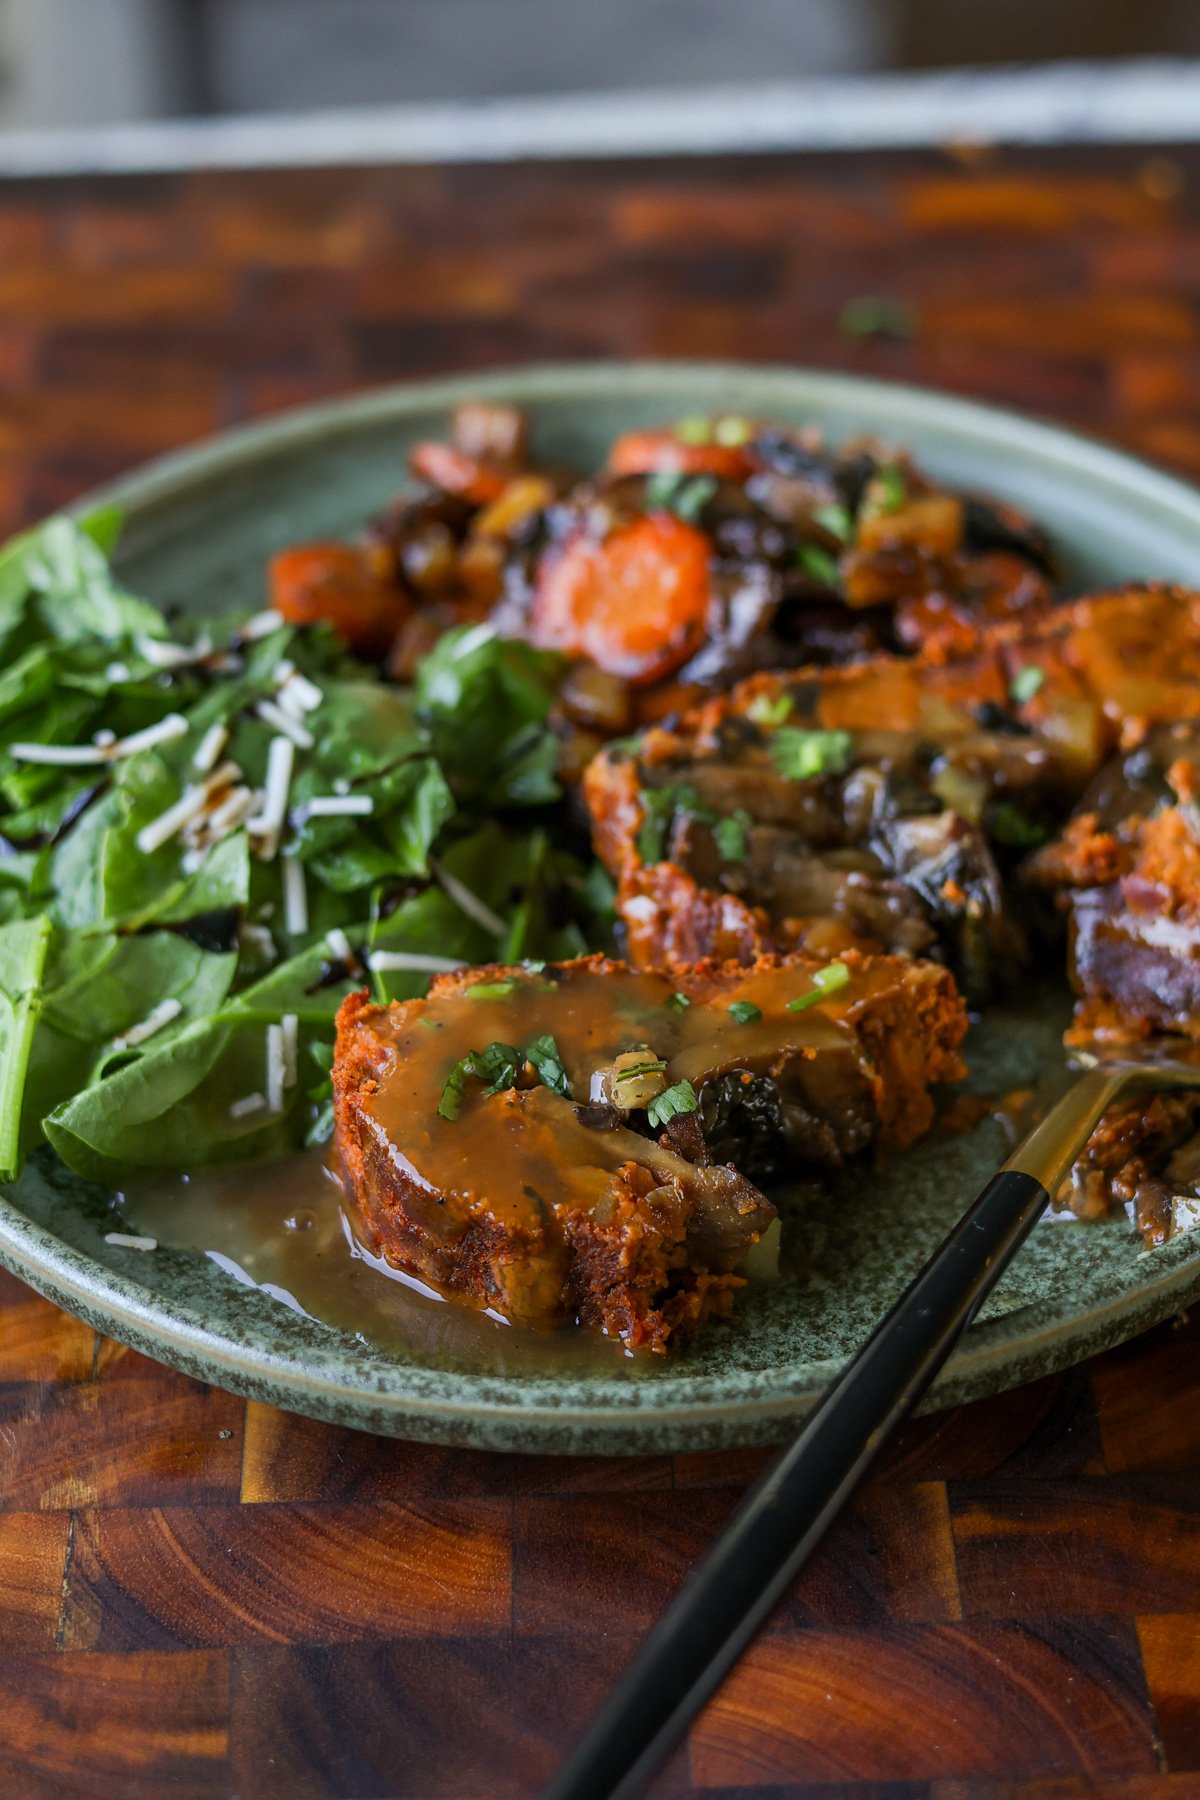
This sun-dried tomato roast makes a stunning centerpiece for any holiday table. Packed with umami and filled with a hearty blend of mushrooms and potatoes, it delivers deep flavor and satisfying texture in every slice. Completely vegan, gluten-free, and soy-free with an easy nut-free option.
This is my version of a vegan holiday roast. We make this “meat” mixture with some white beans and almond flour, and process it until smooth. I also add some sun dried tomatoes for that rich, umami flavor.
The mixture becomes like a pâté in the food processor, then we spread that onto parchment paper.
Next, make the stuffing with cooked mushrooms, potatoes, and herbs. Place that on top of the bean mixture, roll it up using the parchment, and bake it.
It turns into this delicious, amazing-smelling roast that’s full of herbs and deep umami flavor from the sun dried tomatoes. It’s just perfect!
It’s completely gluten-free, but if you prefer, you can use all-purpose flour instead of tapioca starch. It’s also soy-free, since many of you asked for a soy-free option after I made that very popular tofu holiday roast a few years ago.
You can easily adjust the flavors to your taste! Use fewer sun-dried tomatoes or different herbs, if you like. I usually serve it with a side salad, my simple vegan gravy, and some roasted vegetables for a perfect holiday or dinner plate.
Why You’ll Love Sun Dried Tomato Roast
umami-packed vegan holiday roast
savory mushroom-potato stuffing
make-ahead friendly vegan holiday entree
naturally gluten-free and soy-free with nut-free option
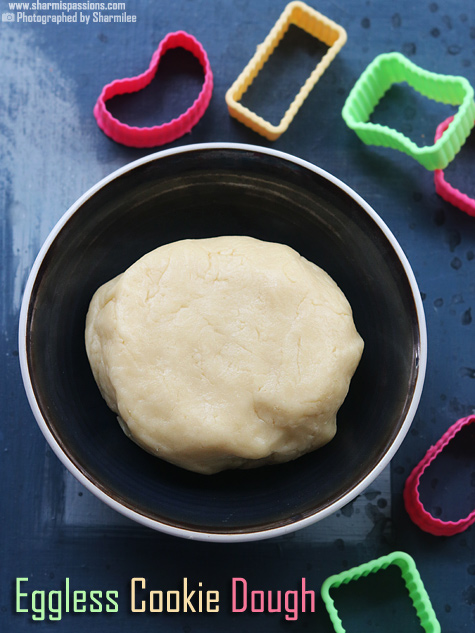
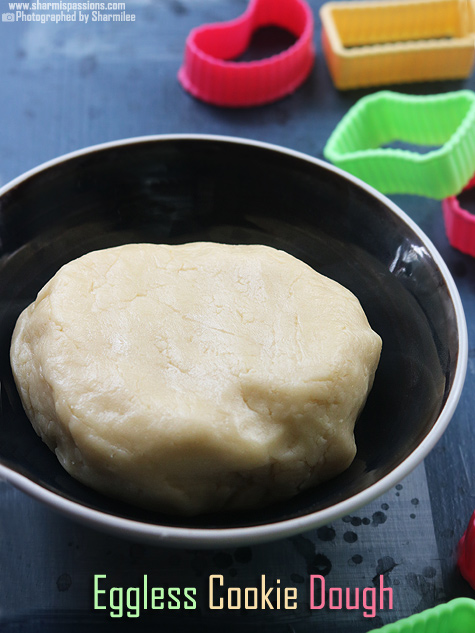
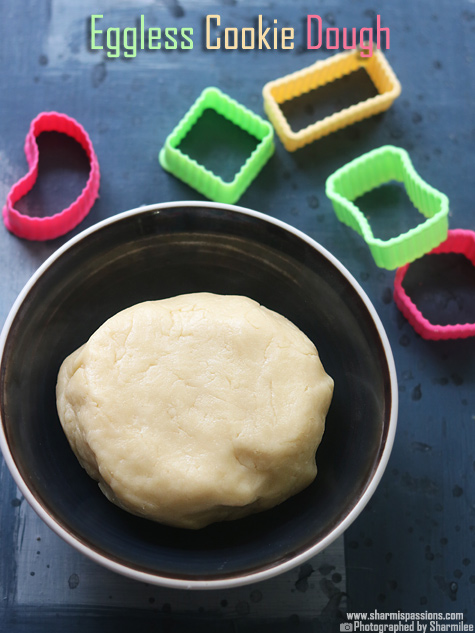
Eggless Cookie Dough is one of those easy dough recipes as it comes together so quick and the cookies turns out perfect with this dough. This dough has a soft buttery taste, and the texture feels smooth and little chewy, almost like the normal cookie dough but without any eggs added. You can use it for making all kinds of cookies.
This is such a easy recipe when you don't want too much work. The flavor is mild and comforting, and the dough gets firmer once you chill it. I make this one day ahead when I am planning cookies for weekend, as the dough stays good in fridge for long time. It gives a neat base, so you can mix in chocolate chips, nuts or anything you like later.
[feast_advanced_jump_to]
About Eggless Cookie Dough
Eggless Cookie Dough is a mix of flour, butter and sugar mixed together to form a smooth, soft dough. This stays a bit soft when it's fresh but becomes firm after chilling for some time. The recipe has a buttery flavor with a tiny hint of vanilla, and the sweetness is not too heavy, so you can pair it with any add-ons easily.
This kind of dough is very common in basic home baking, specially for people who don't prefer using eggs. The butter and sugar gets creamy when whisked, and the flour gives the structure to bring everything together. You can adjust the sugar, add cocoa, add sprinkles or even change to almond essence if you want a different flavor.
It is also very forgiving dough, even if you don't whisk perfectly it still comes fine. Because there is no egg, the dough stays stable in fridge without becoming sticky too fast. Some people toast the flour before using but most time we keep it simple only. It works well for cut-out cookies, drop cookies or even to use as a layer in some desserts.
I usually make a small batch and keep in fridge, so when I get little free time in evening I just take some dough, shape quickly and bake it. Saves lot of effort and kids also like choosing what mix-ins to add.
This basic cookie dough recipe is my keeper recipe since I started baking cookies regularly for mittu. This cookie dough recipe has no rising agents so its best suitable for kids too.
When mittu was around 4 yrs , whenever we plan to go for a movie or for a long hour outing, I bake these cookies and pack it for her to avoid buying snacks for her from outside vendors. I usually bake it as cutout shortbread cookies just the way she likes it.
Eggless Cookie Dough Ingredients
Maida / All purpose flour - I have used this as the main base and it helps the dough stay firm and hold shape after chilling. It gives that soft crumb later when you bake. You can use wheat flour also but the cookies might turn little dense.
Butter - I have used room temperature butter so it gets creamy easily. It gives a rich buttery flavor. You can use homemade butter too, it gives a small rustic taste.
Powdered sugar - I used powdered granulated sugar since it blends quick with butter and doesn't give grainy feel. It adds sweetness and you can adjust according to your taste also.
Vanilla essence - I have used this for flavor and it gives mild nice smell. You can replace with almond essence or even cinnamon powder for different flavor.
Why This Recipe Works
It is a simple dough and uses basic ingredients which we mostly have at home.
It gives a soft buttery flavor that suits many cookie varieties.
This recipe stays good in fridge for long days, so you can prepare ahead.
You can mix in like choco chips, nuts or cocoa, making the dough very flexible.
It is eggless, the dough stays stable and easier to handle even for beginners.
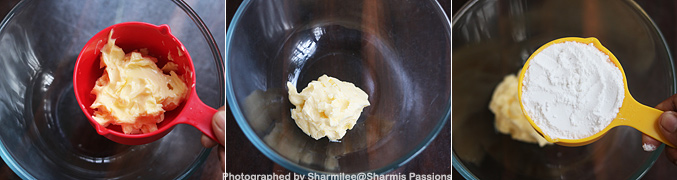
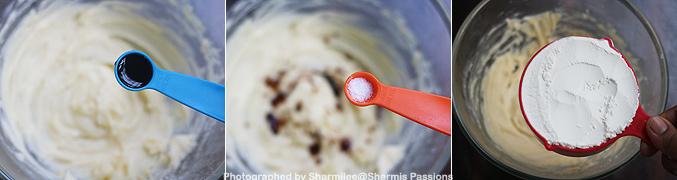
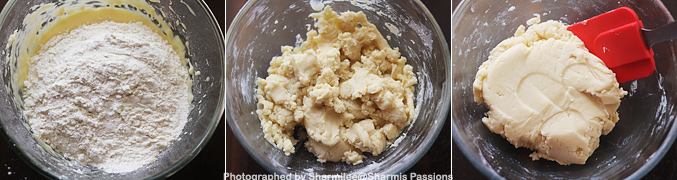
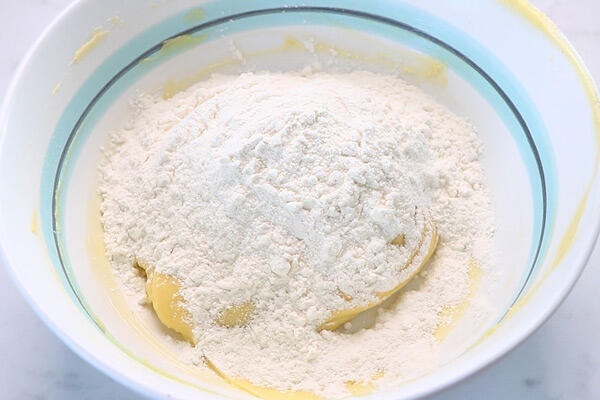
1.Measure and take butter in a mixing bowl, add powdered sugar to it
2.Whisk it well, I used my hand whisk, you can use electric mixer too. Whisk it until creamy and fluffy.
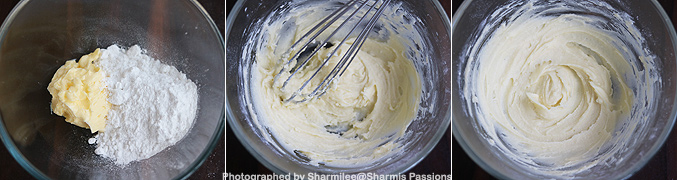
3.Now add vanilla essence and salt. Finally add in the flour
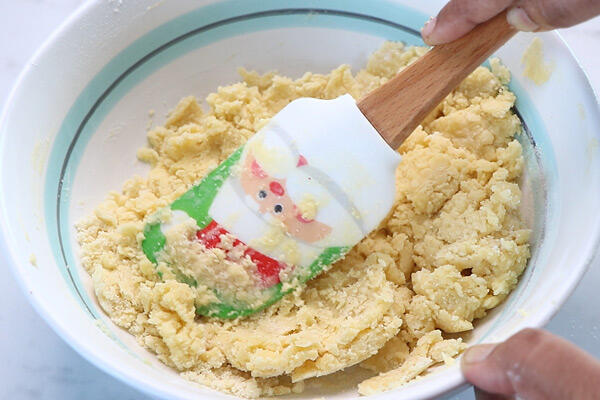
4.Mix with a spatula to form a dough.
5.Now use your hands to roll into a ball, cling wrap it and refrigerate it
Refrigerate until use.
Expert Tips
Mix butter well - Make sure to whisk butter and sugar well till soft and creamy. I usually whisk little extra because it gives nicer texture after baking the cookies.
Chill the dough - This can be chilled for at least one hour so that it firms up nicely. Try not to skip this step because it helps the cookies hold shape.
Use powdered sugar - I have used powdered sugar as it blends fast regular sugar take time to dissolve.
Adjust flavors - You can just add chocolate chips, nuts, cocoa, cinnamon or anything you like. I usually add whatever is at home.
Don't over mix - Once the dough comes together, stop mixing. If mixed too long, the cookies may turn bit tougher.
Serving and Storage
Serve them hot with tea or milk after you bake the cookies using this dough. This goes well as small treat also because of the mild buttery flavor. You can store leftover dough in airtight box and keep in fridge for 2-3 weeks easily. If it becomes too firm, just leave it outside for few minutes before shaping. No need to freeze unless you want to keep for long time.
FAQS
1.Can I skip vanilla?
Yes you can skip it. You can add any other essence you like too.
2.Can I freeze this dough?
Yes you can freeze, but honestly fridge storing itself works fine for few weeks.
3.Can I use wheat flour?
You can use it, but the cookies come little dense since wheat flour is heavy.
4.Can I reduce the sugar?
Yes you can reduce it and the dough will still hold well. Just mix properly.
5.Is it okay to eat the dough raw?
It is eggless so mostly fine, but I usually give only small portions avoid raw food intake.
If you have any more questions about this Eggless Cookie Dough Recipe do mail me at sharmispassions@gmail.com. In addition, follow me on Instagram, Facebook, Pinterest, Youtube and Twitter .
Tried this Eggless Cookie Dough Recipe? Do let me know how you liked it. Also tag us on Instagram @sharmispassions and hash tag it on #sharmispassions.
Eggless Cookie Dough is one of those easy dough recipes as it comes together so quick and the cookies turns out perfect with this dough. This dough has a soft buttery taste, and the texture feels smooth and little chewy, almost like the normal cookie dough but without any eggs added. You can use it for making all kinds of cookies.
Keyword 30 mins recipes, all purpose flour recipes, Baking, baking recipes, butter recipes, christmas recipes, cookie recipes, Festival, How to, maida recipes, no bake recipes
Measure and take butter in a mixing bowl, add powdered sugar to it.
Whisk it well, I used my hand whisk, you can use electric mixer too. Whisk it until creamy and fluffy.
Now add vanilla essence and salt. Finally add in the flour.
Mix with a spatula to form a dough.
Now use your hands to roll into a ball, cling wrap it and refrigerate it.
Refrigerate Cookie Dough until use.
Notes
Maida / All purpose flour - I have used this as the main base and it helps the dough stay firm and hold shape after chilling. It gives that soft crumb later when you bake. You can use wheat flour also but the cookies might turn little dense.
Butter - I have used room temperature butter so it gets creamy easily. It gives a rich buttery flavor. You can use homemade butter too, it gives a small rustic taste.
Powdered sugar - I used powdered granulated sugar since it blends quick with butter and doesn't give grainy feel. It adds sweetness and you can adjust according to your taste also.
Vanilla essence - I have used this for flavor and it gives mild nice smell. You can replace with almond essence or even cinnamon powder for different flavor.
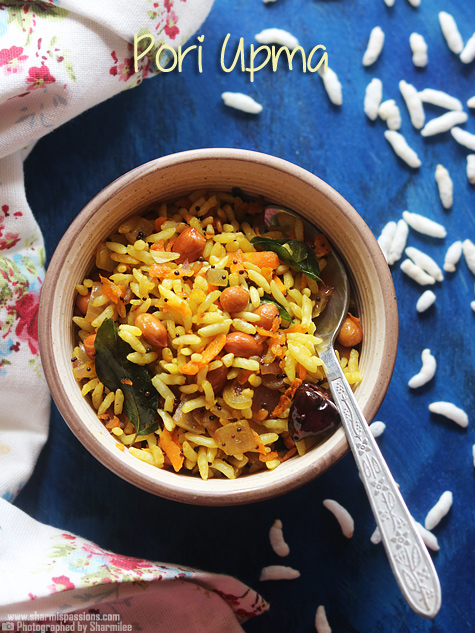
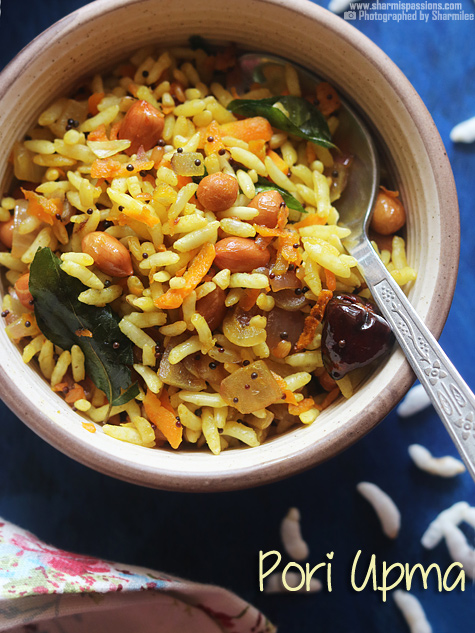
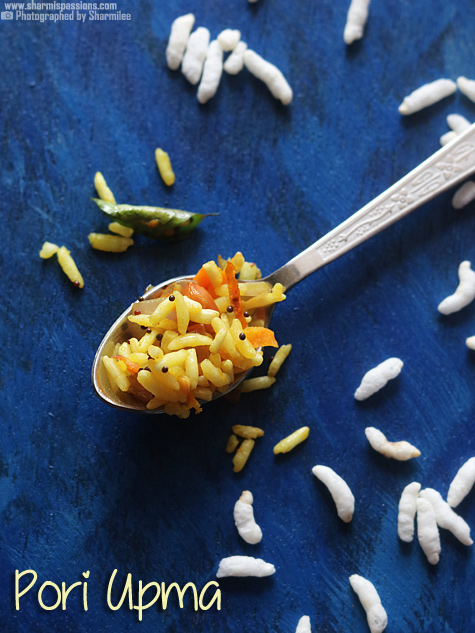
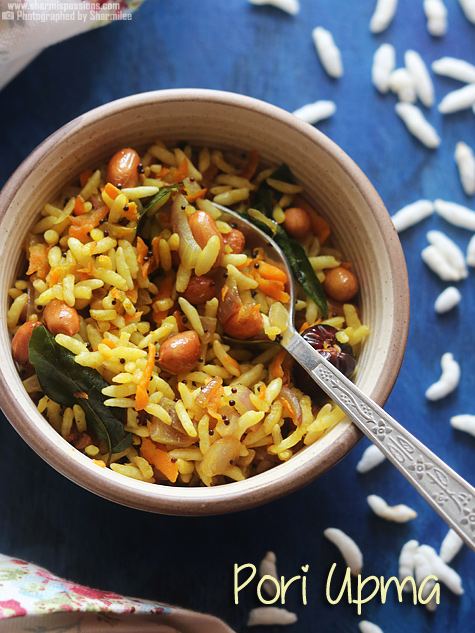
Pori Upma is a quick and easy dish that you can make for after school snacks as it is light still filling. Masala Pori is spicy for kids and hence Pori Upma is a good alternate to it. It is healthy too with carrots & peanuts. It tastes mild and soft, and the puffed rice takes in flavors so easily, so you don't need anything fancy at all to make it taste good.
I make this Pori Upma mostly on weekdays when everything feels rushed but you still want to put something warm on the plate. The texture is soft but still has a little crunch from peanuts and carrots which makes it more enjoyable. It is different from regular upma since it is much lighter and doesn't feel heavy at all.
[feast_advanced_jump_to]
About Pori Upma
Pori Upma, also called puffed rice upma, is a light South Indian dish made using pori that is softened slightly with water and then mixed with a simple tempering. The base flavor comes from onion, peanuts and spices, the pori becomes soft in just few seconds. The dish stays mild yet has a comforting taste.
You can make it spicy like masala pori, but this upma version stays very gentle in taste and suits small kids also. This recipe turns out soft and fluffy only, mainly because puffed rice absorbs water and flavors so quick. You can add grated carrot, tomato or even some tiny veggies to make it look more colorful also.
You can even squeeze little lemon juice or add a small piece of tomato if you want that slight tangy feel coming through. Peanut gives a nice crunch, and sometimes I add few cashews also when I want some extra flavor going on. If you like more spicy version, just add green chillies instead of the dry red ones, this comes out quite nice.
I usually make this on busy mornings or those evenings when I really don't feel like eating any heavy snacks. Just quick toss and done, that's why I keep doing this often only.This is one of those after-school kind of snacks that many homes still make, mainly because it gets done in just few minutes.
Pori Upma Ingredients
Pori / Puffed Rice - I have used this as the main base and it turns soft quickly when rinsed. It gives the light fluffy texture for the whole upma. You can use any fresh pori available.
Carrot - I have used grated carrot to add light sweetness and small crunch. It is for color also, and you can use beetroot or capsicum if you want some change.
Onion - I used finely chopped as it gives mild flavor when sautéed. It also helps balance the softness of the pori. You can add shallots also.
Raw peanuts - I have used peanuts mainly for crunch and extra flavor. It gives nice bite in between. You can use cashews also if you like.
Turmeric powder - I added a pinch to give color and mild earthy taste. It is optional but gives nice look.
Coconut oil - I have used coconut oil for tempering, it gives very homely aroma. You can use any cooking oil also.
Mustard seeds - I used this for tempering and it gives a small pop and flavor. You can skip if you don't prefer.
Urad dal - I have used this for bite and texture. It adds tiny crunch when fried. You can add chana dal also.
Red chillies - This is for mild heat and aroma. You can replace with green chilli if you want stronger spice.
Hing - I added a pinch as it brings a nice flavor and helps digestion. You can skip but it tastes nicer with it.
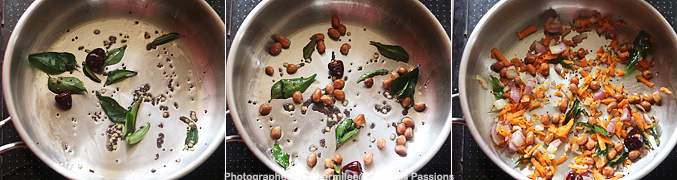
1.In a pan heat oil in pan - add the items listed under 'to temper' let it splutter, then add peanuts roast until crisp. Then add onion saute till transparent then add carrot,turmeric powder.
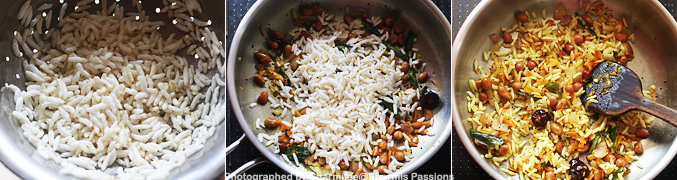
2. Saute for 2-3 minutes. Meanwhile take pori in a strainer.
3.Rinse it once, squeeze excess water and add it to the pan. Toss it well.Alternatively you can soak for 2 minutes then squeeze excess water too.
Serve hot / warm!
Expert Tips
Rinse the pori gently - Make sure to rinse the pori just once and squeeze it lightly. I usually rinse in a strainer so it doesn't turn mushy.
Don't overcook veggies - Try not to overcook the carrot or onion because the upma tastes better when veggies have little crunch still.
Adjust spice easily - You can add green chilli for more spice or skip red chilli for kids. This can be modified in many ways.
Use fresh pori - I have used fresh crisp pori as it softens well. Old pori becomes too chewy after rinsing.
Add lemon for tang - You can add few drops of lemon juice in the end for mild tangy flavor. I do this sometimes when I want fresh taste.
Serving and Storage
Serve them hot with a cup of tea or as a simple evening snack. This goes well with some chutney also but most time we eat it plain only. You can store leftover pori upma in fridge for few hours but it tastes best when served fresh. If storing, reheat lightly in a pan to bring back the softness. Don't add water again.
FAQS
1.Can I add tomato?
Yes you can add a small tomato for slight tangy taste. It mixes well with pori.
2.Can I skip peanuts?
Yes you can skip peanuts or add cashews instead. Both works fine.
3.Does the pori need soaking?
You can soak for 2 minutes or just rinse once. Both gives slightly different texture.
4.Can I use masala pori instead?
You can but the final upma will be slightly spicy. The plain pori gives more mild taste.
5.Does this increase in volume after cooking?
Not much, pori stays almost same size, so this quantity serves one or two only.
If you have any more questions about this Pori Upma do mail me at sharmispassions@gmail.com. In addition, follow me on Instagram, Facebook, Pinterest ,Youtube and Twitter .
Tried this Pori Upma? Do let me know how you liked it. Also tag us on Instagram @sharmispassions and hash tag it on #sharmispassions.
Pori Upma is a quick and easy dish that you can make for after school snacks as it is light still filling. Masala Pori is spicy for kids and hence Pori Upma is a good alternate to it. It is healthy too with carrots & peanuts. It tastes mild and soft, and the puffed rice takes in flavors so easily, so you don't need anything fancy at all to make it taste good.
Course Breakfast, dinner, Snack
Cuisine Indian
Keyword 30 mins recipes, 30 mins rice recipes, puffed rice recipes, recipes, Rice, upma, upma recipes, veg recipes
In a pan heat oil in pan - add the items listed under 'to temper' let it splutter, then add peanuts roast until crisp.Then add onion saute till transparent then add carrot,turmeric powder.
Saute for 2-3 minutes.Meanwhile take pori in a strainer.
Rinse it once,squeeze excess water and add it to the pan.Toss it well.Alternatively you can soak for 2 minutes then squeeze excess water too.
Serve Pori Upma hot / warm!
Video
Notes
Rinse the pori gently - Make sure to rinse the pori just once and squeeze it lightly. I usually rinse in a strainer so it doesn't turn mushy.
Don't overcook veggies - Try not to overcook the carrot or onion because the upma tastes better when veggies have little crunch still.
Adjust spice easily - You can add green chilli for more spice or skip red chilli for kids. This can be modified in many ways.
Use fresh pori - I have used fresh crisp pori as it softens well. Old pori becomes too chewy after rinsing.
Add lemon for tang - You can add few drops of lemon juice in the end for mild tangy flavor. I do this sometimes when I want fresh taste.
Kimbap (Korean sushi roll) also known as gimbap. This vegetarian kimbap is called Yachae Kimbap (야채 김밥) in Korea and this is the most basic kimbap variety available. Learn how to make perfect looking kimbap with step by step pictures. Vegetarian Kimbap Kimbap was completely new to me until our Korean trip, and we instantly fell...
Dubai kunafa chocolate is a rich, dreamy dessert that combines crunchy roasted kunafa, creamy chocolate and pistachio butter. This version is a fun and chocolatey twist to the classic kunafa. The best part about this chocolate is you only need very few ingredients like kataifi, pistachio butter, chocolates, butter and sugar. Kunafa Chocolate Recipe The...
If green chutney is a star ingredient in your kitchen, you’re going to love this recipe. It’s juicy, flavorful, and cooks up quickly, making it perfect for both weeknight dinners and weekend grilling.
When the weather starts to get chilly, this is the kind of chicken you actually feel like eating. Reminding us of our favorite street food stalls, it’s warm, fresh, and unlike them, not loaded with those heavy masalas.
The coriander and mint give it such a clean flavour, and the whole thing cooks quickly, which is always a plus. And the colour? It just makes the plate look happy. If you’ve tried simple recipes like our Chicken Curry, this has that same comfort but with a lighter, greener twist.
Chicken: Bone-in or boneless, both work well. The curd marinade helps keep it tender and juicy.
Curd (Yogurt): Adds creaminess and gently tenderises the chicken while giving the gravy a balanced tang.
Basic Seasoning: Turmeric and salt form the simple base flavour for the marinade.
Green Herbs: Coriander, mint, and a few palak (spinach) leaves come together into a bright green splash of colour and fresh, herby flavour.
Green Chillies: Brings about the heat so you can adjust depending on how spicy you like it.
Cashews: Blended in to give the gravy a naturally rich, creamy texture without using cream.
Ice Cubes: Helps the green paste stay vibrant by keeping the herbs cool while grinding.
Whole Spices: Green cardamom, cloves, and cinnamon add warmth and aroma right at the start of cooking.
Aromatics: Finely chopped onions plus ginger–garlic paste build the savoury base of the gravy.
Seasonings: Water, salt, crushed pepper, garam masala, and kasuri methi round out the flavours and balance the dish beautifully.
Richa’s Top Tips
Keep the greens bright: Grind the coriander, mint, and palak with ice cubes. This little trick keeps the colour fresh and green instead of dulling while cooking.
Don’t skip the marinade: Even 20–30 minutes makes a huge difference. The curd softens the chicken and helps the flavours cling better.
Roast the chicken briefly: When you add the marinated chicken to the pan, roast it on high heat for a minute or two. This helps seal in juices and gives the gravy a deeper flavour.
Adjust water wisely: Add water little by little so the gravy turns out to be thick, not watery
Frequently Asked Questions
Can I use frozen spinach instead of fresh?
Yes, you can! Thaw it completely, squeeze out the excess water, and blend it into a puree. Fresh spinach gives you a brighter colour and flavour, but frozen works in a pinch and saves you the blanching step.
Why does my spinach turn dark when cooking?
Spinach turns dark when it’s overcooked or not cooled quickly enough after blanching. The ice bath is key, it stops the cooking process immediately and locks in that vibrant green colour. Skip it, and you’ll end up with a dull, olive-toned curry.
Can I substitute spinach with other greens like methi or kale?
Absolutely! Methi (fenugreek leaves) will give you a slightly bitter, earthy flavour that’s delicious with chole. Kale works too, though it’s a bit tougher, so blanch it a little longer. Amaranth leaves or mustard greens are also great options if you want to switch things up.
How do I prevent the curry from becoming too watery?
Cook the spinach puree for a good 3-4 minutes after adding it so it absorbs all the masala and thickens up. If it’s still too thin, let it simmer uncovered for a bit longer. The curry should have a thick, coating consistency, not a soupy one.
Storage Tips
Fridge: Hariyali Chicken stays well in an airtight container for up to 2 days. Reheat it on low heat with a splash of water or milk so the gravy stays soft and creamy.
Freezer: You can freeze it for up to a month. Thaw overnight in the fridge and warm gently on the stove. The colour may darken slightly but the flavour stays great.
Storing the green paste: If you want to prep ahead, make the green paste and freeze it in small portions. It stays fresh for 2–3 weeks and makes cooking much quicker.
Avoid boiling after reheating: Overheating can dull the green colour and make the chicken tough. Keep the heat low and slow.
Serving Ideas
Hariyali Chicken pairs beautifully with simple sides that let the herby flavour shine. Here are some recipes from the blog you can serve it with:
Perfect with Indian Breads
Garlic Naan: soft, buttery, and great for scooping up that green gravy.
Lachha Paratha: flaky layers that taste amazing with creamy chicken curries.
Great with Rice
Jeera Rice: light and aromatic, perfect for balancing the herbs and spices.
Vegetable Pulao: adds a bit more colour and texture to your meal.
Indian Raita: a simple, homely side dish that pairs beautifully with fresh herb-based curries.
Kachumber Salad: fresh, crunchy, and helps brighten the meal.
Customisation Ideas
Swap the protein: Use paneer, mushrooms, tofu, prawns, or even soya chunks for a vegetarian or lighter version, the green marinade tastes amazing on all of them.
Turn it into a grill recipe: Use the same marinade and grill the chicken (or paneer) on a grill pan or tandoor for a smoky, tikka-style twist.
Make it creamy: Add 1–2 tablespoons of cashew cream or coconut milk toward the end for a richer, restaurant-style gravy without changing the flavour too much.
Dry version option: Cook off the water and finish with a squeeze of lemon to turn this into a dry, starter-style Hariyali Chicken which is great for wraps or platters.
Now it’s over to you. Go ahead & try this at your home, don’t forget to tag me on Instagram @my_foodstory when you do. I’d love to see your Hariyali Chicken and how you make it your own!
Add all ingredients listed for Marination to a bowl, give a good toss and set aside to marinate for 20-30 minutes.
500 grams bone-in or boneless chicken, 3 tablespoons curds, ¼ teaspoon turmeric powder, ½ teaspoon salt
Green paste:
Add all the ingredients for the green paste to a mixer grinder and grind to a smooth paste.
1 cup coriander leaves, ½ cup mint leaves, 3 palak leaves, 3-4 green chillies, 1 tablespoon cashews, 4-5 ice cubes
Hariyali gravy:
Heat oil in a kadai or pan, add whole spices – cardamoms, cloves, dalchini and saute on low for a few seconds. Add chopped onions and heat fry for 2-3 minutes on low till they turn translucent. Add ginger garlic paste and fry on low till they golden brown.
3 tablespoons oil, 3 green cardamoms, 2 cloves, 1 inch dalchini, ½ cup finely chopped onions, 1 tablespoon ginger garlic paste
Add marinated chicken and roast on high for 1-2 minutes till the chicken gets coated with the aromatics.
Add ground green paste and saute for 1-2 minutes. Add water, salt, pepper and cook on low for 20-25 minutes till the chicken is cooked well. Add garam masala powder, kasuri methi, cook for 5 minutes and serve.
½ cup water, ½ teaspoon salt, ¼ teaspoon pepper, ¼ teaspoon garam masala powder, ¼ teaspoon roasted & crushed kasuri methi
If you are looking for a delicious, nutrient-packed spin on traditional sourdough, this Sourdough Sweet Potato Loaf is about to become your new favorite bake. Combining the tangy complexity of sourdough with the natural sweetness and moisture of roasted sweet potatoes, this loaf is perfect for breakfast toast, warm fall dinners, or simply enjoying it...
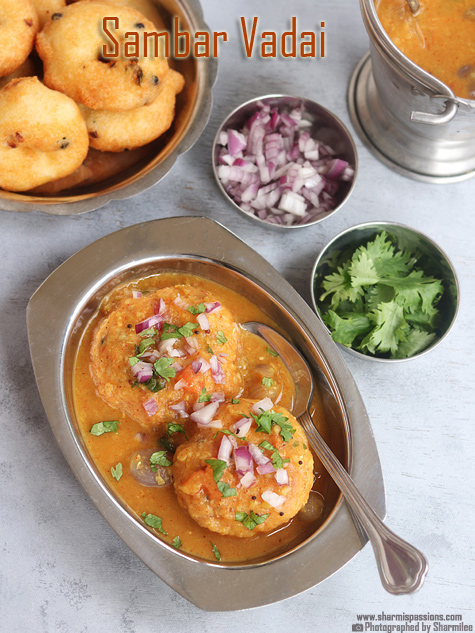
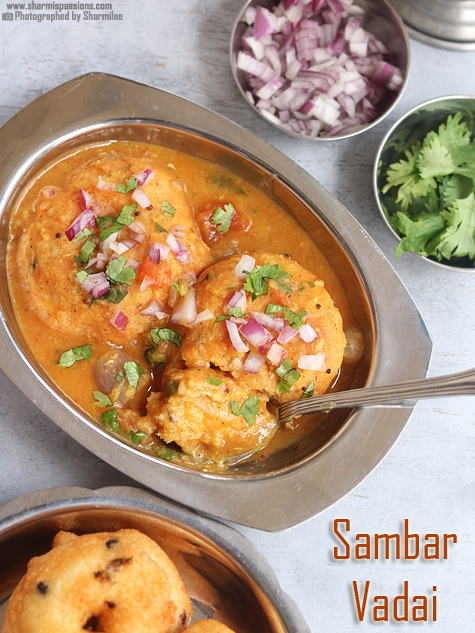
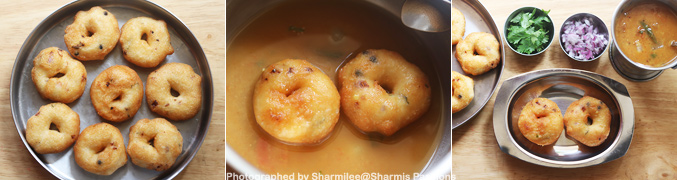
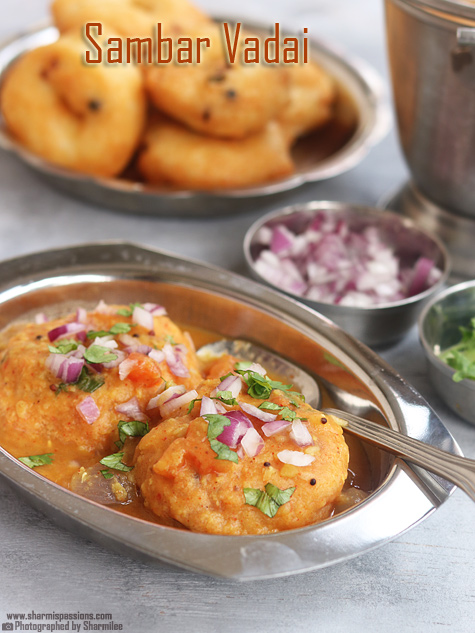
Sambar Vada is nothing but medhu vadai dunked in hot sambar with chopped raw onion and coriander leaves. Sambar Vada is recipe made with basic ingredients. It's just crispy medu vadas soaked in hot sambar till they turn all soft and juicy. The vadas soak up sambar for few minutes, it turns soft inside but still holds a tiny bite outside makes it so tasty.
This dish is very common for breakfast or evening tiffin in lot of South Indian homes and small hotels. You will mostly see it in the menu along with idli, dosa, pongal. It tastes the best when both vada and sambar are hot and fresh. Even leftover vadas works nicely for this. Just pour hot sambar and add onion on top, it will feel like a new dish again.
[feast_advanced_jump_to]
About Sambar Vada
Sambar Vada is basically a simple tiffin where medu vadas are soaked in hot sambar till they turn soft and absorb all that flavor. These vadas are made with urad dal batter mixed with onion, curry leaves and pepper, then shaped in the center and fried till golden. They soak the sambar, and becomes soft, juicy and very comforting to eat.
The nice thing here is the mix of textures. You get the soft soaked vada, a slightly thick sambar and that crunchy bite from raw onions. A small spoon of ghee or some coriander gives a good aroma also. For this recipe, hotel style sambar works well because the flavor is a bit stronger. It should not be very thick or very thin, so it coats the vadas nicely.
You can soak the vadas first in thin sambar and then pour little thick sambar on top if you want more. You can add grated carrot, coconut or little ghee also if you like richer taste. If you want very soft vadas, soak a bit longer. If you want them slightly firm, soak less time and serve quickly.
I usually make Sambar Vada on weekends when I get time to soak and grind the dal properly. It becomes a filling meal so no need for too many sides also. It is simple but tastes really homely.
Usually in hotels they use leftover medhu vadai(they make for morning breakfast) for making sambar vadai.I love sambar vadai only in selected hotels, amma loves sambar vadai so thought of trying it at home when I made hotel sambar.It is very easy to make ,so do try this at home and enjoy!
Sambar Vada Ingredients
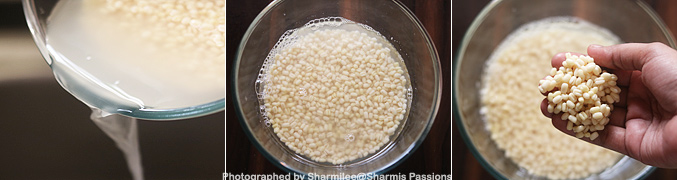
Urad dal - I soak it for a few hours and grind it smooth. It gives the fluffy texture for vadas. Whole or split urad without skin both work.
Big onion - I add finely chopped onion in batter for mild sweetness. Small onions give stronger flavor, so you can use that too.
Curry leaves - I tear them slightly so the aroma spreads well in the batter. Use fresh ones for better taste.
Whole pepper - I add whole pepper for tiny crunchy bites. Sometimes I crush lightly if I don't want full peppercorns.
Hotel sambar - I use slightly thin hotel-style sambar for soaking and little thick sambar for topping.
Onion - I add raw chopped onions for crunch. Rinsing once makes the sharpness less.
Coriander leaves - I add lots of fresh coriander for color and that herby taste.
Why This Recipe Works
This recipe uses basic pantry ingredients but gives hotel-style taste.
Vadas turn soft and absorb sambar beautifully.
It's a perfect way to use leftover vadas.
It has fresh onions and coriander, add nice crunch.
You can adjust spice, thickness and soaking time easily accordingly.
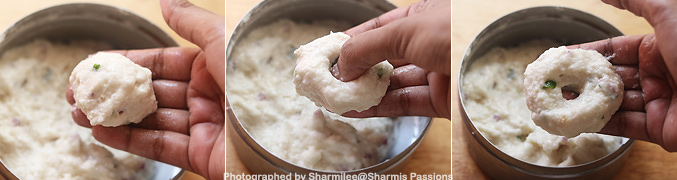
1.Rinse urad dal twice, then soak for 2 to 3 hours at least.
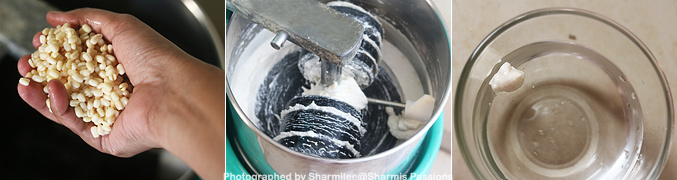
2.Then add it to wet grinder. Grind it with very little water. Grind it to a thick batter. Scrap the sides every now and then.Grind it for at least 30 minutes. When you take a pinch of the batter and put it in water, it should float that's the right consistency. The batter should be more like butter very smooth and light.
3.Now transfer the batter to a mixing bowl, add chopped onion, curry leaves and whole pepper, Mix well. Add required salt.
4.Now take a lemon sized ball, using your thumb finger make a small hole in the center like shown.
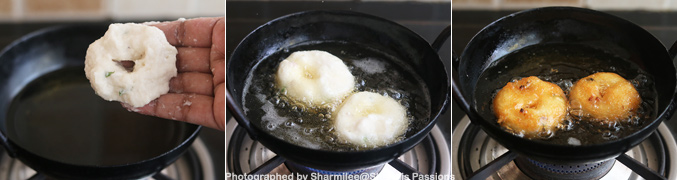
5.Heat oil, add the vadai into the oil.Similarly make other vadais too. As I used my small kadai I fried only 2 vadais at a time. Fry till golden.Prepare all the vadais similarly and make it ready.
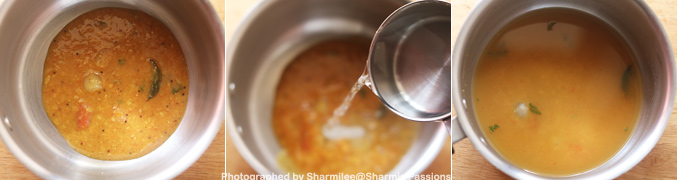
6.Now take ¼ cup sambar in a bowl, add little hot water and dilute it.
7.Now add the prepared vadais into the diluted sambar, soak it for 2 minutes,then take it out and place it in the serving plate.
8.Now pour thick hot sambar over it. Add chopped onion, sprinkle chopped coriander leaves.
Serve hot!
Expert Tips
Soaking - I just soak the urad dal for 2-3 hours and grind with very little water. Batter should be fluffy, helps vadas puff nicely.
Batter consistency - I keep the batter thick. If you drop a small bit in water and it floats, it's correct.
Shaping the vadas - I wet my hands slightly before shaping. Makes it easier to form the hole and slide into oil.
Frying - Don't fry on high flame, it browns outside but stays raw inside. Medium heat gives even color.
Sambar thickness - I keep soaking sambar little thin and topping sambar slightly thick. Always pour hot sambar so vadas absorb well.
Serving and Storage
Serve hot for breakfast, brunch or evening tiffin with coffee or tea. For guests, keep vadas ready and just heat sambar before serving. Leftover vadas can be stored in airtight box and reheated on tawa or oven. Once soaked, better to finish the dish the same day.
FAQS
1.Can I use leftover vadas?
Yes, just warm them slightly and soak in hot sambar.
2.Can I make this without onions?
Yes, skip onions in both batter and garnish. Curry leaves and pepper give enough flavor.
3.What if my batter becomes runny?
Add a little rice flour or rava, but don't add too much. Next time grind with less water.
4.Can I use any sambar?
Yes, regular sambar works. Keep it not too thick so vadas absorb better.
5.How long should I soak the vadas?
Usually 2-3 minutes is enough. If you want softer vadas, soak a bit longer.
If you have any more questions about this Sambar Vada Recipe do mail me at sharmispassions@gmail.com. In addition, follow me on Instagram, Facebook, Pinterest, Youtube and Twitter .
Tried this Sambar Vada Recipe? Do let me know how you liked it. Also tag us on Instagram @sharmispassions and hash tag it on #sharmispassions.
Sambar Vada is nothing but medhu vadai dunked in hot sambar with chopped raw onion and coriander leaves. Sambar Vada is recipe made with basic ingredients. It's just crispy medu vadas soaked in hot sambar till they turn all soft and juicy. The vadas soak up sambar for few minutes, it turns soft inside but still holds a tiny bite outside makes it so tasty.
Course Breakfast, Snack
Cuisine Indian
Keyword hotel sambar recipe, idli sambar, idli sambar recipe, sambar, sambar recipes, snack recipes, Vada
Prep Time 3 hourshours
Cook Time 20 minutesminutes
Total Time 3 hourshours20 minutesminutes
Servings 3plates
Calories 276kcal
Author Sharmilee J
Ingredients
½cupurad dal
2tablespoonbig onion finely chopped
1tablespooncurry leaves finely chopped
1teaspoonwhole pepper
1cuphotel sambar
salt to taste
FOR GARNISH:
2tablespoonbig onion finely chopped
2teaspooncoriander leaves finely chopped
Instructions
Rinse urad dal twice, then soak for 2 to 3 hours at least.
Then add it to wet grinder & grind it with very little water to a thick batter. Scrap the sides every now and then.
Grind it for at least 30 minutes. When you take a pinch of the batter and put it in water, it should float that's the right consistency. The batter should be more like butter very smooth and light.
Now transfer the batter to a mixing bowl, add chopped onion, curry leaves and whole pepper. Mix well. Add required salt.
Now take a lemon sized ball, using your thumb finger make a small hole in the center like shown.
Heat oil, add the vadai into the oil. Similarly make other vadais too. As I used my small kadai I fried only 2 vadais at a time. Fry till golden.
Prepare all the vadais similarly and make it ready.
Now take ¼ cup sambar in a bowl, add little hot water and dilute it.
Now add the prepared vadais into the diluted sambar, soak it for 2 minutes, then take it out and place it in the serving plate.
Crème Brûlée is a classic French dessert that looks elegant but is easy to make at home. You only need cream, milk, sugar and some cornstarch to get that smooth custard texture. This Crème Brûlée recipe gives you a silky custard with a proper caramel crust. The dessert tastes rich but feels light because the...
The best Friendship tea recipe with tang also known as Russian Friendship tea or tang tea. This is a cozy, old fashioned friendship tea recipe is an instant spiced tea mix made with Tang, instant tea, lemonade mix and warm spices. If you grew up in the era of church cookbooks, potlucks and handwritten recipe cards, there’s a good chance you’ve met this cozy classic Russian Friendship Tea.
This old-fashioned Friendship Tea recipe with Tang is a sweet, citrusy, spiced instant tea mix that you stir into hot water whenever you want a warm hug in a mug. It tastes like orange and lemon with gentle black tea and just enough cinnamon and cloves to feel like winter and holidays in one sip.
I was introduced to this instant spiced tea recipe in 90’s in a brunch time gathering in Air Force mess. A warm and cozy drink and then I got the recipe from the mess library in an old cook book and since that time this russian spiced tea is my winter essential. I love keeping a big jar of this friendship tea mix in my pantry during the colder months. It’s perfect for last minute guests, late night something warm cravings, and it doubles as the easiest homemade holiday gift. You mix everything once, store it in jars, and then just stir a spoonful into hot water whenever you want a cup.
What Is Friendship Tea or Russian Tang Tea Recipe ?
Friendship Tea is an old school American drink mix that became popular in the 1960s–80s. You’ll also see it called:
Russian Friendship Tea
Instant Russian Tea Mix
Tang Tea
Spiced Tea Mix with Tang
Despite the Russian name, this is not a traditional Russian recipe. It’s a very American pantry treat. The base is simple:
Instant tea powder
Tang orange drink mix
Lemonade drink mix
Warm spices like cinnamon and cloves
You stir all the dry ingredients together to make an instant spiced tea mix, store it in a jar, and then mix it with hot water to serve.
It’s called friendship tea because the recipe was often shared between friends, and people gifted jars of the mix at Christmas, church events, and neighborhood gatherings. It’s one of those nostalgic recipes from grandma’s kitchen.
If you’re as tea-obsessed as I am, don’t miss my other tea recipes from soothing herbal blends to classic masala chai.
Why You’ll Love This Friendship Tang Tea Recipe
Here’s why this friendship tea recipe with Tang deserves a spot in your winter rotation:
Instant comfort: Just add hot water. No brewing, steeping or babysitting a teapot.
Nostalgic flavor: Sweet-tart orange and lemon, gentle black tea, warm cinnamon and cloves… it tastes like holiday season in a mug.
Perfect holiday gift: Fill Mason jars with the mix, tie a ribbon, add a cute tag and you’ve got a thoughtful DIY food gift.
Customizable: Easily make it decaf, lighter on sugar, or extra spiced.
Pantry-friendly: Everything is shelf-stable and lives in your pantry. It’s ideal for winter or for gifting.
Here’s what you need to make this friendship tea with Tang and instant tea.
Instant tea powder: Use unsweetened instant black tea for best control over sweetness. You can use regular or decaf depending on how caffeine-friendly you want this to be.
Tang orange drink mix: This is the classic orange-flavored powdered drink mix. It gives that bright, nostalgic orange flavor.
Lemonade drink mix: A powdered lemonade drink mix (like the classic-style ones) adds tangy lemon flavor and some extra sweetness.
Ground cinnamon: Warm, cozy spice that makes this tea feel like fall and winter.
Ground cloves: Cloves add a deeper, slightly spicier warmth. A little goes a long way, so measure carefully.
Note: Since We do not have instant black tea powder, I used instant lemon Iced tea mix so I skipped lemonade mix altogether.
Variations of Friendship Tea Recipe
You can make the classic friendship tea or add a twist:
Ground cardamom or allspice: ¼ to ½ teaspoon For a slightly more complex spice profile.
Extra sugar: 2–4 tablespoons (if needed) Only if you’re using unsweetened lemonade mix and want a sweeter cup.
Red hot cinnamon candies: a small handful of hot cinnamon candies are also added in some vintage versions of Russian friendship tea. If you add cinnamon candies, reduce the ground cinnamon slightly so it doesn’t become overpowering.
How to Make Friendship Tea Mix
This instant Russian tea mix is incredibly easy to put together. You’ll spend more time smelling the spices than actually working.
Step by Step Instructions
Combine the dry ingredients
In a large mixing bowl, add: 1 cup instant tea powder, 2 cups Tang orange drink mix, 1 cup lemonade drink mix, 2 teaspoons ground cinnamon, 1 teaspoon ground cloves
If you’re using any optional spices (cardamom, allspice) or a bit of extra sugar, add them now.
Whisk until evenly mixed
Use a whisk or a large spoon to thoroughly mix everything until the color is uniform and there are no streaks of tea or spices.
Optional: Pulse the mixture in a food processor in small batches if you want a super-fine, more instant
powder. This also helps the spices distribute evenly.
Store the mix
Transfer the friendship tea mix into clean, dry, airtight jars or containers.
Label with the name and date. I also like to write the serving directions right on the jar: Stir 1 tablespoon mix into 6–8 oz hot water.
How to Make a Cup of Friendship Tea
Now the fun part making the actual friendship tea.
Add the mix
Add 1 tablespoon of friendship tea mix to a mug.
For a bigger mug (10–12 oz), start with 1½–2 tablespoons.
Pour in hot water
Pour 6–8 oz (about ¾–1 cup) of hot water over the mix. Just-off-boiling water works best.
Stir and taste
Stir until everything is dissolved.
Taste and adjust: Add a little more mix if you like it sweeter or stronger. Add more hot water if you want it lighter.
Stir again halfway through
The spices can slowly settle at the bottom of the cup. Give your tea a quick stir halfway through drinking to bring that flavor back up.
Iced Friendship Tea Recipe
For making iced friendship tea recipe:
Dissolve the mix in a small amount of hot water (so it fully dissolves).
Top up with cold water and ice.
Stir well and adjust the amount of mix to taste, it makes a very refreshing citrusy iced tea.
Variations & Substitutions
This Russian Tea recipe is very forgiving. Here are some ways to tweak it.
Lightened-Up / Less Sweet Friendship Tea
If you want to reduce the sweetness:
Use a slightly smaller amount of Tang (for example, 1¾ cups instead of 2).
Choose unsweetened lemonade mix and add just enough sugar or sweetener to match your taste.
Start with 1 tablespoon of mix per cup of water and see if you’re happy with that before adding more.
Sugar Free or Low Sugar Friendship Tea
You can experiment with sugar-free drink mixes: For this use sugar free orange drink mix instead of Tang and sugar free lemonade drink mix. Keep the same amount of instant tea and spices.
Decaf Friendship Tea
If you want to sip this at night swap the regular instant tea for decaf instant tea. Everything else stays the same.
If You Can’t Find Instant Tea
If you can’t find instant tea or iced tea powder you can still make Friendship tea without Instant Tea powder with brew tea method.
Making Friendship Tea Recipe with Brewed Tea
Prepare a strong pot of black tea 2–3 times your usual strength.
In a mug, stir together Tang + lemonade mix + spices first, then pour the hot brewed tea over the top.
It won’t be an instant mix in a jar, but you’ll still get the same flavor profile.
How to Gift Friendship Tea Mix | Edible Gift Idea
Spoon the friendship tea mix into small 8 oz Mason jar or pretty glass jar.
Add a tight-fitting lid.
Tie a ribbon or twine around the neck of the jar.
Attach a simple tag with directions, for example:Friendship Tea Mix Stir 1 tablespoon mix into 6–8 oz hot water. Store in a cool, dry place. Best within 6–12 months.
How Much Friendship tea Instant Mix Does One Batch Make?
Depending on the jars you use, one batch (with the measurements in this post) will roughly fill:
About 2 small jars (8 oz each), or
1 medium jars (12–16 oz)
This makes them perfect holiday gift for:Teacher gifts, Neighbors, Co-workers, Hostess gifts, Book club or church gathering favors.
Storage & Shelf Life
Because everything in this friendship tea mix is dry and shelf-stable, it keeps well when stored properly.
Store the mix in airtight jars or containers and keep it in a cool, dry place, away from heat and moisture.
Make sure you always use a completely dry spoon to scoop out the mix.
How long does friendship tea mix last?
For best flavor, use within 6–12 months.
Over time, the spices may lose a little bit of their intensity. If the mix is still dry and smells fine, you can simply use a little more in your mug to get the same flavor.
On gift jars, I like to write a simple Best by date about 9–12 months from the day I make it.
Serving Ideas & Pairings
This old fashioned friendship tea recipe is made for cozy moments. Here are a few ways to serve it:
With cookies especially shortbread, sugar cookies, or simple spiced cookies.
Alongside quick breads like pumpkin bread, banana bread, or cranberry-orange loaf.
As a warming drink at holiday parties or casual get-togethers.
In a slow cooker for a crowd: add hot water and friendship tea mix to a slow cooker on warm and let guests ladle their own.
For adults, you can also:
Add a small splash of whiskey, rum or brandy to a mug of hot friendship tea for a cozy evening treat.
Friendship Tea FAQs
Is friendship tea the same as Russian tea?
Yes Russian tea and friendship tea are very similar and the names are often used interchangeably. Both are instant spiced tea mixes made with Tang, instant tea and warm spices. Some families call it Friendship Tea, others call it Russian Tea.
Can I make friendship tea without Tang?
Tang is what gives this tea its nostalgic orange flavor, so the taste will change without it. You can use another orange-flavored drink mix as a substitute, but for that classic “church cookbook” flavor, Tang is the closest match.
Can I make friendship tea without instant tea?
Yes, but it won’t be an instant dry mix anymore. You can make a strong pot of black tea and stir the Tang, lemonade mix and spices directly into the hot brewed tea. Serve immediately. For a true pantry-friendly mix, instant tea works best.
How much friendship tea mix do I use per cup of water?
Start with 1 tablespoon of mix per 6–8 oz hot water. If you prefer a very strong or sweet cup, add a little more mix. If it’s too strong, simply dilute with more water.
Is friendship tea caffeinated?
If you use regular instant black tea, then yes, there is some caffeine. To make it caffeine-free, simply swap in decaf instant tea.
Can I make a big batch for a crowd?
Absolutely. Add hot water to a slow cooker or large beverage dispenser and whisk in the friendship tea mix to taste. Start with ½ cup mix per 8 cups (2 liters) of hot water and adjust based on how sweet and strong you want it.
Can I serve friendship tea cold?
Yes. Dissolve the mix in a little hot water first, then top up with cold water and ice. It makes a refreshing citrusy iced tea with warm spice notes.
If You like this recipe and made it Please rate the recipe. It helps us to reach more people. For the Latest updates Subscribe to Rekha’s Whatsapp. You can follow me onInstagram, Facebook, Youtube, Pinterestfor more food inspirations.
Old-fashioned Friendship Tea recipe with Tang, instant tea, lemonade mix, and warm spices. This instant spiced tea mix is perfect for cozy winter evenings and makes a beautiful homemade holiday gift.
1cupinstant black tea powderregular or decaf, unsweetened
2cupsTang orange drink mix
1cuplemonade drink mixpowdered
2teaspoonsground cinnamon
1teaspoonground cloves
Instructions
Combine the dry ingredients
In a large mixing bowl, add the instant tea, Tang, lemonade mix, ground cinnamon and ground cloves. Add optional cardamom or allspice, and sugar if using.
Mix well
Whisk until everything is evenly combined and the color is uniform. The spices should be well distributed throughout the mix.
Store the mix
Transfer the friendship tea mix to clean, dry, airtight jars or containers. Label with the name, date, and serving directions.
To make a cup of friendship tea
Add 1 tablespoon of friendship tea mix to a mug. Pour 6–8 oz hot water over the top and stir until dissolved. Taste and adjust, adding a bit more mix for a stronger, sweeter tea or more hot water for a milder cup.
Video
Notes
Sweetness: This recipe is moderate in sweetness by design. If you prefer it sweeter, increase the Tang slightly or add a few tablespoons of sugar to the mix. Decaf option: Use decaf instant tea so you can enjoy this spiced tea in the evening. Sugar-free variation: Swap the Tang and lemonade mix for sugar-free versions and adjust the amount of mix per cup to taste. Gift idea: Spoon the mix into small jars, decorate with ribbon and a tag, and include the directions: “Stir 1 tablespoon mix into 6–8 oz hot water.” Iced version:
Kunafa is one of the most popular Arabic | Turkish dessert. Traditionally kunafa is made with kunafa dough or kataifi, but this recipe is made using bread and it is too easy to make and really delicious. Enjoy this bread kunafa with some ice cream. Bread Kunafa Recipe Bread Kunafa Recipe is one of the...
Whole wheat fruit and nut cake is a healthy, delicious and wholesome version of the classic Christmas cake. It is made with whole wheat flour and jaggery, which makes the cake naturally nutritious and tastes really light. Whether baking for special occasions, wanting to make it as a gift or enjoy as a snack, this...
Pinwheel sandwiches are a fun, colorful and easy finger food snack. I often make them when I want something light but filling, especially on warm days. These small rolls look impressive but come together with simple ingredients. You can customize the Pinwheel Sandwich fillings based on what you have at home. Kids also enjoy them...
Snowball Cookies are rich, buttery and delicious cookies that just melts in the mouth. These are also called as Mexican wedding cookies / Russian tea cakes. Snowball Cookies are one of the easiest Christmas cookies that you can try with just few ingredients. Learn to make the perfect classic version of Snowball Cookies with the help of step by step pictures and video.
If you are a beginner and want to try cookies for Christmas then this snowball cookies are just perfect for you. These are easy, simple to make and tastes so delicious that every one will fall for it. These cookies are slightly soft, melt-in-the-mouth texture and snowy white appearance.
[feast_advanced_jump_to]
About Snowball Cookies
Snowball cookies, also known as Mexican wedding cookies or Russian tea cakes, are rich and delicious. They are traditionally made with simple ingredients like butter, flour, powdered sugar, and finely chopped nuts, giving them a rich, nutty flavor. These cookies are a perfect classic holiday treats.
These melt in the mouth snowball cookies are perfect for holiday gatherings, or for party get together or as just sweet treats. Snowball cookies are one of the traditional cookies that is included in Christmas baking.
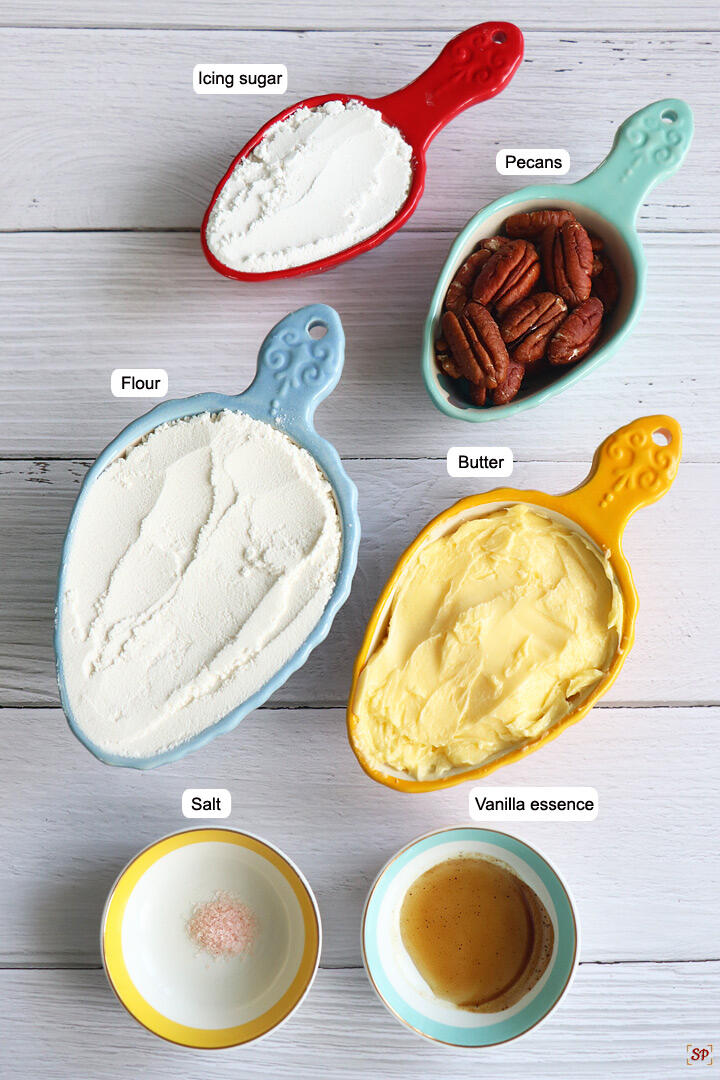
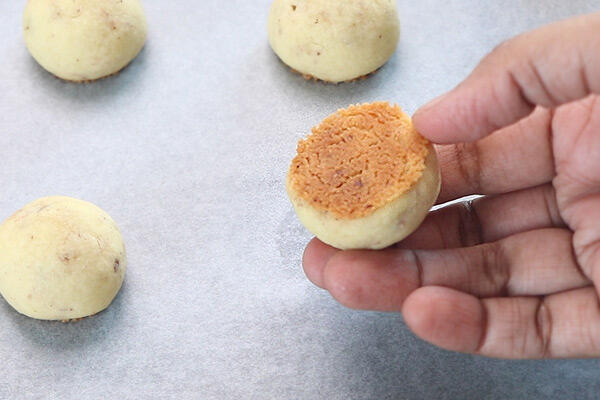
Classic Snowball Cookies are made using flour, butter, icing sugar, vanilla essence and pecans. These cookies are made with a simple dough then rolled to make balls and baked until golden and then rolled in icing sugar to resemble little snowballs hence the name snowball cookies.
The main difference between melting moments and the Mexican wedding cookies is : Both are round balls coated with icing sugar, both are shortbread like cookie that rely on butter as one of the main ingredients. But there are a few differences between these two cookies: one is that Mexican Wedding Cakes(Cookies) contain chopped/ground nuts, and melting moments is that it replaces some of the flour with corn flour so the cookies really "melt-in-your-mouth".
These cookies just vanish in few minutes and no wonder this cookie is popular all over the world. The taste of these cookies is just awesome and I am sure this recipe is going to be my keeper. Don't give excuses and bake these cookies, and I am sure you will love them as much as me and my family did!
Flour - All purpose flour or maida is used for this recipe. For a healthy alternate you can use wheat flour too but taste and texture slightly varies.
Icing Sugar - Icing sugar is used in these classic cookies. But you can replace it with powdered sugar too.
Butter - Room temperature butter is used for best results. If you have cold butter, bring it to room temperature and use it.
Nuts - Pecans are usually used but you can also use almonds or walnuts too.
Flavoring - Vanilla essence is the only flavoring used here.
How to make Snowball Cookies Step by Step
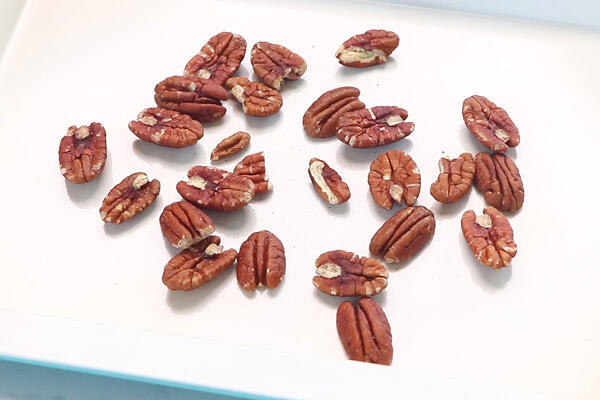
1.Add ½ cup pecans to a baking tray. Preheat oven at 160 DEG C for 10 minutes.
2.Bake in preheated oven at 160 DEG C for 5 minutes. The nuts will become crispy.
3.Chop them finely or coarse grind it and set aside.
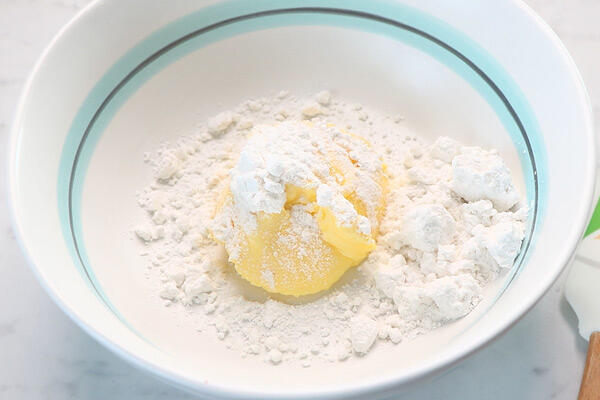
4.To a mixing bowl : add ½ cup butter and ¼ cup icing sugar.
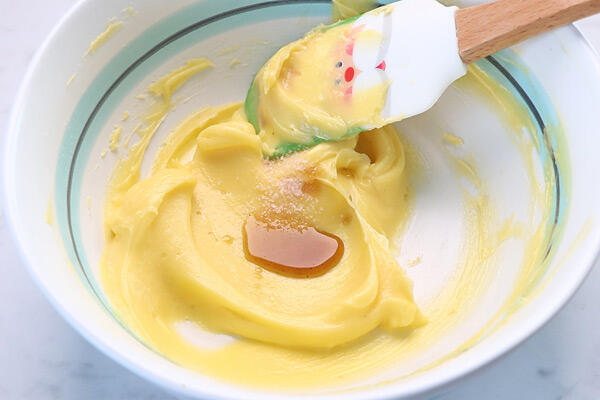
5.Cream it well then add 1 teaspoon vanilla essence and ⅛ teaspoon salt.
6.Give a quick mix then add 1 cup flour.
7.Mix well with a spatula first until no dry flour is seen.
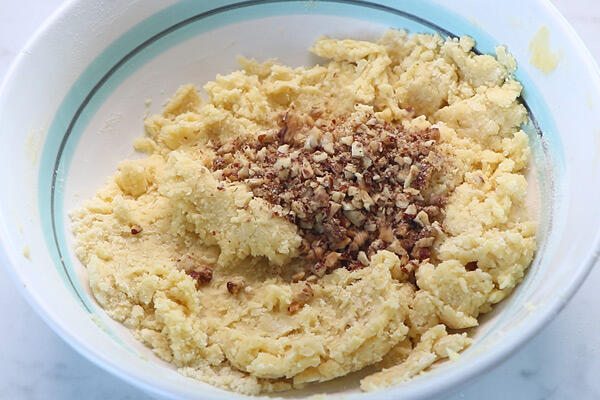
8.Add chopped pecans.
9.Mix and make a dough - do not knead. Just bring them all together using your finger tips that is just enough.
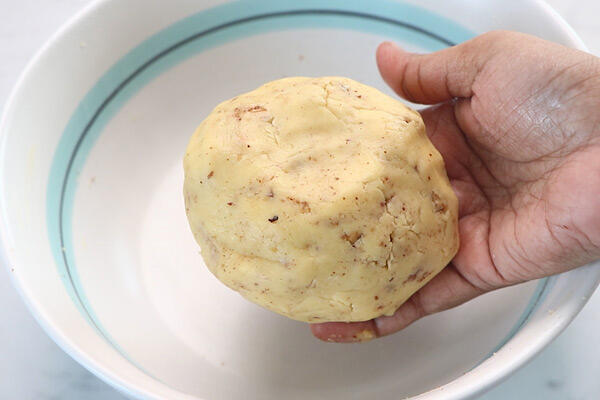
10.Cling wrap the dough and refrigerate for at least 30 minutes.
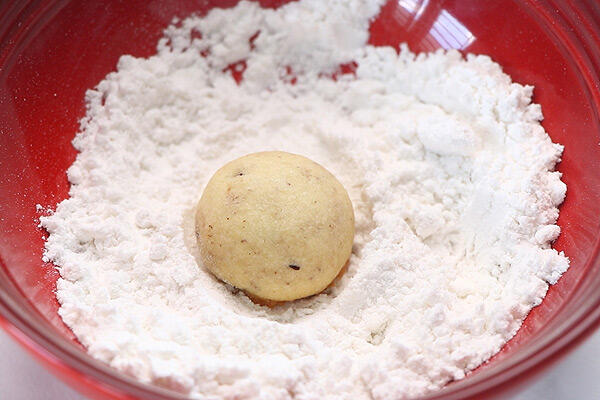
11.Then remove from fridge and open. Scoop out the dough using 1 tablespoon measure for even sized cookies.
Preheat oven at 177 DEG C for 10 minutes.
12.Roll in between your palms.
13.Roll it just like a ball. Repeat to finish the dough.
14.Lay a parchment paper on the baking tray. Place the cookies 2 inch apart from each other.
15.Bake in preheated oven at 177 DEG C for 12-15 minutes or until the cookies are golden.
16.Cookies are done. They may be soft when hot but will harden after cooling down so do not over bake.
17.See the base it golden this is perfect.
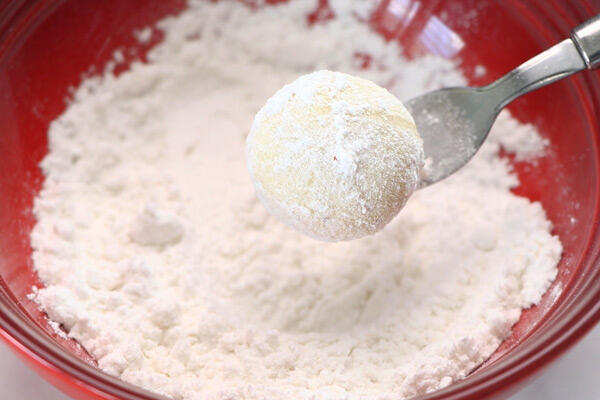
18.Add ½ cup icing sugar to a bowl. When the cookies are still warm add a cookie in it.
19.Roll over until the icing sugar coats well, tap to remove excess. I used a fork to do this which was easy.
20.Repeat to finish for all the cookies. Arrange them on a wire rack.
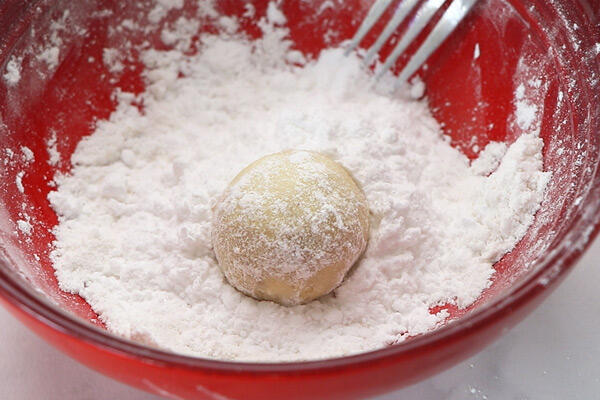
21.Now again double coat it. Add each cookie to the bowl.
22.Roll over to coat well.
23.Arrange them on a wire rack cool down completely then store in a clean airtight jar.
24.Snowball cookies are ready to be enjoyed!
Enjoy rich, buttery delicious cookies!
Expert Tips
Texture - The cookies are rich, buttery and has a melt in the mouth texture.The cookies bake verypale - only bottoms should be slightly golden. If tops become brown, they're over baked and may crack or turn dry.
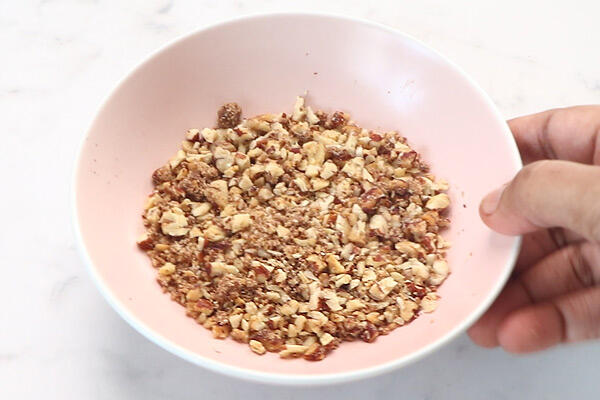
Nuts - The nuts give a very nice addition so don't skip it. Toasting the nuts adds flavor and crunch so do not miss this step. You can add 1 cup pecans too. Crush it coarsely or fine chop the nuts. It is easy to chop when it is crisp.
Keeping in fridge - I usually keep the baking tray with cookie balls in fridge for 10 minutes before baking to avoid spreading of cookies.
Icing Sugar - Sift the powdered sugar to avoid lumps.
Butter - Use butter at room temperature for best results. I used unsalted butter so added salt. If you are using salted butter then you can skip salt.
Coating - Coat the cookies twice for the icing sugar to coat well. First coat while cookies are warm, sugar melts slightly and sticks well. Second coat it after fullycooled to give the beautiful snowy look.
Serving & Storage Suggestion
Snowball cookies keeps well in room temperature for 3 days if stored in a airtight container. However you can freeze the unbaked cookie dough for up to 3 months. When you need to bake, thaw the dough then proceed with the process.
FAQS
1.What is Snowball cookies? Why is it named so?
Snowball cookies are rich, buttery cookies made using flour, butter, sugar, vanilla essence and nuts. They are baked round balls coated in icing sugar which resembles snow balls hence the name snowball cookies.
2.Can I replace icing sugar with powdered sugar?
Yes you can replace icing sugar with powdered sugar but make sure it is fine.
3.How to store snowball cookies?
Snowball cookies keeps well for up to 3 days at room temperature in a airtight jar and up to 2 weeks if refrigerated.
4.Do Snowball Cookies contain eggs?
No. Traditional snowball cookies are naturally eggless, which gives them their crumbly, tender texture.
5.Can I make them without nuts?
Yes! Simply skip the nuts. Add 1-2 tablespoons extra flour if the dough feels too soft.
If you have any more questions about this snowball cookies recipe do mail me at sharmispassions@gmail.com. In addition, follow me on Instagram, Facebook, Pinterest, Youtube and Twitter .
Tried this snowball cookies recipe? Do let me know how you liked it. Also tag us on Instagram @sharmispassions and hash tag it on #sharmispassions.
Snowball Cookies are rich, buttery and delicious cookies that just melts in the mouth. These are also called as Mexican wedding cookies / Russian tea cakes. Snowball Cookies are one of the easiest Christmas cookies that you can try with just few ingredients. Learn to make the perfect classic version of Snowball Cookies with the help of step by step pictures and video.
Add ½ cup pecans to a baking tray. Preheat oven at 160 DEG C for 10 mins.
Bake in preheated oven at 160 DEG C for 5 minutes. The nuts will become crispy.
Chop them finely or coarse grind it and set aside.
To a mixing bowl : add ½ cup butter and ¼ cup icing sugar.
Cream it well then add 1 teaspoon vanilla essence and ⅛ teaspoon salt.
Give a quick mix then add 1 cup flour.
Mix well with a spatula first until no dry flour is seen.
Add chopped pecans.
Mix and make a dough - do not knead. Just bring them all together using your finger tips that is just enough.
Cling wrap the dough and refrigerate for at least 30 minutes.
Then remove from fridge and open. Scoop out the dough using 1 tablespoon measure for even sized cookies.Preheat oven at 177 DEG C for 10 minutes.
Roll in between your palms.
Roll it just like a ball. Repeat to finish the dough.
Lay a parchment paper on the baking tray. Place the cookies 2 inch apart from each other.
Bake in preheated oven at 177 DEG C for 12-15 minutes or until the cookies are golden.
Cookies are done. They may be soft when hot but will harden after cooling down so do not overbake.
See the base it golden this is perfect.
Add ½ cup icing sugar to a bowl. When the cookies are still warm add a cookie in it.
Roll over until the icing sugar coats well, tap to remove excess. I used a fork to do this which was easy.
Repeat to finish for all the cookies. Arrange them on a wire rack.
Now again double coat it. Add each cookie to the bowl.
Roll over to coat well.
Arrange them on a wire rack cool down completely then store in a clean airtight jar.
Snowball cookies are ready to be enjoyed!
Notes
Texture - The cookies are rich, buttery and has a melt in the mouth texture.The cookies bake very pale - only bottoms should be slightly golden. If tops become brown, they're over baked and may crack or turn dry.
Nuts - The nuts give a very nice addition so don't skip it. Toasting the nuts adds flavor and crunch so do not miss this step. You can add 1 cup pecans too. Crush it coarsely or fine chop the nuts. It is easy to chop when it is crisp.
Keeping in fridge - I usually keep the baking tray with cookie balls in fridge for 10 minutes before baking to avoid spreading of cookies.
Icing Sugar - Sift the powdered sugar to avoid lumps.
Butter - Use butter at room temperature for best results. I used unsalted butter so added salt. If you are using salted butter then you can skip salt.
Coating - Coat the cookies twice for the icing sugar to coat well. First coat while cookies are warm, sugar melts slightly and sticks well. Second coat it after fully cooled to give the beautiful snowy look.
The wonder soup recipe also called cabbage wonder soup, diet soup, or detox cabbage soup or Original Cabbage soup diet recipe is very popular. This low-calorie, high-fiber vegetable soup is consumed in the 7 day cabbage soup diet.
As a nutrition focused recipe creator, I look at it with two minds:
On one hand, it’s a very light, vegetable packed soup that’s easy to cook and quite budget-friendly.
On the other, the original cabbage soup diet is a short term, very low calorie fad diet that isn’t designed for long term, sustainable weight loss.
So in this post, I’m sharing the original wonder soup recipe from 7 day cabbage soup diet plan. It’s a classic, low-calorie cabbage soup diet soup.
Here’s Why I Like This Cabbage Soup
It move the scale (quickly): When you follow the original cabbage soup diet properly for a short, set period, the scale usually drops fast. A lot of it is water weight, of course, but works great before an event or special occasion can feel really motivating.
It’s simple and structured: I do not need to count calories and no complicated recipes and I can eat this soup in as much quantity as I want. Just a big pot of cabbage soup and a clear 7 days plan.
It feels like a short, sharp reset: After a period of overeating or rich food, a few days on this very light, veggie-heavy soup makes me feel a bit de-puffed and less bloated. So I don’t take it as a lifestyle and it’s not meant to be but as a quick reset before getting back to normal eating, this works great.
It’s good as a jumpstart, not a forever diet: I don’t see the cabbage soup diet as a long-term solution. I see it as a jumpstart: a strict, one-week push that leads me into a more balanced, sustainable way of eating.
What Is Wonder Soup?
Wonder soup is essentially a very simple cabbage vegetable soup:
Based on cabbage, onion, celery, carrots, bell pepper and tomatoes
Cooked in water or low-sodium vegetable broth
Lightly seasoned with herbs, salt, pepper and sometimes a pinch of chilli
It became famous because of the cabbage soup diet a 7 day eating plan. In cabbage soup diet plan this soup is eaten in generous amounts alongside a small list of other foods each day.
Online you’ll see it under many names:
wonder soup
miracle soup
cabbage soup diet soup
fat-burning cabbage soup
detox cabbage soup
sacred heart soup / GM diet soup
In this recipe, I’m sharing the original cabbage soup diet recipe: lots of vegetables, water based broth, very little oil in the soup itself so it stays true to its “diet soup” origins.
Ingredients for Original Wonder Soup
For making wonder soup recipe You’ll need:
Cabbage: green cabbage, chopped into bite-sized pieces
Onion: yellow or white onion, chopped
Celery: chopped; classic in almost every version
Carrots: sliced or diced
Green bell pepper: adds sweetness and colour
Garlic powder: optional but recommended for flavour
Tomatoes: canned diced tomatoes or fresh chopped tomatoes
Tomato Paste: Adds a subtle thickness
Water or low sodium vegetable broth: the base; water is most “original” and lowest in calories
Olive oil: just 1–2 teaspoons to soften the onion (you can omit if you prefer absolutely no added fat)
Dried herbs: such as Italian seasoning, thyme or parsley
Bay leaf: optional, adds depth to the broth
Salt and black pepper: to taste
Optional heat: a pinch of red chilli flakes or cayenne
Fresh parsley or cilantro: for garnish
This keeps it very low in calories, high in volume and fibre, and as close as possible to the original cabbage soup diet soup.
How to Make Wonder Soup (Stovetop)
You can adapt this for pressure cooker/Instant Pot, but the classic method is just a big pot on the stove.
Sauté the aromatics (very lightly)
In a large pot, add 1–2 teaspoons of olive oil (or a splash of water if you prefer oil-free).
Add chopped onion and celery and carrots. Cook on medium heat for 3–4 minutes until they start to soften.
Add garlic and cook for another 30 seconds until fragrant.
Add the main vegetables
Stir in the, bell pepper and chopped tomatoes.
Toss everything together so the vegetables are lightly coated and start to soften at the edges.
Add Chopped cabbage
Cover and cook for 2 minutes
Add liquids and seasoning
Pour in water or low sodium vegetable broth. You want enough to just cover the vegetables generously the soup should be brothy.
Add diced tomatoes (with their juices).
Add bay leaf, dried herbs, a small pinch of chilli flakes (if using), salt and pepper.
Simmer until tender
Bring the soup to a gentle boil, then reduce heat to low.
Cover partially and simmer for about 20–30 minutes, or until the cabbage and other vegetables are tender but not mushy.
Taste and adjust seasoning with a little more salt, pepper or herbs if needed.
Serve
Remove the bay leaf.
Ladle the wonder soup into bowls and garnish with fresh parsley or cilantro.
Serve hot as a very light meal or starter.
This is the classic, low calorie version: lots of vegetables, almost no fat, no added protein, and a very clear broth.
How Low Calorie Is Wonder Soup?
Exact calories will depend on the quantities you use, but most original cabbage soup diet recipes come out roughly in this range:
About 60 – 90 calories per serving (1½–2 cups)
Very low in fat
Mostly from cabbage, carrots, onion, and tomatoes
That’s why wonder soup is used in very low-calorie diets it’s high in volume and fibre but low in energy.
Wonder Soup, Cabbage Soup Diet & Detox
I simply love this cabbage soup recipe. While many people don’t support this quick fix weightloss soup and call it a fad diet, I love it! Here are a few reasons why I like this and use cabbage soup diet safely without compromising health. Many people say that weight comes back when you stop diet.
This diet works for me and I have noticed the weight stays off as long as I eat balanced portion controlled diet. Only thing I restrict is sugars and carbs because if you do that weight comes back quickly.
The original cabbage soup diet suggests eating this soup several times a day, plus a small number of specific foods, for one week. People often report fast weight loss, but most of that is water weight and some muscle, and most health experts classify it as a fad diet.
Some important realities:
It’s very low in calories (often under 1,000 calories per day during the diet).
It’s not nutritionally balanced and low in protein, fats and some vitamins/minerals.
It’s meant as a short-term pattern, not a lifestyle.
Weight lost this way is usually regained when you return to normal eating.
Healthline, Medical News Today and other nutrition sources describe the cabbage soup diet as a short-term, unsustainable approach and do not recommend it as a long-term weight-loss solution.
My take, as someone who loves both food and evidence:
It’s okay to enjoy this wonder soup recipe as a very light meal or part of a short reset period.
It’s not a good idea to rely on it alone for long periods or repeat strict 7-day cycles again and again.
For sustainable weight loss, a balanced eating pattern plus movement and good sleep will always win over crash diets.
If you want a more balanced, everyday cabbage soup that fits into long-term healthy eating, I also have a healthy cabbage soup recipe with more flexible seasoning and a more cozy, “normal soup” feel.
And if you’re curious about the full cabbage soup diet – the 7-day schedule, pros and cons and who should avoid it – I’ve broken that down in a separate, detailed article.
Wonder Soup vs Healthy Cabbage Soup: What’s the Difference?
Since we now have both on the blog, here’s how I’d describe them quickly:
Wonder Soup :
Very low calorie
Minimal oil, no protein add-ins
As close as possible to the original cabbage soup diet soup
Often used as “detox cabbage soup” or short reset soup
Healthy Cabbage Soup :
Still light and veggie packed, but more flexible and flavour layered
Easier to pair with normal meals and use as an everyday soup
Better suited to long-term healthy eating and weight-loss-friendly routines
Storing & Reheating Wonder Soup
Because this soup is almost all vegetables and broth, it stores very well:
Fridge: Store cooled soup in an airtight container for 3–4 days.
Freezer: Portion into freezer-safe containers and freeze for up to 2–3 months. Thaw overnight in the fridge or reheat gently with a splash of water.
Reheating: Warm on the stovetop over medium heat, or in the microwave until hot. Taste and adjust salt if needed – flavours can mellow slightly after chilling.
FAQs About Wonder Soup & Detox Cabbage Soup
Is this the original cabbage soup diet recipe?
This version is very close to the original cabbage soup diet recipe: cabbage, onion, celery, carrots, bell pepper, tomatoes, water or broth, herbs and minimal oil, and no added protein inside the soup. Different versions tweak herbs and quantities, but the structure is the same.
Why do people call it “detox cabbage soup”?
People often use the term detox cabbage soup because the recipe is: Very low in calories, High in fibre and water Built almost entirely from vegetables. It can feel like a “reset” after heavy eating, but it doesn’t literally detox your body your liver and kidneys already do that. Think of it as a light, vegetable-rich soup, not a magic detox.
How long can I eat wonder soup?
Most sources agree the cabbage soup diet should only be followed for about one week, and even then it is not considered a healthy long-term plan. If you enjoy the soup, you can keep it in your regular rotation, but eat it as part of a balanced diet, not as your only major food.
Does wonder soup really help you lose weight?
Wonder soup is very low in calories, so if you eat a lot of it instead of higher-calorie foods, you will likely see some weight loss especially in the first few days. But research suggests much of that loss is water and some muscle, and most people regain it when they go back to normal eating.
Can I add other ingredients to this soup?
You can always experiment in your own kitchen, but this recipe is intentionally: Original-style and Low-calorie Based only on vegetables, herbs, water/broth and minimal oil If you want a more filling, balanced soup (with protein or more hearty ingredients), I’d recommend my healthy cabbage soup recipe instead of changing this wonder soup.
This is a very low-calorie, short-term diet. It’s not suitable for everyone and it’s always a good idea to speak to your doctor before trying it, especially if you have any health conditions.
If You like this recipe and made it Please rate the recipe. It helps us to reach more people. For the Latest updates Subscribe to Rekha’s Whatsapp. You can follow me onInstagram, Facebook, Youtube, Pinterestfor more food inspirations.
This classic wonder soup is the original low-calorie cabbage vegetable soup used in cabbage soup diet plans. It’s a simple, brothy cabbage soup made with basic vegetables, minimal oil and plenty of fibre, often called detox cabbage soup, fat-burning soup or cabbage diet soup.
1.5lbgreen cabbageabout 800–900 g / 1.7–2 lb, core removed and chopped
1can diced tomatoes with juicesor 3 medium fresh tomatoes, chopped
8cupswater or low-sodium vegetable broth2 litres
1bay leaves
2teaspoonsdried mixed herbsItalian seasoning, thyme, oregano or a blend
1teaspoonsaltor to taste
½teaspoonfreshly ground black pepper
¼teaspoonred chilli flakes or cayenne pepperoptional, for heat
2tablespoonschopped fresh parsley or cilantrofor garnish (optional)
Instructions
Prep the vegetables
Chop the onions, celery, carrots, bell pepper and cabbage. Mince the garlic and chop the tomatoes if using fresh.
Sauté aromatics (very lightly)
In a large soup pot, heat 1–2 teaspoons olive oil over medium heat (or use a splash of water for an oil-free version).
Add the chopped onions and celery. Sauté for 3–4 minutes, until they start to soften.
Add the garlic and cook for another 30 seconds, just until fragrant.
Add the rest of the vegetables
Stir in the carrots, green bell pepper and chopped cabbage. Toss everything together so the vegetables are mixed and just starting to soften.
Add liquids and seasoning
Pour in the water or vegetable broth and add the diced tomatoes with their juices.
Add bay leaves, dried mixed herbs, salt, black pepper and red chilli flakes or cayenne if using. Stir well.
Simmer the wonder soup
Increase the heat and bring the soup to a gentle boil.
Once boiling, reduce heat to low, cover the pot partially and let it simmer for about 20–30 minutes, or until the cabbage and other vegetables are tender but not mushy.
Taste and adjust
Remove the bay leaves. Taste the broth and adjust salt, pepper or herbs if needed.
Serve
Ladle the hot wonder soup into bowls and sprinkle with chopped fresh parsley or cilantro if you like.
Serve as a very light meal, starter or part of a short “reset” – not as your only food for long periods.
Notes
This is an original-style wonder soup / cabbage diet soup: very low in calories, high in volume and fibre, with no added protein in the soup itself.
For everyday, long-term healthy eating, it’s best to enjoy this soup as one part of a balanced diet, not as your only meal. For a more cozy, flexible version you can pair with protein and whole grains Healthy Cabbage Soup (Vegetarian & Easy)
Storage: keep in an airtight container in the fridge for 3–4 days or freeze for up to 2–3 months. Reheat gently on the stovetop or in the microwave.
7 Day cabbage soup diet plan is one of those quick-fix weight loss plans that never completely disappears. Before you commit to seven days of wonder soup, it’s worth understanding what this diet really does to your body.
If you’ve ever googled quick weight loss or scrolled through New Year diet trends, you’ve probably seen the cabbage soup diet pop up. It promises fast results from a simple wonder soup also known as original cabbage soup that you can eat as much as you like for 7 days.
As a nutrition focused recipe developer who also loves a good big bowl of veggie soup, I totally understand the appeal. A cheap, delicious and easy soup you can batch cook, that might also help with weight loss? Of course it goes viral every few years. But the reality is more complicated.
In this post, I’ll walk you through:
What the cabbage soup diet actually is?
The typical 7 day cabbage soup diet plan (day by day)
What results can you get from 7 day cabbage diet results vs what really happens
Pros and cons, side effects, and who should avoid cabbage soup diet
And, a healthier way to enjoy cabbage soup for weight loss without crash dieting
Quick note: This post is for general information. It’s not medical advice. Always check with your doctor or dietitian before starting any restrictive diet, especially if you have health conditions or take medications.
What Is the Cabbage Soup Diet?
The cabbage soup diet is a short-term, very low-calorie eating plan that usually lasts 7 days. The star of this 7 day cabbage soup diet plan is a simple vegetable soup made mainly with cabbage, onions, carrots, celery, and tomatoes.
You’ll see it online under a lot of different names:
Cabbage soup diet soup
Wonder soup or miracle soup
Fat-burning cabbage soup
Original Cabbage Soup Recipe
Detox cabbage soup
Sometimes even linked with military diet or old hospital diet stories
The promise is dramatic: eat unlimited amounts of this low calorie cabbage soup plus a few allowed foods each day, and you can lose several pounds in a week.
What makes it different from just eating a healthy cabbage soup?
It’s not just a recipe it’s a strict 7 day schedule
The overall calories are usually extremely low
Food choices are very limited and repetitive
It’s meant as a quick fix, not a long term way of eating
The Classic 7 Day Cabbage Soup Diet Plan (Day by Day)
There are many versions, but most 7 day cabbage soup diet plans look something like this:
Day 1 : Fruit Day Unlimited cabbage soup + any fruit you like, except bananas.
Day 2: Vegetables Day Cabbage soup + non-starchy vegetables (often a baked potato with a little butter is allowed at dinner).
Day 3: Fruits + Veggies Cabbage soup + a mix of fruits and vegetables (still no bananas or potatoes).
Day 4: Bananas and Milk Day Cabbage soup + bananas + skim milk or unsweetened yogurt.
Day 5: Protein + Tomatoes Cabbage soup + lean protein (usually beef or chicken) + tomatoes. Vegetarians can include Tofu
Day 6: Protein + Veggies Cabbage soup + more lean protein + non-starchy vegetables.
Day 7: Brown Rice Day Cabbage soup + brown rice + vegetables + sometimes unsweetened fruit juice.
Different websites and TikTok videos tweak the details, but the structure is similar: a lot of soup, a little fruit, veg and some protein on certain days, and overall very few calories.
Short answer: most of the weight you lose is from water and glycogen, not all body fat.
Here’s what’s usually happening behind the scenes:
The diet is very low in calories, often well under what most adults need just to maintain weight. Healthline
You’re eating mostly high fibre, high water vegetables, which fill your stomach for very few calories.
When you suddenly drop calories like this, your body uses up stored glycogen (carbohydrate stored in muscles and liver) and the water attached to it so the scale moves quickly at first. Medical News Today
That’s why people often report:
“I lost 5–10 pounds in a week!”
But then regain a lot of it once they return to normal eating.
There’s no special fat burning magic in cabbage itself. Cabbage is a nutritious vegetable, but the fat-burning reputation comes from the extreme calorie deficit, not from a special ingredient in the soup.
Cabbage Soup Diet Results: What Can You Really Expect?
If you follow a 7 day cabbage soup diet strictly, you’ll very likely see the scale go down simply because you’re eating so much less.
But it’s important to understand what those results mean:
A large part of the loss is water weight and stored glycogen, especially in the first few days.
You may also lose some lean muscle, especially if the diet is low in protein.
Once you go back to your usual pattern of eating, a lot of that weight tends to come back.
Some people use the cabbage soup diet as a short reset before moving into a more balanced plan. Others end up in a frustrating cycle of:
Strict 7 days → weight drops → normal eating → weight jumps back → try another extreme diet.
Long term, that all or nothing pattern can make weight management feel harder, not easier.
Pros of the Cabbage Soup Diet (Yes, There Are a Few)
Let’s be fair and talk about what actually works here, even if I don’t love the overall diet:
You eat more vegetables. The soup is loaded with cabbage, onions, carrots, celery, tomatoes all nutrient-dense, low calorie foods.
You get a short term calorie reset. For some people, a structured 7-day plan can feel easier than eat a bit less overall , especially after a holiday or period of overeating.
It’s simple to follow. No calorie tracking apps, no macro calculations just a pot of soup and a basic daily food list.
If you struggle with snacking on ultra processed foods, a week of big, simple, home cooked soup can feel mentally refreshing.
Cons and Risks: Why Most Experts Call It a Fad Diet
Now, the bigger picture. Most health professionals and nutrition writers consider the cabbage soup diet a fad and not something to repeat often or follow long-term.
Here’s why.
1. Very low in calories
For many people, the total daily intake on this diet ends up well under 1,200 calories, sometimes closer to 800–1,000. That’s lower than what most adults need for basic metabolic functions, let alone exercise or an active lifestyle.
2. Not nutritionally balanced
On several days of the classic 7 days cabbage soup diet plan:
Protein is very low
Healthy fats are almost non existent
The overall diet is skewed towards soup, fruit and some veg, with very little variety
Followed beyond a short timeframe, that can lead to nutrient gaps, fatigue, weakness and cravings.
3. Mostly short-term, water-based weight loss
Crash diets like this tend to:
Drop weight quickly in the first week (mostly water)
Slow down your metabolic rate if repeated often
Make it easier to regain weight once normal eating resumes
4. Possible side effects
People often report:
Headaches, dizziness, low energy
Digestive issues like gas, bloating or cramps (cabbage is high in fibre and can trigger symptoms for some)
Moodiness and strong cravings
Difficulty concentrating
Who Should Avoid the Cabbage Soup Diet?
Always talk to your healthcare provider, but in general, the cabbage soup diet is not appropriate for:
People with a history of disordered eating or yo-yo dieting
Those with diabetes or blood sugar regulation issues
Anyone with digestive conditions worsened by high-fibre, cruciferous vegetables
Pregnant or breastfeeding individuals
People on certain medications that interact with very low-calorie or very low-carb diets
If you recognise yourself in any of those categories, treat cabbage soup as a food not a structured 7 day crash diet for weightloss .
A Healthier Way to Use Cabbage Soup for Weight Loss
Here’s the good news: you don’t have to throw away the idea of cabbage soup altogether.
A hearty, vegetable rich soup can be a fantastic tool in a balanced weight loss approach, if you use it differently:
As a starter before a meal: research on low calorie soups shows they can help reduce how much you eat at the main course.
As a light lunch or dinner, pair the cabbage soup with enough protein (beans, lentils, tofu, paneer, eggs, or meat if you eat it).
As part of a routine that also includes movement, strength training, sleep and realistic calorie intake not as the only thing you eat all day.
If you like the idea of a cabbage based “weight loss soup” but want it to be more balanced, you might enjoy this Weight Loss Cabbage Soup recipe also known as Original wonder soup recipe.
Add beans, chickpeas, lentils or tofu to boost protein
Adjust the spice and herbs to your taste
Batch cook and freeze portions so you always have a healthy option ready
Example: 1-Day Balanced Menu Using Cabbage Soup
Instead of a full 7 day cabbage soup diet, here’s what a more balanced day might look like, where cabbage soup plays a supporting role:
Breakfast Greek yogurt or plant-based yogurt + berries + a sprinkle of oats or granola
Lunch 1–2 bowls of cabbage soup + whole grain toast + hummus or cottage cheese
Snack Fruit + a handful of nuts or seeds
Dinner A protein rich main (tofu stir-fry, lentil curry, baked fish or chicken) + vegetables + a small portion of rice, quinoa or potatoes
You still get the light, full feeling from soup, but your body also gets enough protein, carbs and healthy fats to function well and preserve muscle.
Cabbage Soup Diet FAQs
How much weight can you lose on the cabbage soup diet?
Many people claim to lose 5–10 pounds in a week, but a lot of that is water and glycogen, not just body fat. There’s no strong scientific evidence that the cabbage soup diet leads to healthy, long term fat loss.
Is the cabbage soup diet safe?
For most healthy adults, following a very low-calorie plan like this for just one week is unlikely to cause serious damage, but it can still lead to fatigue, headaches, digestive issues and nutrient gaps. It’s not recommended as a long-term or frequently repeated diet, and it’s not suitable for everyone.
Can you do the cabbage soup diet for 2 weeks?
Most medical and nutrition sources strongly advise against following the cabbage soup diet beyond 7 days because it is not nutritionally balanced and is too low in calories and protein. Extending it increases the risk of nutrient deficiencies, muscle loss and rebound weight gain.
Does cabbage soup burn fat?
Cabbage itself doesn’t “burn fat.” The calorie deficit created by eating mostly low-calorie soup is what leads to weight loss, and that includes water, muscle and some fat. Cabbage is a very healthy vegetable packed with fibre, vitamin C and vitamin K, but it’s not a magic fat-burning food.
Can you eat cabbage soup every day?
You can enjoy cabbage soup regularly as part of a balanced diet, especially if you: Pair it with protein and healthy fats Keep the rest of your meals varied. Listen to your body if cabbage causes bloating or discomfort. What’s not recommended is eating only cabbage soup (or nearly only cabbage soup) for days or weeks at a time.
Is there a vegetarian cabbage soup diet?
Most versions of the cabbage soup diet can be made vegetarian by skipping meat and using vegetable broth. But the overall structure is still a very low-calorie, restrictive 7-day plan. A better approach is to use a vegetarian cabbage soup inside a balanced eating pattern instead of following the strict cabbage soup diet rules.
Bottom Line: Is the Cabbage Soup Diet Worth It?
The cabbage soup diet keeps coming back because it offers exactly what many of us secretly want: fast results with simple rules.
But underneath the wonder soup and lose 10 pounds in 7 days headlines, it’s still a very low-calorie, short term fad diet:
It can lead to quick, mostly temporary weight loss
It’s not nutritionally balanced or sustainable
It doesn’t teach you how to eat for long-term health and weight management
My suggestion as a recipe developer and nutritionist:
Enjoy cabbage soup as a healthy, budget friendly, veggie packed meal,
Use it as one tool among many in a balanced, realistic weight-loss plan,
And skip the strict, repeat 7-day cabbage soup diet cycles.
If you’d like a cabbage soup you can actually keep in your routine, my Weight Loss Cabbage Soup is designed exactly for that flavourful, veggie heavy, and much more friendly to real life.
If You like this recipe and made it Please rate the recipe. It helps us to reach more people. For the Latest updates Subscribe to Rekha’s Whatsapp. You can follow me onInstagram, Facebook, Youtube, Pinterestfor more food inspirations.